Learning ASP.NET 3.5 will teach you everything you need to know to build professional quality web applications using Microsoft’s latest technology, including ASP.NET 3.5 and AJAX. ASP.NET is Microsoft’s tool for creating dynamic, interactive web pages and applications. Using plain vanilla HTML, you can make a web page that has some great content, but it’s static—the content doesn’t change, no matter what the user does. You can even use Cascading Style Sheets (CSS) to make it the most visually impressive thing on the Web, but if what you really need is for users to be able to leave comments, or browse your inventory, or buy things from you, then HTML alone won’t get it done.
That’s where ASP.NET 3.5 comes in. Within these chapters, you’ll find out how to do all the great tricks that you see on the most popular commercial web sites. Order forms? We’ve got that. Interact with a database? You’ll do that, too. Dynamic navigation tools? It’s in here. Personalized appearance that the user can customize? No problem.
The best part is, you’ll do it all with minimal coding. You can make ASP.NET pages in your favorite text editor if you want, but that’s a bit like using a hammer and chisel to write the Great American Novel. If you use Visual Studio 2008, or its free counterpart, Visual Web Developer, adding many features to your page is as simple as dragging and dropping. The tools generate most of the code for you. If you’re an old-school type who cringes at the idea of letting someone else write your code, it’s all still there, and you can tweak it to your heart’s content. Consider this, though: would you rather spend your time writing the code for another radio button list, or figuring out what to do with the data that you gather using it? In short, the tools do the tedious chores for you, so you can get to the good stuff.
On top of all this, you can enhance your ASP.NET 3.5 site with AJAX, which is more than just résumé enhancement—it’s a genuine improvement in the user experience. When a user is browsing your product catalog, and she clicks on one of your thumbnail images to view the product’s details in another panel, she simply expects it to work instantly. She doesn’t want to wait while the page contacts your server, reloads, and then redraws itself with the new information. With AJAX, she won’t see any of that. The update is seamless, and the user never has to slow down. You’ll see AJAX tools used throughout this book. In fact, Chapter 3 is dedicated solely to just that topic, so you can use AJAX with everything else we’ll show you.
One of the wonderful characteristics of the tools (Visual Web Developer or Visual Studio) and the technology you’ll be using (ASP.NET and ASP.NET with AJAX) is that you’ll be able to create your applications by dropping controls onto the page and just a little bit of handcoding to handle “events” (such as what happens when the user clicks a button). Not toy applications—meaningful business applications.
By the time you’ve finished this book, you’ll be able to do all of that and more, and you’ll learn about it by doing it yourself—hands-on. If you don’t have Visual Studio or Visual Web Developer installed yet, turn to Appendix A now for detailed instructions on how to install and set it up. Once you’ve done that, it’s time to dive right in and create your first application, "Hello World.”
One of the most difficult problems in beginning to learn any programming technology is the “bootstrap” problem. That is, writing your first program requires using techniques that you haven’t learned yet, but learning those techniques in a vacuum is not only boring, but to some degree pointless because there’s no context, and thus no way to integrate that which you learned.
The traditional solution to this dilemma is to create the canonical “Hello World” program. Our Hello World web site will allow us to demonstrate many useful aspects of ASP.NET without overwhelming you with detail. We promise we will explain every aspect of this web site in detail as we go along.
Tip
According to Wikipedia (http://en.wikipedia.org/wiki/Hello_World), the tradition of a Hello World program dates back to a 1974 Bell Laboratories memorandum by Brian Kernighan.
This introductory web site will have only a Button and a Label control. Initially, the Label will display the text “Label.” When the user clicks the Button, the Label text becomes “Hello World.” Very cool, eh? You can see the finished product in Figure 1-1 as it appears after you’ve clicked the button.
To get started, open the Integrated Development Environment (IDE), which for your purposes in this book is Visual Web Developer or Visual Studio. (Throughout this book, we will use the acronym IDE for both, specifically using Visual Studio or Visual Web Developer only where they are different.)

Figure 1-1. This is what the HelloWorld web site will look like after you click the Button. It may not look like a lot, but this is a fully functional, interactive web site.
To create a new web site, click on the menu item File → New Web Site…, or alternatively, use the Create: Web Site… link on the Start Page. Either way, you should see the New Web Site dialog, like the one shown in Figure 1-2.
Tip
In this book, we will be using Visual Basic as our default language, although it is our profound belief that Visual Basic and C# are really a single language, just with slightly different syntax.
We will be showing many of our screen shots from Visual Web Developer, because it is freely available from Microsoft; however, anything that you can do in Visual Web developer can also be done in Visual Studio.
Take another look at Figure 1-2, and we’ll examine it in some detail. In the upper part of the window, you are offered various Visual Studio templates (though yours may vary, depending on any features and add-ons you’ve installed). Select the ASP.NET Web Site template because that is the kind of site that you are going to create (shown highlighted in this figure).
In the Location drop-down box at the bottom of the dialog box, select File System (the other options are HTTP or FTP; we’ll explain this selection in the next section).
The Location drop-down in Figure 1-2 covers up another drop-down in which we have set the language to Visual Basic (rather than to Visual C#). Finally, you need to specify where on your disk you would like this web site to be placed—in this case, in the LearningASP directory on the C drive. You won’t have such a directory on your hard drive yet, so you’ll need to type it into the Location field (or whatever directory you want to use for your projects in this book).

Figure 1-2. To create a new web site, open the IDE, and click on Menu → New Web Site to open the New Web Site dialog box. The Visual Studio Installed templates and My Templates panels show you the types of sites supported by your version of Visual Studio.
The name of the new web site will be HelloWorld (with no space character), so type that into the Location field. The site will be fully contained in a subdirectory named HelloWorld within the directory LearningASP.
Click OK; the IDE will create the directory for you, put the needed default files for your site within it, and then open the new web site.
You can confirm that the files are in the right place by navigating to the specified directory using Windows Explorer, as shown in Figure 1-3. When you work on your site, however, you’ll most likely access these files through the Solution Explorer window located on the right side of the IDE window.
The Location field in Figure 1-2 is really composed of two parts: a drop-down with three possible values, and a text box for the folder name and path. The drop-down choices are File System, HTTP, and FTP.
File System is the default choice for new web sites and the only choice we’ll be using in this book. It creates a new web site folder somewhere on the physical file system, either on your local machine or your network. One important feature of ASP.NET is that an entire web site can be contained within a directory. This is convenient not only for deploying your web site to a web server, but as a side benefit, it allows us to easily place samples from this book onto our web site for you to download and try on your local machine.
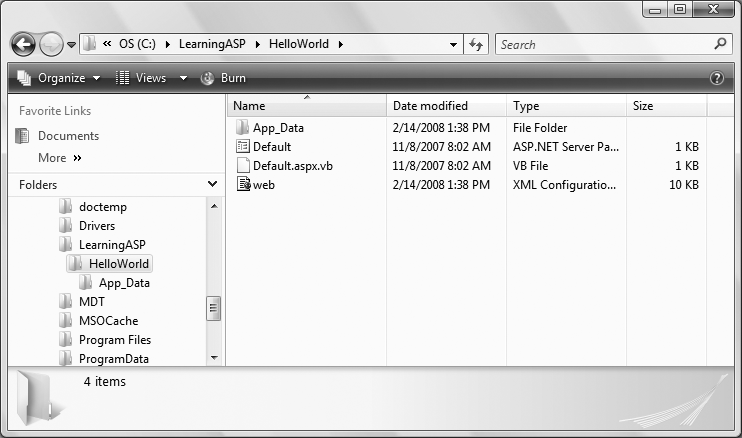
Figure 1-3. Visual Studio creates a new web site directory for you, complete with some default files to start with.
When you create your web site, you can use the Browse button (lower-right corner in Figure 1-2) and its associated drop-down list to browse the file system as you would with Windows Explorer; you can also select any desired folder as the “home” for your new web site folder.
When you run your file system-based web application from within the IDE, the development environment runs the application using its own internal web server rather than a web server program such as Microsoft Internet Information Server (IIS). This means that you can easily develop web sites on your machine without the necessity of installing IIS.
The alternatives to hosting your site in your file system are named HTTP and FTP. HTTP indicates that IIS (the web server product from Microsoft) will be serving the pages and requires that the web application be located in an IIS virtual directory. If you choose HTTP, the IDE will automatically create this virtual directory for you and the web site will be served by IIS.
FTP allows you to develop your web site on a remote location accessible via the FTP protocol. You will be presented with an FTP Log On dialog box with a checkbox to allow Anonymous Log in, and text boxes for login user name and password, if necessary.
After you’ve named your new web application and chosen a place to keep the files, the IDE will look more or less like Figure 1-4. This is where you do the real work of putting your site together.
Tip
Which exact windows you see and how they are presented may be determined by the options you’ve chosen. In your IDE, you can always open new windows from the View or Window menu, and you can undock, move, and redock the various windows using the mouse and the on-screen docking indicators.
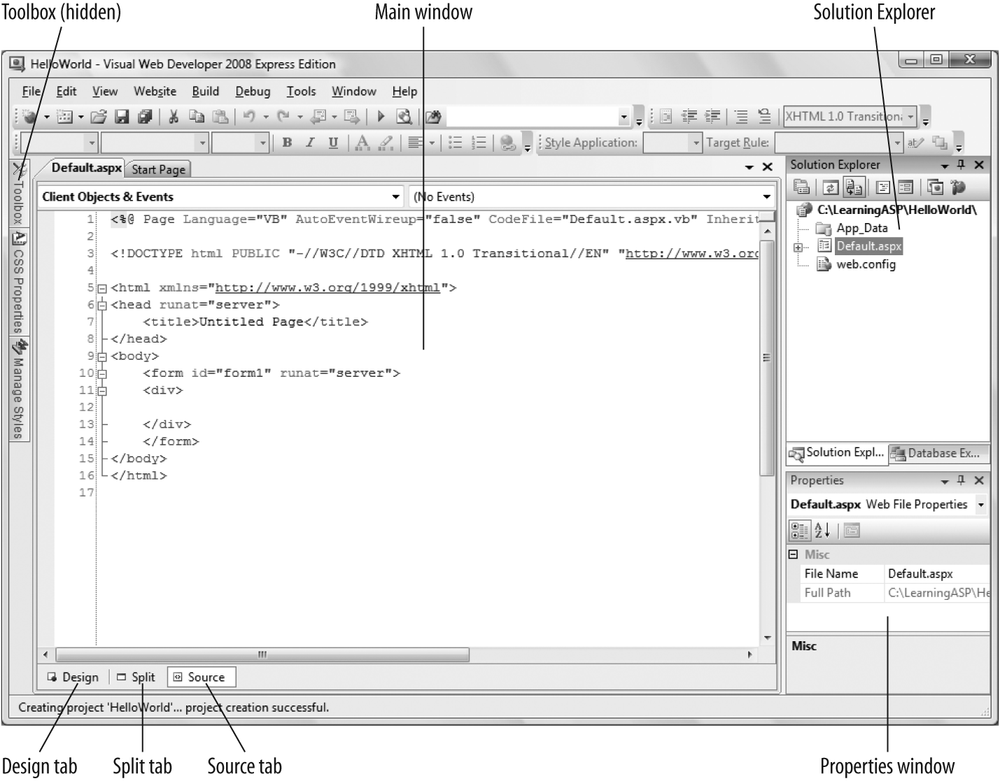
Figure 1-4. Initial IDE screen for HelloWorld. This is what you’ll see after you’ve named your web site, chosen a language, and created a directory for it.
In Figure 1-4, you see the main window, which shows the page markup: HTML plus ASP.NET declarations and controls. This is called the markup file, or the .aspx file, because .aspx is the file extension associated with markup files. Also note the three tabs at the bottom of this pane, labeled Design, Split, and Source. You’ll be using these three tabs a lot as you create your pages.
To start, click on the Design tab. When you click this tab, the middle window of your IDE becomes the design surface. On the design surface, you can drag and drop items such as buttons, text fields, labels, and so on from the Toolbox (which you’ll see in a moment), where they automatically become part of your application. Each item that you can drag onto the design surface is called a control. You’ll be reading more about controls in Chapter 2 and throughout this book.
Next, click on the Source tab. This view allows you to see the same controls, but displayed as HTML and ASP.NET markup. When you drag a control onto the design surface, the IDE automatically adds the appropriate markup to make that control part of the page. You can view and adjust that markup from the Source tab and even drag controls from the Toolbox directly onto the Source view. As you switch back and forth between the Source and Design views, they will remain consistent with one another, as they are two views of the same information.
Tip
Many working programmers—and even Microsoft itself—will refer to markup as source code. Other programmers draw a distinction between markup (HTML, ASP.NET controls, XML, etc.) on the one hand, and source code (C#, VB.NET, JavaScript) on the other. This can—and does—cause confusion, and all ASP.NET programmers learn to differentiate as best we can by context. The Source tab shows markup or HTML source code. The "code-behind” file, discussed below, shows C# or VB.NET source code. Not a perfect naming system, but there you have it. In practice, markup and ASP.NET source code have become synonymous.
Finally, click on the Split tab—here you’ll see the best of both worlds. The Split view combines shows the Source view in the top pane, and the Design view in the bottom pane. You can drag controls onto either pane and the other pane will adjust appropriately. Sometimes it might take a moment or two for the other pane to catch up and synchronize, but you’ll see a warning message when they’re out of sync.
Again, referring to Figure 1-4, the window at the right edge of the screen displays the Solution Explorer, which is used for navigating and working with the files that make up your web site. The Database Explorer tab (called the Server Explorer in Visual Studio) at the bottom of the Solution Explorer window allows you to create and work with data connections.
Below the Solution Explorer window is the Properties window, which displays the properties for the currently selected object on the page. Properties are settings that are specific to each control, so the content of this window changes depending on what control you’ve clicked on. You’ll be reading a lot more about properties in the discussion on controls in Chapter 2.
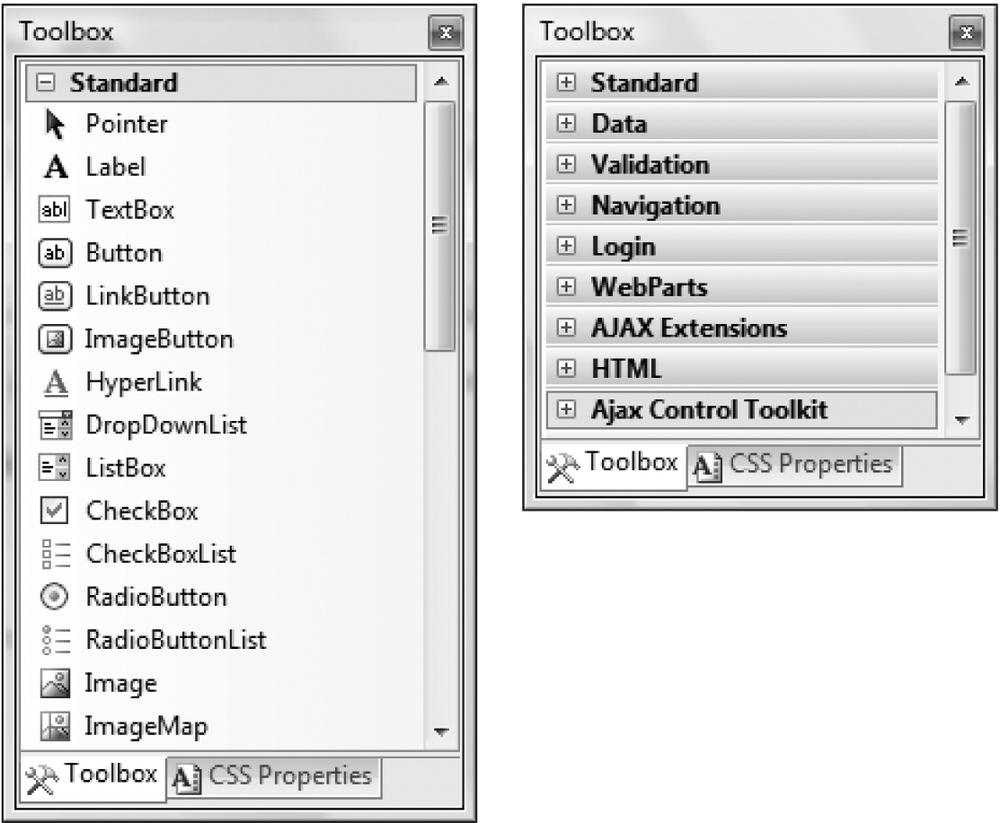
On the left edge of the Main window, click on the Toolbox tab to display the Toolbox. By default, the Toolbox will obscure part of your code window, so click the pushpin button in the title bar of the Toolbox to “pin” it in place and shove the code window over a bit. You can “pin” any of the auxiliary windows in place, keeping them visible. When “unpinned,” they will auto-hide, showing only their tab. Clicking on a tab while unpinned will make them temporarily visible.
Inside the Toolbox, you’ll find a number of expandable categories that contain just about every control you’d want to use on your web page. If the Toolbox tab is not visible, click on View → Toolbox to display it. Initially it will be displayed in expanded view, as shown on the left side of Figure 1-5. Click on the + or – icon to collapse or expand each section.
Although it doesn’t seem like you’ve done much, you’ve already created your web page. It just doesn’t do much of anything right now. To make your page come alive, you need to add some controls to it. Everything that you’ll find in the Toolbox is a control, and you can add controls to your pages simply by dragging them onto the design surface or into the Source view.
For this first program, you’ll add a button and a label to your page, making it look like what you saw back in Figure 1-1. Follow these steps:
Click the Design tab at the bottom of the main window to ensure that you are in Design view.
If the Toolbox window is not already pinned in place, click on the pushpin icon in its title bar to pin it in place.
If the Standard category of the Toolbox is not expanded, click on the plus symbol and expand it. You should be able to see a number of basic controls listed in the Toolbox, such as "Label,” “TextBox,” and "Button.”
Click on a
Buttoncontrol in the Toolbox and drag it onto the design surface inside thedivelement.Click on a
Labelcontrol in the Toolbox, and drag that onto the design surface next to the button.
At this point, your IDE should appear similar to Figure 1-6.

Figure 1-6. After you’ve added the button and label to your HelloWorld application, the Design view should look like this.
This is a good time to stop and run your program to see what it does so far. There are three ways to do this:
Because this is the first time you’ve run the program, the IDE will detect that your application (specifically, its web.config file) is not set to allow debugging and will offer to make that adjustment for you, as shown in Figure 1-7. Get used to this dialog box—you’ll see it the first time you run any web site.
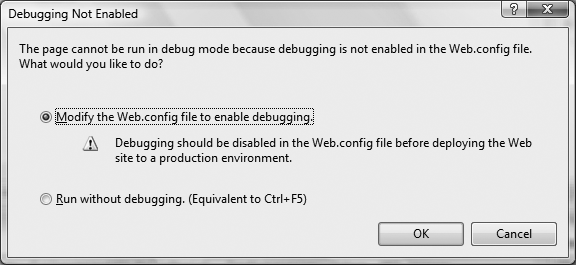
Figure 1-7. You’ll see this Debugging Not Enabled dialog box the first time you run your application. Just select the first option and click OK to keep going.
It’s not important to know what a web.config file is right now; we’ll explain it later. For now, click OK to allow the IDE to modify the configuration file.
After you click OK, your application begins, your default browser opens, and the page that contains your button is displayed, as shown in Figure 1-8.
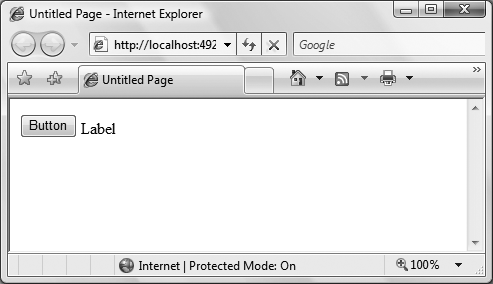
Figure 1-8. This is what HelloWorld looks like in the browser before you do any coding. The button doesn’t do anything yet, though.
Tip
In the address bar of the browser, where you normally see the URL of the web site you’re visiting, you’ll see http://localhost:, followed by a number. This is still a URL, and “Localhost” is just what it sounds like—it represents the ASP.NET web server running on your local machine. The number is a port number, and will probably vary each time you run your application.
Click the button. Unfortunately, nothing happens. In the status bar of the browser, you may see evidence that the page is sent back to the server—this is called a post back, which we’ll describe in Chapter 2. For now, close the browser to end the application, then return to the Design view in the IDE. You may see a new window named “Output” at the bottom of the IDE. If so, just close the window and don’t worry about that for now.
All web applications are "event-driven.” Any action that your control can take, or that a user can take with a control—clicking a button, opening a tool tip, checking a checkbox—is an event. Put simply, a web page without any events just sits there. When an event occurs, it is said to be raised, (we might also say that the event is fired). Then, behind the scenes, a block of code called an event handler is called to respond to that event. All of this firing of events and calling event handlers is automatically wired in by ASP.NET, and is far easier to set up than it is to describe, so don’t panic!
Not surprisingly, all buttons have a default event named Click. The Click event is automatically fired whenever the user clicks a button. At the moment, when you click the button on your web page, the event is fired, but there’s no event handler yet, so nothing happens.
Creating the event handler for the Click event is easy. In Design view, all you have to do is double-click the Button control. This instructs the IDE to create an event handler and name it. The IDE will name your event handler as follows: the ID of the control, followed by an underscore, followed by the name of the event. If you do not explicitly provide the ID for a button (we’ll discuss naming events and event handlers later), the IDE will apply the default ID of Button1. Thus, the name of the event handler will be set to Button1_Click.
The IDE then displays the code-behind file and an event handler stub for you to complete. Here, you can add your own custom code to specify the operations you want the handler to perform when it’s called.
Give it a try. Switch to Design view and double-click on the button. The code-behind file containing your newly created event handler will open, as shown in Figure 1-9.
Don’t worry about any of the other code you see, like the Partial Class and End Class lines; that’s all added automatically by Visual Studio. All you need to know right now is that your event handler is the code that starts with Protected Sub and ends with End Sub. You’ll add your code in between those lines.
In this event handler, whenever the user clicks the button, you want to set the Text property of the Label control, which the IDE named Label1, to the phrase "Hello World.” To do that, you need to assign that string of letters to the Text property of the Label. The event handler for Button1_Click appears as shown in Example 1-1.
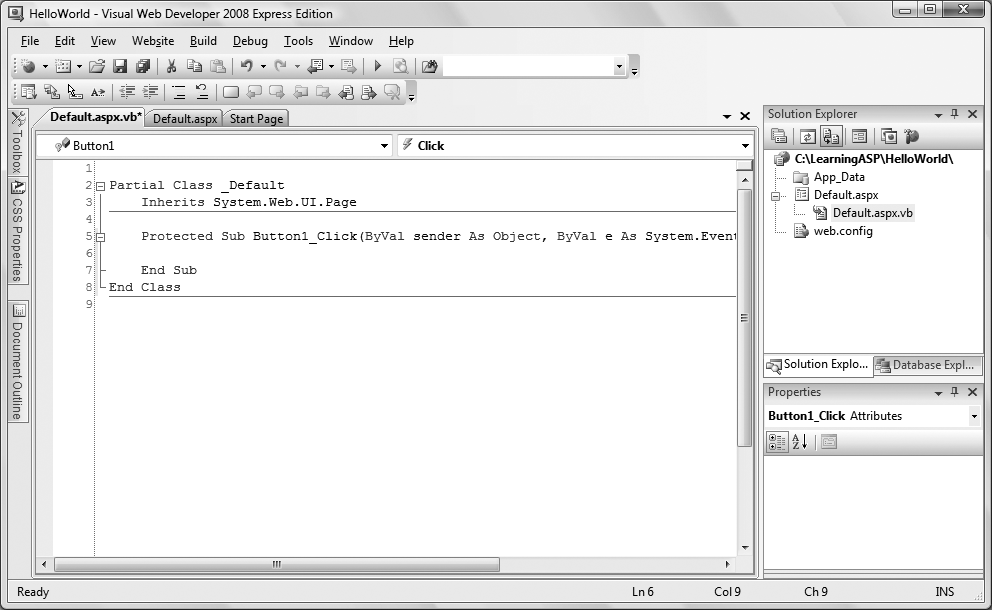
Figure 1-9. When you double-click the button in HelloWorld, you’ll be taken to the code-behind page, where you can modify the event handler yourself.
Example 1-1. The Button1_Click event handler in HelloWorld, before you change it
Protected Sub Button1_Click( _
       ByVal sender As Object, _
       ByVal e As System.EventArgs) _
       Handles Button1.Click
End Sub
Tip
In this listing, and in other listings throughout this book, we’ve reformatted the code to fit the width of the printed page. In Visual Basic, the line continuation character is the underscore (as seen at the end of the first three lines, used here and elsewhere to make valid VB code). You, or the IDE, may place much of that code on a single line without the continuation character(s).
To assign the text string to the label, click inside the event handler, and then type the following code:
Label1.Text = "Hello World"
When you’re done, the event handler should look like Example 1-2.
Example 1-2. The Button1_Click event handler, after your addition
Protected Sub Button1_Click( _
       ByVal sender As Object, _
       ByVal e As System.EventArgs) _
       Handles Button1.Click
             Label1.Text = "Hello World"
End Sub
After you’ve added the code to your event handler, save the file by clicking the Save button on the toolbar, then run the program again by clicking the Debugging icon or pressing F5. When the page opens in your browser, click the button. Your event handler is working now, so you should see the text label change to "Hello World,” as displayed back in Figure 1-1.
What has happened is that when you click the button, the page is sent back to the server, where your event handler code runs, and the string “Hello World” is assigned to the Text property of the Label control. A new page was created by the server and sent back down the “wire” to the browser as pure HTML, and then displayed on your screen. Close your browser to stop the application and return to the IDE.
When you follow step-by-step instructions as if following a recipe, it’s easy to lose sight of what you’ve done. Here’s a quick review:
You created a new web site on your file system.
You dragged a
Buttonand aLabelonto the design surface.You double-clicked on the
Buttonto create an event handler.In the event handler, you assigned “Hello World” to the
Textproperty of theLabelcontrol.You ran your application and clicked on the
Button, causing the page to be sent back to the server where the event handler code ran. The text “Hello World” was assigned to theLabeland the page was sent back to the browser.
Congratulations! You’ve just built your first bona fide web page—and it’s interactive, too. Pretty easy, isn’t it? You’ve seen how to use the IDE, you’ve worked in Design view and in the code-behind file, and, most important, you saw how to create a page that actually responds to user input.
ASP.NET 3.5 lets you create interactive web pages and applications. With dynamic pages, you can interact with your users and create a richer experience for them.
Visual Studio 2008, or the free Visual Web Developer, supplies the tools that make creating a web page as easy as dragging and dropping, minimizing the code you need to write.
AJAX is a set of technologies that you can use to make the user’s experience more responsive.
You can create a new web site or open an existing one from the Start Page in Visual Web Developer or Visual Studio.
In ASP.NET, you can store your entire web site within a single directory, which in this book will always be on your local hard drive, but you can also store them at a remote location and serve them using IIS.
The main window of the IDE has three views: Design, Source, and Split. Design view allows you to see the visual design of your web page; Source view shows the HTML and ASP.NET markup instead; and Split shows both views in separate panes. You can switch between the views on the fly.
The items that you add to your web page are called controls. Controls are stored in the Toolbox, which by default appears on the left side of the IDE. You add controls to the page simply by dragging them from the Toolbox onto the appropriate spot on the page in Design view or Source view.
The Solution Explorer, located on the right side of the IDE, displays the files in your web site. Below the Solution Explorer is the Properties window, which lets you adjust the properties of any control you select. On a separate tab is the Database Explorer (called Server Explorer in Visual Studio) for access to the databases that support your web site.
You can run your application by clicking Debug → Start Debugging from the menu, pressing F5, or clicking the Start Debugging button.
Web applications are event-driven, meaning that the controls raise events, which are handled by code blocks called event handlers.
The code for the server controls resides in another file called the code-behind file.
When you double-click on a control in Design view, you’re automatically taken to the code-behind file, where the IDE will create a handler for the control’s default event.
You’ve come a long way in just one chapter. Sure, “Hello World” is a trivial page, as web pages go, but it’s interactive, which is the point of the book. You can close out the chapter with some quiz questions to see how much you’ve learned and then a simple exercise to let you practice your skills. Even though you’ve come this far, you’ve just scratched the surface of what’s available to you in ASP.NET. Just glancing at the Toolbox shows you that there are many more controls than you’ve used in this chapter. In Chapter 2, we’ll show you how to use some of them, and you’ll build an order form to see how they all work together.
How do you create a new web site in the IDE?
What are the three views of your page that you can use in the IDE?
What’s the name for the settings that are specific to each control?
Where in the IDE will you find the controls that you can place on your page?
How do you run your application?
What event is fired when you click on the
Buttoncontrol?Where is the code for the event handler located?
What’s one way to access the default event handler’s code?
What property of the
Labelcontrol do you use to set its content?When you click the button in your Hello World application, where is the code processed?
Exercise 1-1. This is your first exercise, so we’ll take it easy on you—you’ll make some changes to HelloWorld. Open the example again. There are a few ways to do this:
Select File → Open Web Site.
Click the Start Page tab at the top of the main window to display the Start Page, and click the Open Web Site link, or select it from the Recent Projects list, if it’s there (and it should be, if you’ve just finished this chapter).
With the file open, select the code-behind file, either from the tab at the top of the window, or in Solution Explorer. Go to the Click event handler, and change the “Hello World” text to a message of support for your favorite sports team (or band, or movie, or whatever you like).
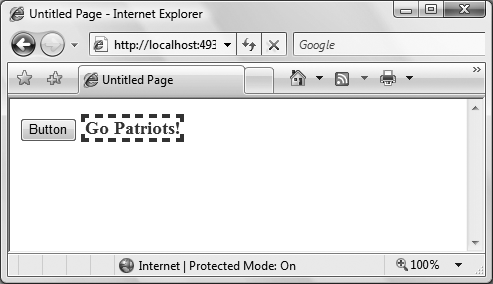
Now switch back to the .aspx file. Select the Label control, and check out the Properties window. There’s more here than just setting the text, as you’ve seen. Go to the Appearance section of the Properties, and play around with them to your liking. Click the + sign next to the Font property, and you’ll find lots of options that you’re probably familiar with. Try changing the font, the text size, and the color. You can also play with the border of the label, too. Note that if you change the Text property here, you’re changing the initial text that the label displays. After you’ve kicked the tires a bit, run your application to see how it looks. You can see an example in Figure 1-10, although this is the affiliation of only one of the authors.
Get Learning ASP.NET 3.5, 2nd Edition now with the O’Reilly learning platform.
O’Reilly members experience books, live events, courses curated by job role, and more from O’Reilly and nearly 200 top publishers.

