Chapter 14. Unified Threat Management
Unified Threat Management (UTM) is an industry term that was coined to define Layer 7 protection against client-side threats. This does not include IPS (which also has protection against server-to-client attacks) but rather technologies such as network-based antivirus protection, URL filtering, antispam solutions, and content filtering. At this point, you might be asking yourself, if you have an IPS, why you need UTM? It’s an excellent question, and one that many administrators confuse. IPS is primarily focused on network-based attacks on protocols, and is stream based, meaning that it processes traffic inline without modifying it as a stream. This works great from a performance perspective to detect attacks against services and applications. UTM, on the other hand, is meant more for protecting against files that are transmitted on top of the network streams. Although IPS might be more geared for detecting an overflow of the parser of the network stream, it isn’t as well geared for detecting threats within files. That is, it certainly can detect such file-based attacks, but attackers can go to great lengths to encode, encrypt, and obfuscate files to perform some malicious action—and it is very difficult to detect these attacks in Stream mode.
If you think about it, network-based vulnerabilities have a very specific and fixed attack surface for the individual vulnerabilities, where, say, executables can be programmed to do virtually anything, both legitimate and malicious. To properly protect against such attacks you need a dedicated technology like antivirus software. We examine how this functions in this chapter.
Virus protection isn’t the only feature that UTM provides. URL filtering is another powerful technology that can not only be used to prevent users from going to undesirable web content, but also as a mechanism to prevent them from going to known malicious sites. Again, you could use IPS to accomplish URL filtering, but particularly on a larger scale, it simply isn’t geared to do so in an administrator-friendly manner. URL filtering, on the other hand, makes this process much easier, and has a large predefined database of URLs and categories to source for such reputations.
Antivirus protection and URL filtering are certainly the most commonly used UTM features, but the SRX also provides antispam solutions and content filtering features to protect clients against annoying and malicious spam. They also provide a mechanism for the administrator to do some lightweight data leak prevention. We explore these features in greater depth in this chapter.
As you can see, UTM is synonymous with protecting clients and enforcing organizational policy. In this chapter, we explore the various facets of UTM, how it functions, and how to properly deploy it in your network for maximum effectiveness.
Shifting Threats
As network administrators have gotten savvy about firewall placement and limiting inbound direct access to resources, along with the hardening of most common Internet-facing platforms like Apache, IIS, Exchange, and other platforms, attackers have shifted their attack strategies. Directly targeting and exploiting a specific victim on demand is the most ideal approach for attackers, but this has become much more difficult in modern networks. Both firewall infrastructure and DMZ best practices, along with these Internet-facing systems being stripped down and hardened, has made this much more difficult. Instead, attackers are taking advantage of a much more enticing target, the clients themselves. In many organizations, Internet-facing resources are somewhat quarantined in a DMZ, so even if they are compromised, it might be difficult to pivot and compromise other internal resources. On the other hand, many organizations leave their internal hosts with carte blanche access to internal resources. Additionally, as applications have shifted from being standalone clients, to network enabled, to web browser enabled, there has been a lot of effort to create a better user experience in these applications. Technologies such as Flash, Java, JavaScript, and ActiveX, as well as file-based attacks through PDF and Office documents have become a major source of exploits for malicious attackers.
For these reasons, attackers have shifted to target clients. Of course, you might think that it is harder to exploit because said attackers cannot be directly contacted, but it is actually easier than you think. There are numerous examples of such advanced attacks that leverage targeted emails, web links, drive-by downloads, and social engineering to ensnare either specific or broad targets for compromise. In fact, these methods are some of the most prevalent ways to compromise machines today. For the purpose of this chapter, we won’t focus on a specific class of malware like viruses, worms, Trojans, or spyware. Malware is malware, and we discuss how to protect yourself against it with the SRX platform, and specifically UTM technologies.
UTM, IPS, or Both?
Before we go into an in-depth discussion of how UTM works and how to configure it, let’s start with a brief overview of the applicable use cases for deploying UTM, and how it can be used in conjunction with other Layer 7 security technologies. Before delving into all of the details of how each technology works, let’s take an overview of each technology and what issue it solves, followed by how services like AppSecure and IPS can interact with UTM to provide maximum security.
Antivirus
The antivirus component of UTM provides the ability to inspect files transmitted over several protocols to determine if the files exchanged are known malicious files, similar to how desktop antivirus software scans files for the same purpose. Of course, the antivirus protection integrated into the SRX is purely network based, so it can’t provide enforcement for any files that aren’t transmitted through the SRX. We offer both Kaspersky and Sophos engines in the SRX. You can only have one active at a time, but you can have different profiles active per engine. In addition to the file scanning, the Sophos engine also offers the ability to perform reputation analysis on URIs to determine if the location of the file is known to be malicious (more on this later).
Although antivirus is primarily viewed as a technology to protect clients, technically it can also be used for server-side inspection. For instance, if you run an SMTP, FTP, HTTP, IMAP, or POP3 server, antivirus can provide inspection for these as well—but typically this technology is used for protecting clients from threats on the Internet.
URL Filtering
URL filtering is strictly a client protection technology of UTM. It can be used for both providing policy enforcement, such as limiting access to what sites different users can access based on category and organizational policy, as well as to act as another layer of security by limiting access to potentially malicious sites. With the new Enhanced Web Filtering offered by Websense built into the SRX, we can also assign a reputation score to a site and base a decision on a score, similar to spam. This gives administrators a lot more flexibility, especially when it comes to using URL filtering as a security mechanism to limit exposure to potentially malicious sites.
Antispam
The antispam feature built into the SRX offers a lightweight antispam solution that can block spam based on source IP blacklists offered by Sophos. This isn’t the most sophisticated form of antispam protection, but it does solve a simple use case that can be used to filter out well-known spam servers from forwarding spam into your email system. Technically, this is a technology that operates on the server side, but if you think about it, it is geared toward protecting clients, even if indirectly.
Content Filtering
The content filtering functionality built into the SRX offers a simple mechanism to filter files from being transmitted across firewall boundaries. In the past, you would have to leverage either a standalone Data Leak Protection (DLP) solution or full-blown IPS with custom signatures to detect such communication. This is geared slightly more toward policy enforcement than it is for actual client-side security, but it can still be effective at enforcing some policies for exchanging different types of files. The content filtering solution shouldn’t be considered to be a fully functioning DLP solution by any means. It is very lightweight, but it can simplify some of the operations from an administrative perspective and offer some quick fixes to limit certain data exchanges.
Antivirus + URL Filtering+ IPS?
So the question in your mind is probably why you need IPS if you have antivirus and URL filtering capabilities. Certainly, it depends. Remember that IPS is geared toward looking for exploits in network streams, both from a client-to-server perspective (client attacks the server) or from a server-to-client perspective (server is attacking the client). Antivirus is primarily interested in inspecting files, and these threats in the network stream (e.g., against an HTTP implementation) might not be bound within a file. Of course, with the new features like URI inspection with Sophos integration, the Sophos engine might be able to prevent you from accessing a malicious resource before the attacker has the opportunity to try to infect you.
URL filtering with the Enhanced Websense Filtering also offers some degree of overlap with antivirus when it comes to reputation filtering of URIs. It is never a bad idea to have two different databases for threat information. Of course, there can be performance concerns when it comes to running all of the technologies concurrently, and we go into more detail about the implementation and how to best leverage them later in this chapter. If performance is not a concern, these technologies can provide a nice overlap that can serve to protect your clients from Internet and network-based threats, and make it significantly more difficult for attackers to be successful.
Note
URI versus URL? There is a difference, although many use them as one and the same. For a complete definition, Wikipedia has a nice write up at this link.
I Have SRX Antivirus: Do I Need Desktop Antivirus?
The answer is a resounding yes. There are a few different reasons for this. First, not all potential malware threats might be transmitted over the network, or perhaps not always in band with the SRX. For instance, malware can be exchanged over USB devices and other portable media, or it could be exchanged internally through file shares and other media that might not pass through the SRX if it is placed at the perimeter. Another case might be for malware exchanged through encrypted protocols such as IPsec, or proprietary encryption that the SRX cannot inspect.
Another compelling reason for running desktop antivirus software is because it can dedicate a lot more resources toward inspecting traffic than a network-based device can, at least in real time. For instance, most desktop-based antivirus products have the ability to monitor the execution of an application and track the system calls and other behavioral activity. This simply isn’t an easy task for a network-based antivirus product to perform. Additionally, many malware crimeware kits heavily obfuscate their programs, so searching for simple patterns can be very difficult to enforce because the malware can alter itself in subtle ways to try to evade these inspection techniques. Of course, the SRX relies on much more than simple pattern matching, but it cannot provide inline inspection with the same depth that a real-time system with execution analysis can. That’s why new technologies like URI technologies are leveraged as another layer of protection, because it can offload the processing and leverage reputation to help make inspection decisions.
So if a network-based antivirus solution isn’t as powerful as a desktop-based antivirus package, why should you even bother? The answer is because it’s another layer, particularly if it’s a different engine than what you are using on your desktops. Additionally, it can block threats at the perimeter, and it offers the ability to do some reputation analysis on the traffic as well, something that many desktop-based antivirus products do not do.
Note
Not all Desktop AV products are created equal, as you might have experienced. They vary widely in effectiveness, stability, usability, central management, and so on. We are not seeking to endorse any anitvirus solutions in this book, but definitely have to do your research. There are third-party tests available like VB100, NSS Labs, and other independent analysis of various antivirus products and features available through your favorite search engine.
UTM Licensing
The UTM feature set all requires licenses with the exception of URL filtering with custom URLs only. This is because Juniper leverages third-party technology that is constantly updated to provide the most up-to-date inspection capabilities. Licenses can be purchased individually or as bundled licenses with other features like AppSecure/IPS. The licenses are term based and offered as per-year licenses.
Note
If using an HA cluster, you must license each device in the cluster.
You can configure the features without the licenses, but they will not be active (or download their respective databases) until a valid license is installed. In terms of the licensing for the different features, you do need to purchase the specific solution license. For instance, there is a different antivirus license for Sophos, Kaspersky Full, and Kaspersky Lab, along with Websense or Websense Enhanced. You cannot purchase the Kaspersky engine and try to activate the Sophos feature set; they are specific to each feature.
Note
Junos does offer a 30-day grace period after a license has expired before the functionality will no longer update.
Configuring Licensing
The UTM licenses are applied the same way that they are
applied for other features. They must be done per chassis, using the
request system license add command
either adding the licenses from the terminal or loading the files to the
SRX and installing them from the file.
{primary:node0}
root@SRX550-Node0> request system license add terminal
[Type ^D at a new line to end input,
 enter blank line between each license key]
JUNOS132562 aeaqea qmifgd embrgj aucmbq gi2qqb qcdo6o
            bpsna4 ukmsmc 6e7hxv vqapku laamzj zs534b
            wwmcqs l7nacd phmzv6 lblxol wwg62c ibqcwq
            ftq

add license succeded JUNOS132562

{primary:node0}
root@SRX550-Node0> show system license
License usage:
                      Licenses  Licenses Licenses Expiry
  Feature name            used installed   needed
  anti_spam_key_sbl          0         1        0 2013-09-01 00:00:00 UTC
  idp-sig                    0         1        0 2013-09-01 00:00:00 UTC
  dynamic-vpn                0         2        0 permanent
  ax411-wlan-ap              0         2        0 permanent
  appid-sig                  0         1        0 2013-09-01 00:00:00 UTC
  av_key_sophos_engine       0         1        0 2013-09-01 00:00:00 UTC
  wf_key_websense_ewf        0         1        0 2013-09-01 00:00:00 UTC

Licenses installed:
  License identifier: JUNOS132555
  License version: 2
  Valid for device: AL2012AA0011
  Features:
    av_key_sophos_engine - Anti Virus with Sophos Engine
      date-based, 2012-09-01 00:00:00 UTC - 2013-09-01 00:00:00 UTC

  License identifier: JUNOS132556
  License version: 2
  Valid for device: AL2012AA0011
  Features:
    wf_key_websense_ewf - Web Filtering EWF
      date-based, 2012-09-01 00:00:00 UTC - 2013-09-01 00:00:00 UTC

  License identifier: JUNOS132557
  License version: 2
  Valid for device: AL2012AA0011
  Features:
    anti_spam_key_sbl - Anti-Spam
      date-based, 2012-09-01 00:00:00 UTC - 2013-09-01 00:00:00 UTC

  License identifier: JUNOS132558
  License version: 2
  Valid for device: AL2012AA0011
  Features:
    idp-sig          - IDP Signature
      date-based, 2012-09-01 00:00:00 UTC - 2013-09-01 00:00:00 UTC

  License identifier: JUNOS132559
  License version: 2
  Valid for device: AL2012AA0011
  Features:
    appid-sig        - APPID Signature
      date-based, 2012-09-01 00:00:00 UTC - 2013-09-01 00:00:00 UTC
UTM Components
The UTM features implemented in the SRX follow similar concepts that apply across the different UTM technologies offered. There are feature profiles, custom objects, and UTM policies that can be configured in the SRX. We examine each one of these components, how they interact, and how they are leveraged in this section. We then delve into each UTM technology on a feature-by-feature basis.
From a high level, feature profiles specify how a feature is configured, and are applied to UTM policies, which then in turn are applied to firewall policies, as shown in Figure 14-1. Unlike IPS, which at the time of writing this book can only have one active policy at a time, UTM can have multiple active profiles. UTM profiles do not have their own seven-tuple rulebase like IPS does; it inherits the seven-tuple from the firewall rule in a sense. The power here comes especially with URL filtering, where you might want to have a separate configuration for different users or user groups. We examine how this functions in greater depth later in the chapter.

Feature Profiles
Feature profiles specify how components of each should function. They are defined for each of the UTM technologies supported by the SRX. As mentioned, you are not limited to one single feature profile per platform. You can configure multiple feature profiles that can be applied through different UTM policies to firewall rules. Think of feature profiles as the actual rules and engine configuration for each feature. All UTM features share the fact that they have a feature profile, but each feature profile is different depending on the feature it supports, so we examine configuring feature profiles on a feature-by-feature basis.
Note
Each UTM feature also has one or more predefined feature profiles that you can reference rather than having to create your own.
Custom Objects
Although the SRX supports predefined feature profiles that can handle most typical use cases, there are some cases where you might need to define your own objects, particularly for URL filtering, but also for antivirus and content filtering. This isn’t quite as advanced as configuring IPS custom objects, which requires some knowledge of configuring regular expressions. Because custom objects can be configured in a feature-specific manner, we discuss implementing them on a feature-by-feature basis in the following sessions where applicable.
UTM Policies
UTM policies act as a logical container for the individual feature profiles. UTM profiles are then applied to specific traffic flows based on the classification of firewall rules in the security policy. This allows you to define separate UTM policies per firewall rule to differentiate the enforcement per firewall rule. You can only define one feature profile per feature (well, with a slight exception for antivirus, which can apply a feature profile per protocol) but you can combine the different UTM technologies per UTM policy, and even create different policies to be applied on a firewall rule-by-rule basis. Essentially, the firewall rulebase acts as the match criteria, and the UTM policy acts as action to be applied.
Note
There are both predefined feature profiles and predefined UTM policies that can be leveraged in the system. In this chapter, we use only the predefined feature profiles for our UTM policies that are applied to the firewall rules rather than using the predefined UTM policies. The advantage here is that if using a predefined UTM policy, it is only for that one UTM technology (e.g., URL filtering or antivirus) and not both. By using the predefined feature profiles (which is a bulk of the config) you can mix and match the UTM technologies into a predefined UTM policy easily. If you only wanted to use one technology with the default option, you might be better off just referencing that predefined UTM policy from your firewall rule. You’ll see how this is all done later in the chapter.
Application Proxy
To provide both advanced detection and also a better user experience, the UTM leverages a TCP application proxy for some of the components. This shouldn’t require much consideration by the administrator, but it is important to understand that this technique is used. Application proxy allows the SRX to manipulate the traffic in certain ways. For instance, with antivirus it allows us to perform HTTP trickling to the client while the file is collected by the antivirus engine for inspection before fully transmitting it to the client. Additionally, it allows us to inject a redirect page for antivirus, URL filtering, and content filtering with HTTP when a threat or policy violation is detected. This allows for a better user experience than simply dropping a connection or sending a TCP Reset, which can result in strange application messages to the user. There are a few advanced options that can be configured to manipulate this, but it shouldn’t be necessary for normal operation. We are bringing this to your attention because if you are troubleshooting an application issue for a protocol that antivirus supports, collecting PCAPs on client/server sides might yield some strange results if you weren’t familiar with the fact that the SRX was leveraging this, although it should be entirely transparent to both users and applications.
Networking Requirements for UTM Features
Some of the UTM features either require Internet connections to get updates, or require Internet connections to function and perform lookups. For this to work, you need to have DNS, routing, and ideally NTP set up to be able to properly function. Of course, any upstream firewalls or access control must be opened up to allow the system to connect to the update servers. In each section we call out where this is required and what protocol is used.
Antivirus
The term UTM is somewhat synonymous with at least two technologies, antivirus and URL filtering, although the SRX offers more than just that. In this section, we examine the antivirus component of the SRX UTM offering, including how it functions, the various configuration and deployment options, and how it is applied.
Antivirus flavors in the SRX
The branch SRX Series offers three different types of antivirus engines at the time this book was written: Sophos, Kaspersky Full, and Kaspersky Express. The high-end SRX only supports Sophos antivirus. Why offer more than one solution, particularly from more than one vendor? Typically, customers will want to deploy a different antivirus system on their perimeter firewall than what they use on their internal hosts. Additionally, some customers have restrictions on purchasing security technologies from companies based in certain countries, so offering two vendors gives the customer the choice of which technology to deploy.
Sophos AV
Sophos AV was added to the branch SRX in the 11.1 release and is in beta for the high-end SRX at the time of writing this book. It offers two different inspection technologies to detect malware. First, it offers some traditional content inspection via hash checks and pattern matching that is common to most modern solutions. Second, it leverages a built-in reputation feed provided by Sophos that checks the requested resource URI to determine if it is a known source of malware. With the URI check, the firewall can actually block the user from downloading malware before the request even hits the server.
One important concept to understand with Sophos inspection is because there are millions of types of malware in the wild at any given time, along with billions (if not trillions) of potential URIs on the Internet, it is not feasible to load all of this information onto the SRX itself, particularly not the branch SRX. To keep the hardware requirements low while maximizing the inspection technology, the SRX leverages the Sophos cloud infrastructure to assist with the inspection. Assuming the default options are enabled, when a user requests access to a resource, the SRX will send an encoded message to the Sophos cloud over DNS, which will have the resource information encoded in the DNS request. Sophos will then respond with an all-clear message or information about the suspected malware at that URI via a DNS reply. This process is displayed in Figure 14-2.
Assuming that the URI check does not yield any malware, the file transfer will continue. The SRX will keep track of the data as it’s sent and continually hash chunks of it. These hashes will be sent to Sophos via encoded DNS requests, and Sophos can respond with a DNS reply that the file is a virus based on one or more chunks. Pattern matching for certain known malware can also occur in this process on the SRX itself.
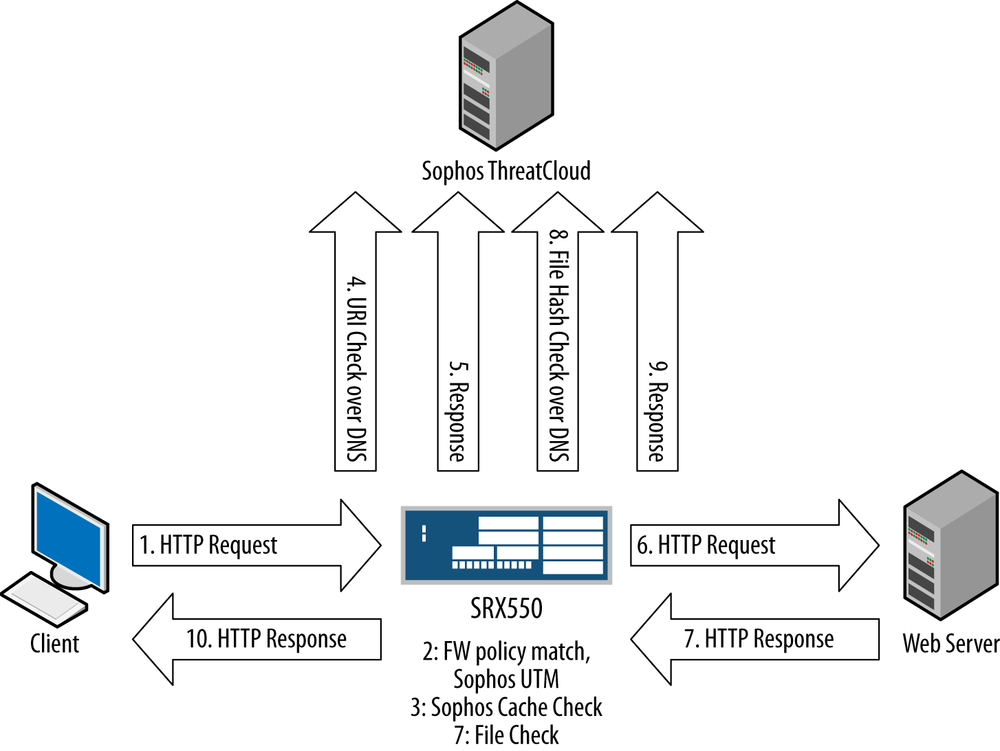
This model allows a near unlimited malware database to be leveraged, while decreasing the cost of expensive pattern matching and execution analysis on the real-time traffic and provides much better security than most competitive AV platforms that load a limited database onto their devices. Additionally, with this solution, the SRX does not send any actual data payloads to the cloud, just the URI checks and the content hashes, so we don’t have any latency hit or worries about forwarding actual private data through third parties. Of course, if you are leveraging the URI or content hash features, this does require that the SRX has access to the Sophos cloud via an Internet connection. You can run the Sophos feature without URI and content hash checks, but it won’t be as effective.
Note
The main challenge with malware detection with legacy antivirus technologies is that the actual malware can change rapidly, and often has mechanisms in it to alter itself on replication to avoid detection. Detecting these techniques with traditional malware engines is very difficult, particularly in network streams in real time. By leveraging the cloud to also provide some reputation analysis, the SRX can identify threats known to the Sophos database without trying to actually inspect the content and taking a large performance hit.
Implementing Sophos AV
In this section, we examine the various configuration options for enabling Sophos AV. We begin by looking at how to enable the default option, which doesn’t require any additional configuration tuning, followed by some options that you may want to tweak.
Configuring Sophos with a default profile
In this example, we configure a UTM policy to use Sophos AV with the default profile configuration for both HTTP and FTP (download and upload). This UTM policy will be applied to an outbound firewall rule called Client-Outbound that will inspect any outbound traffic from the Internet-Client address-set to the Internet on TCP port 80 (HTTP) and TCP port 21/20 (FTP).
{primary:node0}[edit]
root@SRX550-Node0# edit security utm

{primary:node0}[edit security utm]
root@SRX550-Node0# set utm-policy Basic-UTM anti-virus http-profile junos-sophos-av-defaults ftp upload-profile junos-sophos-av-default download-profile junos-sophos-av-defaults

{primary:node0}[edit security utm]
root@SRX550-Node0# show
utm-policy Basic-UTM {
    anti-virus {
        http-profile junos-sophos-av-defaults;
        ftp {
            upload-profile junos-sophos-av-defaults;
            download-profile junos-sophos-av-defaults;
        }
    }
}


{primary:node0}[edit security utm]
root@SRX550-Node0# top

{primary:node0}[edit]
root@SRX550-Node0# edit security policies from zone trust to-zone untrust policy Client-Outbound

{primary:node0}[edit security policies from-zone trust to-zone untrust policy Client-Outbound]
root@SRX550-Node0# set match source-address Internal-Clients destination-address any application [junos-http junos-ftp]

{primary:node0}[edit security policies from-zone trust to-zone untrust policy Client-Outbound]
root@SRX550-Node0# set then permit application-services utm-policy Basic-UTM

{primary:node0}[edit security policies from-zone trust to-zone untrust policy Client-Outbound]
root@SRX550-Node0# set then log session-close

{primary:node0}[edit security policies from-zone trust to-zone untrust policy Client-Outbound]
root@SRX550-Node0# show
match {
    source-address Internal-Clients;
    destination-address any;
    application [ junos-http junos-ftp ];
}
then {
    permit {
        application-services {
            utm-policy Basic-UTM;
        }
    }
    log {
        session-close;
    }
}
As you can see from the preceding example, we are leveraging the predefined Sophos AV profile.
Default profile configuration
You can view the configuration of the default profiles
next leveraging the hidden show groups
junos-defaults command in configuration mode. This shows
all hidden default configuration options that don’t appear in the
standard configuration with show
commands.
{primary:node0}[edit]
root@SRX550-Node0# show groups junos-defaults security utm feature-profile anti-virus

sophos-engine {
    pattern-update {
        url http://update.juniper-updates.net/SAV/;
        interval 1440;
    }
    profile junos-sophos-av-defaults {
        fallback-options {
            default log-and-permit;
            content-size log-and-permit;
            engine-not-ready log-and-permit;
            timeout log-and-permit;
            out-of-resources log-and-permit;
            too-many-requests log-and-permit;
        }
        scan-options {
            uri-check;
            content-size-limit 10000;
            timeout 180;
        }
        notification-options {
            virus-detection {
                type message;
                no-notify-mail-sender;
                custom-message "VIRUS WARNING";
            }
            fallback-block {
                type message;
                no-notify-mail-sender;
            }
        }
    }
Sophos AV feature profiles
For the most part, you will probably be able to leverage the standard Sophos AV profile when configuring antivirus, but your organizational security policies and user experience requirements might warrant a different configuration. In this section, we examine the various configuration options available for Sophos AV, then follow up with a bulk configuration of those options.
Fallback options allows you to define the expected behavior when the engine cannot function as intended. There are several options and for each you can select whether you want to drop the session, permit the session and log it as bypass, or just permit the session bypassing AV.
The content size exceeds the size that the AV engine can handle.
The default is the action that should be taken when a condition is reached not specified by the other fallback settings.
Engine-not-ready occurs when the system is booting, if there is an issue with the engine (e.g., restarting), or if there is an issue contacting the update server to get a definition file when the system is not already running.
Out of resources can occur if there is not enough memory to process the session or if the maximum sessions for UTM are active.
Under a timeout, the engine cannot contact the Sophos cloud server when it is configured to do so.
If there are too many outstanding requests, the engine cannot process them.
Notification options are the options that can be used when a virus is detected or fallback is triggered for blocking or nonblocking.
Virus Detected: What should the SRX do if a virus is detected? This is for email. You can send a message to the sender, as well as altering the message or subject.
Fallback-Block: You can notify the sender and send an email to the administrator to let them know the message has been blocked.
Fallback-non-Block: You can notify the sender as well as the administrator that the message has been bypassed and not inspected.
Scan-options are various options that can be configured when scanning content with Sophos, and this section allows you to define those.
Content Size Limit: You can define the maximum size of the inspected file before we would consider it to be too large per the Fallback-Options content size. This can be between 20 and 40,000 bytes (40 MB).
URI/NO-URL-Check: This option allows you to enable the URI check with Sophos rather than only relying on just payload inspection and not the reputation. Ideally, you should have this enabled so that you get much more security by leveraging reputation on top of just pattern matching.
Timeout: This is the timeout for how long it can inspect a file before considering it timed out.
Trickling allows the SRX to pass some traffic from the server to the client during inspection so that the client doesn’t timeout the session while the antivirus engine reassembles the content being passed to it. There is a value from 0 to 600 seconds for how long the SRX should trickle a session before timing it out.
SXL Retry/Timeouts define what happens when the Sophos engine does not get a response from the Sophos server, how long the SRX should wait, and how many times it should retry before considering the connection down.
Pattern Update allows you to define a custom URL and frequency. Normally this is set once per day, which is fine, because as you know, the main part of the inspection occurs in real time in the cloud so more frequent updates aren’t required. Normally you will not need to modify the URL unless specified by JTAC.
Configuring Sophos feature profile example
In this example, we configure a custom profile called Custom-Sophos-Profile, which alters the default content-size limits, and drops any session when the engine is out of resources or there are too many requests. This profile will then be applied to the UTM policy so that it will be active in our previous example.
{primary:node0}[edit]
root@SRX550-Node0# edit security utm feature-profile anti-virus sophos-engine profile Custom-Sophos-Profile
root@SRX550-Node0# set fallback-options content-size block default log-and-permit out-of-resources block too-many-requests block

{primary:node0}[edit security utm feature-profile anti-virus sophos-engine profile Custom-Sophos-Profile]
root@SRX550-Node0# set scan-options content-size-limit 20000

{primary:node0}[edit security utm feature-profile anti-virus sophos-engine profile Custom-Sophos-Profile]
root@SRX550-Node0# up 4

{primary:node0}[edit security utm]
root@SRX550-Node0# set utm-policy Basic-UTM anti-virus http-profile Custom-Sophos-Profile ftp download-profile Custom-Sophos-Profile upload-profile Custom-Sophos-Profile

{primary:node0}[edit security utm]
root@SRX550-Node0# show
feature-profile {
    anti-virus {
        sophos-engine {
            profile Custom-Sophos-Profile {
                fallback-options {
                    default log-and-permit;
                    content-size block;
                    out-of-resources block;
                    too-many-requests block;
                }
                scan-options {
                    content-size-limit 20000;
                }
            }
        }
    }
}
utm-policy Basic-UTM {
    anti-virus {
        http-profile Custom-Sophos-Profile;
        ftp {
            upload-profile Custom-Sophos-Profile;
            download-profile Custom-Sophos-Profile;
        }
    }
}
Kaspersky Full AV
Kaspersky Full AV has been offered on the SRX since Junos 9.6. It differs from Sophos because it relies entirely on built-in content inspection via pattern matching and some execution analysis and some file heuristics. Kaspersky doesn’t need to access the Internet other than to get the pattern updates from Kaspersky. In this section, we demonstrate how Kaspersky functions, and the configuration options available for this mode. Kaspersky is essentially the same as Sophos for notification options and trickling, so we won’t explore those items here, but instead focus on the fallback options and scan options, which have a few additional options that differ from Sophos.
Fallback options define the action that should be taken (block, log and permit, or just permit) when a condition is met as defined here.
Content Size: Defines what action to take when the content size is too large to inspect as defined by the scan options.
Corrupt File: Defines what action to take when the file being transmitted is corrupted and cannot be inspected.
Decompress Layer: Kaspersky can decompress payloads such as ZIP files to inspect the contents within. This setting defines what happens when the number of compressed layers exceeds the defined supported number.
Default: What default action to take if a condition not specified by other fallback options occurs.
Engine Not Ready: What action to take if the engine is not ready to scan the traffic.
Out of Resources: This defines what action to take when the SRX doesn’t have enough memory to inspect the payload.
Password File: What action to take when the file is password protected and cannot be inspected.
Timeout: Defines what happens when the scan timeout is reached.
Too Many Requests: What happens when the SRX has too many outstanding requests.
Scan options define the antivirus scanner configuration and what values should be enforced for various limits (as defined by the fallback options).
Content Size Limit: Like the Sophos limit, this defines how large of a file to inspect, from 20 B to 40 MB.
Decompress Layer Limit: Allows the SRX to scan up to eight levels of compression.
No/Intelligent Prescreening: This is a feature that allows the SRX to use some heuristics to attempt to determine if the content is suspicious before requiring full inspection, which has a much greater performance impact.
Scan-Extension: Defines what file extensions should be inspected by the SRX. There is a default file list called junos-default-extension.
Scan Mode: Allows you to define whether to always scan files or by the extension list only.
Timeout: Defines the scanning timeout.
Pattern update allows you to specify the URL, proxy settings (if applicable), and frequency information to download the new database.
Configuring Kaspersky with the default profile
In this example, we configure UTM to use Kaspersky as the antivirus engine using the default feature profile. This will be applied to the Basic-UTM policy that will be applied to the Client-Outbound firewall rule, which allows the UTM to inspect HTTP and FTP on ports TCP 80 and 21/20, respectively.
{primary:node0}[edit security utm]
root@SRX550-Node0# set utm-policy Basic-UTM anti-virus http-profile junos-av-defaults ftp download-profile junos-av-defaults upload-profile junos-av-defaults

{primary:node0}[edit security utm]
root@SRX550-Node0# show
utm-policy Basic-UTM {
    anti-virus {
        http-profile junos-av-defaults;
        ftp {
            upload-profile junos-av-defaults;
            download-profile junos-av-defaults;
        }
    }
}


{primary:node0}[edit security utm]
root@SRX550-Node0# top

{primary:node0}[edit]
root@SRX550-Node0# edit security policies from zone trust to-zone untrust policy Client-Outbound

{primary:node0}[edit security policies from-zone trust to-zone untrust policy Client-Outbound]
root@SRX550-Node0# set match source-address Internal-Clients destination-address any application [junos-http junos-ftp]

{primary:node0}[edit security policies from-zone trust to-zone untrust policy Client-Outbound]
root@SRX550-Node0# set then permit application-services utm-policy Basic-UTM

{primary:node0}[edit security policies from-zone trust to-zone untrust policy Client-Outbound]
root@SRX550-Node0# set then log session-close

{primary:node0}[edit security policies from-zone trust to-zone untrust policy Client-Outbound]
root@SRX550-Node0# show
match {
    source-address Internal-Clients;
    destination-address any;
    application [ junos-http junos-ftp ];
}
then {
    permit {
        application-services {
            utm-policy Basic-UTM;
        }
    }
    log {
        session-close;
    }
}
Default Kaspersky profile configuration
For your reference, here is the default Kaspersky Full AV configuration.
{primary:node0}[edit]
root@SRX550-Node0# show groups junos-defaults security utm feature-profile anti-virus
kaspersky-lab-engine {
    pattern-update {
        url http://update.juniper-updates.net/AV/SRX550/;
        interval 60;
    }
    profile junos-av-defaults {
        fallback-options {
            default log-and-permit;
            corrupt-file log-and-permit;
            password-file log-and-permit;
            decompress-layer log-and-permit;
            content-size log-and-permit;
            engine-not-ready log-and-permit;
            timeout log-and-permit;
            out-of-resources log-and-permit;
            too-many-requests log-and-permit;
        }
        scan-options {
            intelligent-prescreening;
            scan-mode all;
            content-size-limit 10000;
            timeout 180;
            decompress-layer-limit 2;
        }
        notification-options {
            virus-detection {
                type message;
                no-notify-mail-sender;
                custom-message "VIRUS WARNING";
            }
            fallback-block {
                type message;
                no-notify-mail-sender;
            }
        }
    }
}
Configuring Kaspersky AV scanning and fallback options
In this section, we configure the Kaspersky AV engine to drop antivirus files when the decompression limit is reached or corrupt or password-protected files are detected, but all other conditions should be permitted with logging. The decompression limit should be set to 2, scan all extensions, and content length to 20 MB.
{primary:node0}[edit]
root@SRX550-Node0# edit security utm feature-profile anti-virus kaspersky-lab-engine profile Custom-Kaspersky-Profile

{primary:node0}[edit security utm feature-profile anti-virus kaspersky-lab-engin                                                                                                                               e profile Custom-Kaspersky-Profile]
root@SRX550-Node0# set scan-options decompress-layer-limit 2 content-size-limit 20 scan-mode all

root@SRX550-Node0# set fallback-options default log-and-permit decompress-layer block corrupt-file block password-file block

{primary:node0}[edit security utm feature-profile anti-virus kaspersky-lab-engin                                                                                                                               e profile Custom-Kaspersky-Profile]
root@SRX550-Node0# show
fallback-options {
    default log-and-permit;
    corrupt-file block;
    password-file block;
    decompress-layer block;
}
scan-options {
    scan-mode all;
    content-size-limit 20;
    decompress-layer-limit 2;
}
Express AV
The SRX also offers a third scanning option called the Express AV engine. This is actually a version provided by Kaspersky that has a stripped-down function set to detect malware in a lightweight model. It isn’t as good as the full Kaspersky or Sophos but is lighter from a performance perspective.
In this section, we just make a simple example of using the Express AV profile and apply it to our configuration profile as is for HTTP and FTP upload/download for our Client-Outbound rule. Express AV has the same profile options as Sophos AV, so you can reference that example for configuring the Sophos options.
 {primary:node0}[edit security utm]
root@SRX550-Node0# set utm-policy Basic-UTM anti-virus http-profile junos-eav-defaults ftp download-profile junos-eav-defaults upload-profile junos-eav-defaults

{primary:node0}[edit security utm]
root@SRX550-Node0# show
utm-policy Basic-UTM {
    anti-virus {
        http-profile junos-eav-defaults;
        ftp {
            upload-profile junos-eav-defaults;
            download-profile junos-eav-defaults;
        }
    }
}

{primary:node0}[edit security utm]
root@SRX550-Node0# top

{primary:node0}[edit]
root@SRX550-Node0# edit security policies from zone trust to-zone untrust policy Client-Outbound

{primary:node0}[edit security policies from-zone trust to-zone untrust policy Client-Outbound]
root@SRX550-Node0# set match source-address Internal-Clients destination-address any application [junos-http junos-ftp]

{primary:node0}[edit security policies from-zone trust to-zone untrust policy Client-Outbound]
root@SRX550-Node0# set then permit application-services utm-policy Basic-UTM

{primary:node0}[edit security policies from-zone trust to-zone untrust policy Client-Outbound]
root@SRX550-Node0# set then log session-close

{primary:node0}[edit security policies from-zone trust to-zone untrust policy Client-Outbound]
root@SRX550-Node0# show
match {
    source-address Internal-Clients;
    destination-address any;
    application [ junos-http junos-ftp ];
}
then {
    permit {
        application-services {
            utm-policy Basic-UTM;
        }
    }
    log {
        session-close;
    }
}
Default Express AV profile
Here is a copy of the default express AV configuration for your reference if you are using this feature.
{primary:node0}[edit]
root@SRX550-Node0# show groups junos-defaults security utm feature-profile anti-virus
juniper-express-engine {
    pattern-update {
        url http://update.juniper-updates.net/EAV/SRX550/;
        interval 1440;
    }
    profile junos-eav-defaults {
        fallback-options {
            default log-and-permit;
            content-size log-and-permit;
            engine-not-ready log-and-permit;
            timeout log-and-permit;
            out-of-resources log-and-permit;
            too-many-requests log-and-permit;
        }
        scan-options {
            intelligent-prescreening;
            content-size-limit 10000;
            timeout 180;
        }
        notification-options {
            virus-detection {
                type message;
                no-notify-mail-sender;
                custom-message "VIRUS WARNING";
            }
            fallback-block {
                type message;
                no-notify-mail-sender;
            }
        }
    }
}
}
Which AV to Choose?
Now that we’ve gone through all of the available AV options, you’re probably asking yourself which one is right for you. We can’t give the same answer for all cases, so here are some guidelines for and against each solution.
Sophos
Pros: Very good detection, particularly with the URI checks. Medium in terms of performance impact of the three solutions, database is unlimited because it leverages the Sophos cloud. Can detect obfuscated malware.
Cons: Requires an active Internet connection to query Sophos cloud for URI checks, although this can be disabled.
Other: Based in the UK.
Kaspersky Full
Pros: Full antivirus capabilities built in, ability to inspect compressed content, good detection capabilities for content loaded on device, doesn’t require URI information to be sent, but does require Internet connection for downloads.
Cons: No reputation feed for URI, most impactful from a performance perspective, database limited by device memory, limited detection for obfuscated attacks if not known by patterns or heuristics.
Other: Based in Russia.
Kaspersky Express AV
URL Filtering
The URL filtering feature set in the SRX provides two desirable functions for network administrators. The first is obvious, which is to be able to control what web resources a user can access based on category or specific whitelists or blacklists, and the second is that it offers an additional layer of security by preventing users going to potentially malicious sites (if configured to do so). In this section, we examine the URL filtering feature set, the various flavors offered, and how they are implemented.
Note
At the time of writing this book, URL filtering on the high-end SRX was in beta. The high-end SRX will only support Websense Enhanced URL filtering, which is the most effective. Alternatively, you can use filter-based forwarding to redirect traffic to other third-party servers.
URL filtering flavors
There are essentially four different flavors of URL filtering on the SRX.
- Local
Allows the administrator to define a custom whitelist or blacklist of URLs that are to be enforced by the SRX. This feature doesn’t require a license because the administrator is responsible for defining his own list.
- Websense Redirect
This is useful when you have an existing Websense standalone server and you want the firewall to redirect the HTTP requests through the Websense server rather than out to the Internet for policy validation. There is a special protocol that the SRX understands that can redirect to the Websense server. It doesn’t redirect all of the traffic, just the URL to which the Websense server will respond with the classification. This classification is then used to determine what action should be taken based on the URL filtering policy on the SRX. This feature does not require a license on the SRX, but does require that you have a standalone Websense server that is licensed with Websense accordingly.
- Surfcontrol (Websense)
This is called Surfcontrol because that was the original name before Websense purchased Surfcontrol. This option leverages the Websense cloud to send requests encoded in UDP port 9020 from the SRX to get the classification of the URL. This classification is then used to determine what action should be taken based on the URL filtering policy on the SRX.
- Websense Enhanced
This is a new feature as of Junos 11.4r1 that leverages the Websense cloud in a similar way as the older Surfcontrol option, but also offers additional categorization and a reputation-based feed that can identify malicious sites and provide a score that can be used to leverage policy. Finally, Websense Enhanced can also force well-known search engines like Google only to use Safe Searches, which won’t return results for known malicious sites.
Note
Just like antivirus, you can only have one URL filtering solution active at a time, not multiple types (although you can use custom URL blacklists and whitelists). You must apply the specific license for Surfcontrol or Websense Enhanced, including per cluster member.
Configuring the URL filtering with default profiles
You can leverage the default profiles in the device to simply activate the features without creating a full customized option. In this example, we show how to enable Websense Enhanced (although the same method is used for enabling any of the profiles). This profile is then applied to the Client-Outbound rule.
{primary:node0}[edit security utm]
root@SRX550-Node0# set utm-policy Basic-UTM web-filtering http-profile ?
Possible completions:
  <http-profile>       Web-filtering HTTP profile
  junos-wf-cpa-default  [security utm feature-profile web-filtering surf-control-integrated profile]
  junos-wf-enhanced-default  [security utm feature-profile web-filtering juniper-enhanced profile]
  junos-wf-local-default  [security utm feature-profile web-filtering juniper-local profile]
  junos-wf-websense-default  [security utm feature-profile web-filtering websense-redirect profile]
{primary:node0}[edit security utm]
root@SRX550-Node0# set utm-policy Basic-UTM web-filtering http-profile junos-wf-enhanced-default

{primary:node0}[edit security utm]
root@SRX550-Node0# show
utm-policy Basic-UTM {
    web-filtering {
        http-profile junos-wf-enhanced-default;
    }
}

{primary:node0}[edit security utm]
root@SRX550-Node0# top

{primary:node0}[edit]
root@SRX550-Node0# edit security policies from zone trust to-zone untrust policy Client-Outbound

{primary:node0}[edit security policies from-zone trust to-zone untrust policy Client-Outbound]
root@SRX550-Node0# set match source-address Internal-Clients destination-address any application [junos-http junos-ftp]

{primary:node0}[edit security policies from-zone trust to-zone untrust policy Client-Outbound]
root@SRX550-Node0# set then permit application-services utm-policy Basic-UTM

{primary:node0}[edit security policies from-zone trust to-zone untrust policy Client-Outbound]
root@SRX550-Node0# set then log session-close

{primary:node0}[edit security policies from-zone trust to-zone untrust policy Client-Outbound]
root@SRX550-Node0# show
match {
    source-address Internal-Clients;
    destination-address any;
    application [ junos-http junos-ftp ];
}
then {
    permit {
        application-services {
            utm-policy Basic-UTM;
        }
    }
    log {
        session-close;
    }
}
Websense Enhanced filtering
Starting in Junos 11.4r1, the branch SRX supports the Websense Enhanced web filtering. The enhanced web filtering adds some additional technologies on top of the previous generation of Surfcontrol Web filtering. First, the category list is greatly expanded so it is more granular. Next, HTTPS is supported by the destination IP for lookups. Websense has integrated a reputation score for the website that is used to determine the risk of the site to deliver malware to clients. Finally, this also has the ability to turn on Safe Searching for search engines for HTTP searches (see Figure 14-3).
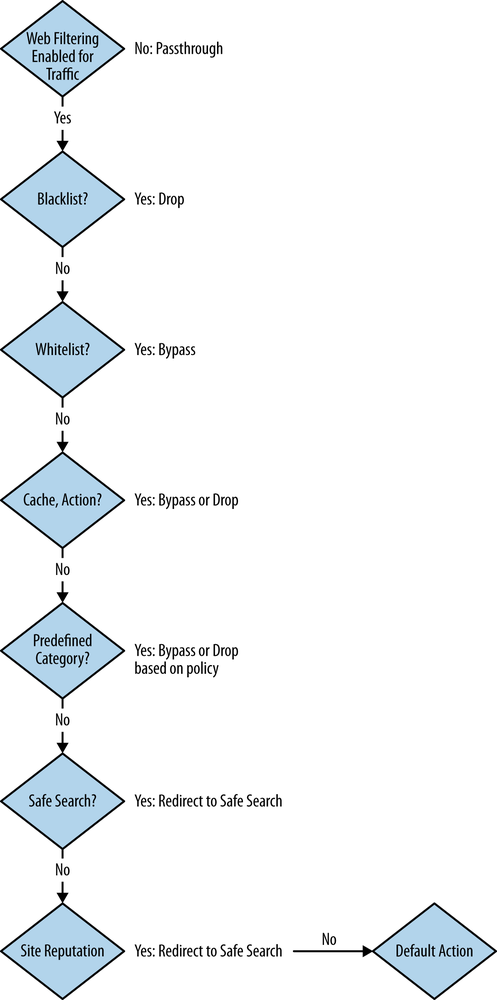
The Enhanced Web filtering functions in a similar way to the Surfcontrol Integrated in that it relies on the Websense Threatseeker cloud to perform the lookup and provide a response. The advantage here is that the device is not limited by the size of the available memory on the device, but instead can leverage the full Websense Threatseeker database which is updated in real time. Additionally, the full traffic does not need to be sent, just the header lookup. This feature also leverages a cache so that it does not need to perform a check every time the resource is looked up, but only if it is not in a blacklist or whitelist or in the cache. Most of the components for this feature are the same as the Surfcontrol Integrated, besides additional categories, Safe Search, and the reputation scores. Here is a breakdown of the features in the Websense Enhanced engine:
- Cache
The cache allows you to define how large the cache should be and how long to maintain entries in the cache before triggering another lookup.
- Server
This allows you to define a different server to use in the Threatseeker cloud. In normal circumstances you will not need to use this option.
- Profile
The profile defines the device configuration for this feature. There are several options that are available to configure, as shown here:
- Block Message
This allows you to define an external URL to redirect users to when they are in violation of a policy rather than having them redirect to the internal UTM page on the SRX. The advantage here is that you are not restricted on what you can do on the external server, which gives you much better flexibility to provide a better user experience.
- Category
This defines the category to action mapping (e.g., Gambling should be blocked).
- Custom Block Message
Allows you to specify a custom block message to the clients.
- Default
This is the action that should be taken when the URL doesn’t have a category.
- No-Safe-Search
Safe Search is on by default, and this turns it off for the profile.
- Site Reputation Action
This provides a mapping between the site’s reputation and the action (e.g., Fairly-Safe should be blocked).
- Timeout
This is the value that should be applied to determine if the request to Websense has been timed out.
- Fallback Settings
Provides the ability to define what action should be taken for any unknown condition (default), too many requests, server connectivity, and timeout values.
Configuring Websense Enhanced default profile
In this example, we simply enable the Juniper Websense Default Enhanced profile to our Basic-UTM profile, which is applied to the Client-Outbound firewall rule.
{primary:node0}[edit security utm]
root@SRX550-Node0# set utm-policy Basic-UTM web-filtering http-profile junos-wf-enhanced-default

utm-policy Basic-UTM {
    web-filtering {
        http-profile junos-wf-enhanced-default;
    }
}
{primary:node0}[edit security utm]
root@SRX550-Node0# top

{primary:node0}[edit]
root@SRX550-Node0# edit security policies from zone trust to-zone untrust policy Client-Outbound

{primary:node0}[edit security policies from-zone trust to-zone untrust policy Client-Outbound]
root@SRX550-Node0# set match source-address Internal-Clients destination-address any application [junos-http junos-ftp]

{primary:node0}[edit security policies from-zone trust to-zone untrust policy Client-Outbound]
root@SRX550-Node0# set then permit application-services utm-policy Basic-UTM

{primary:node0}[edit security policies from-zone trust to-zone untrust policy Client-Outbound]
root@SRX550-Node0# set then log session-close

{primary:node0}[edit security policies from-zone trust to-zone untrust policy Client-Outbound]
root@SRX550-Node0# show
match {
    source-address Internal-Clients;
    destination-address any;
    application [ junos-http junos-ftp ];
}
then {
    permit {
        application-services {
            utm-policy Basic-UTM;
        }
    }
    log {
        session-close;
    }
}
Default Websense Enhanced profile
This output is the default configuration for the Websense Enhanced predefined profile.
{primary:node0}[edit]
root@SRX550-Node0# show groups junos-defaults security utm web-filtering
        juniper-enhanced {
            server {
                host rp.cloud.threatseeker.com;
                port 80;
            }
            profile junos-wf-enhanced-default {
                category {
                    Enhanced_Adult_Material {
                        action block;
                    }
                    Enhanced_Gambling {
                        action block;
                    }
                    Enhanced_Games {
                        action block;
                    }
                    Enhanced_Illegal_or_Questionable {
                        action block;
                    }
                    Enhanced_Tasteless {
                        action block;
                    }
                    Enhanced_Violence {
                        action block;
                    }
                    Enhanced_Weapons {
                        action block;
                    }
                    Enhanced_Militancy_and_Extremist {
                        action block;
                    }
                    Enhanced_Racism_and_Hate {
                        action block;
                    }
                    Enhanced_Advertisements {
                        action block;
                    }
                    Enhanced_Nudity {
                        action block;
                    }
                    Enhanced_Adult_Content {
                        action block;
                    }
                    Enhanced_Sex {
                        action block;
                    }
                    Enhanced_Hacking {
                        action block;
                    }
                    Enhanced_Personals_and_Dating {
                        action block;
                    }
                    Enhanced_Alcohol_and_Tobacco {
                        action block;
                    }
                    Enhanced_Abused_Drugs {
                        action block;
                    }
                    Enhanced_Marijuana {
                        action block;
                    }
                    Enhanced_Malicious_Web_Sites {
                        action block;
                    }
                    Enhanced_Spyware {
                        action block;
                    }
                    Enhanced_Phishing_and_Other_Frauds {
                        action block;
                    }
                    Enhanced_Keyloggers {
                        action block;
                    }
                    Enhanced_Emerging_Exploits {
                        action block;
                    }
                    Enhanced_Potentially_Damaging_Content {
                        action block;
                    }
                    Enhanced_Malicious_Embedded_Link {
                        action block;
                    }
                    Enhanced_Malicious_Embedded_iFrame {
                        action block;
                    }
                    Enhanced_Suspicious_Embedded_Link {
                        action block;
                    }
                }
                default log-and-permit;
                custom-block-message "Juniper Web Filtering has been set to block this site.";
                fallback-settings {
                    default log-and-permit;
                    server-connectivity log-and-permit;
                    timeout log-and-permit;
                    too-many-requests log-and-permit;
                }
            }
        }
    }
Configuring a custom Websense Enhanced profile
In this example, we create our own feature profile for the Websense Enhanced options to provide greater granularity for our profile. Our example is configured as follows:
Create our own feature profile called Websense-Enhanced.
It should have a cache timeout of 300 minutes.
Block Enhanced_Tasteless and Enhanced_Political_Organizations.
Set the default to permit and the timeout to four seconds.
Configure very safe reputations as accepted, and all others to block.
Block all fallback settings.
{primary:node0}[edit security utm]
root@SRX550-Node0# set feature-profile web-filtering juniper-enhanced profile Websense-Enhanced category Enhanced_Tasteless action block

{primary:node0}[edit security utm]
root@SRX550-Node0# set feature-profile Websense-Enhanced site-reputation-action fairly-safe block harmful block moderately-safe block suspicious block very-safe permit

{primary:node0}[edit security utm]
root@SRX550-Node0# set profile Websense-Enhanced default permit timeout 4 fallback-settings default block server-connectivity block timeout block too-many-requests block

{primary:node0}[edit security utm]
root@SRX550-Node0# set feature-profile web-filtering type juniper-enhanced


{primary:node0}[edit security utm]
root@SRX550-Node0# set feature-profile web-filtering juniper-enhanced cache timeout 300

{primary:node0}[edit security utm]
root@SRX550-Node0# set utm-policy Basic-UTM web-filtering http-profile Websense-Enhanced

{primary:node0}[edit security utm]
root@SRX550-Node0# show
feature-profile {
    web-filtering {
        type juniper-enhanced;
        juniper-enhanced {
            cache {
                timeout 300;
            }
            profile Websense-Enhanced {
                category {
                    Enhanced_Political_Organizations {
                        action block;
                    }
                    Enhanced_Tasteless {
                        action block;
                    }
                }
                site-reputation-action {
                    very-safe permit;
                    moderately-safe block;
                    fairly-safe block;
                    suspicious block;
                    harmful block;
                }
                default permit;
                fallback-settings {
                    default block;
                    server-connectivity block;
                    timeout block;
                    too-many-requests block;
                }
                timeout 4;
            }
        }
    }
}
utm-policy Basic-UTM {
    web-filtering {
        http-profile Websense-Enhanced;
    }
}
Surfcontrol/Websense Integrated URL filtering
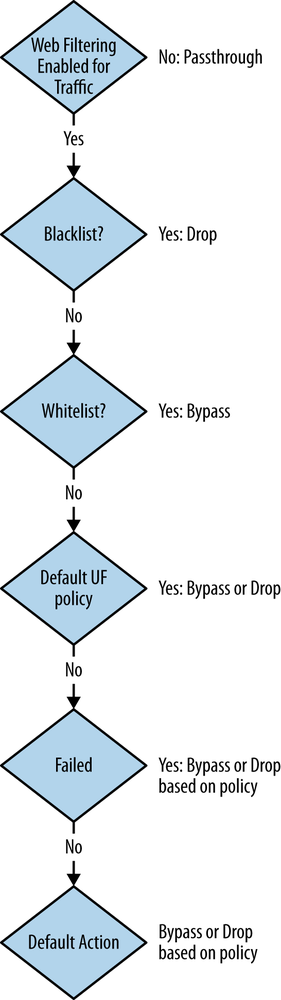
The Surfcontrol/Websense “Integrated” model URL filtering solution leverages the Surfcontrol/Websense cloud to perform the local lookups on the SRX. Because the URL database has entries in the billions, there is not a good way to store this entire database on the SRX itself, particularly on the branch SRX platforms, which are more limited with memory. Instead, the SRX performs a lookup by sending the request to the Websense cloud with the URL in the request and awaits an answer back on the categorization of the website. This categorization is then used in the policy lookup on the SRX itself to determine what action should be taken for that category. For this model, there is support for both predefined URL filtering profiles, as well as ones that you can define manually for each category to action mapping.
In this section, we discuss the various options for configuring Integrated Surfcontrol/ Websense and sample configurations. The following are components under the Surfcontrol/ Websense integrated feature profile:
- Cache
The SRX leverages a cache of URLs for some period of time so that the next time the resource is requested it doesn’t need to go to the Surfcontrol/Websense server for a lookup. Under this option you can define how large the cache is, along with how long the timeout should be for a cached entry.
- Server
This allows you to define a nondefault Surfcontrol server for this lookup. This is not usually necessary unless you’re doing some sort of troubleshooting or beta testing. You would be instructed to connect to this specific server.
- Profile
The profile defines the bulk of the engine configuration that you would be concerned with.
- Categories
There are numerous categories, each of which can be associated with an action to permit or block the request. The default list was shown earlier in this chapter. Remember that there is a difference between the Surfcontrol and the Websense Enhanced list, so your categories will be specific to the feature you’re using. If you are creating your own profiles, then you would need to define the categories and actions that should be taken.
- Custom Block Message
This is the message that you want to appear for the user if they are blocked.
- Default
This is the action that should be taken for an undefined URL that doesn’t have an action.
- Timeout
This is how long the SRX should wait before considering the Surfcontrol server to be unavailable.
- Fallback options
The fallback options define what action should be taken when a defined condition occurs:
- Default
What action to take on all undefined issues.
- Timeout
What action to take if the request times out.
- Server Connectivity
What action to take if the server connection is considered down (slightly different than timeout, which is for an individual request).
- Too Many Requests
The action to take when SRX has too many requests queued up.
Configuring Surfcontrol Integrated with default profile
This example is very straightforward. We simply enable the Surfcontrol default profile with our Basic-UTM profile. This leverages the default options, and is supported because we don’t need to specify any server information because it is configured by default.
{primary:node0}[edit security utm]
root@SRX550-Node0# set utm-policy Basic-UTM web-filtering http-profile junos-wf-cpa-default

{primary:node0}[edit security utm]
root@SRX550-Node0# show
utm-policy Basic-UTM {
    web-filtering {
        http-profile junos-wf-cpa-default;
    }
}

{primary:node0}[edit security utm]
root@SRX550-Node0# top

{primary:node0}[edit]
root@SRX550-Node0# edit security policies from zone trust to-zone untrust policy Client-Outbound

{primary:node0}[edit security policies from-zone trust to-zone untrust policy Client-Outbound]
root@SRX550-Node0# set match source-address Internal-Clients destination-address any application [junos-http junos-ftp]

{primary:node0}[edit security policies from-zone trust to-zone untrust policy Client-Outbound]
root@SRX550-Node0# set then permit application-services utm-policy Basic-UTM

{primary:node0}[edit security policies from-zone trust to-zone untrust policy Client-Outbound]
root@SRX550-Node0# set then log session-close

{primary:node0}[edit security policies from-zone trust to-zone untrust policy Client-Outbound]
root@SRX550-Node0# show
match {
    source-address Internal-Clients;
    destination-address any;
    application [ junos-http junos-ftp ];
}
then {
    permit {
        application-services {
            utm-policy Basic-UTM;
        }
    }
    log {
        session-close;
    }
}
Default Surfcontrol/Websense profile configuration
{primary:node0}[edit]
root@SRX550-Node0# show groups junos-defaults security utm web-filtering
web-filtering {
        surf-control-integrated {
            server {
                host cpa.surfcpa.com;
                port 9020;
            }
            profile junos-wf-cpa-default {
                category {
                    Adult_Sexually_Explicit {
                        action block;
                    }
                    Advertisements {
                        action block;
                    }
                    Arts_Entertainment {
                        action permit;
                    }
                    Chat {
                        action permit;
                    }
                    Computing_Internet {
                        action permit;
                    }
                    Criminal_Skills {
                        action block;
                    }
                    Drugs_Alcohol_Tobacco {
                        action block;
                    }
                    Education {
                        action permit;
                    }
                    Finance_Investment {
                        action permit;
                    }
                    Food_Drink {
                        action permit;
                    }
                    Gambling {
                        action block;
                    }
                    Games {
                        action block;
                    }
                    Glamour_Intimate_Apparel {
                        action permit;
                    }
                    Government_Politics {
                        action permit;
                    }
                    Hacking {
                        action block;
                    }
                    Hate_Speech {
                        action block;
                    }
                    Health_Medicine {
                        action permit;
                    }
                    Hobbies_Recreation {
                        action permit;
                    }
                    Hosting_Sites {
                        action permit;
                    }
                    Job_Search_Career_Development {
                        action permit;
                    }
                    Kids_Sites {
                        action permit;
                    }
                    Lifestyle_Culture {
                        action permit;
                    }
                    Motor_Vehicles {
                        action permit;
                    }
                    News {
                        action permit;
                    }
                    Personals_Dating {
                        action block;
                    }
                    Photo_Searches {
                        action permit;
                    }
                    Real_Estate {
                        action permit;
                    }
                    Reference {
                        action permit;
                    }
                    Religion {
                        action permit;
                    }
                    Remote_Proxies {
                        action block;
                    }
                    Sex_Education {
                        action block;
                    }
                    Search_Engines {
                        action permit;
                    }
                    Shopping {
                        action permit;
                    }
                    Sports {
                        action permit;
                    }
                    Streaming_Media {
                        action permit;
                    }
                    Travel {
                        action permit;
                    }
                    Usenet_News {
                        action permit;
                    }
                    Violence {
                        action block;
                    }
                    Weapons {
                        action block;
                    }
                    Web_based_Email {
                        action permit;
                    }
                }
                default log-and-permit;
                custom-block-message "Juniper Web Filtering has been set to block this site.";
                fallback-settings {
                    default log-and-permit;
                    server-connectivity log-and-permit;
                    timeout log-and-permit;
                    too-many-requests log-and-permit;
                }
            }
        }
}
Configuring Surfcontrol/Websense Integrated options
In this example, we configure an example using some nondefault settings for Websense/Surfcontrol to alter the behavior of the URL filter as follows:
Create a profile called Block-Hacking that blocks access to Adult Sexually Explicit and Remote proxies.
The SRX should fail to open if it loses connection to the server or a request times out, but drop traffic when too many requests exist.
Set the cache to 120-minute timeouts.
Apply it to Basic-UTM policy.
{primary:node0}[edit security utm]
root@SRX550-Node0# set feature-profile web-filtering surf-control-integrated profile Integrated-Websense category Audult_Sexually_Explicit action block

{primary:node0}[edit security utm]
root@SRX550-Node0# set feature-profile web-filtering surf-control-integrated profile Integrated-Websense category Remote_Proxies action block

{primary:node0}[edit security utm]
root@SRX550-Node0# set feature-profile web-filtering type surf-control-integrated

root@SRX550-Node0# set feature-profile web-filtering surf-control-integrated cache timeout 120

root@SRX550-Node0# set feature-profile web-filtering surf-control-integrated profile Integrated-Websense default permit

{primary:node0}[edit security utm]
root@SRX550-Node0# set feature-profile web-filtering surf-control-integrated profile Integrated-Websense fallback-settings default log-and-permit

{primary:node0}[edit security utm]
root@SRX550-Node0# set feature-profile web-filtering surf-control-integrated profile Integrated-Websense fallback-settings too-many-requests block

{primary:node0}[edit security utm]
root@SRX550-Node0# set utm-policy Basic-UTM web-filtering http-profile Integrated-Websense

{primary:node0}[edit security utm]
root@SRX550-Node0# show
feature-profile {
    web-filtering {
        type surf-control-integrated;
        surf-control-integrated {
            cache {
                timeout 120;
            }
            profile Integrated-Websense {
                category {
                    Audult_Sexually_Explicit {
                        action block;
                    }
                    Remote_Proxies {
                        action block;
                    }
                }
                default permit;
                fallback-settings {
                    default log-and-permit;
                    too-many-requests block;
                }
            }
        }
    }
}
utm-policy Basic-UTM {
    web-filtering {
        http-profile Integrated-Websense;
    }
}
Websense Redirect
Websense Redirect is used if you have a standalone Websense server that you want to perform the URL check with rather than with some integrated form of URL authentication. The following configurations can be set on the SRX for configuring Websense Redirect. Note that you have to specify a server profile for Websense or at least the server attributes because the default profile won’t know what server to send the traffic to.
- Type
This will always be set to Websense Redirect using this mode.
- Profile
This is the profile configuration for Websense Redirect.
- Account
The account name that is used on the server to authenticate the request.
- Custom Block Message
This is a block message that you can define on the SRX to display when the user is in violation of the policy.
- Server
Specifies the IP and port of the Websense server to contact.
- Sockets
There can be multiple connections to a single Websense standalone server if you have multiple firewalls doing redirects to it. Use a different socket number if this is the case (1-8).
- Timeout
How long to wait until you consider the request timed out.
- Fallback settings
These are the fallback settings for the user traffic that are available if there is an issue with communicating with the Websense server:
- Default
This is the default action that should be taken when a condition occurs that is not specified.
- Server Connectivity
If there is an issue connecting to the Websense server, take this action.
- Timeout
What action to take if the server doesn’t respond to a request in a certain time period.
- Too Many Requests
This is the action that should be taken if the FW has too many open requests.
Configuring Websense Redirect
In this example, we configure Websense Redirect to perform the following actions:
Redirect to server 192.168.1.150 on port 9020, Socket 1.
Use Account AC.
Set the Custom Block Message to “Access is Restricted”.
Set the Fallback options to Default, server connectivity, and timeout to log and permit, too many requests to block.
Apply this Websense Redirect profile to the Basic-UTM policy.
{primary:node0}[edit security utm]
root@SRX550-Node0# set feature-profile web-filtering websense-redirect profile WS-Redirect account AC custom-block-message "Access is Restricted" server host 192.168.1.150 port 9020 socket 1


root@SRX550-Node0# set feature-profile web-filtering websense-redirect profile WS-Redirect fallback-settings default log-and-permit server-connectivity log-and-permit timeout log-and-permit too-many-requests block


{primary:node0}[edit security utm]
root@SRX550-Node0# set feature-profile web-filtering type websense-redirect

{primary:node0}[edit security utm]
root@SRX550-Node0# set utm-policy Basic-UTM web-filtering http-profile WS-Redirect


{primary:node0}[edit security utm]
root@SRX550-Node0# show
feature-profile {
    web-filtering {
        websense-redirect {
            profile WS-Redirect {
                server {
                    host 192.168.1.150;
                    port 9020;
                }
                custom-block-message "Access is Restricted";
                fallback-settings {
                    default log-and-permit;
                    server-connectivity log-and-permit;
                    timeout log-and-permit;
                    too-many-requests block;
                }
                account AC;
            }
        }
    }
}


feature-profile {
    web-filtering {
        type websense-redirect;
        websense-redirect {
            profile WS-Redirect {
                server {
                    host 192.168.1.150;
                    port 9020;
                }
                custom-block-message "Access is Restricted";
                fallback-settings {
                    default log-and-permit;
                    server-connectivity log-and-permit;
                    timeout log-and-permit;
                    too-many-requests block;
                }
                account AC;
            }
        }
    }
}
utm-policy Basic-UTM {
    web-filtering {
        http-profile WS-Redirect;
    }
}
Default Websense Redirect profile
This output is the default configuration for the predefined Websense Redirect profile.
{primary:node0}[edit]
root@SRX550-Node0# show groups junos-defaults security utm web-filtering
        websense-redirect {
            profile junos-wf-websense-default {
                custom-block-message "Juniper Web Filtering has been set to block this site.";
                fallback-settings {
                    default log-and-permit;
                    server-connectivity log-and-permit;
                    timeout log-and-permit;
                    too-many-requests log-and-permit;
                }
            }
        }
Default local URL filtering profile
The default configuration for the predefined local URL profile is shown here.
{primary:node0}[edit]
root@SRX550-Node0# show groups junos-defaults security utm web-filtering
        juniper-local {
            profile junos-wf-local-default {
                custom-block-message "Juniper Web Filtering has been set to block this site.";
                fallback-settings {
                    default log-and-permit;
                    server-connectivity log-and-permit;
                    timeout log-and-permit;
                    too-many-requests log-and-permit;
                }
            }
    }
URL Custom URLs, blacklists, whitelists, and categories
To properly leverage Juniper Local filtering, you must define some blacklist and whitelist content that can be applied to the profile. You are only allowed to use one blacklist and one whitelist at a time, but it gives you enough flexibility to set up the system as you see fit. In this section, we examine creating the individual components which are to be leveraged for Local URL filtering, as shown in Figure 14-4.
Custom URL patterns
Before you can create a category that is applied to a profile, you must define the URL pattern itself. Juniper allows you to use the * and ? regex wildcards. * means to match any characters before or after a character until the next specified value, and ? means to match 0 or one instance of any character. We show a few examples here.
Create a pattern that matches any subdomain for abc.com on HTTP.
Create a pattern that matches any top-layer domain suffix for www.abc on HTTP.
Create a pattern that matches an IP address 65.27.183.45 on HTTP.
Create a pattern that only looks for two-character top-layer domain names for www.abc on HTTP.
{primary:node0}[edit]
root@SRX550-Node0# edit security utm custom-objects


{primary:node0}[edit security utm custom-objects]
root@SRX550-Node0# set url-pattern Any-ABC-Domain value "http://*.abc.com"

{primary:node0}[edit security utm custom-objects]
root@SRX550-Node0# set url-pattern Any-ABC-Suffix value "http://www.abc.*"

{primary:node0}[edit security utm custom-objects]
root@SRX550-Node0# set url-pattern Specific-IP value "http://65.27.183.45"

{primary:node0}[edit security utm custom-objects]
root@SRX550-Node0# set url-pattern Two-TLD value "http://www.abc.??"

{primary:node0}[edit security utm custom-objects]
root@SRX550-Node0# show
url-pattern {
    Any-ABC-Domain {
        value http://*.abc.com;
    }
    Any-ABC-Suffix {
        value http://www.abc.*;
    }
    Specific-IP {
        value http://65.27.183.45;
    }
    Two-TLD {
        value "http://www.abc.??";
    }
}
Note
It is important to remember that the local URL feature does exactly what it says by matching the patterns in the host or URL field. If a user can talk to a URL via IP address, it could potentially bypass the engine, so be sure to specify by IP address as well if the server will accept the IP address as the header host field.
Custom URL category
Once you have defined a custom URL pattern, the next step is to specify a custom category for it. We make two categories, one called FQDN and one called IP-Address. The IP address example is in the IP-Address category, and the other three FQDN-based patterns will be in the FQDN category.
{primary:node0}[edit security utm custom-objects]
root@SRX550-Node0# set custom-url-category FQDN value [ Any-ABC-Domain Any-ABC-Suffix Two-TLD ]

{primary:node0}[edit security utm custom-objects]
root@SRX550-Node0# set custom-url-category IP-Address value Specific-IP

{primary:node0}[edit security utm custom-objects]
root@SRX550-Node0# show
url-pattern {
    Any-ABC-Domain {
        value http://*.abc.com;
    }
    Any-ABC-Suffix {
        value http://www.abc.*;
    }
    Specific-IP {
        value http://65.27.183.45;
    }
    Two-TLD {
        value "http://www.abc.??";
    }
}
custom-url-category {
    FQDN {
        value [ Any-ABC-Domain Any-ABC-Suffix Two-TLD ];
    }
    IP-Address {
        value Specific-IP;
    }
}
URL filtering profiles
The default profiles can get you up and running quickly, but you might want to create your own profile and options. In this example, we apply the category to a whitelist, which is applied to the juniper-local profile.
{primary:node0}[edit security utm]
root@SRX550-Node0# set feature-profile web-filtering type juniper-local


{primary:node0}[edit security utm]
root@SRX550-Node0# set feature-profile web-filtering type juniper-local url-whitelist Specific-IP

{primary:node0}[edit security utm]
root@SRX550-Node0# set feature-profile web-filtering type juniper-local url-blacklist FQDN

{primary:node0}[edit security utm]
root@SRX550-Node0# show
custom-objects {
    url-pattern {
        Any-ABC-Domain {
            value http://*.abc.com;
        }
        Any-ABC-Suffix {
            value http://www.abc.*;
        }
        Specific-IP {
            value http://65.27.183.45;
        }
        Two-TLD {
            value "http://www.abc.??";
        }
    }
    custom-url-category {
        FQDN {
            value [ Any-ABC-Domain Any-ABC-Suffix Two-TLD ];
        }
        IP-Address {
            value Specific-IP;
        }
    }
}
feature-profile {
    web-filtering {
        url-whitelist FQDN;
        url-blacklist Specific-IP;
        type juniper-local;
    }
}
Juniper Local feature profile options
When defining your own local profile in the SRX, you have some options available to you based on the state of the internal engine. This section lists each of those options, what they signify, and an example of configuring them.
- Custom Block Message
Simple string message that can be displayed if the user is in violation of a page and is blocked rather than going to the original destination page.
- Default
This is the default action that should be taken on the traffic if it doesn’t match a whitelist or blacklist.
- Fallback Options
Either log and permit or block for each setting.
- Default
Set a default action when the engine cannot complete the actions due to an undefined condition.
- Too Many Requests
What to do when there are too many pending requests for the engine.
In this example, we configure the Junos-Local Feature profile to have a default action of permit for any undefined URL, and a fallback option of block when there are too many requests. Additionally, we will set a default block message of “Access to this Website is Restricted by Company Policy” for any block actions.
{primary:node0}[edit]
root@SRX550-Node0# edit security utm feature-profile web-filtering juniper-local profile Juniper-Local

{primary:node0}[edit security utm feature-profile web-filtering juniper-local profile Juniper-Local]
root@SRX550-Node0# set custom-block-message "Access to this Website is Restricted by Company Policy"

{primary:node0}[edit security utm feature-profile web-filtering juniper-local profile Juniper-Local]
root@SRX550-Node0# set default permit fallback-settings too-many-requests block

{primary:node0}[edit security utm feature-profile web-filtering juniper-local profile Juniper-Local]

root@SRX550-Node0# show
default permit;
custom-block-message "Access to this Website is Restricted by Company Policy";
fallback-settings {
    too-many-requests block;
}
Putting it all together for Juniper Local web filtering
Now that we’ve examined each individual element of local web filtering, here is a final example with all of the above defined for a complete solution that is applied to a firewall rule.
{primary:node0}[edit security utm]
root@SRX550-Node0# show
custom-objects {
    url-pattern {
        Any-ABC-Domain {
            value http://*.abc.com;
        }
        Any-ABC-Suffix {
            value http://www.abc.*;
        }
        Specific-IP {
            value http://65.27.183.45;
        }
        Two-TLD {
            value "http://www.abc.??";
        }
    }
    custom-url-category {
        FQDN {
            value [ Any-ABC-Domain Any-ABC-Suffix Two-TLD ];
        }
        IP-Address {
            value Specific-IP;
        }
    }
}
feature-profile {
    web-filtering {
        url-whitelist FQDN;
        url-blacklist Specific-IP;
        type juniper-local;
        juniper-local {
            profile Juniper-Local {
                default permit;
                custom-block-message "Access to this Website is Restricted by Company Policy";
                fallback-settings {
                    default log-and-permit;
                    too-many-requests block;
                }
            }
        }
    }
}
utm-policy Basic-UTM {
    web-filtering {
        http-profile Juniper-Local;
    }
}

{primary:node0}[edit security policies from-zone trust to-zone untrust policy Client-Outbound]
root@SRX550-Node0# show
match {
    source-address Internal-Clients;
    destination-address any;
    application [ junos-http junos-ftp ];
}
then {
    permit {
        application-services {
            utm-policy Basic-UTM;
        }
    }
    log {
        session-close;
    }
}
Which URL filtering solution to choose?
Because there are four options for enabling web filtering, it can seem like it might be a tough call, but in this section we examine all of the options.
Websense Enhanced
Pros: This is the most powerful integrated method in terms of detection and the integrated package. It has a granular list of URL categories, support for Google Safe Search, and a reputation engine. It also doesn’t require any additional server components. This feature can also redirect users to a custom URL for block pages.
Cons: Requires an Internet connection to be able to contact the Threatseeker cloud to function. Requires Junos 11.4+, which is probably not a major issue going forward, but for some that are standardized on a legacy release it could be an issue.
Websense/Surfcontrol Integrated
Pros: Supported from Junos 9.6, provides decent URL categorization and functionality. Still has a full URL list as the enhanced, just fewer categories.
Cons: It is not the most powerful URL filtering features. It doesn’t support Safe Search or URL reputation, although you can use some categories for this. Requires an Internet connection to function by querying the cloud.
Websense Redirect
Pros: Doesn’t require an Internet connection, all queries are tracked locally. Can use the logging/reporting of a standalone Websense solution. Slightly lower latency because the server is onsite. You own the entire solution. Can be run from Junos 9.6.
Cons: Requires an expensive separate Websense server. Not as much functionality as directing the entire HTTP session through the Websense, but is equivalent to other integrated solutions.
Juniper Local
Antispam
The antispam technology that is built into the SRX offers a simple solution for filtering inbound spam on SMTP. In all candor, this is not the most powerful solution for blocking spam. It is only based on an IP reputation list offered from the cloud via Sophos. That being said, it can be much simpler to implement than a full-blown antispam solution and certainly less expensive. If this sounds like it meets your needs, then by all means use it, or even better you can use it in conjunction with a full solution.
Configuring the antispam solution is quite simple. It also leverages feature profiles like antivirus and URL filtering, although there are not as many options to configure, and only one solution. In this section, we examine configuring the default profile as well as a custom profile.
Note
The antispam feature relies on DNS to get the IP blacklist information from the cloud. As of Junos 11.4, Juniper leverages Sophos for this functionality (formerly it was Symantec).
Configuration options for antispam
The following configuration options are available for configuring the antispam solution in the SRX.
- Address Blacklist
Defines a list of hosts that will be blocked by the antispam solution (regardless of the lookup result).
- Address Whitelist
Defines a list of hosts that will be permitted (regardless of the lookup result) in the antispam solution.
- SBL
This is the main part of the profile that defines what action should be taken.
- Custom Tag String:
This is a string that can be tagged in the header or the subject of the message if spam is detected (rather than dropping it). This can be used by a downstream antispam server or for rules in the client itself.
- No/SBL Default Server
Defines whether or not to use the default server for server blacklists, enabled by default.
- Spam Action
Defines what action should be taken if spam is detected. The options are block the message, tag the SMTP header, or tag the email subject line.
The following are the default configurations for antispam.
{primary:node0}[edit]
root@SRX100HM# show groups junos-defaults security utm feature-profile anti-spam
sbl {
    profile junos-as-defaults {
        sbl-default-server;
        spam-action block;
        custom-tag-string ***SPAM***;
    }
}
Configuring antispam with the default profile
The following example uses the default antispam profile and applies it to a rule from the Untrust to DMZ context called SMTP, which only allows SMTP to our email server called Email-Server.
{primary:node0}[edit security utm]
root@SRX550HM# set utm-policy MAIL anti-spam smtp-profile junos-as-defaults

{primary:node0}[edit]
root@SRX550HM# set security policies from-zone untrust to-zone DMZ policy Mail-Inbound match source-address any destination-address SMTP-server application junos-smtp

{primary:node0}[edit]
root@SRX550HM# set security policies from-zone untrust to-zone DMZ policy Mail-Inbound then permit application-services utm-policy MAIL

{primary:node0}[edit]
root@SRX550HM#set security policies from-zone untrust to-zone DMZ policy Mail-Inbound then log session-close

{primary:node0}[edit]
root@SRX550HM# show security policies from-zone untrust to-zone DMZ policy Mail-Inbound
match {
    source-address any;
    destination-address SMTP-server;
    application junos-smtp;
}
then {
    permit {
        application-services {
            utm-policy MAIL;
            }
        }
    }
    log {
        session-close;
    }
}

primary:node0}[edit security utm]
root@SRX550HM# show utm-policy MAIL
anti-spam {
    smtp-profile junos-as-defaults;
}
Configuring a custom spam profile and policy
In this example, we configure a custom antispam profile that we apply to our firewall rule with the following configuration:
Create a custom antispam profile called AS.
The profile should apply a custom tag of SPAM Detected! to the subject line of any spam message that is detected but not block it.
Apply this to the SMTP inbound rule for the email server.
{primary:node0}[edit]
root@SRX550HM# set feature-profile anti-spam sbl profile AS custom-tag-string "Spam Detected!" spam-action tag-subject

{primary:node0}[edit security utm]
root@SRX550HM# set utm-policy MAIL anti-spam smtp-profile AS

{primary:node0}[edit]
root@SRX550HM# set security policies from-zone untrust to-zone DMZ policy Mail-Inbound match source-address any destination-address SMTP-server application junos-smtp

{primary:node0}[edit]
root@SRX550HM# set security policies from-zone untrust to-zone DMZ policy Mail-Inbound then permit application-services utm-policy MAIL

{primary:node0}[edit]
root@SRX550HM#set security policies from-zone untrust to-zone DMZ policy Mail-Inbound then log session-close

{primary:node0}[edit]
root@SRX550HM# show security policies from-zone untrust to-zone DMZ policy Mail-Inbound
match {
    source-address any;
    destination-address SMTP-server;
    application junos-smtp;
}
then {
    permit {
        application-services {
            utm-policy MAIL;
            }
        }
    }
    log {
        session-close;
    }
}

{primary:node0}[edit security utm]
root@SRX550HM# show
feature-profile {
    anti-spam {
        sbl {
            profile AS {
                spam-action tag-subject;
                custom-tag-string "Spam Detected!";
            }
        }
    }
}
utm-policy MAIL {
    anti-spam {
        smtp-profile AS;
    }
}
Content Filtering
Content filtering is a very simple feature to provide some lightweight data leak prevention in the UTM feature set. This definitely isn’t a full-blown DLP solution by any means. Most of the functionality can also be achieved using the IPS, but this is a much, much simpler approach from a configuration perspective. Content filtering is purely defined by you, the administrator, because the SRX has no way of knowing what activity to block or permit. This feature does not require any license (nor is there one) to function.
Content filtering provides the ability to whitelist or blacklist the following activity:
Protocol Commands: You can either permit or block specific commands on a protocol-by-protocol basis. You simply define the command. Supported protocols are HTTP, IMAP, SMTP, FTP, and POP3.
Content Types: The SRX can inspect files in HTTP, IMAP, SMTP, FTP, and POP3 and can block certain content types from being transmitted. These include ActiveX, Java applets, Windows executables, HTTP cookies, and ZIP files.
Block Extensions: This is a list of file extensions that should be blocked over the supported protocols. Note that this is just per extension so it doesn’t inspect the actual content.
Note
If you want more in-depth filtering support than that offered by content filtering or you’re using the high-end SRX, you can leverage IDP. This can not only block per extension or command, but works for virtually any protocol and it can inspect the actual content itself for content types.
Content filtering is applied in the same way that other UTM features are supported, although you must define the custom objects. Once custom objects are defined, they are applied to feature profiles that define the per profile activity, applying the feature profile to the UTM policy, and finally the UTM policy is applied to the firewall rule.
Configuring content filtering example
In this example, we configure content filtering to perform the following activity:
Create a feature profile called Content-Filter, and apply it to a UTM policy called Content-Filter-Policy.
Apply this UTM policy to the Client Outbound rule.
Permit only GET HTTP commands.
Block any EXE, ActiveX, and Java applets by inspecting the content to determine the file type.
Block any extensions that have .js, .pdf, and .swf files.
{primary:node0}[edit security utm]
root@SRX550-Node0# set feature-profile content-filtering profile Content-Filtering permit-command "GET"

{primary:node0}[edit security utm]
root@SRX550-Node0# set feature-profile content-filtering profile Content-Filtering block-content-type activex exe java-applet

{primary:node0}[edit security utm]
root@SRX550-Node0# set feature-profile content-filtering profile Content-Filtering block-extension Extension-List

{primary:node0}[edit security utm]
root@SRX550-Node0# set custom-objects protocol-command GET value "GET"

{primary:node0}[edit security utm]
root@SRX550-Node0# set custom-objects filename-extension Extension-List value [pdf swf js]

{primary:node0}[edit security utm]
root@SRX550-Node0# set utm-policy Content-Filter-Policy content-filtering http-profile Content-Filtering


{primary:node0}[edit security utm]
root@SRX550-Node0# show
custom-objects {
    filename-extension {
        Extension-List {
            value [ pdf swf js ];
        }
    }
    protocol-command {
        GET {
            value GET;
        }
    }
}
feature-profile {
    content-filtering {
        profile Content-Filtering {
            permit-command GET;
            block-extension Extension-List;
            block-content-type {
                activex;
                java-applet;
                exe;
            }
        }
    }
}
utm-policy Content-Filter-Policy {
    content-filtering {
        http-profile Content-Filtering;
    }
}

{primary:node0}[edit security utm]
root@SRX550-Node0# top

{primary:node0}[edit]
root@SRX550-Node0# edit security policies from zone trust to-zone untrust policy Client-Outbound

{primary:node0}[edit security policies from-zone trust to-zone untrust policy Client-Outbound]
root@SRX550-Node0# set match source-address Internal-Clients destination-address any application junos-http

{primary:node0}[edit security policies from-zone trust to-zone untrust policy Client-Outbound]
root@SRX550-Node0# set then permit application-services utm-policy Content-Filter-Policy

{primary:node0}[edit security policies from-zone trust to-zone untrust policy Client-Outbound]
root@SRX550-Node0# set then log session-close

{primary:node0}[edit security policies from-zone trust to-zone untrust policy Client-Outbound]
root@SRX550-Node0# show
match {
    source-address Internal-Clients;
    destination-address any;
    application junos-http;
}
then {
    permit {
        application-services {
            utm-policy Content-Filter-Policy;
        }
    }
    log {
        session-close;
    }
}
Logging UTM Messages
The UTM feature set provides some very useful log messages on the SRX, which are enabled by default. You can both log them locally to the box (if Event mode logging is configured) or you can log them remotely to a syslog server. The log information can help you to get historical information, alerts, and reports. Because these messages are sent via syslog, there are no proprietary requirements on the syslog collector, so any solution that supports syslog will do. Of course, Juniper’s STRM and Security Insight have predefined dashboards, log views, and reports that are tailored to the Juniper UTM solution, so it’s more plug and play, but there is no strict requirement to use this technology if your organization wants to use another solution. To enable this, you simply need to enable syslog on the data plane just as you would for normal firewall and IPS logs.
Configuring syslog to send UTM to a remote server
Just to refresh, we configure the syslog server on the data plane to send the syslogs to a remote syslog server. In this example, our firewall sends syslog messages to a syslog server at IP address 192.168.2.50, with a source address 192.168.2.30 on UDP port 514.
{primary:node0}[edit security log]
root@SRX550-Node0# set mode stream format sd-syslog source-address 192.168.2.30 stream STRM category all host 192.168.2.50 port 514

{primary:node0}[edit security log]
root@SRX550-Node0# show
mode stream;
format sd-syslog;
source-address 192.168.2.30;
stream STRM {
    category all;
    host {
        192.168.2.50;
        port 514;
    }
}Best Practices
We’ve covered a lot of ground in this chapter, so it can be easy to get lost in all of the details. Let’s discuss a few best practices for each feature and overall for the UTM profiles.
Evaluate what your organization’s needs are for UTM. Identify where the internal resources are and where the threats are. This will give you a good idea of where to apply the content filtering policies.
Determine which protocols are permitted to transit the network and what support there is for the UTM technologies on those protocols (HTTP, IMAP, POP3, SMTP, and FTP). Primarily you will be most concerned with HTTP.
In the case of URL filtering and antivirus, you need to determine which technology will best suit your needs. In both sections of this chapter we discuss the pros and cons of each technology, so you can leverage this to best select the technology that works for you.
When it comes to performance concerns, it can be an issue if you are leveraging multiple Level 7 technologies on top of each other like antivirus, URL filtering, and IPS, depending on the platform and traffic needs. The good news is that you can enable the profiles both for UTM and for IDP on a firewall rule-by-rule basis to limit the impacts and only apply the technologies where needed.
Juniper is making a lot of improvements to UTM functionality in its newer Junos code, so if you are using legacy code you might want to consider an upgrade to avoid these limitations. Check the release notes for each version to get more details on what new features are introduced and what issues have been fixed.
Particularly with initial deployments, you will want to keep an eye on the log messages generated and also the output of the
show security utm <feature>
        statistics|status
output. This will give you lot of great information about the current status of your system and what is occurring from a traffic and threat perspective. It can also be a good idea to monitor the performance and memory of your system with theshow security monitoring fpc <x>andshow chassis routing-enginecommands to ensure that the CPU, SPU, and memory utilization isn’t too high.
Troubleshooting and Operation
Now that we have discussed how the features work, let’s also discuss how to troubleshoot and operate them. We break this down on a feature-by-feature basis.
UTM Engine
The UTM engine itself is not something that you need to explicitly configure. It is implicitly enabled, but if you are troubleshooting UTM, it can help to double-check that the system is running and that traffic is being inspected by the engine. The following two commands are useful for getting some high-level information. If you don’t see that the service is running or no active sessions when you think they should, it could be the result of some misconfiguration or the engine not being active. Note that this is overall UTM sessions, not a specific feature, which we dig into shortly.
{primary:node0}
root@SRX100HM> show security utm status
node0:
---------------------------------------------------------
UTM service status: Running

node1:
---------------------------------------------------------
UTM service status: Running

{primary:node0}
root@SRX100HM> show security utm session
node0:
---------------------------------------------------------
 UTM session info:
 Maximum sessions:                 4000
 Total allocated sessions:         1239
 Total freed sessions:             1139
 Active sessions:                  57

node1:
---------------------------------------------------------
 UTM session info:
 Maximum sessions:                 4000
 Total allocated sessions:         1239
 Total freed sessions:             1239
 Active sessions:                  57
Also make sure that you have licenses for the features
that you have enabled (if in a cluster, on both members). Not all UTM
features require licenses, but without them, the configuration might
apply but the engine won’t run. A simple check of the output of the
specific feature will give some hints that the engines aren’t active due
to licenses, but it’s something that’s easy to overlook. You can
double-check the license status on a per-host basis with the show system license output to ensure the
system is licensed and the license is active.
{primary:node0}
root@SRX550-Node0> show system license
License usage:
                      Licenses  Licenses Licenses Expiry
  Feature name            used installed   needed
  anti_spam_key_sbl          0         1        0 2013-09-01 00:00:00 UTC
  idp-sig                    0         1        0 2013-09-01 00:00:00 UTC
  dynamic-vpn                0         2        0 permanent
  ax411-wlan-ap              0         2        0 permanent
  appid-sig                  0         1        0 2013-09-01 00:00:00 UTC
  av_key_sophos_engine       0         1        0 2013-09-01 00:00:00 UTC
  wf_key_websense_ewf        0         1        0 2013-09-01 00:00:00 UTC

Licenses installed:
  License identifier: JUNOS132555
  License version: 2
  Valid for device: AL2012AA0011
  Features:
    av_key_sophos_engine - Anti Virus with Sophos Engine
      date-based, 2012-09-01 00:00:00 UTC - 2013-09-01 00:00:00 UTC

  License identifier: JUNOS132556
  License version: 2
  Valid for device: AL2012AA0011
  Features:
    wf_key_websense_ewf - Web Filtering EWF
      date-based, 2012-09-01 00:00:00 UTC - 2013-09-01 00:00:00 UTC

  License identifier: JUNOS132557
  License version: 2
  Valid for device: AL2012AA0011
  Features:
    anti_spam_key_sbl - Anti-Spam
      date-based, 2012-09-01 00:00:00 UTC - 2013-09-01 00:00:00 UTC

  License identifier: JUNOS132558
  License version: 2
  Valid for device: AL2012AA0011
  Features:
    idp-sig          - IDP Signature
      date-based, 2012-09-01 00:00:00 UTC - 2013-09-01 00:00:00 UTC

  License identifier: JUNOS132559
  License version: 2
  Valid for device: AL2012AA0011
  Features:
    appid-sig        - APPID Signature
      date-based, 2012-09-01 00:00:00 UTC - 2013-09-01 00:00:00 UTC
Note
If running this command on a cluster, you must run it on each cluster member. The same is true for adding licenses: they must be done on a per cluster member basis at the time of writing this book.
Antivirus
Although there are three different antivirus solutions
available on the SRX, the troubleshooting and operation is relatively
the same, particularly from the output commands. The two main commands
you should start with are the show security utm
anti-virus status and show security
anti-virus statistics commands. These will show the status of
the engine and some statistical information about the activity seen on
the system, including inspected files, malware threats, and any engine
failures. Note that the output for each AV solution will vary slightly
because there are some different stats, but the commands are the same
and quite self-explanatory.
{primary:node0}
root@SRX100HM> show security utm anti-virus statistics
node0:
--------------------------------------------------------------------------
 UTM Anti Virus statistics:
 MIME-whitelist passed:                0
 URL-whitelist passed:                 0
 Scan Request:

  Total           Clean         Threat-found    Fallback
     614             611              3               0

 Fallback:
                         Log-and-Permit    Block             Permit
 Engine not ready:           0                 0                 0
 Out of resources:           0                 0                 0
 Timeout:                    0                 0                 0
 Maximum content size:       0                 0                 0
 Too many requests:          0                 0                 0
 Others:                     0                 0                 0

node1:
-------------------------------------------------------------------
 UTM Anti Virus statistics:
 MIME-whitelist passed:                0
 URL-whitelist passed:                 0
 Scan Request:

  Total           Clean         Threat-found    Fallback
       0               0              0               0

 Fallback:
                         Log-and-Permit    Block             Permit
 Engine not ready:           0                 0                 0
 Out of resources:           0                 0                 0
 Timeout:                    0                 0                 0
 Maximum content size:       0                 0                 0
 Too many requests:          0                 0                 0
 Others:                     0                 0                 0

{primary:node0}
root@SRX100HM> show security utm anti-virus status
node0:
-------------------------------------------------------------------
 UTM anti-virus status:

    Anti-virus key expire date: 2012-11-13 19:00:00
    Update server: http://update.juniper-updates.net/SAV/
           Interval: 60 minutes
           Pattern update status: next update in 4 minutes
           Last result: already have latest database
    Anti-virus signature version: 1.02.0 (1.02)
    Scan engine type: sophos-engine
    Scan engine information: last action result: No error

node1:
-------------------------------------------------------------------
 UTM anti-virus status:

    Anti-virus key expire date: 2012-11-13 19:00:00
    Update server: http://update.juniper-updates.net/SAV/
           Interval: 60 minutes
           Pattern update status: next update will be synchronized from primary node
           Last result: already have latest database
    Anti-virus signature version: 1.02.0 (1.02)
    Scan engine type: sophos-engine
    Scan engine information: last action result: No error
Remember that for both pattern updates and also for Sophos URI checking, Internet connections must be available including DNS for hostname resolution. If you have upstream firewalls, they must permit the SRX to make the applicable connections to the cloud services (HTTP and DNS) to get updates. You will quickly find this out if you see errors in the preceding output like server connectivity timeouts and inability to download updates. Check both the networking on your SRX and also that the upstream system permits the traffic to pass through to the Internet.
You can also check to make sure that your system is properly updating with antivirus with the following request command:
{primary:node0}
root@SRX100HM> request security utm anti-virus sophos-engine pattern-update
node0:
-------------------------------------------------------------------
Anti-virus update request results: av_mgr: pattern updater 2967 is started, downloading from http://update.juniper-updates.net/SAV/.

node1:
-------------------------------------------------------------------
Anti-virus update request results: av_mgr: updater exiting on secondary node
There are some additional traceoptions that you can enable on a UTM and feature-by-feature basis, but they are out of the scope of this chapter. Typically, if you need to enable them, it should be done with support from JTAC or via specific Knowledge Base articles on the Juniper Knowledge Base.
Testing antivirus
If you want to test that your antivirus is working properly, a very simple way is to just download the EICAR test virus, which is not a real virus, but one that the SRX and virtually all antivirus systems list as a test virus for the purpose of testing whether the engine is active or not. This is available on the Eicar.org website. Downloading it should trigger the antivirus engine to detect the EICAR virus if it is properly set up and applied to the firewall rule that your session is transmitting over.
URL Filtering
Similar to the antivirus feature, there are several
different flavors of URL filtering, but luckily the methods of
troubleshooting them are virtually the same. There two main commands
that will be of interest after you have determined that the UTM service
is active and URL filtering is licensed. These are show security utm web-filtering statistics and
show security utm web-filtering
      status
. These are shown here. There is a slight variation in
the output depending on the solution you are using, but they are more or
less the same and certainly intuitive.
{primary:node0}
root@SRX100HM> show security utm web-filtering statistics
node0:
-------------------------------------------------------------------
 UTM web-filtering statistics:
    Total requests:                  529627
    white list hit:                  0
    Black list hit:                  0
    Queries to server:               181686
    Server reply permit:             144188
    Server reply block:              13
    Custom category permit:          0
    Custom category block:           0
    Site reputation permit:          37252
    Site reputation block:           63
    Cache hit permit:                347900
    Cache hit block:                 22
    Safe-search redirect:            169
    Web-filtering sessions in total: 4000
    Web-filtering sessions in use:   0
    Fallback:                       log-and-permit           block
          Default                                 1               0
          Timeout                                 1               0
     Connectivity                                 0               0
Too-many-requests                                 0               0

node1:
--------------------------------------------------------------------
 UTM web-filtering statistics:
    Total requests:                  79
    white list hit:                  0
    Black list hit:                  0
    Queries to server:               71
    Server reply permit:             61
    Server reply block:              0
    Custom category permit:          0
    Custom category block:           0
    Site reputation permit:          6
    Site reputation block:           0
    Cache hit permit:                8
    Cache hit block:                 0
    Safe-search redirect:            0
    Web-filtering sessions in total: 4000
    Web-filtering sessions in use:   50
    Fallback:                       log-and-permit           block
          Default                                 0               0
          Timeout                                 0               0
     Connectivity                                 0               0
Too-many-requests                                 0               0

{primary:node0}
root@SRX100HM> show security utm web-filtering status
node0:
-------------------------------------------------------------------
 UTM web-filtering status:
    Server status: Juniper Enhanced using Websense server UP

node1:
-------------------------------------------------------------------
 UTM web-filtering status:
    Server status: Juniper Enhanced using Websense server DOWN
In the preceding implementation which is in HA, the secondary web service is down, but that’s okay because all of the requests are handled by the active node. In the output, we get very detailed information about the actions that the feature has taken on traffic and any reported failures.
It is important to remember a few things when it comes to URL filtering troubleshooting. First, for both Websense/Surfcontrol and Websense Enhanced, it requires an Internet connection to function, so if the connection to the Surfcontrol or Websense server is down, you will likely get connectivity and timeout stat increases. You will need to have both DNS and also UDP 9020 for Surfcontrol, and HTTP for Websense Enhanced open. If you are running in Websense Redirect mode, the Websense server must be up and reachable. Local URL filtering shouldn’t require any extra features other than DNS to resolve hostnames.
Websense site lookup tool
There is a test utility on the Junos command list called
test security utm web-filtering profile
        <profile> test-string <test-string>
but it is
only geared for testing strings in the internal blacklist or
whitelist. Websense does provide a site lookup tool on their website,
but it requires you to log in. You can obtain a login from the Websense portal and then use the
tool for free to enter URLs and get the classification
information.
Note
Testing a URL for the categorization and blocking action is pretty easy, as you can always set up a client to attempt to access a blocked resource and you should see it blocked on the client. You can also review the syslogs and stats for more information about what is being seen on the device. You also must make sure that the UTM profile with web filtering enabled is applied to the correct firewall rule to be triggered.
The traceoptions available for this feature is outside of the scope of this book,and shouldn’t be required unless directed by JTAC.
Antispam
Troubleshooting antispam is usually pretty easy, as SMTP
has the ability to queue messages rather than having to process them in
real time as antivirus and URL filtering do. Also there is only one
antispam solution available on the SRX. There are two primary commands
that you will want to run on the SRX when troubleshooting antispam
settings: show security utm anti-spam
status and show security utm
anti-spam statistics.
{primary:node0}
root@SRX100HM> show security utm anti-spam status
node0:
-------------------------------------------------------------------
SBL Whitelist Server:
SBL Blacklist Server:
    msgsecurity.juniper.net

DNS Server:
    Primary  :          4.2.2.2, Src Interface: fe-0/0/1
    Secondary:          0.0.0.0, Src Interface: fe-0/0/2
    Ternary  :          0.0.0.0, Src Interface: fe-1/0/1

node1:
-------------------------------------------------------------------
SBL Whitelist Server:
SBL Blacklist Server:
    msgsecurity.juniper.net

DNS Server:
    Primary  :          4.2.2.2, Src Interface: fe-0/0/1
    Secondary:          0.0.0.0, Src Interface: fe-0/0/2
    Ternary  :          0.0.0.0, Src Interface: fe-1/0/1

{primary:node0}
root@SRX100HM> show security utm anti-spam statistics
node0:
-------------------------------------------------------------------
 UTM Anti Spam statistics:

Total connections:     1165
Denied connections:    0
Total greetings:       650
Denied greetings:      0
Total e-mail scanned:  592
White list hit:        0
Black list hit:        0
Spam total:            139
Spam tagged:           139
Spam dropped:          0
DNS errors:            0
Timeout errors:        0
Return errors:         0
Invalid parameter errors: 0

Statistics start time: 07/28/2012 21:06:27
Statistics for the last 10 days (permitted emails / spams):
day 1: 15/2
day 2: 14/1
day 3: 19/1
day 4: 28/0
day 5: 109/1
day 6: 25/2
day 7: 31/0
day 8: 28/4
day 9: 20/84
day 10: 11/25

node1:
-------------------------------------------------------------------
 UTM Anti Spam statistics:

Total connections:     0
Denied connections:    0
Total greetings:       0
Denied greetings:      0
Total e-mail scanned:  0
White list hit:        0
Black list hit:        0
Spam total:            0
Spam tagged:           0
Spam dropped:          0
DNS errors:            0
Timeout errors:        0
Return errors:         0
Invalid parameter errors: 0

Statistics start time: 07/28/2012 21:05:45
As you can see from the preceding output, the SRX captures both
stats about the spam detected, the action taken, and also some
statistics about what is being done on the active system. For antispam
to function properly, you need to ensure that DNS is allowed outbound
and that the SRX performs the lookups for the IP reputation of the peer
email server. This will inherit the same DNS information that is
configured for the platform under set system
name-server.
The traceoptions available for this feature are outside of the scope of this book and shouldn’t be required unless directed by JTAC.
Content Filtering
The troubleshooting and operation of content filtering is
quite straightforward, as this feature is entirely self-contained. You
simply can check the show security utm
content-filtering statistics command to get information about
the number of hits for the different content types and actions
taken.
{primary:node0}
root@SRX100HM> show security utm content-filtering statistics
node0:
------------------------------------------------------------------

 Content-filtering-statistic:         Blocked
     Base on command list:                    4
     Base on mime list:                       0
     Base on extension list:                  51
     ActiveX plugin:                          3
     Java applet:                             7
     EXE files:                               3
     ZIP files:                               0
     HTTP cookie:                             0

node1:
------------------------------------------------------------------

 Content-filtering-statistic:         Blocked
     Base on command list:                    0
     Base on mime list:                       0
     Base on extension list:                  0
     ActiveX plugin:                          0
     Java applet:                             0
     EXE files:                               0
     ZIP files:                               0
The traceoptions available for this feature is outside of the scope of this book and shouldn’t be required unless directed by JTAC.
Sample Deployments
For this sample deployment, we are going to configure multiple UTM solutions to protect a sample solution as defined here. If you are proficient with the concepts discussed in this chapter, you should have no problem creating this same deployment in your own device.
Antivirus
Configure your own Sophos AV profile with the following properties:
Max content size of 20 MB, engine timeout of 3 seconds, and trickling timeout of 10 seconds.
Configure the SRX to always fail open and log in the case that the engine is not able to complete a request for any reason.
URL filtering
Enable Websense Enhanced URL filtering on the SRX with the following configuration:
Cache timeout of two hours.
Redirect any blocked users to the URL http://192.168.1.70/blocked-request.html, which is an internal web page that shows the company policy for browsing web resources.
Set the default option to permit any unknown URLs.
Anything but very safe sites should be blocked.
Block gambling and violence websites.
If an issue occurs with the engine, be sure to fail open and log the request.
Antispam
Create a Client-Outbound firewall rule that matches clients from the internal network 192.168.1.0/24 on the LAN zone going to any external resources on the Internet zone. This traffic should be inspected by your antivirus and URL filtering traffic. You should only allow HTTP outbound on this rule.
Create another policy that allows SMTP traffic from the Internet into your SMTP server 2.2.2.50 in the DMZ. This traffic should be inspected by antivirus and antispam.
This solution could be configured as follows:
root@SRX550-Node0# show security utm
feature-profile {
    anti-virus {
        type sophos-engine;
        sophos-engine {
            profile Sophos {
                fallback-options {
                    default log-and-permit;
                    content-size log-and-permit;
                    engine-not-ready log-and-permit;
                    timeout log-and-permit;
                    out-of-resources log-and-permit;
                    too-many-requests log-and-permit;
                }
                scan-options {
                    content-size-limit 20000;
                    timeout 3;
                }
                trickling timeout 10;
            }
        }
    }
    web-filtering {
        type juniper-enhanced;
        juniper-enhanced {
            cache {
                timeout 120;
            }
            profile Websense {
                site-reputation-action {
                    very-safe permit;
                    moderately-safe block;
                    fairly-safe block;
                    suspicious block;
                    harmful block;
                }
                default permit;
                fallback-settings {
                    default log-and-permit;
                    server-connectivity log-and-permit;
                    timeout log-and-permit;
                    too-many-requests log-and-permit;
                }
                block-message {
                    type custom-redirect-url;
                    url http://192.168.1.70/blocked-request.html;
                }
            }
        }
    }
    anti-spam {
        sbl {
            profile AS {
                spam-action tag-subject;
                custom-tag-string "SPAM Detected";
            }
        }
    }
}
utm-policy Protect-Clients {
    anti-virus {
        http-profile Sophos;
    }
    web-filtering {
        http-profile Websense;
    }
}
utm-policy Email-Inspection {
    anti-virus {
        smtp-profile Sophos;
    }
    anti-spam {
        smtp-profile AS;
    }
}


{primary:node0}[edit]
root@SRX550-Node0# show security address-book
global {
    address Internal-Clients 1.1.1.0/24;
    address Internal-Clients-192.168.1.0/24 192.168.1.0/24;
    address SMTP-Server-2.2.2.50/32 2.2.2.50/32;
}

{primary:node0}[edit]
root@SRX550-Node0# show security policies
from-zone LAN to-zone Internet {
    policy Client-Outbound {
        match {
            source-address Internal-Clients-192.168.1.0/24;
            destination-address any;
            application junos-http;
        }
        then {
            permit {
                application-services {
                    utm-policy Protect-Clients;
                }
            }
            log {
                session-close;
            }
        }
    }
}
from-zone Internet to-zone DMZ {
    policy SMTP-Inbound {
        match {
            source-address any;
            destination-address SMTP-Server-2.2.2.50/32;
            application junos-smtp;
        }
        then {
            permit {
                application-services {
                    utm-policy Email-Inspection;
                }
            }
            log {
                session-close;
            }
        }
    }
}
Summary
In this chapter, we explored the far reaches of the UTM feature set implemented in the SRX. Each of the different UTM technologies along with the different flavors implemented were discussed, along with some guidance on selecting the correct implementation for your specific case. With this knowledge, you should be able to successfully deploy the SRX in your network, leveraging the UTM technologies to more effectively protect your client and server infrastructure from malware threats, along with controlling user activities to ensure that they are in compliance with your organizational policies. As malicious threats continue to evolve in the future, it will be essential to layer all of the protective defenses that you can possibly leverage to protect your resources and infrastructure. UTM on the perimeter and internal environment will certainly be a component of this overall defense in-depth approach.
Study Questions
- Questions
What is the difference between antivirus and intrusion prevention on the SRX?
Which antivirus solution offered by the SRX can do URI reputation checking to determine if the resource being requested is potentially malicious?
Which protocols are supported by the Juniper antivirus and content filtering suites?
Order the three Juniper antivirus solutions from most to least expensive from a performance perspective.
What are the four different URL filtering techniques available on the SRX?
Which URL filtering solution supports site reputation scoring and enforcement?
What method does the SRX antispam feature leverage to detect spam messages?
True or False: You can have multiple antivirus or web filtering solution types enabled at the same time.
How are UTM policies applied to user traffic in the SRX configuration?
True or False: You can have different UTM policies applied to different traffic at the same time.
True or False: You need to apply UTM licenses to both nodes in an HA cluster.
True or False: You can use any antivirus technology as long as you license one of the antivirus solutions.
What are feature profiles and how are they implemented on the SRX?
Which flavor of URL filtering allows you to redirect users to a URL rather than the internal block page when a user tries to go to a blocked website?
- Answers
Antivirus is geared toward detecting malware via transmitted files, whereas IPS is geared more toward detecting stream-based threats. Although it can detect some attacks in files and malicious payloads, it is not the strong suit of the technology, as it is stream-based versus the antivirus, which can act as a full TCP and application proxy.
The Sophos AV solution in the SRX supports this technique.
HTTP, SMTP, FTP, IMAP, and POP3 are supported.
Full Kaspersky, Sophos, ExpressAV.
Websense Enhanced, Surfcontrol/Websense Integrated, Websense Redirect, and Local.
Websense Enhanced.
The SRX antispam feature leverages an SMTP blacklist of known spamming servers.
False. You can have both antivirus and web filtering enabled concurrently, but only one type each can be used. For instance, you can run Sophos AV and Enhanced Web Filtering, but you can’t run both Sophos AV and Kaspersky AV, or Enhanced Websense and Websense Redirect concurrently.
UTM policies are applied to firewall traffic on a firewall rule-by-rule basis.
True: The system allows you to have multiple UTM policies applied to different firewall rules at the same time.
True.
False.
Feature profiles define how an individual UTM feature should behave. They are specific to not only the UTM technology, but also the specific flavor of the solution (e.g., Sophos is different than Kaspersky). Each feature profile is applied to the UTM policies, and can be done on a protocol-by-protocol basis if that technology has multiple protocol support like AV and content filtering.
Websense Enhanced.
Get Juniper SRX Series now with the O’Reilly learning platform.
O’Reilly members experience books, live events, courses curated by job role, and more from O’Reilly and nearly 200 top publishers.

