Modern enterprise applications revolve around relational databases, and our application is no exception. However, up to this point we have barely paid any attention to configuring the all-important database tier. We’ve been using the embedded Hypersonic database and delegating all the schema management to JBoss. This has allowed us to focus on making our application work first, without needing to bother with the added complexity of a database.
Developing an application with this approach makes a lot of sense, but now that our application is up and running, it’s time to turn our attention toward the database, and have our application access a more robust, production-friendly database. We’ll use MySQL for the application.
MySQL is a free download that is available from http://dev.mysql.com for every major computing platform. You’ll want to download and install the most current MySQL distribution available for your platform. We’ll be working from the MySQL Standard 4.1.8 GA version.
We’ll assume you can follow the instructions for installing MySQL on your platform. Once you have MySQL running, you’ll need to create a database to be used by JBoss. You’ll also need to create a database user that has access to the JBoss database for JBoss to use.
MySQL is administered using the mysql command found in your MySQL installation. On our machine it is found in /usr/local/mysql/bin/mysql. You’ll want to run with the mysql client as the root user, using the -u option:
    $ /usr/local/mysql/bin/mysql -u root
    Welcome to the MySQL monitor.  Commands end with ; or \g.
    Your MySQL connection id is 4 to server version: 4.1.8-standard

    Type 'help;' or '\h' for help. Type '\c' to clear the buffer.

    mysql>
After connecting to the database, we’ll create a database named jbossdb, using the create database command:
Note
If you want to run MySQL on a different host, you need to give the database user access from the host JBoss is running on.
    mysql> create database jbossdb;
    Query OK, 1 row affected (0.01 sec)
Now we need to create a user account to be used when accessing the jbossdb database. The grant command accomplishes this:
    mysql> grant all privileges on jbossdb.* to todoapp@localhost identified
    by 'secretpassword';
    Query OK, 0 rows affected (0.38 sec)
This creates a user called todoapp whose password is secretpassword. This user is granted full rights to everything in the jbossdb database when connecting from the same host. You can examine the mysql.user table to verify that the user was created correctly:
    mysql> select user,host,password from mysql.user;
    +-----------+------------+-------------------------------------------+
    | user      | host       | password                                  |
    +-----------+------------+-------------------------------------------+
    | root      | localhost  |                                           |
    | root      | toki.local |                                           |
    |           | toki.local |                                           |
    |           | localhost  |                                           |
    | todoapp   | localhost  | *F89FFE84BFC48A876BC682C4C23ABA4BF64711A4 |
    +-----------+------------+-------------------------------------------+
    6 rows in set (0.00 sec)
Note that todoapp only has permission to access the database locally, and has no remote access. You can test the username and password using the -u and -password options:
$ /usr/local/mysql/bin/mysql -u todoapp --password=secretpasswordYou can also test remote access to the database by running the mysql command from a remote machine, using the -h option to specify the machine that is running MySQL. Since we’ve only granted access from localhost, the access attempts should fail.
As mature as relational database technologies are, there is still no standard network protocol for accessing them. JDBC saves us from needing to couple our application to proprietary database APIs by letting us hide the proprietary access protocols behind a nice, standard Java interface. To do that, we will need to provide the JDBC driver code to JBoss.
The first step is to locate the JDBC driver code. The MySQL driver is called MySql Connector/J. The current production version is Connector/J 3.0, which you can download from http://www.mysql.com/products/connector/j/. The driver JAR file is located inside of the archive you downloaded. For the 3.0.16 version, which is current as of this writing, the name of the file is mysql-connector-java-3.0.16-ga-bin.jar.
Once you’ve located the JDBC JAR file, you will need to copy it to the lib directory of your JBoss server configuration. As you recall, we are working from the default configuration, so that would be server/default/lib.
Well, nothing happened. We’ve talked about the hot deploy feature of JBoss, but that works only for items placed in the deploy directory. The lib directory works differently. JARs in the lib directory are added to the topmost JBoss classloader and cannot be redeployed or removed. The lib directory is ignored after JBoss starts up. The only way to get JBoss to notice the new JDBC driver is to restart the server, so you’ll need to shut down and restart your JBoss instance after installing the driver.
How do we know that JBoss has found our driver? We would hope that JBoss would give us some kind of warning or error when we try to use the database connection, but that is a very delayed form of feedback when we haven’t yet seen how to use the new database.
There is a solution, though. We’ll use the JMX Console to check on our class. Open the JMX Console in your web browser (http://localhost:8080/jmx-console). Near the top of the screen you will see the JMImplementation domain, which has three managed beans (MBeans), as shown here:
    JMImplementation
      • name=Default,service=LoaderRepository
      • type=MBeanRegistry
      • type=MBeanServerDelegate
Selecting the Loader repository brings you to the management interface for the loader repository (see Figure 4-1).
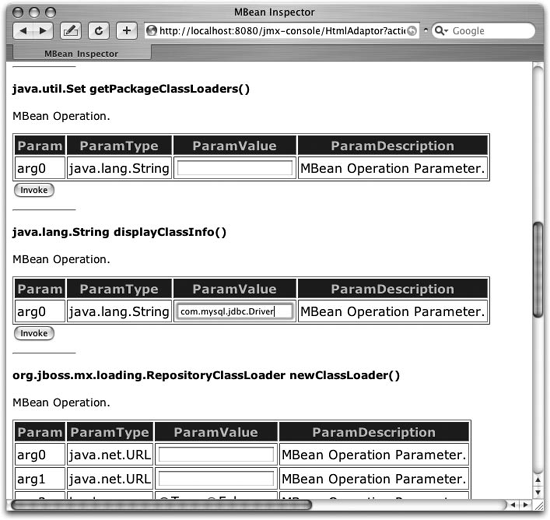
We can use the displayClassInfo operation, which is shown in Figure 4-1, to find out what JBoss knows about the class. The operation takes a Java class name as input, so enter the name of our MySQL driver (com.mysql.jdbc.Driver) and click the Invoke button. The MBean will respond with the following text:
    com.mysql.jdbc.Driver Information
    Not loaded in repository cache


    ### Instance0 found in UCL: org.jboss.mx.loading.UnifiedClassLoader3@f8d6a6
    ...
We haven’t used the class yet, so JBoss has not yet loaded the class into memory. However, it can see that the driver class is visible in one of JBoss’s classloaders. If JBoss had already loaded the class, we would have gotten much more information back from the displayClassInfo operation, as shown in the following listing:
    com.mysql.jdbc.Driver Information
    Repository cache version:
    com.mysql.jdbc.Driver(85d49e).ClassLoader=org.jboss.mx.loading.UnifiedClassLoader3@
    f8d6a6{ url=file:/private/tmp/jboss-4.0.2/server/default/tmp/deploy/tmp14828jboss-
    service.xml ,addedOrder=2}
    ..org.jboss.mx.loading.UnifiedClassLoader3@f8d6a6{ url=file:/private/tmp/jboss-
    4.0.2/server/default/tmp/deploy/tmp14828jboss-service.xml ,addedOrder=2}
    ....file:/private/tmp/jboss-4.0.2/server/default/tmp/deploy/tmp14828jboss-service.xml
    ....file:/private/tmp/jboss-4.0.2/server/default/lib/activation.jar
    ....file:/private/tmp/jboss-4.0.2/server/default/lib/avalon-framework.jar
    ....file:/private/tmp/jboss-4.0.2/server/default/lib/bcel.jar
       ...
    ++++CodeSource:
      (file:/private/tmp/jboss-4.0.2/server/default/lib/mysql-connector-
      java-3.0.16-ga-bin.jar )
    Implemented Interfaces:

    ### Instance0 found in UCL: org.jboss.mx.loading.UnifiedClassLoader3@f8d6a6
Note
Class loading can be tricky, but JBoss provides all the tools you need to understand what is going on.
This tells us that we have indeed loaded the MySQL driver into memory, and JBoss is using the version from the JAR file we put in server/default/lib. This might seem like a lot more detail than we want, but when you have different versions of JARs in different packages and are trying to understand exactly how your classes are being loaded, the extra information is invaluable. But for now, we just want to know that JBoss can locate our driver class.
...placing the JDBC driver in the deploy directory?
It certainly seems harsh that we had to restart JBoss to make it see our little JDBC driver. Why can’t we just put the JDBC driver in the deploy directory and let it be hot deployed? Well, we could have. And it would work almost the same. However, it’s generally accepted that it’s better to put fundamental service code in the lib directory. JAR files in the deploy directory will be redeployed if you accidentally touch them, through an automated build script, for example. That can create havoc if several applications share the JDBC driver.
Note
Wouldn’t it be nice if relational databases had a standard network protocol so that we didn’t have to mess with drivers?
We really just don’t think of a JDBC driver as being an application component. It’s generally thought of as system-level code and is placed with the other system-level JAR files in the lib directory. However, if it’s more convenient, feel free to put the JDBC driver along with your application code in the deploy directory.
With a database running and the drivers loaded, the application could connect directly to the database and issue queries if we wanted it to. But in a J2EE world we don’t need to do that. JBoss, like all J2EE application servers, can manage database connections for us, allowing us to write our applications free of the need to configure connections or maintain connection pools ourselves.
Even though we haven’t specified the datasource for the ToDo application, JBoss has connected us to a default datasource called, conveniently enough, DefaultDS. It connects to our embedded Hypersonic database. Now we want to create a new datasource definition that will connect to the MySQL database we created in the first lab.
In JBoss, a datasource is a deployable entity just like our application WAR and EAR files. It is represented by a special *-ds.xml file in the deploy directory. The Hypersonic datasource is configured in the hsqldb-ds.xml file. We’ll look at that as an example. Here’s an abbreviated version of it:
    <?xml version="1.0" encoding="UTF-8"?>

    <datasources>
       <local-tx-datasource>
          <jndi-name>DefaultDS</jndi-name>

          <connection-url>
              jdbc:hsqldb:${jboss.server.data.dir}${/}hypersonic${/}localDB
          </connection-url>
          <driver-class>org.hsqldb.jdbcDriver</driver-class>

          <user-name>sa</user-name>
          <password></password>

          <min-pool-size>5</min-pool-size>
          <max-pool-size>20</max-pool-size>
          <idle-timeout-minutes>0</idle-timeout-minutes>
          <track-statements/>

          <security-domain>HsqlDbRealm</security-domain>

          <metadata>
              <type-mapping>Hypersonic SQL</type-mapping>
          </metadata>

          <depends>jboss:service=Hypersonic,database=localDB</depends>
       </local-tx-datasource>
</datasources>While there is a bit of noise in the file, it’s pretty easy to guess what is going on. This datasource is named DefaultDS. It’s bound under the JNDI name java:DefaultDS, meaning that it, like everything in the java: context, is only available inside the JVM. You can also see the connection URL and the database username and password, as well as a few other minor connection pool details.
It’s really a simple format, and it would be pretty easy to duplicate this file, adding the connection details for our MySQL database. But it’s even easier than that. The docs/examples/jca directory (under the root of your JBoss installation, not the server configuration directory you are working in) contains sample templates for the most popular database servers (and most of the less popular ones too).
The MySQL template is mysql-ds.xml:
    <?xml version="1.0" encoding="UTF-8"?>

    <!-- $Id: ch04.xml,v 1.5 2005/08/05 18:55:20 ellie Exp $ -->
    <!--  Datasource config for MySQL using 3.0.9 available from:
    http://www.mysql.com/downloads/api-jdbc-stable.html
    -->

    <datasources>
      <local-tx-datasource>
        <jndi-name>MySqlDS</jndi-name>
        <connection-url>jdbc:mysql://mysql-hostname:3306/jbossdb
        </connection-url>
        <driver-class>com.mysql.jdbc.Driver</driver-class>
        <user-name>x</user-name>
        <password>y</password>

          <!-- corresponding type-mapping in the
               standardjbosscmp-jdbc.xml (optional) -->
          <metadata>
             <type-mapping>mySQL</type-mapping>
          </metadata>
      </local-tx-datasource>

    </datasources>
To get started, you need to copy mysql-ds.xml to the deploy directory and change the items in bold to the correct values for the server. The MySQL JNDI name is fine, so we’ll start with connection-url. We’ll assume that our database is located on the same machine as our JBoss instance, so we’ll use localhost as the machine name.
<connection-url>jdbc:mysql://localhost:3306/jbossdb</connection-url>
The only other step is to tell JBoss the database user to connect as. We used the user todoapp, so we’ll specify that, and the password, here:
    <user-name>todoapp</user-name>
    <password>secretpassword</password>
You’ve now deployed a datasource in JBoss. You can look to the console log to make sure everything went right. If all went well, you’ll see a line that looks like the following:
    20:09:23,756 INFO [WrapperDataSourceService] Bound connection factory for resource
    adapter for ConnectionManager 'jboss.jca name=MySqlDS,service=DataSourceBinding to
JNDI name 'java:MySqlDS'If you’ve edited and saved the file a few times, the console should show that you’ve redeployed it several times. We’ll make one more change, explicitly specifying the datasource connection pool size, and watch it redeploy.
Since we don’t expect much traffic, we’ll ask JBoss to keep just two connections ready in the pool, and to keep a maximum of ten connections open. To do that, add the following min-pool-size and max-pool-size elements to your mysql-ds.xml file:
    <?xml version="1.0" encoding="UTF-8"?>

    <!-- $Id: ch04.xml,v 1.5 2005/08/05 18:55:20 ellie Exp $ -->
    <!--  Datasource config for MySQL using 3.0.9 available from:
    http://www.mysql.com/downloads/api-jdbc-stable.html
    -->
    <datasources>
        <local-tx-datasource>
            <jndi-name>MySqlDS</jndi-name>
            <connection-url>jdbc:mysql://mysql-hostname:3306/jbossdb
            </connection-url>
            <driver-class>com.mysql.jdbc.Driver</driver-class>
            <user-name>todoapp</user-name>
            <password>secretpassword</password>

            <min-pool-size>2</min-pool-size>
               <max-pool-size>10</max-pool-size>

            <!-- corresponding type-mapping in the
                 standardjbosscmp-jdbc.xml (optional) -->
            <metadata>
                <type-mapping>mySQL</type-mapping>
            </metadata>
        </local-tx-datasource>

    </datasources>
When you save the file you’ll see that the datasource successfully redeployed in the console log. This is all the feedback JBoss gives you directly. In the "Monitoring the Connection Pool" lab later in this chapter, we’ll see how to verify our pool size and check on other aspects of the connection pool, such as how many connections are in use. For a full set of configuration options, see jboss-ds_1_5.dtd in the docs/dtd directory. Other template datasource descriptors are located in docs/examples/jca.
...making our datasource be DefaultDS?
That is possible. If we removed hsql-ds.xml and changed our datasource JNDI name to DefaultDS, JBoss would use our MySQL database as the default for all applications. However, keep in mind that internal services such as JMS use DefaultDS. While they can be easily configured to use other databases, and indeed they should be if we are deploying a production server using those services, it’s generally better to be explicit about which datasource you are using.
Note
XA datasources are a real pain. Just because your database and driver claim to support XA transactions doesn’t mean it really works. If you plan to use XA transactions, make sure to test them thoroughly.
And what about XA datasources?
You might be wondering what the local-tx-datasource element means in the datasource file. It means that the datasource only supports local transactions and can’t be combined with other resources in a true distributed (XA) transaction. If your database supports XA (MySQL doesn’t), you can change the local-tx-datasource tag to xa-datasource. Examples of XA datasource configurations are available in doc
s/examples/jca and are named *-xa-ds.xml.
With the datasource in place, we need to tell our application to use it. The amount of effort involved depends on how coupled our application is to the datasource. If an application used the datasource directly, we would need to adjust the lookup code, or at least the environment references, and update our SQL statements to be compatible with MySQL. Fortunately for us, the ToDo application uses container-managed persistence and the database access is completely transparent. So, migrating the application will be quite simple.
This one is going to be easy. JBoss looks for the container-managed persistence configuration in a jbosscmp-jdbc.xml deployment descriptor. The default datasource for the application is set in the defaults section of the file, as shown here:
    <!DOCTYPE jbosscmp-jdbc PUBLIC
        "-//JBoss//DTD JBOSSCMP-JDBC 4.0//EN"
        "http://www.jboss.org/j2ee/dtd/jbosscmp-jdbc_4_0.dtd">

    <jbosscmp-jdbc>
        <defaults>
               <datasource>java:MySqlDS</datasource>
               <datasource-mapping>mySQL</datasource-mapping>
               </defaults>
    </jbosscmp-jdbc>
The datasource element contains the JNDI name of the datasource we specified in the mysql-ds.xml file earlier. The datasource-mapping name declares the type of the database. The database type determines how to generate SQL and how to map types for a particular database.
You can look at the
conf/standardjbosscmp-jdbc.xml file to see the full set of datasource mappings available in JBoss. Inside the type-mappings section, you should find the mySQL type mapping referenced in the jbosscmp-jdbc.xml file:
    <type-mapping>
        <name>mySQL</name>
        ...
    </type-mapping>
The type mapping defines SQL templates for schema generation, EJB-QL, and JBOSS-QL function mappings, as well as the default mapping for standard Java types. Here is the mapping for java.lang.String:
    <mapping>
        <java-type>java.lang.String</java-type>
        <jdbc-type>VARCHAR</jdbc-type>
        <sql-type>VARCHAR(250) BINARY</sql-type>
    </mapping>
If you need to change the mapping for strings for all MySQL databases in the system, you can edit the standardjbosscmp-jdbc.xml file. In general you’ll probably want to edit the mapping on a field-by-field basis, but it is nice to know that you have the power to edit the systemwide mapping if need be.
The jbosscmp-jdbc.xml file is placed in the META-INF directory of the EJB JAR, right next to the ejb-jar.xml and jboss.xml deployment descriptors. In order to include the MySQL-specific jbosscmp-jdbc.xml file, add -Doptional.dd=mysql to the ant commands used to build the ToDo application, as shown here:
$ ant -Doptional.dd=mysql main deployThis builds and deploys the MySQL version of the application.
The ToDo application is no longer speaking to the internal Hypersonic database. Instead it is speaking to the MySQL instance you set up. And just as before, JBoss automatically created the database schema appropriate for our entity beans. You can check to see that our tables were created correctly using the show tables command:
    mysql> use jbossdb;
    Database changed
    mysql> show tables;
    +-------------------+
    | Tables_in_jbossdb |
    +-------------------+
    | Comment           |
    | Task              |
    +-------------------+
    2 rows in set (0.19 sec)
You can check the generated schema for the table using the describe command:
    mysql> describe task;
    +---------------+--------------+------+-----+---------+-------+
    | Field         | Type         | Null | Key | Default | Extra |
    +---------------+--------------+------+-----+---------+-------+
    | id            | varchar(250) |      | PRI |         |       |
    | name          | varchar(250) | YES  |     | NULL    |       |
    | user          | varchar(250) | YES  |     | NULL    |       |
    | startedDate   | datetime     | YES  |     | NULL    |       |
    | completedDate | datetime     | YES  |     | NULL    |       |
    +---------------+--------------+------+-----+---------+-------+
    5 rows in set (0.42 sec)
If you access the application and create a few tasks, you can easily query the data from the mysql tool and verify that everything is working:
    mysql> select name,user,startedDate from task;
    +---------------------+-------+---------------------+
    | name                | user  | startedDate         |
    +---------------------+-------+---------------------+
    | take over the world | brain | 2005-01-18 00:50:29 |
    | eat the box         | pinky | 2005-01-18 00:51:22 |
    +---------------------+-------+---------------------+
2 rows in set (0.20 sec)We’ve spent all our time looking at how to create the datasource, but we haven’t mentioned how you can interact with the underlying connection pool during the life of your application. You need to set up the datasource only once, but your application will use it every day. In this lab we will find the connection pool and see how to interact with its management interface to monitor and tune it.
Each datasource declared in a ds.xml file translates into several MBeans that you can interact with in the JMX Console. All the datasource-related objects are in the jboss.jca domain. You can find them by searching through the JMX Console page, or by using jboss.jca:* as the query filter.
This is enough of a filter to spot the items related to the MySQL datasource, but you could use a more specific filter, such as jboss.jca:name=MySqlDS,*, to see only the MySQL entries. In either case, four MBeans will be related to the MySQL datasource:
name=MySqlDS,service=DataSourceBindingname=MySqlDS,service=LocalTxCMname=MySqlDS,service=ManagedConnectionFactoryname=MySqlDS,service=ManagedConnectionPool
While each plays a critical role in providing the datasource functionality in JBoss, you are most likely to need to interact with the connection pool. Click the connection pool MBean to expose the management attributes and operations.
The mysql-ds.xml file we’ve been using specified a minimum connection pool size of 2 and a maximum pool size of 10. You’ll see those values reflected in the MinSize and MaxSize attributes. You can change the values in the running server by adjusting the values and clicking Apply Changes.
Setting the values here affects the connection pool only in memory. To change the configuration permanently, update the mysql-ds.xml file. Try setting the pool sizes there. When you save the file, JBoss will redeploy the datasource and the new pool sizes will be displayed when you reload the page.
You might occasionally want to adjust the pool size to account for usage; you are more likely to be curious how much of the connection pool is being used. The ConnectionCount attribute shows how many connections are currently open to the database. However, open connections are not necessarily in use by application code. The InUseConnectionCount attribute shows how many of the open connections are in use. Viewing the statistic from the other direction, AvailableConnectionCount shows how much room is left in the pool.
Finally, the MBean has several statistics that track connection pool usage over the pool’s lifetime. ConnectionCreatedCount and Connection-DestroyedCount keep running totals of the number of connections created and destroyed by the pool. If IdleTimeout is greater than 0, connections will eventually timeout, be destroyed, and be replaced by fresh connections. This will cause the created and destroyed counts to rise constantly. The MaxConnectionsInUseCount attribute keeps track of the highest number of connections in use at a time.
If you notice anything awkward in the connection pool, or you just want to reset the statistics, you can flush the connection pool using the flush operation on the MBean. This will cause a new connection pool to be created, abandoning the previous connection pool.
You’ve seen a whole set of attributes that will prove invaluable when you need to understand how an application is using its database connections. All the MBean attributes are visible through the JMX management tool of your choice. We’ve used the JBoss JMX Console in this lab, but other options exist.
Note
We will use some of the more advanced monitoring and alerting features of the web console in Chapter 8.
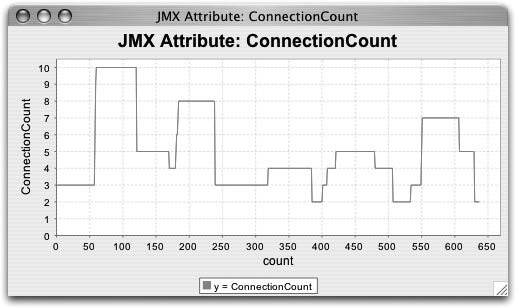
To give you a taste of what you can do, Figure 4-2 shows a graph of the ConnectionCount attribute over a short, 10-minute time period that we used the ToDo application. The graph was created by the JBoss Web Console application, the GUI companion to the JMX Console we’ve been using.
Get JBoss: A Developer's Notebook now with the O’Reilly learning platform.
O’Reilly members experience books, live events, courses curated by job role, and more from O’Reilly and nearly 200 top publishers.

