Client-side JavaScript does not exhibit the nonlinear cross-reference problem nearly to the extent that the core language does, and it is possible to learn how to use JavaScript in web browsers in a fairly linear sequence. But you’re probably reading this book to learn client-side JavaScript, and Part II is a long way off, so this section is a quick sketch of basic client-side programming techniques, followed by an in-depth example.
Chapter 13, JavaScript in Web Browsers, is the
first chapter of Part II and it explains in detail how
to put JavaScript to work in web browsers. The most important thing
you’ll learn in that chapter is that JavaScript code can be embedded
within HTML files using the <script> tag:
<html><head><scriptsrc="library.js"></script><!-- include a library of JavaScript code --></head><body><p>This is a paragraph of HTML</p><script>// And this is some client-side JavaScript code// literally embedded within the HTML file</script><p>Here is more HTML.</p></body></html>
Chapter 14, The Window Object, explains techniques for scripting the web browser and covers some important global functions of client-side JavaScript. For example:
<script>functionmoveon(){// Display a modal dialog to ask the user a questionvaranswer=confirm("Ready to move on?");// If they clicked the "OK" button, make the browser load a new pageif(answer)window.location="http://google.com";}// Run the function defined above 1 minute (60,000 milliseconds) from now.setTimeout(moveon,60000);</script>
Note that the client-side example code shown in this section comes in longer snippets than the core language examples earlier in the chapter. These examples are not designed to be typed into a Firebug (or similar) console window. Instead you can embed them in an HTML file and try them out by loading them in your web browser. The code above, for instance, works as a stand-alone HTML file.
Chapter 15, Scripting Documents, gets down to the real business of client-side JavaScript, scripting HTML document content. It shows you how to select particular HTML elements from within a document, how to set HTML attributes of those elements, how to alter the content of those elements, and how to add new elements to the document. This function demonstrates a number of these basic document searching and modification techniques:
// Display a message in a special debugging output section of the document.// If the document does not contain such a section, create one.functiondebug(msg){// Find the debugging section of the document, looking at HTML id attributesvarlog=document.getElementById("debuglog");// If no element with the id "debuglog" exists, create one.if(!log){log=document.createElement("div");// Create a new <div> elementlog.id="debuglog";// Set the HTML id attribute on itlog.innerHTML="<h1>Debug Log</h1>";// Define initial contentdocument.body.appendChild(log);// Add it at end of document}// Now wrap the message in its own <pre> and append it to the logvarpre=document.createElement("pre");// Create a <pre> tagvartext=document.createTextNode(msg);// Wrap msg in a text nodepre.appendChild(text);// Add text to the <pre>log.appendChild(pre);// Add <pre> to the log}
Chapter 15 shows how JavaScript can script the
HTML elements that define web content. Chapter 16, Scripting CSS, shows how you can use JavaScript with the
CSS styles that define the presentation of that content. This is often
done with the style or class attribute of HTML elements:
functionhide(e,reflow){// Hide the element e by scripting its styleif(reflow){// If 2nd argument is truee.style.display="none";// hide element and use its space}else{// Otherwisee.style.visibility="hidden";// make e invisible, but leave its space}}functionhighlight(e){// Highlight e by setting a CSS class// Simply define or append to the HTML class attribute.// This assumes that a CSS stylesheet already defines the "hilite" classif(!e.className)e.className="hilite";elsee.className+=" hilite";}
JavaScript allows us to script the HTML content and CSS presentation of documents in web browsers, but it also allows us to define behavior for those documents with event handlers. An event handler is a JavaScript function that we register with the browser and the browser invokes when some specified type of event occurs. The event of interest might be a mouse click or a key press (or on a smart phone, it might be a two-finger gesture of some sort). Or an event handler might be triggered when the browser finishes loading a document, when the user resizes the browser window, or when the user enters data into an HTML form element. Chapter 17, Handling Events, explains how you can define and register event handlers and how the browser invokes them when events occur.
The simplest way to define event handlers is with HTML attributes
that begin with “on”. The “onclick” handler is a particularly useful one
when you’re writing simple test programs. Suppose that you had typed in
the debug() and hide() functions from above and saved them in
files named debug.js and
hide.js. You could write a simple HTML test file
using <button> elements with
onclick event handler
attributes:
<scriptsrc="debug.js"></script><scriptsrc="hide.js"></script>Hello<buttononclick="hide(this,true); debug('hide button 1');">Hide1</button><buttononclick="hide(this); debug('hide button 2');">Hide2</button>World
Here is some more client-side JavaScript code that uses events. It registers an event handler for the very important “load” event, and it also demonstrates a more sophisticated way of registering event handler functions for “click” events:
// The "load" event occurs when a document is fully loaded. Usually we// need to wait for this event before we start running our JavaScript code.window.onload=function(){// Run this function when the document loads// Find all <img> tags in the documentvarimages=document.getElementsByTagName("img");// Loop through them, adding an event handler for "click" events to each// so that clicking on the image hides it.for(vari=0;i<images.length;i++){varimage=images[i];if(image.addEventListener)// Another way to register a handlerimage.addEventListener("click",hide,false);else// For compatibility with IE8 and beforeimage.attachEvent("onclick",hide);}// This is the event handler function registered abovefunctionhide(event){// srcElement needed for IE8, target for Chrome and Firefoxvartarget=event.target?event.target:event.srcElement;target.style.visibility="hidden";}};
Chapters 15, 16, and 17 explain how you can use JavaScript to script the content (HTML), presentation (CSS), and behavior (event handling) of web pages. The APIs described in those chapters are somewhat complex and, until recently, riddled with browser incompatibilities. For these reasons, many or most client-side JavaScript programmers choose to use a client-side library or framework to simplify their basic programming tasks. The most popular such library is jQuery, the subject of Chapter 19, The jQuery Library . jQuery defines a clever and easy-to-use API for scripting document content, presentation, and behavior. It has been thoroughly tested and works in all major browsers, including old ones like IE6.
jQuery code is easy to identify because it makes frequent use of a
function named $(). Here is what the debug() function used previously looks like
when rewritten to use jQuery:
functiondebug(msg){varlog=$("#debuglog");// Find the element to display msg in.if(log.length==0){// If it doesn't exist yet, create it...log=$("<div id='debuglog'><h1>Debug Log</h1></div>");log.appendTo(document.body);// and insert it at the end of the body.}log.append($("<pre/>").text(msg));// Wrap msg in <pre> and append to log.}
The four chapters of Part II described so far
have all really been about web pages. Four more
chapters shift gears to focus on web applications.
These chapters are not about using web browsers to display documents
with scriptable content, presentation, and behavior. Instead, they’re
about using web browsers as application platforms, and they describe the
APIs that modern browsers provide to support sophisticated client-side
web apps. Chapter 18, Scripted HTTP, explains
how to make scripted HTTP requests with JavaScript—a kind of networking
API. Chapter 20, Client-Side Storage, describes
mechanisms for storing data—and even entire applications—on the client
side for use in future browsing sessions. Chapter 21, Scripted Media and Graphics, covers a client-side API for drawing
arbitrary graphics in an HTML <canvas> tag. And, finally, Chapter 22, HTML5 APIs, covers an assortment of
new web app APIs specified by or affiliated with HTML5. Networking,
storage, graphics: these are OS-type services being provided by the web
browser, defining a new cross-platform application environment. If you
are targeting browsers that support these new APIs, it is an exciting
time to be a client-side JavaScript programmer. There are no code
samples from these final four chapters here, but the extended example
below uses some of these new APIs.
This chapter ends with an extended example that puts many of these techniques together and shows what real-world client-side JavaScript (plus HTML and CSS) programs look like. Example 1-1 lists the code for the simple loan payment calculator application pictured in Figure 1-2.
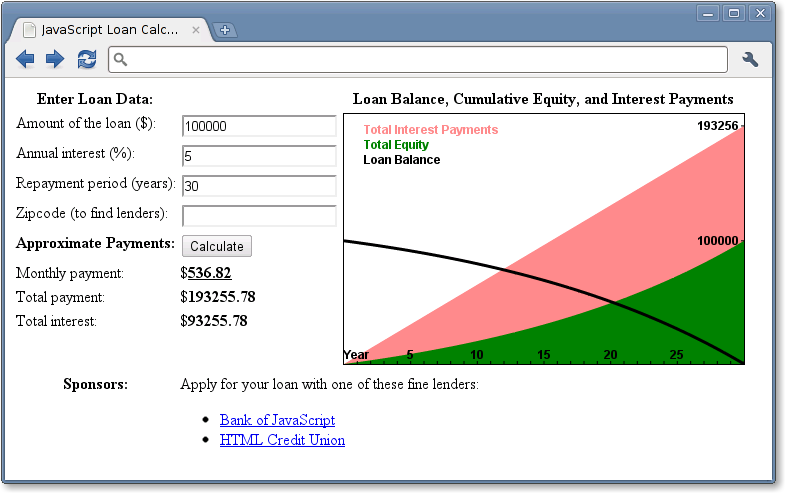
It is worth reading through Example 1-1 carefully. You shouldn’t expect to understand everything, but the code is heavily commented and you should be able to at least get the big-picture view of how it works. The example demonstrates a number of core JavaScript language features, and also demonstrates important client-side JavaScript techniques:
How to find elements in a document.
How to get user input from form input elements.
How to set the HTML content of document elements.
How to store data in the browser.
How to make scripted HTTP requests.
How to draw graphics with the
<canvas>element.
Example 1-1. A loan calculator in JavaScript
<!DOCTYPE html><html><head><title>JavaScript Loan Calculator</title><style>/* This is a CSS style sheet: it adds style to the program output */.output{font-weight:bold;}/* Calculated values in bold */#payment{text-decoration:underline;}/* For element with id="payment" */#graph{border:solidblack1px;}/* Chart has a simple border */th,td{vertical-align:top;}/* Don't center table cells */</style></head><body><!--This is an HTML table with <input> elements that allow the user to enter dataand <span> elements in which the program can display its results.These elements have ids like "interest" and "years". These ids are usedin the JavaScript code that follows the table. Note that some of the inputelements define "onchange" or "onclick" event handlers. These specify stringsof JavaScript code to be executed when the user enters data or clicks.--><table><tr><th>Enter Loan Data:</th><td></td><th>Loan Balance, Cumulative Equity, and Interest Payments</th></tr><tr><td>Amount of the loan ($):</td><td><inputid="amount"onchange="calculate();"></td><tdrowspan=8><canvasid="graph"width="400"height="250"></canvas></td></tr><tr><td>Annual interest (%):</td><td><inputid="apr"onchange="calculate();"></td></tr><tr><td>Repayment period (years):</td><td><inputid="years"onchange="calculate();"></td></tr><tr><td>Zipcode (to find lenders):</td><td><inputid="zipcode"onchange="calculate();"></td></tr><tr><th>Approximate Payments:</th><td><buttononclick="calculate();">Calculate</button></td></tr><tr><td>Monthly payment:</td><td>$<spanclass="output"id="payment"></span></td></tr><tr><td>Total payment:</td><td>$<spanclass="output"id="total"></span></td></tr><tr><td>Total interest:</td><td>$<spanclass="output"id="totalinterest"></span></td></tr><tr><th>Sponsors:</th><tdcolspan=2>Apply for your loan with one of these fine lenders:<divid="lenders"></div></td></tr></table><!-- The rest of this example is JavaScript code in the <script> tag below --><!-- Normally, this script would go in the document <head> above but it --><!-- is easier to understand here, after you've seen its HTML context. --><script>"use strict"; // Use ECMAScript 5 strict mode in browsers that support it /* * This script defines the calculate() function called by the event handlers * in HTML above. The function reads values from<input>elements, calculates * loan payment information, displays the results in<span>elements. It also * saves the user's data, displays links to lenders, and draws a chart. */ function calculate() { // Look up the input and output elements in the document var amount = document.getElementById("amount"); var apr = document.getElementById("apr"); var years = document.getElementById("years"); var zipcode = document.getElementById("zipcode"); var payment = document.getElementById("payment"); var total = document.getElementById("total"); var totalinterest = document.getElementById("totalinterest"); // Get the user's input from the input elements. Assume it is all valid. // Convert interest from a percentage to a decimal, and convert from // an annual rate to a monthly rate. Convert payment period in years // to the number of monthly payments. var principal = parseFloat(amount.value); var interest = parseFloat(apr.value) / 100 / 12; var payments = parseFloat(years.value) * 12; // Now compute the monthly payment figure. var x = Math.pow(1 + interest, payments); // Math.pow() computes powers var monthly = (principal*x*interest)/(x-1); // If the result is a finite number, the user's input was good and // we have meaningful results to display if (isFinite(monthly)) { // Fill in the output fields, rounding to 2 decimal places payment.innerHTML = monthly.toFixed(2); total.innerHTML = (monthly * payments).toFixed(2); totalinterest.innerHTML = ((monthly*payments)-principal).toFixed(2); // Save the user's input so we can restore it the next time they visit save(amount.value, apr.value, years.value, zipcode.value); // Advertise: find and display local lenders, but ignore network errors try { // Catch any errors that occur within these curly braces getLenders(amount.value, apr.value, years.value, zipcode.value); } catch(e) { /* And ignore those errors */ } // Finally, chart loan balance, and interest and equity payments chart(principal, interest, monthly, payments); } else { // Result was Not-a-Number or infinite, which means the input was // incomplete or invalid. Clear any previously displayed output. payment.innerHTML = ""; // Erase the content of these elements total.innerHTML = "" totalinterest.innerHTML = ""; chart(); // With no arguments, clears the chart } } // Save the user's input as properties of the localStorage object. Those // properties will still be there when the user visits in the future // This storage feature will not work in some browsers (Firefox, e.g.) if you // run the example from a local file:// URL. It does work over HTTP, however. function save(amount, apr, years, zipcode) { if (window.localStorage) { // Only do this if the browser supports it localStorage.loan_amount = amount; localStorage.loan_apr = apr; localStorage.loan_years = years; localStorage.loan_zipcode = zipcode; } } // Automatically attempt to restore input fields when the document first loads. window.onload = function() { // If the browser supports localStorage and we have some stored data if (window.localStorage&&localStorage.loan_amount) { document.getElementById("amount").value = localStorage.loan_amount; document.getElementById("apr").value = localStorage.loan_apr; document.getElementById("years").value = localStorage.loan_years; document.getElementById("zipcode").value = localStorage.loan_zipcode; } }; // Pass the user's input to a server-side script which can (in theory) return // a list of links to local lenders interested in making loans. This example // does not actually include a working implementation of such a lender-finding // service. But if the service existed, this function would work with it. function getLenders(amount, apr, years, zipcode) { // If the browser does not support the XMLHttpRequest object, do nothing if (!window.XMLHttpRequest) return; // Find the element to display the list of lenders in var ad = document.getElementById("lenders"); if (!ad) return; // Quit if no spot for output // Encode the user's input as query parameters in a URL var url = "getLenders.php" + // Service url plus "?amt=" + encodeURIComponent(amount) + // user data in query string "&apr=" + encodeURIComponent(apr) + "&yrs=" + encodeURIComponent(years) + "&zip=" + encodeURIComponent(zipcode); // Fetch the contents of that URL using the XMLHttpRequest object var req = new XMLHttpRequest(); // Begin a new request req.open("GET", url); // An HTTP GET request for the url req.send(null); // Send the request with no body // Before returning, register an event handler function that will be called // at some later time when the HTTP server's response arrives. This kind of // asynchronous programming is very common in client-side JavaScript. req.onreadystatechange = function() { if (req.readyState == 4&&req.status == 200) { // If we get here, we got a complete valid HTTP response var response = req.responseText; // HTTP response as a string var lenders = JSON.parse(response); // Parse it to a JS array // Convert the array of lender objects to a string of HTML var list = ""; for(var i = 0; i< lenders.length;i++){list+="<li><ahref='" + lenders[i].url + "'>" + lenders[i].name + "</a>"; } // Display the HTML in the element from above. ad.innerHTML = "<ul>" + list + "</ul>"; } } } // Chart monthly loan balance, interest and equity in an HTML<canvas>element. // If called with no arguments then just erase any previously drawn chart. function chart(principal, interest, monthly, payments) { var graph = document.getElementById("graph"); // Get the<canvas>tag graph.width = graph.width; // Magic to clear and reset the canvas element // If we're called with no arguments, or if this browser does not support // graphics in a<canvas>element, then just return now. if (arguments.length == 0 || !graph.getContext) return; // Get the "context" object for the<canvas>that defines the drawing API var g = graph.getContext("2d"); // All drawing is done with this object var width = graph.width, height = graph.height; // Get canvas size // These functions convert payment numbers and dollar amounts to pixels function paymentToX(n) { return n * width/payments; } function amountToY(a) { return height-(a * height/(monthly*payments*1.05));} // Payments are a straight line from (0,0) to (payments, monthly*payments) g.moveTo(paymentToX(0), amountToY(0)); // Start at lower left g.lineTo(paymentToX(payments), // Draw to upper right amountToY(monthly*payments)); g.lineTo(paymentToX(payments), amountToY(0)); // Down to lower right g.closePath(); // And back to start g.fillStyle = "#f88"; // Light red g.fill(); // Fill the triangle g.font = "bold 12px sans-serif"; // Define a font g.fillText("Total Interest Payments", 20,20); // Draw text in legend // Cumulative equity is non-linear and trickier to chart var equity = 0; g.beginPath(); // Begin a new shape g.moveTo(paymentToX(0), amountToY(0)); // starting at lower-left for(var p = 1; p<= payments; p++) { // For each payment, figure out how much is interest var thisMonthsInterest = (principal-equity)*interest; equity += (monthly - thisMonthsInterest); // The rest goes to equity g.lineTo(paymentToX(p),amountToY(equity)); // Line to this point } g.lineTo(paymentToX(payments), amountToY(0)); // Line back to X axis g.closePath(); // And back to start point g.fillStyle = "green"; // Now use green paint g.fill(); // And fill area under curve g.fillText("Total Equity", 20,35); // Label it in green // Loop again, as above, but chart loan balance as a thick black line var bal = principal; g.beginPath(); g.moveTo(paymentToX(0),amountToY(bal)); for(var p = 1; p<= payments; p++) { var thisMonthsInterest = bal*interest; bal -= (monthly - thisMonthsInterest); // The rest goes to equity g.lineTo(paymentToX(p),amountToY(bal)); // Draw line to this point } g.lineWidth = 3; // Use a thick line g.stroke(); // Draw the balance curve g.fillStyle = "black"; // Switch to black text g.fillText("Loan Balance", 20,50); // Legend entry // Now make yearly tick marks and year numbers on X axis g.textAlign="center"; // Center text over ticks var y = amountToY(0); // Y coordinate of X axis for(var year=1; year*12<= payments; year++) { // For each year var x = paymentToX(year*12); // Compute tick position g.fillRect(x-0.5,y-3,1,3); // Draw the tick if (year == 1) g.fillText("Year", x, y-5); // Label the axis if (year % 5 == 0&&year*12 !== payments) // Number every 5 years g.fillText(String(year), x, y-5); } // Mark payment amounts along the right edge g.textAlign = "right"; // Right-justify text g.textBaseline = "middle"; // Center it vertically var ticks = [monthly*payments, principal]; // The two points we'll mark var rightEdge = paymentToX(payments); // X coordinate of Y axis for(var i = 0; i< ticks.length;i++){//Foreachofthe2pointsvary =amountToY(ticks[i]);//ComputeYpositionoftickg.fillRect(rightEdge-3, y-0.5, 3,1); // Draw the tick mark g.fillText(String(ticks[i].toFixed(0)), // And label it. rightEdge-5, y); } }</script></body></html>
Get JavaScript: The Definitive Guide, 6th Edition now with the O’Reilly learning platform.
O’Reilly members experience books, live events, courses curated by job role, and more from O’Reilly and nearly 200 top publishers.

