In the remainder of this chapter, we will build and run a sample application that demonstrates each MBean instrumentation approach. The sections that follow look at the design of the application, where to obtain the source code, how to actually build and run the application, and how to monitor the application via a web browser.
In this section, we will take a look at how the sample application is designed, so that you can better understand what is going on when you see it run. First, we will look at the pattern that is fundamental to the application’s design. Then we will see how the pattern is implemented and what classes constitute the source code for the application.
The design pattern used in the application is a monitor. A monitor is a construct that coordinates activity between multiple threads in the system. In this pattern, the monitor coordinates activities between two categories of threads: producer threads and consumer threads. As you might imagine, a producer thread provides something that the consumer uses. That “something” is generically defined as a unit of work. This can be physically realized as anything relevant to a problem that is solved by this pattern.
For example, the unit of work might be an email message that is sent to the email system (the monitor) by the producer (an email client) and removed by the consumer (some agent on the incoming email server side). The producer might perform additional processing on the message before sending it to the email system, such as checking the spelling. By the same token, the consumer may perform additional processing of the message after removing it from the queue, such as applying an anti-virus check. For this reason, we will refer to the pattern as “value-added producer/consumer.” This pattern is shown in UML notation in Figure 1-9.
As you can see in Figure 1-9, the producer and consumer are separated (decoupled) by the monitor. This pattern is best applied to systems that are inherently asynchronous in nature, where the producer and consumer are decoupled by varying degrees. This decoupling can be a separation of location as well as of synchronicity.
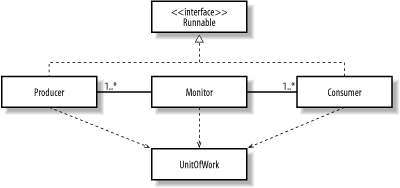
The implementation of the value-added producer/consumer pattern is shown in Figure 1-10. The classes in the diagram are implemented as Java classes. The stereotypes shown in the diagram are named according to the pattern shown in Figure 1-9.

Basic is the base
class for all of the classes that
make up the implementation (with the exception of
WorkUnit, which represents the unit of work that
is exchanged between Supplier and
Consumer). Controller is a
class that acts as the JMX agent and is responsible for creating the
producer and consumer threads that run inside the application.
Queue is a thread-safe queue that acts as the
monitor. Producer threads place items in the queue in a thread-safe
way, and consumer threads remove them. Worker is
the base class for Supplier and
Consumer, because much of their behavior is
common.
In the sample application, the following resources can be managed:
ControllerQueueSupplierConsumer
I encourage you to look at the source code to see exactly what attributes and operations are on each of the management interfaces for these resources.
The source
code for the application
is standalone
with respect to each type of
instrumentation approach. There are three versions of the
application, each in its own package. The name of the package
corresponds to the instrumentation approach. For example, with the
exception of common classes such as
GenericException, the application source code for
standard MBeans is entirely contained in the
standard package; thus, if you install the source
code to c:\jmxbook, the path to the application
source code for standard MBeans will be
c:\jmxbook\sample\standard. All of the source
code shares the contents of the exception package.
Other than that, however, the application can be built and run
independently of the other packages.
For each type of MBean, there is a Windows batch file and a Unix
(Korn shell) script that builds and runs the code for that
instrumentation strategy. The name of the script or batch file
matches the instrumentation strategy: for example, the build script
for dynamic MBeans is called dynamic.sh, and the
batch file for building the source code for the version of the
application instrumented as dynamic MBeans is called
dynamic.bat. The major differences between the
application versions are in the source code. The console output and
the management view will show very little difference (other than
output from the Ant build script) between the versions of the
application.
Before you can build and run the sample application (see Section P.5 in the Preface for details on how to obtain the application’s source code), you must download the JMX RI and Jakarta Ant. For this book, I used JMX RI 1.0.1 and Ant 1.4. You can obtain the JMX RI at http://java.sun.com/products/JavaManagement/ and Jakarta Ant at http://jakarta.apache.org/ant/index.html.
The name of the build file Ant uses to build the application for all
of the instrumentation strategies is build.xml.
The build scripts are designed to work with
very little modification on your part. However, you may have to
modify either the build script or the Ant build file, depending on
where you installed the JDK, the JMX RI, and Ant itself. Example 1-5 shows an excerpt from
build.xml.
Example 1-5. Selected portions of the Ant build file for the application, build.xml
.
.
.
<project name="jmxbook" default="standard" basedir=".">

<!-- Set global properties -->
<property name="source_root" value="c:\jmxbook\sample"/>
<property name="jmx_home" value="c:\jmx1.0.1"/>

<path id="project.general.class.path">
  <pathelement path="${jmx_home}\jmx\lib\jmxri.jar"/>
  <pathelement path="${jmx_home}\jmx\lib\jmxtools.jar"/>
  <pathelement path="."/>
</path>

<!-- Build the init target -->
<target name="init">
  <!-- create the time stamp -->
  <tstamp>
    <format property="build.start.time" pattern="MM/dd/yyyy hh:mm:ss aa"/>
  </tstamp>
  <echo message="Build started at ${build.start.time}..."/>
</target>

<!-- Build the exception target -->
<target name="build-exception" depends="init">
  <javac>
    <classpath refid="project.general.class.path"/>
    <src path="${source_root}"/>
    <include name="exception\*"/>
  </javac>
</target>

<!-- Build the "standard" target -->
<target name="build-standard" depends="build-exception">
  <javac>
    <classpath refid="project.general.class.path"/>
    <src path="${source_root}"/>
    <include name="standard\*"/>
  </javac>
</target>

<!-- Build the "dynamic" target -->
<target name="build-dynamic" depends="build-exception">
  <javac>
    <classpath refid="project.general.class.path"/>
    <src path="${source_root}"/>
    <include name="dynamic\*"/>
  </javac>
</target>

<!-- Build the "model" target -->
<target name="build-model" depends="build-exception">
  <javac>
    <classpath refid="project.general.class.path"/>
    <src path="${source_root}"/>
    <include name="model\*"/>
  </javac>
</target>
.
.
.
</project>
As you can see, the Ant
build
file is an XML document. This is what sets Ant apart from other build
utilities, such as make. Each component to be
built using Ant is called a target. A target may
have one or more dependent targets that must be built first, each of
which may be dependent on other targets, and so on. Ant resolves
these dependencies for you. A target is specified in an Ant build
file as an XML tag called target and has the
following format:
<target name="mytarget" depends="d1,d2">
in which case mytarget depends on targets
d1 and d2, or:
<target name="mytarget">
if mytarget has no dependent targets.
Let’s look at the build-standard
target from Example 1-5:
<!-- Build the "standard" target -->
<target name="build-standard" depends="build-exception">
  <javac>
    <classpath refid="project.general.class.path"/>
    <src path="${source_root}"/>
    <include name="standard\*"/>
  </javac>
</target>
You can see that the build-standard target depends
on the build-exception target. Ant knows that
there may be other dependencies, so it looks at
build-exception:
<!-- Build the exception target -->
<target name="build-exception" depends="init">
  <javac>
    <classpath refid="project.general.class.path"/>
    <src path="${source_root}"/>
    <include name="exception\*"/>
  </javac>
</target>
and notices that build-exception depends on
init. Ant then looks at init:
<target name="init">
  <!-- create the time stamp -->
  <tstamp>
    <format property="build.start.time" pattern="MM/dd/yyyy hh:mm:ss aa"/>
  </tstamp>
  <echo message="Build started at ${build.start.time}..."/>
</target>
Ant sees that init has no dependencies, so it
begins the build. init is built first, followed by
build-exception and finally
build-standard. Notice the
javac tag within build-standard
and build-exception. This is known as an Ant
task.
A task is a Java class that executes within the JVM in which Ant is
running (unless you tell Ant to fork a new process when executing the
task). The javac task is the java compiler. The
classpath, src, and
include tags nested within the
javac task tell the Java compiler what the
CLASSPATH is, the root location of the
.java files, and the packages (directories) to
compile, respectively.
The application classes for each chapter in this book are built and
run using either a batch file or a shell script. If you are running
the application on Windows (as I did to produce the screen shots for
this chapter), use the batch file (i.e., the
.bat file). If you are running the application
on Unix, use the shell script (i.e., the .sh
file). Throughout the rest of this chapter, the examples will be
Windows-based. There are two reasons for this. First, because of the
popularity of Windows, it is likely that most developers will be
running this operating system. Second, the differences in the
behavior of the application when it is run on Windows versus Unix are
negligible.
To build and run the application, type in the name of the batch file you want to run, based on the type of MBean instrumentation strategy you want to see in action. You will notice that there is no detectable difference between what you see when you run the build/run batch file and what you see in your browser (discussed in the next section), regardless of the instrumentation strategy. Suppose we want to run the standard MBean batch file, which will build and run the application as standard MBeans. Example 1-6 shows the batch file that builds the application.
Example 1-6. standard.bat, the batch file that builds the application as standard MBeans
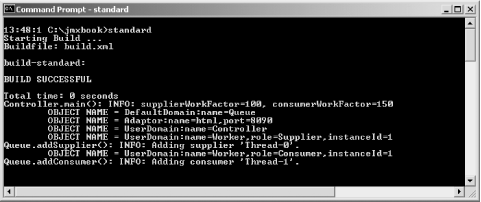
@set TARGET_NAME=build-standard
@set JAVA_HOME=c:\jdk1.3.1
@set ANT_VERSION=1.4
@set ANT_HOME=c:\ant%ANT_VERSION%

@echo Starting Build ...

call %ANT_HOME%\bin\ant %TARGET_NAME%

if NOT "%ERRORLEVEL%"=="0" goto DONE

%JAVA_HOME%\bin\java sample.standard.Controller 100 150

:DONE
This batch file is very simple. Aside from setting a few environment variables, it does only two things: it builds the application by calling Ant, and, if that succeeds, it starts the application. Figure 1-11 shows the output of running the batch file. Recall our earlier discussion of how Ant resolves target dependencies; you’ll see that the targets are built in the order described there.
All of the batch files (standard.bat,
dynamic.bat, and model.bat)
operate as described below, but I’ve used
standard.bat here for the purposes of
illustration.
In each version of the application, Controller
contains the
main( ) method that
starts the producer and consumer threads and is itself an MBean that
can be managed and monitored. There are two command-line arguments to
Controller’s main(
) method: the work factor for the producer thread and the
work factor for the consumer thread. Notice that in
standard.bat values of 100
and 150, respectively, are specified for these
arguments. I set these values for a reason: it is unlikely that you
will find an application of the value-added producer/consumer pattern
where the producer and consumer perform an equal amount of work.
These command-line parameters to Controller allow
you to simulate this asymmetry. When Controller is
started, one producer thread and one consumer thread are created.
However, Controller has a management method that
allows you to start additional threads to balance out the workload
(we will see how to do this later).
Figure 1-10 illustrates the relationship between the
various classes in the application, where there is a single
Queue object into which
Supplier threads place WorkUnit
objects and from which Consumer threads remove
them. For a single unit of work, here is the flow of control:
The
Supplierperforms an amount of work N—where N is specified on the command line toController—and places a singleWorkUnitobject into theQueue.The
Consumerremoves a singleWorkUnitobject from theQueueand performs an amount of work M—again, where M is specified on the command line toController.
These steps are repeated for each work unit.
Tip
The work that is performed
by Supplier and
Consumer threads is to calculate prime numbers.
The amount of work specified on the command line to
Controller is the number of prime numbers to
calculate for each WorkUnit. The
Supplier calculates N primes,
then places a WorkUnit object into the
Queue. The Consumer removes a
WorkUnit object from the Queue
and then calculates M primes.
This section looked at how to run the sample application and briefly discussed what it is doing internally to simulate the production and consumption of units of work. I strongly encourage you to examine the source code for yourself to see the various attributes and operations available on the management interfaces of each resource in the application.
In the next section, we will look at how to use a web browser to monitor and manage the sample application’s MBeans.
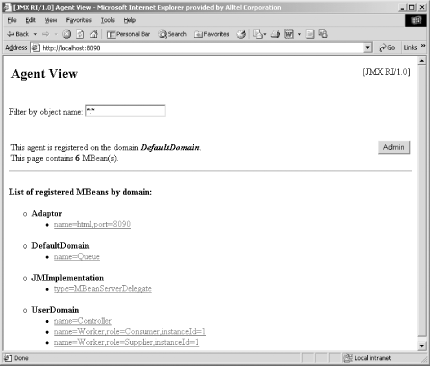
Once the
application
is running, you can point your web browser to port 8090 (the
default—you can change this, but if you do so, remember to
point your browser to the new port number). Figure 1-12 shows the result of pointing my web browser
(which happens to be Internet Explorer) to port 8090 after running
standard.bat.
Remember the work factors that we specified on the command line to
Controller for the producer and consumer threads?
Because they are different (100 and
150, respectively), and the producer thread does
less work than the consumer thread for each work unit, I expect the
Queue to always be full once the application
reaches a steady state.
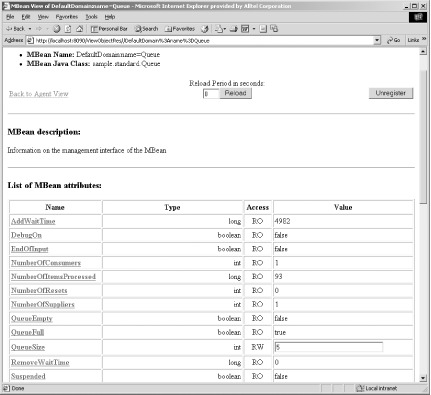
If I click on the Queue MBean in my browser, I see
the screen shown in Figure 1-13. There are several
interesting things about Figure 1-13. First, the
AddWaitTime attribute is much larger than the
RemoveWaitTime attribute. After processing 72
units of work (according to the
NumberOfItemsProcessed attribute), the
Supplier thread has waited a total of 3,421
milliseconds to add items to the Queue because it
was full, whereas the Consumer thread has not had
to wait at all to remove items (although, depending on which thread
actually starts first, you may see a small amount of
Consumer wait time). This is pretty much what we
would expect, as the Supplier thread does only
two-thirds the work of the Consumer thread.
Suppose we want to start another Consumer thread
to pick up some of the slack of the other Consumer
thread and balance things out a bit. For the moment,
let’s ignore the fact that we can control the amount
of work each type of Worker thread can perform. In
a real-world application, we would not have that luxury. As I
mentioned earlier in this chapter, Controller acts
as the JMX agent for the application, but it is also itself a managed
resource (i.e., an MBean). If we look at the management interface of
Controller, we’ll see that there
is a
management operation to start new
Worker threads, called createWorker(
). Figure 1-14 shows the management view
of the Controller MBean and its
createWorker( ) operation.
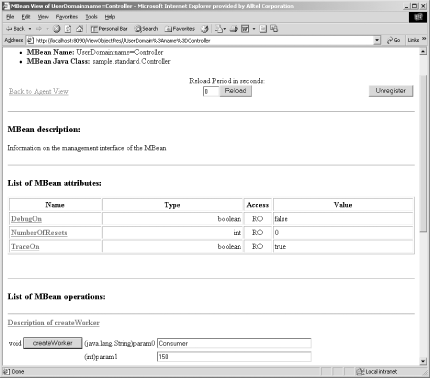
There are two parameters to createWorker( ): the
first is a string that contains the worker type, and the second is
the work factor that worker is to have (i.e., the number of primes
calculated per unit of work). The valid values for the worker type
are “Supplier” and
“Consumer”. We want to create a new
Consumer thread with the same work factor as the
currently running Consumer thread, so we set these
parameters to Consumer and 150,
respectively. Once we have entered the parameters for the management
operation into the text boxes, as shown in Figure 1-14, we click the
createWorker button to invoke the management
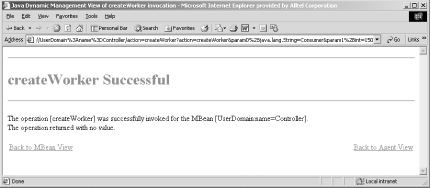
operation. If the operation succeeds, we will see a screen that looks
like Figure 1-15.
We would now expect that activity in the Queue has
balanced out somewhat, and we would expect to start seeing the
Supplier wait, as we now have two
Consumer threads at work. Figure 1-16 shows the management view of the
Queue after we start the second
Consumer thread.
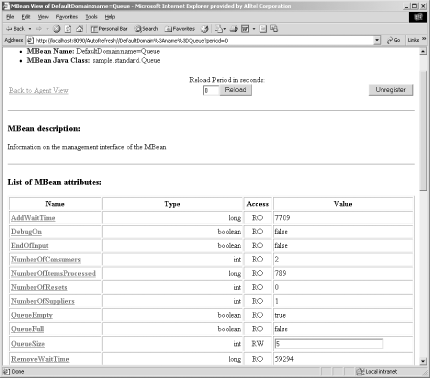
Notice that after processing 1,013 units of work (as we see from the
NumberOfItemsProcessed attribute), the
Consumer threads have waited nearly 7 times as
long as the Supplier thread. Through the use of
management operations, we can give an operator at a management
console the ability to tune our application at runtime.
Get Java Management Extensions now with the O’Reilly learning platform.
O’Reilly members experience books, live events, courses curated by job role, and more from O’Reilly and nearly 200 top publishers.

