Uh-oh, you’ve got an inventory problem at the warehouse, and an urgent order for one of your best customers is going to be late. Time to dash off an apologetic letter to break the bad news and smooth things over. At least Pages will help you to do it in style.
Launch Pages, and choose your template: From the Template Chooser, click the Letters category under Word Processing, and select your preferred template in the right pane. For this example, choose Modern Letter. Pages fills your new document window with the template design, including a few paragraphs of dummy text, ready to be replaced with your own mellifluous prose, as shown in Figure 1-3.
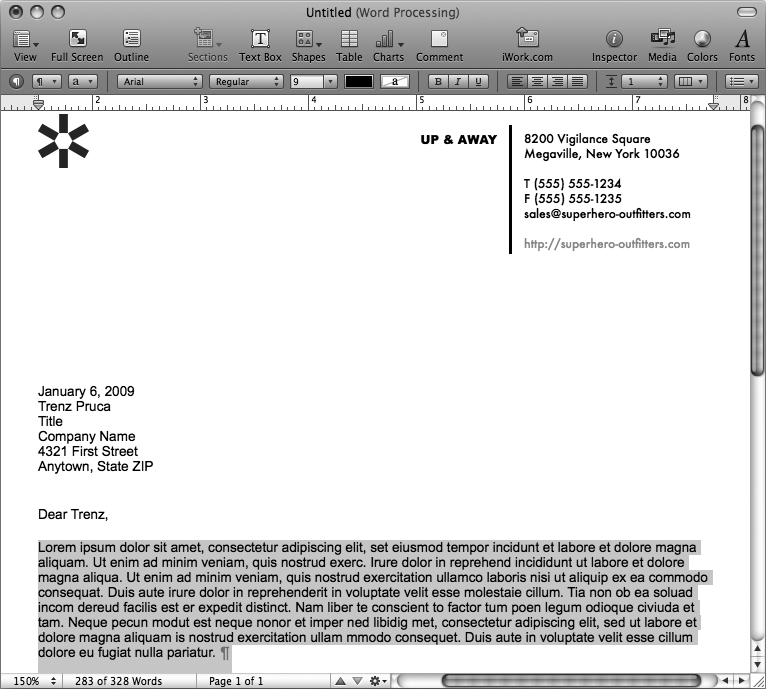
Figure 1-3. When you open a new document from a template, Pages fills out the whole layout for you, using temporary placeholder text filled with inscrutable “lorem ipsum” pseudo-Latin (see Immovable Objects: Locked, Background, and Master Objects for the ipso facto of “lorem ipsum”). Pages lets you know that you’re working with a word-processing document by slapping a “(Word Processing)” label on the top of the window.
Pages is even smart enough to go ahead and address the letter from you. This info comes straight from your Mac’s Address Book program, where Pages looks up your contact info and plucks out your work address—assuming you’ve entered it. (Some of the other letter templates prefer your home address; this particular business template assumes you’re at the office. See Managing Mass Mailings with Address Book Groups to find out how to swap your home and work info.)
Pages’ letter templates include merge fields, smart placeholders for sender and recipient address info which—you guessed it—merge info from Address Book into your letter. Sure enough, you can use Address Book to grab your customer’s contact info, too: Launch Address Book, find your customer, and drag the address card into your document as shown in Figure 1-4. Presto! The name, address, and even the salutation fill in automatically.
Tip
When you drag the address card, be sure to drag it sideways out of Address Book. If you drag up or down, you’ll only highlight other address cards. Also, don’t worry: Dragging a card out of Address Book doesn’t remove it from your little black book; you’re simply copying the card’s info into your Pages document.
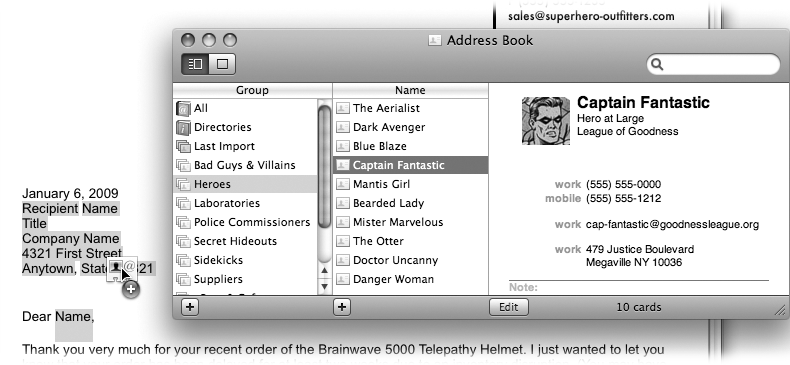
Figure 1-4. Drop an address card into your document to update the address. In letter templates, there are two sets of merge fields—one for the recipient and one for the sender—and Pages usually plunks the new info into the recipient’s fields. If you want to replace the sender’s address instead, drag the card directly on top of a sender field. Pages highlights all the info that will be updated and, when you drop the address card, updates the info in one fell swoop.
If you don’t have your dear customer in your address book—or if his address card doesn’t include info for some of the Address Book fields in the document—you’ll wind up with unfilled fields in your letter. You can just delete these stragglers, or replace them by clicking each one and typing them manually.
Tip
If you’re going to the trouble of typing this info, though, you may as well do it directly in Address Book; by updating your customer’s card now, you’ll have instant access to his details for your next letter. Fill out your customer’s address card with his latest info and then drag the card into the document to let Pages fill in the address for you.
This Address Book magic isn’t limited to documents created from templates. You can add merge fields to your own custom documents and even use Address Book or a Numbers spreadsheet to automate mass mailings to large groups. For details, see Displaying the Filename.
Note
Using Address Book to fill in addresses doesn’t create an automatic link between your letter and your address book. If you update your customer’s info in Address Book later, you’ll need to come back to Pages and update your letter separately.
With your addresses taken care of, Pages frees you to focus on the main task: the letter to your customer.
Pages’ templates include placeholder text to show where you should type the body of your letter within the template’s layout. Just click anywhere in the placeholder text and Pages highlights the entire text block. Start typing, and the block disappears to be replaced with your new text. You’re off and running.
The next chapter digs into all the nitty-gritty options for editing and formatting text. For now, we’ll keep it simple. If you’ve ever used a computer before, you already know how this works: Click to place the insertion point where you want to add or delete text. Type the text of your letter, and as you reach the end of each line, Pages automatically takes care of the line breaks for you—there’s no need to press Return like you would on a typewriter (reserve the Return key for starting a new paragraph or adding a blank line).
When your text grows too long to fit on a single page, Pages automatically adds another page, jumping your text over to the next sheet automatically. Use the vertical scroll bar on the right side of the window to move up and down through the text, as you would in any computer program (for more on document navigation, see Navigating Your Document).
When you’re ready, save the document so you can come back later and continue working on it:
Choose File → Save or press ⌘-S.
The Save dialog box appears (Figure 1-5).
Type a title for the document in the Save As box.
This box is already highlighted, so you can just start typing. Click the Where pop-up menu and choose Documents (if it doesn’t already say Documents) to store this Pages file in your Documents folder.
Figure 1-5. The most important parts of the Save dialog box are (A) Save As, which is where you create the name for your document, and (B) Where, which indicates where your file will be saved. In its compact view, the Save dialog box shows only those two items. The Where pop-up menu lists (C) your computer’s drives and disks, (D) your sidebar items, and (E) recently used folders. If you want to navigate elsewhere on your computer or network, click the downward-pointing triangle to the right of the Save As box, as shown in Figure 1-6.
Click Save.
The Save dialog box retracts, and Pages stores your document on your computer’s hard drive. You can continue to work on your letter, periodically choosing File → Save (or, more quickly, ⌘-S) to update the saved file with any changes.

Tip
Save often! Pages doesn’t offer an option to save your document automatically for you, so it’s a good habit to save your document every few minutes, just in case. To find out how to make Pages create an additional backup of your document when you save, check out Backing Up the Previous Version of a Document.
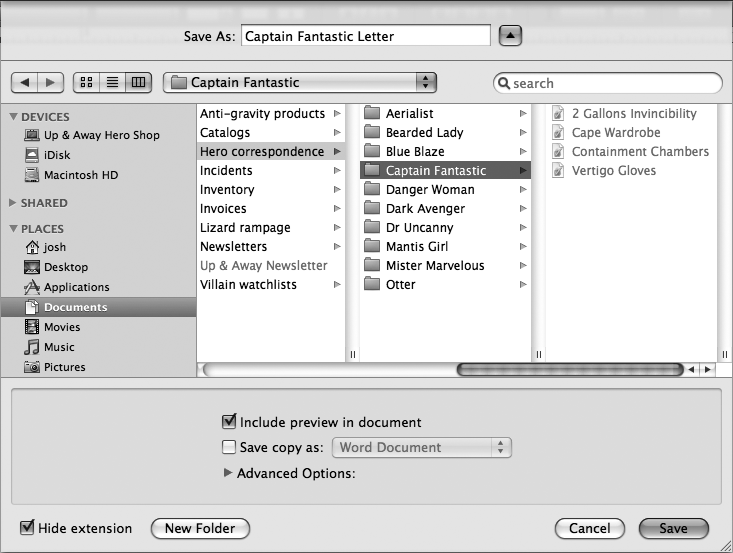
Figure 1-6. The Save dialog box in its full glory gives you access to locations not listed in its compact version. You can navigate through your entire computer, your iDisk, or other computers on your network to find the perfect destination. Turn on the “Include preview in document” option to let yourself and others browse a fully formatted version of your document directly from your desktop, using Mac OS X’s Quick Look feature. Turn on the “Save copy as” option to save your document in Word or iWork ’08 format (see Exporting Documents). The Advanced Options features let you reduce the file size of documents loaded with images and movies (see pages 240 and 248).
Print your document when you’re ready to commit your correspondence to paper and send it on its way to your customer:
Choose File → Print or press ⌘-P.
The Print dialog box appears.
Type the number of copies you need in the Copies box.
If you just want one copy, no need to make any changes. If you don’t see a Copies field in the Print dialog box, click the blue downward arrow next to the printer name to expand the window to its full view.
Click Print.
Your printer starts whirring and chirping and, in short order, delivers the hard copy.
Now that you’re done writing your letter, you can close its document window. Click the red Close button in the upper-left corner of the window. If Pages asks if you want to save your changes, click Save. Your letter vanishes from the screen but remains safe on your hard drive, ready to be reopened if you ever want to review it.
Back in the Template Chooser, you saw several document categories listed under Word Processing. In addition to letters, Pages offers you envelopes, forms, résumés, reports, and miscellaneous documents. A bit of casual browsing turns up many stationery templates with similar names, indicating that they belong to the same design “family.” For instance, the example above used the Modern Letter template; Pages also offers Modern Envelope, Modern Résumé, Modern Outline, and Modern Business Card templates, all using styles that complement those in your letter. When you use templates from the same family for your various documents, Pages makes it easy for you to create visual consistency in your communications.
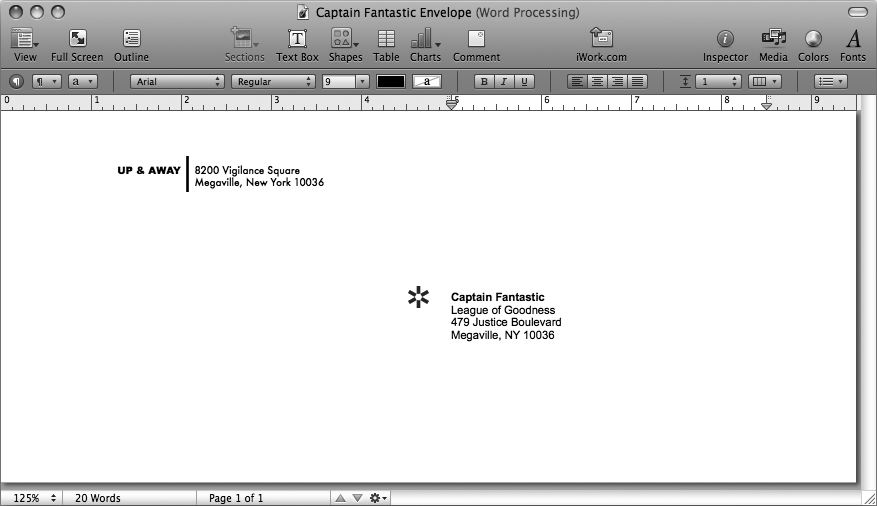
To make an envelope for your letter, for example, choose File → New from Template Chooser, and select Modern Envelope from the Envelopes category. The envelope opens in a new document window (Figure 1-7). Like your letter, it already sports your address as the sender. Using Address Book (Integration with Address Book), just drag your customer’s address card into the window, and you’re ready to print.
Get iWork '09: The Missing Manual now with the O’Reilly learning platform.
O’Reilly members experience books, live events, courses curated by job role, and more from O’Reilly and nearly 200 top publishers.

