Chapter 1. Meet the iPod: Out of the Box and Into Your Ears in 15 Minutes
IF YOU’RE LIKE MOST PEOPLE, YOU WANT TO JUMP RIGHT IN AND GET your spiffy new iPod up and running. Apple thoughtfully includes a tiny folding pamphlet of starter info with every iPod it sells. And while it’s nicely designed, you may find that it doesn’t go far enough; you want more help than a few line drawings and some haiku-like instructions can give you.
This book—and especially this chapter—is designed for you.
You won’t get bogged down in a bland gray ocean of print here. You’ll learn how to get your iPod whistling sweet tunes in your ear in no time, and find out how to control your particular iPod model. If you want more information on in-depth ‘Podding or getting the most out of iTunes, you can find that in chapters farther down the road.
But for now, let’s get rolling with your new iPod. Ready?
Meet the iPod Touch
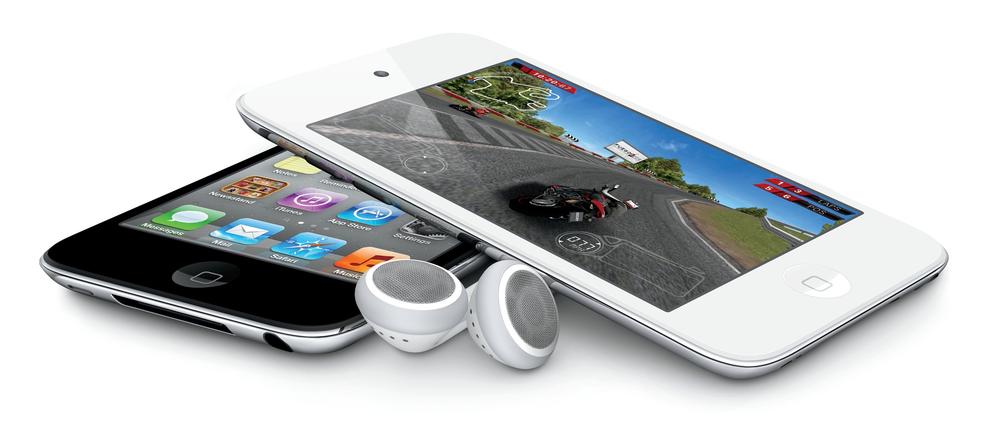
SINCE ITS ARRIVAL IN 2007, the iPod Touch has become the most popular member of the iPod family. It’s also the most versatile; it runs thousands of mini-programs called apps, makes and takes FaceTime video calls, keeps you on schedule, surfs the Web, handles your email, takes text and audio notes, and serves up plenty of fun as a handheld game console. Oh, it also plays music, videos, slideshows, and podcasts, and it displays eBooks on a gorgeous screen whenever you feel like reading. Yes, the Touch is the Swiss Army knife of iPods.
The Touch gets its moniker from its responsive touchscreen, the smooth glass surface that lets you navigate through your music, videos, and photos with nothing more than a tap or drag of your finger.
While the Touch may have inherited its sensitive screen from the iPhone, it gets its playback stability from the flash memory that holds all your media files. No matter how hard you run or rock out, you’ll probably never hear your music skip a beat. Nor is it likely you’ll run out of juice: the Touch gives you about 40 hours of audio playback or 7 hours of video viewing on a single battery charge.
Speaking of video, the Touch sports the same eye-catching 3.5-inch Retina Display as the iPhone does, giving it an impressive 960 x 640 pixel resolution. To see the display in its finest form, flip the Touch sideways when you view photos, movies, and TV shows. You don’t have to be content just watching videos, either—the Touch lets you shoot and edit high-definition movies as well, and you can upload them directly to YouTube. Need a still camera? The Touch has one of those, too.
You can buy the Touch in three memory configurations: an 8-gigabyte model that stores 1,750 songs or 10 hours of iPod-friendly video, a 32-gigabyte version that holds 7,000 songs or 40 hours of video, and a 64-gig model that stores a relatively whopping 14,000 songs and 80 hours of video. It also comes in two colors: black or white (and yes, it’s no Nano in the exterior-color department).
As an entertainment device, the Touch is tops, but its ability to reach out and touch the Internet is what makes it an iPod you can do business with (if you can tear yourself away from all the fun stuff, that is). Thanks to its built-in WiFi chip and a mobile version of Apple’s Safari browser, you can surf the Web whenever you’re in range of a wireless network. And where there’s Internet, there’s email, stock-market updates, weather forecasts, YouTube videos, and online maps. You use your fingertips to point your way around the Web—or to fire up the Touch’s onscreen keyboard for a little good, old-fashioned text entry.
With iOS 5, the latest version of Apple’s system software for the Touch, you also get Reminders (a to-do list app), iMessages (so you can send text messages and photos to other iOS 5 users), and Newsstand (a place to park your eMagazines). Chapter 3 has more on all these new, built-in apps. And if that’s not enough, you can customize your Touch with purchases from the iTunes App Store, where more than 500,000 additional mini-programs await you.


One more thing: if you’ve ever been out and about with your iPod and wished you could buy music or video on the fly, you can. With the Touch and a wireless network connection, this little Internet iPod can step right up to the iTunes Store and shop away.
Note
The Touch and the iPhone may look like kissing cousins, but they have some distinct differences. For one thing, the Touch isn’t a mobile phone, like the iPhone is. While this means that Touch owners get to skip The Wireless Carrier Experience, it also means there’s no ubiquitous cellphone network to tap into when you run out of WiFi hotspots. (The good news: no phone bill, either.) In addition, the Touch’s built-in camera—with less than a full megapixel of photo resolution—isn’t as good as the iPhone 4S’s 8-megapixel gem. On the plus side, without the extra hardware inside, the Touch is much more svelte.
Meet the iPod Nano
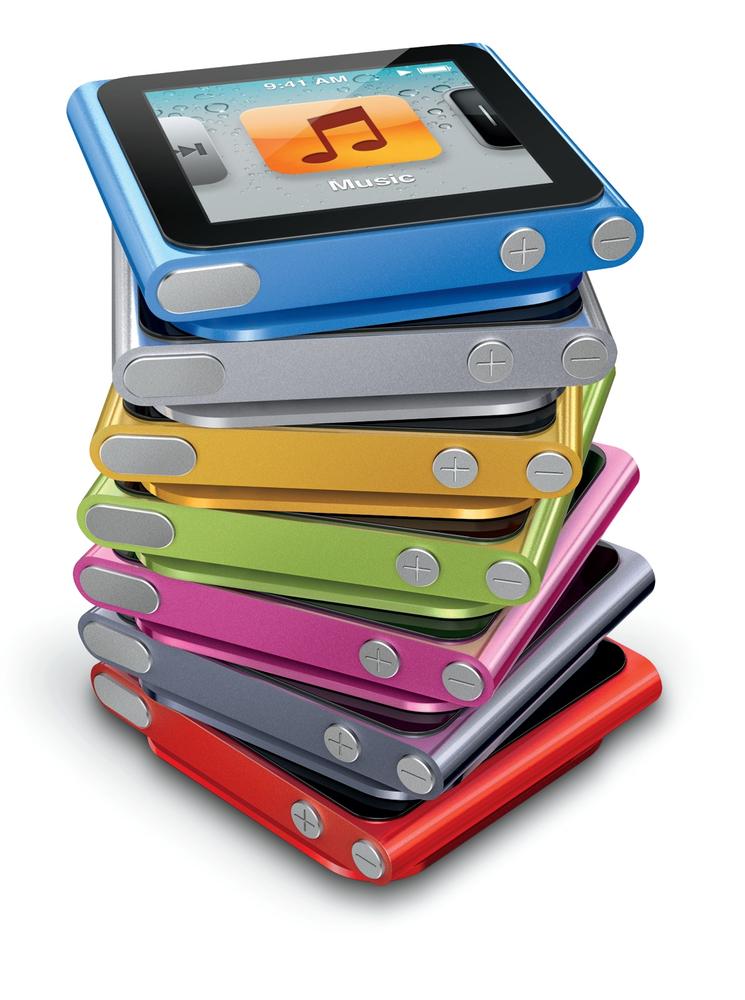
IF THERE’S ANY IPOD that’s undergone a radical transformation since its introduction, it’s the humble Nano. From the time it hit the scene in 2005, this sporty little player has changed its size and shape nearly every year, and the 2011 Nano is no exception: It’s even smaller—and sportier—than its ancestors.
How small? A mere 1.48 inches wide by 1.61 inches high, and it weighs less than an ounce; you can clip it to your shirt and barely feel it. Unlike the models before 2010, this Nano comes with a touchscreen for tapping, flicking, and swiping your way to music, podcasts, audiobooks, and photos. Its bright color screen shows them all off in 240 x 240 pixel resolution on a 1.54-inch display.
Designed with runners and other fitness enthusiasts in mind, the Nano has a built-in pedometer that tracks your steps and helps you chart your workouts. As of 2011, you don’t even need special gym shoes and an electronic sensor to have this iPod compile your workout data—it does all that on its own now.
This Nano also includes Apple’s VoiceOver feature, which recites menus and song titles into your headphones when you’re too busy running to look at the screen. And since it stores all your music on a nice, stable flash-memory chip, you don’t have to worry about your music skipping, even if you are.
When you get tired of recorded music, switch to the Nano’s integrated FM radio. Unlike standard receivers, the Nano can pause live shows for a few minutes should someone start talking at you in the middle of a song.
The Nano comes in 8- and 16-gigabyte models, and you can choose from seven anodized aluminum colors (pink, red, blue, green, yellow, silver, and a graphite gray). With a full battery charge, you’ll get up to 24 hours of audio playback. That should get you through even the most intense cardio routine.
Note
Stripped down and buffed up with a touchscreen, the current Nano offers far fewer features than pre-2010 models. It has no video camera or video playback capability; no Contacts, Calendars, or Notes features; and no built-in microphone or games. If you long for the more full-featured Nanos of the past, remember that there’s always eBay or inventory-clearance sales.
Meet the iPod Shuffle
THE SMALLEST MEMBER OF Team iPod doesn’t have a screen—but it doesn’t need one, because it’s designed for fuss-free music on the go. You don’t have to worry about losing your Shuffle because, like the new Nano, it clips right onto your lapel or pocket—it’s like jewelry you can rock out with.
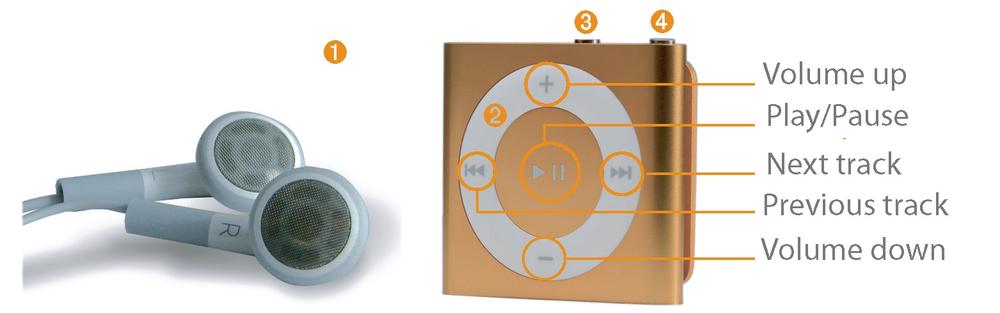
TAKE YOUR PICK OF five standard Shuffle colors: blue, orange, green, pink, and silver. It comes with a 2-gigabyte memory chip that holds hundreds of songs, audio podcasts, and audiobooks. And even though it’s called the Shuffle, you don’t have to shuffle your music; you can play your tracks in order with the nudge of a button (see below).
The Shuffle may not have a screen, but it does include VoiceOver technology. Just press the VoiceOver button to make your Shuffle announce the name and artist of the song currently playing. Speaking of playing, you get about 15 hours of music between battery charges.
This iPod is so petite that you can’t charge it with the same USB cable the other iPods use—it comes with its own little dual-function USB adapter that connects to your computer to both charge the player and load music from iTunes. In addition to the adapter, here’s what you’ll find in the Shuffle box:
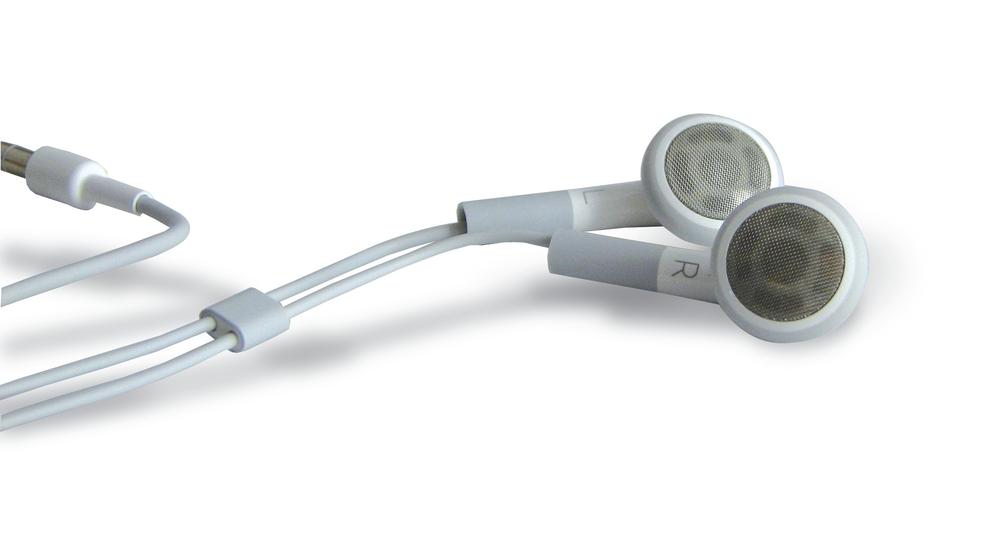
Those trademark white Apple headphones that plug into a jack on top of the Shuffle.
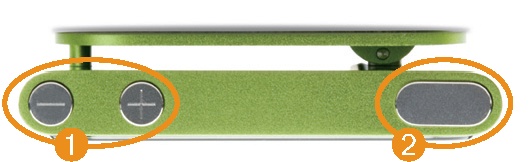
The Shuffle itself, complete with a handy control ring that lets you adjust the volume and jump back and forth between songs.
The Shuffle’s VoiceOver button. Push it to hear the Shuffle announce the name of the current song or playlist.
The Shuffle’s On/Off switch. Slide it one notch to the left to play tunes in order (
 ) or slide it over all the way over to shuffle them (
 ).
).
Meet the iPod Classic
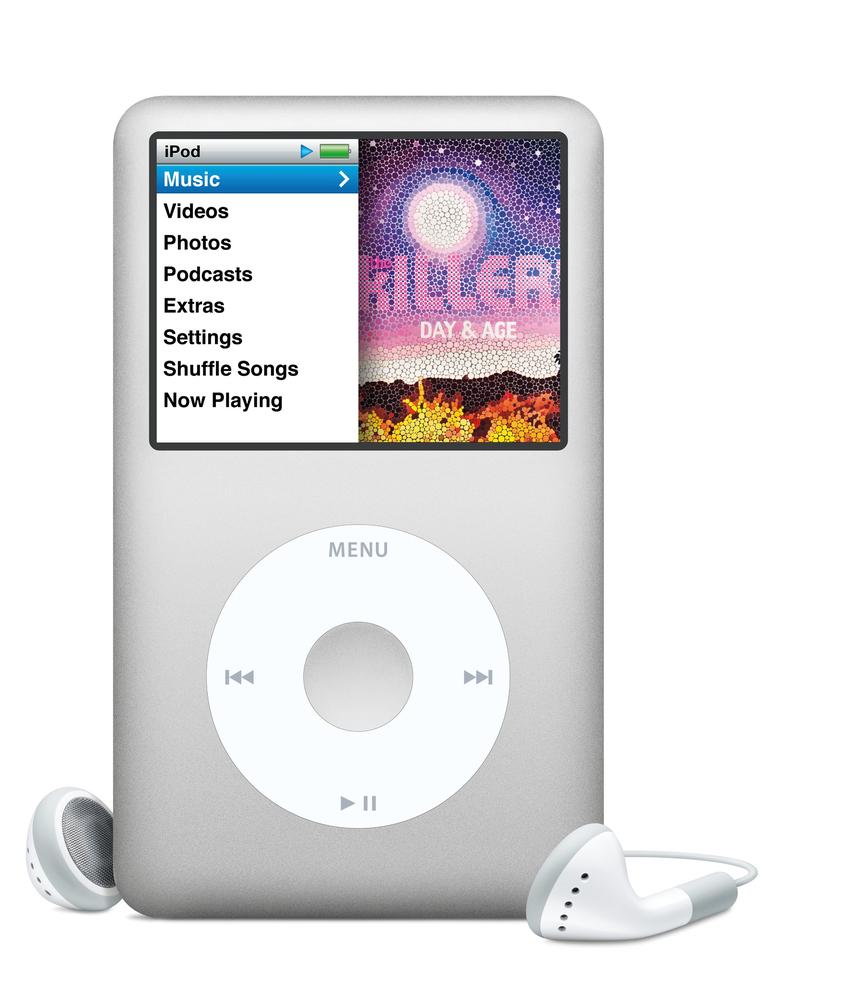
WITH ITS SOLID, RECTANGULAR shape and horizontal screen, the faithful iPod Classic still retains the look of the original, boxy white-and-chrome iPod that started it all back in 2001.
A decade later, Apple has transformed that humble little 5-gigabyte music player with its black-and-white screen into a gorgeous full-color portable media system that can play movies, TV shows, and video games—and it still fits comfortably in the palm of your hand. Although Apple hasn’t added any new features to the Classic in the past few years, it’s still a beloved model, especially for media lovers who want to carry around all (or most) of their music collections with them.
That’s because the Classic has more than double the storage of even the highest-capacity new-gen iPods—and quite an improvement over its original 5 gigabytes. You can stuff 160 gigabytes of music, photos, videos, and more onto the Classic. That’s 40,000 songs or 200 hours of video. And you don’t have to stock up on the Duracells, either, because the Classic has a rechargeable battery that can play audio for 36 hours or video for 6 hours.
The Classic comes in either silver or black. Unlike earlier iPods that sported hard glossy plastic on the front, Apple’s latest version comes outfitted in a full metal jacket—anodized aluminum on the front and shiny stainless steel on the back.
Along with the click wheel—think of it as the Classic’s mouse—the 2.5-inch color screen is the player’s other main component. Capable of displaying more than 65,000 colors at a resolution of 320 x 240 pixels (translation: high-quality), the Classic is a great place to store and show off your latest vacation photos. In fact, you can keep up to 25,000 pictures on your ‘Pod. The screen also makes it a delight to catch up on that episode of The Daily Show you missed, or play a few rounds of solitaire while you listen to your favorite music.
The Classic comes with a USB cable to connect with your Windows PC or Macintosh, along with those iconic see-what-I’ve-got white earphones. Want more stuff for your Classic? Check out the accessories mentioned in Chapter 12.
Install iTunes
BEFORE YOU CAN HAVE hours of iPod fun, you need to install iTunes, Apple’s multimedia, multifunction jukebox program, on your computer. Apple’s QuickTime program, a video helper for iTunes, comes along with the download. (With the modern iPod Touch, you technically don’t need iTunes, but it is a great place to store your big video files.) To get iTunes:
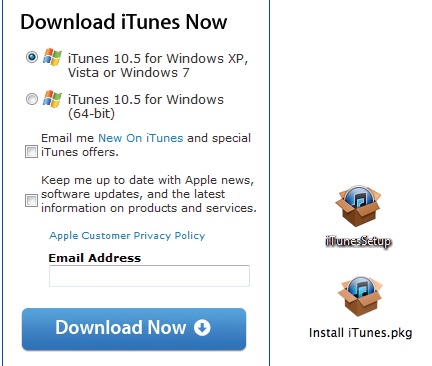
Fire up your computer’s web browser and point it to www.itunes.com/downloads.
Click the Download Now button. (Turn off the “Email me…” and “Keep me up to date…” checkboxes to spare yourself future marketing missives.) Wait for the file to download to your computer.
When the file lands on your hard drive, double-click the iTunesSetup.exe file. If you use a Mac, double-click the iTunes.dmg file and then open the iTunes.mpkg file to start the installation. If your Mac is younger than 7 years old, you probably already have iTunes installed. Go to
 →Software Update and tell your Mac to see if there’s a newer version of the program, just in case.
Follow the screens until the software installer says it’s done.
You may need to restart your computer after you install iTunes. Once you do, you’re ready to connect your new iPod to your computer.
Note
The hardware and operating-system requirements needed to run iTunes are listed below the Download Now button. If you have an older computer, it’s worth a glance just to make sure your rig can handle the program. For the record, iTunes 10.5 requires Windows XP, Windows Vista, or Windows 7; or Mac OS X 10.5 and later.
Get Music into iTunes (and Later, Onto Your iPod)
ONCE YOU HAVE ITUNES running on your computer, you can start filling it up with music (and then loading your songs onto your iPod). Chapters Chapter 4 and Chapter 5 have info on song formats and technical settings, but if you’ve got a brand-new iPod, odds are you don’t care about that right now. You just want to load up some music. Here are three simple ways to do that:
Import Existing Songs into iTunes
When iTunes first opens and displays your sad, empty music library, it suggests a couple of ways to get yourself some tunes—namely by buying them from the iTunes Store or converting songs from your CD collection into iPod-ready files. Those methods are described on the opposite page.
But there’s another way, and it doesn’t involve money or a lot of extra effort.
If you’ve had a computer for longer than a few years, odds are you already have some songs on your hard drive in the popular MP3 format. Since they’re already on your computer, why not add them to your iPod through iTunes? They’re probably sitting in a folder, waiting for you to play them.
To grab that music and add it to iTunes, choose File→Add Folder to Library (Windows PCs) or File→Add to Library (Macs). In the box that appears, navigate across your hard drive to your folder of music, select it, and click the Choose button to pull your songs into iTunes.
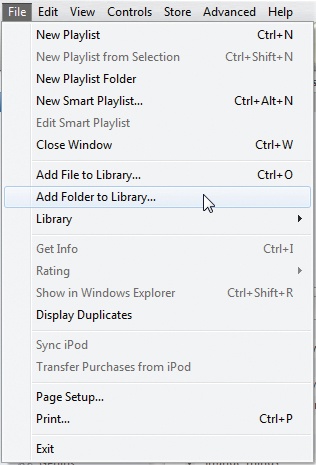
Boom! There you have it—your old music in your brand-new iTunes library.
Note
Now, many Windows fans may have music in the Windows Media Audio (WMA) format. The bad news here is that iTunes can’t play WMA files. The good news is that when iTunes finds WMA files, it can automatically convert them to an iPod-friendly format. You can always add WMA tracks by choosing File→Add to Library and selecting the songs you want; iTunes then converts them. One last thing to remember: The program can’t convert copy-protected tracks you may have downloaded from other online music stores.
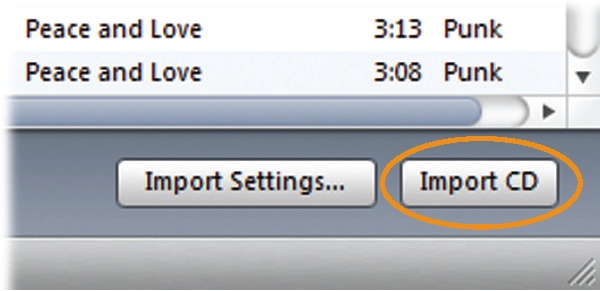
Import a CD
You can also use iTunes to convert tracks from your audio CDs into iPod-ready music files. Just start up iTunes and stick a CD in your computer’s disc drive. The program asks if you want to import the CD into iTunes. (If it doesn’t ask, click the Import CD button at the bottom-right of the iTunes window.) If you’re connected to the Internet, iTunes automatically downloads song titles and artist information for the CD (yes, strange as it may seem, music managers like iTunes don’t get information about an album from the album itself; they search for it in a huge database on the Web).
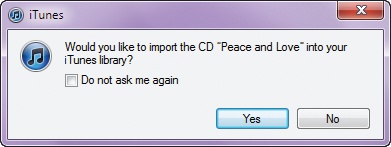
Once you tell iTunes to import music, it begins adding the songs to your library. You can import all the tracks from a CD or, if you don’t want every song, turn off the checkboxes next to titles you want to skip. Chapter 4 has more on using iTunes to convert CDs.
Buy Music in the iTunes Store
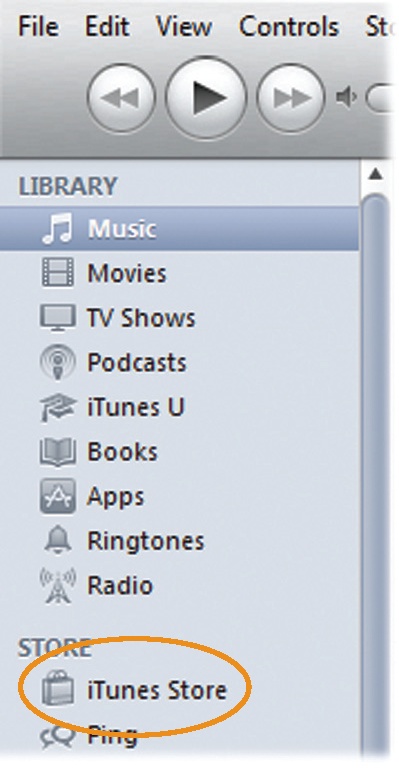
Another way to get music for your iTunes library and iPod is to buy it from the iTunes Store. Click the iTunes Store icon in the list on the left side of iTunes (that’s called the Source list, since it identifies the source of your media, like “Library” or “Store”).
Once you land on the Store’s main page and set up your iTunes account (see Set Up an iTunes Store Account), you can buy and download songs, audiobooks, and videos. The content goes straight into your iTunes library and then onto your iPod. Chapter 7 is all about the iTunes Store.
If you buy music, apps, or books from the Store on one of your iOS devices, like your iPod Touch or iPhone, you can have iTunes automatically download copies to your computer. Use iTunes In the Cloud tells you how.
Meet the iPod Accessories
AS YOU MAY HAVE noticed before you got preoccupied with iTunes, your new iPod came with a few other things inside its smooth plastic box. What you find inside varies by iPod model, but all of them come with three things:
A USB cable to connect your iPod to your computer. The iPod Touch, Nano, and Classic come with a white USB cable with a flat dock-connector port, while the Shuffle has its own USB adapter (see Meet the iPod Shuffle).
A little pamphlet of quick-start information that’s not nearly as fun or as colorful as this book.
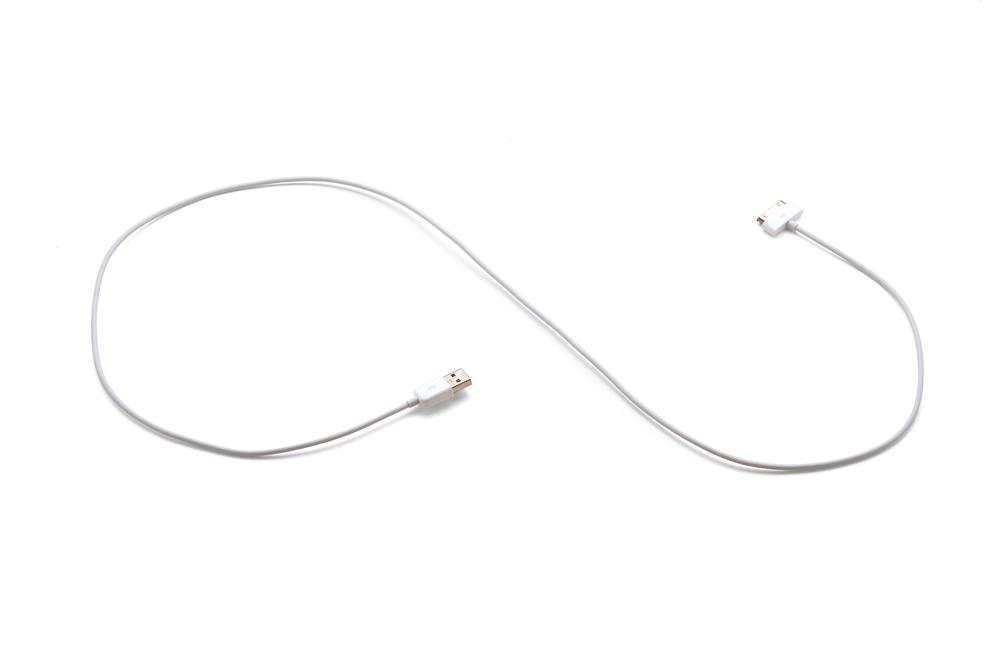
What you want right now is the USB cable. Connect the small, narrow end to your computer’s USB port and the wide, flat end (or the adapter, if you have a Shuffle) to the iPod. The first time you connect your iPod to a computer, iTunes’ Setup Assistant walks you through a few steps to get your iPod ready to go (see Set Up and Sync Your Touch With iTunes for a description). In addition, the iPod begins to charge, as described on Charge Your iPod for the First Time.
Connect or Disconnect Your iPod from Your Computer
Connecting and disconnecting your iPod from the computer to load new songs, videos, and other content is a basic fact of life for the Nano, Shuffle, and Classic. With its wireless powers, the iPod Touch doesn’t need to rely on the white cord as much (except for charging), but it, too, can make occasional visits to the computer to, say, sync over huge files or get a full-system software restore (Start Over: Restoring Your iPod’s Software).
No matter how often you need to make the iPod-computer link, you should do it properly to keep both you and your iPod happy. As the previous page explained, to make the connection, plug the smaller end of the USB cable into your computer’s USB port and the wider, flatter end into the bottom of your iPod. (Shuffle owners, insert the 3.5 mm plug into your headphone jack, and the other end into your computer’s USB port.)
When it comes to portable devices, what gets connected usually needs to get disconnected. Resist the impulse to yank the USB cable out of your iPod without checking it first. If you see menus or the battery icon on your ‘Pod, you can safely unplug it. (Shuffle owners, see the steps below.)
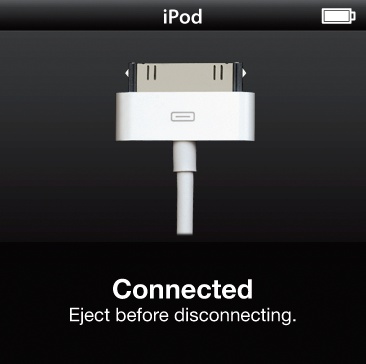
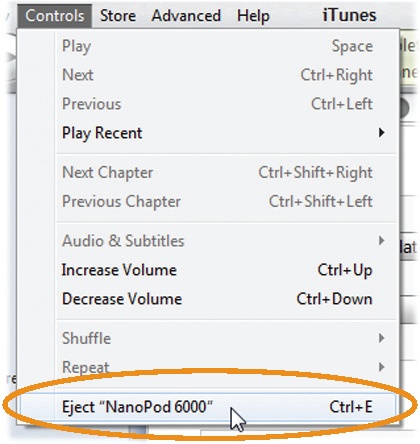
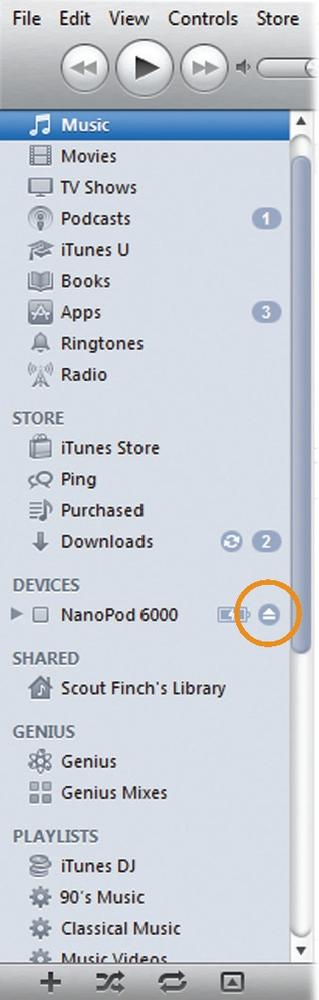
But if you see the icon circled at right in iTunes, you need to manually eject the iPod from your computer. iTunes gives you two easy ways to do that:
Click the Eject icon next to the name of your iPod in the iTunes Source list.
If your iPod is already selected in the Source list, choose Controls→Eject iPod or press Ctrl+E (⌘-E).
With either method, the iPod announces onscreen that it’s disengaging, displaying an “OK to Disconnect” progress bar as it breaks its connection with the computer. Once all the gray screens go away and you see the regular menus again, you can safely liberate your iPod.
Charge Your iPod for the First Time
RIGHT OUT OF THE box, your iPod probably has enough juice to run for a while without having to charge it up. Eventually, though, you’ll need to go in for an electric fill-up. All you need to do is plug the iPod into your computer using the USB cable (the iPod charges itself by drawing power from the USB connector). Just make sure you have your computer turned on and that it isn’t asleep.
It takes only a few hours to fully charge your iPod battery, and even less time to do what Apple calls a fast charge, which quickly powers up the battery to 80 percent of its capacity. That should be plenty of gas in your iPod’s tank for a quick spin.
Here’s how much time each iPod needs for both a fast and a full charge:
FAST CHARGE | FULL CHARGE | |
iPod Touch | 2 hours | 4 hours |
iPod Nano | 1.5 hours | 3 hours |
iPod Shuffle | 2 hours | 3 hours |
iPod Classic | 2 hours | 4 hours |
If you’re traveling and don’t want to drag your laptop with you just to charge your iPod, you can buy an AC adapter for the USB cable. Chapter 2 has more on that.
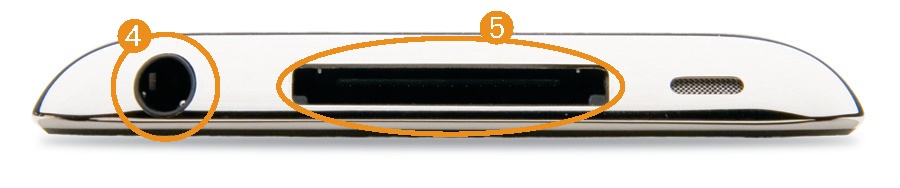
iPod Touch Ports and Switches
THE IPOD TOUCH KEEPS most of its controls behind its sensitive screen, but it does have a few physical buttons and jacks on the outside. Here’s a tour of the Touch from top to bottom:
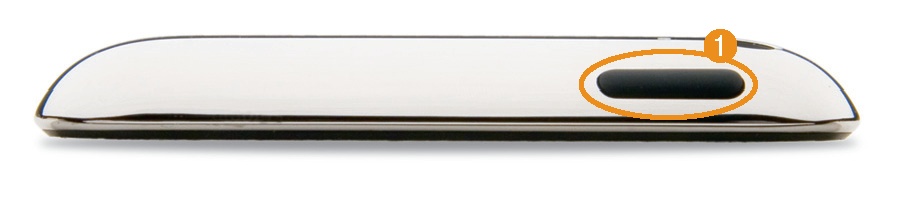
Sleep/Wake. Press the thin black button on top of the Touch to put it to sleep and save some battery power. If you’ve got a song playing, no problem: A sleeping Touch still plays—it’s just the display that goes dark.
Volume. These two buttons reside on the left side of the Touch. Press the top one to increase the sound on either the tiny external speaker or an attached pair of headphones; the bottom button lowers the volume.
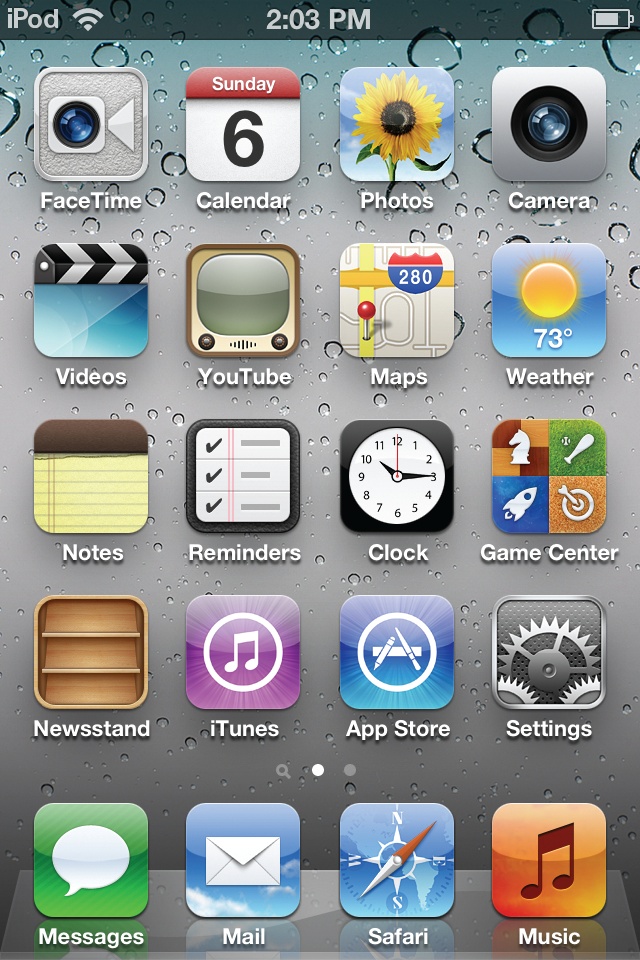
Home. Forget clicking your heels together three times to get home—just push the indented button below the Touch’s screen and you’ll always return home. The iPod’s Home screen is where your tappable icons for music, photos, Safari web browsing, and more hang out. If you ever wander deep into the iPod and don’t know how to get out, push the Home button to escape. You can also push it to wake the Touch from sleep.
Headphones. Plug the included headphones into the small, round jack on the bottom edge of the Touch. You can also use non-Apple headphones, so long as the new gear uses the standard 3.5 mm stereo plug (most do).
Dock connector. This thin jack is the port you use to plug in the iPod’s USB cable for charging and media transfers from iTunes. Most iPod accessories (Chapter 12), such as audio docks, connect through this port as well. You may also see it referred to as the “30-pin dock connector.” The Touch’s own tiny external speaker sits to its right.


Set Up and Activate the iPod Touch
THANKS TO ITS IOS 5 software and WiFi chip, the Touch can jump onto the Internet over the airwaves, making it the easiest iPod to set up. Touch owners no longer have to get to a computer and unwind the USB cable to get their iPods ready for action—all that can be done wirelessly now. This, of course, means you need a WiFi network nearby. (If you don’t have one, flip ahead to Set Up and Sync Your Touch With iTunes to learn how to set up the Touch via good old-fashioned USB cable.)
Here’s how you set up your player as a brand-new iPod Touch right out of the box—providing, of course, that the tablet retained its charge on the trip from China; if power is running low, see Charge Your iPod for the First Time for charge-up instructions.
Press the Touch’s Home button. You see a gray screen with the word “iPod” in the middle of it and a right-pointing arrow underneath it. Put your finger on the arrow and slide it to the right.
Tap your preferred language for iPad screens and menus. As you can see in the image below, English is the default option for U.S. users, but tap the arrow for more choices.
Pick your country or region. The United States is the default choice, but if you’re not there, tap Show More.
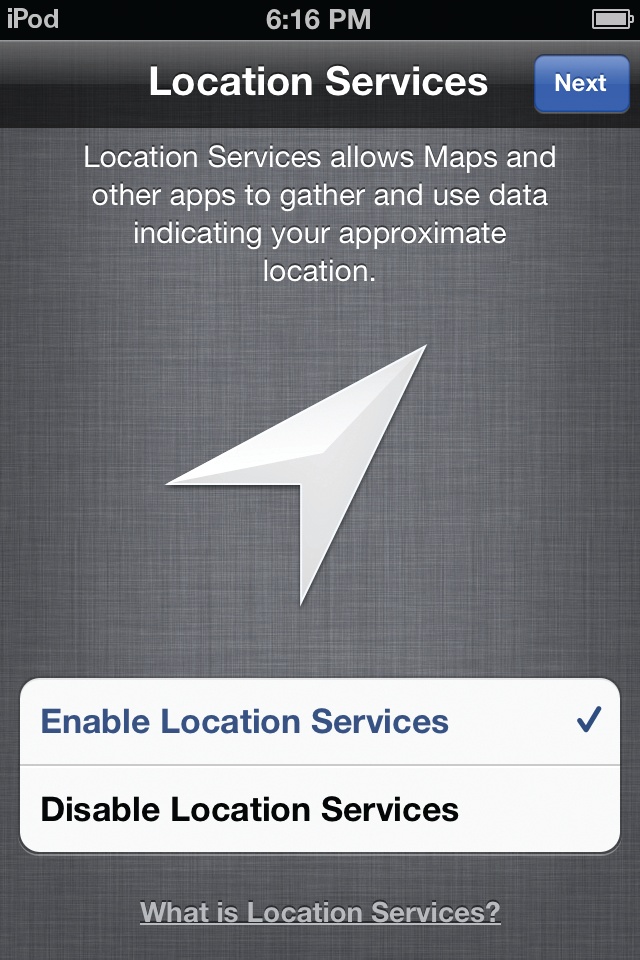
Decide whether you want to turn on Location Services. Location Services pinpoints the position of your Touch on a map, using a database of WiFi hotspots to guide it. It’s great for finding restaurants close to you, but not so much for your privacy. If you leave Location Services off, you can always turn it on later by tapping Home→Settings→Location Services→On.
Choose your WiFi network. If you’re at home, find your personal network on the list and tap it to select it. Type in your network’s password. If you’re in range of a public network, you can connect to it, but be leery of typing in any personal information, like a credit-card number to set up an Apple ID. Once the iPod connects to the Internet, it takes a few minutes to activate itself with Apple’s servers.
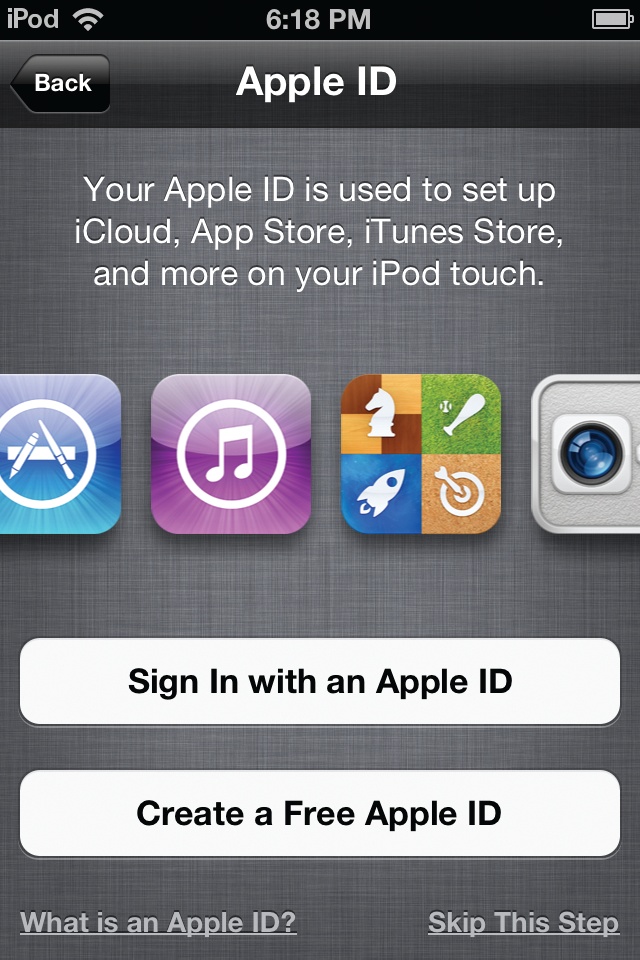
Sign in with or create an Apple ID. Your Apple ID (Set Up an iTunes Store Account) is the online user name and password you use to buy and download apps, music, books, videos, podcasts, and more from the iTunes and App Stores. If you already have an Apple ID, sign in with it here. If not, tap “Create a new Apple ID” to go to the next screen, where you can base your new ID on an existing email address or set up a spiffy new—and free—iCloud account (see below). If you don’t want to deal with this Apple ID stuff now, tap the Skip This Step link at the bottom of the screen.
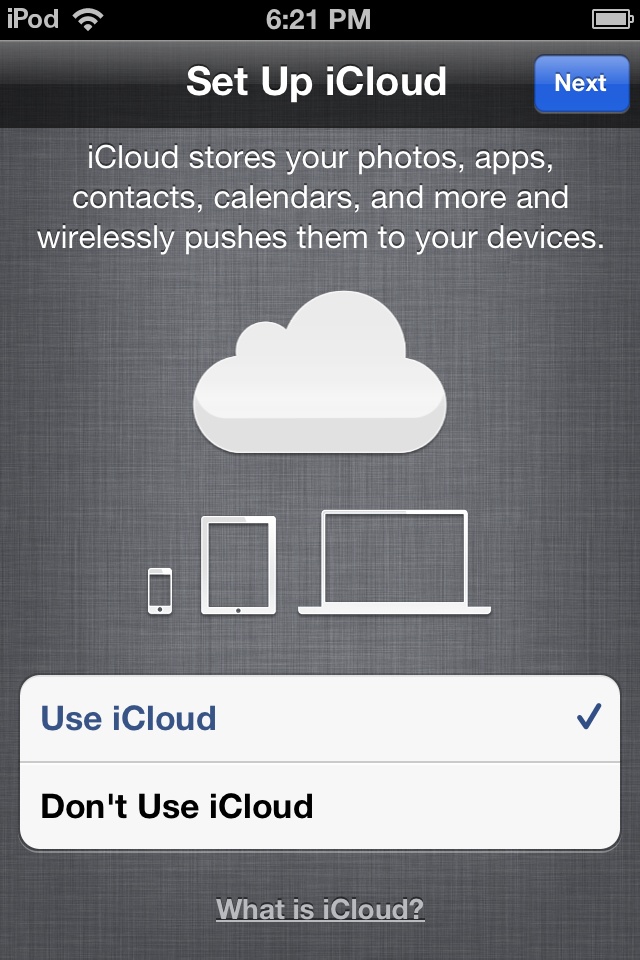
Set up iCloud. On this screen, you can turn on Apple’s free iCloud service, where you can back up all your apps, contacts, calendars, and more to Apple’s online servers. You can also restore the Touch from an iCloud backup. (Chapter 11 has more on iCloud.)
Set up your email account. You can compose, send, and receive email right on your iPod, but first you have to introduce it to your mail account(s). You can use an existing account or your free iCloud mail account from Apple. Or, you can set up your mail accounts later by going to Home→Settings→Mail, Contacts, Calendars→Add Account. The iPod automatically sets up the accounts from most major services, like Gmail and Yahoo when you type in your account name and password. You may need to drag out the account info from your Internet service provider to add an ISP-based account, like those from Comcast and Verizon.
Now, start using your Touch! You don’t see these setup screens again, unless you need to replace the software on an ailing iPod (Start Over: Restoring Your iPod’s Software). You get the option during the setup steps to restore a backup of the iPod’s settings and account data from an iCloud or iTunes backup file, so you’re not totally parked back on Square One. The iPod setup process has come a long way, baby.
Set Up and Sync Your Touch With iTunes
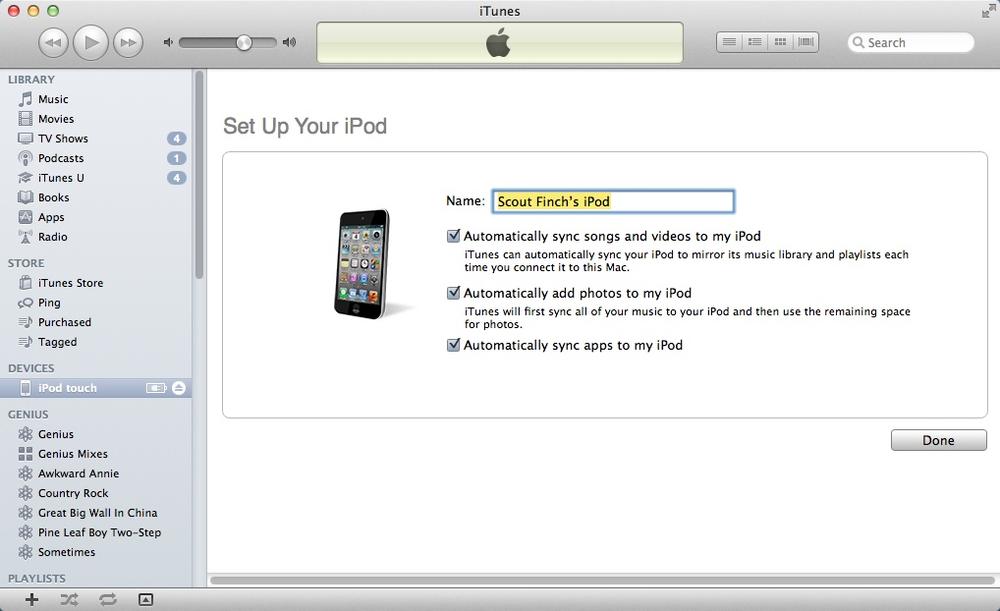
IF YOU SKIPPED THE PC-free iPod Touch setup because you didn’t have a WiFi network around (or because all your stuff is on your computer), you can set up the player using iTunes instead. Just connect your iPod to the computer with the USB cable. When you do, iTunes pops up and walks you through the setup, which includes naming your gadget and choosing sync options.
If you already use iTunes to manage media on an iPhone or iPad, odds are you already have a healthy media library on your computer. And if you’ve had an iPod before, iTunes offers to put the content from your old player onto your new one. Depending on the size of your new iPod’s drive, you may be able to fit all your stuff on it—or not, if you have more than 8, 32, or 64 GB of digital treasures on your computer. If you have less than that and want to take it all with you, just click Done in the Setup box. iTunes loads a copy of everything in its library onto your iPod. If you have more media than your iPod has storage, iTunes loads up your ‘Pod until it’s full. If you want to be more selective about what you sync, see the next page.
iTunes Wi-Fi Sync
Now, just because you chose to set up your iPod with iTunes instead of doing it wirelessly doesn’t mean you always have to dig up your USB cable when you want to put new stuff on your Touch. That’s because you can now sync your ‘Pod wirelessly. The iPod and the computer you’re syncing with just need to be on the same WiFi network, and iTunes has to be open at the time of the sync.
To set up Wi-Fi Sync, connect your iPod to your computer. Click the Touch’s icon in iTunes’ Source list and click the Summary tab in the iTunes window. Scroll down to the Options area and turn on the checkbox next to “Sync this iPod over Wi-Fi.” Click the Apply button and then click Sync. Remember, the computer needs to be connected to the network wirelessly, not by an Ethernet cable.
A Touch icon now stays visible in the iTunes window, where you can manually add stuff to it (as the next page explains). The Touch wirelessly syncs itself once a day when it’s plugged into power. It’s slower than a USB sync, but often more convenient, and you can still sync by USB when you want. In a hurry to sync over that new album? Click the Sync button in iTunes window—or, on the iPod Touch, tap Home→Settings→General→iTunes Wi-Fi Sync→Sync Now.
Manually Load the iPod Touch
IF YOU DON’T WANT to autosync your Touch, you need to load songs onto it manually. Until you do, the Touch just sits there, empty and forlorn in your iTunes window, waiting for you to give it something to play with. Here are your options:
Manual Method #1
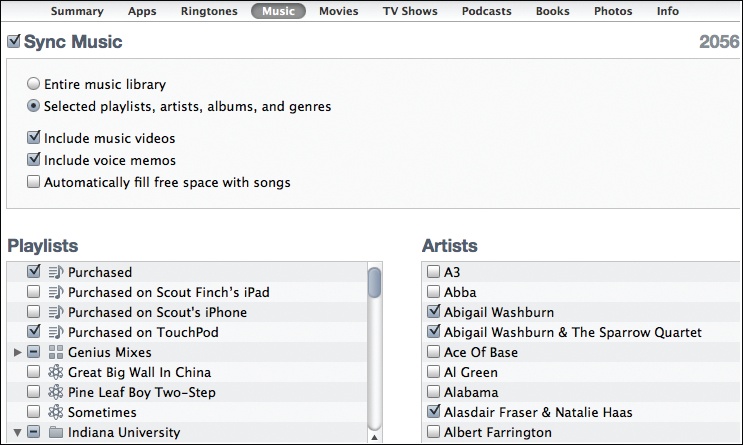
Click the Touch icon on the left side of the iTunes window (the Source list). This opens up a world of syncing preferences for your ‘Pod.
Click the Music tab, and then turn on the Sync Music checkbox.
Click the button next to “Selected playlists, artists, and genres,” and check off the items you want to copy to your iPod. (No playlists yet? See Chapter 6.)
Click the Apply button at the bottom of the iTunes window.
Manual Method #2
This one’s for those into detailed picking and choosing: Click the Summary tab and turn on “Manually manage music and videos.” Now you can click the songs, albums, or playlists you want on your iPod and drag them to the Touch icon in the Source list.
Manual Method #3
Every item in your iTunes library has a checkmark next to its name when you first import it. Clear the checkmark next to whatever you don’t want on your Touch. (If you have a big library, hold down the Ctrl [⌘] key while clicking any title; that performs the nifty trick of removing all the check-marks. Then go back and check only the stuff you do want.)
Click the Touch icon under Devices in the Source list, and then click the Summary tab.
At the bottom of the Summary screen, turn on the checkbox next to “Sync only checked songs and videos,” and then click the Sync button.
Finger Moves for the iPod Touch
UNTIL THE TOUCH ARRIVED on the scene, iPods were controlled by a click wheel or control ring on the front of the player. The Nano has a limited version of the touch-sensitive screen, and the Shuffle and the Classic still use the circular dashboard. But with an iPod Touch, you don’t need a steering wheel to get around the iPod—you just tap the onscreen icons and menus to navigate.
You’ll use some moves more often than others as you navigate the Touch:
Tap. Lightly touch a song title, app icon, or picture thumbnail on the screen with your fingertip. The Touch isn’t a crusty old calculator, so you don’t have to push down hard; a gentle tap on the glass starts a song, launches an app, or pops a picture into view.
Drag. This time, keep your fingertip pressed down on the screen. As you slide it around the Touch glass, you scroll to different parts of a web page, photo, or other item that goes beyond the screen’s boundaries. You also use the drag move to nudge onscreen volume sliders up and down. It’s really the same concept as holding down the button on a computer mouse and dragging. A two-finger drag scrolls a web window within a web window (which is, fortunately, not too common on mobile sites).
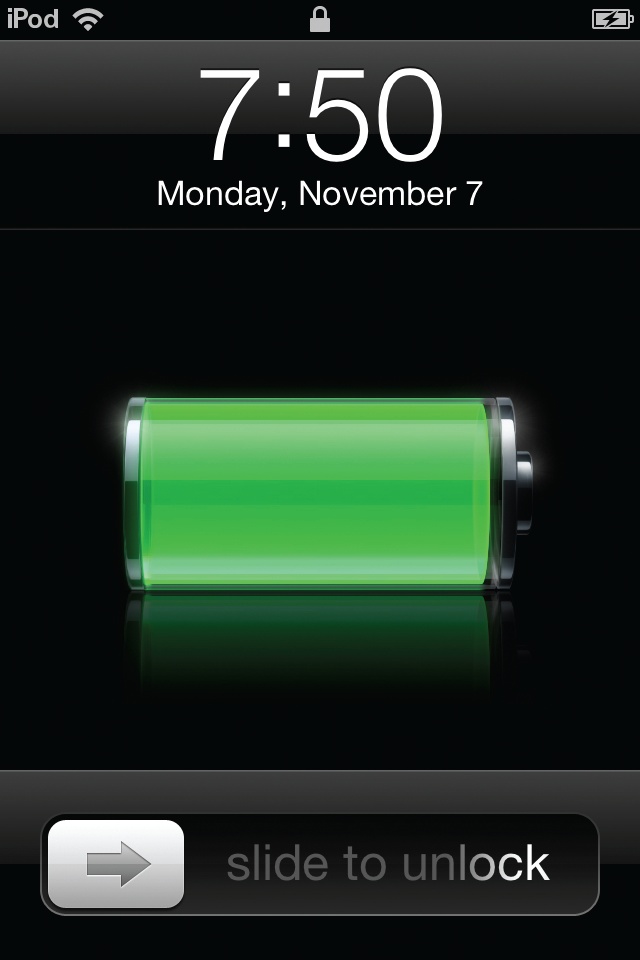
Slide. A slide is like a drag, but you need it on only a couple of Touch times. The first is on the “slide to unlock” screen you see when you wake the iPod from a nap (see below). The second is when you want to power down the Touch completely; press the Sleep/Wake button until the “slide to power off” slider appears.
Note
The iPod Touch relies on the human touch—skin-on-glass contact—to work. If you have really long fingernails, a Band-Aid on the tip of your finger, or happen to be wearing gloves at the time, you’re going to have problems working the Touch. You can’t use a pencil eraser or pen tip, either. You can, however, find special styluses that work with the Touch screen; for example, Pogo (http://tenonedesign.com) makes one for $15.
Flick. This move lets you speed-scroll up and down through long lists of songs, or side to side through overstuffed photo albums. To flick properly, quickly whip your finger along the length or width of the screen. (Make it a light movement—this isn’t a slide or a drag here.) The faster you flick that finger, the faster the screens fly by. For example, use the flick when you’re in Cover Flow mode—tap the Home screen’s Music icon and hold the Touch horizontally. All your album covers appear onscreen, and you can flick through them until you find the one you want to hear.
Finger spread and pinch. Can’t see what you want because it’s too small on the screen? To make it bigger, put your thumb and index finger together, place them on that area of the screen, and then spread your fingers apart. To go the opposite way and zoom out so things shrink back down, put those same fingers on the screen, separated this time, and then pinch them together.
Double-tap. This twosteppin’ tap comes into play in a couple of situations. First, it serves as a shortcut to automatically zoom in on a photo or a section of a web page. You can also double-tap to zoom in on a section of a Google map (Chapter 3).
Second, if you’re watching a movie or TV show, tap the screen twice to toggle back and forth between screen aspect ratios—the full-screen view (top right), where the edges of the frame get cropped off, or the widescreen, letter-boxed view (bottom right), which movie lovers favor because it’s what the film’s director intended a scene to look like.
Two-finger tap. Two fingers, one tap. That’s what you do to zoom out of a Google map view (remember, you use one finger and two taps to zoom in—Google just wants to keep you on your toes).


Nano and Classic Ports and Switches
ALTHOUGH THEY STARTED OUT looking and acting similarly despite their different sizes, the iPod Nano and Classic don’t have that much in common anymore. The Nano has fled the click-wheel world for a glossy touch screen, and the Classic hasn’t changed much at all over the past few years.
Here’s where the Nano and Classic differ:
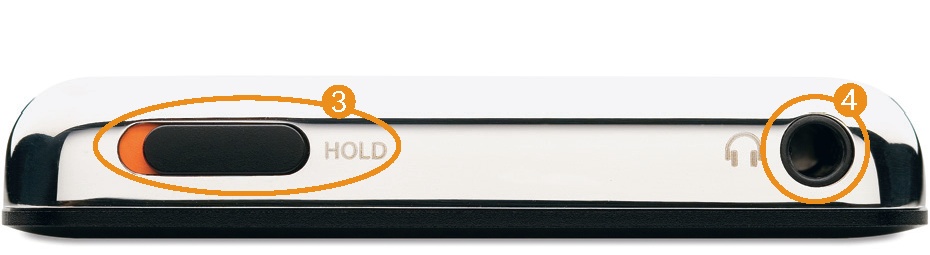
Volume. The Nano has + and – buttons on its top-left edge to control the sound output through the headphones. The Classic still clings to its click wheel for menu navigation and volume control.
Sleep/Wake. The Tic Tac–shaped button on the Nano’s top-right edge turns its touchscreen on or off. Press it gently.
Hold. The Classic is the only iPod left with a physical Hold switch. Slide it to the On position (with the orange spot visible) to lock down the Classic’s controls so your iPod doesn’t accidentally get bumped on or off when it rattles around in your pocket or bag.
Despite their design differences, the Nano and the Classic still have two things in common:
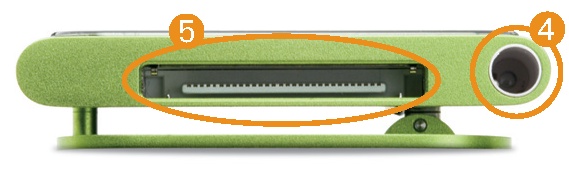
Headphones. The small, round jack on the bottom of the Nano (below) or the top of the Classic (above) is where you plug in your white earbuds.
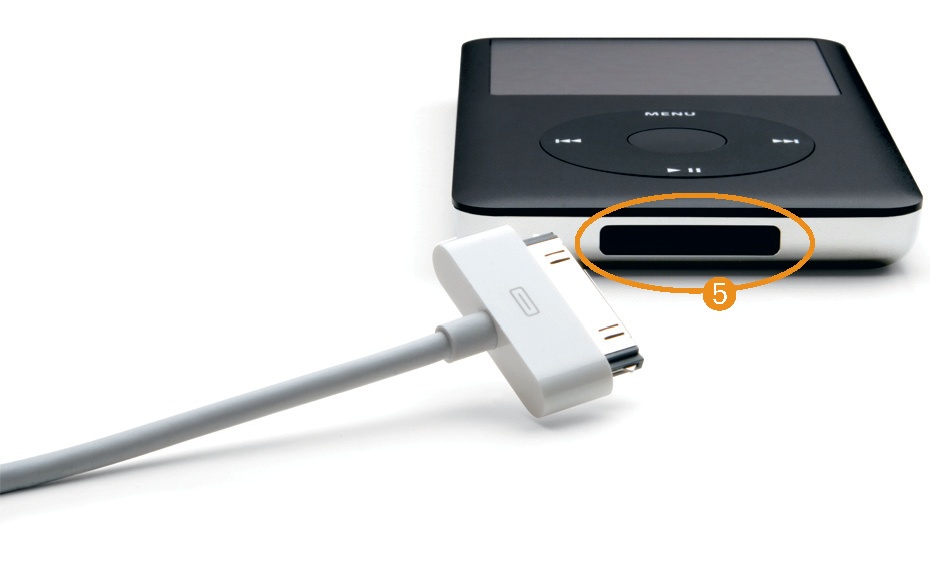
Dock connector. This flat, thin jack is where you plug in the iPod’s USB cable so you can connect it to your computer to sync up your iTunes library, or charge up your Nano or Classic battery.
Control the iPod Nano or Classic
THE NANO AND THE Classic let you control media in different ways. Here’s how to work either ‘Pod.
iPod Nano
Here are the finger moves that get your Nano singing:
Tap. Gently press your finger on an icon to open its menus, or on a song title to play it.
Double-tap. Tap two times to zoom in on a photo—do the same to zoom back out.
Swipe. Lightly whip your finger side to side on the glass to move through the parade of icons on the Home screen.
Flick. Whip your finger up and down to scroll through long playlists.
Drag. Hold down a volume control and slide your finger to adjust it.
Rotate. Home screen upside-down? Place two fingers on the glass and twist them in the direction you want the screen to be.
Press. Hold your finger on the screen while a song plays or you look at a photo to return to the Home screen.
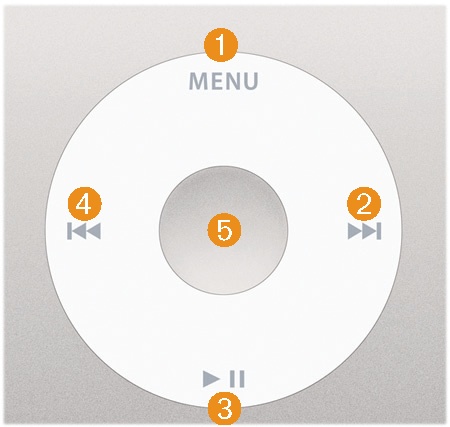
iPod Classic
Push any button to turn the Classic on. Then control it like so:
Menu. Tap this button to return to any screen you just viewed. For example, if you visited Music→Playlists→My Top Rated, you’d press Menu twice to return to the Music menu.
Next/Fast-Forward. Press here to jump to the next song in a playlist (Chapter 6), or hold it down to zip through a song.
Play/Pause. This button starts a song; push it again to pause the music.
Previous/Rewind. Press and release this button to play the song before the current track, or hold it down to “rewind” within a song.
Select. Press here to choose a highlighted menu item. When you have a song title highlighted, the Select button begins playback.
Get Stuff onto the iPod Nano or Classic: The Quick Way
YOU DON’T HAVE TO do much to keep your iPod’s music and video collection up to date with what’s on your computer. That’s because iTunes has a nifty autosync feature that automatically makes sure that whatever is in your iTunes library also appears on your iPod once you connect ‘Pod to desktop PC.
The first time you plug in your new iPod (after you install iTunes, of course), the iPod Setup Assistant leaps into action, asking you to name your iPod, and if you’d like to “Automatically sync songs to my iPod.” If your answer is yes, then just click the Done button. iTunes loads a copy of everything in its library that fits onto your iPod (see the note below if you have more music than the iPod has storage). That’s it. Your iPod is ready to go.
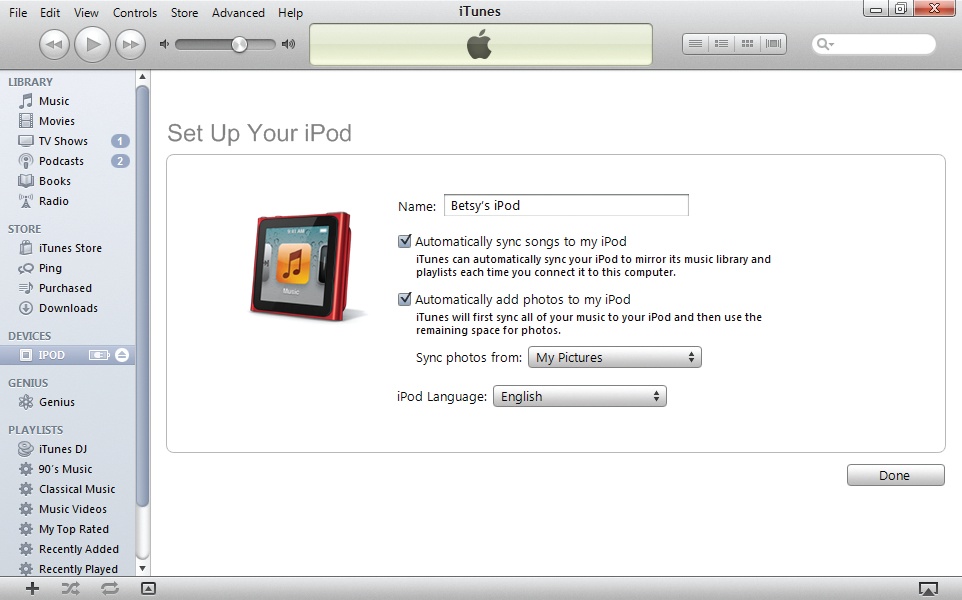
You can copy photos from a specific folder on your computer and choose the language you’d like the iPod menus to appear in here as well. But if you just want to stick with the music for now, Chapter 9 can fill you in on the photo business. If you generally like the autosync feature but want more control over what goes onto your iPod, read on to find out how to make that happen.
Note
If you have a small-capacity iPod, you may already have more music than can fit on your player. If that’s the case, your automatic option is the Autofill button at the bottom of the iTunes window. Skip ahead to Fill Up Any iPod with Autofill to learn more about Autofill, which lets iTunes decide what to put on your ‘Pod. And if you want to selectively sync certain playlists or artists, check out Manually Load the iPod Nano or Classic for the details.
Manually Load the iPod Nano or Classic
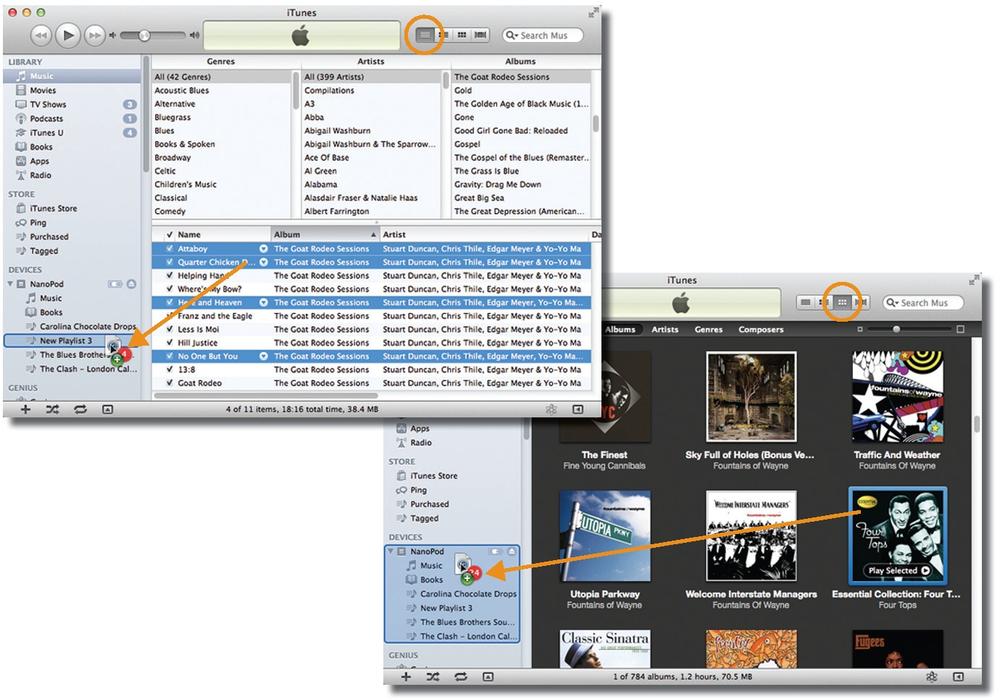
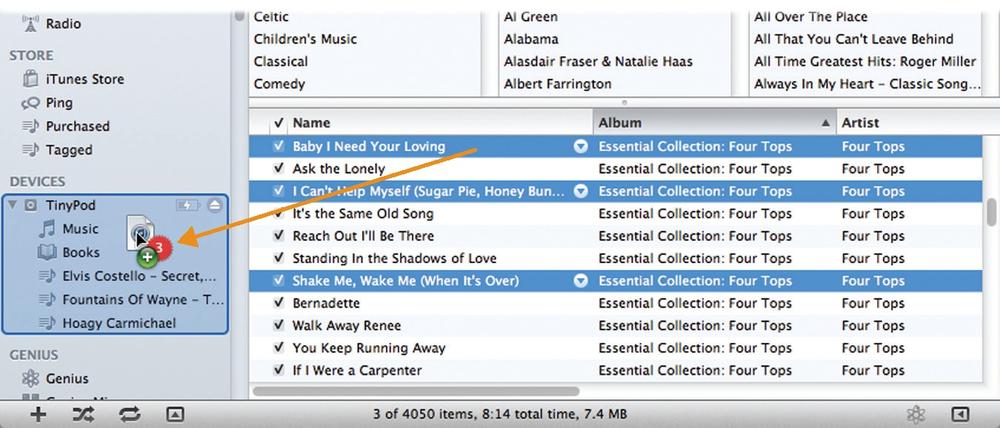
IF YOU DON’T HAVE enough room on your Nano or Classic for your whole iTunes library, or if you plan to load music onto your iPod from more than one computer (say your work PC and home PC), you’ll want to manually manage your songs and other media. To put your iPod on manual right from the get-go, turn off the check-box on the iPod Setup Assistant screen next to “Automatically sync songs….” (If you’ve already done the setup thing, see Load Songs onto an iPod from More Than One Computer to learn how to get back to Manual Land.) iTunes now refrains from automatically dumping everything onto your iPod. “But,” you ask, “how do I get the music on there by myself?” Easy—you just drag it:
In iTunes’ Source list, click the Music icon under Library. Click the button circled below to see a list of all the songs in your music library. You can also click Ctrl+B (⌘-B) to go into Column Browser view (see Four Ways to Browse Your Collection), where iTunes lists your music by genre, artist, and album.
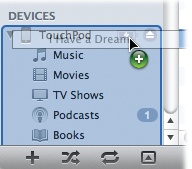
Click the songs or albums you want to copy to your iPod. Grab multiple songs or albums by holding down the Ctrl (⌘) key while clicking.
Drag your selections onto the iPod icon. The number of songs you’re dragging appears inside a red circle.
You can manually load any items in your iTunes library—audiobooks, movies, whatever—onto your iPod this way.
Fill Up Any iPod with Autofill
MOST PEOPLE’S ENTIRE MUSIC library is too big to stuff onto the wee 2-gigabyte Shuffle, or even the 8-gigabyte Touch or Nano. (Classic owners can chuckle here.) If you love all your music and don’t want to spend time cherry-picking tracks to load up your iPod, Autofill it to the brim with a full serving of tunes.
If you’re a Shuffle owner connecting your iPod to your PC for the first time, the iPod Setup Assistant appears. Leave the “Automatically choose songs…” checkbox turned on, click Done, and presto: iTunes grabs a random collection of songs from your library and copies them onto your tiny ‘Pod. After that, each time you connect your Shuffle, a small panel appears at the bottom of iTunes, inviting you to fill up your player with a click of the Autofill button.
Although Autofill used to be a Shuffle-only feature, other iPods can use it as well, as long as you set them to manually manage music. To use Autofill with a Touch, Nano, or Classic, connect the iPod and click the flippy triangle next to its icon in the iTunes Source list. The Autofill bar appears at the bottom of the screen. Click the Autofill button to load up.

In the “Autofill From” pop-up menu, tell iTunes to snag songs from your entire library or just a particular playlist (see Chapter 6). Click the Settings button to have iTunes pick random tracks or to select highly rated songs more often. (“Ratings?” you say? Check out Chapter 5 for the details.)
After you Autofill for the first time, when you return for another batch of songs, you can turn on the check-box next to “Replace all items when Autofilling” to have iTunes wipe the first batch of songs off your iPod and substitute new tracks.

Once iTunes fills up your ‘Pod, you see an “iPod sync is complete” message at the top of the screen. Click the Eject button next to your iPod’s icon, unplug the player from the computer, clip it onto your shirt, and head out with your little metal square full of music.
Manually Load Your iPod Shuffle
IF YOU WANT TO decide what goes onto your Shuffle, opt for manual updates instead of letting iTunes choose. As with any other iPod on manual control, you drag songs and playlists you want from your iTunes library and drop them onto the Shuffle’s icon in the Source list.
When you click the Shuffle icon and it displays your song list, feel free to rearrange individual songs in the order you want to hear them—just drag them up or down. The info at the bottom of the iTunes window tells you how much space you have left on your Shuffle if you’re looking to fill it to the brim.
To delete songs from the Shuffle, select one or more tracks and then press the Delete key on your keyboard. This action deletes the song from your Shuffle only, not your iTunes library; see Change an Existing Playlist.
You can also mix and match your song-loading methods. Start by dragging a few favorite playlists over to the Shuffle, and then click Autofill to finish the job. Just make sure you turn the “Replace all items when Autofilling” checkbox off, or iTunes will wipe out the tracks you already added.
Early versions of the iPod Shuffle used to be monogamous—that is, they wanted to work with only one iTunes library at a time and would threaten to erase and replace the Shuffle’s contents if you added music from a different computer. As you can imagine, this was quite a drag if you bought music on both a work and a home computer and wanted to load it up wherever you happened to be.
Thankfully, the free-spirited iPod Shuffles of today let you manually add music from multiple computers, just as you can with any other ol’ iPod.
Find the Music on Your iPod—and Play It
NOW THAT YOU’VE GOT some songs on your iPod, you’re ready to listen to them. Plug your headphones into the headphone jack and press the Sleep/ Wake button on your Touch or Nano—or any button on the front of the Classic—to turn it on.
Find Music on Your iPod Touch
The Touch’s screen is full of icons, but when it comes time to crank up the tunes, here’s what you do:
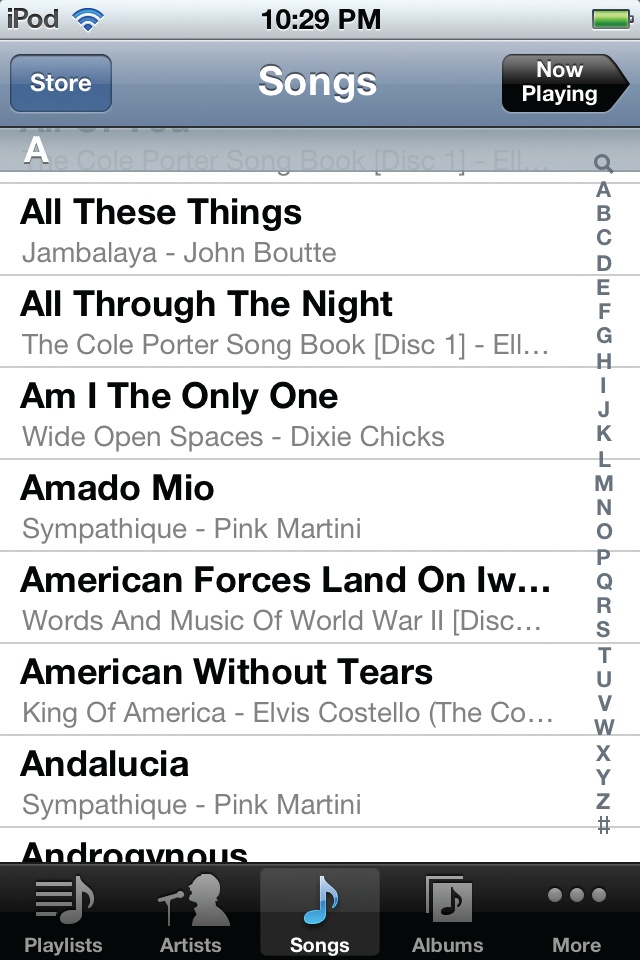
Tap the Music icon in the bottom-left corner of the Home screen.
You see five tappable buttons at the bottom of the screen. These let you see your music sorted by playlist, artist, song, or album. The More button at the end lets you sort by composer, genre, and other categories.
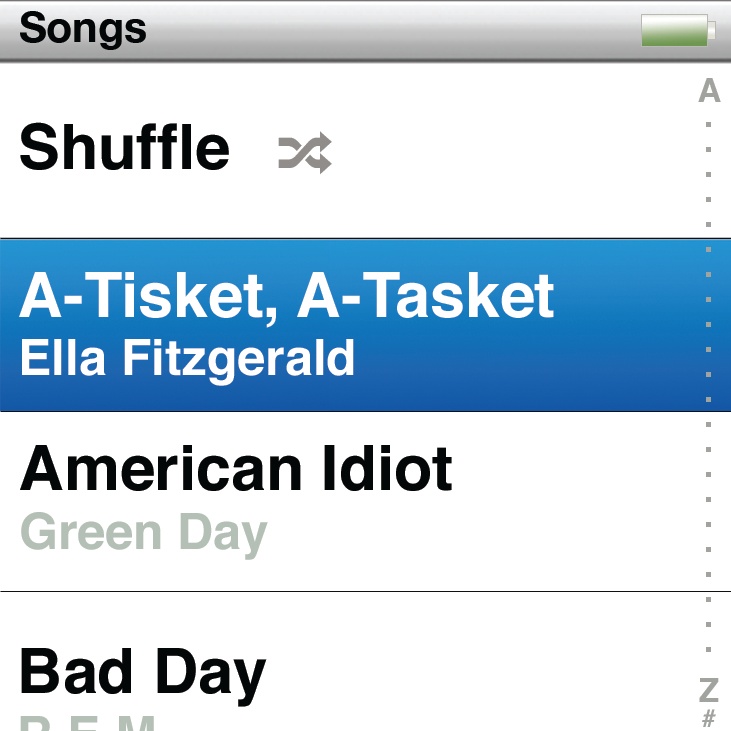
Tap the Songs button and then scroll (by flicking your finger) down to the song you want to play. You can also hold down the alphabet bar on the right and then drag your finger slowly to better target the scroll. Tap a song’s title to hear it play. (Apple, never missing an opportunity to nibble on your credit card, has pinned a Store button in the upper-right corner in case you can’t find any songs you want to hear at the moment.)
Find Music on Your Nano
Your music is just a finger-length away on the iPod Nano:
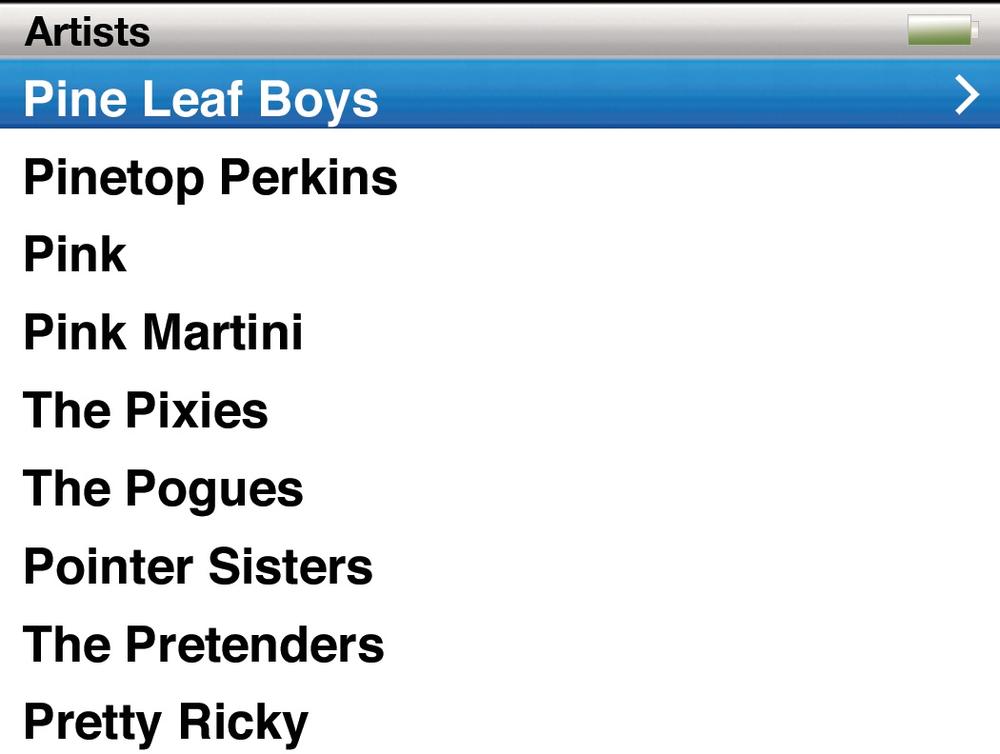
On the Home screen, tap the Music icon. That brings up a list of categories labelled Songs, Artists, and Albums. If you’re in the Songs menu, tap a title to hear it play. If you tapped Artists or Albums, tap a name or title to see the available tracks, and then tap one to listen.
Tap the screen to get playback controls. The usual suspects like Pause, Fast-Forward, and Rewind await your gentle touch.
Tap the screen again and flick your finger right to left to get a volume control slider. You can raise or lower the volume onscreen if you don’t feel like pressing the Nano’s physical volume buttons.
Find Music on Your Classic
After you pick a language, the first menu you see says “iPod” at the top of the screen. Here’s how to start playing your tunes:
On the iPod menu, highlight the Music menu. Run your thumb over the scroll wheel to move the blue highlight bar up and down.
Press the round center button to select Music.
On the Music menu, scroll to a category so you can find your song. You can select music by artist, album, song, genre, and so on. Scroll to the one you want, and then press the center button.
Scroll through the list on the iPod’s screen. Say you decided to look for music by artist. You now see a list of all the singers and bands whose songs sit on your iPod. Scroll down to the one you want, and press the center button. You’ll see a list of the albums you have from that artist.
Scroll to the album you want to hear. Press the Select or
 button to start playing the album. Press again to stop the song, or press the Menu button to retrace your steps back to the Classic’s main screen.
Get iPod: The Missing Manual, 10th Edition now with the O’Reilly learning platform.
O’Reilly members experience books, live events, courses curated by job role, and more from O’Reilly and nearly 200 top publishers.

