You want to send your iOS app to others so that they can test your app or have a look at it before you submit your app to the App Store.
In order to archive an application, you need to follow certain steps:
Make sure that you have fully tested the app on the simulator and you are happy that your app is stable.
Gather the UDIDs (Unique Device Identifiers) of all those devices on which you want to run your app. You can ask your friends and colleagues for these if the devices belong to them.
Add these UDIDs to your iOS Portal.
Create an Ad Hoc Distribution provision profile. Provision profiles are a mix of binary and XML content that allow an application to be executed on devices that have been linked to that provision profile.
After you have your provision profiles (a file that ends with the .mobileprovision extension), tell Xcode to use that provision profile for release purposes, as we will soon see.
Within Xcode, select the Product menu and then choose Archive. Xcode will now archive your application and, when that is done, display Organizer to you. Here you can export your archived application as a file (with the .ipa extension) that your testers/colleagues/friends can drag and drop into their iTunes or iPhone Configuration Utility to install your app on their iOS devices.
To distribute your iOS app to testers/colleagues and friends, you have to create an Ad Hoc provision profile. Follow these steps to create your Ad Hoc provision profile:
Log into the iOS Dev Center.
Select iOS Provision Portal from the right side of the screen.
If you have not created a Distribution certificate yet, follow these steps:
On the lefthand side of iOS Provision Profile, select Certificates.
On the righthand side, select the Distribution tab on the top of the screen.
Follow the instructions on the screen, which will ask you to use Keychain Access to create a new certificate on your computer and then upload that certificate to the portal. After this, you will have your Distribution certificate.
Click on the Download button to the right side of your Distribution certificate to download it. After you’ve downloaded it on your computer, double-click on it to install it in your Keychain Access.
Now move to the Devices item on the left side of the screen.
Select the Add Devices button on the right side of the screen.
Enter the device name and the device UDID in the boxes provided. If entering more than one device, press the + button after every device to make room for a new device. You can add a maximum of 100 devices to each provision portal (except for Enterprise portals, which we won’t cover in this book, as they are given only to big organizations).
Note
After a device is added to your iOS portal, it cannot be removed for the period that you hold this portal (which is usually a year). After your portal has expired and when it has been renewed, you will get a chance to delete any unwanted devices, so make sure you are not adding devices to your portal without considering this.
Once you are done adding the devices, press the Submit button.
Select Provisioning on the left side of the screen.
Select the Distribution tab on the righthand side of the screen.
Select the New Profile button on the right side of the screen.
In the Create iOS Distribution Provisioning Profile screen, make sure the Distribution Method is Ad Hoc (Figure 1-19).
Under Profile Name, give a descriptive name to your provision profile. For instance, something like Wildcard Ad Hoc Profile. Be creative and descriptive.
In the App ID drop-down, pick Xcode: Wildcard AppID. This will allow you to provision your apps regardless of their App Identifiers so that you can use the same Ad Hoc provision profile for all your iOS apps.
In the Devices section, select all the devices on which you want this provision profile to work. Devices that are not selected in this list will not be able to run your apps.
After you are done selecting the devices, press the Submit button.

Now head back to the Distribution tab of the Provisioning section and press the Download button for the provision profile that you just created. If the status of this profile is Pending, refresh your page in your browser until the provision profile is created.
Now that you have this provision profile downloaded on your computer, drag and drop it into iTunes. iTunes will then install this profile for you.
All done. We are now ready to create an archived app. Follow these steps:
Select your profile file in Xcode (this is the file with the blue icon).
Now you will see the targets your app supports. Select the desired target.
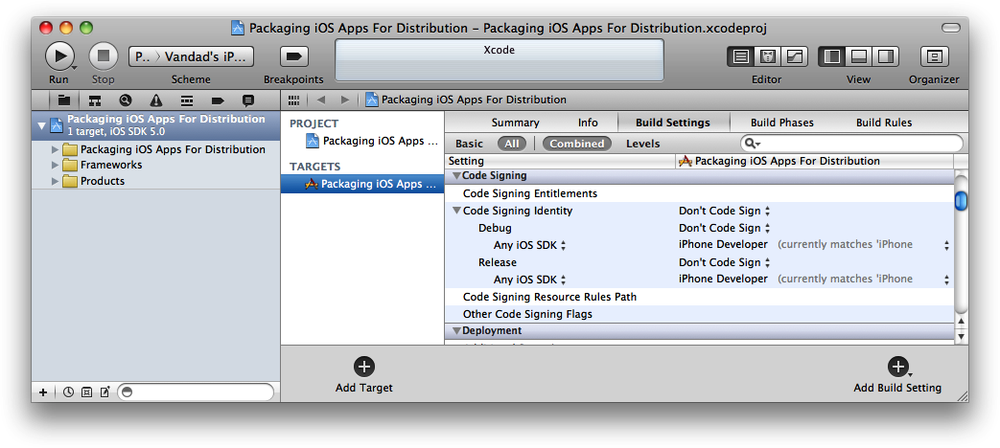
Select Build Settings on the right side of the screen (Figure 1-20).
In the Build Settings tab, scroll down until you get to the Code Signing category, as shown in Figure 1-20.
Under Code Signing Identity → Release and Code Signing Identity → Release → Any iOS SDK, make sure you pick the provision profile that you created earlier in this recipe.
On the Scheme breadcrumb (Figure 1-11), make sure you’ve chosen iOS Device/Your Device Name instead of iOS Simulator (iPad or iPhone). Under the simulator, you cannot create an app for distribution.
Head over to the Product menu and choose Archive.
After the archiving process is finished, Xcode will open Organizer for you and will display the Archives tab, as depicted in Figure 1-21.
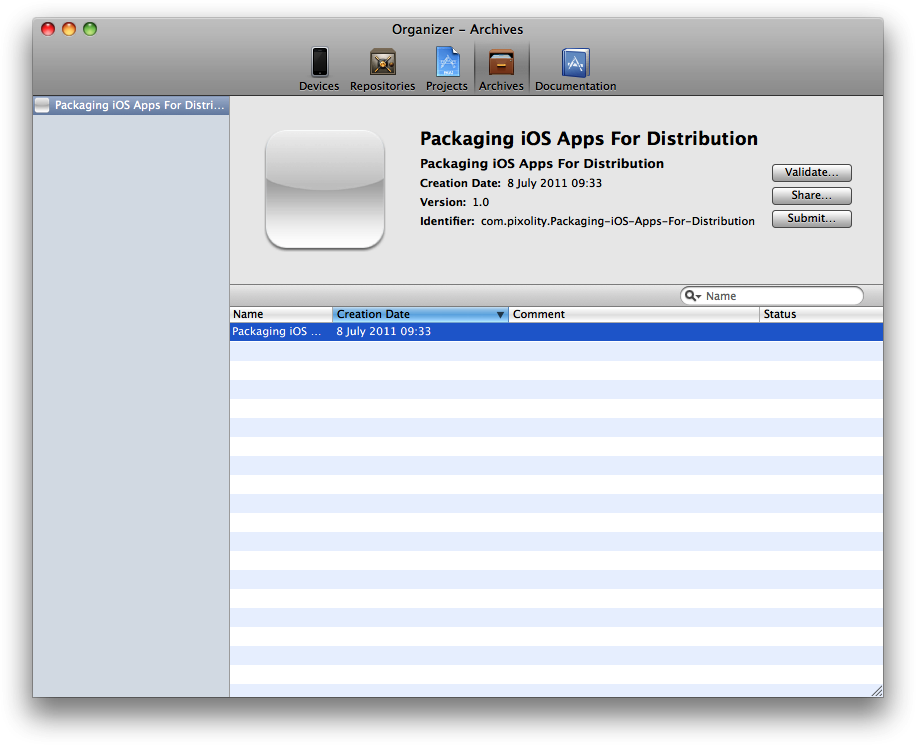
Select the Share button on the top-right side of the screen. You will be presented with a dialog similar to that shown in Figure 1-22.
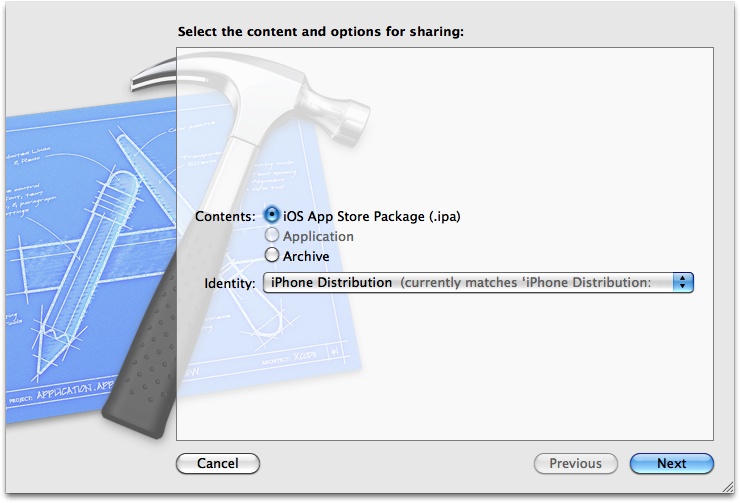
Keep the Contents selection as iOS App Store Package (.ipa file), as shown in Figure 1-22.
In the Identity drop-down, again, choose the provision profile with which you want to sign your app. We created this provision profile before, remember? Choose the same profile again. Once you are done, press Next.
You will now be asked to specify the location where you would like to save this file. Select your desired location and filename, then press Save.
All done. Now you have a file with an .ipa extension. When sending this file to your friends/colleagues/etc., make sure you send the provision profile (which you created in the iOS Dev Portal) as well. They will need both of these files (the .ipa and the .mobileprovision files) in order to install your archived apps on their devices.
A user can use either iTunes or iPhone Configuration Utility (both are free) in order to install your apps on their devices. I personally recommend iPhone Configuration Utility (or iCU) since it is certainly more robust when it comes to installing Ad Hoc apps on devices. iTunes has some issues when installing archived apps on devices, which I am not going to bore you with. The more you work with these two pieces of software, the more you get to know about their advantages and disadvantages.
Get iOS 6 Programming Cookbook now with the O’Reilly learning platform.
O’Reilly members experience books, live events, courses curated by job role, and more from O’Reilly and nearly 200 top publishers.

