In this chapter, we will discuss the options for file storage in infrastructures with multiple web nodes. Ensuring your file storage is coherent and synchronized between your web nodes is often the redheaded stepchild of infrastructure design—most everyone is aware that you need all your web nodes to agree on database information, and quite a few know that your object cache needs to be coherent. However, the complication of ensuring your static files are synchronized between web nodes is often overlooked.
Why is this important? Imagine that a user goes to your site and uploads an avatar. That user’s avatar is written to disk on webnode1. If there is a delay in that file becoming available on webnode2—or worse, if its not synchronized at all—users will start seeing broken image links for that file. Even if your site doesn’t accept user uploads, Drupal creates its own JS/CSS aggregate files on disk, and if those don’t exist on both web nodes, you will quickly hit issues on the web node without them. Keep this in mind while debugging “strange issues” that may come up on your infrastructure (certain users not seeing CSS correctly, 404s on only certain web nodes, etc.). It is easy to forget how important coherent file storage is to a functional website.
Now that we understand why this is important, we can cover a few different methods of maintaining this consistency when using multiple web nodes. In this chapter, we will discuss some of the more popular methods for Drupal deployments and their various advantages and disadvantages.
The first option we should consider is, at first glance, the simplest. In this configuration, you would simply set up rsync processes between your web nodes to ensure that every file on webnode1 is also on webnode2, webnode3, and so on. This setup has a few problems, though. First, there will always be some sort of delay in file syncing. It must be acceptable to have broken links on pages during this sync delay. Additionally, this configuration virtually requires session affinity. Having a missing user avatar during the sync delay for some users is a problem, but having the user who uploaded that avatar not able to see it on his own profile page is a critical problem. Because of this, session affinity is usually a requirement as it “resolves” the issue by ensuring that a user who uploads an avatar remains on the webnode he uploaded it on.
Even if you are entirely fine with having session affinity enabled and with the synchronization delay, there are other complications. For example, there is no clear method for removing files from web nodes where the file removal did not originally take place. During an rsync from point A to point B, how do you differentiate between a file having not yet been synced and a file having been deleted? Issues like this are why “just using rsync” is becoming less of an answer to this problem.
Gluster is one of the most popular options for file storage, and in particular file storage in cloud deployments (discussed in the next chapter). It is popular for good reason—Gluster is simple to set up, does not create a single point of failure, and works extremely well for many types of deployments. It is in essence a clustering filesystem, but one designed for standard deployments and not necessarily an enterprise configuration (meaning it doesn’t assume you have access to high-quality disk backends, etc.).
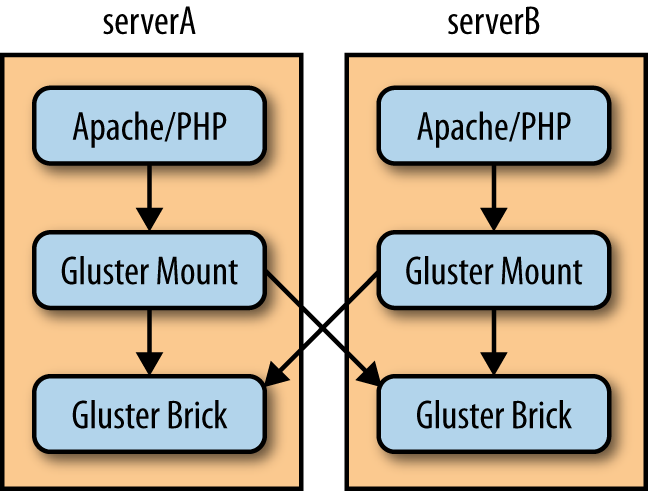
GlusterFS works as follows. First, you define storage “bricks,” the servers and mount points where the actual data will be stored. Note that these can be the web nodes themselves; all that matters is that they exist, are relatively stable, and have a low-latency network connection. You then can “combine” these bricks together using GlusterFS “translators.” This sounds complicated, but the default configuration is fairly good and largely just creates a redundant array of these bricks with locking, caching, prefetching, and other performance and feature translators layered on top. You can then mount the Gluster volume on each web node, and the Gluster translators will do the work of ensuring both that files are kept in sync and that there are replicas of the files across the brick cluster. Figure 10-1 illustrates a Gluster mount across two servers and the underlying Gluster brick on each server.
There are multiple ways to mount the Gluster volume: you can mount it via Gluster’s native protocol, using the FUSE (File Systems in User Space) driver, or you can mount the volume over NFS (Gluster has an NFS emulation layer). There are mixed reports as to which is better, with many people agreeing that NFS is somewhat less stable, but better for high concurrency. Most people tend to use the native FUSE driver.
Recent versions of Gluster have made it quite easy to get up and running with a simple setup. Assuming you have at least two servers with available disk space for the bricks and Gluster is installed on all of the servers, you can get started by typing something like the following in the terminal (let’s assume you have two servers, serverA and serverB, and that on each server you’re going to store data in /var/gluster/data):
(On serverA): gluster peer probe serverB
(On serverA): gluster volume create testVolume replica 2 \
              serverA:/var/gluster/data serverB:/var/gluster/data
(On serverA): gluster volume start testVolume
You can now check on the status of your volume with:
(On serverA or serverB): gluster volume info
And you can now mount your new volume by executing the following on any server you want it mounted on:
# mount -t glusterfs serverA:/testVolume /mnt/gluster_volume
The hostname used in the mount command could be either of the glusterfs hosts (that is, serverA could be replaced with serverB to access the same volume, only mounted directly from serverB). Thus, if you had two web nodes, you could have a brick on each and then mount from the local server on each. This is often the easiest way to get a replicated files directory between web nodes, without inserting a single point of failure.
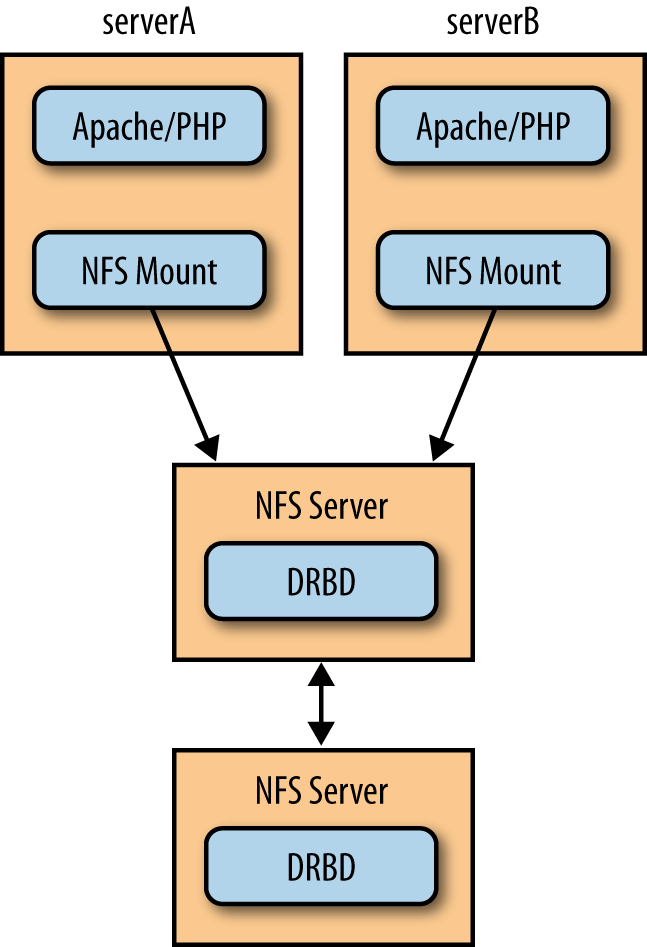
A decreasingly common practice is to set up an NFS share somewhere on your cluster and just hope for the best. The advantage of this practice is simplicity. The disadvantage is that if that one NFS server goes down, needs a reboot for updates, or has a hardware failure, the entire site will go down. You should really only use this method (illustrated in Figure 10-2) if you have single points of failure everywhere else in your infrastructure as well and one more won’t bother you.

While a single NFS server is usually a poor idea, there are other configurations that are quite useful and still use NFS as the protocol of choice. One such setup is to use DRBD (a kernel-level distributed remote block device) to replicate the actual block device NFS is hosted on. This allows you (with some significant configuration) to successfully fail over an NFS mount without having stale file handles on the client side. This configuration (shown in Figure 10-3) is somewhat difficult to get correct, but is one of the few ways to have truly highly available NFS.
The configuration of HA-NFS actually has very little to do with NFS and more to do with having a truly (and absolutely) replicated block device. NFSv3 has no concept of failover, so when you do actually failover between two servers, the challenge is convincing it to “look over there” during the failover and then pretend like nothing happened. Heartbeat and DRBD are surprisingly good at this.
This whole system depends on two things. Firstly, NFS file handles on the client side not only depend on the IP address and NFS statd hostname, but also on the inode on the server itself. DRBD allows you to have these inodes be the same between two servers, which is a core requirement, since if all the inodes suddenly changed, everything would break. Secondly, NFS has a directory where it stores state information, and DRBD is accurate enough that you can synchronize this directory between the two servers, as well as the data itself. Once you have the data and this state information perfectly replicated between the two servers, failover becomes much more possible, as the event itself looks like just a momentary network failure to the NFS clients.
The first step in setting up DRBD is to create two identical partitions on two servers. They must literally be exactly the same size. You must then install DRBD—this will include the userland utilities and a kernel module. Start the DRBD service and you can begin with the standard setup procedure.
Note
We assume DRBD version 8.4 in the following discussion, if you are using 8.3, we recommend following the instructions on the DRBD website (http://www.drbd.org).
Edit /etc/drbd.conf (or global.conf and r0.res in /etc/drbd.d, depending on your distribution). There are two sections in the drbd.conf file: the global/common section and the resource section. (These two sections map to the two different files in some distributions.) The global/common section is very simple and should contain something like this:
global {
  usage-count yes;
}
common {
  net {
    protocol C;
  }
}
The resource section is where you define your volume and should have something like this in it:
resource resourceName {
  on server1 {
    device    /dev/drbd0;
    disk      /dev/sdb1;
    address   192.168.1.2:7789;
    meta-disk internal;
  }
  on server2 {
    device    /dev/drbd0;
    disk      /dev/sdb1;
    address   192.168.1.3:7789;
    meta-disk internal;
  }
}
Once you have this file in place and exactly the same on both servers, start the DRBD service and proceed to set up the volume. The following commands will need to be run on both servers:
# drbdadm create-md resourceName
# drbdadm up resourceName
At this point, you should be able to run cat /proc/drbd and see the state of the volume. It should list the two servers as both up, in the “Secondary/Secondary” state, and “Inconsistent.” This means that the two physical devices are not synchronized and that neither server considers itself the “primary” (the server receiving reads/writes with the volume mounted).
Now let’s perform our first synchronization. Run the following command on the server you want to be the primary:
# drbdadm primary --force resourceName
Note that this will copy every bit of data on the physical device on this server to the secondary server. This is important if there is actual “legitimate” data on one of these devices—in that case, you would run this command on the server with legitimate data. This is an important consideration when resynchronizing a cluster or replacing a DRBD node.
You can monitor the process of the synchronization via cat /proc/drbd.
Once the sync is complete, you can format and mount this new DRBD resource on your primary server. The device name will be /dev/drbd0, and it can be treated exactly like a new partition (i.e., you format and mount it the same way).
This is a very general description of how to set up DRBD; you really should go to the DRBD website and read the detailed documentation there before ever attempting to use it in production. It is a complicated system, but exceptionally useful in many situations.
The part of this configuration that actually detects failure and then takes action on that failure is Heartbeat. This software is packaged in most distributions and should be easy to install. There are two ways to configure Heartbeat: the “v1” way and the “pacemaker” way. We recommend the v1 method for most people as it’s quite simple, and for a NFS-DRBD cluster, you don’t need anything more complicated. Heartbeat is used repeatedly in many sections of this book (and many infrastructures), and most of Chapter 12 is dedicated to it.
The NFS setup is mostly normal, with a few exceptions (they are weird exceptions, though!):
- Stop nfs.
- Set the statd hostname to the same thing on both servers. On Red Hat-based systems, this is located in /etc/sysconfig/nfs.
- Unmount rpc_pipefs. This may be difficult, and you may have to force the umount. This is a virtual file system used for NFS4, and it’s mounted into the NFS state directory. We want to move this directory, so we need to unmount it.
- Copy /var/lib/nfs to the DRBD mount and then delete the original /var/lib/nfs and symlink the directory from the DRBD mount back to /var/lib/nfs.
- Remount rpc_pipefs.
- Finally, on the other server, ensure that the statd hostname is changed, unmount rpc_pipefs, and symlink /var/lib/nfs to the path where the NFS state directory would be if the DRBD volume was mounted. (The same symlink command you ran on the primary server will work here. This directory will only actually exist on this server when the DRBD volume is failed over. This is important, as this state directory must be synchronized between the two machines.)
We recommend starting Heartbeat (drbd, nfs, etc.) on the primary, mounting NFS on another server, and either attempting a failover via the Heartbeat utilities or just shutting down the server you’re testing. For example (given heartbeat/drbd/nfs running on serverA and serverB):
(on serverA): cat /proc/drbd
# verify that you are master
(on serverA): /etc/init.d/heartbeat stop
(on serverA): tail -f /var/log/messages
# watch it failing over and ensure there are no errors
(on serverB): cat /proc/drbd
#verify that it is master
(on serverA): /etc/init.d/heartbeat start
(on serverA): tail -f /var/log/messages
# watch it failing back and ensure there are no errors
(on serverA): cat /proc/drbd
# ensure that serverA is now master--there may be a resync period shown
During all of the above, your test website should never go down. (There may be brief stalls in service, but it shouldn’t go down completely.) If your website does become unavailable for a few minutes at a time around a failover event, consider mounting the NFS volume over UDP and not TCP. Some additional information and tips on this method of HA-NFS is available here.
It is difficult to really discuss a SAN device (an enterprise appliance specifically designed to provide highly available shared storage) while comparing it to these other options. Very few people have the money or inclination to buy a SAN device for a single website. If you do have both the money and the inclination, you also probably have a very large site (or, more likely, several). The summary here is that every option presented so far in this chapter is designed to get you partially to the feature set and reliability of a real SAN device. If a SAN is an option for you, then it is the obvious choice. However, it is a rarity that it is a realistic option.
Get High Performance Drupal now with the O’Reilly learning platform.
O’Reilly members experience books, live events, courses curated by job role, and more from O’Reilly and nearly 200 top publishers.

