Chapter 4. Initializing Instances: Off to a Great Start
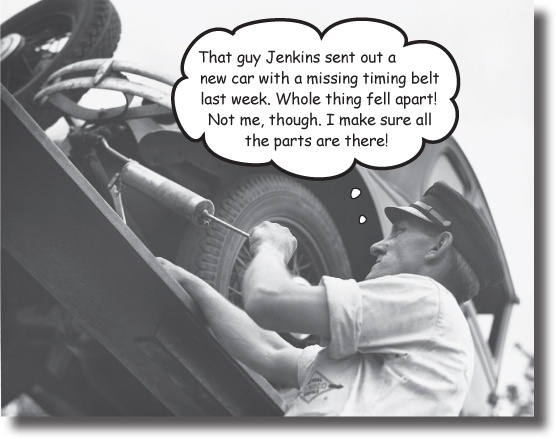
Right now, your class is a time bomb. Every instance you create starts out as a clean slate. If you call certain instance methods before adding data, an error will be raised that will bring your whole program to a screeching halt.
In this chapter, weâre going to show you a couple of ways to create objects that are safe to use right away. Weâll start with the initialize method, which lets you pass in a bunch of arguments to set up an objectâs data at the time you create it. Then weâll show you how to write class methods, which you can use to create and set up an object even more easily.
Payroll at Chargemore
Youâve been tasked with creating a payroll system for Chargemore, a new chain of department stores. They need a system that will print pay stubs for their employees.
Chargemore employees are paid for two-week pay periods. Some employees are paid a two-week portion of their annual salary, and some are paid for the number of hours they work within the two-week period. For starters, though, weâre just going to focus on the salaried employees.
A pay stub needs to include the following information:
The employee name
The amount of pay an employee received during a two-week pay period
So...hereâs what the system will need to know for each employee:
Employee name
Employee salary
And hereâs what it will need to do:
Calculate and print pay for a two-week period
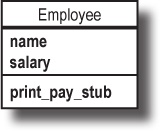
This sounds like the ideal place to create an Employee class! Letâs try it, using the same techniques that we covered back in Chapter 2.
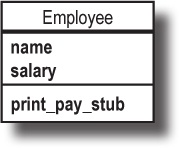
Weâll set up attribute reader methods for @name and @salary instance variables, then add writer methods (with validation). Then weâll add a print_pay_stub instance method that prints the employeeâs name and their pay for the period.

An Employee class
Hereâs some code to implement our Employee class...
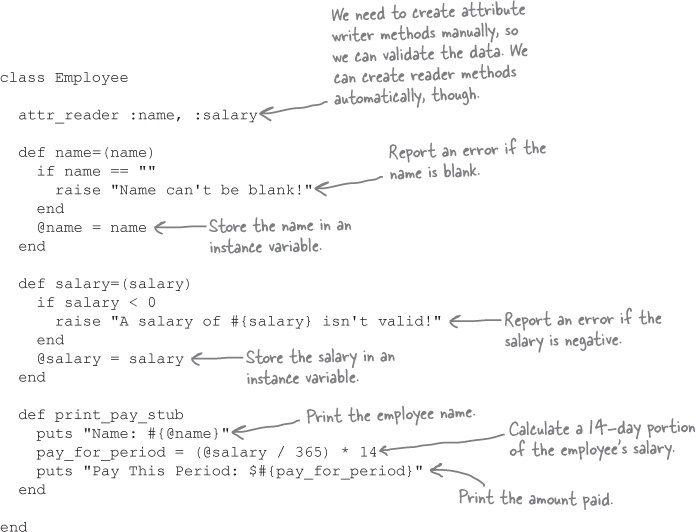
(Yes, we realize that this doesnât account for leap years and holidays and a host of other things that real payroll apps must consider. But we wanted a print_pay_stub method that fits on one page.)
Creating new Employee instances
Now that weâve defined an Employee class, we can create new instances and assign to their name and salary attributes.
amy = Employee.new
amy.name = "Amy Blake"
amy.salary = 50000
Thanks to validation code in our name= method, we have protection against the accidental assignment of blank names.

Our salary= method has validation to ensure that negative numbers arenât assigned as a salary.

And when an Employee instance is properly set up, we can use the stored name and salary to print a summary of the employeeâs pay period.

Hmmm... Itâs typical to display two decimal places when showing currency, though. And did that calculation really come out to an even dollar amount?
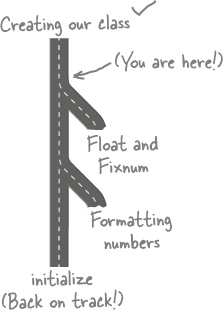
Before we go on to perfect our Employee class, it looks like we have a bug to fix. And that will require us to go on a couple of brief detours. (But youâll learn some number formatting skills that youâll need laterâpromise!)

Our employee pay is getting its decimal places chopped off. To fix this, weâll need to look at the difference between Rubyâs
FloatandFixnumnumeric classes.We donât want to display too many decimal places, either, so weâll need to look at the
formatmethod to format our numbers properly.
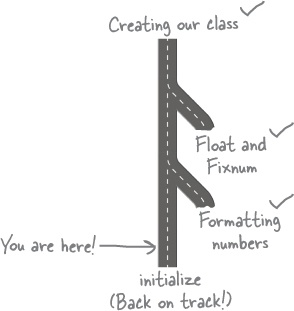
A division problem
Weâre working to make the perfect Employee class to help us calculate payroll for the Chargemore department store. But thereâs a little detail we have to take care of first...

Thatâs true. Doing the math on paper (or launching a calculator app, if thatâs your thing) can confirm that Amy should be earning $1917.81, rounded to the nearest cent. So where did that other $13.81 go?
To find out, letâs launch irb and do the math ourselves, step by step.
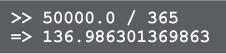
First, letâs calculate a dayâs pay.


Thatâs nearly a dollar a day missing, compared to doing the math by hand:
50,000 ÷ 365 = 136.9863...
This error is then compounded when we calculate fourteen daysâ pay:
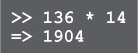
Compare that to the answer weâd get if we multiplied the full daily pay:
136.9863 x 14 = 1917.8082...
So weâre nearly $14 off. Multiply that by many paychecks and many employees, and youâve got yourself an angry workforce. Weâre going to have to fix this, and soon...
Division with Rubyâs Fixnum class
The result of our Ruby expression to calculate two weeks of an employeeâs pay doesnât match up with doing the math by hand...

The problem here is that when dividing instances of the Fixnum class (a Ruby class that represents integers), Ruby rounds fractional numbers down to the nearest whole number.

It rounds the number because Fixnum instances arenât meant to store numbers with decimal places. Theyâre intended for use in contexts where only whole numbers make sense, like counting employees in a department or the number of items in a shopping cart. When you create a Fixnum, youâre telling Ruby: âI expect to only be working with whole numbers here. If anyone does math with you that results in a fraction, I want you to throw those pesky decimal places away.â
How can we know whether weâre working with Fixnum instances? We can call the class instance method on them. (Remember we talked about the Object class back in Chapter 3? The class method is one of the instance methods inherited from Object.)
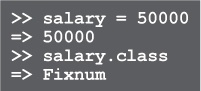
Or, if youâd rather save yourself the trouble, just remember that any number in your code that doesnât have a decimal point in it will be treated as a Fixnum by Ruby.
Any number in your code that does have a decimal point in it gets treated as a Float (the Ruby class that represents floating-point decimal numbers):
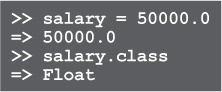
If itâs got a decimal point, itâs a
Float. If it doesnât, itâs aFixnum.
Division with Rubyâs Float class
We loaded up irb and saw that if we divide one Fixnum (integer) instance by another Fixnum, Ruby rounds the result down.

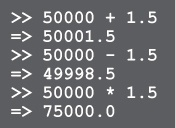
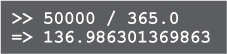
The solution, then, is to use Float instances in the operation, which we can get by including a decimal point in our numbers. If you do, Ruby will give you a Float instance back:
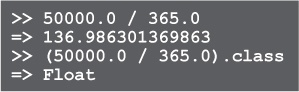
It doesnât even matter whether both the dividend and divisor are Float instances; Ruby will give you a Float back as long as either operand is a Float.
It holds true for addition, subtraction, and multiplication as well: Ruby will give you a Float if either operand is a Float:
When the first operand is a... | And the second operand is a... | The result is a... |
|
|
|
|
|
|
|
|
|
|
|
|
And of course, with addition, subtraction, and multiplication, it doesnât matter whether both operands are Fixnum instances, because thereâs no fractional number to lose in the result. The only operation where it really matters is division. So, remember this rule:
When doing division, make sure at least one operand is a
Float.
Letâs see if we can use this hard-won knowledge to fix our Employee class.
Fixing the salary rounding error in Employee
As long as one of the operands is a Float, Ruby wonât truncate the decimals from our division operation.
With this rule in mind, we can revise our Employee class to stop truncating the decimals from employeesâ pay:
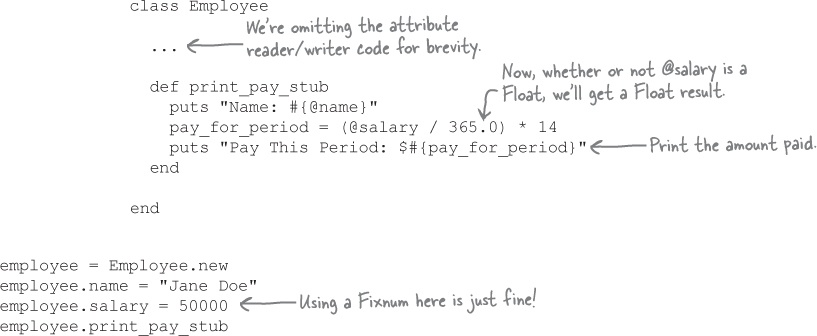
Now we have a new problem, though: look what happens to the output!

Weâre showing a little too much precision! Currency is generally expected to be shown with just two decimal places, after all. So, before we can go back to building the perfect Employee class, we need to go on one more detour...

Formatting numbers for printing
Our print_pay_stub method is displaying too many decimal places. We need to figure out how to round the displayed pay to the nearest penny (two decimal places).

To deal with these sorts of formatting issues, Ruby provides the format method.
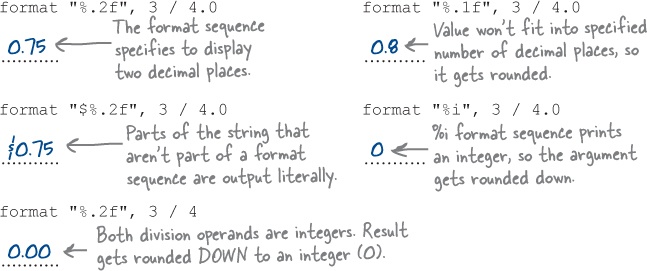
Hereâs a sample of what this method can do. It may look a little confusing, but weâll explain it all on the next few pages!
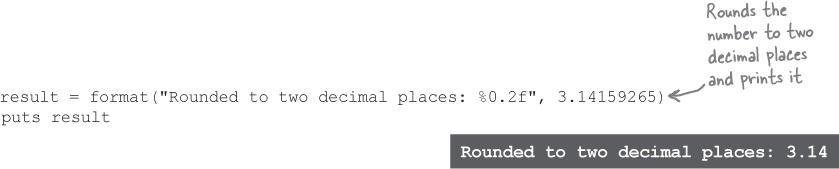
So it looks like format can help us limit our displayed employee pay to the correct number of places. The question is, how? To be able to use this method effectively, weâll need to learn about two features of format:
Format sequences (the little
%0.2fabove is a format sequence)Format sequence widths (thatâs the
0.2in the middle of the format sequence)
Relax
Weâll explain exactly what those arguments to format mean on the next few pages.
We know, those method calls look a little confusing. We have a ton of examples that should clear that confusion up. Weâre going to focus on formatting decimal numbers, because itâs likely that will be the main thing you use format for in your Ruby career.
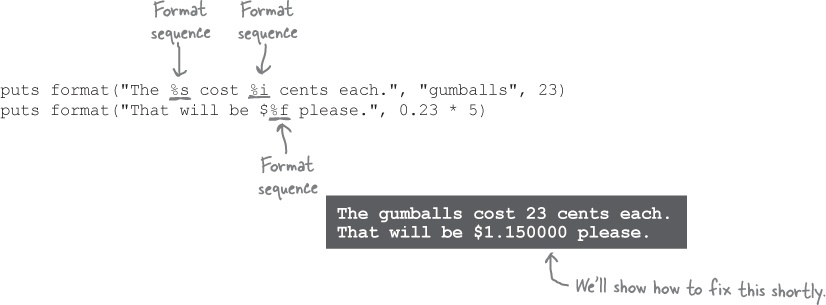
Format sequences
The first argument to format is a string that will be used to format the output. Most of it is formatted exactly as it appears in the string. Any percent signs (%), however, will be treated as the start of a format sequence, a section of the string that will be substituted with a value in a particular format. The remaining arguments are used as values for those format sequences.
Format sequence types
The letter following the percent sign indicates the type of value thatâs expected. The most common types are:
| string |
| integer |
| floating-point decimal |

So %f is for floating-point decimal numbers... We can use that sequence type to format the currency in our pay stubs.
By itself, though, the %f sequence type wonât help us. The results still show too many decimal places.
Up next, weâll look at a fix for that situation: the format sequence width.
Format sequence width
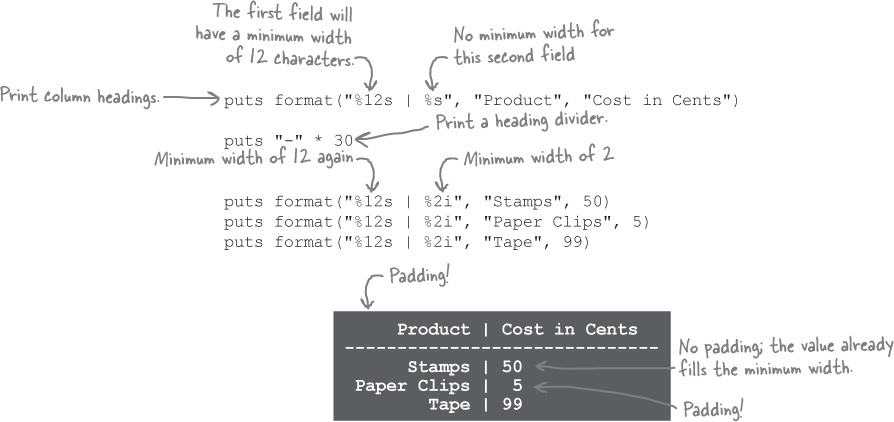
Hereâs the useful part of format sequences: they let you specify the width of the resulting field.
Letâs say we want to format some data in a plain-text table. We need to ensure the formatted value fills a minimum number of spaces, so that the columns align properly.
You can specify the minimum width after the percent sign in a format sequence. If the argument for that format sequence is shorter than the minimum width, it will be padded with spaces until the minimum width is reached.
And now we come to the part thatâs important for todayâs task: you can use format sequence widths to specify the precision (the number of displayed digits) for floating-point numbers. Hereâs the format:
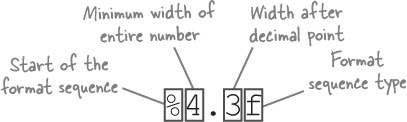
The minimum width of the entire number includes decimal places. If itâs included, shorter numbers will be padded with spaces at the start until this width is reached. If itâs omitted, no spaces will ever be added.
The width after the decimal point is the maximum number of digits to show. If a more precise number is given, it will be rounded (up or down) to fit in the given number of decimal places.
Format sequence width with floating-point numbers
So when weâre working with floating-point numbers, format sequence widths let us specify the number of digits displayed before and after the decimal point. Could this be the key to fixing our pay stubs?
Hereâs a quick demonstration of various width values in action:
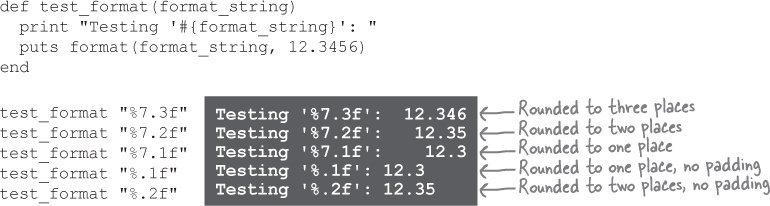
That last format, "%.2f", will let us take floating-point numbers of any precision and round them to two decimal places. (It also wonât do any unnecessary padding.) This format is ideal for showing currency, and itâs just what we need for our print_pay_stub method!

Previously, our calculated pay for our Employee classâs print_pay_stub method was displayed with excess decimal places:
But now we finally have a format sequence that will round a floating-point number to two decimal places:
Letâs try using format in the print_pay_stub method.
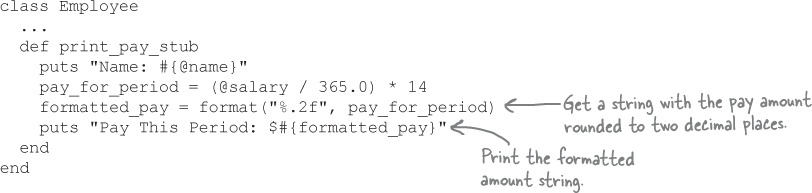
Using âformatâ to fix our pay stubs
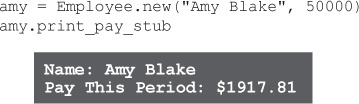
We can test our revised print_pay_stub using the same values as before:


We had to make a couple of detours, but weâve finally got our Employee class printing pay stubs as it should! Next, weâll get back to the business of perfecting our class...

When we forget to set an objectâs attributes...
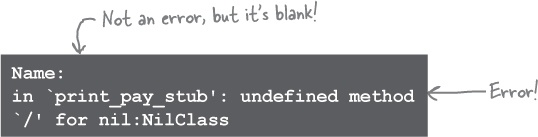
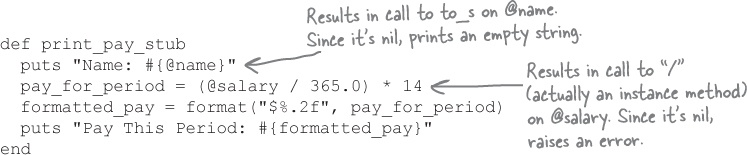
Now that you have the employee pay printing in the correct format, youâre puttering along, happily using your new Employee class to process payroll. That is, until you create a new Employee instance and forget to set the name and salary attributes before calling print_pay_stub:

What happened? Itâs only natural that the name is empty; we forgot to set it. But whatâs this âundefined method for nilâ error? What the heck is this nil thing?
This sort of error is pretty common in Ruby, so letâs take a few pages to understand it.
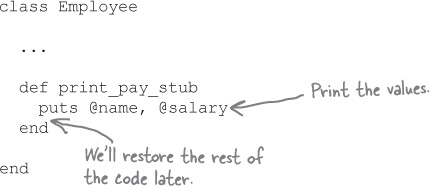
Letâs alter the print_pay_stub method to print the values of @name and @salary, so we can figure out whatâs going on.
ânilâ stands for nothing
Now letâs create a new Employee instance and call the revised method:

Well, that wasnât very helpful. Maybe weâre missing something, though.
Back in Chapter 1, we learned that the inspect and p methods can reveal information that doesnât show up in ordinary output. Letâs try again, using p:
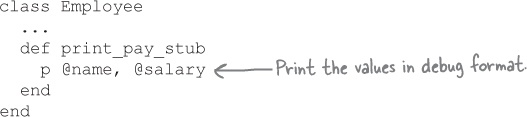
We create another new instance, make another call to the instance method, and...

Ruby has a special value, nil, that represents nothing. That is, it represents the absence of a value.
Just because nil represents nothing doesnât mean itâs actually nothing, though. Like everything else in Ruby, itâs an object, and it has its own class:
But if thereâs actually something there, how come we didnât see anything in the output?
Itâs because the to_s instance method from NilClass always returns an empty string.
The puts and print methods automatically call to_s on an object to convert it to a string for printing. Thatâs why we got two blank lines when we tried to use puts to print the values of @name and @salary; both were set to nil, so we wound up printing two empty strings.
Unlike to_s, the inspect instance method from NilClass always returns the string "nil".
You may recall that the p method calls inspect on each object before printing it. Thatâs why the nil values in @name and @salary appeared in the output once we called p on them.
â/â is a method
So, when you first create an instance of the Employee class, its @name and @salary instance variables have a value of nil. The @salary variable, in particular, causes problems if you call the print_pay_stub method without setting it first:

Itâs obvious from the error that the problem is related to the nil value. But it says undefined method '/'... Is division really a method?
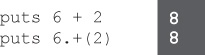
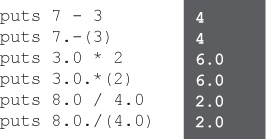
In Ruby, the answer is yes; most mathematical operators are implemented as methods. When Ruby sees something like this in your code:
6 + 2
...it converts it to a call to a method named + on the Fixnum object 6, with the object on the right of the + (that is, 2) as an argument:

Both forms are perfectly valid Ruby, and you can try running them yourself:
The same is true for most of the other mathematical operators.
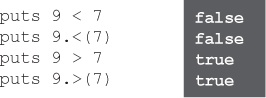
Even comparison operators are implemented as methods.
But while the Fixnum and Float classes define these operator methods, NilClass does not.
In fact, nil doesnât define most of the instance methods you see on other Ruby objects.
And why should it? If youâre doing mathematical operations with nil, itâs almost certainly because you forgot to assign a value to one of the operands. You want an error to be raised, to bring your attention to the problem.
It was a mistake when we forgot to set a salary for an Employee, for example. And now that we understand the source of this error, itâs time to prevent it from happening again.
The âinitializeâ method
We tried to call print_pay_stub on an instance of our Employee class, but we got nil when we tried to access the @name and @salary instance variables.
employee = Employee.new
employee.print_pay_stub
Chaos ensued.
Hereâs the method where the nil values caused so much trouble:
Hereâs the key problem: at the time we create an Employee instance, itâs in an invalid state; itâs not safe to call print_pay_stub until you set its @name and @salary instance variables.
If we could set @name and @salary at the same time as we create an Employee instance, it would reduce the potential for errors.
Ruby provides a mechanism to help with this situation: the initialize method. The initialize method is your chance to step in and make the object safe to use, before anyone else attempts to call methods on it.
class MyClass
  def initialize
    puts "Setting up new instance!"
  end
end
When you call MyClass.new, Ruby allocates some memory to hold a new MyClass object, then calls the initialize instance method on that new object.
Ruby calls the
initializemethod on new objects after theyâre created.
Employee safety with âinitializeâ
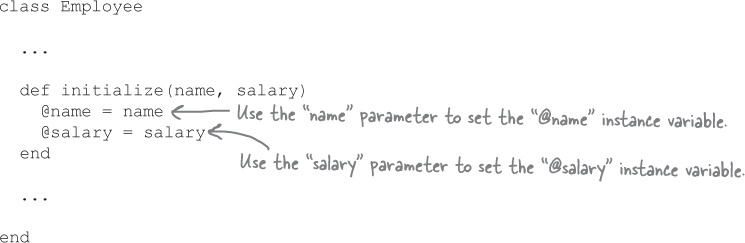
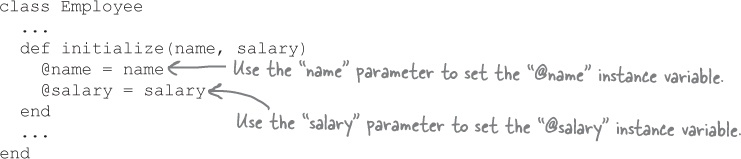
Letâs add an initialize method that will set up @name and @salary for new Employee instances before any other instance methods are called.
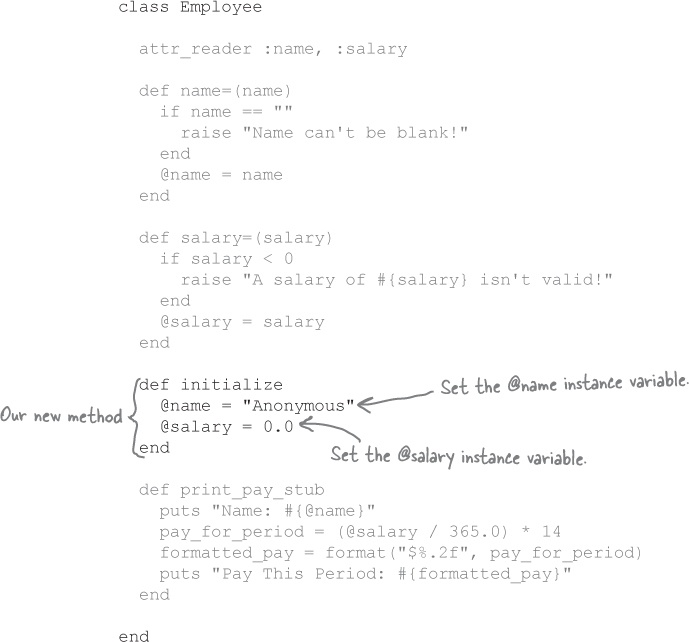
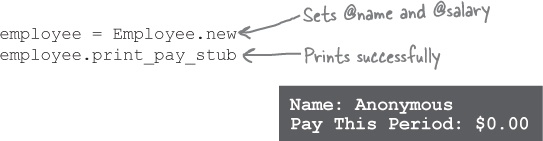
Now that weâve set up an initialize method, @name and @salary will already be set for any new Employee instance. Itâll be safe to call print_pay_stub on them immediately!
Arguments to âinitializeâ
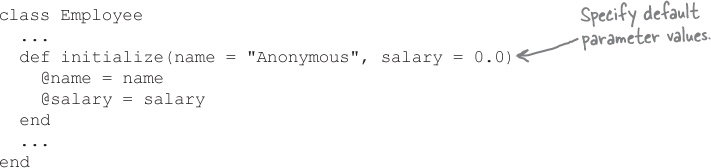
Our initialize method now sets a default @name of "Anonymous" and a default @salary of 0.0. It would be better if we could supply a value other than these defaults.
Itâs for situations like this that any arguments to the new method are passed on to initialize.
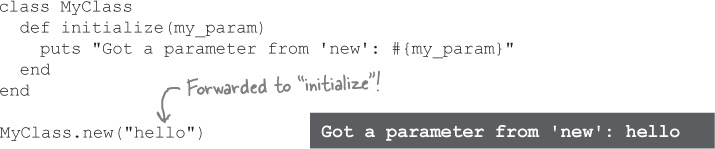
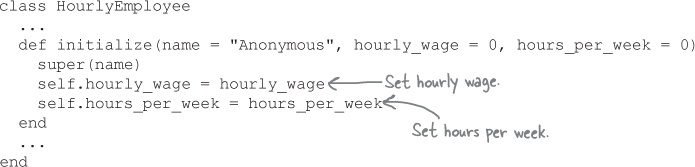
We can use this feature to let the caller of Employee.new specify what the initial name and salary should be. All we have to do is add name and salary parameters to initialize, and use them to set the @name and @salary instance variables.
And just like that, we can set @name and @salary via arguments to Employee.new!

Of course, once you set it up this way, youâll need to be careful. If you donât pass any arguments to new, there will be no arguments to forward on to initialize. At that point, youâll get the same result that happens any time you call a Ruby method with the wrong number of arguments: an error.

Weâll look at a solution for this in a moment.
Using optional parameters with âinitializeâ
We started with an initialize method that set default values for our instance variables, but didnât let you specify your own...

Then we added parameters to initialize, which meant that you had to specify your own name and salary values, and couldnât rely on the defaults...
Can we have the best of both worlds?
Yes! Since initialize is an ordinary method, it can utilize all the features of ordinary methods. And that includes optional parameters. (Remember those from Chapter 2?)
We can specify default values when declaring the parameters. When we omit an argument, weâll get the default value. Then, we just assign those parameters to the instance variables normally.
With this change in place, we can omit one or both arguments and get the appropriate defaults!

Your job is to take code snippets from the pool and place them into the blank lines in the code. Donât use the same snippet more than once, and you wonât need to use all the snippets. Your goal is to make code that will run and produce the output shown.
class Car

  def _________ (______)
   _______  = engine
  end

  def rev_engine
    @engine.make_sound
  end

end

class Engine

  def initialize(_____ = _________)
    @sound = sound
  end

  def make_sound
    puts @sound
  end

end

engine = Engine. ____
car = Car.new(________)
car.rev_engine
Output:

Note: each thing from the pool can only be used once!

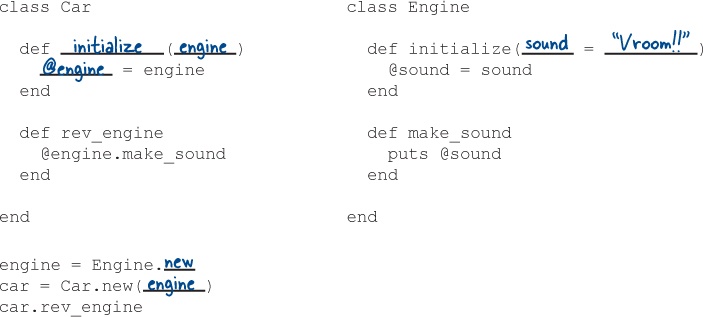

The
newmethod is needed to actually create the object;initializejust sets up the new objectâs instance variables.
âinitializeâ does an end-run around our validation

You remember our name= attribute writer method, which prevents the assignment of an empty string as an Employee name:

Thereâs also our salary= attribute writer method, which ensures that negative numbers arenât assigned as a salary:

We have bad news for you: since your initialize method assigns directly to the @name and @salary instance variables, bad data has a new way to sneak in!

âinitializeâ and validation
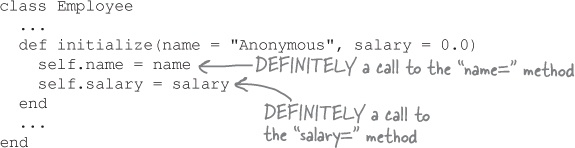
We could get our initialize method to validate its parameters by adding the same validation code to the initialize method...
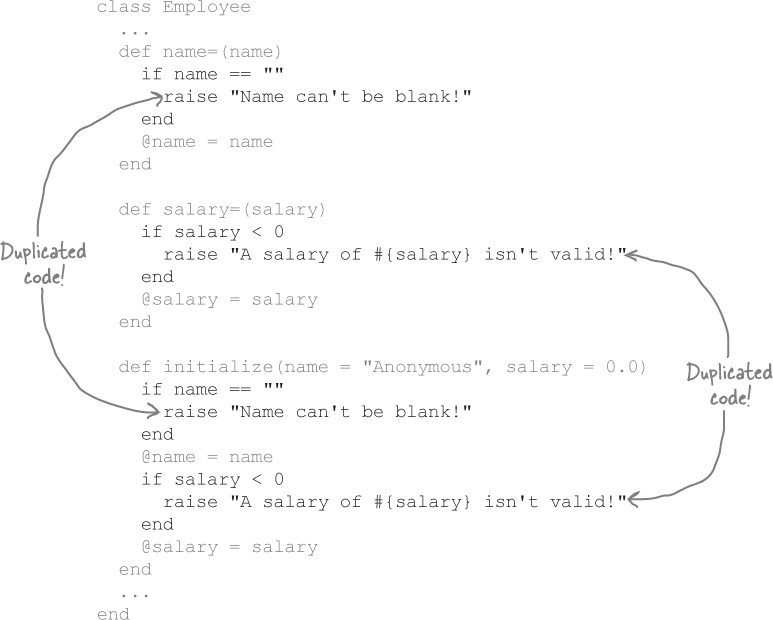
But duplicating code like that is a problem. What if we changed the initialize validation code later, but forgot to update the name= method? There would be different rules for setting the name, depending on how you set it!
Rubyists try to follow the DRY principle, where DRY stands for Donât Repeat Yourself. It means that you should avoid duplicating code wherever possible, as itâs likely to result in bugs.
What if we called the name= and salary= methods from within the initialize method? That would let us set the @name and @salary instance variables. It would also let us run the validation code, without duplicating it!
Call other methods on the same instance with âselfâ
We need to call the name= and salary= attribute writer methods from within the initialize method of the same object. That will let us run the writer methodsâ validation code before we set the @name and @salary instance variables.
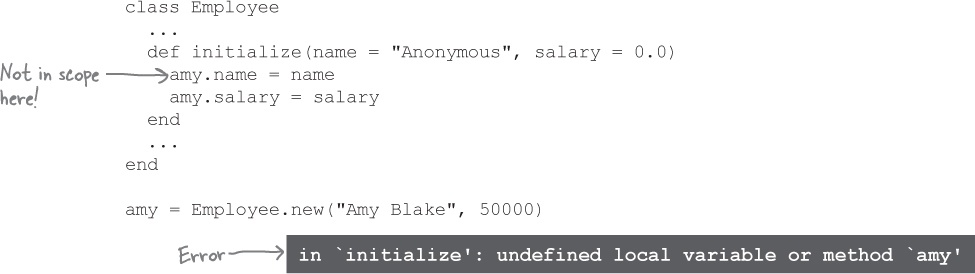
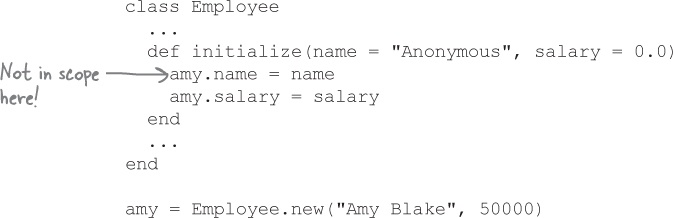
Unfortunately, code like this wonât work...

The code in the initialize method treats name= and salary= not as calls to the attribute writer methods, but as resetting the name and salary local variables to the same values they already contain! (If that sounds like a useless and nonsensical thing to do, thatâs because it is.)
What we need to do is make it clear to Ruby that we intend to call the name= and salary= instance methods. And to call an instance method, we usually use the dot operator.
But weâre inside the initialize instance method...what would we put to the left of the dot operator?
We canât use the amy variable; it would be silly to refer to one instance of the class within the class itself. Besides, amy is out of scope within the initialize method.
We need something to put to the left of the dot operator, so that we can call our Employee classâs name= and salary= attribute accessor methods within our initialize method. The problem is, what do we put there? How do you refer to the current instance from inside an instance method?
Ruby has an answer: the self keyword. Within instance methods, self always refers to the current object.
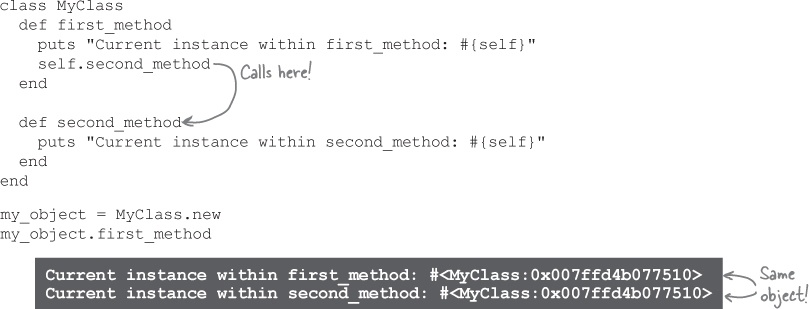
We can demonstrate this with a simple class:
class MyClass
  def first_method
    puts "Current instance within first_method: #{self}"
  end
end
Within instance methods, the keyword
selfrefers to the current object.
If we create an instance and call first_method on it, weâll see that inside the instance method, self refers to the object the method is being called on.

The string representations of my_object and self include a unique identifier for the object. (Weâll learn more about this in Chapter 8.) The identifiers are the same, so itâs the same object!
We can also use self with the dot operator to call a second instance method from inside the first one.
Now that we have self to use the dot operator on, we can make it clear to Ruby that we want to call the name= and salary= instance methods, not to set the name and salary variables...
Letâs try calling our new constructor and see if it worked!
Success! Thanks to self and the dot operator, itâs now clear to Ruby (and everyone else) that weâre making calls to the attribute writer methods, not assigning to variables.
And since weâre going through the accessor methods, that means the validation works, without any duplicated code!


When âselfâ is optional
Right now, our print_pay_stub method accesses the @name and @salary instance variables directly:
class Employee
def print_pay_stub
puts "Name: #{@name}"
pay_for_period = (@salary / 365.0) * 14
formatted_pay = format("$%.2f", pay_for_period)
puts "Pay This Period: #{formatted_pay}"
end
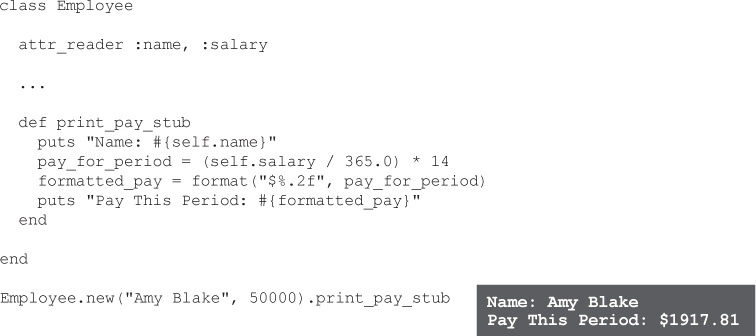
endBut we defined name and salary attribute reader methods in our Employee class; we could use those instead of accessing the instance variables directly. (That way, if you ever change the name method to display last name first, or change the salary method to calculate salary according to an algorithm, the print_pay_stub code wonât need to be updated.)
We can use the self keyword and the dot operator when calling name and salary, and it will work just fine:
But Ruby has a rule that can save us a little typing when calling from one instance method to another... If you donât specify a receiver using the dot operator, the receiver defaults to the current object, self.
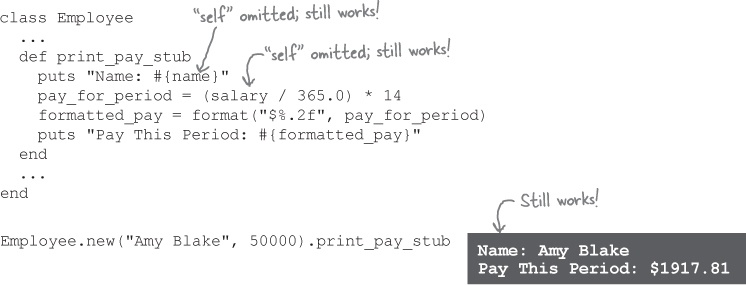
As we saw in the previous section, you have to include the self keyword when calling attribute writer methods, or Ruby will mistake the = for a variable assignment. But for any other kind of instance method call, you can leave self off, if you want.
If you donât specify a receiver using the dot operator, the receiver defaults to the current object,
self.
Implementing hourly employees through inheritance
The Employee class youâve created for Chargemore is working great! It prints accurate pay stubs that are formatted properly, and thanks to the initialize method you wrote, itâs really easy to create new Employee instances.
But, at this point, it only handles salaried employees. Itâs time to look at adding support for employees that are paid by the hour.
The requirements for hourly employees are basically the same as for salaried ones; we need to be able to print pay stubs that include their name and the amount paid. The only difference is the way that we calculate their pay. For hourly employees, we multiply their hourly wage by the number of hours they work per week, then double that amount to get two weeksâ worth.
(salary / 365.0) * 14
Salaried employee pay calculation formula
hourly_wage * hours_per_week * 2
Hourly employee pay calculation formula
Since salaried and hourly employees are so similar, it makes sense to put the shared functionality in a superclass. Then, weâll make two subclasses that hold the different pay calculation logic.
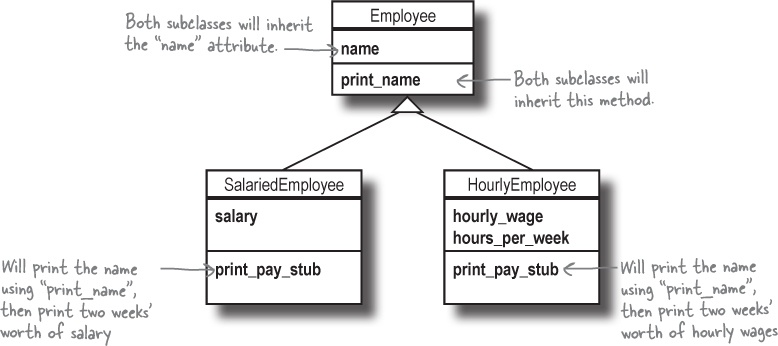
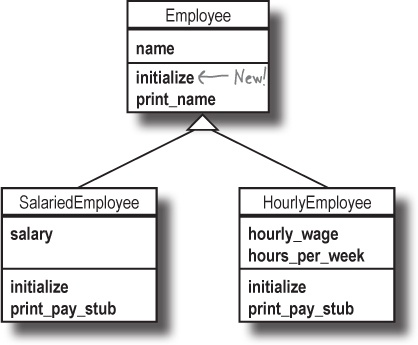
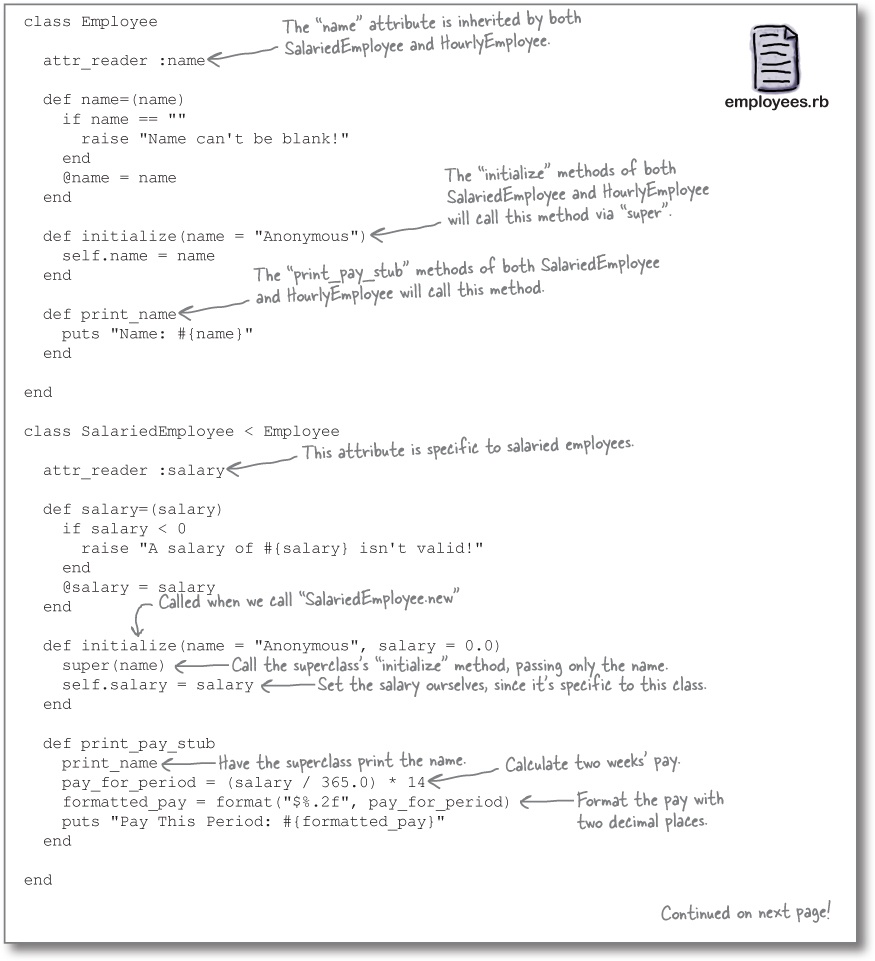
Letâs start by ensuring the common logic between SalariedEmployee and HourlyEmployee stays in the Employee superclass.
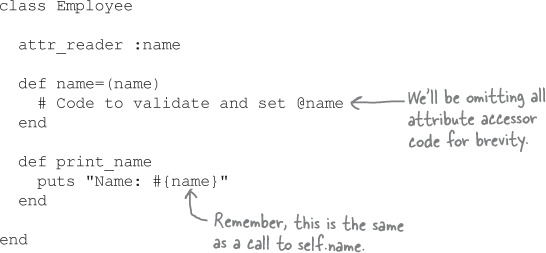
Since pay stubs for both salaried and hourly employees need to include their names, weâll leave the name attribute in the superclass, for the subclasses to share. Weâll move the code that prints the name into the print_name method in the superclass.
Weâll move the logic to calculate pay for salaried employees to the SalariedEmployee class, but weâll call the inherited print_name method to print the employee name.
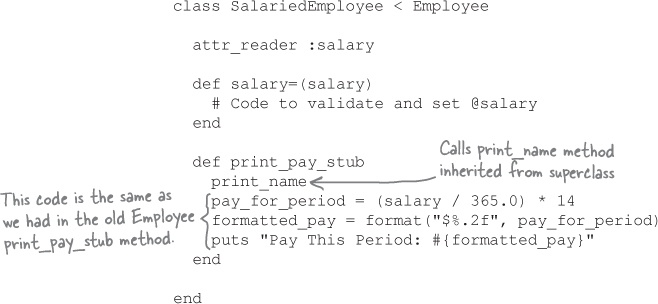
With those changes in place, we can create a new SalariedEmployee instance, set its name and salary, and print a pay stub as before:

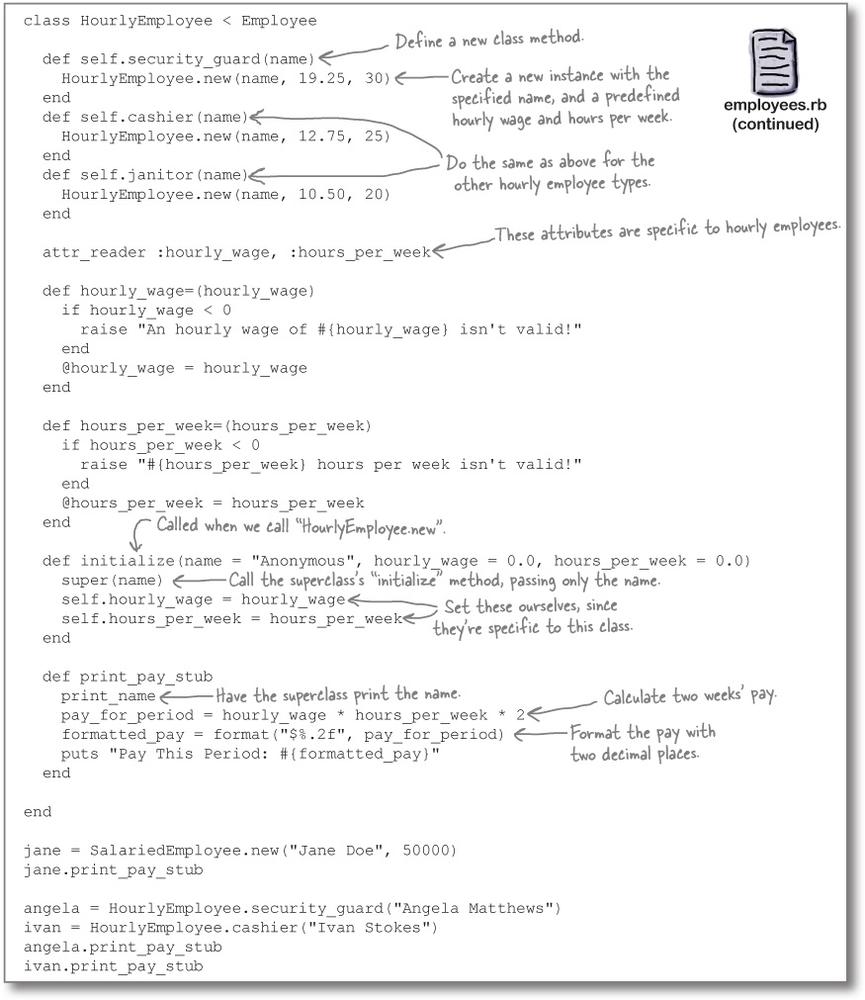
Now weâll build a new HourlyEmployee class. Itâs just like SalariedEmployee, except that it holds an hourly wage and number of hours worked per week, and uses those to calculate pay for a two-week period. As with SalariedEmployee, storing and printing the employee name is left up to the Employee superclass.
class HourlyEmployee  <  Employee

  attr_reader :hourly_wage, :hours_per_week

  def hourly_wage=(hourly_wage)
    # Code to validate and set @hourly_wage
  end

  def hours_per_week=(hours_per_week)
    # Code to validate and set @hours_per_week
  end

  def print_pay_stub
    print_name
    pay_for_period = hourly_wage * hours_per_week * 2
    formatted_pay = format("$%.2f", pay_for_period)
    puts "Pay This Period: #{formatted_pay}"
  end

end
And now we can create an HourlyEmployee instance. Instead of setting a salary, we set an hourly wage and number of hours per week. Those values are then used to calculate the pay stub amount.

That wasnât bad at all! Through the use of inheritance, weâve implemented pay stubs for hourly employees, kept pay stubs for salaried employees, and minimized code duplication between the two.
Weâve lost something in the shuffle, thoughâour initialize method. We used to be able to set up an Employee objectâs data at the time we created it, and these new classes wonât let us do that. Weâll have to add initialize methods back in.
Restoring âinitializeâ methods
To make SalariedEmployee and HourlyEmployee objects that are safe to work with as soon as theyâre created, weâll need to add initialize methods to those two classes.
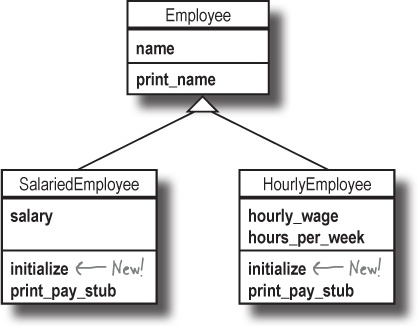
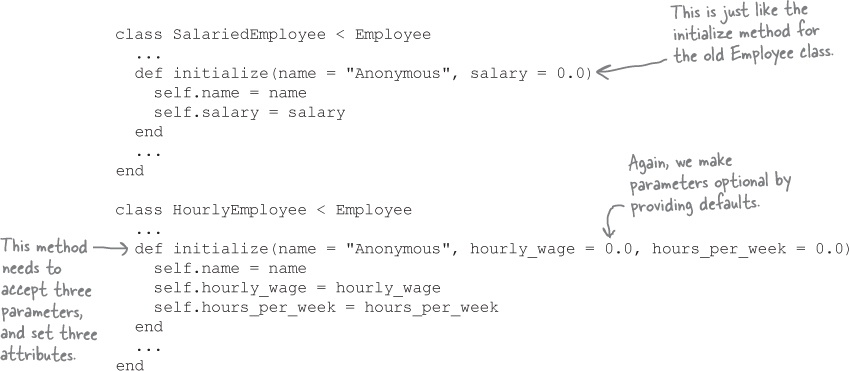
As we did with the Employee class before, our initialize methods will need to accept a parameter for each object attribute we want to set. The initialize method for SalariedEmployee will look just like it did for the old Employee class (since the attributes are the same), but initialize for HourlyEmployee will accept a different set of parameters (and set different attributes).
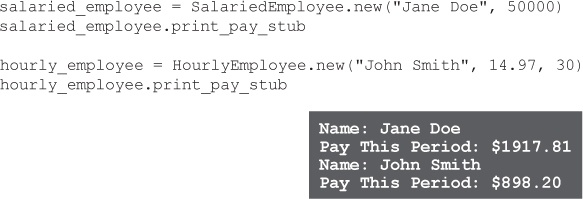
With our initialize methods added, we can once again pass arguments to the new method for each class. Our objects will be ready to use as soon as theyâre created.
Inheritance and âinitializeâ
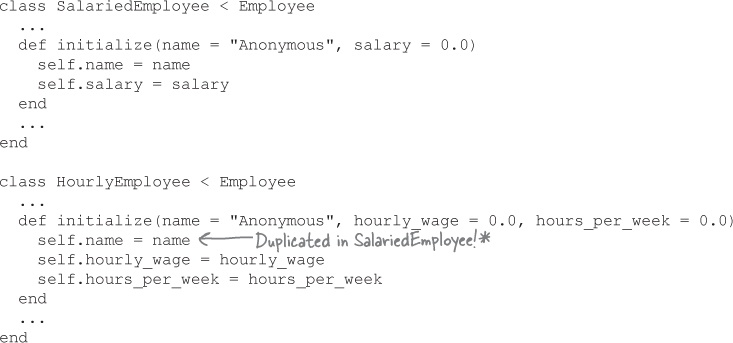
Thereâs one small weakness in our new initialize methods, though: the code to set the employee name is duplicated between our two subclasses.
In all other aspects of our subclasses, we delegate handling of the name attribute to the Employee superclass. We define the reader and writer methods there. We even print the name via the print_name method, which the subclasses call from their respective print_pay_stub methods.
But we donât do this for initialize. Could we?
Yes! Weâve said it before, and weâll say it again: initialize is just an ordinary instance method. That means that it gets inherited like any other, that it can be overridden like any other, and that overriding methods can call it via super like any other. Weâll demonstrate on the next page.
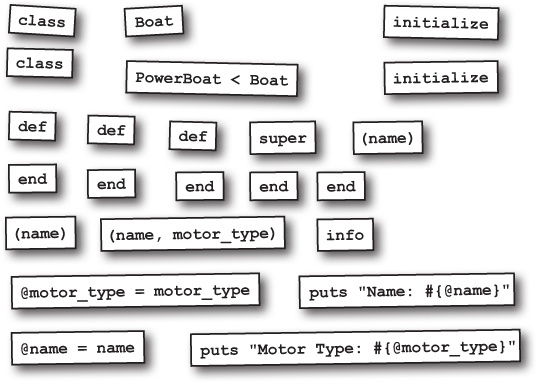
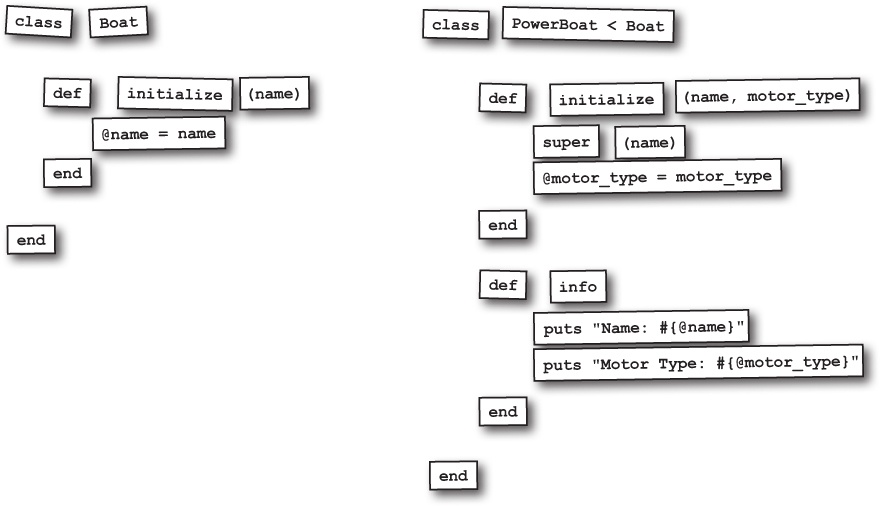
âsuperâ and âinitializeâ
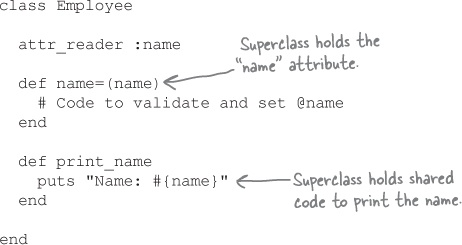
To eliminate the repeated name setup code in our Employee subclasses, we can move the name handling to an initialize method in the superclass, then have the subclass initialize methods call it with super. SalariedEmployee will keep the logic to set up a salary, HourlyEmployee will keep the logic to set up an hourly wage and hours per week, and the two classes can delegate the shared logic for name to their shared superclass.
First, letâs try moving the name handling from the initialize method in SalariedEmployee to the Employee class.
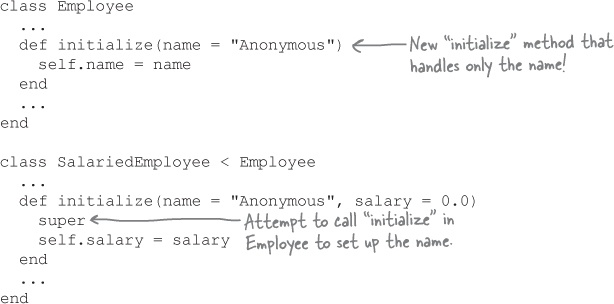
Trying to use this revised initialize method reveals a problem, though...

Oops! We forgot a key detail about super that we learned earlierâif you donât specify a set of arguments, it calls the superclass method with the same set of arguments that the subclass method received. (This is true when youâre using super in other instance methods, and itâs true when youâre using super within initialize.) The initialize method in SalariedEmployee received two parameters, and super passed them both on to the initialize method in Employee. (Even though it only accepts one argument.)
The fix, then, is to specify which parameter we want to pass on: the name parameter.
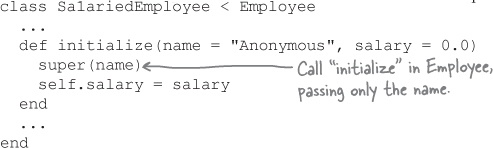
Letâs try to initialize a new SalariedEmployee again...

It worked! Letâs make the same changes to the HourlyEmployee class...
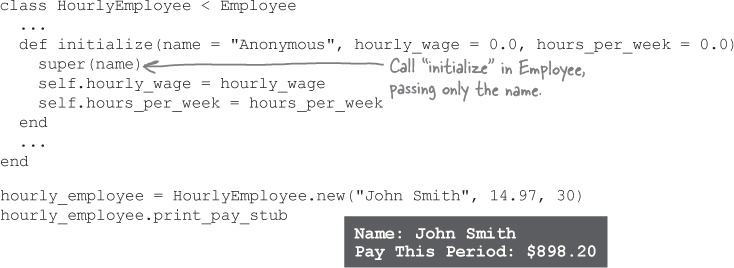
Previously, we used super within our print_pay_stub methods in SalariedEmployee and HourlyEmployee to delegate printing of the employee name to the Employee superclass. Now weâve just done the same thing with the initialize method, allowing the superclass to handle setting of the name attribute.
Why does it work? Because initialize is an instance method just like any other. Any feature of Ruby that you can use with an ordinary instance method, you can use with initialize.


Same class, same attribute values
With your HourlyEmployee class complete, Chargemore is ready to begin a hiring blitz to staff their new stores. Hereâs the set of employees they need to create for their first store downtown:

If you look at the above code, youâll probably notice there are large groups of objects where similar arguments are passed to the new method. Thereâs a good reason for this: the first group are cashiers for the new store, the second group are janitors, and the third group are security guards.
Chargemore starts all new cashiers off at the same base pay and number of hours per week. Janitors get a different rate and number of hours than cashiers, but itâs the same for all janitors. And the same is true for security guards. (Individuals may get raises later, depending on performance, but they all start out the same.)
The upshot is that thereâs a lot of repetition of arguments in those calls to new, and a lot of chances to make a typo. And this is just the first wave of hiring, for the first Chargemore store, so things can only get worse. Seems like we can make this easier.
An inefficient factory method
When you need to make many instances of a class that have similar data, you can often save some repetition by making a factory method to create objects prepopulated with the needed attribute values. (Factory methods are a programming pattern that can be used in any object-oriented language, not just Ruby.)
But if we use only the tools we have now, any factory method we make will be inefficient at best.
To demonstrate what we mean, letâs try making a method to set up new HourlyEmployee objects with the default pay and hours per week for cashiers.
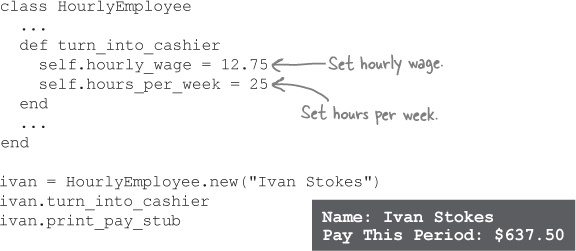
This works, yes. So whatâs so inefficient about it? Letâs look at our initialize method (which of course has to run when we create a new HourlyEmployee) again...
Weâre setting the hourly_wage and hours_per_week attributes within initialize, then immediately turning around and setting them again within turn_into_cashier!
This is inefficient for Ruby, but thereâs potential for it to be inefficient for us, too. What if we didnât have default parameters for hourly_wage and hours_per_week on initialize? Then, weâd have to specify the arguments weâre throwing away!
Thatâs the problem with writing factory methods as instance methods: weâre trying to make a new instance of the class, but there has to already be an instance to run the methods on! There must be a better way...
Fortunately, there is! Up next, weâre going to learn about class methods.
Class methods
You donât have an instance of a class, but you need one. And you need a method to set it up for you. Where do you put that method?
You could stick it off by itself in some little Ruby source file, but it would be better to keep it together with the class that it makes instances of. You canât make it an instance method on that class, though. If you had an instance of the class, you wouldnât need to make one, now would you?
Itâs for situations like this that Ruby supports class methods: methods that you can invoke directly on a class, without the need for any instance of that class. You donât have to use a class method as a factory method, but itâs perfect for the job.
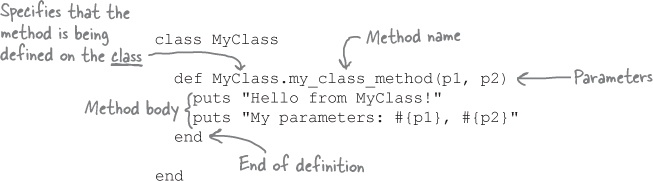
A class method definition is very similar to any other method definition in Ruby. The difference: you specify that youâre defining it on the class itself.
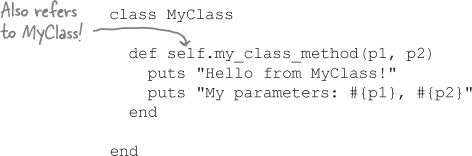
Within a class definition (but outside any instance method definitions), Ruby sets self to refer to the class thatâs being defined. So many Rubyists prefer to replace the class name with self:
In most ways, class method definitions behave just like youâre used to:
You can put as many Ruby statements as you like in the method body.
You can return a value with the
returnkeyword. If you donât, the value of the last expression in the method body is used as the return value.You can optionally define one or more parameters that the method accepts, and you can make the parameters optional by defining defaults.
Weâve defined a new class, MyClass, with a single class method:
class  defined a new class,

  def self.my_class_method(p1, p2)
    puts "Hello from MyClass!"
    puts "My parameters: #{p1}, #{p2}"
  end

end
Once a class method is defined, you can call it directly on the class:

Perhaps that syntax for calling a class method looks familiar to you...
MyClass.new
Thatâs right, new is a class method! If you think about it, that makes sense; new canât be an instance method, because youâre calling it to get an instance in the first place! Instead, you have to ask the class for a new instance of itself.
Now that we know how to create class methods, letâs see if we can write some factory methods that will create new HourlyEmployee objects with the pay rate and hours per week already populated for us. We need methods to set up predefined pay and hours for three positions: cashier, janitor, and security guard.
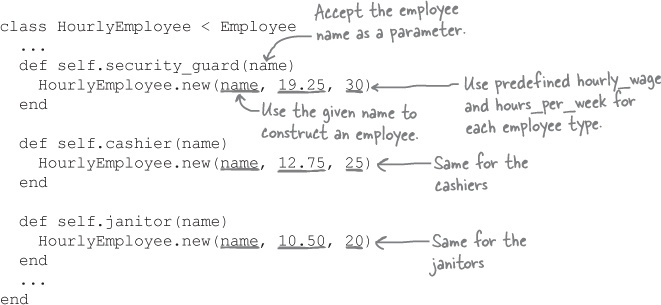
We wonât know the name of the employee in advance, so we accept that as a parameter to each of the class methods. We do know the values for hourly_wage and hours_per_week for each employee position, though. We pass those three arguments to the new method for the class, and get a new HourlyEmployee object back. That new object is then returned from the class method.
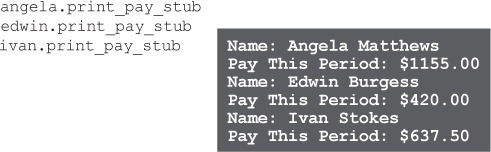
Now we can call the factory methods directly on the class, providing only the employee name.
angela = HourlyEmployee.security_guard("Angela Matthews")
edwin = HourlyEmployee.janitor("Edwin Burgess")
ivan = HourlyEmployee.cashier("Ivan Stokes")
The HourlyEmployee instances returned are fully configured with the name we provided, and the appropriate hourly_wage and hours_per_week for the position. We can begin printing pay stubs for them right away!
In this chapter, youâve learned that there are some pitfalls to creating new objects. But youâve also learned techniques to ensure your objects are safe to use as soon as you make them. With well-designed initialize methods and factory methods, creating and configuring new objects is a snap!
With well-designed
initializemethods and factory methods, creating and configuring new objects is a snap!
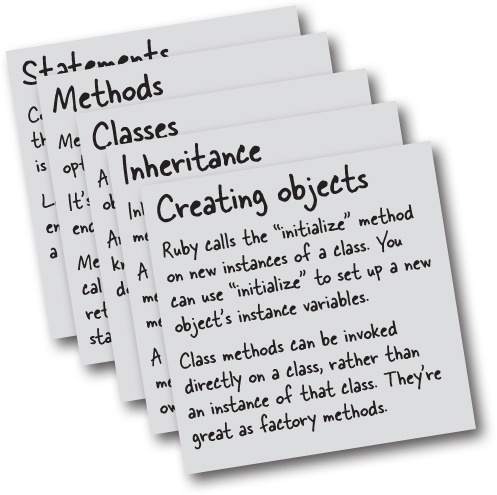
Your Ruby Toolbox
Thatâs it for Chapter 4! Youâve added the initialize method and class methods to your toolbox.
Up Next...
So far, weâve been working with objects one at a time. But itâs much more common to work with groups of objects. In the next chapter, weâll show you how to create a group, with arrays. Weâll also show you how to process each of the items in those arrays, using blocks.
Get Head First Ruby now with the O’Reilly learning platform.
O’Reilly members experience books, live events, courses curated by job role, and more from O’Reilly and nearly 200 top publishers.

