Chapter 4. Types and References: It’s 10:00. Do you know where your data is?

Data type, database, Lieutenant Commander Data... it’s all important stuff. Without data, your programs are useless. You need information from your users, and you use that to look up or produce new information to give back to them. In fact, almost everything you do in programming involves working with data in one way or another. In this chapter, you’ll learn the ins and outs of C#’s data types, see how to work with data in your program, and even figure out a few dirty secrets about objects (pssst...objects are data, too).
The variable’s type determines what kind of data it can store
There are a bunch of types built into C#, and each one stores a different kind of data. You’ve already seen some of the most common ones, and you know how to use them. But there are a few that you haven’t seen, and they can really come in handy, too.
Types you’ll use all the time
It shouldn’t come as a surprise that int, string, bool, and double are the most common types.
intcan store any whole number from –2,147,483,648 to 2,147,483,647.stringcan hold text of any length (including the empty string"").boolis a Boolean value—it’s eithertrueorfalse.doublecan store real numbers from ±5.0 × 10–324 to ±1.7 × 10308 with up to 16 significant figures. That range looks weird and complicated, but it’s actually pretty simple. The “significant figures” part means the precision of the number: 35,048,410,000,000, 1,743,059, 14.43857, and 0.00004374155 all have seven significant figures. The 10308 thing means that you can store any number as large as 10308 (or 1 followed by 308 zeros)—as long as it only has 16 or fewer significant figures. On the other end of the range, 10–324 means that you can store any number as small as 10–324 (or a decimal point followed by 324 zeros followed by 1)...but, you guessed it, as long as it only has 16 or fewer significant figures.
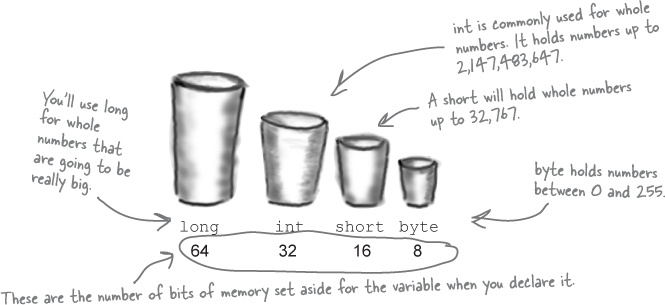
More types for whole numbers
Once upon a time, computer memory was really expensive, and processors were really slow. And, believe it or not, if you used the wrong type, it could seriously slow down your program. Luckily, times have changed, and most of the time if you need to store a whole number you can just use an int. But sometimes you really need something bigger...and once in a while, you need something smaller, too. That’s why C# gives you more options:
Note
A lot of times, if you’re using these types it’s because you’re solving a problem where it really helps to have the “wrapping around” effect that you’ll read about in a few minutes.
bytecan store any whole number between 0 and 255.sbytecan store any whole number from –128 to 127.shortcan store any whole number from –32,768 to 32,767.ushortcan store any whole number from 0 to 65,535.uintcan store any whole number from 0 to 4,294,967,295.l
ongcan store any whole number between minus and plus 9 billion billion.ulongcan store any whole number between 0 and about 18 billion billion.
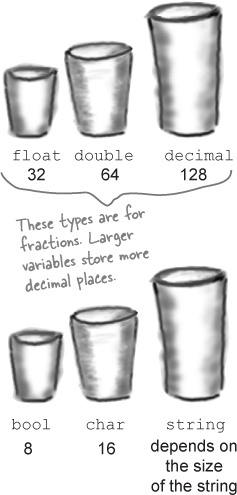
Types for storing really HUGE and really tiny numbers
Sometimes seven significant figures just isn’t precise enough. And, believe it or not, sometimes 1038 isn’t big enough and 10–45 isn’t small enough. A lot of programs written for finance or scientific research run into these problems all the time, so C# gives us multiple types to handle floating-point values:
floatcan store any number from ±1.5 × 10–45 to ±3.4 × 1038 with 7 significant digits.doublecan store any number from ±5.0 × 10–324 to ±1.7 × 10308 with 15-16 significant digits.decimalcan store any number from ±1.0 × 10⁻²⁸ to ±7.9 × 1028 with 28–29 significant digits.
Literals have types, too
Note
A “literal” just means a number that you type into your code. So when you type “int i = 5;”, the 5 is a literal.
When you type a number directly into your C# program, you’re using a literal...and every literal is automatically assigned a type. You can see this for yourself—just enter this line of code that assigns the literal 14.7 to an int variable:
int myInt = 14.7;
Now try to build the program. You’ll get this:

That’s the same error you’ll get if you try to set an int equal to a double variable. What the IDE is telling you is that the literal 14.7 has a type—it’s a double. You can change its type to a float by sticking an F on the end (14.7F). And 14.7M is a decimal.
Note
If you try to assign a float literal to a double or a decimal literal to a float, the IDE will give you a helpful message reminding you to add the right suffix. Cool!
A few more useful built-in types
Sometimes you need to store a single character like Q or 7 or $, and when you do you’ll use the char type. Literal values for char are always inside single quotes ('x', '3'). You can include escape sequences in the quotes, too ('\n' is a line break, '\t' is a tab). You write an escape sequence in your C# code using two characters, but your program stores each escape sequence as a single character in memory.
Note
You’ll learn a lot more about how char and byte relate to each other in Chapter 9.
And finally, there’s one more important type: object. You’ve already seen how you can create objects by creating instances of classes. Well, every one of those objects can be assigned to an object variable. You’ll learn all about how objects and variables that refer to objects work later in this chapter.
Brain Power
The Windows desktop calculator app has a really neat feature called “Programmer” mode, where you can see binary and decimal at the same time!
You can use the Windows desktop calculator to convert between decimal (normal, base-10) numbers and binary numbers (base-2 numbers written with only ones and zeros)—put it in Programmer mode, enter a number, and click the Bin radio button to convert to binary. Then click Dec to convert it back. Now enter some of the upper and lower limits for the whole number types (like –32,768 and 255) and convert them to binary. Can you figure out why C# gives you those particular limits?
Windows 8 has two different calculators, a Windows Store app and a desktop app. Use Search to find the desktop app, and use its “View” menu to switch between its modes.
A variable is like a data to-go cup
All of your data takes up space in memory. (Remember the heap from last chapter?) So part of your job is to think about how much space you’re going to need whenever you use a string or a number in your program. That’s one of the reasons you use variables. They let you set aside enough space in memory to store your data.
Note
Not all data ends up on the heap. Value types usually keep their data in another part of memory called the stack. You’ll learn all about that in Chapter 14.
Think of a variable like a cup that you keep your data in. C# uses a bunch of different kinds of cups to hold different kinds of data. And just like the different sizes of cups at the coffee shop, there are different sizes of variables, too.
Numbers that have decimal places are stored differently than whole numbers. You can handle most of your numbers that have decimal places using float, the smallest data type that stores decimals. If you need to be more precise, use a double. And if you’re writing a financial application where you’ll be storing currency values, you’ll want to use the decimal type.
It’s not always about numbers, though. (You wouldn’t expect to get hot coffee in a plastic cup or cold coffee in a paper one.) The C# compiler also can handle characters and non-numeric types. The char type holds one character, and string is used for lots of characters “strung” together. There’s no set size for a string object, either. It expands to hold as much data as you need to store in it. The bool data type is used to store true or false values, like the ones you’ve used for your if statements.
10 pounds of data in a 5-pound bag

When you declare your variable as one type, that’s how your compiler looks at it. Even if the value is nowhere near the upper boundary of the type you’ve declared, the compiler will see the cup it’s in, not the number inside. So this won’t work:
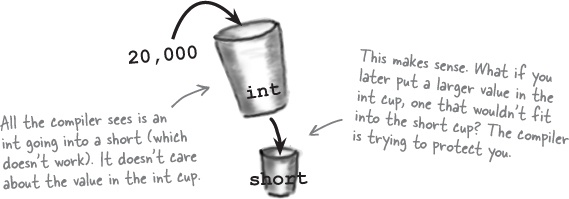
int leaguesUnderTheSea = 20000;

short smallerLeagues = leaguesUnderTheSea;
20,000 would fit into a short, no problem. But since leaguesUnderTheSea is declared as an int, the compiler sees it as int-sized and considers it too big to put in a short container. The compiler won’t make those translations for you on the fly. You need to make sure that you’re using the right type for the data you’re working with.
Even when a number is the right size, you can’t just assign it to any variable
Let’s see what happens when you try to assign a decimal value to an int variable.
Do this
➊ Create a new Windows Forms project and add a button to it. Then add these lines to the button’s
Click()method:decimal myDecimalValue = 10; int myIntValue = myDecimalValue; MessageBox.Show("The myIntValue is " + myIntValue);➋ Try building your program. Uh oh—you got an error that looks like this:
➌ Make the error go away by casting the
decimalto anint. Once you change the second line so it looks like this, your program will compile and run:
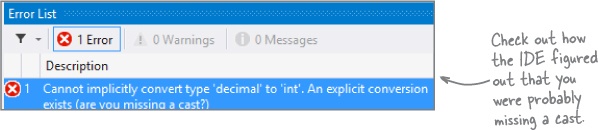

So what happened?
The compiler won’t let you assign a value to a variable if it’s the wrong type—even if that variable can hold the value just fine—because that’s the underlying cause behind an enormous number of bugs, and the compiler is helping by nudging you in the right direction. When you use casting, you’re essentially making a promise to the compiler that you know the types are different, and that in this particular instance it’s OK for C# to cram the data into the new variable.
Note
Take a minute to flip back to the beginning of the last chapter and check out how you used casting when you passed the NumericUpDown. Value to the Talker Tester form.
Three of these statements won’t compile, either because they’re trying to cram too much data into a small variable or because they’re putting the wrong type of data in. Circle them.

You can read more about the value types in C# here: http://msdn.microsoft.com/en-us/library/s1ax56ch.aspx |
When you cast a value that’s too big, C# will adjust it automatically
Wrap it yourself!
There’s no mystery to how casting “wraps” the numbers—you can do it yourself. Just pop up the Windows desktop calculator, switch it to Scientific mode, and calculate 365 Mod 256 (using the Mod button, which does a modulo calculation). You’ll get 109.
You’ve already seen that a decimal can be cast to an int. It turns out that any number can be cast to any other number. But that doesn’t mean the value stays intact through the casting. If you cast an int variable that’s set to 365 to a byte variable, 365 is too big for the byte. But instead of giving you an error, the value will just wrap around: for example, 256 cast to a byte will have a value of 0. 257 would be converted to 1, 258 to 2, etc., up to 365, which will end up being 109. And once you get back to 255 again, the conversion value “wraps” back to zero.
Yes! The + operator converts for you.
What you’ve been doing is using the + operator, which does a lot of converting for you automatically—but it’s especially smart about it. When you use + to add a number or Boolean to a string, then it’ll automatically convert that value to a string, too. If you use + (or *, /, or -) with two different types, it automatically converts the smaller type to the bigger one. Here’s an example:
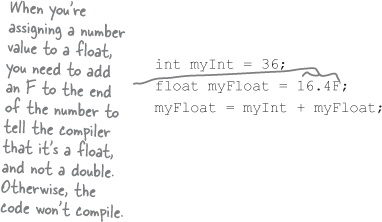
Since an int can fit into a float but a float can’t fit into an int, the + operator converts myInt to a float before adding it to myFloat.
C# does some casting automatically
There are two important conversions that don’t require you to do the casting. The first is done automatically any time you use arithmetic operators, like in this example:
The other way C# converts types for you automatically is when you use the + operator to concatenate strings (which just means sticking one string on the end of another, like you’ve been doing with message boxes). When you use + to concatenate a string with something that’s another type, it automatically converts the numbers to strings for you. Here’s an example. The first two lines are fine, but the third one won’t compile.
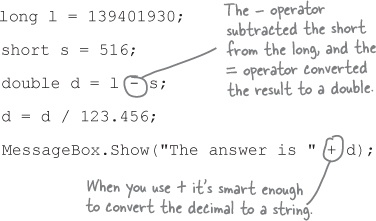
long x = 139401930;

MessageBox.Show("The answer is " + x);

MessageBox.Show(x);
The C# compiler spits out an error that mentions something about invalid arguments (an argument is what C# calls the value that you’re passing into a method’s parameter). That’s because the parameter for MessageBox.Show() is a string, and this code passed a long, which is the wrong type for the method. But you can convert it to a string really easily by calling its ToString() method. That method is a member of every value type and object. (All of the classes you build yourself have a ToString() method that returns the class name.) That’s how you can convert x to something that MessageBox.Show() can use:
MessageBox.Show(x.ToString());
When you call a method, the arguments must be compatible with the types of the parameters
Note
A parameter is what you define in your method. An argument is what you pass to it. A method with an int parameter can take a byte argument.
Try calling MessageBox.Show(123)—passing MessageBox.Show() a literal (123) instead of a string. The IDE won’t let you build your program. Instead, it’ll show you an error in the IDE: “Argument ‘1’: cannot convert from ‘int’ to ‘string’.” Sometimes C# can do the conversion automatically—like if your method expects an int, but you pass it a short—but it can’t do that for ints and strings.
But MessageBox.Show() isn’t the only method that will give you compiler errors if you try to pass it a variable whose type doesn’t match the parameter. All methods will do that, even the ones you write yourself. Go ahead and try typing this completely valid method into a class:
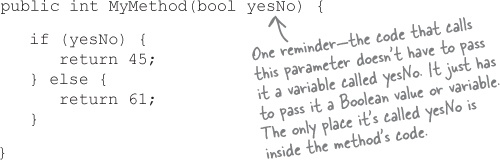
It works just fine if you pass it what it expects (a bool)—call MyMethod(true) or MyMethod(false), and it compiles just fine.
But what happens if you pass it an integer or a string instead? The IDE gives you a similar error to the one that you got when you passed 123 to MessageBox.Show(). Now try passing it a Boolean, but assigning the return value to a string or passing it on to MessageBox.Show(). That won’t work, either—the method returns an int, not a long or the string that MessageBox.Show() expects.
When the compiler gives you an “invalid arguments” error, it means that you tried to call a method with variables whose types didn’t match the method’s parameters.
if statements always test to see if something’s true
You did this in the code you wrote in “Save the Humans”—go back and have a look; see if you can spot it.
Did you notice how we wrote our if statement like this:
if (yesNo) {We didn’t have to explicitly say “if (yesNo == true)”. That’s because an if statement always checks if something’s true. You check if something’s false using ! (an exclamation point, or the NOT operator). “if (!yesNo)” is the same thing as “if (yesNo == false)”. In our code examples from now on, you’ll usually just see us do “if (yesNo)” or “if (!yesNo)”, and not explicitly check to see if a Boolean is true or false.
Note
If you really want to use reserved keywords as variable names, you can put @ in front of it, but that’s as close as the compiler will let you get to the reserved keyword. You can do that with nonreserved names too, if you want to.
There are about 77 reserved words called keywords in C#. These are words reserved by the C# compiler; you can’t use them for variable names. You’ll know a lot of them really well by the time you finish the book. Here are some you’ve already used. Write down what you think these words do in C#.
![]() Answers in Exercise Solution.
Answers in Exercise Solution.
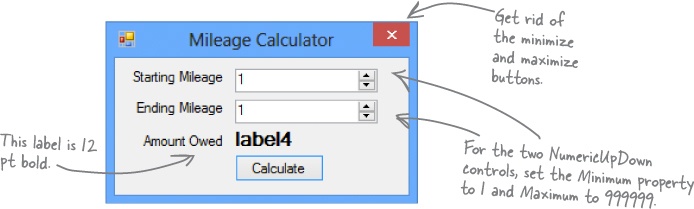
Create a reimbursement calculator for a business trip. It should allow the user to enter a starting and ending mileage reading from the car’s odometer. From those two numbers, it will calculate how many miles she’s traveled and figure out how much she should be reimbursed if her company pays her $.39 for every mile she puts on her car.
➊ START WITH A NEW WINDOWS FORMS PROJECT.
Make the form look like this:
When you’re done with the form, double-click on the button to add some code to the project.
➋ CREATE THE FIELDS YOU’LL NEED FOR THE CALCULATOR.
Put the fields in the class definition at the top of
Form1. You need two whole number values to track the starting odometer reading and the ending odometer reading. Call themstartingMileageandendingMileage. You need three numbers that can hold decimal places. Make themdoubles and call themmilesTraveled,reimburseRate, andamountOwed. Set the value forreimburseRateto .39.➌ MAKE YOUR CALCULATOR WORK.
Add code in the
button1_Click()method to:Make sure that the number in the
startingMileagefield is smaller than the number in theendingMileagefield. If not, show a message box that says “The starting mileage must be less than the ending mileage.” Make the title for the message box “Cannot Calculate Mileage.”Subtract the starting number from the ending number and then multiply it by the reimburse rate using these lines:
milesTraveled = endingMileage -= startingMileage;

amountOwed = milesTraveled *= reimburseRate;

label4.Text = "$" + amountOwed;
➍ RUN IT.
Make sure it’s giving the right numbers. Try changing the starting value to be higher than the ending value, and make sure it’s giving you the message box.

Debug the mileage calculator
There’s something wrong with the mileage calculator. Whenever your code doesn’t work the way you expect it to, there’s always a reason for it, and your job is to figure out what that reason is. Let’s figure out what went wrong here and see if we can fix it.
Do this
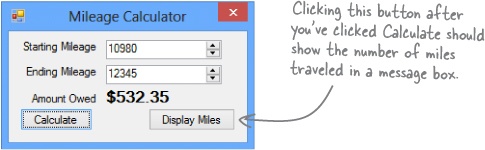
➊ NOW ADD ANOTHER BUTTON TO THE FORM.
Let’s track down that problem by adding a button to your form that shows the value of the
milesTraveledfield. (You could also use the debugger for this!)When you’re done with the form, double-click on the Display Miles button to add some code to the project.
➋ ONE LINE SHOULD DO IT.
All we need to do is get the form to display the
milesTraveledvariable, right? So this line should do that:private void button2_Click(object sender, EventArgs e) { MessageBox.Show(milesTraveled + " miles", "Miles Traveled"); }➌ RUN IT.
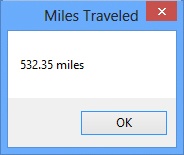
Type in some values and see what happens. First enter a starting mileage and ending mileage, and click the Calculate button. Then click the Display Miles button to see what’s stored in the
milesTraveledfield.➍ UM, SOMETHING’S NOT RIGHT...
No matter what numbers you use, the number of miles always matches the amount owed. Why?
Combining = with an operator
Take a good look at the operator we used to subtract ending mileage from starting mileage (-=). The problem is it doesn’t just subtract, it also assigns a value to the variable on the left side of the subtraction sign. The same thing happens in the line where we multiply the number of miles traveled by the reimbursement rate. We should replace the -= and the *= with just - and *:

So can good variable names help you out here? Definitely! Take a close look at what each variable is supposed to do. You already get a lot of clues from the name milesTraveled—you know that’s the variable that the form is displaying incorrectly, and you’ve got a good idea of how that value ought to be calculated. So you can take advantage of that when you’re looking through your code to try to track down the bug. It’d be a whole lot harder to find the problem if the incorrect lines looked like this instead:

Objects use variables, too
So far, we’ve looked at objects separate from other types. But an object is just another data type. Your code treats objects exactly like it treats numbers, strings, and Booleans. It uses variables to work with them:
Using an int
Using an object
Objects are just one more type of variable your program can use.
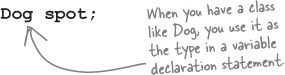
If your program needs to work with a whole number that’s really big, use a long. If it needs a whole number that’s small, use a short. If it needs a yes/no value, use a boolean. And if it needs something that barks and sits, use a Dog. No matter what type of data your program needs to work with, it’ll use a variable.
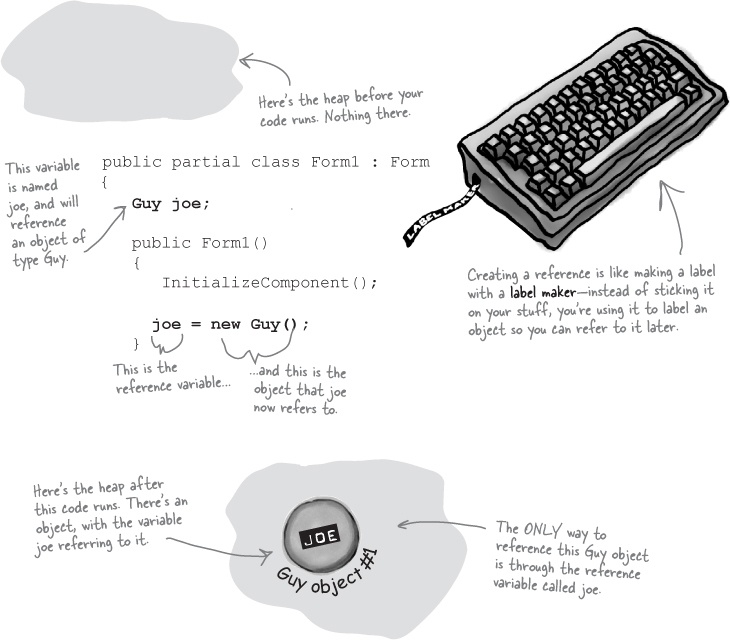
Refer to your objects with reference variables
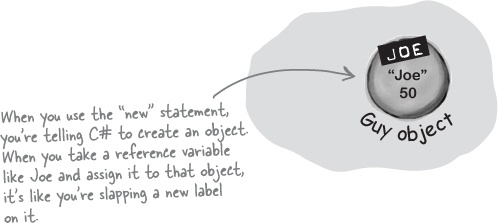
When you create a new object, you use code like new Guy(). But that’s not enough; even though that code creates a new Guy object on the heap, it doesn’t give you a way to access that object. You need a reference to the object. So you create a reference variable: a variable of type Guy with a name, like joe. So joe is a reference to the new Guy object you created. Any time you want to use that particular guy, you can reference it with the reference variable called joe.
So when you have a variable that is an object type, it’s a reference variable: a reference to a particular object. Take a look:
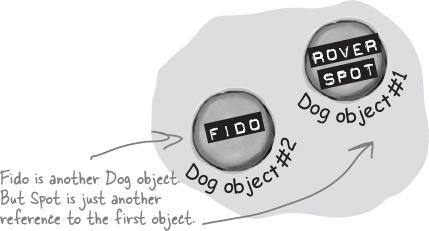
References are like labels for your object
In your kitchen, you probably have containers of salt and sugar. If you switched their labels, it would make for a pretty disgusting meal—even though the labels changed, the contents of the containers stayed the same. References are like labels. You can move labels around and point them at different things, but it’s the object that dictates what methods and data are available, not the reference itself.
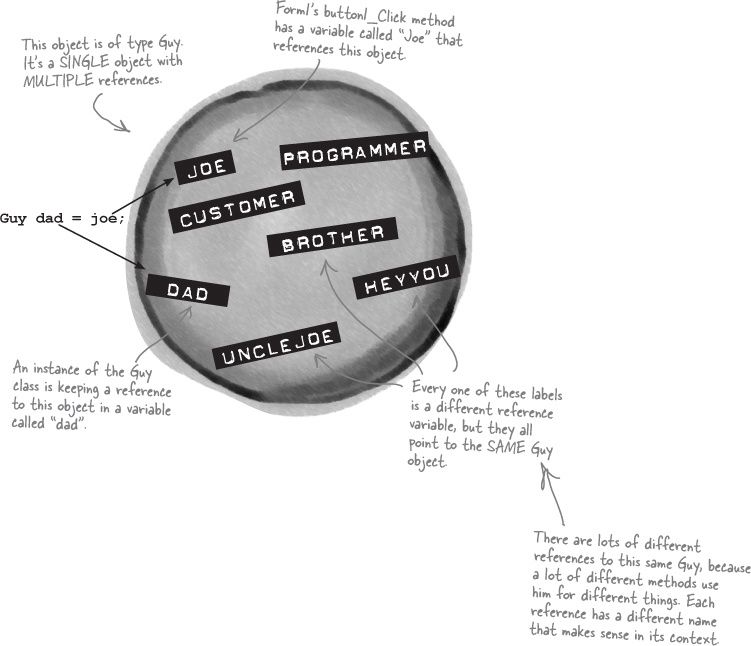
When your code needs to work with an object in memory, it uses a reference, which is a variable whose type is a class of the object it’s going to point to. A reference is like a label that your code uses to talk about a specific object.
You never refer to your object directly. For example, you can’t write code like Guy.GiveCash() if Guy is your object type. The C# compiler doesn’t know which Guy you’re talking about, since you might have several instances of Guy on the heap. So you need a reference variable, like joe, that you assign to a specific instance, like Guy joe = new Guy().
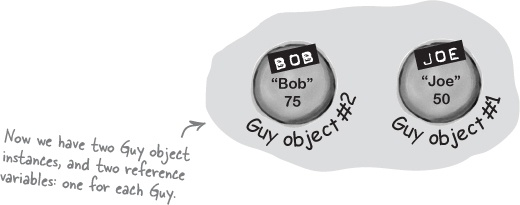
Now you can call (non-static) methods like joe.GiveCash(). joe refers to a specific instance of the Guy class, and your C# compiler knows exactly which instance to use. And, as you saw above, you might have multiple labels pointing to the same instance. So you could say Guy dad = joe, and then call dad.GiveCash(). That’s OK, too—that’s what Joe’s kid does every day.
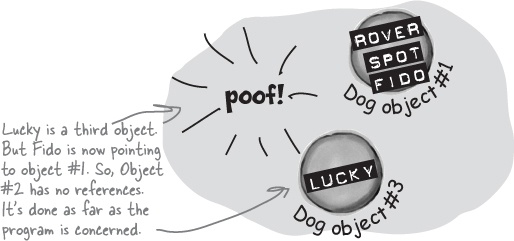
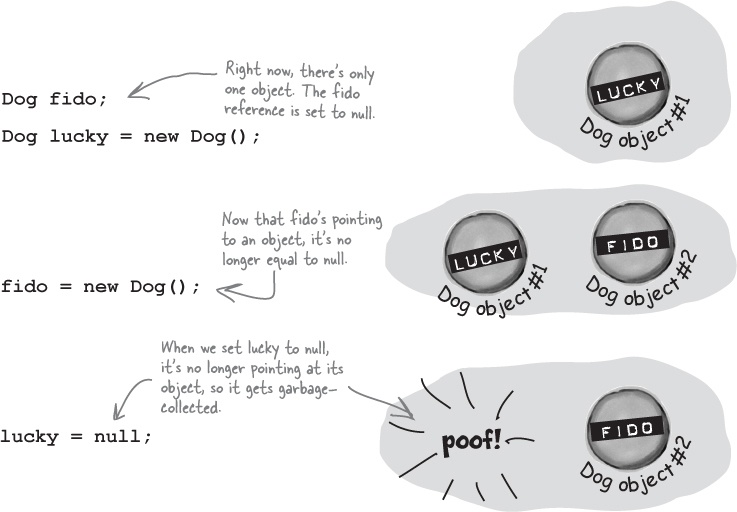
If there aren’t any more references, your object gets garbage-collected
If all of the labels come off of an object, programs can no longer access that object. That means C# can mark the object for garbage collection. That’s when C# gets rid of any unreferenced objects, and reclaims the memory those objects took up for your program’s use.
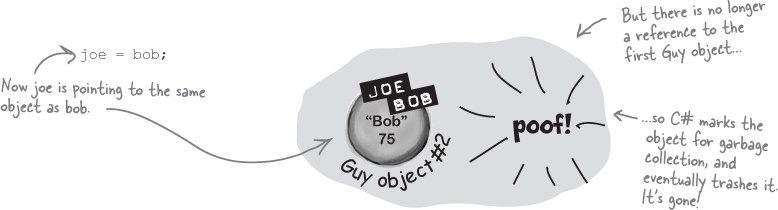
For an object to stay in the heap, it has to be referenced. Some time after the last reference to the object disappears, so does the object.
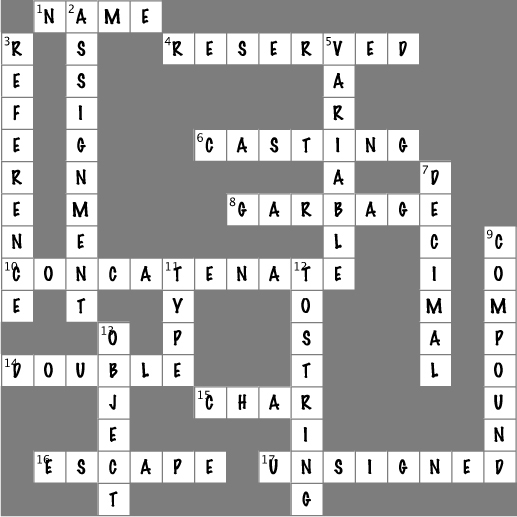
Take a break, sit back, and give your right brain something to do. It’s your standard crossword; all of the solution words are from this chapter.
When you’re done, turn the page and take on the rest of the chapter.
Across | Down |
1. The second part of a variable declaration 4. 6. What ( 8. When an object no longer has any references pointing to it, it’s removed from the heap using ____________ collection 10. What you’re doing when you use the + operator to stick two strings together 14. The numeric type that holds the biggest numbers 15. The type that stores a single letter or number 16. 17. The four whole-number types that only hold positive numbers | 2. You can combine the variable declaration and the _________ into one statement 3. A variable that points to an object 5. What your program uses to work with data that’s in memory 7. If you want to store a currency value, use this type 9. += and -= are this kind of operator 11. A variable declaration always starts with this 12. Every object has this method that converts it to a string 13. When you’ve got a variable of this type, you can assign any value to it |
![]() Answers in Typecross Solution.
Answers in Typecross Solution.
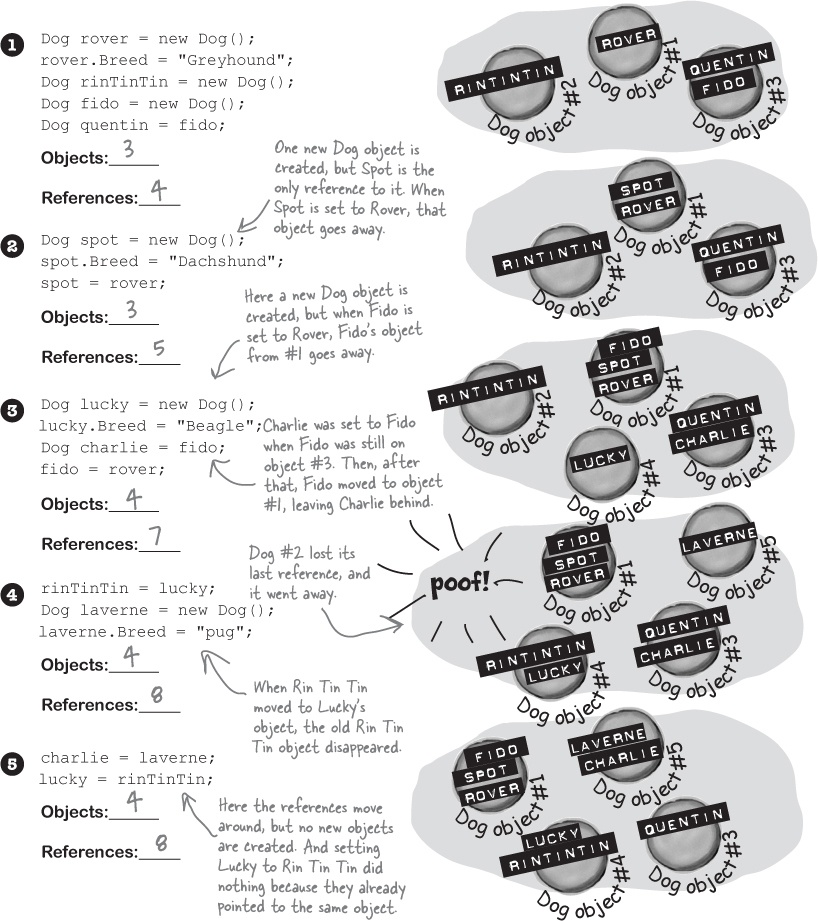
Multiple references and their side effects
You’ve got to be careful when you start moving around reference variables. Lots of times, it might seem like you’re simply pointing a variable to a different object. But you could end up removing all references to another object in the process. That’s not a bad thing, but it may not be what you intended. Take a look:

Now it’s your turn. Here’s one long block of code. Figure out how many objects and references there are at each stage. On the righthand side, draw a picture of the objects and labels in the heap.
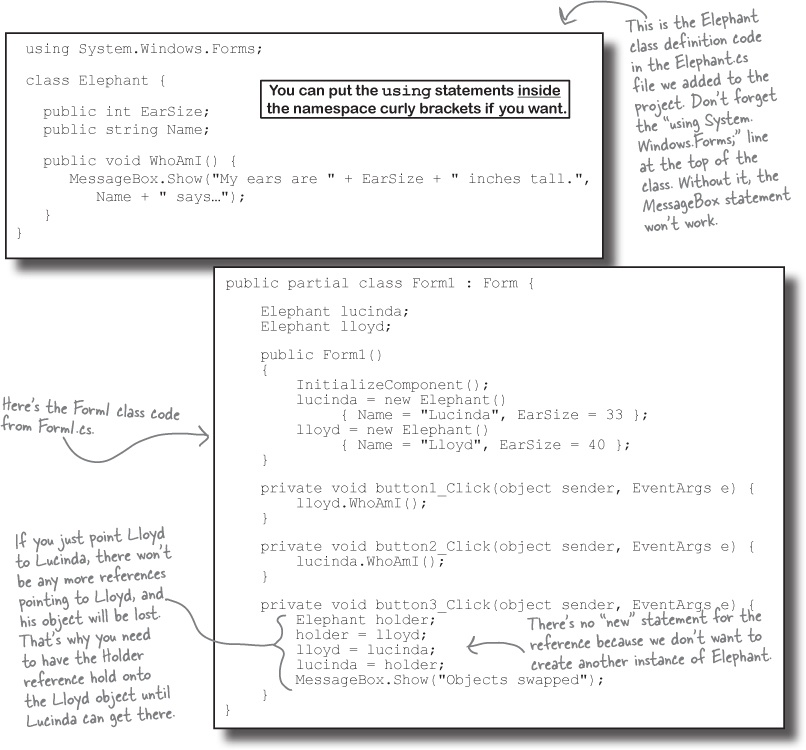
Create a program with an Elephant class. Make two Elephant instances and then swap the reference values that point to them, without getting any Elephant instances garbage-collected.
➊ Start with a new Windows Forms Application project.
Make the form look like this:
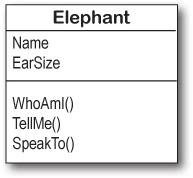
➋ Create the Elephant class.
Add an
Elephantclass to the project. Have a look at theElephantclass diagram—you’ll need anintfield calledEarSizeand aStringfield calledName. (Make sure both are public.) Then add a method calledWhoAmI()that displays a message box that tells you the name and ear size of the elephant.➌ Create two Elephant instances and a reference.
Add two
Elephantfields to theForm1class (in the area right below the class declaration) namedLloydandLucinda. Initialize them so they have the right name and ear size. Here are theElephantobject initializers to add to your form:lucinda = new Elephant() { Name = "Lucinda", EarSize = 33 }; lloyd = new Elephant() { Name = "Lloyd", EarSize = 40 };➍ Make the Lloyd and Lucinda buttons work.
Have the Lloyd button call
lloyd.WhoAmI()and the Lucinda button calllucinda.WhoAmI().➎ Hook up the swap button.
Here’s the hard part. Make the Swap button exchange the two references, so that when you click Swap, the
LloydandLucindavariables swap objects and a “Objects swapped” box is displayed. Test out your program by clicking the Swap button and then clicking the other two buttons. The first time you click Swap, the Lloyd button should pop up Lucinda’s message box, and the Lucinda button should pop up Lloyd’s message box. If you click the Swap button again, everything should go back.

C# garbage-collects any object with no references to it. So here’s your hint: If you want to pour a glass of beer into another glass that’s currently full of water, you’ll need a third glass to pour the water into....
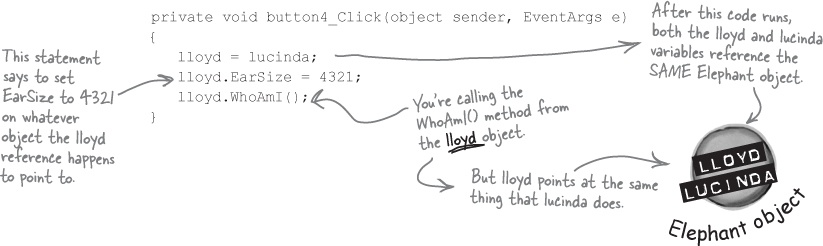
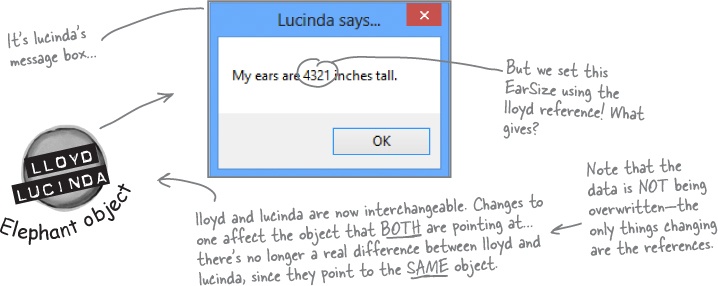
Two references means TWO ways to change an object’s data
Besides losing all the references to an object, when you have multiple references to an object, you can unintentionally change an object. In other words, one reference to an object may change that object, while another reference to that object has no idea that something has changed. Watch:
A special case: arrays
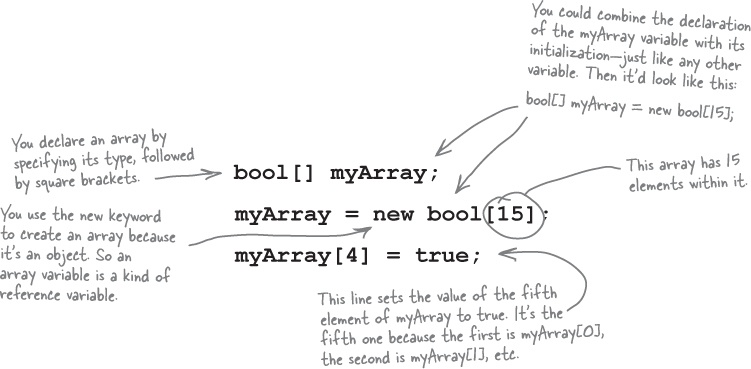
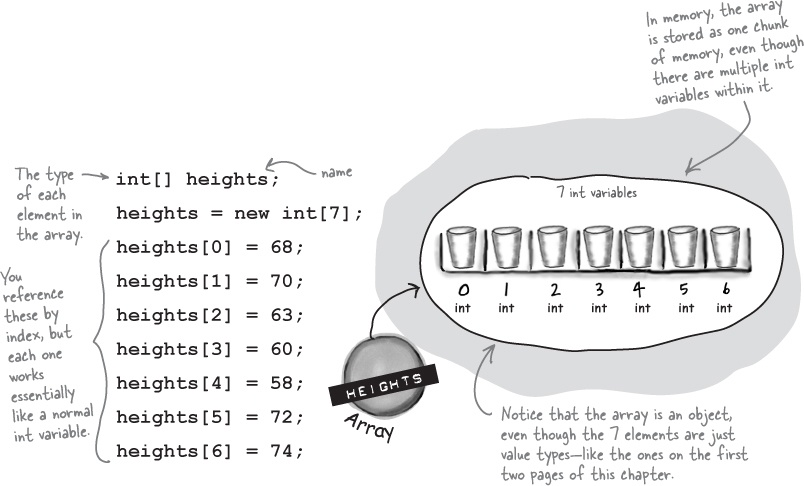
If you have to keep track of a lot of data of the same type, like a list of heights or a group of dogs, you can do it in an array. What makes an array special is that it’s a group of variables that’s treated as one object. An array gives you a way of storing and changing more than one piece of data without having to keep track of each variable individually. When you create an array, you declare it just like any other variable, with a name and a type:
Strings and arrays are different from the other data types you’ve seen so far, because they’re the only ones without a set size (think about that for a bit). |
Use each element in an array like it is a normal variable
When you use an array, first you need to declare a reference variable that points to the array. Then you need to create the array object using the new statement, specifying how big you want the array to be. Then you can set the elements in the array. Here’s an example of code that declares and fills up an array—and what’s happening on the heap when you do it. The first element in the array has an index of zero.
Arrays can contain a bunch of reference variables, too
You can create an array of object references just like you create an array of numbers or strings. Arrays don’t care what type of variable they store; it’s up to you. So you can have an array of ints, or an array of Duck objects, with no problem.
Here’s code that creates an array of seven Dog variables. The line that initializes the array only creates reference variables. Since there are only two new Dog() lines, only two actual instances of the Dog class are created.
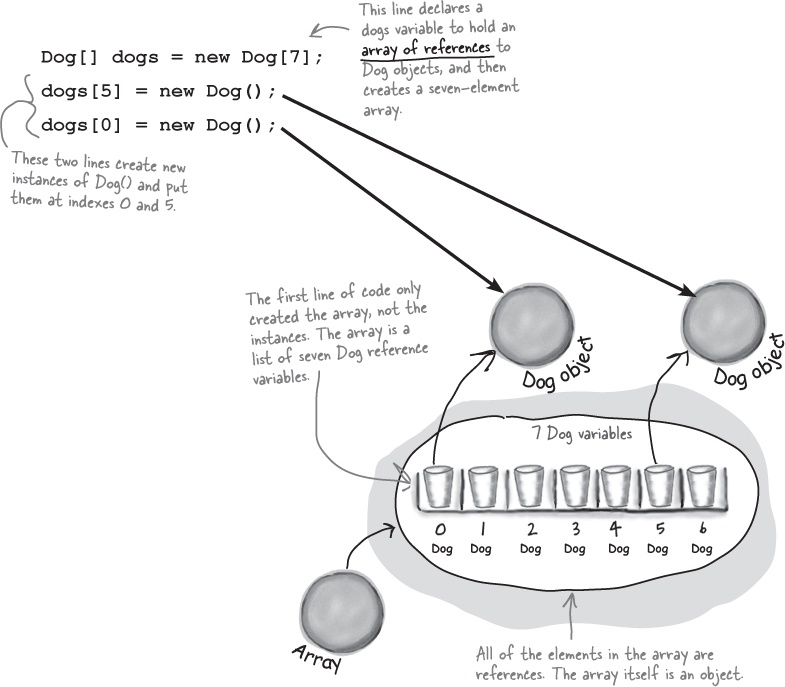
When you set or retrieve an element from an array, the number inside the brackets is called the index. The first element in the array has an index of zero.
An array’s length
You can find out how many elements are in an array using its Length property. So if you’ve got an array called heights, then you can use heights. Length to find out how long it is. If there are seven elements in the array, that’ll give you 7—which means the array elements are numbered 0 to 6.
Welcome to Sloppy Joe’s Budget House o’ Discount Sandwiches!
Sloppy Joe has a pile of meat, a whole lotta bread, and more condiments than you can shake a stick at. But what he doesn’t have is a menu! Can you build a program that makes a new random menu for him every day?
Do this
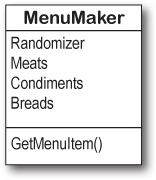
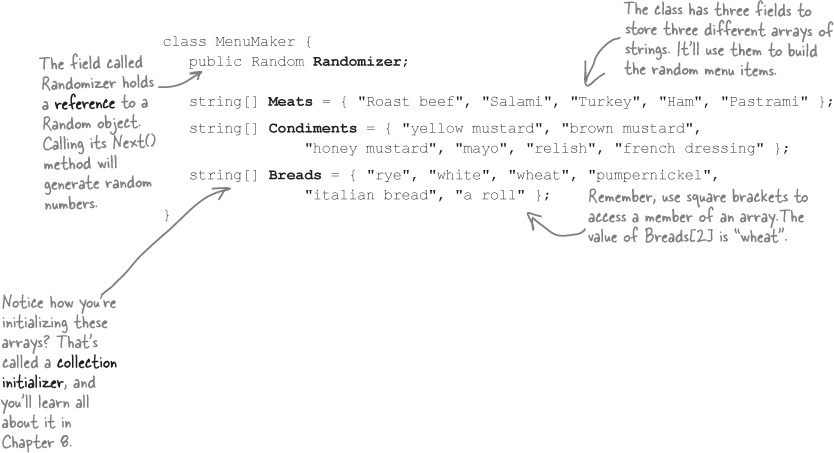
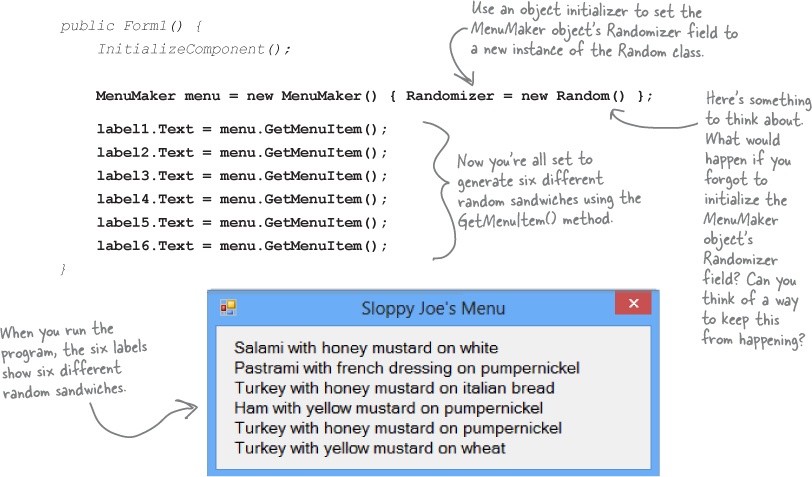
➊ Start a new project and add a MenuMaker class.
If you need to build a menu, you need ingredients. And arrays would be perfect for those lists. We’ll also need some way of choosing random ingredients to combine together into a sandwich. Luckily, the .NET Framework has a built-in class called
Randomthat generates random numbers. So we’ll have four fields in our class: a Randomizer field that holds a reference to aRandomobject, and three arrays ofstrings to hold the meats, condiments, and breads.➋ Add a GetMenuItem() method to the class that generates a random sandwich.
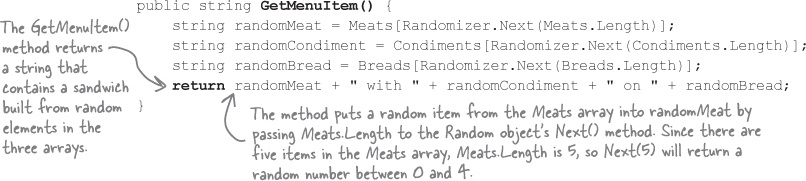
The point of the class is to generate sandwiches, so let’s add a method to do exactly that. It’ll use the
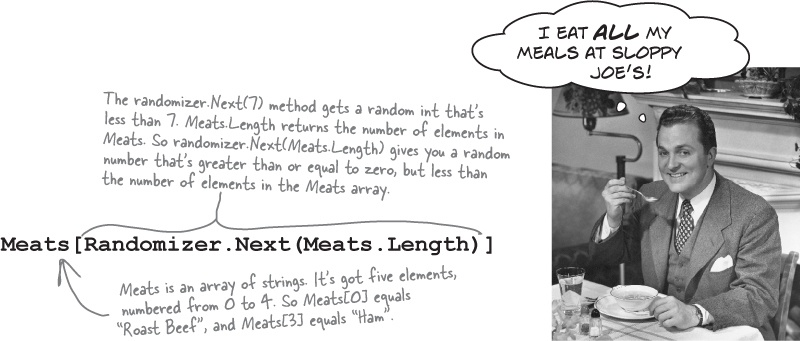
Randomobject’sNext()method to choose a random meat, condiment, and bread from each array. When you pass anintparameter toNext(), the method returns a random number that’s less than that parameter. So if yourRandomobject is calledRandomizer, then callingRandomizer.Next(7)will return a random number between 0 and 6.So how do you know what parameter to pass into the
Next()method? Well, that’s easy—just pass in each array’sLength. That will return the index of a random item in the array.
Objects use references to talk to each other
So far, you’ve seen forms talk to objects by using reference variables to call their methods and check their fields. Objects can call one another’s methods using references, too. In fact, there’s nothing that a form can do that your objects can’t do, because your form is just another object. And when objects talk to each other, one useful keyword that they have is this. Any time an object uses the this keyword, it’s referring to itself—it’s a reference that points to the object that calls it.
➊ HERE’S A METHOD TO TELL AN ELEPHANT TO SPEAK.
Let’s add a method to the
Elephantclass. Its first parameter is a message from anelephant. Its second parameter is theelephantthat said it:public void TellMe(string message, Elephant whoSaidIt) { MessageBox.Show(whoSaidIt.Name + " says: " + message); }Here’s what it looks like when it’s called. You can add to
button4_Click(), but add it before the statement that resets the references! (lloyd = lucinda;)lloyd.TellMe("Hi", lucinda);We called Lloyd’s
TellMe()method, and passed it two parameters: “Hi” and a reference to Lucinda’s object. The method uses itswhoSaidItparameter to access theNameparameter of whatever elephant was passed intoTellMe()using its second parameter.➋ HERE’S A METHOD THAT CALLS ANOTHER METHOD.
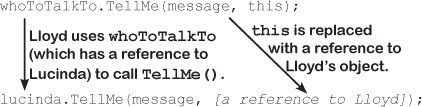
Now let’s add this
SpeakTo()method to theElephantclass. It uses a special keyword:this. That’s a reference that lets an object talk about itself.Let’s take a closer look at how this works.
lloyd.SpeakTo(lucinda, "Hello");
When Lloyd’s
SpeakTo()method is called, it uses itswhoToTalkToparameter (which has a reference to Lucinda) to call Lucinda’sTellMe()method.So Lucinda acts as if she was called with (
"Hello",lloyd), and shows this message:


Where no object has gone before
There’s another important keyword that you’ll use with objects. When you create a new reference and don’t set it to anything, it has a value. It starts off set to null, which means it’s not pointing to anything.
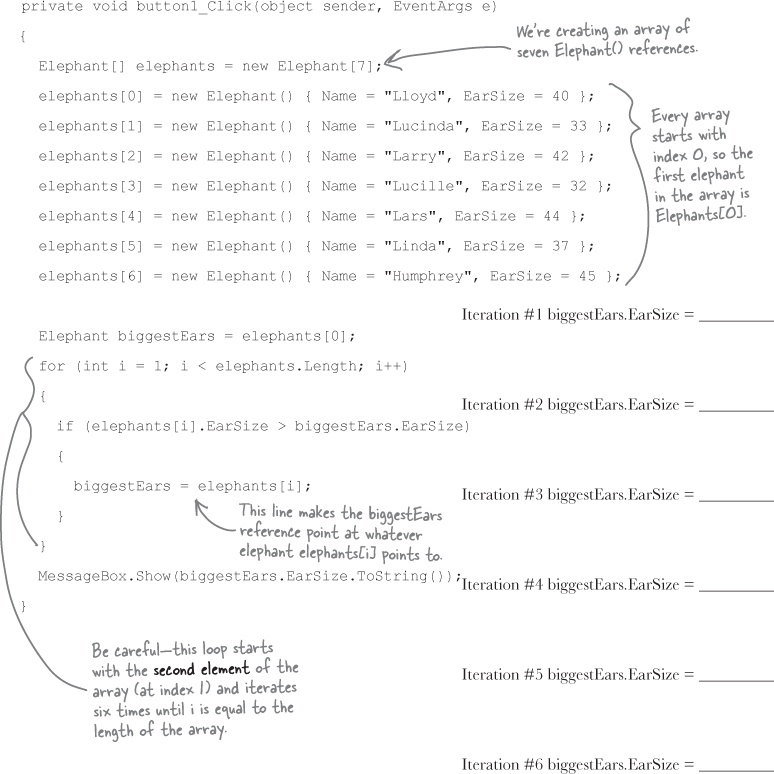
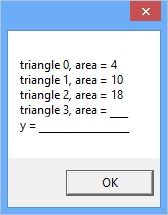
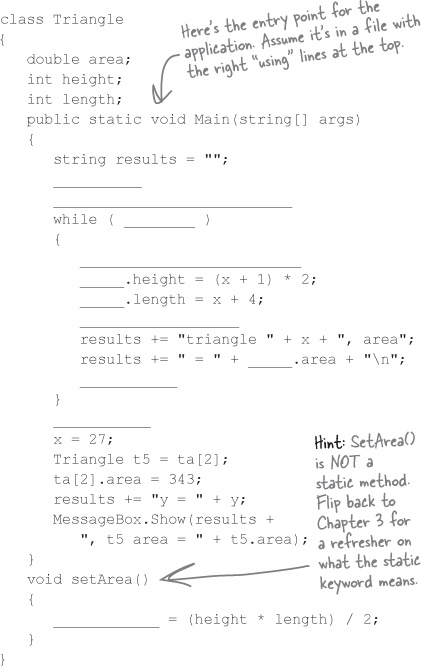
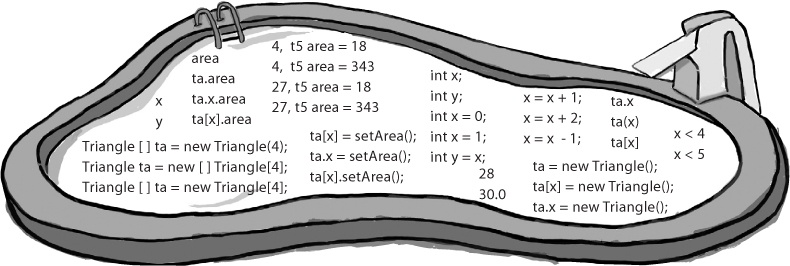
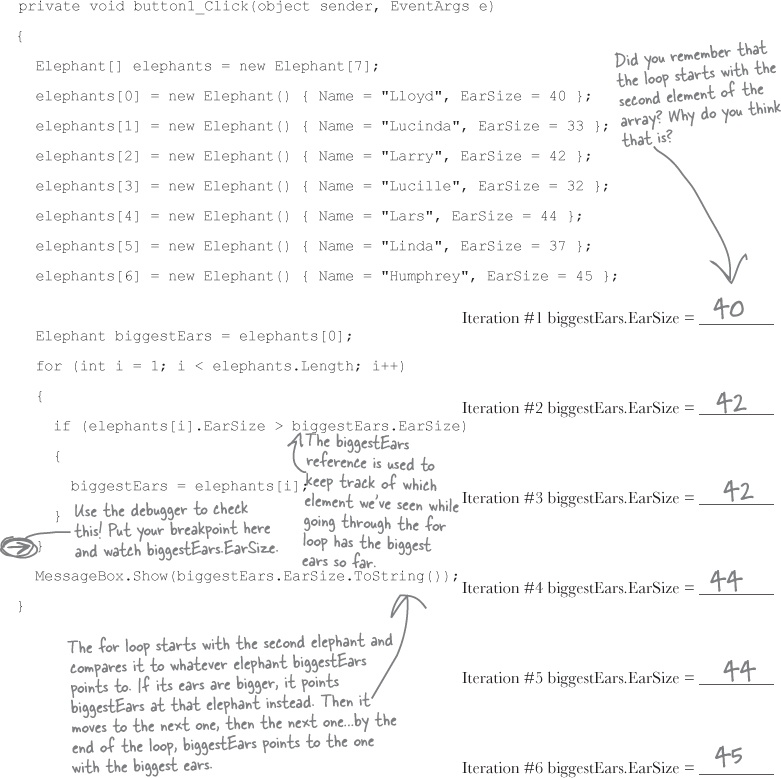
Here’s an array of Elephant objects and a loop that will go through it and find the one with the biggest ears. What’s the value of the biggestEars.Ears after each iteration of the for loop?
![]() Answers in Sharpen your pencil Solution.
Answers in Sharpen your pencil Solution.
The code for a button is all scrambled up on the fridge. Can you reconstruct the code snippets to make a working method that produces the output listed below?
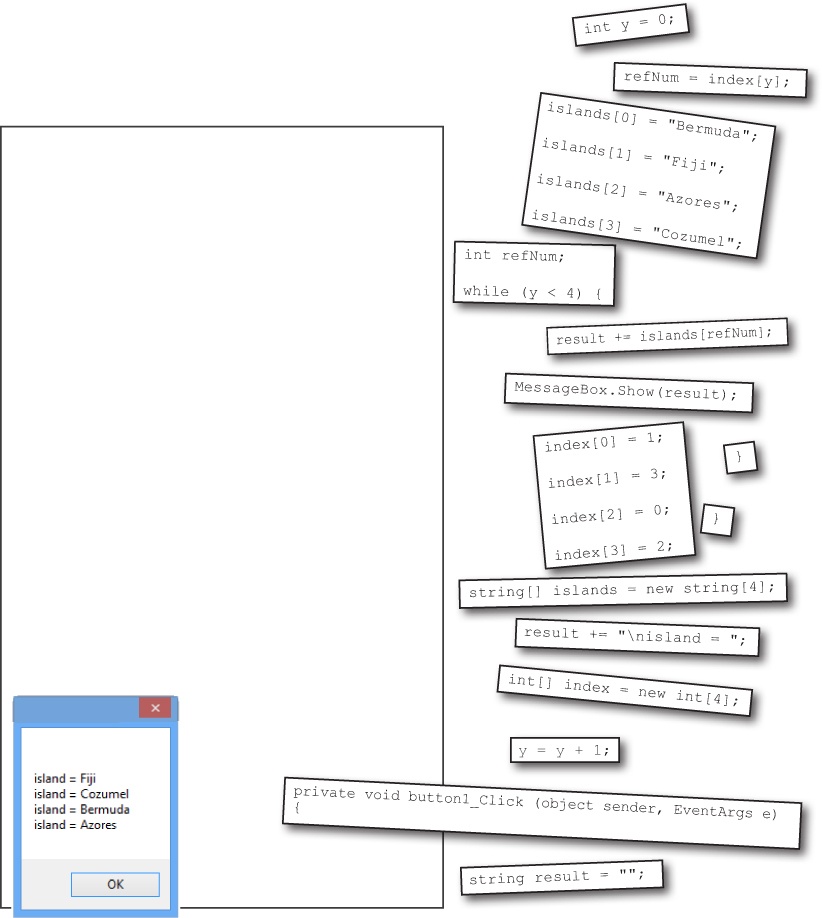
![]() Answers in Code Magnets Solution.
Answers in Code Magnets Solution.
Your job is to take code snippets from the pool and place them into the blank lines in the code. You may use the same snippet more than once, and you won’t need to use all the snippets. Your goal is to make a class that will compile and run, and produce the output listed.
Output
Bonus Question!
For extra bonus points, use snippets from the pool to fill in the two blanks missing from the output.
Note: each snippet from the pool can be used more than once.
![]() Answers in Pool Puzzle Solution.
Answers in Pool Puzzle Solution.
Build a typing game
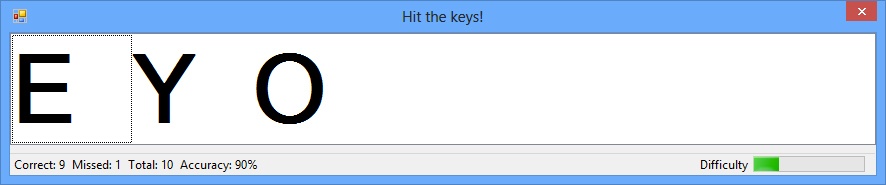
You’ve reached a milestone...you know enough to build a game! Here’s how your game will work. The form will display random letters. If the player types one of them, it disappears and the accuracy rate goes up. If the player types an incorrect letter, the accuracy rate goes down. As the player keeps typing letters, the game goes faster and faster, getting more difficult with each correct letter. If the form fills up with letters, the game is over!
➊ BUILD THE FORM.
Here’s what the form will look like in the form designer:
You’ll need to:
Turn off the minimize box and maximize box. Then set the form’s
FormBorderStyleproperty toFixed3D. That way, the player won’t be able to accidentally drag and resize it. Then resize it so that it’s much wider than it is tall (we set our form’s size to 876, 174).Drag a ListBox out of the toolbox onto the form. Set its
Dockproperty to Fill, and itsMultiColumnproperty to True. Set itsFontto 72 point bold.In the toolbox, expand the All Windows Forms group at the top. This will display many controls. Find the Timer control and double-click on it to add it to your form.
Find the StatusStrip in the All Windows Forms group in the toolbox and double-click on it to add a status bar to your form. You should now see the StatusStrip and Timer icons in the gray area at the bottom of the form designer:
See how you can use a Timer to make your form do more than one thing at once? Take a minute and flip to #4 in the “Leftovers” appendix to learn about another way to do that.
➋ SET UP THE STATUSSTRIP CONTROL.
Take a closer look at the status bar at the bottom of the screenshot. On one side, it’s got a series of labels:
And on the other side, it’s got a label and a progress bar:
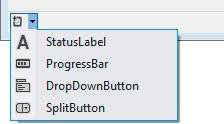
Add a StatusLabel to your StatusStrip by clicking its drop-down and selecting StatusLabel. Then do the following:
Use the Properties window to set its
(Name)to correctLabel and itsTextto “Correct: 0”. Add three more StatusLabels:missedLabel,totalLabel, andaccuracyLabel, and set theirTextproperties to “Missed: 0”, “Total: 0”, and “Accuracy: 0%”.Add one more StatusLabel. Set its
Springto True,TextAlignto MiddleRight, andTextto “Difficulty”. Finally, add a ProgressBar and name itdifficultyProgressBar.Set the StatusStrip’s
SizingGripproperty to False (hit Escape if you’ve got a child StatusLabel or ProgressBar selected to return the IDE’s focus to the parent StatusStrip).
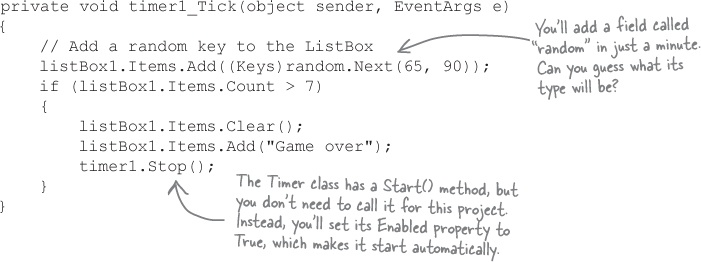
➌ SET UP THE TIMER CONTROL.
Did you notice how your Timer control didn’t show up on your form? That’s because the Timer is a nonvisual control. It doesn’t actually change the look and feel of the form. It does exactly one thing: it calls a method over and over again. Set the Timer control’s
Intervalproperty to 800, so that it calls its method every 800 milliseconds. Then double-click on the timer1 icon in the designer. The IDE will do what it always does when you double-click on a control: it will add a method to your form. This time, it’ll add one calledtimer1_Tick. Here’s the code for it:➍ ADD A CLASS TO KEEP TRACK OF THE PLAYER STATS.
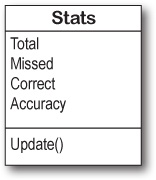
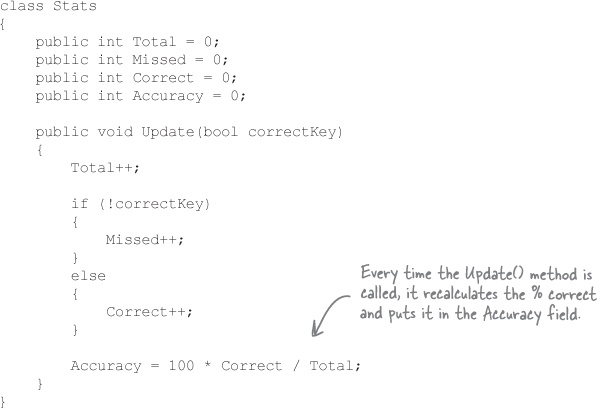
If the form is going to display the total number of keys the player pressed, the number that were missed and the number that were correct, and the player’s accuracy, then we’ll need a way to keep track of all that data. Sounds like a job for a new class! Add a class called
Statsto your project. It’ll have fourintfields calledTotal,Missed,Correct, andAccuracy, and a method calledUpdatewith oneboolparameter:trueif the player typed a correct letter that was in the ListBox, orfalseif the player missed one.➎ ADD FIELDS TO YOUR FORM TO HOLD A STATS OBJECT AND A RANDOM OBJECT.
You’ll need an instance of your new
Statsclass to actually store the information, so add a field calledstatsto store it. And you already saw that you’ll need a field calledrandom—it’ll contain aRandomobject.Add the two fields to the top of your form:
public partial class Form1 : Form
{
    Random random = new Random();
    Stats stats = new Stats();
    ...
Before you go on, there are three properties you need to set. Set the Timer control’s
Enabledproperty toTrue, the ProgressBar control’sMaximumproperty to701, and the Form’sKeyPreviewproperty toTrue. Take a minute and figure out why you need those properties. What happens if you don’t set them?➏ HANDLE THE KEYSTROKES.
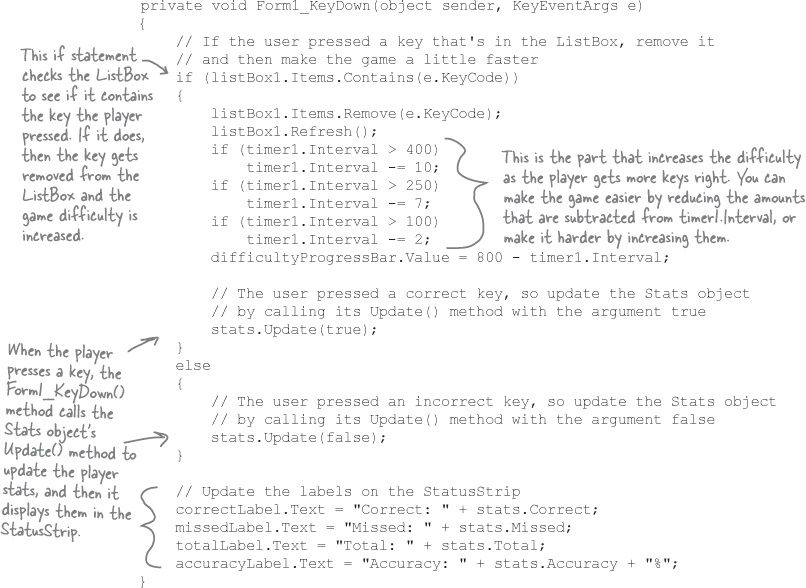
There’s one last thing your game needs to do: any time the player hits a key, it needs to check if that key is correct (and remove the letter from the ListBox if it is), and update the stats on the StatusStrip.
Go back to the form designer and select the form. Then go to the Properties window and click on the lightning bolt button. Scroll to the KeyDown row and double-click on it. This tells the IDE to add a method called
Form1_KeyDown()that gets called every time the user presses a key. Here’s the code for the method:This game only runs once. Can you figure out how to modify it so the player can start a new game when it’s displaying “Game Over”?
➐ RUN YOUR GAME.
Your game’s done! Give it a shot and see how well you do. You may need to adjust the font size of the ListBox to make sure it holds exactly seven letters, and you can change the difficulty by adjusting the values that are subtracted from
timer1.Intervalin theForm1_KeyDown()method.


Controls are objects, just like any other object
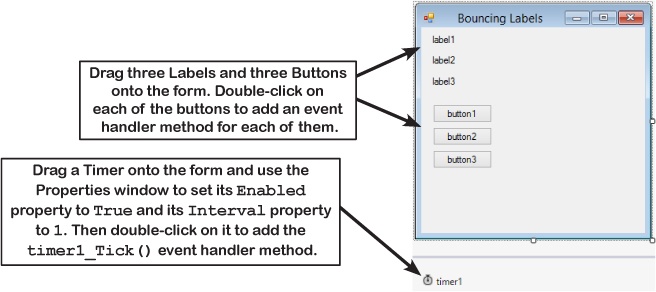
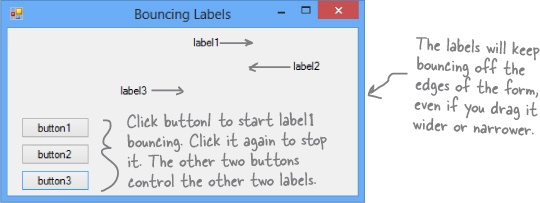
You’ve built plenty of forms by dragging controls out of the toolbox. It turns out that those controls are just regular old objects. And since they’re objects, you can add references to them and work with them like you’d work with an instance of a class that you wrote yourself. Let’s see a live example of that by building a program that animates some Label controls by bouncing them back and forth on a form.
Do this
➊ Create a new Windows Forms Application and build this form.
➋ Add a class called
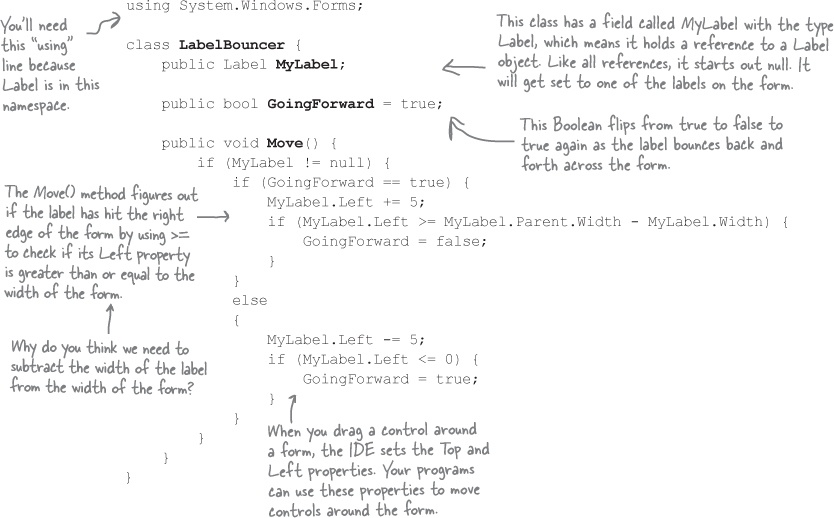
LabelBouncer. Here’s the code for it:All you need to do to bounce a label across a form is to create a new instance of the
LabelBouncerclass, set itsMyLabelfield to point to a Label control on the form, and then call itsMove()method over and over again.Each time the
Move()method is called, theLabelBouncernudges the label by changing itsLeftproperty. If theGoingForwardfield istrue, then it nudges it to the right by adding 5; otherwise, it nudges it to the left by subtracting 5.Every control has a
Parentproperty that contains a reference to the form, because the form is an object too!➌ Here’s the code for the form. See if you can figure out exactly what’s going on here. It uses an array of
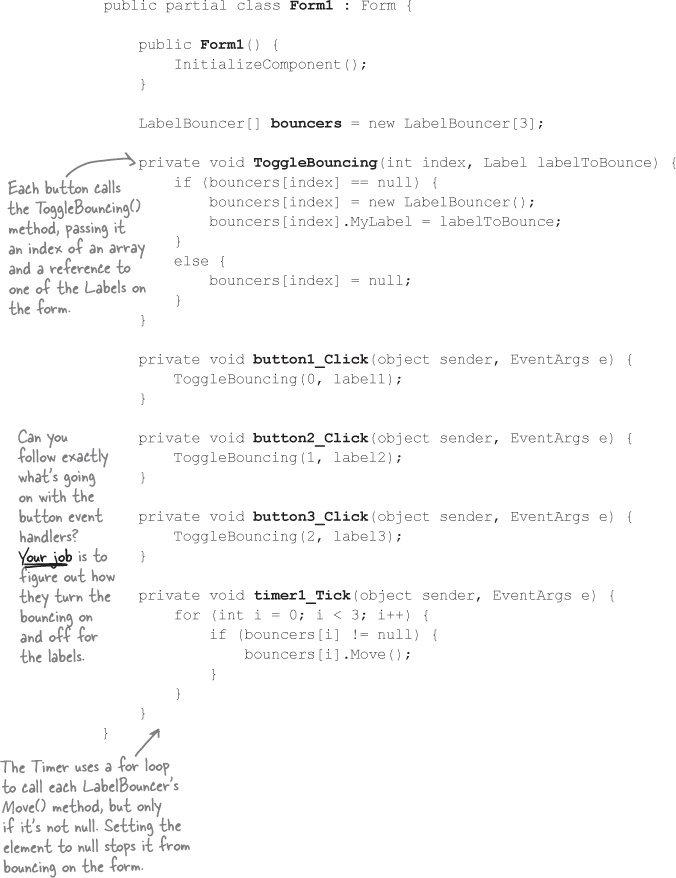
LabelBouncerobjects to bounce labels back and forth, and has the Timer’sTickevent handler method call theirMove()methods over and over again.The form stores an array of
LabelBouncerreferences in a field calledbouncers. When theToggleBouncing()method is called, it uses theindexparameter to check an element of the array. If the element is null, it creates a newLabelBouncerobject and stores its reference in the array; otherwise, it clears the element by setting it tonull.Since controls are just objects, you can pass references to them as method parameters and store them in arrays, fields, and variables.
There are about 77 reserved words called keywords in C#. These are words reserved by the C# compiler; you can’t use them for variable names. You’ll know a lot of them really well by the time you finish the book. Here are some you’ve already used. Write down what you think these words do in C#.
Here’s an array of Elephant objects and a loop that will go through it and find the one with the biggest ears. What’s the value of the biggestEars.Ears after each iteration of the for loop?
Get Head First C#, 3rd Edition now with the O’Reilly learning platform.
O’Reilly members experience books, live events, courses curated by job role, and more from O’Reilly and nearly 200 top publishers.

