Chapter 4. The Activity Lifecycle: Being an Activity

Activities form the foundation of every Android app.
So far you’ve seen how to create activities, and made one activity start another using an intent. But what’s really going on beneath the hood? In this chapter, we’re going to dig a little deeper into the activity lifecycle. What happens when an activity is created and destroyed? Which methods get called when an activity is made visible and appears in the foreground, and which get called when the activity loses the focus and is hidden? And how do you save and restore your activity’s state?
How do activities really work?
So far you’ve seen how to create apps that interact with the user, and apps that use multiple activities to perform tasks. Now that you have these core skills under your belt, it’s time to take a deeper look at how activities actually work. Here’s a recap of what you know so far, with a few extra details thrown in.
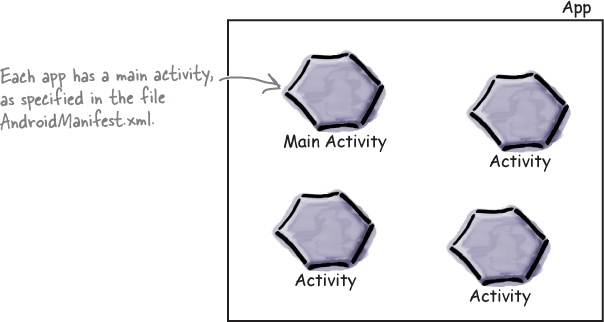
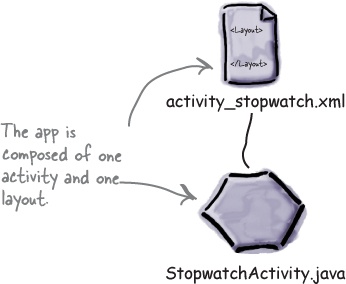
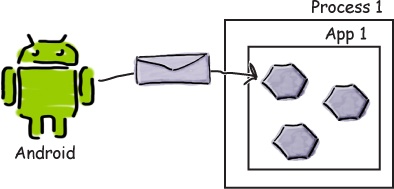
An app is a collection of activities, layouts, and other resources.
One of these activities is the main activity for the app.
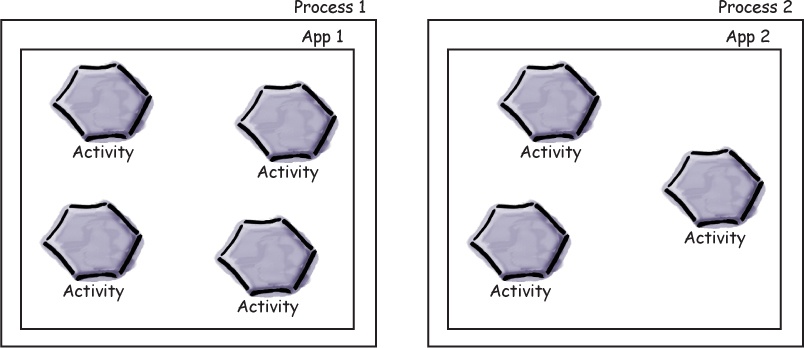
By default, each app runs within its own process.
This helps keep your apps safe and secure. You can read more about this in Appendix A (which covers the Android runtime, or ART) at the back of this book.
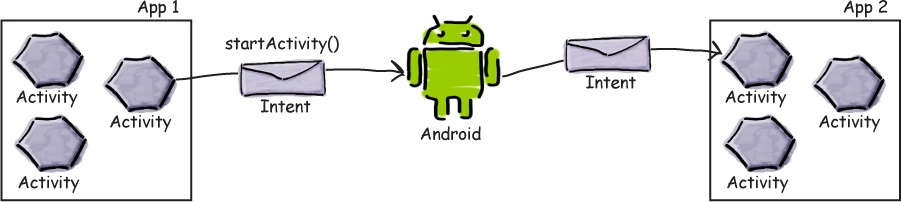
You can start an activity in another application by passing an intent with startActivity().
The Android system knows about all the installed apps and their activities, and uses the intent to start the correct activity.
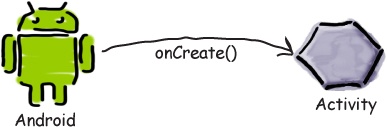
When an activity needs to start, Android checks if there’s already a process for that app.
If one exists, Android runs the activity in that process. If one doesn’t exist, Android creates one.
When Android starts an activity, it calls its onCreate() method.

But there are still lots of things we don’t yet know about how activities function. How long does the activity live for? What happens when your activity disappears from the screen? Is it still running? Is it still in memory? And what happens if your app gets interrupted by an incoming phone call? We want to be able to control the behavior of our activities in a whole range of different circumstances, but how?
The Stopwatch app
In this chapter, we’re going to take a closer look at how activities work under the hood, common ways in which your apps can break, and how you can fix them using the activity lifecycle methods. We’re going to explore the lifecycle methods using a simple Stopwatch app as an example.
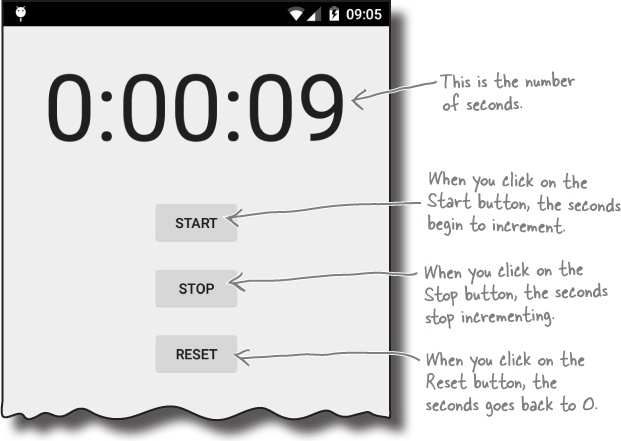
The Stopwatch app consists of a single activity and a single layout. The layout includes a text view showing you how much time has passed, a Start button that starts the stopwatch, a Stop button that stops it, and a Reset button that resets the timer value to zero.
Build the app
You have enough experience under your belt to build the app without much guidance from us. We’re going to give you just enough code to be able to build the app yourself, and then you can see what happens when you try to run it.
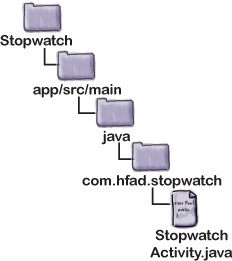
Start off by creating a new Android project for an application named “Stopwatch” with a package name of com.hfad. stopwatch. The minimum SDK should be API 15 so it can run on most devices. You’ll need an activity called “StopwatchActivity” and a layout called “activity_stopwatch”.
The stopwatch layout code
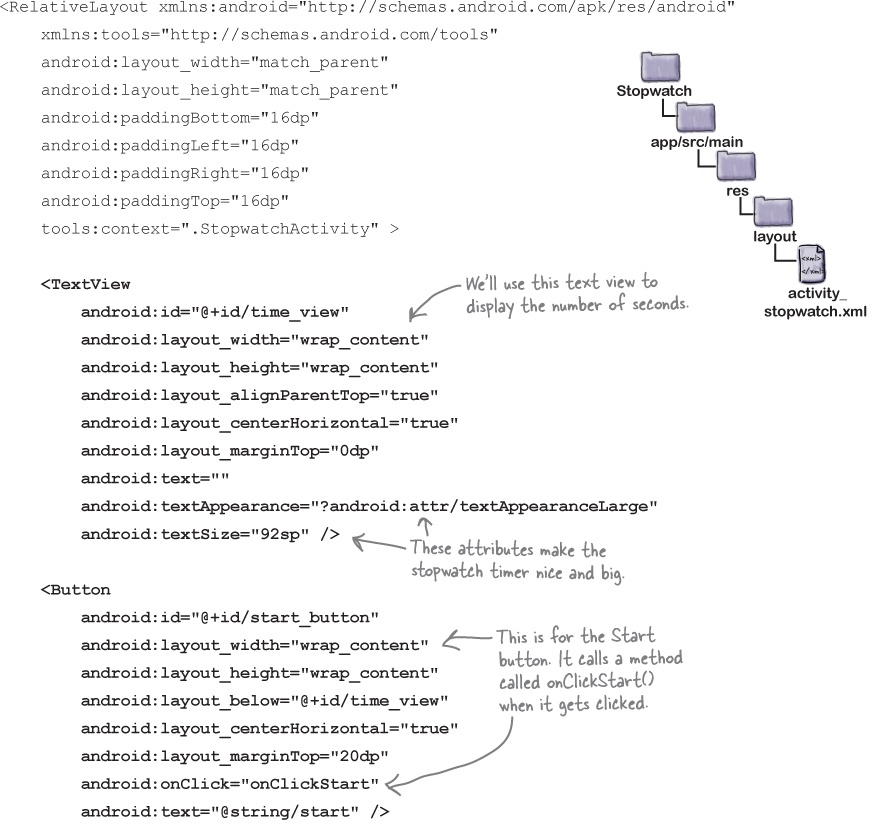
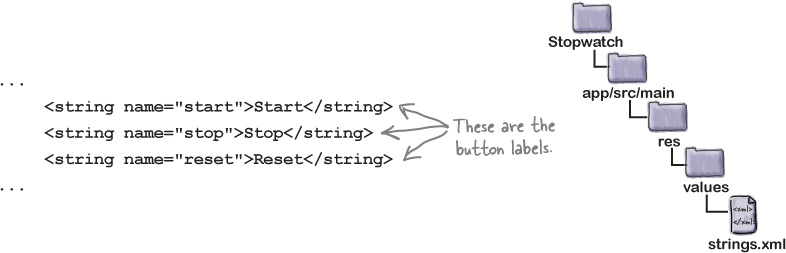
Here’s the XML for the layout. It describes a single text view that’s used to display the timer, and three buttons to control the stopwatch. Replace the XML currently in activity_stopwatch.xml with the XML shown here:
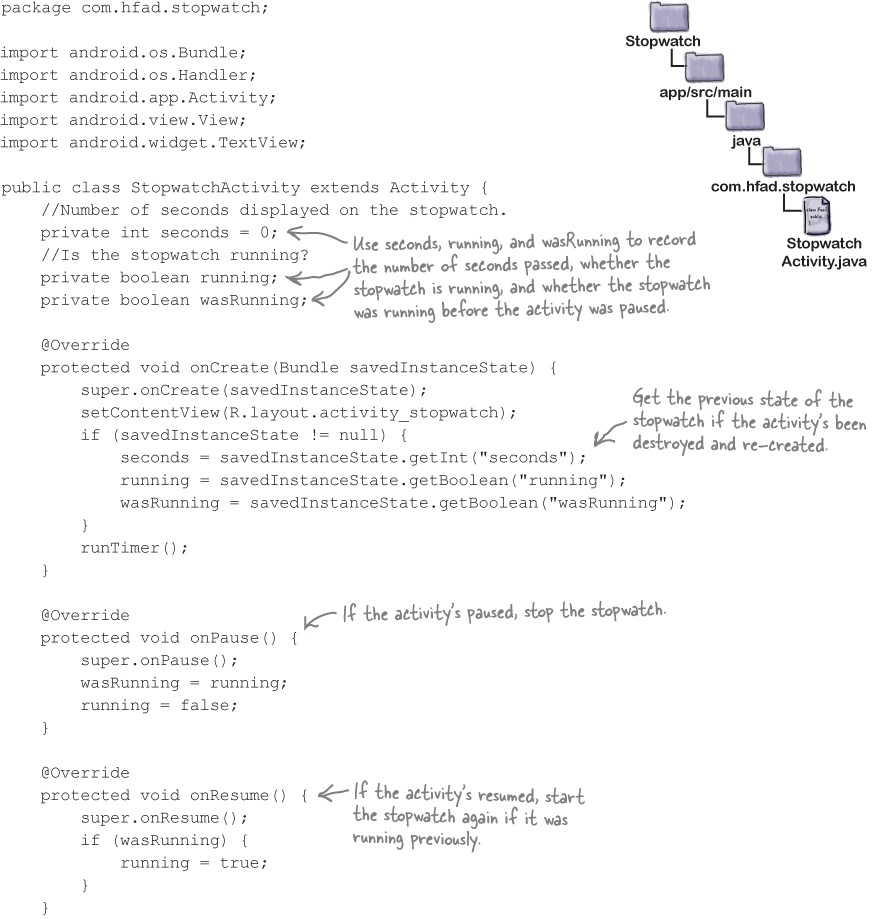
How the activity code will work
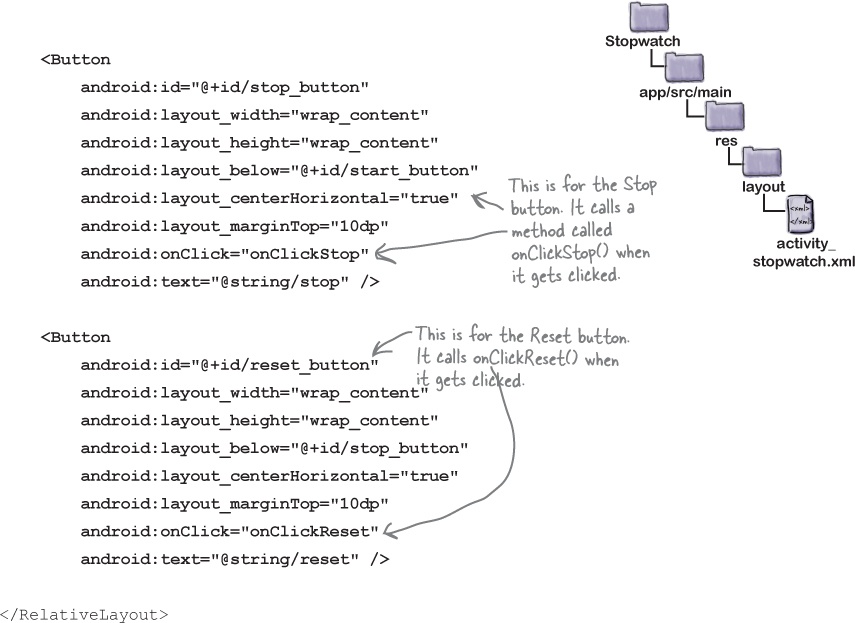
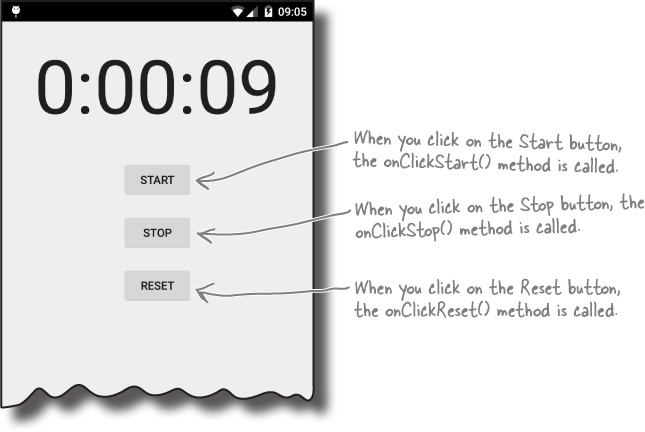
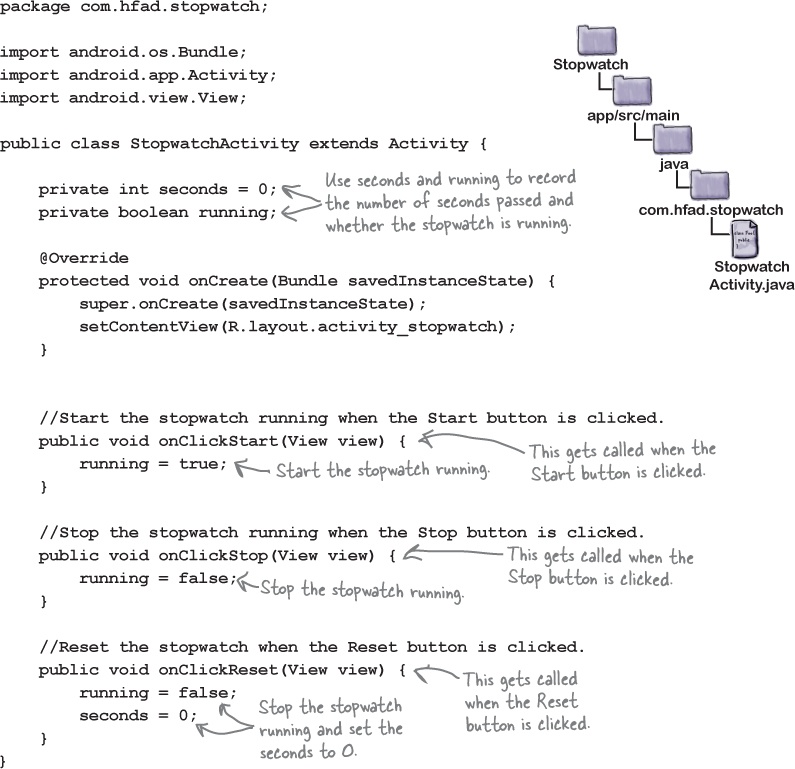
The layout defines three buttons that we’ll use to control the stopwatch. Each button uses its onClick attribute to specify which method in the activity should run when the button is clicked. When the Start button is clicked, the onClickStart() method gets called, when the Stop button is clicked the onClickStop() method gets called, and when the Reset button is clicked the onClickReset() method gets called. We’ll use these method to start, stop, and reset the stopwatch.
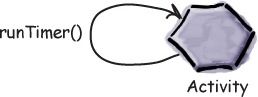
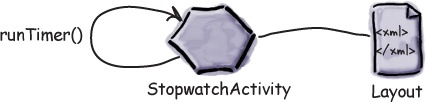
We’ll update the stopwatch using a method we’ll create called runTimer(). The runTimer() method will run code every second to check whether the stopwatch is running, increment the number of seconds and display the number of seconds in the text view.
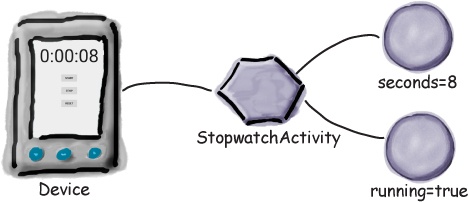
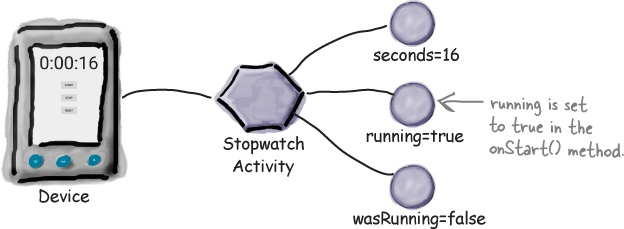
To help us with this, we’ll use two private variables to record the state of the stopwatch. We’ll use an int called seconds to track how many seconds have passed since the stopwatch started running, and a boolean called running to record whether the stopwatch is currently running.
We’ll start by writing the code for the buttons, and then we’ll look at the runTimer() method.
Add code for the buttons
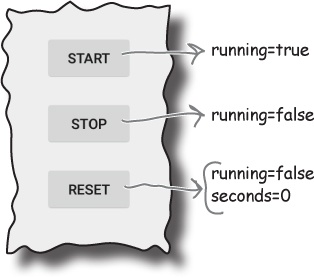
When the user clicks on the Start button, we’ll set the running variable to true so that the stopwatch will start. When the user clicks on the Stop button, we’ll set running to false so that the stopwatch stops running. If the user clicks on the Reset button, we’ll set running to false and seconds to 0 so that the stopwatch is reset and stops running.
Replace the contents of StopwatchActivity.java with the code below:
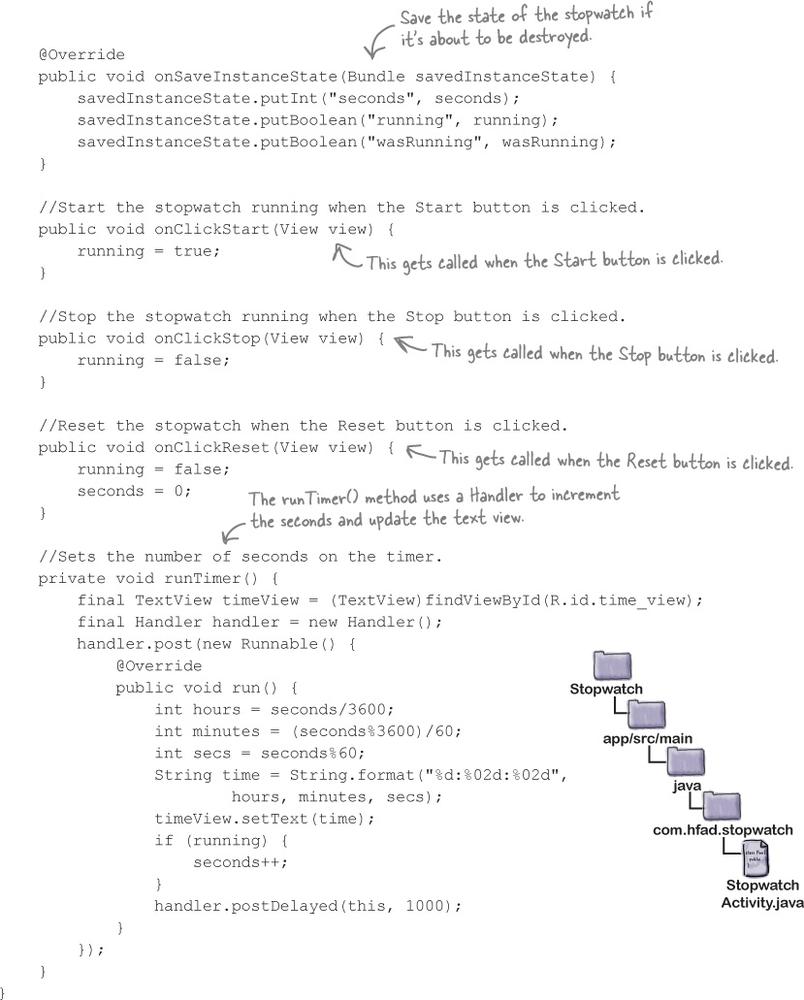
The runTimer() method
The next thing we need to do is create the runTimer() method. The runTimer() method will get a reference to the text view in the layout, format the contents of the seconds variable into hours, minutes, and seconds, and then display the results in the text view. If the running variable is set to true, it will increment the seconds variable. Here’s the code:
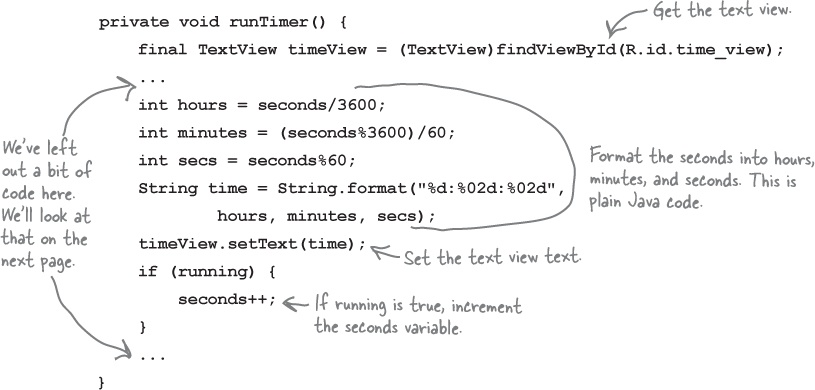
We need this code to keep looping so that it increments the seconds variable and updates the text view every second. We need to do this in such a way that we don’t block the main Android thread.
In non-Android Java programs, you can perform tasks like this using a background thread. In Androidville, this is a problem—only the main Android thread can update the user interface, and if any other thread tries to do so, you get a CalledFromWrongThreadException.
The solution is to use a Handler. We’ll look at this on the next page.
Handlers allow you to schedule code
A Handler is an Android class you can use to schedule code that should be run at some point in the future. You can also use it to post code that needs to run on a different thread. In our case, we’re going to use a Handler to schedule the stopwatch code to run every second.
To use the Handler, you wrap the code you wish to schedule in a Runnable object, and then use the Handler post() and postDelayed() methods to specify when you want the code to run. Let’s take a closer look at these mehods.
The post() method
The post() method posts code that needs to be run as soon as possible (which is usually almost immediately). The post() method takes one parameter, an object of type Runnable. A Runnable object in Androidville is just like a Runnable in plain old Java, a job you want to run. You put the code you want to run in the Runnable’s run() method, and the Handler will make sure the code is run as soon as possible. Here’s what the method looks like:
The postDelayed() method
The postDelayed() method works in a similar way to the post() method except that you use it post code that should be run in the future. The postDelayed() method takes two parameters: a Runnable and a long. The Runnable contains the code you want to run in its run() method, and the long specifies the number of milliseconds you wish to delay the code by. The code will run as soon as possible after the delay. Here’s what the method looks like:

On the next page, we’ll use these methods to update the stopwatch every second.
The full runTimer() code
To update the stopwatch, we’re going to repeatedly schedule code using the Handler with a delay of 1,000 milliseconds each time. Each time the code runs, we’ll increment the seconds variable and update the text view.
Here’s the full code for the runTimer() method:
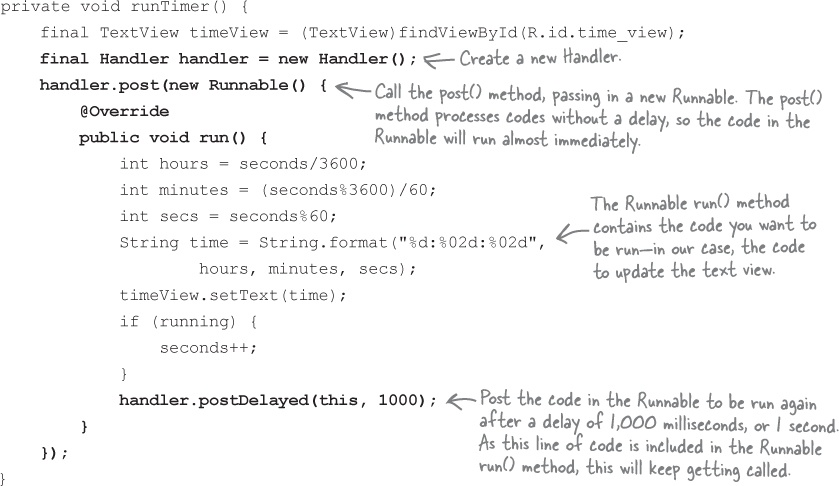
Using the post() and postDelayed() methods in this way means that the code will run as soon as possible after the required delay, which in practice means almost immediately. While this means the code will lag slightly over time, it’s accurate enough for the purposes of exploring the lifecycle methods in this chapter.
We want the runTimer() method to start running when StopwatchActivity gets created, so we’ll call it in the activity onCreate() method:
protected void onCreate(Bundle savedInstanceState) {
    ...
    runTimer();
}
We’ll show you the full code for the activity on the next page.
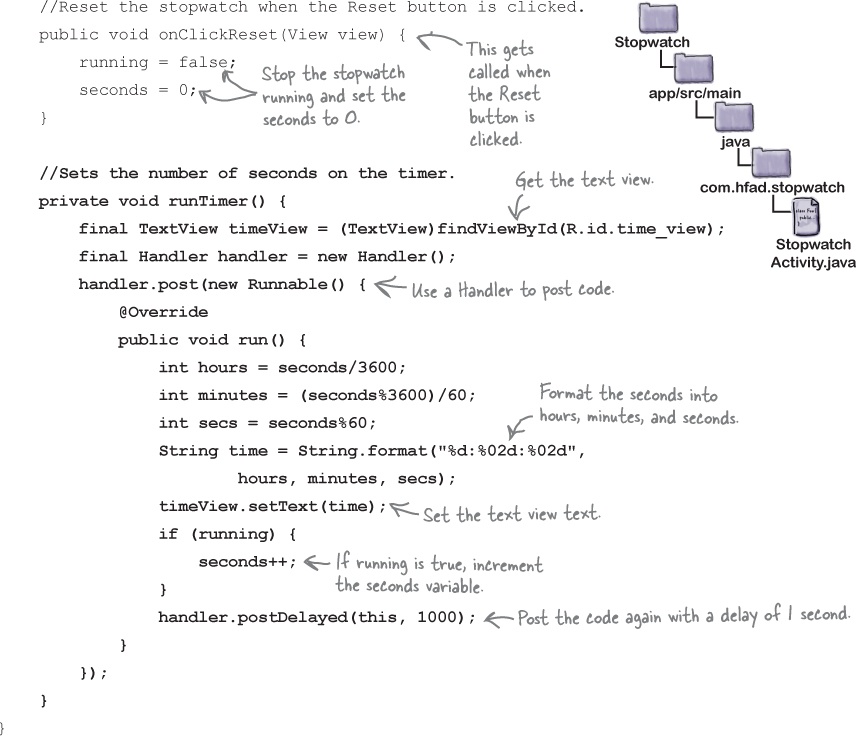
The full StopwatchActivity code
Here’s the full code for StopwatchActivity.java. Update your code with our changes below.

Let’s look at what happens when the code runs.
What happens when you run the app
The user decides she wants to run the app.
She clicks on the icon for the app on her device.
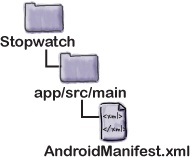
The AndroidManifest.xml file for the app specifies which activity to use as the launch activity.
An intent is constructed to start this activity using
startActivity(intent).Android checks if there’s already a process running for the app, and if not, creates a new process.
It then creates a new activity object—in this case, for
StopwatchActivity.


The story continues
The onCreate() method in the activity gets called.
The method includes a call to
setContentView(), specifying a layout, and then starts the stopwatch withrunTimer().When the onCreate() method finishes, the layout gets displayed on the device.
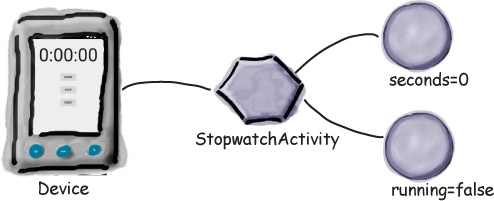
The
runTimer()method uses thesecondsvariable to determine what text to display in the text view, and uses therunningvariable to determine whether to increment the number of seconds. Asrunningis initiallyfalse, the number of seconds isn’t incremented.
Test drive the app
When we run the app in the emulator, the app works great. We can start, stop, and reset the stopwatch without any problems at all—the app works just as you’d expect.

But there’s just one problem...
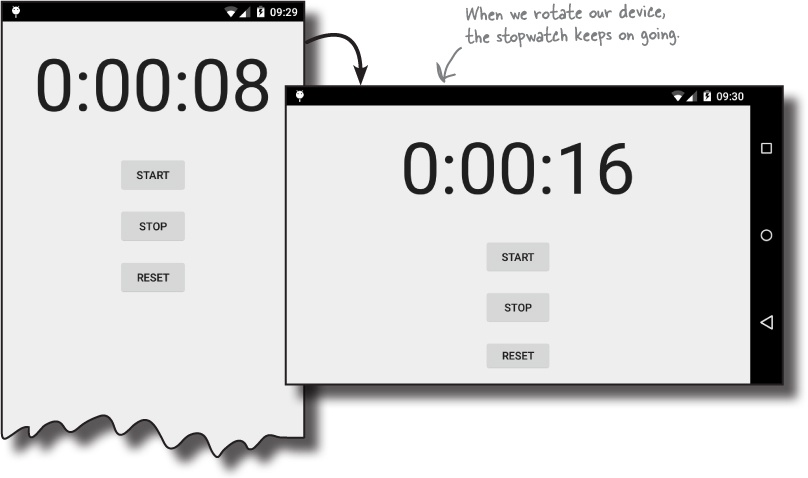
When we ran the app on a physical device, the app worked OK up until someone rotated the device. When the device was rotated, the stopwatch set itself back to 0.

In Androidville, it’s surprisingly common for apps to break when you rotate the device. Before we fix the problem, let’s take a closer look at what caused it.
What just happened?
So why did the app break when the user rotated the screen? Let’s take a closer look at what really happened.
The user starts the app, and clicks on the start button to set the stopwatch going.
The
runTimer()method starts incrementing the number of seconds displayed in thetime_viewtext view using thesecondsandrunningvariables.The user rotates the device.
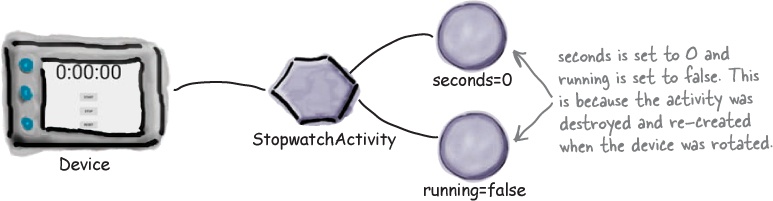
Android sees that the screen orientation and screen size has changed, and it destroys the activity, including any variables used by the
runTimer()method.StopwatchActivity is then re-created.
The
onCreate()method runs again, and therunTimer()method gets called. As the activity has been re-created, thesecondsandrunningvariables are set to their default values.


Rotating the screen changes the device configuration
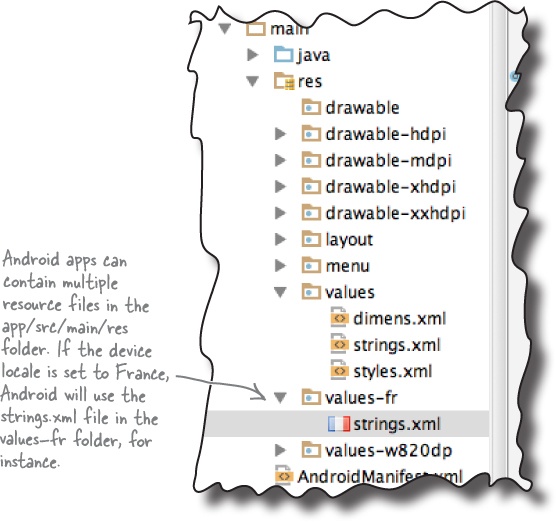
When Android runs your app and starts an activity, it takes into account the device configuration. By this we mean the configuration of the physical device (such as the screen size, screen orientation, and whether there’s a keyboard attached) and also configuration options specified by the user (such as the locale).
Android needs to know what the device configuration is when it starts an activity because it can impact what resources are needed for the application. A different layout might need to be used if the device screen is landscape rather than portrait, for instance, and a different set of string values might need to be used if the locale is French.
The device configuration includes options specified by the user (such as the locale), and options relating to the physical device (such as the orientation and screen size). A change to any of these options results in the activity being destroyed and re-created.
When the device configuration changes, anything that displays a user interface needs to be updated to match the new configuration. If you rotate your device, Android spots that the screen orientation and screen size has changed, and classes this as a change to the device configuration. It destroys the current activity, and then re-creates it again so that resources appropriate to the new configuration get picked up.
From birth to death: the states of an activity
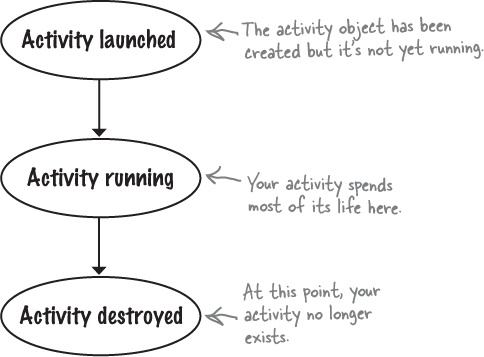
When Android creates and destroys an activity, the activity moves from being launched, to running, to being destroyed.
The main state of an activity is when it’s running or active. An activity is running when it’s in the foreground of the screen, has the focus, and the user can interact with it. The activity spends most of its life in this state. An activity starts running after it has been launched, and at the end of its life, the activity is destroyed.
An activity is running when it’s in the foreground of the screen.
When an activity moves from being launched to being destroyed, it triggers key activity lifecycle methods: the onCreate() and onDestroy() methods. These are lifecycle methods that your activity inherits, and which you can override if necessary.
The onCreate() method gets called immediately after your activity is launched. This method is where you do all your normal activity setup such as calling setContentView(). You should always override this method. If you don’t override it, you won’t be able to tell Android what layout your activity should use.
onCreate() gets called when the activity is first created, and it’s where you do your normal activity setup.
The onDestroy() method is the final call you get before the activity is destroyed. There are a number of situations in which an activity can get destroyed—for example, if it’s been told to finish, if the activity’s being re-created due to a change in device configuration, or if Android has decided to destroy the activity in order to save space.
onDestroy() gets called just before your activity gets destroyed.
We’ll take a closer look at how these methods fit into the activity states on the next page.
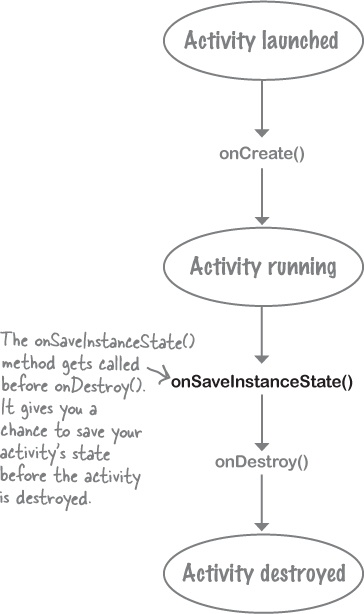
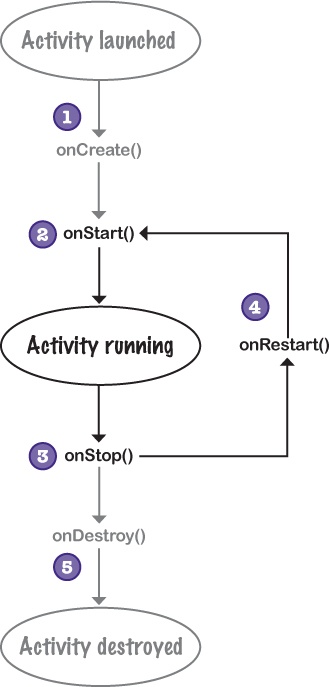
The activity lifecycle: from create to destroy
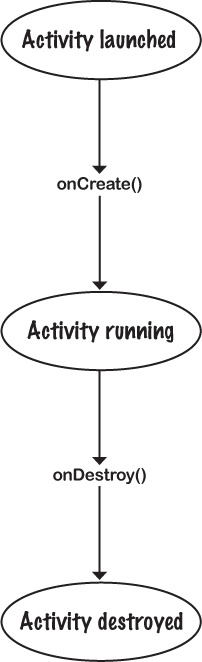
Here’s an overview of the activity lifecycle from birth to death. As you’ll see later in the chapter, we’ve left out some of the details, but at this point we’re just focusing on the onCreate() and onDestroy() methods.
The activity gets launched.
The activity object is created and its constructor is run.
The onCreate() method runs immediately after the activity is launched.
The
onCreate()method is where any initialization code should go, as this method always gets called after the activity has launched and before it starts running.An activity is running when it’s visible in the foreground and the user can interact with it.
This is where an activity spends most of its life.
The onDestroy() method runs immediately before the activity is destroyed.
The
onDestroy()method enables you to perform any final clean up such as freeing up resources.After the onDestroy() method has run, the activity is destroyed.
The activity ceases to exist.
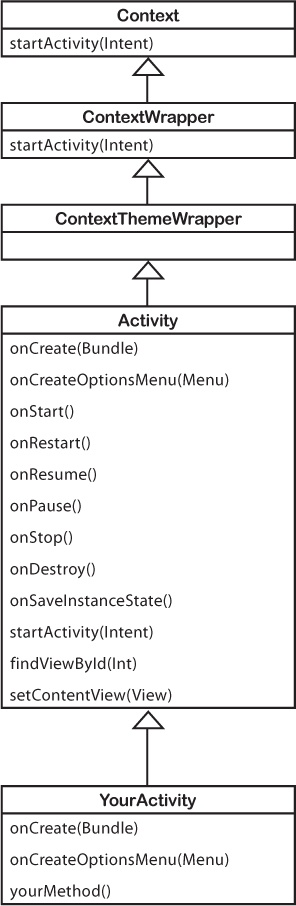
Your activity inherits the lifecycle methods
As you saw earlier in the book, your activity extends the android.app.Activity class. It’s this class that gives your activity access to the Android lifecycle methods:
Context abstract class
(android.content.Context)
Note
An interface to global information about the application environment. Allows access to application resources, classes, and application-level operations.
ContextWrapper class
(android.content.ContextWrapper)
ContextThemeWrapper class
(android.view.ContextThemeWrapper)
Activity class
(android.app.Activity)
Note
The Activity class implements default versions of the lifecycle methods. It also defines methods such as findViewById(Int) and setContentView(View).
YourActivity class
(com.hfad.foo)
How do we deal with configuration changes?
As you saw, our app went wrong when the user rotated the screen. The activity was destroyed and re-created, which meant that local variables used by the activity were lost. So how do we get around this issue? How do we deal with device configuration changes such as a change to the screen orientation?
There are two options: we can either tell Android to bypass restarting the activity, or we can save its current state so that the activity can re-create itself in the same state. Let’s look at these two options in more detail.
Bypass re-creating the activity
The first option is to tell Android not to restart the activity if there’s been a configuration change. While we’re going to show you how to do this, bear in mind that it’s usually not the best option. This is because when Android re-creates the activity, it makes sure it uses the right resources for the new configuration. If you bypass this, you may have to write a bunch of extra code to deal with the new configuration yourself.
Watch it!
Only deal with configuration changes this way as a last resort.
You’ll bypass built-in Android behavior that could cause problems.
You can tell Android not to re-create an activity due to a configuration change by adding a line to the activity element of the AndroidManifest.xml file like this:
android:configChanges="configuration_change"where configuration_change is the type of configuration change.
In our case, we’d want to get Android to bypass a change to the screen orientation and screen size, so we’d need to add the following code to the AndroidManifest.xml file:

If Android encounters this type of configuration change, it makes a call to the onConfigurationChanged(Configuration) method instead of re-creating the activity:
public void onConfigurationChanged(Configuration config) {
}
You can implement this method to react to the configuration change if you need to.
Or save the current state...
The better way of dealing with configuration changes which you’ll use most often is to save the current state of the activity, and then reinstate it in the onCreate() method of the activity.
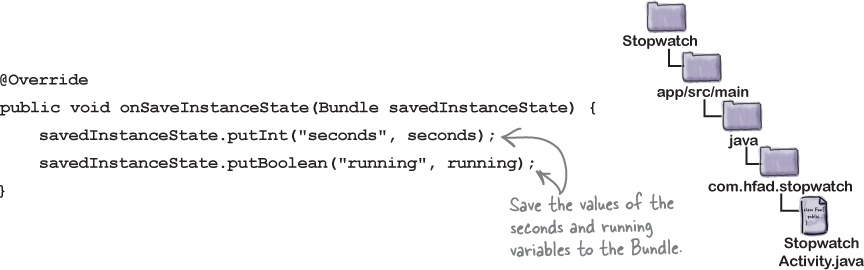
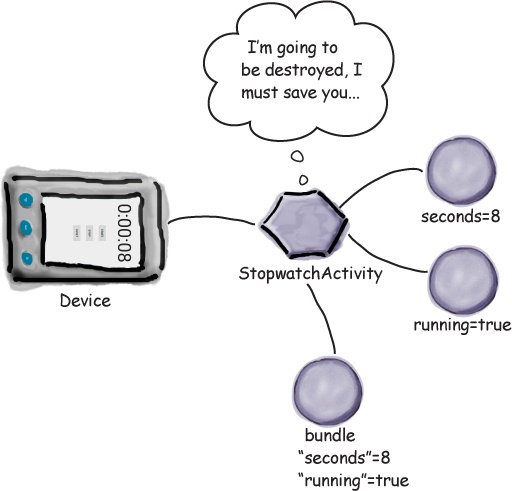
To save the current state of the activity, you need to implement the onSaveInstanceState() method. The onSaveInstanceState() method gets called before the activity gets destroyed, which means you get an opportunity to save any values you want to retain before they get lost.
The onSaveInstanceState() method takes one parameter, a Bundle. A Bundle allows you to gather together different types of data into a single object:
public void onSaveInstanceState(Bundle savedInstanceState) {
}
The onCreate() method gets passed the Bundle as a parameter. This means that if you add the values of the running and seconds variables to the Bundle, the onCreate() method will be able to pick them up when the activity gets recreated. To do this, you use Bundle methods to add name/value pairs to the Bundle. These methods take the form:
bundle.put*("name", value)where bundle is the name of the Bundle, * is the type of value you want to save, and name and value are the name and value of the data. As an example, to add the seconds int value to the Bundle, you’d use:
bundle.putInt("seconds", seconds);You can save multiple name/value pairs of data to the Bundle.
Here’s our onSaveInstanceState() method in full:
Now that we’ve saved our variable values to the Bundle, we can use them in our onCreate() method.
...then restore the state in onCreate()
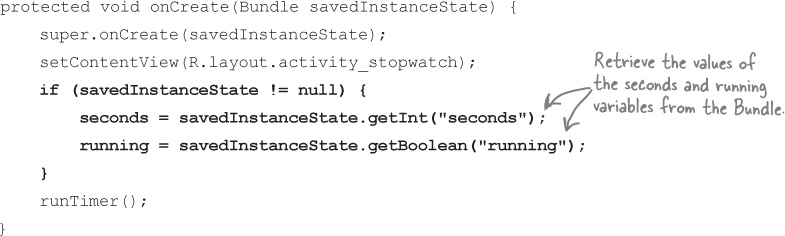
As we said earlier, the onCreate() method takes one parameter, a Bundle. If the activity’s being created from scratch, this parameter will be null. If, however, the activity’s being re-created and there’s been a prior call to onSaveInstanceState(), the Bundle object used by onSaveInstanceState() will get passed to the activity:

protected void onCreate(Bundle savedInstanceState) {
    ...
}
You can get values from Bundle by using methods of the form
bundle.get*("name");where bundle is the name of the Bundle, * is the type of value you want to get, and name is the name of the name/value pair you specified on the previous page. As an example, to get the seconds int value from the Bundle, you’d use:
int seconds = bundle.getInt("seconds");Putting all of this together, here’s what our onCreate() method now looks like:
So how does this work in practice?
What happens when you run the app
The user starts the app, and clicks on the start button to set the stopwatch going.The | |
The user rotates the device.Android views this as a configuration change, and gets ready to destroy the activity. Before the activity is destroyed, |
The story continues
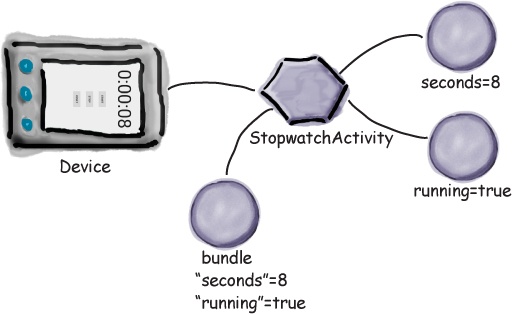
Android destroys the activity, and then re-creates it.The | |
The Bundle contains the values of the seconds and running variables as they were before the activity was destroyed.Code in the | |
The runTimer() method gets called, and the timer picks up where it left off.The stopwatch gets displayed on the device. |

Test drive the app
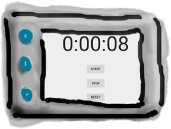
Make the changes to your activity code, then run the app. When you click on the Start button, the timer starts, and it continues when you rotate the device.
There’s more to an activity’s life than create and destroy
So far we’ve looked at the create and destroy parts of the activity lifecycle,and you’ve seen how to deal with configuration changes such as a change in the screen orientation. But there are other events in an activity’s life that you might want to deal with to get the app to behave in the way you want.
As an example, suppose the stopwatch is running and you get a phone call. Even though the stopwatch isn’t visible, it will continue running. But what if you want the stopwatch to stop while it’s hidden, and resume once the app is visible again?
Note
Even if you don’t really want your stopwatch to behave like this, it’s a great excuse to look at more lifecycle methods.
Start, stop, and restart
Fortunately, it’s easy to handle actions that relate to an activity’s visibility if you use the right lifecycle methods. In addition to the onCreate() and onDestroy() methods, which deal with the overall lifecycle of the activity, there are other lifecycle methods that deal with an activity’s visibility.
An activity has a state of stopped if it’s completely hidden by another activity and isn’t visible to the user. The activity still exists in the background and maintains all state information.
There are three key lifecycle methods that deal with when an activity becomes visible or invisible to the user. These methods are onStart(), onStop(), and onRestart(). Just as with onCreate() and onDestroy(), your activity inherits them from the Android Activity class.
onStart() gets called when your activity becomes visible to the user.
onStop() gets called when your activity has stopped being visible to the user. This might be because it’s completely hidden by another activity that’s appeared on top of it, or because the activity is going to be destroyed. If onStop() is called because the activity’s going to be destroyed, onSaveInstanceState() gets called before onStop().
onRestart() gets called after your activity has been made invisible, before it gets made visible again.
We’ll take a closer look at how these fit in with the onCreate() and onDestroy() methods on the next page.
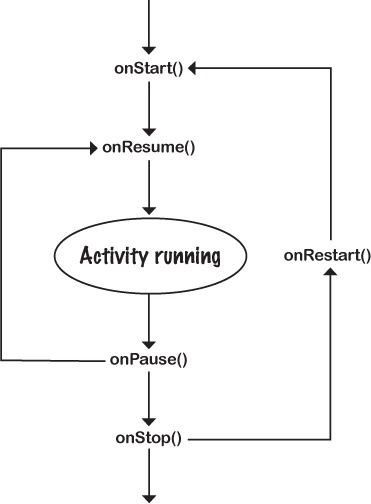
The activity lifecycle: the visible lifetime
Let’s build on the lifecycle diagram you saw earlier in the chapter, this time including the onStart(), onStop(), and onRestart() methods (the bits you need to focus on are in bold):
The activity gets launched, and the onCreate() method runs.
Any activity initialization code in the
onCreate()method runs. At this point, the activity isn’t yet visible, as no call toonStart()has been made.The onStart() method runs after the onCreate() method. It gets called when the activity is about to become visible.
After the
onStart()method has run, the user can see the activity on the screen.The onStop() method runs when the activity stops being visible to the user.
After the
onStop()method has run, the activity is no longer visible.If the activity becomes visible to the user again, the onRestart() method gets called followed by onStart().
The activity may go through this cycle many times if the activity repeatedly becomes invisible and visible again.
Finally, the activity is destroyed.
The
onStop()method will usually get called beforeonDestroy(), but it may get bypassed if the device is extremely low on memory.
We need to implement two more lifecycle methods
There are two things we need to do to update our Stopwatch app. First, we need to implement the activity’s onStop() method so that the stopwatch stops running when the app isn’t visible. Once we’ve done that, we need to implement the onStart() method so that the stopwatch starts again when the app is visible. Let’s start with the onStop() method.

Implement onStop() to stop the timer
You override the onStop() method in the Android Activity class by adding the following method to your activity:
@Override
protected void onStop() {
       super.onStop();
}
Whenever you override one of the Android lifecycle methods, it’s important that you first call up the onStop() method in the superclass using:
super.onStop();There are a couple of reasons for this. First, you need to make sure that the activity gets to perform all of the actions in the superclass lifecycle method. Second, Android will never forgive you if you bypass this step—it will generate an exception.
When you override an activity lifecycle method, you need to call the superclass method. If you don’t, you’ll get an exception.
We need to get the stopwatch to stop when the onStop() method is called. To do this, we need to set the value of the running boolean to false. Here’s the complete method:
@Override
protected void onStop() {
    super.onStop();
    running = false;
}
So now the stopwatch stops when the activity is no longer visible. The next thing we need to do is get the stopwatch to start again when the activity becomes visible.
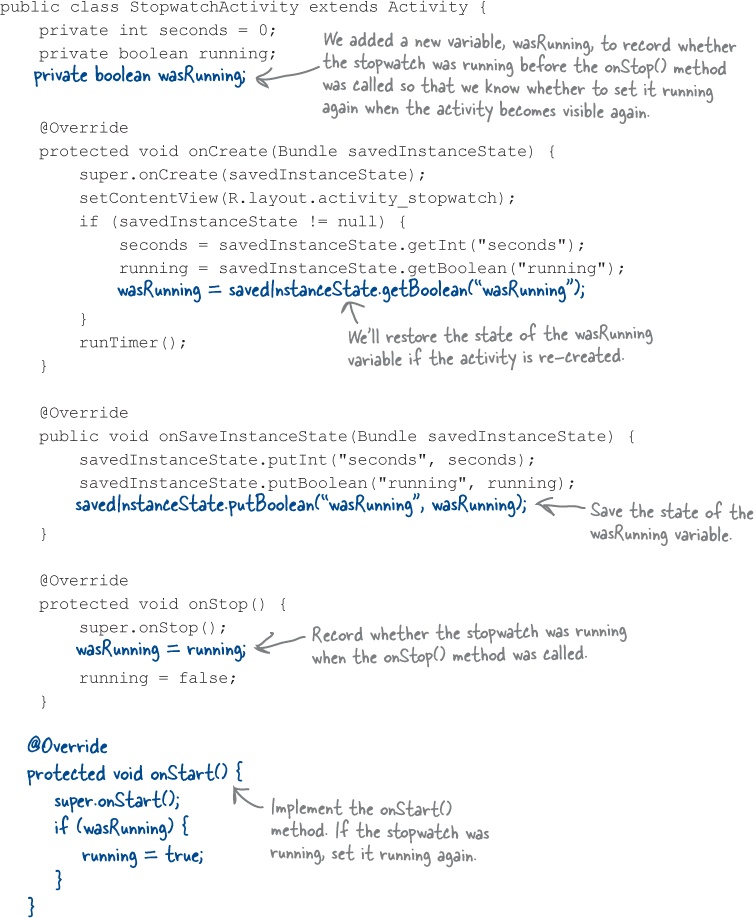
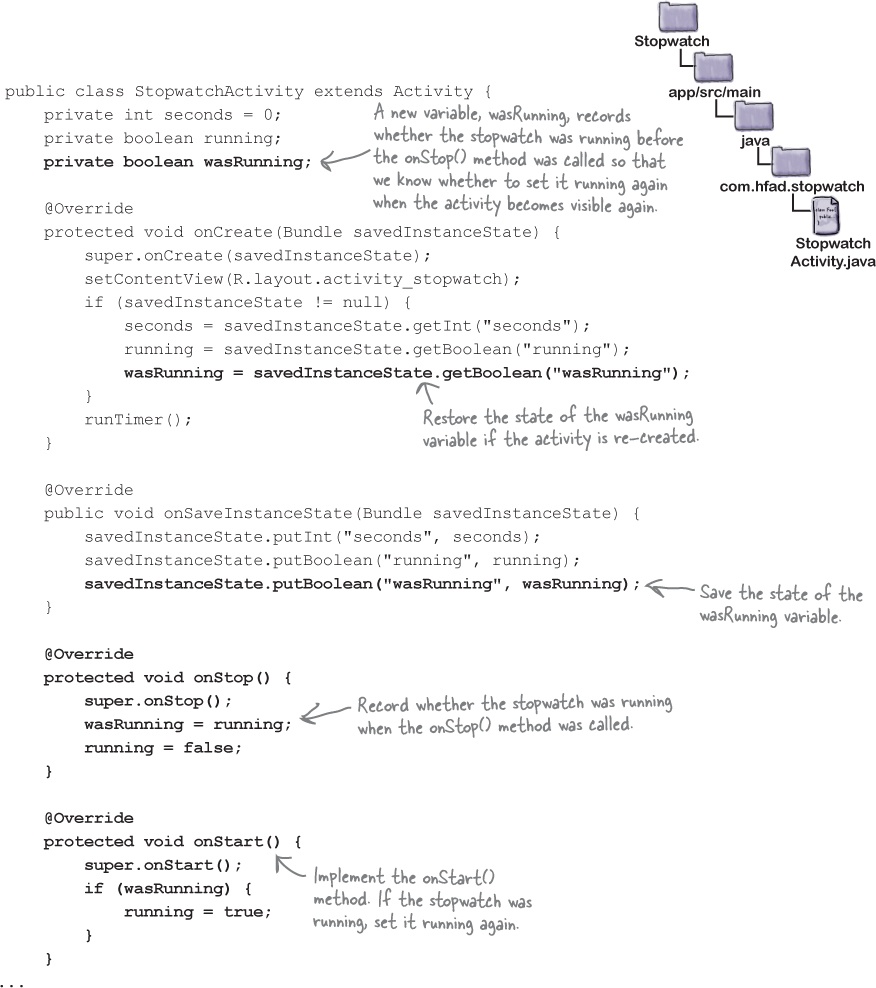
The updated StopwatchActivity code
We updated our activity code so that if the stopwatch was running before it lost the focus, it starts running again when it gets the focus back. Make the changes to your code:
What happens when you run the app
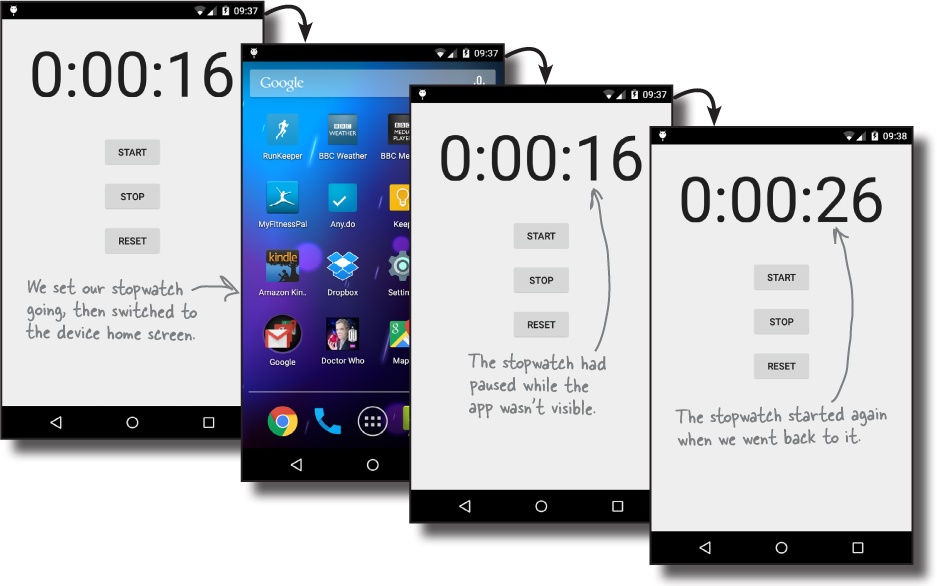
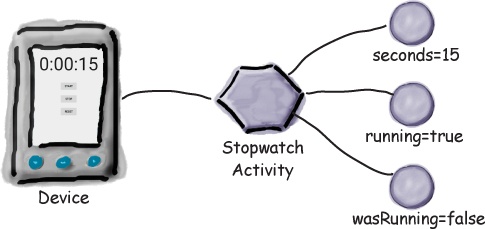
The user starts the app, and clicks the Start button to set the stopwatch going.
The
runTimer()method starts incrementing the number of seconds displayed in thetime_viewtext view.The user navigates to the device home screen so the Stopwatch app is no longer visible.
The
onStop()method gets called,wasRunningis set totrue,runningis set tofalse, and the number of seconds stops incrementing.The user navigates back to the Stopwatch app.
The
onStart()method gets called,runningis set totrue, and the number of seconds starts incrementing again.


Test drive the app
Save the changes to your activity code, then run the app. When you click on the Start button the timer starts, it stops when the app is no longer visible, and it starts again when the app becomes visible again.
But what if an app is only partially visible?
So far you’ve seen what happens when an activity gets created and destroyed, and you’ve also seen what happens when an activity becomes visible, and when it becomes invisible. But there’s one more situation we need to consider: when an activity’s visible but doesn’t have the focus.
When an activity is visible but doesn’t have the focus, the activity is paused. This can happen if another activity appears on top of your activity that isn’t full-size or that’s transparent. The activity on top has the focus, but the one underneath is still visible and is therefore paused.
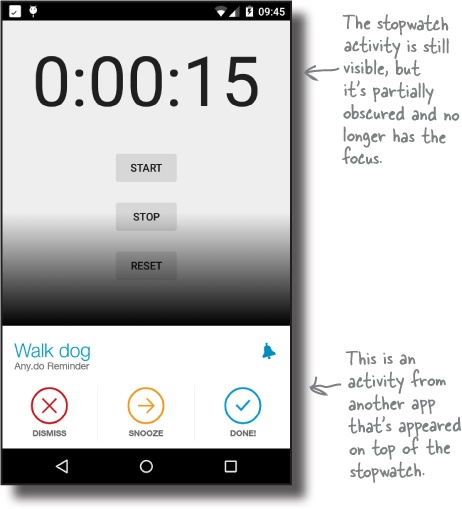
An activity has a state of paused if it’s lost the focus but is still visible to the user. The activity is still alive and maintains all its state information.
There are two lifecycle methods that deal with when the activity is paused and when it becomes active again: onPause() and onResume(). onPause() gets called when your activity is visible but another activity has the focus. onResume() is called immediately before your activity is about to start interacting with the user. If you need your app to react in some way when your activity is paused, you need to implement these methods.
You’ll see on the next page how these methods fit in with the rest of the lifecycle methods you’ve seen so far.
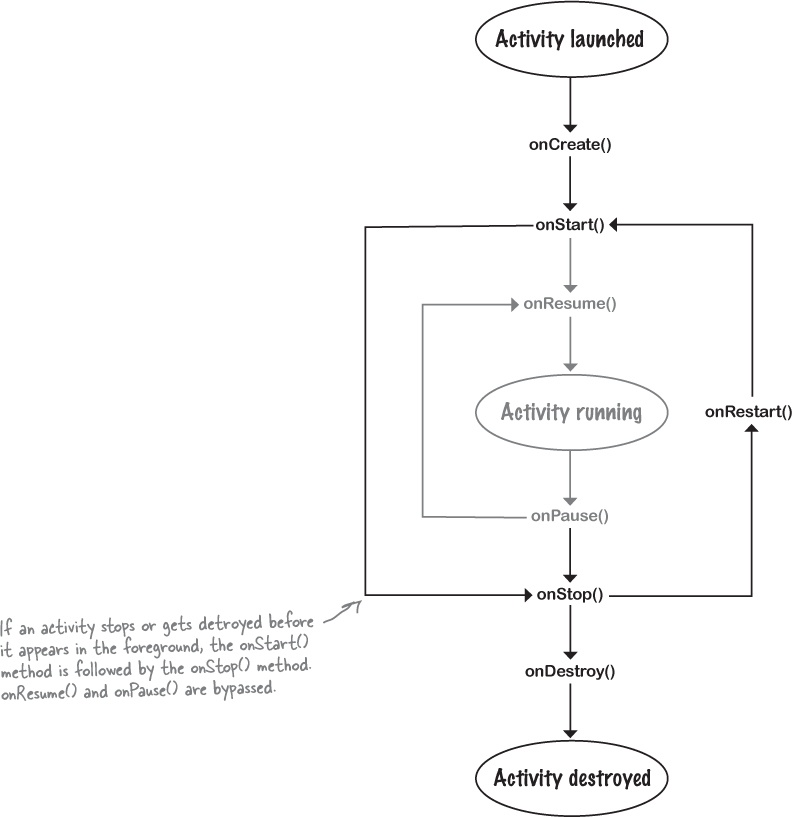
The activity lifecycle: the foreground lifetime
Let’s build on the lifecycle diagram you saw earlier in the chapter, this time including the onResume() and onPause() methods (the new bits are in bold):
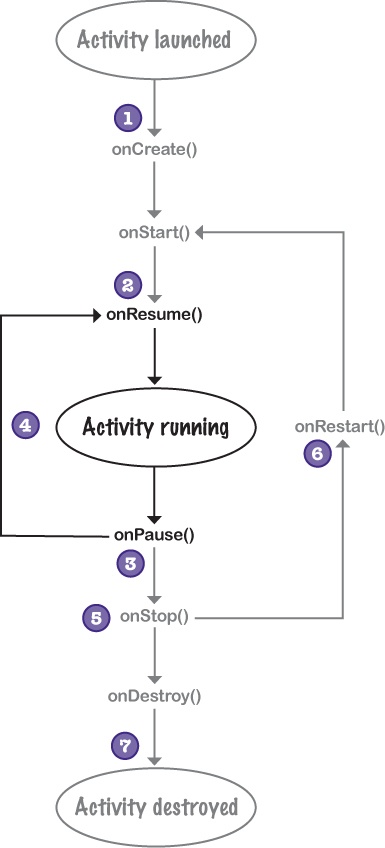
The activity gets launched, and the onCreate() and onStart() methods run.
At this point, the activity is visible, but it doesn’t have the focus.
The onResume() method runs after the onStart() method. It gets called when the activity is about to move into the foreground.
After the
onResume()method has run, the activity has the focus and the user can interact with it.The onPause() method runs when the activity stops being in the foreground.
After the
onPause()method has run, the activity is still visible but doesn’t have the focus.If the activity moves into the foreground again, the onResume() method gets called.
The activity may go through this cycle many times if the activity repeatedly loses and regains the focus.
If the activity stops being visible to the user, the onStop() method gets called.
After the
onStop()method has run, the activity is no longer visible.If the activity becomes visible to the user again, the onRestart() method gets called, followed by onStart() and onResume().
The activity may go through this cycle many times.
Finally, the activity is destroyed.
As the activity moves from running to destroyed, the
onPause()method gets called before the activity is destroyed. TheonStop()method usually gets called too.
That’s a great question, so let’s look at this in more detail before getting back to the Stopwatch app.

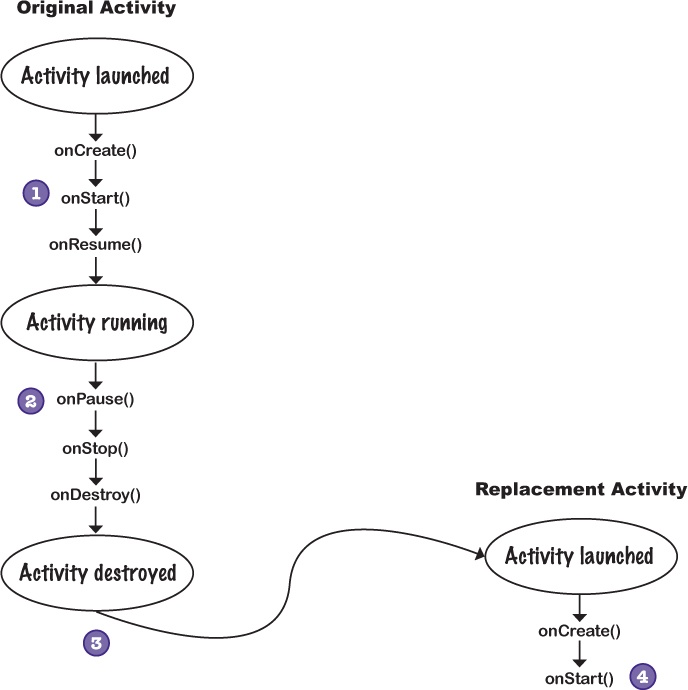
The original activity goes through all its lifecycle methods, from onCreate() to onDestroy(). A new activity is created when the original is destroyed. As this new activity isn’t in the foreground, only the onCreate() and onStart() lifecycle methods get called:
The user launches the activity.
The activity lifecycle methods
onCreate(),onStart(), andonResume()get called.Another activity appears in front of it.
The activity
onPause()method gets called.The user rotates the device.
Android sees this as a configuration change. The
onStop()andonDestroy()methods get called, and Android destroys the activity. A new activity is created in its place.The activity is visible but not in the foreground.
The
onCreate()andonStart()methods get called. As the activity is only visible and doesn’t have the focus,onResume()isn’t called.
Activities can go straight from onStart() to onStop() and bypass onPause() and onResume().
If you have an activity that’s visible, but never in the foreground and never has the focus, the onPause() and onResume() methods never get called.
The onResume() method gets called when the activity appears in the foreground and has the focus. If the activity is only visible behind other activities, the onResume() method doesn’t get called.
Similarly, the onPause() method gets called when the activity is no longer in the foreground. If the activity is never in the foreground, this method won’t get called.
Stop the stopwatch if the activity’s paused
Let’s get back to the Stopwatch app.
So far we’ve made the stopwatch stop if the Stopwatch app isn’t visible, and made it start again when the app becomes visible again. In addition to this, let’s get the stopwatch to stop if the activity is paused, and start again when the activity is resumed. So which lifecycle methods do we need to implement?
The easy answer is that we need to use the onPause() and onResume() methods, but we can take this one step further. We’ll use these methods to replace the calls to onStop() and onStart() that we’ve already implemented. If you look again at the lifecycle diagram, calls are made to onPause() and onResume() in addition to onStop() and onStart() whenever an activity is stopped and started. We’ll use the same methods for both situations as we want the app to behave in the same way.
Here’s our version of the onPause() method:
@Override
protected void onPause() {
    super.onPause();
    wasRunning = running;
    running = false;
}
And here’s the onResume() method:
@Override
protected void onResume() {
    super.onResume();
    if (wasRunning) {
        running = true;
    }
}
So let’s see what happens when we run the app.
What happens when you run the app
The user starts the app, and clicks on the start button to set the stopwatch going.
The
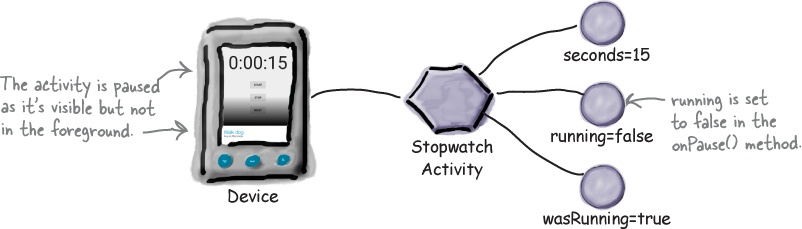
runTimer()method starts incrementing the number of seconds displayed in thetime_viewtext view.Another activity appears in the foreground, leaving StopwatchActivity partially visible.
The
onPause()method gets called,wasRunningis set totrue,runningis set tofalse, and the number of seconds stops incrementing.When StopwatchActivity returns to the foreground, the onResume() method gets called, running is set to true, and the number of seconds starts incrementing again.

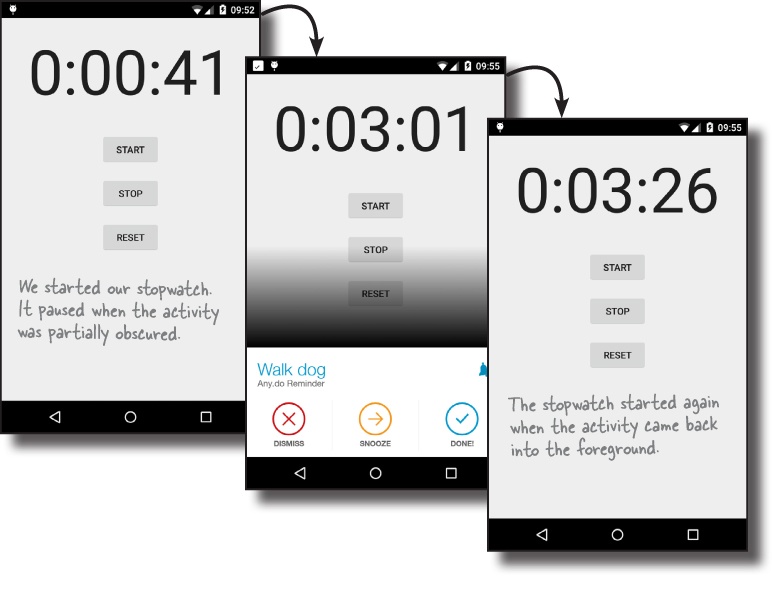
Test drive the app
Save the changes to your activity code, then run the app. When you click on the Start button, the timer starts; it stops when the app is partially obscured by another activity, and it starts again when the app is back in the foreground.
The complete activity code
Here’s the full StopwatchActivity.java code for the finished app:
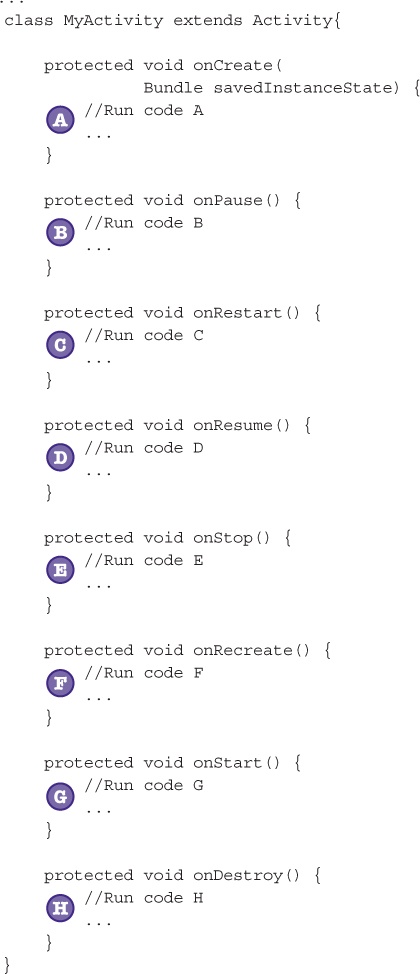
On the right, you’ll see some activity code. Your job is to play like you’re the activity and say which code will run in each of the situations below. We’ve labeled the code we want you to consider. We’ve done the first one to start you off.
User starts the activity and starts using it.
Code segments A, G, D. The activity is created, then it’s made visible, then it receives the focus.
User starts the activity, starts using it, then switches to another app.
User starts the activity, starts using it, rotates the device, switches to another app, then goes back to the activity.
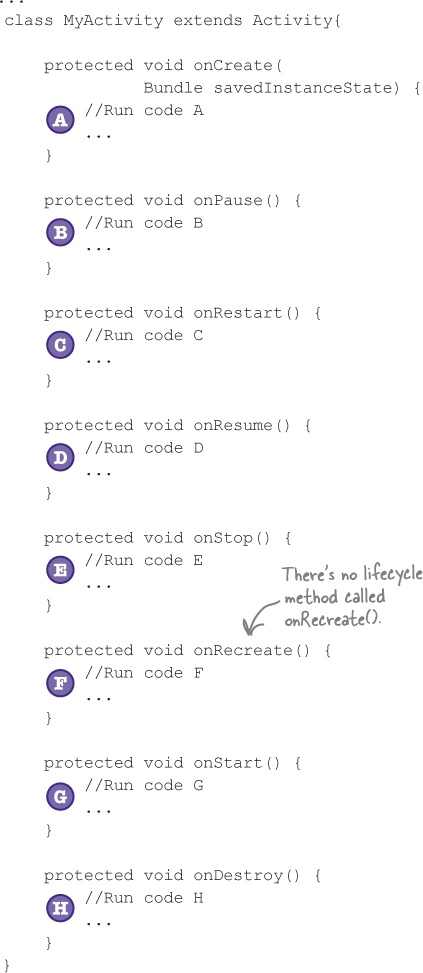
On the right, you’ll see some activity code. Your job is to play like you’re the activity and say which code will run in each of the situations below. We’ve labeled the code we want you to consider. We’ve done the first one to start you off.
User starts the activity and starts using it.
Code segments A, G, D. The activity is created, then it’s made visible, then it receives the focus.
User starts the activity, starts using it, then switches to another app.
Code segments A, G, D, B, E. The activity is created, then it’s made visible and receives the focus. When the user switches to another app, it loses the focus and is no longer visible to the user
User starts the activity, starts using it, rotates the device, switches to another app, then goes back to the activity.
Code segments A, G, D, B, E, H, A, G, D, B, E, C, G, D. First, the activity is created, made visible, and receives the focus. When the device is rotated, the activity loses the focus, stops being visible, and is destroyed. It’s then created again, made visible, and receives the focus. When the user switches to another app and back again, the activity loses the focus, loses visibility, becomes visible again, and regains the focus.
Your handy guide to the lifecycle methods
When it’s called | Next method | |
onCreate() | When the activity is first created. Use it for normal static setup, such as creating views. It also gives you a |
|
onRestart() | When your activity has been stopped just before it gets started again. |
|
onStart() | When your activity is becoming visible. It’s followed by |
|
onResume() | When your activity is in the foreground. |
|
onPause() | When your activity is no longer in the foreground because another activity is resuming. The next activity isn’t resumed until this method finishes, so any code in this method needs to be quick. It’s followed by |
|
onStop() | When the activity is no longer visible. This can be because another activity is covering it, or because the activity’s being destroyed. It’s followed by |
|
onDestroy() | When your activity is about to be destroyed or because the activity is finishing. | None |
Your Android Toolbox
You’ve got Chapter 4 under your belt and now you’ve added the activity lifecycle to your toolbox.
Note
You can download the full code for the chapter from https://tinyurl.com/HeadFirstAndroid.

Get Head First Android Development now with the O’Reilly learning platform.
O’Reilly members experience books, live events, courses curated by job role, and more from O’Reilly and nearly 200 top publishers.

