Chapter 1. Flex and ActionScript Basics
A Flex application consists primarily of code written in two different languages: ActionScript and MXML. In its 3.0 incarnation, ActionScript went from a prototype-based scripting language to a fully object-oriented, strictly typed language. MXML is a markup language that will feel comfortable to anyone who has spent time working with Hypertext Markup Language (HTML), Extensible Markup Language (XML), or a host of newer markup-based languages.
Many newcomers to Flex wonder how MXML and ActionScript relate to one another. The MXML compiler (mxmlc), after parsing through the different idioms, translates them into the same objects, so that this:
<s:Button id="btn" label="My Button" height="100"/>
and this:
var btn:Button = new Button();
btn.label = "My Button";
btn.height = 100;
produce the same object. The major difference is that while creating that object in ActionScript (the second example) creates the button and nothing else, creating the object in MXML adds the button to whatever component contains the MXML code. The Flex Framework handles calling the constructor of the object described in MXML and either adding it to the parent or setting it as a property of the parent.
MXML files can include ActionScript within a <fx:Script> tag, but ActionScript files
cannot include MXML. Although it’s tempting to think of MXML as describing
the appearance and components that make up your application and of
ActionScript as describing the event handlers and custom logic your
application requires, this is not always true. A far better way to think of
their relationship is that both languages ultimately describe the same objects via
different syntax. Certain aspects of the Flash platform cannot be accessed
without using ActionScript loops, function declarations, and conditional
statements, among many other features. Consequently, the use of
ActionScript, and the integration between MXML and ActionScript, is
necessary for all but the very simplest applications.
This chapter discusses many aspects of integrating MXML and ActionScript: creating components in MXML, creating classes in ActionScript, adding event listeners, creating code-behind files by using ActionScript and MXML, and creating function declarations. Although it doesn’t contain all the answers, it will get you started with the basics of ActionScript and MXML.
1.1. Create a Flex Project in Flash Builder
Solution
Use the Create New Project wizard.
Discussion
Flash Builder is built on top of Eclipse, the venerable and well-respected integrated development environment (IDE) most strongly associated with Java development. Although Flash Builder certainly is not necessary for Flex development, it is the premier tool for creating Flex applications and as such, provides a wealth of features to help you design and develop applications more effectively. You can use Flash Builder either as a standalone application or as a plug-in to an existing installation of Eclipse.
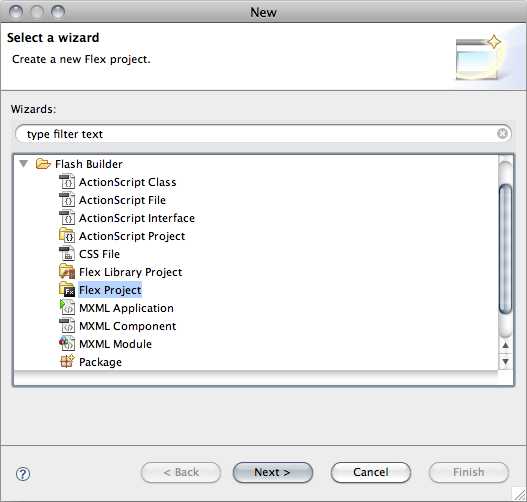
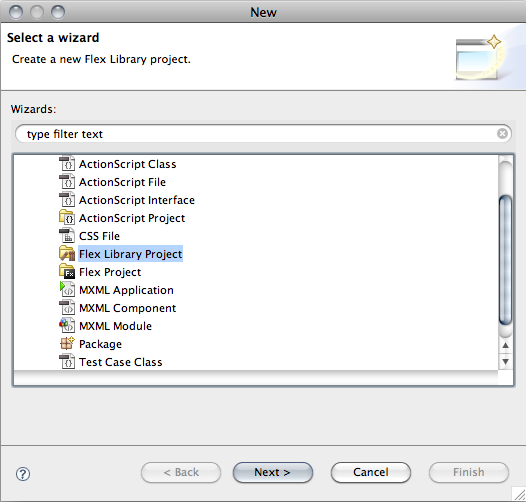
The first thing to do as a Flex developer is to create a new Flex project. A Flex project is different from the other types of projects in Flash Builder because it includes the Flex library SWC (unlike an ActionScript project) and is compiled to a SWF file that can be viewed in the Flash Player (unlike a Flex Library project). To create a project, right-click or Ctrl-click (Mac) in Flash Builder’s project navigator to display the contextual menu (Figure 1-1), or use the File menu at the top of the application. From either, choose New→Flex Project. A dialog box will appear to guide you through creating a project.
When prompted to specify how the project will get its data, choose Basic, which brings you to the New Flex Project dialog box (Figure 1-2).
Enter an application name and, below, a location where the files will be stored on your system. The default location is C:/Documents and Settings/Username/Documents/workspace/Projectname on a Windows machine, and Users/Username/Documents/workspace/Projectname on a Mac. You can, of course, uncheck Use Default Location and store your files wherever you like. The name of the project must be unique. The Application Type section lets you select whether you are making an Adobe Integrated Runtime (AIR) application or an application that will run in a browser via the Flash Player plug-in. Finally, the Server Technology settings let you indicate whether the application will be connecting to a server, and if so, what server type and separate configuration type are needed.
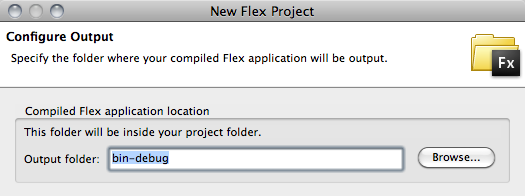
If you have nothing more to add, click Finish. To change the location where the compiled SWF file will be placed, click Next to reach the screen shown in Figure 1-3.
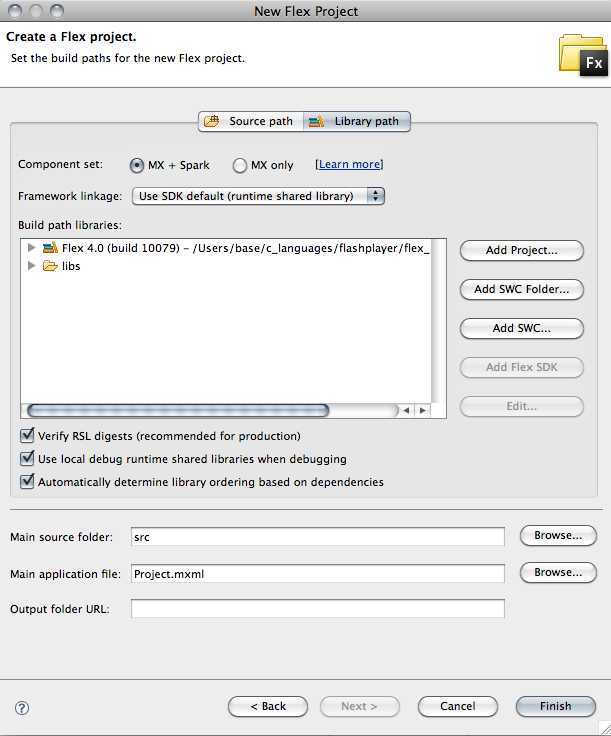
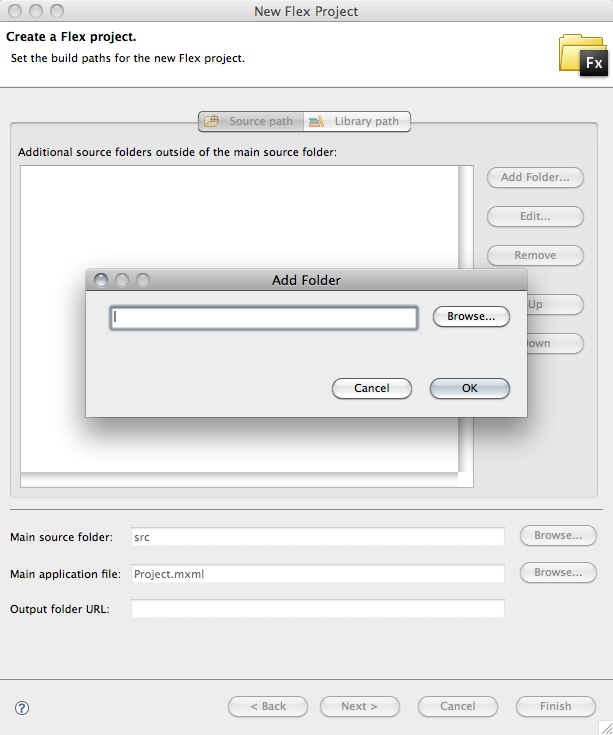
Once you’ve set the location for the generated SWF, you can either click Finish or add source folders or SWC files to the project. To add another folder or set of folders, click the Source Path tab (Figure 1-4). To add SWC files to the project, click the Library Path tab (Figure 1-5). On this screen, you can also change the main MXML application file, which by default has the same name as the project.
With all paths and names specified, click Finish. Your project is now configured, and you are ready to begin development.

1.2. Create a Flex Library Project in Flash Builder
Solution
From the Flex Navigator, choose New Flex Library Project to access the Create New Project wizard.
Discussion
A Flex Library project does not have a main MXML file that is compiled into a SWF. Instead, the project files are compiled into a SWC file that can be used in other applications or as the source for a runtime shared library (usually referred to as an RSL). The classes within the library are used to create a group of assets that can be reused in multiple projects at either compile time or runtime. To create a Flex Library project, right-click or Ctrl-click (Mac) in the Flash Builder’s project navigator to open the contextual menu (Figure 1-6), or use the File menu. In either case, then choose New→Flex Library Project.
In the resulting dialog box (Figure 1-7), specify a name for your project as well as its location.

If you have nothing more to add, click Finish now. If you need to include files, assets, or other SWC files, including the Adobe AIR libraries, click Next and select them from the resulting screen. To set the path to assets or classes that you would like to add to the library, first browse to a source path you would like to include and then specify the classes or graphical assets to compile into the library. Click Finish to create the project.
1.3. Set Compiler Options in Flash Builder
Solution
Set the options for the compiler arguments in the Flex Compiler screen of the Project Properties dialog box.
Discussion
The MXML compiler, also called mxmlc, is the application that compiles ActionScript and MXML files into a SWF file that can be viewed in the Flash Player. When you run or debug a Flex application in Flash Builder, the MXML compiler is invoked and the files are passed to the compiler as an argument to the application. When you debug the player, an argument to create a debug SWF is passed to the MXML compiler. Flash Builder lets you pass other arguments to the compiler, as well; for example, you can pass arguments to specify the location of an external library path, allow the SWF to access local files, or set the color of the background.
To change the compiler settings for a project, right-click or Ctrl-click (Mac) on the project and select Properties from the contextual menu (Figure 1-8), or choose Project→Properties from the menu bar.
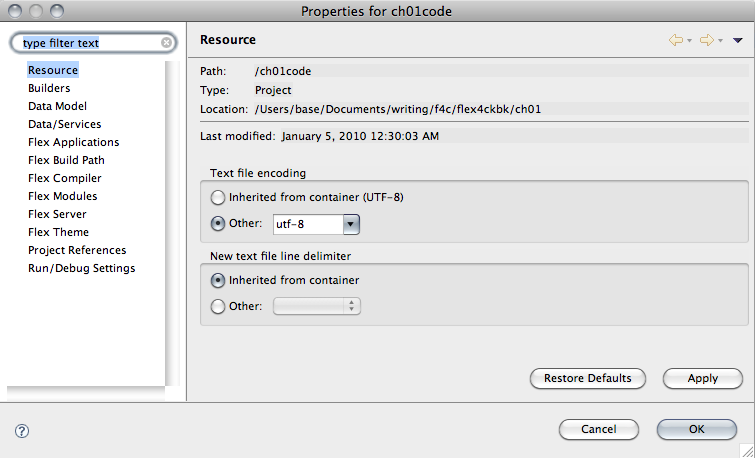
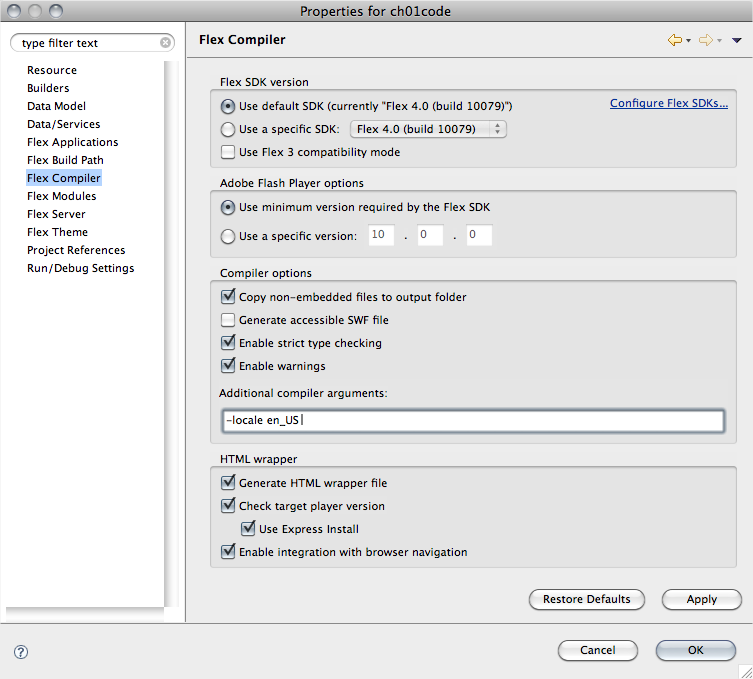
In the resulting Project Properties dialog box (Figure 1-9), select Flex Compiler. Here you have several options to control how the SWF file is compiled. In the input field labeled Additional Compiler Arguments, you can add multiple options; simply type a hyphen (-) in front of each option and separate the options with spaces.
Some of the most commonly used options are as follows:
verbose-stacktracesSpecifies whether the SWF will include line numbers and filenames when a runtime error occurs. This makes the generated SWF larger. Note that a SWF with
verbose-stacktracesenabled is not the same as a debug SWF.source-path path-elementSpecifies directories or files to be added to the source path that contain MXML or ActionScript you want included. You can use wildcards to include all files and subdirectories of a directory. Also, you can use
+=to append the new argument to the default options or any options set in a configuration file. For example:-source-path+=/Users/base/Project
include-librariesSpecifies a SWC file to be compiled into the application and links all the classes and assets in the library into the SWF. This option is useful if the application will load in other modules that may need access to the classes in a SWC that the SWF will not be using.
library-pathSimilar to the
include-librariesoption but includes only classes and assets that are used in the SWF. This lets you keep the size of the SWF file manageable.localeSpecifies a locale to be associated with a SWF file. For example, you can use
-locale=es_ESto specify that the SWF is localized for Spanish.use-networkIndicates whether the SWF will have access to the local filesystem and is intended for use on a local machine, or whether the standard Flash Player security will apply. For example, use
-use-network=falseto specify that the SWF will have local filesystem access but will not be able to use any network services. The default value istrue.frames.frameEnables you to add asset factories that stream in after the application and then publish their interfaces with the
ModuleManagerclass. The advantage of doing this is that the application starts faster than it would have if the assets had been included in the code, but it does not require moving the assets to a external SWF file.keep-all-type-selectorsEnsures that all style information, even if it is not used in the application, is compiled into the SWF. This is important if the application will be loading other components that require style information. The default value is
false, which means that style information not used in the application is not compiled into the SWF.
After setting the options for the compiler, click the Apply button to save the options for that project.
1.4. Compile a Flex Project Without Flash Builder
Discussion
Although Flash Builder is a powerful tool for Flex development, it is certainly not a requirement for creating Flex applications. The MXML compiler (mxmlc) is free to anyone and can be downloaded from the Adobe website. To compile a Flex application outside of Flash Builder, open a command prompt (Windows) or a terminal window (Mac OS X), invoke the MXML compiler, and pass the file containing the application as an argument, using a command such as the following:
home:base$. /Users/base/Flex SDK 4/bin/mxmlc ~/Documents/FlexTest/FlexTest.mxml
This will compile the MXML file into a SWF that by default resides in the folder where the MXML file is located. Any warnings or errors from the compiler will be displayed in the terminal or command-prompt window. To add further options to the MXML compiler, you append arguments to the call to the compiler. For example, this command:
home:base$ ./mxmlc ~/Documents/FlexTest/FlexTest.mxml
-output=/Users/base/test/generated/Index.swf -library-path+=/Users/lib/MyLib.swc
generates a SWF file named Index.swf, places it in the directory at /Users/base/test/generated/, and includes the SWC library /Users/lib/MyLib.swc.
To invoke the MXML compiler directly from the command line without
providing the full path to your SDK installation (which in this example
is C:\flex_sdk_4), you will need to
add the /bin directory the compiler
resides into the Path systems
variable. On a Windows machine, do the following:
Open System from the Control Panel.
Select the Advanced tab.
Click Environment Variables.
Within the System variables grid, navigate to and double-click Path.
In the Variable Value field, if the last character is not set to a semicolon (
;), enter a semicolon and then the path to the /bin folder within your Flex SDK installation directory.With the path to the MXML compiler directory set, open a command prompt, navigate to your project directory, and enter the following command:
C:\Documents\FlexTest>
mxmlc FlexTest.mxmlThis generates the FlexTest.swf file within C:\Documents\FlexTest, just as the first command presented in this section does. Setting the path to the /bin directory of the Flex 4 SDK installation lets you invoke the compiler from any directory, including, in this example, your current project directory.
If step 6 results in the following error message:
Error: could not find JVM
you must manually enter the path to the directory in which the Java Runtime Environment (JRE) is installed on your machine. To manually enter the path, navigate to the /bin directory of your Flex 4 SDK installation, open the jvm.config file in a text editor, and append the path to your JRE installation directory to the variable
java.home. Assuming the Java installation is on the root of your drive, you would enter the following:java.home=C:/Java/jre
On a Linux or Mac box, you would do the following:
Open your .bash_profile file (if you are using Bash) and edit the
PATHvariable, adding the location of the MXML compiler. Your .bash_profile file should look something like this:PATH="${PATH}:~/flex4SDK/bin" export PATHThe .bash_profile file will be located in your home directory (which you can always access via a command line by typing
cd
          ~
). If you are using tsch, the path to the MXML compiler should be added to the .profile file.If the Java runtime is not set properly, set the following
PATHvariable in your terminal shell:PATH="${PATH}:~/flex4SDK/bin" export PATH
Now that you’ve set the path to the Flex compiler, you’re ready to compile your Flex applications from the command line.
1.5. Add an Event Listener in MXML
Problem
You need to add an event listener in MXML that will listen for any events dispatched by children within the MXML file.
Solution
Pass a method name to the event
property of the component either with or without an event object.
Discussion
Flex components dispatch events whenever an action occurs, such as a user clicking a button, the selected item in a combo box changing, or data loading. To listen to these events being broadcast, simply add a reference to a function that will handle the events. For example:
<s:Application xmlns:fx="http://ns.adobe.com/mxml/2009"
               xmlns:s="library://ns.adobe.com/flex/spark">
    <fx:Script>
        <![CDATA[

            private function buttonClick():void {
                trace(" Button has been clicked ");
            }
        ]]>
    </fx:Script>
    <s:Button click="buttonClick()" label="Click Me"/>
</s:Application>
Adding click="buttonClick()"
invokes the function buttonClick()
whenever the button dispatches a click event.
You can also pass the event object itself to the function. Every
time a component dispatches an event, the component sends an object of
type Event that any object listening
to the event can receive. For example:
<s:SkinnableComponent xmlns:fx="http://ns.adobe.com/mxml/2009"
                      xmlns:s="library://ns.adobe.com/flex/spark">

    <fx:Script>
        <![CDATA[
            private function buttonClick(event:Event):void {
                trace(event.target.id);
                if(event.target.id == "buttonOne") {
                    trace(" button one was clicked")
                } else {
                    trace(" button two was clicked");
                }
            }
        ]]>
    </fx:Script>
    <s:Button click="buttonClick(event)"
              label="Click Me One" id="buttonOne"/>
    <s:Button click="buttonClick(event)"
              label="Click Me Two" id="buttonTwo"/>

</s:SkinnableComponent>
By telling the event listener to listen for an object of type
Event, you can have a child component
send the event to the event listener method and then respond to that
event in different ways depending on the type of event, where the event
originated, or data included with the event. In this example, the
response depends on where the event originated.
The event object and the event dispatching system in Flex are some
of the most important things to understand. All events have a type that
is used when those events are being listened for; if an event is of type
click, for example, the
event-listening method will be added to the click event of the child:
<mx:Button click="trace('I was clicked')"/>Notifications about user interactions, messages sent to an application from a server, and timers are all sent via events. The event object defines several properties that you can access in any listening function:
bubblesIndicates whether an event is a bubbling event; that is, whether it will be redispatched from the object that has received it to any listeners further up the event chain.
cancelableIndicates whether the behavior associated with the event can be prevented.
currentTargetIdentifies the object that is actively processing the event object with an event listener.
eventPhaseIdentifies the current phase in the event flow.
TargetSpecifies the event target, which is the object that has dispatched the event.
TypeIndicates the type of event.
You can also write event handlers in the MXML itself by using the
binding tags {} to indicate that the
code inside of the braces should be executed when the event is fired.
For example:
<s:Button click="{textComponent.text = 'You clicked the button'}" label="Click Me"/>
<s:Text id="textComponent"/>
When it compiles this code, the Flex compiler creates a function and then sets this:
textComponent.text = 'You clicked the button'
as the body of that function. It may look different from the previous method, but the end result of this function is the same: it listens for the event and executes its code. There’s nothing inherently wrong with this approach, but for anything more complex than setting a single property, you should use a defined function to make your code easier to read and understand.
1.6. Create Typed Vectors
Problem
You want to store arrays of typed objects to avoid the need for casting when retrieving elements from the arrays.
Solution
Create a Vector and pass the
type of object that it will contain in the declaration and
constructor.
Discussion
ActionScript 3 introduced the Vector type with Flash Player 10. The Vector allows you to create a typed array of
elements that only accepts variables of its declared type and returns
variables of its declared type for any operation that returns a value.
Because you don’t need to cast an object from a Vector to a type when you access it, you can
speed up your applications substantially by using Vectors wherever you’re storing arrays of a
single type of object. To create a Vector containing int variables, for example, you would do the
following:
var vec:Vector.<int>;
vec = new Vector.<int>();
vec.push(1, 2, 3, 4);
Now any operations involving the vec instance will be compiled as though they
were of the type passed to it when it was declared, as shown
here:
var newVariable:int = vec[1] + vec[2]; // no need to cast
var anotherVariable:int = vec.pop();   // again no need to cast
You can also pass an Interface
to the Vector, as shown here:
var interfaceVector:Vector.<IUIComponent>;
However, you cannot pass a Class variable to a Vector:
var clazz:Class = SomeCustomClass;
var classVector:Vector.<clazz>;        // won't compile
The type passed to a Vector
must be known at compile time.
1.7. Use Event Bubbling
Problem
You want to listen for events passed up from child components to parent components without adding a long chain of event listeners.
Solution
Use the event-bubbling mechanism in the Flash Player to listen for events passed up from children.
Discussion
Understanding bubbled events requires looking at several classes.
Several types of events can be bubbled up: mouse-down events, click
events, and keyboard events, among others. The term bubbling
up refers to the event working its way up through the display
list to the application container, like a bubble rising to the surface
through water. When the user clicks on any component, that event is
passed up through the hierarchy. This means that the parent of a
component can listen on that component for a click event, and if one is dispatched, the
parent will be notified. To listen for all events of a certain type
within a child component, the parent simply needs to add an event
listener to that child to receive all bubbled-up events.
Consider this class, defined in BubblingComponent.mxml:
<mx:HBox xmlns:mx="http://www.adobe.com/2006/mxml" width="400" height="200">
    <mx:Script>
        <![CDATA[
            private function sendClick():void {
                trace(" BubblingComponent:: click ");
            }
        ]]>
    </mx:Script>
    <mx:Button click="sendClick()"/>
</mx:HBox>
This component contains a button that will dispatch a click event up the display list to any
component that contains an instance of BubblingComponent. To listen to this event,
use the click handler in a component that contains BubblingComponent:
<cookbook:BubblingComponent click="handleClick()" id="bubbler"/>
A BubblingHolder that contains
a BubblingComponent could be defined
as shown in the following code snippet:
<mx:Canvas xmlns:mx="http://www.adobe.com/2006/mxml"
           width="400" height="300" xmlns:cookbook="oreilly.cookbook.*"
           creationComplete="complete()">
    <mx:Script>
        <![CDATA[
            private function handleClick():void {
                trace(" BubblingComponentHolder:: click ");
            }
        ]]>
    </mx:Script>
    <cookbook:BubblingComponent click="handleClick()" id="bubbler"/>
</mx:Canvas>
This component will dispatch an event up to any component
listening. When you add the BubblingHolder to the main application
file:
<mx:Application xmlns:mx="http://www.adobe.com/2006/mxml"
                layout="vertical" xmlns:cookbook="oreilly.cookbook.*">
    <mx:Script>
        <![CDATA[
            public function createName():void {
                name = "Flex Cookbook";
            }
        ]]>
    </mx:Script>
    <cookbook:BubblingComponentHolder click="createName()"/>
</mx:Application>
the click event from BubblingComponent.mxml will be broadcast all
the way up to the application level.
The sequence of events in a MouseEvent sends information about the event,
such as a click and its location, up the display list through all the
children, to the child that should receive the event, and then back down
the display list to the stage.
The stage detects the MouseEvent and passes it down the display list
until it finds the target of the event—that is, the last component that
the user’s mouse was interacting with. This is called the
capturing phase. Next, the event handlers within
the target of the event are triggered. This is called the
targeting phase, when the event is given an actual
target. Finally, the bubbling phase occurs, sending
the event back up the display list to any interested listeners, all the
way back to the stage.
1.8. Use Custom Events and Dispatch Data with Events
Solution
Create a class that extends the flash.events.Event class and create a property
for the data that you would like to be available from the
event.
Discussion
At times, you may need to dispatch data objects with events,
enabling listeners to access that data without accessing the objects
that dispatched the events. Renderers or deeply nested objects that are
dispatching events up through multiple components to listeners will
frequently want to send data without requiring the listening component
to find the object and access a property. As a solution, create an event
type and add any data types that you need to include with the event to
the constructor of the event. Remember to call the super() method of the Event class so that the Event object is properly instantiated. For
example:
package oreilly.cookbook {
    import flash.events.Event;

    public class CustomPersonEvent extends Event {

        public var person:Person;
        public var timeChanged:String;

        public function CustomPersonEvent(type:String, bubbles:Boolean=false,
                                          cancelable:Boolean=false,
                                          personValue:Person=null,
                                          timeValue:String="") {
            super(type, bubbles, cancelable);
            person = personValue;
            timeChanged = timeValue;
        }

        override public function clone():Event {
            return new CustomPersonEvent(type, bubbles, cancelable, personValue,
                                         timeValue);
        }
    }
}
In this custom Event class, the
inherited Event.clone() method is
overridden so that the CustomPersonEvent can duplicate itself. If an
event listener attempts to redispatch this custom event, as shown
here:
private function customPersonHandler(event:CustomPersonEvent):void {
    dispatchEvent(event);
}
the event that is dispatched will not be the event that is
received; instead, it will be a copy of the CustomPersonEvent created using the clone() method. This is done inside the
flash.events.EventDispatcher class.
If the clone() method is not
overridden to ensure that all properties of the CustomPersonEvent are carried into a clone of
itself, the event returned from the clone will be of type flash.events.Event and will not have any
properties of the CustomPersonEvent.
1.9. Listen for a Keyboard Event
Problem
You need to listen for the user pressing a key, determine which key was pressed, and handle the event accordingly.
Solution
Add an event listener for the keyDown event either on the component or on
the stage of the application and read the KeyboardEvents keyCode property.
Discussion
To listen for a KeyboardEvent,
use the keyDown event handler, which
all classes that extend UIComponent
possess. The KeyboardEvent class
defines a keyCode property that
contains the code for the key that the user pressed. That keyCode property is the ASCII representation
of the character (ASCII is a standard that defines a mapping of
characters to integers). For example:
<mx:HBox xmlns:mx="http://www.adobe.com/2006/mxml"
         width="400" height="300" keyDown="keyHandler(event)"
         backgroundColor="#0000ff">
    <mx:Script>
        <![CDATA[

            import flash.events.KeyboardEvent;

            private function keyHandler(event:KeyboardEvent):void {
                switch(event.keyCode) {
                    case 13:
                        trace(" Enter pressed ");
                    break;
                    case 32:
                        trace(" Space Bar pressed ");
                    break;
                    case 16:
                        trace(" Shift Key pressed ");
                    break;
                    case 112:
                        trace(" F1 pressed ");
                    break;
                    case 8:
                        trace(" Delete pressed ");
                    break;
                }
            }

        ]]>
    </mx:Script>
    <mx:Button label="One"/>
</mx:HBox>
A note about this component: it will listen only for events that
occur while the button has focus. If you remove the button from this
component, there is nothing left that can have focus, and the keyHandler() function will never be called. To
catch every KeyEvent that occurs in the application,
whether or not the component has focus, add the following to the opening
tag of the component:
addedToStage="stage.addEventListener(KeyboardEvent.KEY_DOWN, keyHandler)"
This ensures that the keyHandler() method will handle each KeyEvent that the stage catches—i.e., all of
them.
1.10. Define Optional Parameters for Methods
Problem
You want to define methods for a parameter that have default values or null values so that those values do not always need to be passed.
Solution
Specify default values or null values in the method declaration by
setting the parameter equal to a default value or equal to null.
Discussion
To define one or more optional parameters for a method, simply set
the default value of an object to null in the signature of the event. The
ActionScript primitives String,
Number, int, and Boolean cannot be null values, however; you
must supply default values for these. For example:
public function optionalArgumentFunction(value:Object, string:String,
        count:int = 0, otherValue:Object = null):void {
    if(count != 0) {
        // if the count is not the default value, handle the value the
        // call passes in
    }
    if(otherValue != null) {
        // if the otherValue is not null, handle the value the call
        // passes in
     }
}
Another strategy for providing not only optional parameters to the
method but also an indeterminate number of arguments is to use the
... or rest operator in front of a variable name. For
instance, to pass an undefined number of arguments to a method, you
would define the method as shown here:
public function restMethod(...rest):void {
    trace(" here is the number of arguments passed "+rest.length);
}
To use the rest operator with
defined parameters, simply put the defined parameters first and the
rest operator after, as shown
here:
public function restMethod(number:int, name:string, ...rest):void {
    trace(" here is the number of arguments passed "+rest.length);
}
1.11. Define and Implement an Interface
Solution
Create an ActionScript file, declare that file as an Interface, and define any methods you would like the interface to
require. To implement the interface, use the implements keyword in the class
declaration of the component that will use the interface.
Discussion
Interfaces are powerful tools that let you describe a contract that an object must fulfill. The interface must contain a specified set of methods with a certain scope, name, parameters, and return type; components using the object, in turn, will expect this set of methods to be present. This lets you create lightweight descriptions of a class without actually creating a new class that clutters your inheritance trees. Classes that implement an interface are considered to be of that interface type. This can be used to set the types for parameters of methods or to set the return types of methods, as shown here:
public function pay(payment:IPaymentType):IReceipt
This method can accept any object that implements IPaymentType and will return an object that
implements the IReceipt
interface.
The interface cannot define the method body, nor can it define any
variable. In the following code snippet, IDataInterface is declared and defines five
methods that any object that implements the interface must also possess
and define:
package oreilly.cookbook {
    public interface IDataInterface {
        function set dataType(value:Object):void;
        function get dataType():Object;
        function update():Boolean;
        function write():Boolean;
        function readData():Object;
    }
}
To implement the interface, declare the class and add the implements marker to the class declaration.
All methods defined in an Interface
must be implemented by the class. In the following code snippet, all the
methods of the preceding interface are included and are given function
bodies:
package oreilly.cookbook {
    import flash.events.EventDispatcher;
    import flash.events.IEventDispatcher;

    public class ClientData extends EventDispatcher implements IDataInterface {

        private var _dataType:Object;

        public function ClientData(target:IEventDispatcher=null) {
            super(target);
        }

        public function set dataType(value:Object):void {
            _dataType = value;
        }

        public function get dataType():Object {
            return _dataType;
        }

        public function update():Boolean {
            // do the actual updating
            var updateSuccessful:Boolean;
            if(updateSuccessful) {
                return true;
            } else {
                return false;
            }
        }

        public function write():Boolean {
            var writeSuccess:Boolean;
            if(writeSuccess) {
                return true;
            } else {
                return false;
            }
        }

        public function readData():Object {
            var data:Object;
            // get all the data we need
            return data;
        }
    }
}
To implement an interface in MXML, use implements in the top-level tag for the
component. For example:
<mx:HBox xmlns:mx="http://www.adobe.com/2006/mxml"
         width="400" height="300" implements= "IDataInterface">
1.12. Access the Parent of a Flex Component
Problem
You want to access either the immediate parent of a component or the parent application of a component.
Solution
Use the parentDocument property
of the UIComponent to access the
parent of a component, the parentApplication property to access the first
Application that a component is
contained within, and FlexGlobals.topLevelApplication to access the
top-level application in the
hierarchy of a Flex application.
Discussion
A Flex component can be nested within many different parent
components, and also within multiple applications. In previous versions
of Flex, developers would often access the parent application by using
Application.application to return a
reference to the main application. In Flex 4, you should use either the
parentApplication property that all
UIComponents define to access the
application that a particular component is
loaded into, or the FlexGlobals.topLevelApplication to access the
top-most application.
Figure 1-10 shows how a Button could access the various parent
components within which it is nested.

Note that the parentDocument
and the parent of a UIComponent are
different. For instance, a Button
within a list may have a SkinnableContainer as its parent, but a
List as its parentDocument. It’s generally better practice
to dispatch a custom event to the parent than to attempt to access it
using a reference. This ensures that components you’re building will be
portable to multiple parent types and reduces dependencies throughout
your application.
Get Flex 4 Cookbook now with the O’Reilly learning platform.
O’Reilly members experience books, live events, courses curated by job role, and more from O’Reilly and nearly 200 top publishers.

