The ever-helpful status area tells you what layout you’re on and lets you switch to another one. The Layout pop-up menu (Figure 4-3) is one of the most prominent elements of the status area. You can also see the same list of layouts in the View → “Go to Layout” menu.
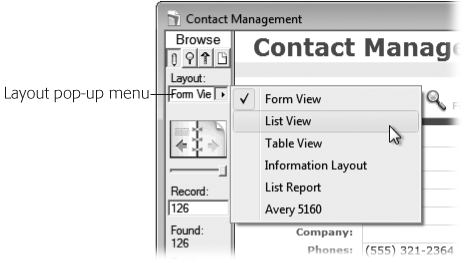
Figure 4-3. In the status area, click the Layout pop-up menu to see a list of layouts in the database. To switch to a layout, choose it from the list. The Layout pop-up menu also shows you which layout you’re using when you haven’t clicked it.
Note
The Layout pop-up menu doesn’t necessarily show every layout. You can actually tell FileMaker to hide certain layout names in this menu. You’ll learn how on Layout name.
Your People database has only one layout, making for a poor demonstration. To get a feel for how layouts work, you can use the Contact Management database instead (you created this database from a template in Chapter 1).
Open the Contact Management database.
If you need a sample database to play with, you can find it on the “Missing CD” page (www.missingmanuals.com/cds), complete with sample data.
If the status area isn’t showing, click the status area control to show it.
You now see the status area. (The status area control is explained back in Figure 1-2.)
From the Layout pop-up menu, choose List View.
Now that you finally understand the difference between layouts and views, the silly database has the nerve to name a layout “List View.” Remain calm: The name just happens to be the best way to describe the layout (at least the developer thought so), because this layout is a list and it’s displayed in list view.
The List View layout shows in the window. FileMaker remembers which view you last used with each layout.
Since the layout affects only how the data shows, your found set and current record stay consistent as you change layouts. The following two steps show how this layout works.
From the List View layout, use the status area’s book icon to switch to another record.
Since you are viewing this layout as a list, as you change records, the little black line along the left edge of the window moves, as explained on Form View.
From the Layout pop-up menu, choose Form – Main Address.
You’re now viewing details of the record you selected when in list view. In other words, FileMaker stayed on the same record while you switched layouts.
Likewise, if you do a find on the Form – Main Address layout, and then switch to the List View layout, you’ll see just the found records in the list. Since FileMaker is all about making all your data easy to see, search, print, and otherwise use, switching among various layouts is a big part of the game.
Note
As you spend more time with your own databases, you’ll probably discover that you switch layouts a lot. You may decide all those trips to the tiny Layout pop-up menu are slowing you down. That’s why most databases (the Contact Management template included) use buttons to make layout switching faster.
In Chapter 1, you learned how to click the tab graphics to switch between viewing record details, a list, or a table (see Adding More Records). Now you know these tabs simply switch between three distinct layouts. You too can create buttons to switch between layouts, and you’ll learn how in Chapter 6.
Get FileMaker Pro 9: The Missing Manual now with the O’Reilly learning platform.
O’Reilly members experience books, live events, courses curated by job role, and more from O’Reilly and nearly 200 top publishers.

