Chapter 4. System Administration
In a way, this entire book revolves around system administration. The details, processes, and infrastructures that make up Mac OS X Server are documented—hopefully to a depth that can’t be found elsewhere—specifically to enable their secure and robust management. System administration, however, is a topic of a much greater depth, and moves well beyond a mechanical understanding of how various pieces fit together, into a set of philosophies and best practices that pervade and are consistent among most aspects of the system. This chapter concerns those philosophies and trends, throwing in a few mechanical tidbits for good measure. In keeping with the spirit of this book thus far, we will examine those components specifically in the light of Mac OS X Server, especially where that differs from the practices and philosophies around other operating systems.
Tip
Note also that these are my opinions and are, in many cases, assertions of the worst kind, with very little data presented behind them. Take them as you will, and where time and budget allow, data will be presented.
Philosophies
Most academic disciplines develop heuristics, or ways of thinking about certain types of problems. System administration (and IT in general), although it has not been widely examined in an academic context, is no different, having developed some common approaches in its young history. While these approaches are not necessarily specific to Mac OS X, and while I hope they are illustrated throughout this book, it does make sense to call at least some of them out here. Remember that there are no hard and fast, black and white rules. These are guidelines that have proven productive in many environments. This does not necessarily mean they will be applicable to yours—only that the possibility deserves analysis.
Minimize Intrusion into Existing Infrastructures
Infrastructure is developed to support certain functionality, and in general, several applications might rely on a single infrastructure element. Few applications, for instance, are useful at any scale without properly configured routing. Similarly, many separate applications (desktop logins, in-house web applications, file servers, and mail delivery, to name a few) might depend on an available and properly functioning directory server, and certain DNS conventions might be established to minimize discrepancies when managing certain classes of devices. The list is really endless. The point is that organizations develop interlocking and centralized systems in order to support other systems that meet their business goals. Significant resources are often invested into development of such environments, and systems being introduced into any organization should seek to fit in as seamlessly as feasible, interrupting as little as possible.
This is particularly the case where Apple technologies are concerned. Mac OS X has paved the way for acceptance into many environments that Apple previously could not have considered. The Macintosh is, however, still a minority platform, and it makes little sense when working to gain acceptance somewhere to ask that organization to make fundamental infrastructure changes in order to support the Mac. Such changes, because they are made to centralized, enterprise systems, are costly, and if it is costly to bring Apple technologies into an infrastructure, then those technologies have a quickly diminishing likelihood of adoption.
With Mac OS X, Apple has steadily become more friendly to such infrastructures, and has, once market realities became apparent, engineered non-intrusive solutions into the OS. Some great examples of this include:
- Panther’s Active Directory plug-in
Active Directory, like nearly any directory service, fits clearly into the mold of one of those expensive, central pieces of infrastructure. Jaguar’s methods for integrating Mac OS X into Active Directory, however, were often difficult to say the least, and were, when supporting a really good user experience, extremely intrusive. They often required fundamental changes to the active directory schema, and LDAP queries to the Active Directory tended to be insecure, since they did not use Kerberized LDAP like Windows clients did. In Panther, however, Apple specifically engineered a solution to work with Active Directory. At least where AD integration is concerned, Panther acts as much like a Windows client as is technically feasible. This is one definition of non-intrusive.
- Use of the .local DNS namespace
As discussed briefly in Chapter 1, when Apple initially introduced Rendezvous, its implementation of the Zeroconf standard, they architected the operating system so that all DNS queries to the .local namespace were dispatched to multicast DNS. Since .local was widely used by some of Apple’s largest customers for standard (nonmulticast) DNS, this effect was problematic, to say the least. With Panther, though, Apple engineered a mechanism (also detailed in Chapter 1) for supporting alternate query mechanisms for a particular namespace, allowing Rendezvous and enterprise .local implementation to coexist.
In both of these cases, Apple was confronted with significant interoperability issues and overcame them by crafting solutions that were less intrusive in nature. Systems engineered by you as a Mac OS X system administrator should take this same approach, striving to fit in, rather than stand out.
Warning
Apple certainly isn’t perfect and has only recently begun to embrace heterogeneous, non-intrusive solutions to this extent. Both of these cases got off to a slow start. Only later, after quite a bit of customer feedback, were they remedied. You most likely do not have the same luxury, and should work to ensure that your systems integrate as seamlessly as feasible.
Focus on the Needs and Business of Your Organization
Management at the head of IT infrastructures all too often tends to consist of IT experts, and not necessarily personnel with a background in the core competency of the organization in question. IT should further the needs of the organization it supports, and not necessarily the needs of IT. This lesson, while painful, is best learned early. (Curriculum developers, not server administrators, best understand the subtleties of an educational environment.) This is not to say that organizational personnel should run rampant over IT, but merely that IT should build its systems in a way that best supports the business goals of the organization. Information technology is not an island, and IT systems should help bring users closer to their professional goals and responsibilities.
Default Policy of Denial
One of the primary aspects of information technology is controlling access to resources—to files on the filesystem, to resources shared out over network protocols like HTTP and AFP or to data stored in (for instance) an LDAP directory. Every new system, however, increases complexity and decreases security of an overall infrastructure. A sane strategy, therefore, minimizes access points into any infrastructure, and supports only services required to support institutional goals. A financial organization, for instance, might not need to permit instant messaging. Similarly, services should not be enabled on the server side unless they are specifically needed. Each service, no matter how well protected and secure, is another point of entry into the system on which it is hosted (and potentially every other system in that organization). Every door built into a wall reduces the capability of that wall. Doors and walls operate towards opposite ends.
Mac OS X Server provides a lot of temptation along these lines. Interesting services like QuickTime Streaming are a click away and easy to manage. I can’t stress enough, though, the need for regression testing against existing systems and a sufficiently thorough incubation period on a protected host that is accessible neither to the Internet in general nor to most other organizational hosts (since malicious intent most often arises in-house). New services should be deployed only after guidelines have been developed and justifications researched, and every new system should specifically support organizational goals.
Minimize Change, Maximize Stability
Apple supports a very feature-driven ecosystem. Much of Apple’s market appeal revolves around the next big thing, the next Macworld keynote, or some surprise mid-quarter product announcement. This trend, however, doesn’t necessarily exist for the benefit of information technology, and long-term, stable systems can be made difficult to maintain by the introduction of new elements and the frequency with which Apple enjoys surprising the world.
IT systems traditionally change only when such a change can be cost justified—when the benefits of change outweigh the costs. More often than not, this means the end of a vendor support cycle, or with the addition of a truly beneficial feature. My web server, though, still runs Jaguar, mainly because I’ve pursued several such upgrades for clients, and right now do not perceive the cost associated with porting, testing, and deployment of my web applications to be justified. Apple still issues security updates for Jaguar, and the server itself is specialized enough in purpose that none of Panther’s features really appeal to me. Stable systems tend to be appreciated more than the newest feature, and at any rate, unstable and unavailable systems are far more likely to gather notice than a flashy new service.
Change to any infrastructure component—version update, feature addition, or bug fix—should be undertaken in a careful manner, bearing in mind and testing its impact on existing systems. At its most careful, this policy entails a rigorous set of processes that should be documented and adhered to for best results. Of course not every system at every scale demands this attention, but the point is that nearly any infrastructure modification can benefit from a little more structure.
Testing
The first step in making any particular change is testing. This examination, always in a nonproduction environment, often occurs in a bench area or at the desk of IT personnel. It ensures that the basic functionality of the system in question is ready for serious analysis. Testing results should be used to generate metrics for upcoming pilots, helping to determine when a pilot should be considered successful (or unsuccessful).
Pilot
Piloting involves a very limited deployment of some new infrastructure component. Pilots should include specific and measurable criteria for success, and should be used to generate plans for further deployment. Target audiences for pilots should be carefully chosen, since the systems in question are, by definition, untested. When rolling out a new image or OS release to a lab, for instance, a pilot of only a few machines (10 percent is a good number) should be first undertaken. Similarly, I often advocate isolation of IT personnel resources onto a specific server, so that it may be upgraded before other production machines. Living on a technology before general deployment allows for a familiarity that is not otherwise feasible. This familiarity, in turn, dramatically increases the likelihood of a successful rollout. Regardless of the circumstances, the pilot should be closely monitored so that the resulting data may be effectively used.
Staging
Once pilots have proven successful, deployment can be undertaken—hopefully in the context of the combined knowledge from testing and piloting. Rather than an immediate, full-scale deployment, however, this generally means deployment in stages, or waves. Staged deployment permits a more careful process, with each stage garnering more and more institutional knowledge of the system in question. As a general rule, I prefer stages of 30 to 50%, resulting in two or three stages per deployment.
Deployment and monitoring
Once a system is fully deployed, it should be continuously monitored, letting youbuild knowledge and prepare for its next revision or update.
Obviously, knowledge building, monitoring, and systematic testing are stressed at each point in the deployment process. The point is to be careful, to be conservative in the management of important architectures, and to carefully document the deployment process.
System Management
This section of the chapter delves into specific features and options available to support the services available in Mac OS X Server. While none fit into a specific existing chapter, all are important to day-to-day server management. These fundamental features affect the overall health of the server rather than supporting specific systems. Managing them correctly helps to support the conceptual elements outlined previously, and it is hoped, will result in a healthier server.
Software Updates
One challenge of server management common to nearly any organization or platform is that of software updates . Vendors release updated software versions, and even subtle changes in functionality or feature set can adversely affect established support infrastructures. Worse yet are new bugs, introduced unknowingly into new software versions. Either case may result in considerable downtime and lost revenue. A careful balance must be struck between secure, up-to-date software and stable, predictable systems. A careful analysis reveals three distinct phenomena in this area: major updates, like the one from 10.2 (Jaguar) to 10.3 (Panther); minor revisions, such as the one from 10.3.4 to 10.3.5, and Security Updates, issued to counter specific vulnerabilities in specific OS versions.
Apple includes a variety of mechanisms for accessing both minor OS versions and security updates via their Software Update infrastructure. (Generally, major OS revisions must be purchased.) Update lists are available from pre-established hosts (http://swscan.apple.com and http://swquery.apple.com), while the updates themselves are usually outsourced to companies that specialize in high-bandwidth downloads, like Akamai and AT&T. All activity—software scans and downloads—occur over port 80. Updates themselves are cryptographically signed so that bogus updates—from DNS spoofing, compromised DHCP, or any other malicious source—may be discarded. Apple includes three tools designed to help keep Mac OS X Server up-to-date:
Command-line: Most comfortable to long-time system administrators and most friendly to managed or scripted environments is the softwareupdate command-line tool. Requiring root privileges, it supports all of the features of the graphical tool (discussed later) accessible in System Preferences. Although it has an accurate and well-developed manpage, many of its common options are listed in Table 4-1.
Option | Description |
-l, --list | List available updates. |
-i --install | Install a particular update. Can be coupled with the -- a flag to install all available updates or with the -- r flag to install only required updates. Automated installation is generally not recommended, for reasons enumerated earlier. |
---ignored | Add specific updates to the ignored list. For more details, consult the manpage. |
-d | Download updates but do not install them. Not mentioned in the manpage (as of 10.3.5), this is an extremely useful option, allowing for offline analysis of proposed updates. |
Example 4-1 is a simple shell script that checks for available updates, and downloads them.
#!/bin/sh
#
for i in `/usr/sbin/softwareupdate --list | egrep '!|\*' | awk '{print $2}'`
do
        echo $i
        echo /usr/sbin/softwareupdate -d $i
        /usr/sbin/softwareupdate -d $i
done
Warning
When using Apple’s command-line softwareupdate tool, be sure to first
set the COMMAND_LINE_INSTALL
environment variable:
Xsg5:~ mab9718$ export COMMAND_LINE_INSTALL=1Or, if using a csh derivative like tcsh:
[xsg5:~] mab9718% setenv COMMAND_LINE_INSTALL 1This step ensures that installers with a graphical element do not block the update process by prompting for premium upgrades or displaying other splash screens or advertisements; QuickTime is the worst offender.
- Server Admin
Located in the Settings tab of the general section in Server Admin, servermgrd’s software update mechanism literally calls the softwareupdate tool. Like most graphical methods, it is a less-granular option supporting fewer features. However, it is fairly convenient and does at least allow the administrator to choose which packages should be installed. Its interface for this choice is illustrated in Chapter 3.
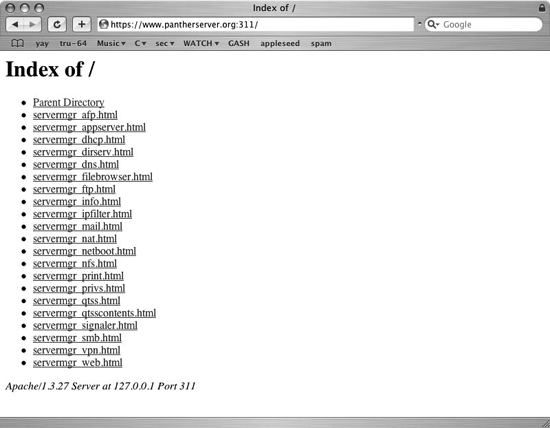
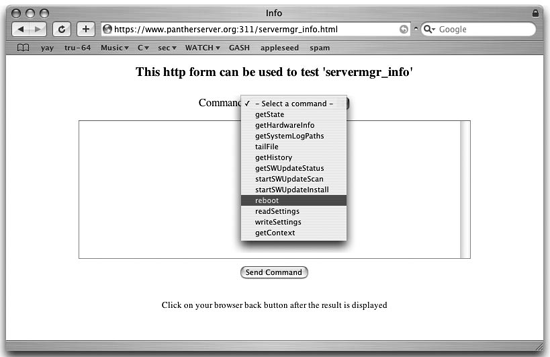
Perhaps most interesting about servermgrd’s software update is the reboot button that becomes available after an update has been successfully installed. This is generally the only method for restarting the server via Server Admin, and it is coupled with update installation. Luckily, though, this is mainly a limitation of Server Admin, and not of its underlying technology. Mac OS X Server can be rebooted via the Server Admin protocol at any time by accessing servermgrd’s built-in web interface, running (using HTTPS) on port 311. Choose the servermgr_info module as illustrated in Figures Figure 4-1 and 4-2, which sends the proper XML (via a secured and authenticated session) to reboot the server. This capability is often present when others, such as SSH or Apple Remote Desktop access, are not working or shut down.
- System Preferences and /System/Library/CoreServices/Software\ Update.app
Generally available only via Apple Remote Desktop or some other graphical remote management tool, the System Preferences application is more commonly used to manage software updates on the client version of Mac OS X. Its functionality is identical on Mac OS X Server.
Minor updates
Apple issues minor OS revisions on average about every 1.9 months, with the time between updates varying from about one month to nearly four. Apple’s convenient Software Update mechanism makes for a formidable temptation to simply install the newest update available, and many administrators fall into this trap and are consequently exposed to either short-term bugs or disruptive feature-set changes.
Rather than immediately installing every available update, a few simple guidelines will help to ease this pain:
Monitor Mac OS X Server resources (documented later in this chapter) to determine whether the update has any known negative repercussions. Keep in mind that your environment might be atypical in some sense and thus could be subject to issues not encountered elsewhere.
Rather than using Apple’s Software Update mechanism, manually download the update installer package and examine it in great depth using the included utility lsbom. lsbom (shown in Example 4-2) examines a packages bill of materials, documenting its payload in three fields: path, stat() output (including filesystem permissions),[*] and owner/group UniqueID.
 [crap:~] mab9718% lsbom ./MacOSXUpdate10.3.5Patch.pkg/Contents/Archive.bom
.       41775   0/80
./Applications  40775   0/80
./Applications/Font Book.app    40775   0/80
./Applications/Font Book.app/Contents   40775   0/80
./Applications/Font Book.app/Contents/Info.plist        100664  0/80    3154   3772715790
./Applications/Font Book.app/Contents/MacOS     40775   0/80
./Applications/Font Book.app/Contents/MacOS/Font Book   100775  0/80    237432 4241228647
./Applications/Font Book.app/Contents/Resources 40775   0/80
./Applications/Font Book.app/Contents/Resources/Dutch.lproj     40775   0/80
./Applications/Font Book.app/Contents/Resources/Dutch.lproj/FBInfoView.nib     40775
0/80
./Applications/Font Book.app/Contents/Resources/Dutch.lproj/FBInfoView.nib/keyedobjects.nib
    100664  0/80    5551    439641685
./Applications/Font Book.app/Contents/Resources/Dutch.lproj/FBPreviewWindow.nib40775
0/80
./Applications/Font Book.app/Contents/Resources/Dutch.lproj/FBPreviewWindow.nib/
keyedobjects.nib        100664  0/80    9379    2762051226
./Applications/Font Book.app/Contents/Resources/Dutch.lproj/FBPreviewWindow.nib/
objects.nib     100664  0/80    3921    2074727774
./Applications/Font Book.app/Contents/Resources/Dutch.lproj/InfoPlist.strings  100664
0/80    632     1241940170
./Applications/Font Book.app/Contents/Resources/English.lproj   40775   0/80
./Applications/Font Book.app/Contents/Resources/English.lproj/FBInfoView.nib   40775
0/80
./Applications/Font Book.app/Contents/Resources/English.lproj/FBInfoView.nib/
keyedobjects.nib   100664  0/80    5532    3192412550
./Applications/Font Book.app/Contents/Resources/English.lproj/FBPreviewWindow.nib
40775   0/80
Careful analysis allows you to determine whether any sensitive or customized files will be overwritten and whether critical systems will be affected by the update. A busy AFP server, for instance, might want to make note of an upgrade to the AppleFileServer daemon. The command line-averse will appreciate the third-party utility Pacifist (http://www.charlessoft.com), which offers much the same functionality in a graphical environment.
Pacifist may also be used to selectively obtain certain portions of the package in order to install particular components of any update. This should be undertaken very carefully, however, since the OS itself will be in an unknown and unsupported state.
For the high end, use a granular filesystem management tool like radmind (http://rsug.itd.umich.edu/software/radmind/), which allows for a tremendous amount of flexibility.
radmindis currently the only solution that allows for a complete system rollback, in case an upgrade produces unintended consequences. radmind documentation is beyond the scope of this book but its active and friendly community is easy to access from its site.
Major updates
It takes Apple 12 to 18 months to produce a major OS release, such as 10.3 (Panther). Most significant changes in functionality are reserved for these releases, and as a consequence each release tends to have fairly far-reaching effects, requiring organizational support mechanisms to be retooled. One example of this dramatic change can be seen in Mac OS X Server’s directory services architecture, which has undergone major reorganization in nearly every OS release. See Table 4-2.
Version | Architecture |
10.0 and 10.1 | Shared NetInfo database |
10.2 | NetInfo database shared out over LDAP; Password Server for authentication |
10.3 | LDAP with BDB for account storage; Password Server and KDC for authentication |
Because adoption of major OS revisions tends to be difficult from a support perspective, it should be undertaken with great care. Mac OS X Server in particular must be examined on a service-by-service basis, and sometimes very specific architectures must be developed in order to effectively manage the upgrade process.
Tip
Although Apple typically includes such upgrade mechanisms as a tool to migrate from NetInfo to LDAP, they do not often scale to meet the needs of larger deployments.
An additional factor to consider is the maturity of the new OS release. Because such a high percentage of the new release tends to be code that is new and in many cases not yet widely deployed, it makes sense to approach it with skepticism. I’ve worked with several customers in the past, in fact, to develop specific criteria that must be met before a new OS may be deployed—usually this criteria is organization-specific, and refers to specific OS functionality. In general, I begin to consider deployment during an OS’s second minor revision, and depending on the feature set that is required, proceed with pilots in the second or third revision (such as 10.3.2 or 10.3.3). As usual, though, this should not be treated as a hard and fast rule, and actual deployment should be planned according to each organization’s needs.
Security updates
Security updates were first deployed by Apple when it became apparent that certain issues would not wait for major or minor OS upgrades. They are generally engineered to address specific vulnerabilities in some component of the operating system. Security updates are themselves usually incorporated into the next minor OS release, in case the standalone updates were not, for some reason, run when they first became available.
Because their focus is so specific, security updates are generally easy to manage. The vulnerability they address should, since they are generally well-documented in the update’s description, be researched and well understood. They should, like any other update, be examined carefully using lsbom or Pacifist, and if the update is applicable, it should generally then be applied as soon as possible. Updates that are not applicable, though, shouldn’t necessarily be installed, since unwarranted modification of the OS can sometimes have unforeseen ramifications. An FTP vulnerability, for instance, doesn’t necessarily have to be fixed if a server will never have FTP access enabled.
Warning
As of this writing, Apple security updates are closely coupled with specific minor OS releases. By requiring customers to prematurely deploy minor OS releases in order to install critical security updates, Apple is painting its customers into a dangerous decision, forcing them to choose either the stability of a well-tested OS revision or the security of a patched OS.
Finally, regardless of the nature of the update in question, it makes sense to roll out system changes in a methodic and careful way. An example of this ploy is documented earlier in this chapter, moving from testing through pilots and staging and into a full deployment.
Backing Up
The science of backup in Unix operating systems is well-established and documented elsewhere. Concerns about tape rotation, scheduling, and organizational backup policy should be referred to O’Reilly’s Unix Backup and Recovery (1999), or Prentice Hall’s Unix System Administration Handbook, Third Edition (2000). Instead, this brief treatment of backup seeks to discuss some Mac OS X and Mac OS X Server’s specific issues, along with a brief analysis of current backup products.
Mac OS X Server backup issues
Mac OS X, especially in its Server flavor, bears careful consideration where backups are concerned. Unlike most server platforms (including Windows server products) it ships with no easily accessible backup solution. Despite all its strengths, I considerthis is a real downside to its deployment and a barrier to its adoption in a number of its core markets. Many server administrators need neither the complexity nor the scope of a commercial backup solution, and the lack of an equivalent to Windows Backup forces nearly all organizations deploying Mac OS X Server to spend a significant amount of money on third-party backup software.
This issue is exacerbated by the lack of a generalized tape device driver in Mac OS X and Mac OS X Server. Most Unix operating systems contain a /dev/tape or equivalent, allowing a wide variety of common Unix utilities to be leveraged towards a backup solution. Apple’s position is that such a device driver would be prohibitively complex, since tape devices are notoriously quirky and vary tremendously from vendor to vendor. While this may be true, Sun, Microsoft, and half a dozen Linux companies don’t seem to have a problem with it.
A final challenge relates to the dual forked nature of HFS+. As noted many times throughout this and other documentation, most Unix utilities have evolved without the notion of dual forked files. Nowhere is this more relevant on Mac OS X and Mac OS X Server than in the backup space. Many applications still rely on documents with resource forks, and the volume of resource-ridden legacy data cannot be underestimated. This means that many well established mechanisms for backup (such as scripts using dump, restore, and tar) are not relevant on Mac OS X and Mac OS X Server, at least in the 10.3 environment.
Although neither ships in a default install of Mac OS X, at least two versions of tar that support resource forks do exist. hfstar (http://www.metaobject.com/Products.html) and xtar (http://www.helios.de/news/news03/N_06_03.phtml) may both be used to effectively manage archival data on Mac OS X, including resource forks. They can be used exactly like traditional versions of tar (even driving remote tape drives hosted on some other OS with /dev/tape). Most of the examples here should work with either xtar or hfstar-- remember, though, they are not meant for the tar binary that is included with Mac OS X or Mac OS X Server. tar tasks include:
Creating an archive. This most basic and common tar operation can be useful for archiving files. Using the tar and date commands to create a timestamped tar archive of an entire volume. Notice that the date command is escaped with backticks in order to make sure that its output is included in the tar command.
tar -cvzf data.`date'+%m%d%y%H%M%S'` /Volumes/Data
Moving the contents of a directory. Unix tar preserves permissions better than other mechanisms for moving files around.
   cd /Users && tar -cf - . | (cd /Volumes/NewUsers && tar -xpvf -)
   cd /Users && tar -cf - . | ssh newserver "cd /Users && tar -xpvf -"
Dumping to a remote tape has been common practice in the Unix world for a good while now, so even though your Mac doesn’t know how to drive a tape drive doesn’t mean that its traditional Unix tools can’t get the job done. Using tar over and ssh connection with dd to drive a remote tape drive. The resource fork management is all done on the Mac OS X side, and dd ensures that the data is blocked properly for the host OS.
tar - czvf - /Users | ssh -l user remote_host dd of=/dev/tape
Slow in coming, it finally seems (halfway through the lifetime of its third major revision) that supported third-party backup products are coming to Mac OS X. Several enterprise backup vendors (among them Veritas, Legato, and Tivoli) offer Mac OS X- native clients. Additionally, a number of vendors support server-side solutions, allowing Mac OS X (using vendor-specific technology to drive tape architectures) to back up data from multiple clients. Note that this section is not meant as an exhaustive survey of backup options, but more as a survey of some of the available options.
Among the server-side offerings, the Tolis Group’s BRU (Backup and Recovery Utility) comes out on top in my book. It’s been a consistent player in the Unix backup marketplace for several years and was among the first commercial applications to offer Linux support. It is fast and efficient, runs totally in the background, and offers a very full feature set. BRU’s downside is that its graphical interface and setup befit its heritage far more than a traditional Mac application. Its error reporting, while accurate, is tucked away behind numerous tabs and pull-down menus. There are few alert dialog boxes and, as a result, figuring out what’s going wrong (and when) can be difficult during the initial setup.
Tip
When adding new hardware to BRU Server, be sure to stop and re-start the server itself after scanning for new hardware.
That said, BRU’s list of features is exhaustive: unqualified support for very large volumes, staged (disk to disk to tape) backups, extensive filtering, totally remote management and pre- and post-actions (scripts or executables to be run before or after a backup operation). It is what I use and have been using ever since I bought BRU 16 for Linux to drive the tape that backed up the data my Macs deposited onto my Linux box every night.
Dantz’s Retrospect (http://www.dantz.com), the perennial leader in Mac backup, is a solid contender on the low end. Sadly, however, Dantz has lost a lot of its focus on the Mac market, leaving things like automated staged backups (disk to disk to tape) to its Windows version and to BRU Server. In their haste to focus on the Windows market, Dantz has created a Mac OS 9 product that happens to run only on Mac OS X-- with no remote management capabilities and weird GUI dialogs that pop up over the login window. Coupled with increasingly unfriendly licensing terms—Dantz wants you to pay more to back up Mac OS X Server, even though they do nothing to support live backups of database-driven services like Mail, NetInfo, or LDAP and MySQL—this oddness results in a picture that is not pretty and a vendor I do not like to send money to.
Tip
One feature of Retrospect that is difficult to find elsewhere is their aggregated view of the backup history. All sessions of a Retrospect differential or incremental archive may be seen in a single view, allowing for easy selection of the newest version of every file.
Several other options bear mentioning—Bakbone (http://www.bakbone.com), another respected vendor in the enterprise backup space, recently debuted its NetVault software in both client and server versions for Mac OS X. NetVault is heavily focused on staged backups (discussed later) and features very granular management—from backup policies that provide prioritized access to backup resources to fine-grained end-user access capabilities, it is a well thought-out product. It is really too early as of this writing to make prognostications—however, while I have not yet seen it deployed at any scale that gives me a lot of confidence, it was a joy to test, and will probably have significant impact on the Mac market.
Amanda (Advanced Maryland Automatic Network Disk Archiver, http://www.amanda.org) is an Open Source tar-based client-server backup application that is well thought of in intuitional circles. I have not used it in Mac OS X, but I know several folks who have had luck coupling it with hfstar or xtar (and in some cases, Esbackup’s dump and restore, mentioned later). Amanda has many of the features of commercial client/server offerings and some, like Kerberos integration, that are unheard of or uncommon at the very least. An active developer and user community supports it, and if you have a Unix background, you will feel right at home. Finally, Esbackup, available from Ugsoft (http://www.ugsoft.de) is notable due to their modification of Unix dump and restore in order to support HFS+.
Several times now, staged backups , or disk-to-disk-to-tape backups, have been mentioned as a feature of some backup packages. The concept is pretty simple, but is nonetheless worth calling out due to its utility. In the past 15 years, disk storage has gotten progressively—sometimes remarkably—faster and larger. At the same time, disks have also dropped dramatically in price. Tape drives, although they’ve grown, have not evolved at nearly the same rate, and they certainly haven’t gotten a whole lot cheaper. The result is that today a terabyte of space is relatively easy to obtain but very difficult to back up. Staged backups have become very popular as a workaround to this issue. Rather than being written to comparatively slow tape devices, backed-up files are initially saved to some disk based storage source (a stage disk). Clients are able to complete the backup process quickly and go on about their business, while the comparatively pokey tape drive or array can take its time working over the staged data.
Tip
An added benefit of staging is its relatively good parallelism. It is rather easy to have multiple clients writing to a single stage disk, whereas most backup packages (in the context of relatively affordable tape devices), can back up only a single client to tape at once.
Well-implemented staged backups keep track of data no matter where it is, automatically noting when an archive has been upstaged (written to tape). This sort of transparency makes the life of any backup administrator easier, and makes staged backups a favorite tool of most larger enterprises.
Account Management
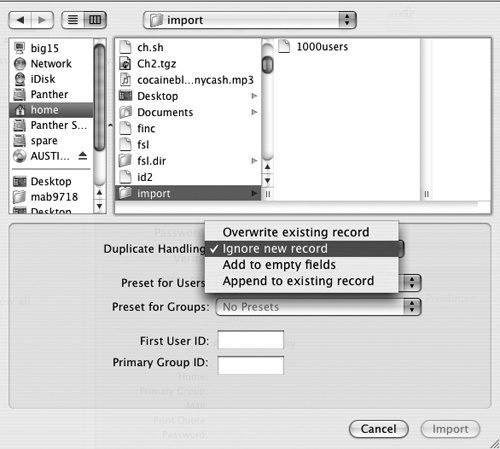
One formidable challenge as Mac OS X deployment expands in scale and scope is that of account management —adding users, groups, and computers to a directory domain. Along these lines, Apple has engineered a passable import system that’s abstract enough to be applied to any type of directory node Mac OS X might interact with. This capability can be accessed graphically, using Workgroup Manager, or from the command line, using dsimportexport (renamed dsimport in later versions of Panther, since it never really did export data). This function is easy to access, from Workgroup Manager’s Server menu, using the import selection, as seen in Figure 4-3.
dsimportexport offers a number of options, most of which are also available in Workgroup Manager. It takes the following general form:
dsimport [-g|-s|-p] /path/to/file directory-node admin pass [O|M|I|A] [options]where directory-node is the
Open Directory node (such as /NetInfo/DefaultLocalNode or /LDAPv3/127.0.0.1) where the imported users
should reside and where admin and
pass are the credentials of an
administrator in that node. Its -p and -s
flags refer to specifically formatted import files from AppleShare
IP and Mac OS X Server 10.X. Under most circumstances, you will be
working with the -g flag, a
custom characterdelineated file, discussed later in this chapter.
Its O, M, I,
and A flags deal with duplicate
handling, and are described in Table 4-3.
Option | Description |
O | Overwrites existing record with that from import. |
M | Granularly merges empty fields in existing record with populated fields from duplicate import. Useful for adding attributes en masse to existing objects. |
I | Ignores duplicate object from import. |
A | Granularly appends attributes from duplicate to attributes from original. This operation will result in multi-valued attributes. |
A typical import, then, would look something like what’s shown in Example 4-3.
g5:~ ladmin$ ./dsimportexport -g 100 u/LDAPv3/odm.pantherserver.org odadm !!g@#d -O
Total Bytes =9937
Total Bytes =9937
Auth err = 0
Bytes Read =234
Bytes Read =332
Bytes Read =430
And that’s generally all you need to know. That syntax should suffice in most situations. However, dsimport, also supports a number of optional arguments, the most common of which are illustrated in Table 4-4.
Option | Argument(s) | Description |
--T | XDSStandardUser or xDSStandardGroup | Delimited import of files without the descriptive header. |
--s | Integer for starting UniqueID value | Indicates the starting UniqueID value for import records without specified UniqueIDs. Avoid this if possible—in general, try to include UniqueIDs in your import record. |
--recordFormat | 0x0A 0x5C 0x3A 0x2C dsRecTypeStandard:Users 8 RecordName AuthMethod Password UniqueID PrimaryGroupID RealName NFSHomeDirectory UserShell | Passes in an import header as a command-line option. The format of this header is discussed later in this chapter. This is somewhat cumbersome, and it’s usually easiest to specify the header in the import file. |
--r | PrimaryGroupID | Specifies a primary group ID for import records that lack one. In general, it is better to include a PrimaryGroupID in your import record. |
--v | Verbose output. | |
--y, --yrnm, and --yrpwd | IP address, username, and password, respectively | Contacts Mac OS X Server remotely over the DSProxy port (625) in order to push a user import to a remote server. |
--d | (in hex) End of record, escape, end of attribute and multiple value delineator characters | Specifies (in hex notation) the delineation fields normally found in the header of the import record. This is quite cumbersome and it’s usually easier to specify delineators in the import file. |
However it is run, dsimportexport leaves a descriptive log file (Example 4-4) in the Home directory of the user who executed the command. This log is named according to the date and time of the import. Logs are never purged automatically, and can accumulate over time on a busy system.
crap:~ mab9718$ head -17 Library/Logs/ImportExport/DSImportExport2004.0828.001157.log
DSImport Log 2004.0828.00:11:57 Number of Args = 10
DSImport Log 2004.0828.00:11:57 ======= Tool Parser Arguements ======

DSImport Log 2004.0828.00:11:57 File Path = /Users/mab9718/100users
DSImport Log 2004.0828.00:11:57 DS Node Path = /NetInfo/root
DSImport Log 2004.0828.00:11:57 User Name = mab9718
DSImport Log 2004.0828.00:11:57 User Password was supplied
DSImport Log 2004.0828.00:11:57 Dup Option = O
DSImport Log 2004.0828.00:11:57 starting ID Num = 1025
DSImport Log 2004.0828.00:11:57 Group ID Num = 20
DSImport Log 2004.0828.00:11:57 ======= End Of Args ======

DSImport Log 2004.0828.00:11:57 Starting Delimited file import
DSImport Log 2004.0828.00:11:57 Inside DoImportDelimitedFile
DSImport Log 2004.0828.00:11:57 Auth err = 0
DSImport Log 2004.0828.00:11:58 Added a user record named: p10001.
DSImport Log 2004.0828.00:12:01 Adding Record succeeded
Import file format
Both Workgroup Manager and dsimportexport use the same type of import files, as Workgroup Manager actually calls dsimportexport when it needs to import data. The format of that file is actually very flexible and not extremely friendly—it requires knowledge of hexadecimal notation, as shown in Example 4-5.
xserve:~ mab9718$ cat 1user
0x0A 0x5C 0x3A 0x2C dsRecTypeStandard:Users 10 RecordName AuthMethod Password UniqueID
PrimaryGroupID RealName NFSHomeDirectory UserShell Comment Keywords
p10001:dsAuthMethodStandard\:dsAuthClearText:apple:10001:20:Student 10001:/Users/
p10001:/bin/bash:this is a comment:2004,marketing
The first line (which in the example wraps onto two lines) consists of the following fields:
- End of record marker (in hex)
Specifies that the end of an individual record has been reached. In this case,
0x0Aspecifies that each record ends with a line feed.- Escape character (in hex)
This character should be used when another structural element (such as the field or value delineator) should be used in the actual value of an attribute. In our example,
0x5Cspecifies the "\“, which is used to escape the colon inp10001’sAuthMethodattribute (dsAuthMethodStandard:dsAuthClearText).- Field delineator (in hex)
Used to separate attributes.
0x3A, from our example, specifies the colon (:), which is used to separate attributes in an individual user record.- Multivalued delineator (in hex)
Separates multiple values for a particular attribute, such as the two keywords in the example import record.
0x2Cspecifies a comma (,). Keywords (along with comments, also represented in the example import record) are highly useful in the management of users and are described in great depth in Chapter 3.- Type of record
Specifics what type of record is being imported. Generally prefixed with the string
dsRecTypeStandard:, this may be any type of record that Open Directory understands, although Users, groups, computers and computer lists are the most common. For a complete listing, see the DirectoryServiceAttributes manpage.- The number of attributes per record
Our example has 10.
- The name of each attribute
In our example,
RecordName,AuthMethod,Password,UniqueID,PrimaryGroupID,RealName,NFSHomeDirectory,UserShell,Comment, andKeywords. For a complete listing of feasible attributes see the DirectoryServiceAttributes manpage.
The actual user records begin on the next line. Note that
each user record, like the import file header, may wrap between
lines. Each record is separated by a carriage return. Of
particular interest in this example are the AuthMethod and Password attributes. Setting the latter
to dsAuthMethodStandard\:dsAuthClearText
and the former to the user’s initial password allows the user’s
password to be added to Password Server—an important aspect of
user imports.
Any number of user attributes may be added in an import.
Bear in mind, though, that each additional attribute, especially
at a scale of thousands of users, adds to total import time. Using
the eight attributes specified in the earlier example results in
an import time of about 2.5 minutes for a thousand users. Results
are not linear, though, and thirty thousand users take around 26
hours. It’s generally a good idea, then, to minimize the number of
records in any import and to minimize the number of attributes in
any large import. Large attributes, such as MCX data and the
AppleMail attribute therefore
can be added later and much more efficiently with tools like
ldapmodify.
Tip
Another popular option for adding user accounts is Passenger, a thirdparty commercial application. Passenger has the added benefit of extensive text-processing capabilities, including attribute generation and multiple file format import. Although most of its features could be implemented with some shell scripting, Passenger is a good way to save time for administrators who prefer a graphical interface.
Group accounts
Management of group accounts presents a challenge that is similar to, if slightly less complex than, user management. The same import record may be used, adjusted only slightly to reflect the requirements of group accounts (see Example 4-6).
g5:~ ladmin$ cat 1G
0x0A 0x5C 0x3A 0x2C dsRecTypeStandard:Groups 4 RecordName Password PrimaryGroupID
GroupMembership
newGroup:*:100:admin,p10001,skwa
In larger-scale deployments, it might make sense to add groups directly to Open Directory Server’s LDAP interface, rather than using DirectoryService and dsimportexport. This is not typically feasible in user imports because the LDAP server has no way to set the user’s password, which is stored in PasswordServer (and sometimes Kerberos). LDAP modifications are typically a lot faster, because they don’t have to be dispatched through the DirectoryService daemon, and administrators from other backgrounds might be more familiar with LDIF, since it is cross-platform (see Example 4-7).
dn: cn=newGroup,cn=groups,dc=4am-media,dc=com
cn: newGroup
objectClass: posixGroup
objectClass: apple-group
objectClass: extensibleObject
objectClass: top
gidNumber: 100
apple-generateduid: A8FABA90-135A-11D9-A695-000A95AE7200
memberUid: admin
memberUid: p10001
memberUid: skwa
Computer accounts and lists are commonly used in Mac OS X to manage access to particular resources. A list of executive machines, for instance, might be reserved for use by a very limited group of users, or a graphics lab could be granted the right to run some licensed (and presumably expensive) application. While these capabilities are for the most part very desirable, this kind of management (based on the computer that the user is logged into) presents two formidable challenges:
Computer accounts by themselves aren’t very useful. They really have no impact on a managed Mac OS X environment until they’re added to a computer list (to which managed client settings are then applied).
Computers, when they contact an Open Directory node, search for their accounts using the MAC (hardware Ethernet) address of their built-in Ethernet; this is the case even when connecting to the network using some alternate interface, like AirPort. In order to be useful, computer accounts must correspond to real computers with real MAC addresses.
While obtaining MAC addresses is left as an exercise to the reader (you might start with your Apple Sales Rep or some automated bar code system), computers and computer lists, like users and groups, may be added to any Open Directory domain using dsimportexport records (see Example 4-8).
g5:~ ladmin$ cat 1c.0
0x0A 0x5C 0x3A 0x2C dsRecTypeStandard:Computers 3 RecordName EnetAddress Comment
East-01:00\:0a\:95\:dp\:45\:56:East Lab
East-02:00\:0a\:95\:hf\:55\:57:East Lab
East-03:00\:0a\:95\:dg\:65\:58:East Lab
g5:~ ladmin$ cat cl.0
0x0a 0x5c 0x3a 0x2c dsRecTypeStandard:ComputerLists 2 RecordName Computers
East-Lab: East-01, East-02, East-03
crap:~ mab9718$ cat cl
0x0a 0x5c 0x3a 0x2c dsRecTypeStandard:ComputerLists 3 RecordName Computers Comment
kerb_srv2:gs.4am-media.com,xserve.4am-media.com:belch
Warning
Different computer lists might have different purposes, and it is important to note that while lists of client Mac OS X systems may be named whatever is convenient, Mac OS X Server accounts, like those used to auto-configure Kerberized server services, should be named using the fully qualified domain name of the server.
Computers, like groups, do not (in Panther) have real passwords. Since computer creation doesn’t require interaction with Password Server or Kerberos, it can be accomplished entirely using LDAP, which is generally faster than using dsimportexport. The LDIF file shown in Example 4-9 should serve as an example for use with the ldapadd command when adding computer lists and accounts to an Open Directory Master.
dn: cn=East-01,cn=computers,dc=4am-media,dc=com
cn: East-01
objectClass: apple-computer
objectClass: top
apple-generateduid: AA0137B4-136B-11D9-96D3-000A95AE7200
description: East Lab, 01

dn: cn=East-Lab,cn=computer_lists,dc=4am-media,dc=com
cn: East-Lab
objectClass: apple-computer-list
objectClass: top
apple-computers: East-01
Failover
New with Jaguar was an Active-Passive IP Failover mechanism, designed to let one server (or peer) take over the IP address of another in the case of a failure. The general premise is illustrated in Figure 4-4.
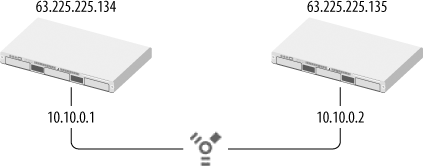
This architecture revolves around two daemons--heartbeatd, running on the master, and failoverd, running on its peer. Both read their respective configurations from the /etc/hostconfig file on the server on which they’re running. These configuration options are documented in Table 4-5.
Daemon | Options |
heartbeatd | FAILOVER_BCAST_IPS="63.225.225.255 192.168.1.255” |
failoverd | FAILOVER_PEER_IP=192.168.1.1 FAILOVER_PEER_IP_PAIRS=en0:63.225.225.134 FAILOVER_EMAIL_RECIPIENT=sysadmin_group@myschool.edu |
During normal operation, heartbeatd, which is started by the IP
failover startup item, broadcasts every second on port 1649 to
the IP addresses listed in its FAILOVER_BCAST_IPS /etc/hostconfig configuration. These should
usually be the broadcast addresses associated with the master’s
network interfaces. failoverd,
running on the failover peer, listens for these broadcasts, and if
they cease, it institutes a failover event.
Tip
Notice that two separate networks are used in the failover process. This policy is intended to prevent false-positive failover events. If, for instance, the network switch that the master’s Public interface was plugged into failed, we would not want to trigger a failover. (Obviously, a full-fledged failover event will do little to remedy the actual physical problem in this case.) So IP Failover is built to use two interfaces. In the best practice, one of those should be an interface that does not rely on extensive intermediary hardware, like a crossover cable or IP over FireWire.
The failover process
When failoverd
detects a failure in the master, it begins a very specific set of
processes, first running /usr/libexec/NotifyFailover (in order to
notify administrators specified in the FAILOVER_EMAIL_RECIPIENT directive) and
then /usr/libexec/ProcessFailover to complete the failover
process.
ProcessFailover is actually a shell script and is, therefore, very clear about what it is doing. It logs to syslogd’s daemon.error facility and is called by failoverd with a specific syntax. Generalized syntax for the ProcessFailover command. Interface:ip_address refers to the Ethernet interface and IP address that the failover peer will use to provide services in the place of its master. ProcessFailover accepts multiple arguments, so that a peer can obtain multiple IP addresses as a result of failover.
ProcessFailover up|down interface:ip_address
ProcessFailover then performs a careful set of tasks that may be customized to suit your specific needs.
A test script, /Library/IPFailover/ip_address/Test (ip_address being the IP that was passed to ProcessFailover by failoverd) is run if it exists. This is an optional mechanism for preventing false positive failover events. The system administrator is responsible for writing this script.
Any executable in /Library/IPFailover/ip_address with the prefix PreAcq (pre-acquisition) is run. These are generally shell scripts designed to ensure that the failover peer is ready to obtain the master’s IP address. It is generally a good practice to write a pre-acquisition script that calls the changeip command, as so may systems in Mac OS X are reliant on a proper IP address and hostname.
The address of the failover peer is changed to reflect the IP(s) specified in the
FAILOVER_PEER_IP_PAIRS/etc/hostconfig directive.Any executable in /Library/IPFailover/ip_address with the prefix PostAcq is executed. Generally scripts of some sort, PostAcq actions might commonly be used to restart processes that do not deal well with IP address changes.
Once the failover process is complete the failover peer continues to listen for the master’s reappearance. If the master should appear, a failback event occurs. This process is similar to the initial failover, except in reverse. Once again, each step in the process is very structured:
Any executable in /Library/IPFailover/ip_address with the prefix PreRel is executed. These scripts should be used to get the environment ready to failover.
This IP is released.
Any executable in /Library/IPFailover/ip_address with the prefix PostRel is executed.
Note that the IP Failover mechanism in Mac OS X is capable
of managing multiple interfaces. In the earlier example, only one
FAILOVER_PEER_IP_PAIRS argument
was specified. It is quite common, though, for a server to support
multiple network interfaces, and failoverd is equipped to handle that
case. All that is required is a second FAILOVER_PEER_IP_PAIRS argument. When a
failure is detected, both pairs will be passed to the
ProcessFailover script (Example 4-10).
FAILOVER_PEER_IP_PAIRS=" en0:192.13.2.2 en1:10.1.0.2"
IP Failover is ideally suited for stateless and short-lived services, like HTTP, SMTP, and POP. Stateful protocols with longer-lived connections (like AFP) are much more likely to experience some sort of downtime, since failure events might occur while clients are connected. Although this should not dissuade you from deploying IP Failover, it is something to keep in mind.
Tip
Whenever it is available, it makes sense to prefer an application-level clustering technology over IP Failover. Application-level clustering, like that available with Apple’s Open Directory Replication environment, allows for more complete solutions, including multimaster infrastructures and data synchronization.
IP Failover is an Active-Passive architecture—the failover peer, until it is needed, is largely idle. Although services may be provided by the peer, they would be subject to an interruption during and after a failover event. It is feasible to engineer around this issue using a PostAcq script that re-enables the peer’s original IP address, but it should be noted that such an infrastructure grows more complex and difficult to maintain with each such addition.
Diskspacemonitor
One corollary to the intrusion minimization principal illustrated earlier in this chapter is that solutions—from a vendor, consultant, or IT staff—should not just minimize intrusion, but should also seek to help customers do what they are already doing more efficiently. This is well illustrated by Mac OS X Server’s diskspacemonitor daemon, which, as its name implies, monitors available storage resources. This in itself is nothing new. System administrators have for years tweaked and hand-rolled countless cron jobs designed to take some action if available disk space became too low, and while it’s nice of Apple to have provided such a service, other vendors have done that, too. The point is not that diskspacemonitor is revolutionary, but that it is a solid and consistent step in the right direction.
diskspacemonitor, which lives in /usr/sbin, is a cron-driven shell script. It is typically enabled using the on flag:
    [ace2:~] nadmin% sudo diskspacemonitor on
    Password:
    crontab: no crontab for root
This script adds entry into the root user’s crontab. The following entry indicates that diskspacemonitor should run automatically every 10 minutes; this time with the check argument:
    sudo cat /var/cron/tabs/root
    # DO NOT EDIT THIS FILE - edit the master and reinstall.
    # (/tmp/diskspacemonitor.22371 installed on Tue Sep 14 14:18:25 2004)
    # (Cron version -- $FreeBSD: src/usr.sbin/cron/crontab/crontab.c,v 1.17 2001/06/16
03:16:52 peter Exp $)

    */10 * * * * /usr/sbin/diskspacemonitor check
The check argument, in turn, obtains a list of local disks and for each one checks the available disk space, comparing it to the alert_threshold and recovery_threshold in diskspacemonitor’s configuration file (/etc/diskspacemonitor/diskspacemonitor.conf), shown in Example 4-11.
 [ace2:~] nadmin% cat /etc/diskspacemonitor/diskspacemonitor.conf
# Config for diskspacemonitor
#

monitor_interval=10     # Check disks at this interval, in minutes

alert_threshold=75      # When a disk is this percentage full, execute
                        # the alert scripts in
                        # /etc/diskspacemonitor/action/
recovery_threshold=85   # When a disk is this percentage full, execute
                        # the recovery scripts in
                        # /etc/diskspacemonitor/action/
log_file=/var/log/diskspacemonitor.log
If the values established for either alert_threshold or recovery_threshold are met or exceeded for
any local volume, diskspacemonitor takes action, executing
/etc/diskspacemonitor/action/alert or
/etc/diskspacemonitor/action/recover,
respectively. The former, which has a configuration file stored at
/etc/diskspacemonitor/alert.conf,
generates an email (with a subject indicating that the disk is
filling up and a body consisting of the output of the df command) to an address specified in
alert.conf’s to variable, as
shown in Example
4-12.
[ace2:~] nadmin% cat /etc/diskspacemonitor/alert.conf
# Config for alert
# Arguments passed to alert (and alert.local, if
# it exists):
# - Volume name
# - Threshold
# - Percentage full
# - Log file
#
subject="DiskSpaceMonitor: Disk $1 has exceeded $2% threshold, is $3% full."
to=it-alerts@pantherserver.org
body=`df -k -l -t ufs; df -k -l -t hfs`
Warning
The default alert.conf configuration specifies a syntax to the df command that will not work—the --l (local) and --t (type) options are actually exclusive, and cannot be run together. Removing the --l flag is probably a good idea, since all HFS or UFS partitions are by definition local.
The recover script (also in /etc/diskspacemonitor/action) is typically executed at a higher-percentage disk usage--85 percent, as opposed to alert’s 75 percent in a default configuration. Typically, the recover script is used to reduce disk usage by compressing, deleting, or rolling files depending on the configuration specified in /etc/diskspacemonitor/recover.conf.
Tip
In a default install, /etc/diskspacemonitor/alert.conf, /etc/diskspace- monitor/action.conf, and /etc/diskspacemonitor/alert.conf do not actually exist. Instead, they’re copied from /etc/diskspacemonitor/action.conf.default and /etc/diskspacemonitor/alert.conf.default, respectively, the first time their respective scripts are run.
In addition to these Apple-supplied scripts, customized alert and recover may be manually specified (see Example 4-13). Respectively called alert.local and recover.local, these scripts should be located along with their Apple-supplied cousins in /etc/diskspacemonitor/action.
[ace2:~] nadmin% cat /etc/diskspacemonitor/action/recover.local
#!/bin/sh
#this is a brute force way of doing this
if [ `/bin/ls /var/spool/cups/tmp | wc | awk '{ print $3}'` -gt 2000 ]
then
        /bin/rm -r /var/spool/cups/tmp
        /bin/mkdir -p /var/spool/cups/tmp
else
        exit 0
fi
diskspacemonitor must be run as root; it logs to /var/log/diskspacemonitor.log, and supplies a little information about itself when issued the status directive.
Mac OS X Server’s startup process is a little bit disjointed. Different process and services are started using a number of different methodologies (illustrated in Table 4-6), and as a result it can be difficult to determine what has started where and why it was started in the first place. They are all worthy of discussion, and several are mentioned elsewhere in this book. The only one that is server-specific (doesn’t exist on Mac OS X client) is watchdog.
Mechanism | Description | Services |
SystemStarter | Main startup infrastructure for OS. Statically starts services, often according to configuration in /etc/hostconfig. | LDAP, NAT, IP Forwarding, servermgrd |
Xinetd | Starts network services on demand. Covered in more depth in Chapter 18. | SSH, FTP |
Mach_init | Starts services (generally local in nature) on demand. | diskarbitrationd, DirectoryService, WindowServer |
watchdog | Starts services on boot, and (depending on its configuration) re-starts them when they become unavailable. | IMAP, Password Server |
Like diskspacemonitor, described earlier in this chapter, watchdog is an Apple-provided mechanism to do what many System Administrators have pursued for many years—service monitoring. In addition to starting the services listed in its configuration file (watchdog.conf, seen here in Example 4-14), watchdog ensures, depending on its configuration, that the services it is responsible for stay running.
g5:/ odadm$ cat /etc/watchdog.conf
#
# /etc/watchdog.conf
#

# /usr/sbin/watchdog is an (AT&T) init-like process that
# launches, monitors, and relaunches critical services.
# See the watchdog man page for more information.

# The file format is familiar to most *NIX hacks:
#       The pound character (#) indicates a comment that continues
#       until the end of line.
#       White-space is ignored.
#       Each configuration line consists of the following
#       colon-delimited fields:
#               id:action:path args
# The id field is a unique identifying key for the service.
# The action field is "off", "respawn", "boot", "bootwait", or
# "now". See the man page for details of their usage.
# The path and args field is the command to execute.

# If a process quits a few seconds after launch, the process is
# considered faulty and will not be respawned. This may be caused
# by programs that daemonize themselves. To avoid this, add the
# "no-daemonize" argument to the command if one exists.

# After modifying this file, send a signal to watchdog to force
# it to reread the file. These are the special signals caught by
# watchdog:
#       HUP - force a re-read: Entries turned off will be terminated;
#               entries turned on will be launched; changed entries will
#               be terminated (if necessary) and relaunched; unchanged
#               entries will not be touched.
#       INT - complete restart: Terminate all children, re-read the
#               file and launch children as necessary.
#       TERM - complete shutdown: Terminate all children and exit.

pwd:respawn:/usr/sbin/PasswordService -n
PSM:respawn:/usr/sbin/PrintServiceMonitor -x    # Server Printing service
mm:off:/usr/sbin/MacintoshManagementServer -x   # Macintosh Manager service
postfix:respawn:/usr/libexec/postfix/master     # Mail services - SMTP
cyrus:off:/usr/bin/cyrus/bin/master     # Mail services - IMAP & POP
kadmind:respawn:/usr/sbin/kadmind -passwordserver  -nofork
kdc:respawn:/usr/sbin/krb5kdc -n
Each service entry in watchdog.conf consists of three fields:
service name:setting:command
service nameis a somewhat arbitrary tag used to identify the service in question, while command is much more specific, specifying the exact syntax used to start a service.settingis one of six keywords, a few of which are documented in Table 4-7. These keywords dictate how the service should be handled by watchdog.commandis the exact command (including arguments) that should be executed.
Watchdog keyword | Description |
off | Do not start process, and end it if it is running (by sending it a signal 15 and, if it does not quit, a signal 9). |
bootonce | Start process, but do not attempt to keep it running. |
respawn | Start the process, and restart it if it fails at some point. |
watchdog, which is started by the Watchdog startup item, logs to /Library/Logs/watchdog.event.log. A sample watchdog log is shown here:
    g5:/System/Library/StartupItems odadm$ tail /Library/Logs/
watchdog.event.log
    2004-09-09 02:52:25 MDT Waiting for KILLed child (pid 327)
    2004-09-09 02:52:25 MDT Reaped child process 327 ("/usr/sbin/PrintServiceMonitor");
quit due to signal 9.
    #End-Date: 2004-09-09 02:52:25 MDT
    #Start-Date: 2004-09-09 02:53:24 MDT
    #Fields: date time s-comment
    2004-09-09 02:53:24 MDT Started child "/usr/sbin/PasswordService" as pid 298.
    2004-09-09 02:53:24 MDT Started child "/usr/sbin/PrintServiceMonitor" as pid 299.
    2004-09-09 02:53:24 MDT Started child "/usr/libexec/postfix/master" as pid 300.
    2004-09-09 02:53:24 MDT Started child "/usr/sbin/kadmind" as pid 301.
    2004-09-09 02:53:24 MDT Started child "/usr/sbin/krb5kdc" as pid 302.
In addition to starting various services, watchdog is also responsible for maintaining Mac OS X Server’s reboot timer, which is enabled using either the systemsetup command or the Energy Saver preference panel in System Preferences. This timer, which runs in the computer’s Power Management Unit (PMU), reboots if it ever gets to 0. It is watchdog’s job to reset that timer, the assumption being that if the timer is not reset, then watchdog is not running and the server has crashed.
watchdog is easily used to start other, non-Apple services, as documented in both its manpage and the commented portions of /etc/watchdog.conf. Processes that daemonize (move to the background) can confuse watchdog-- it thinks they’ve failed, and processes that fail soon after initialization are not restarted (the assumption being that if they fail that soon after boot there’s probably something wrong, and they’ll probably fail again and again). So if the process in question has a -no-daemonize or -foreground option, you should be prepared to use it in watchdog.conf.
Tip
Check with your developer or vendor to determine whether running your daemon in the foreground is recommended.
One additional aspect of Mac OS X Server system administration is the system’s use of cron (a traditional Unix facility for running periodic tasks). cron (which is started by /System/Library/StartupItems/Cron/Cron in both Mac OS X and Mac OS X Server) checks every minute for tasks to execute. No graphical interface for it exists, and its configuration file is /etc/crontab (shown in Example 4-15). cron reads this along with any per-user crontabs (located in /var/cron/tabs) looking for jobs to execute. The crontab format is pretty straightforward, and is made up of seven tab-delineated columns representing various intervals, the user that the cron job should run as, and the command(s) to be executed.
cat /etc/crontab
# /etc/crontab
SHELL=/bin/sh
PATH=/etc:/bin:/sbin:/usr/bin:/usr/sbin
HOME=/var/log
#
#minute hour    mday    month   wday    who     command
#
#*/5    *       *       *       *       root    /usr/libexec/atrun
#
# Run daily/weekly/monthly jobs.
#run daily script at 3:15 am every day
15      3       *       *       *       root    periodic daily

#run the weekly scripts at 4:30 on the 6th day of the week.
30      4       *       *       6       root    periodic weekly

#run the monthly script at 5:30 on the first day of every  month.
30      5       1       *       *       root    periodic monthly
As seen in Example 4-16, a default crontab on both Mac OS X and Mac OS X Server executes the periodic utility. periodic, in turn, exists primarily to work with cron, consolidating daily, weekly, and monthly administrative tasks. When passed one of these arguments (daily, weekly, or monthly), periodic executes appropriate scripts from the /etc/periodic directory as shown in Example 4-16.
g5:~ ladmin$ ls /etc/periodic/*
/etc/periodic/daily:
100.clean-logs          600.daily.server
500.daily               700.daily.server.cyrus

/etc/periodic/monthly:
500.monthly             600.monthly.server

/etc/periodic/weekly:
500.weekly              600.weekly.server
My point in this analysis is primarily to illustrate the Mac OS X Server-specific tasks executed by periodic. Illustrated in Table 4-8, they are cross-functional, impacting a number of server services, and should serve as a template for understanding the potential of cron and periodic as system administration tools.
Periodic Task | Description |
600.daily.server | Compresses, rolls, and deletes various log files defined in /etc/diskspacemonitor/daily.server.conf. |
700.daily.server.cyrus | Rolls the logs for the Cyrus mail system according to the configuration established in /etc/MailServicesOther.plist. |
600.monthly.server | Empty in a default install. |
600.weekly.server | Empty in a default install. |
Your customized administration tasks can be added in (at a minimum) three ways—through periodic, directly to the system’s crontab, or into a user-specific tab in /var/cron/tabs. The latter two options are usually preferable, since it is feasible that Apple could replace /etc/crontab in a future OS upgrade.
Per-user crontabs can be
manipulated with the crontab
utility, which opens the user’s crontab using the executable specified in
the user’s EDITOR environment
variable (vi, in a default
install). It is up to the user at that point to specify a properly
formatted crontab. crontabs are executed as the user they
belong to, so in general system-wide administration tasks are
added to root’s crontab-- both
the Tolis Group’s BRU backup software and Apple’s diskspacemonitor are executed this way.
crontab’s -l argument displays the currently
scheduled tasks for the user. To specify a different user, add the
-u flag.
The periodic scripts should be thoroughly tested and added to the appropriate (daily, weekly, or monthly) directories within /etc/periodic. They are executed in the order specified by their listing in the ls command. Generally, this means that the script name is prepended with a number, and that the scripts are executed in numerical order.
[*] This output generally consists of a five- or six-digit number. The last four digits represent file system permissions, as documented in the chmod manpage. The remaining one or two digits refer to the nature of the file--4 for directory, 6 for block device, 10 for regular file, and 12 for symbolic link.
Get Essential Mac OS X Panther Server Administration now with the O’Reilly learning platform.
O’Reilly members experience books, live events, courses curated by job role, and more from O’Reilly and nearly 200 top publishers.

