This chapter walks through the process of configuring your iOS app for additional services such as Apple Push Notification Service, iCloud, Passes, and Data Protection. All explicit Bundle IDs (as opposed to a wildcard Bundle ID, see App IDs) already have Game Center and In-App Purchase enabled by default. Adding one or more of these additional services to your iOS app starts with enabling the service for your App ID, possibly configuring the service, and modifying or creating new Provisioning Profiles to accommodate the service. The services covered in this chapter are briefly described in the following list:
- Apple Push Notification Service
Notifications enable you to âpushâ a message, badge icon, or play a sound to users who have installed your app and have acknowledged that they wish to receive push notifications.
- iCloud
Enabling the iCloud service allows your app to utilize the iCloud Storage APIs to store content (such as documents, photos, and music) in iCloud (Appleâs cloud-based internet storage). In addition to providing pseudo-backup functionality, iCloud enables a user to have consistent information across multiple devices without having to manually manage the synchronization of files.
- Passes
An app using Passes allows a customer to read, delete, or update a Pass (such as a coupon or airline ticket) that is contained within the Passbook app. For example, a user could use your Passes-enabled app to update a concert ticket that is within their Passbook app and update the corresponding event on the calendar.
- Data Protection
Apps that utilize the Data Protection service (along with the Data Protection APIs) contain an additional level of security in which documents remain encrypted even if a deviceâs passcode is bypassed.
Enabling any of these services adds an entitlement to your iOS app, which is an XML manifest that describes the additional services and privileges an app requires to iOS. Only enable the specific additional services to your appâs App ID that you actually need in order to reduce unnecessary overhead for your app and potential security vulnerabilities.
Note
Apple optimizes the iOS Provisioning Portal for the Safari web browser; for best results use the Safari web browser when going through these processes.
This section covers setting up your app for Apple Push Notification Service (APNS). At a high level this process includes enabling your App ID for APNS, generating SSL Push certificates, and updating (or creating new) Provisioning Profiles. Weâll also go over how to create and export the APNS SSL certificates for deployment to your notification server. For more information on the development aspect of Push Notifications, refer to the Local and Push Notification Programming Guide. SSL Push certificates are used by both the client and the server to communicate with the APNS.
Here are some things to note about the setup and configuration of an App ID for APNS:
To enable APNS, your App IDâs Bundle ID must be explicit as it is defined on the iOS Provisioning Portal (for example: com.acme.FinancialPlanner). APNS cannot be configured for a App ID that has the wildcard character in the Bundle ID (for example: com.acme.*). For more information regarding explicit versus wildcard App IDs (and how to migrate from an explicit to a wildcard App ID), see App IDs.
Only a Team Admin or Agent on the iOS Provisioning Portal can enable APNS or configure them for an App ID.
All Provisioning Profiles linked to the App ID must be modified or created anew in order to be updated with the APNS entitlement. Download and install the updated Provisioning Profiles into Xcode and re-build your app, as the existing Provisioning Profiles for your app will not have the APNS entitlement.
Disabling APNS from an App ID results in invalidating all Provisioning Profiles associated to that App ID. In other words, if you disable APNS (or any other service from an App ID), youâll have to renew any corresponding Provisioning Profiles that were associated to that App ID.
The use of APNS in your iOS app requires the creation of APNS-specific Development and Production SSL certificates.
You must create separate public/private key pairs for the Development SSL certificate and Production SSL certificate. The APNS Production certificate will be associated to an APNS Production private key, and the APNS Development certificate will be associated to an APNS Development private key.
To configure an explicit App ID for APNS, log in to the iOS Dev Center using the Safari web browser and go to the iOS Provisioning Portal. Follow these steps:
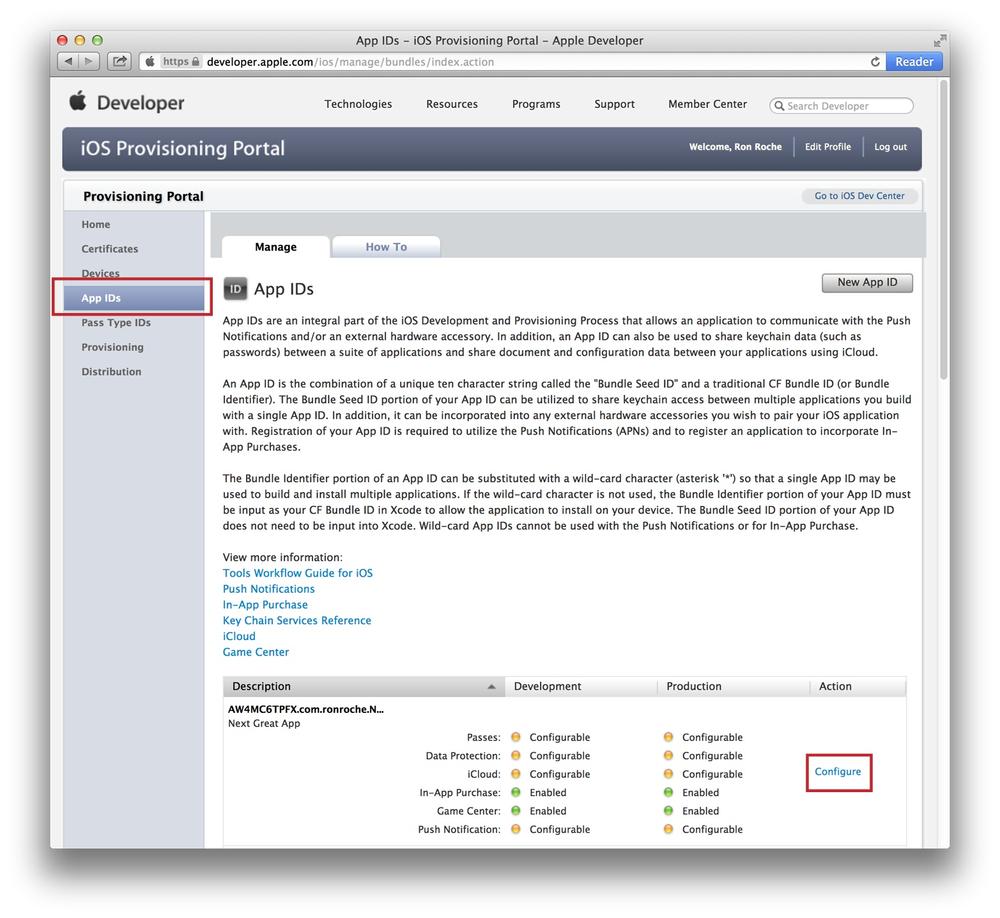
Go to the App IDs section and press Configure next to the App ID you wish to configure for APNS (see Figure 4-1).
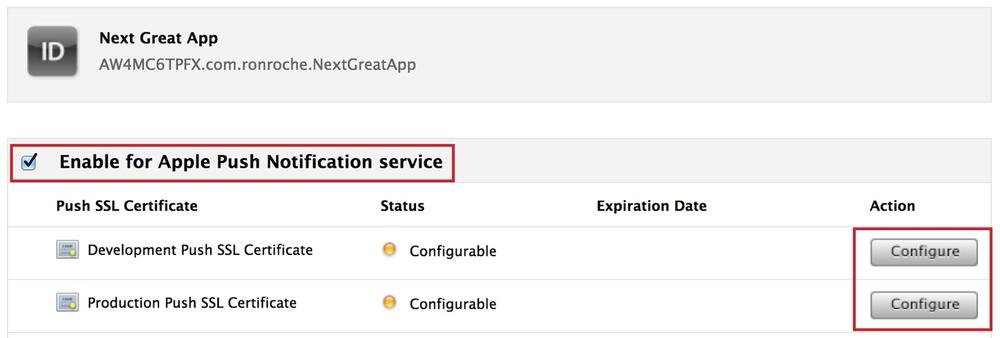
Check the box next to âEnable for Apple Push Notification Serviceâ and press the Configure button for either the âDevelopment Push SSL Certificateâ or the âProduction SSL Certificateâ to bring up the âApple Push Notification Service SSL Certificate Assistant wizardâ (see Figure 4-2). Whichever order you prefer to configure these certificates (Development or Production) does not matter; the last step in this process is to go back and configure the other certificate.
Press Continue at the âGenerate a Certificate Signing Requestâ dialog box (see Figure 4-3).
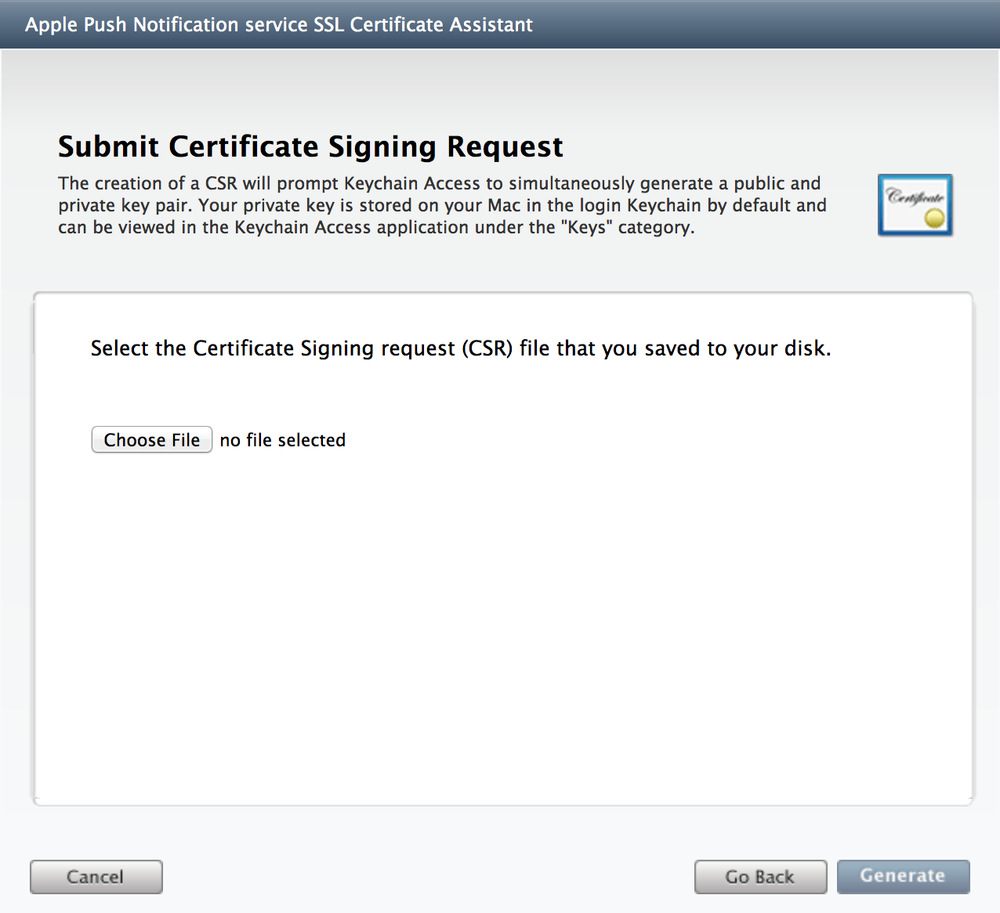
The âSubmit Certificate Signing Requestâ dialog box will be displayed (see Figure 4-4). Leave the browser window open.
Open Keychain Access (located in Applications â Utilities).
Within the Keychains category, highlight the default keychain (whichever keychain is bold is your default keychain), and select Keychain Access â Certificate Assistant â âRequest a Certificate From a Certificate Authorityâ (see Figure 2-3).
Note
Make sure that you do not have a private key highlighted in the Keychain Access main panel prior to selecting options from the Keychain Access menu, because these menu options will change based on the current context.
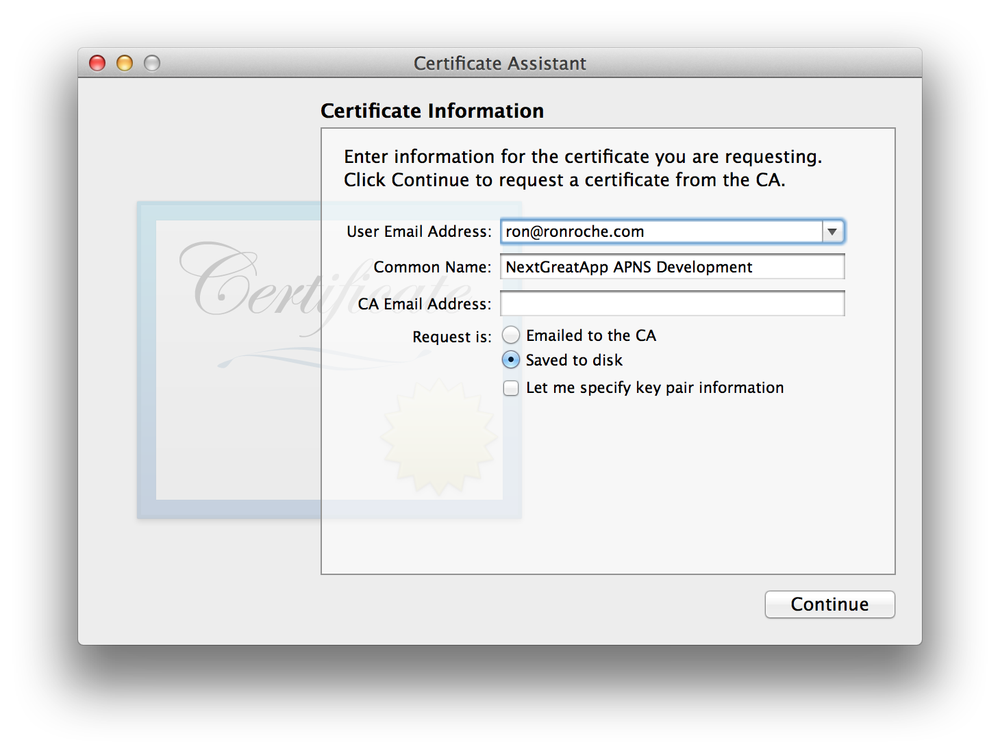
In the Certificate Information window, enter the following information and press Continue when you are done (see Figure 4-5 for an example).
- User Email Address
Enter your email address. Use the same email address that is associated with your account in the Member Center.
- Common Name
Enter a descriptive name for your APNS key pair, such as "
AppNameAPNS Developmentâ or "AppNameAPNS Productionâ. The point here is to name the key pair you are creating for APNS something different than the Common Name used when creating the Development and/or Distribution key pairs so that it is apparent at a glance which key pairs within Keychain Access are being used for what.- CA Email Address
Leave this field blank.
- Request is
Select the âSaved to diskâ radio button.
- Let me specify the key pair information
There is no need to check this box, doing so will prompt you to specify the Key Size and Algorithm, of which the default settings (â2048 bitsâ and RSA respectively) are used. However, make sure the âLet me specify the key pair informationâ checkbox is present. If it is not, you most likely had a private key highlighted in the main panel of Keychain Access when you chose to âRequest a Certificate from a Certificate Authorityâ (see step 6). If this is the case, close the Certificate Assistant and start this process overâensuring that you do not have a private key highlighted, of course!
When prompted, save the CertificateSigningRequest.certSigningRequest file to your Desktop.
The APNS (Development or Production) CSR file will be generated and saved to your Desktop. Press Done at the Conclusion dialog box.
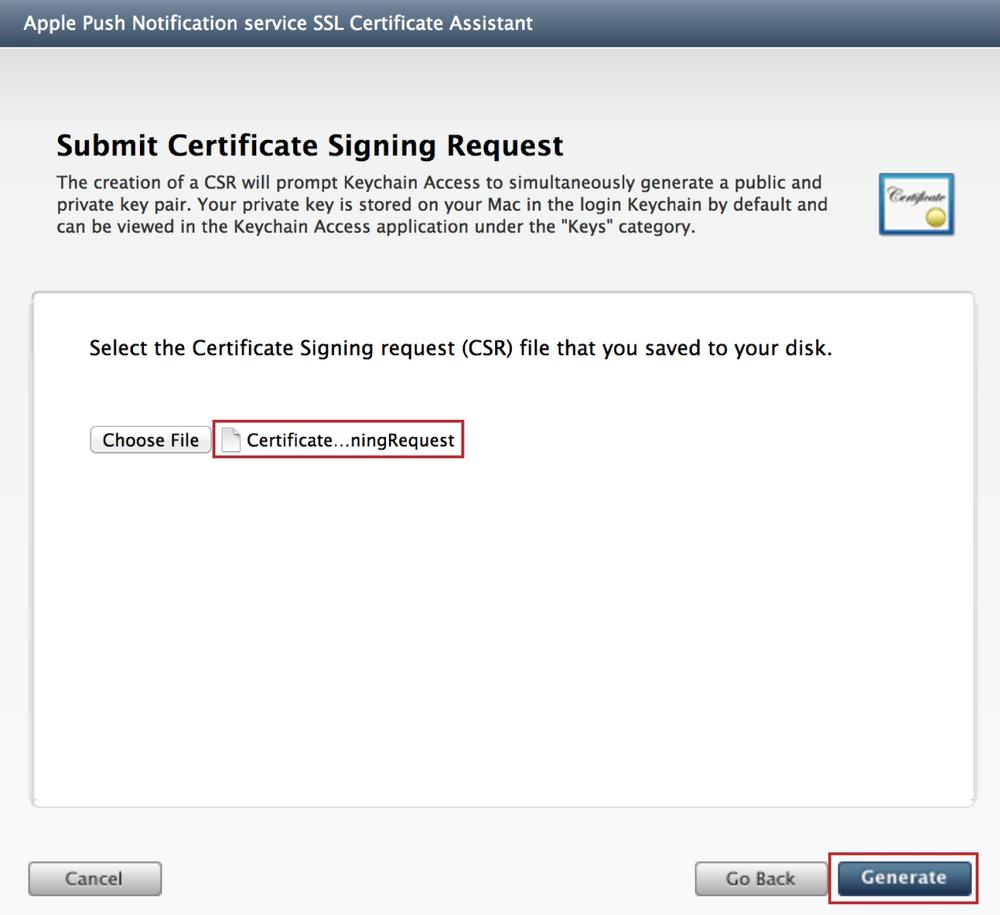
Return to the browser window and press the Choose File button and navigate to the CSR file on the Desktop. Once selected, your CSR file will be listed. Press the Generate button (see Figure 4-6).
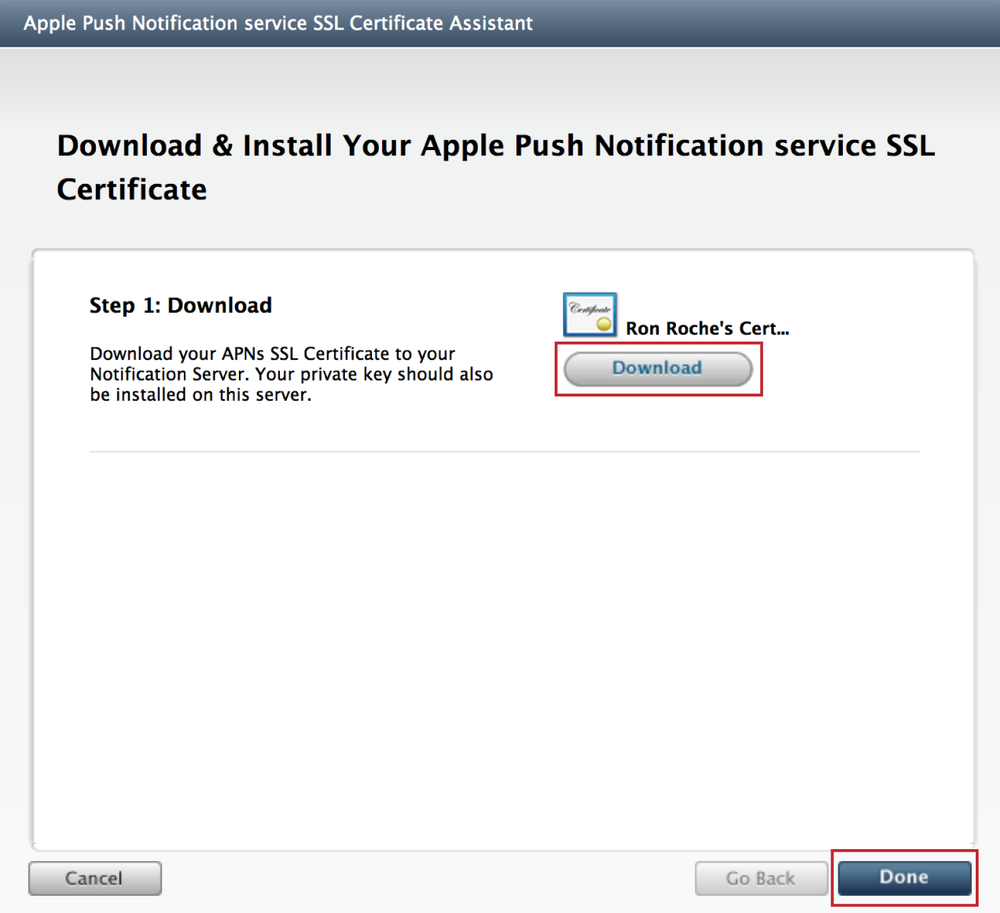
Once the certificate is generated, press the Download button and save the certificate to your computer. Press Done to exit the âApple Push Notification Service SSL Certificate Assistant wizardâ (see Figure 4-7).
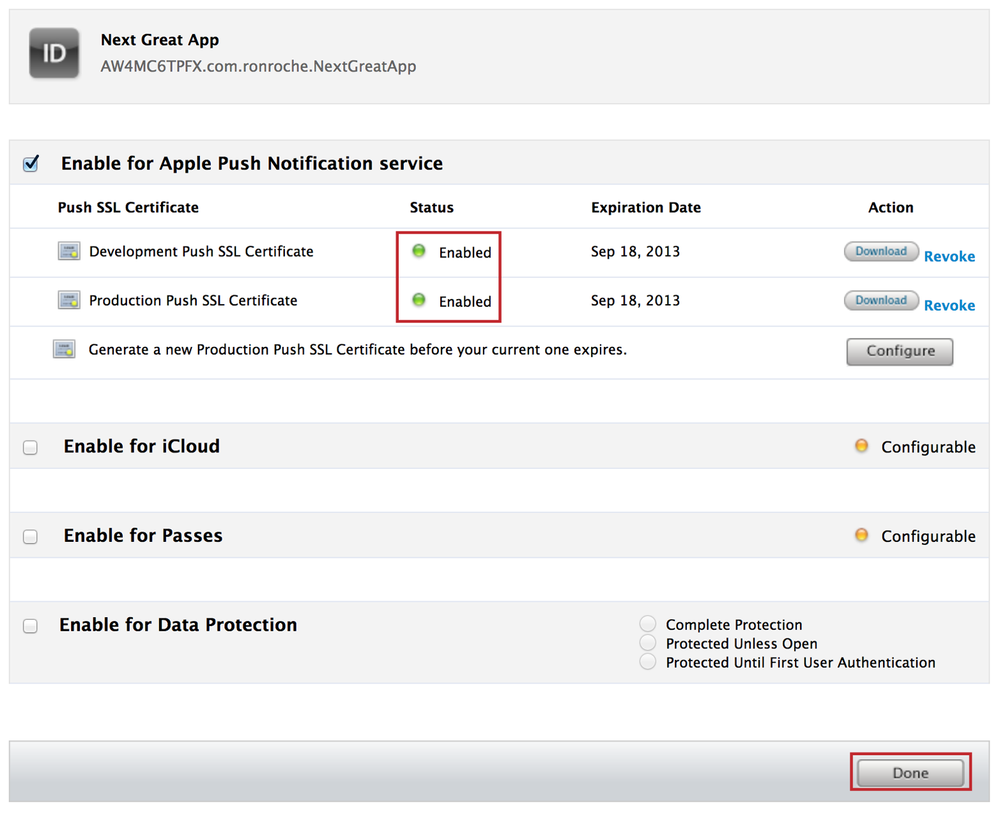
Your App ID is now configured for APNS, press the Done button (see Figure 4-8).
Double-click the certificate file (either aps_development.cer or aps_production.cer) to install the certificate into your login keychain.
Repeat this procedure for the other certificate (Development or Production).
Follow the steps in Modifying Provisioning Profiles for Additional Services to modify the existing Development, Ad Hoc, and App Store Provisioning Profiles that are associated to the App ID newly enabled for APNS. Another alternative would be to create new Provisioning Profiles associated to the App ID (see Development and Distribution Provisioning Profiles). It is important to note that you must do this for this each and every profile associated with the App ID including all Development, Ad Hoc and App Store Provisioning Profiles in order for the profile to be updated with the
aps-environmententitlement.

The following example is a snippet from a Development Provisioning Profile (a .mobileprovision file) that has been configured for APNS:
<key>Entitlements</key><dict><key>application-identifier</key><string>VW6RC9TPBX.com.ronroche.NextGreatApp</string><key>aps-environment</key><string>development</string><key>get-task-allow</key><false/><key>keychain-access-groups</key><array><string>VW6RC9TPBX.*</string></array></dict>
The following example is a snippet from an Ad Hoc or App Store Provisioning Profile (a .mobileprovision file) that has been configured for APNS:
<key>Entitlements</key><dict><key>application-identifier</key><string>VW6RC9TPBX.com.ronroche.NextGreatApp</string><key>aps-environment</key><string>production</string><key>get-task-allow</key><false/><key>keychain-access-groups</key><array><string>VW6RC9TPBX.*</string></array></dict>
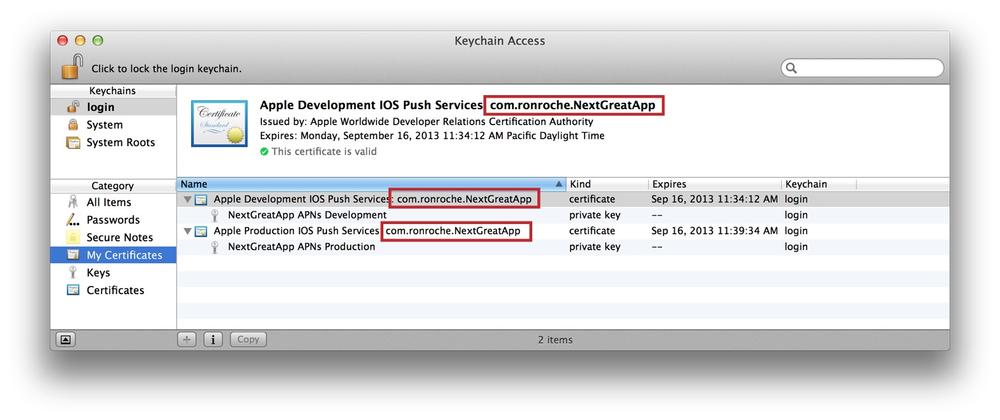
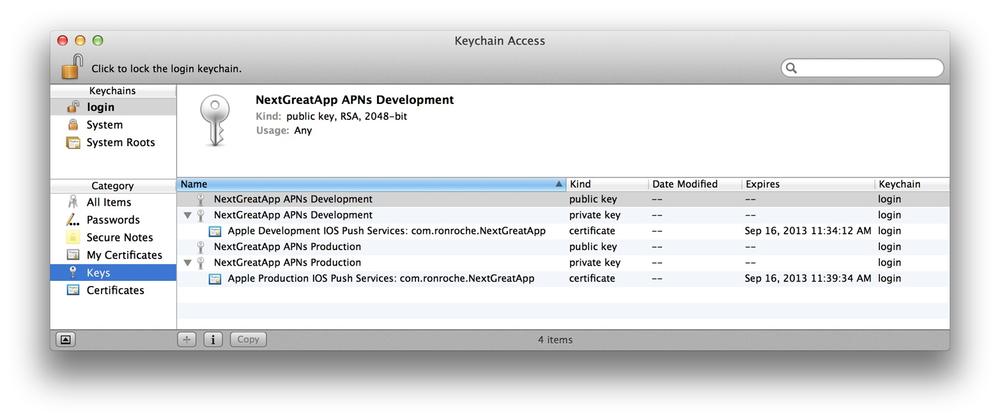
To confirm that the APNS certificates have been generated and installed correctly, open up Keychain Access and select the default keychain.
Within the âMy Certificatesâ category you should see both the âApple Development IOS Push Services:
Bundle
          ID
' and âApple Production IOS Push Services:Bundle ID' certificates. Expand both APNS certificates by clicking on the triangle to the left of the certificate. Each certificate must be associated to the private key that was created along with the CSR file. Selecting either certificate will display a green checkbox with a âThis certificate is validâ message (see Figure 4-9).Ensure that the certificate user ID matches the Bundle ID portion of the App ID (see Figure 4-9).
Within the Keys category you should see the public and private keys that were generated during the creation of the CSR files. Expand both APNS private keys by clicking on the triangle to the left of the keys. Each private key must be associated to the corresponding APNS certificate (see Figure 4-10).
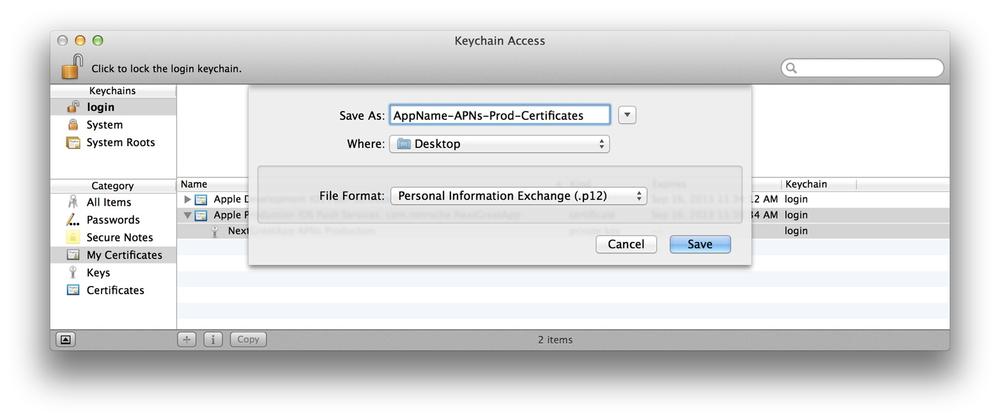
In order to install your APNS certificate onto your server, you will need to export the APNS Production certificate (which will include the associated private key) from Keychain Access. Itâs also a good idea to store the exported APNS Production certificate in a safe place so that they can be easily recovered in the event of a system crash or an operating system reinstall. My advice would be to check it into a secure area of your version control system. The process documented here can also be used to export an APNS Development certificate. Follow these instructions to export an APNS certificate along with the private key:
Open Keychain Access.
Select the login keychain (or whichever keychain your APNS certificate is in), and select the âMy Certificatesâ category.
Select the APNS certificate (which has an associated private key) that you wish to export.
Select the File menu â âExport Itemsâ¦â
A .p12 file will be created that contains both the certificate and the private key associated to it. Save the .p12 file with a meaningful name such as
AppName-APNS-Prod-Cert.p12, orAppName-APNS-Dev-Cert.p12 file to your Desktop (see Figure 4-11).You will be prompted to enter a password to secure the .p12 file.
You will also be prompted for your account login password in order to export the key. Press Allow or Always Allow when you are done entering your password.
To convert the exported .p12 file to Personal Information Exchange (pem) format, use the following syntax (you will be prompted for the password used to lock the .p12 file when it was exported):
$
openssl pkcs12 -inCertificateName.p12 -outCertificateName.pem -nodes
This section covers setting up your app for iCloud storage. This process includes enabling your App ID for iCloud, updating (or creating new) Provisioning Profiles, enabling entitlements within your Xcode target, and configuring the iCloud entitlements.
Here are things to note about the setup of an App ID for iCloud:
To enable the iCloud service, your App IDâs Bundle ID must be explicit as it is defined on the iOS Provisioning Portal (for example: com.acme.FinancialPlanner). The iCloud service cannot be configured for a App ID that has the wildcard character in the Bundle ID (for example: com.acme.*). For more information regarding explicit versus wildcard App IDs (and how to migrate from an explicit to a wildcard App ID), see App IDs.
Only a Team Admin or Agent on the iOS Provisioning Portal can enable or disable iCloud for an App ID.
All Provisioning Profiles linked to the App ID must be modified or created anew in order to be updated with the iCloud entitlements. Download and install the updated Provisioning Profiles and re-build your app, as the existing Provisioning Profiles for your app will not have the iCloud entitlements.
Disabling the iCloud service from an App ID results in invalidating all Provisioning Profiles associated to that App ID. In other words, if you disable iCloud (or any other service from an App ID), youâll have to renew any corresponding Provisioning Profiles that were associated to that App ID. Apps signed with the now-deleted Provisioning Profiles will continue to work; no need to re-sign.
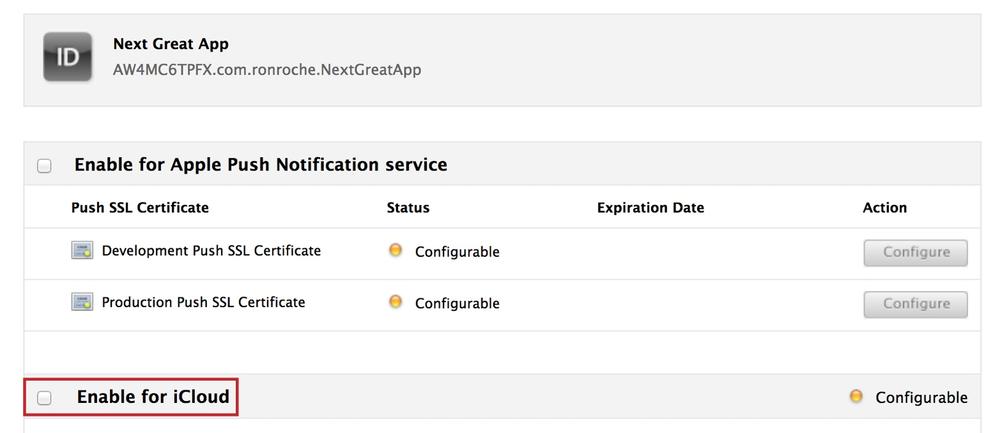
To configure an App ID for iCloud, log in to the iOS Dev Center using the Safari web browser and go to the iOS Provisioning Portal. Follow these steps:
Go to the App IDs section and press Configure next to the App ID you wish to configure for iCloud (see Figure 4-1).
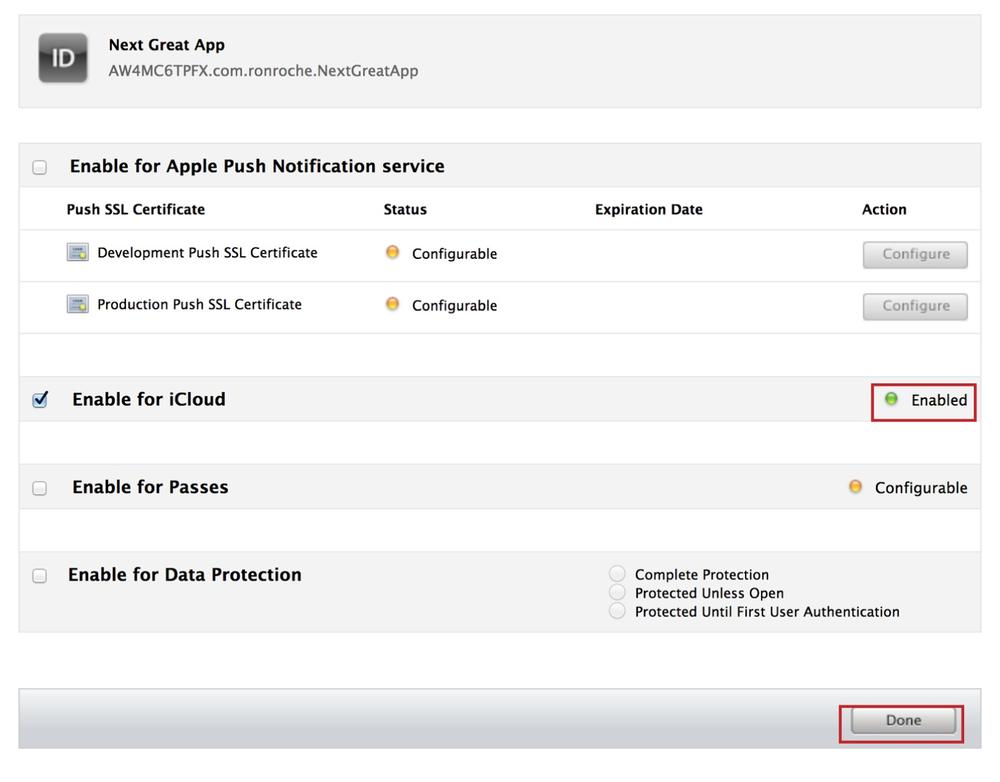
Check the box next to Enable for iCloud (see Figure 4-12).
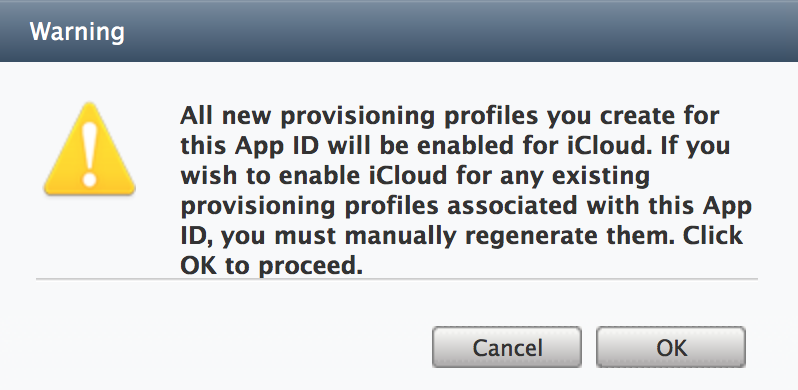
Press OK when you receive the Warning message regarding Provisioning Profiles (see Figure 4-13).
Your App ID is now configured for iCloud, press the Done button (see Figure 4-14).
Follow the steps in Modifying Provisioning Profiles for Additional Services to modify the existing Development, Ad Hoc, and App Store Provisioning Profiles that are associated to the App ID newly enabled for iCloud. Another alternative would be to create new Provisioning Profiles associated to the App ID (see Development and Distribution Provisioning Profiles). It is important to note that you must do this for this each and every profile associated with the App ID including all Development, Ad Hoc and App Store Provisioning Profiles in order for the profile to be updated with the iCloud entitlements.
The following example is a snippet from a Provisioning Profile (a .mobileprovision file) that has been configured for iCloud:
<key>Entitlements</key><dict><key>application-identifier</key><string>VW6RC9TPBX.com.ronroche.NextGreatApp</string><key>com.apple.developer.ubiquity-container-identifiers</key><array><string>PRLW8TB2LH.*</string></array><key>com.apple.developer.ubiquity-kvstore-identifier</key><string>PRLW8TB2LH.*</string><key>get-task-allow</key><false/><key>keychain-access-groups</key><array><string>VW6RC9TPBX.*</string></array></dict>
Prior to configuring your Xcode project (or workspace) target for iCloud, verify the following:
You have enabled Entitlements for your appâs target (see Enabling Entitlements for an Xcode Target).
You have removed your existing Development, Ad Hoc, and App Store Provisioning Profiles from Xcode Organizer, because your current installed profiles do not have the iCloud entitlements.
You have downloaded and installed your updated (or new) Development, Ad Hoc, and App Store Provisioning Profiles into Xcode Organizer, all of which have the
com.apple.developer.ubiquity-container-identifiers, andcom.apple.developer.ubiquity-kvstore-identifierentitlements.
Within your Xcode project, follow these steps enable iCloud for your app:
Select the root project folder.
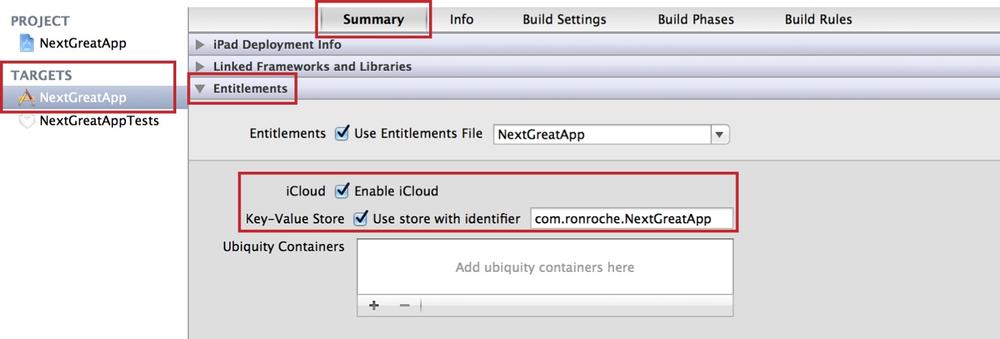
Within the project editor, select your target in the TARGETS section.
Select the Summary tab. Within the Entitlements section, select the box next to âEnable iCloudâ (see Figure 4-15).
To enable Key-Value Storage, check the box next to âKey Value Storeâ. The âUse store with identifierâ field will populate with your appâs Bundle ID (see Figure 4-15).
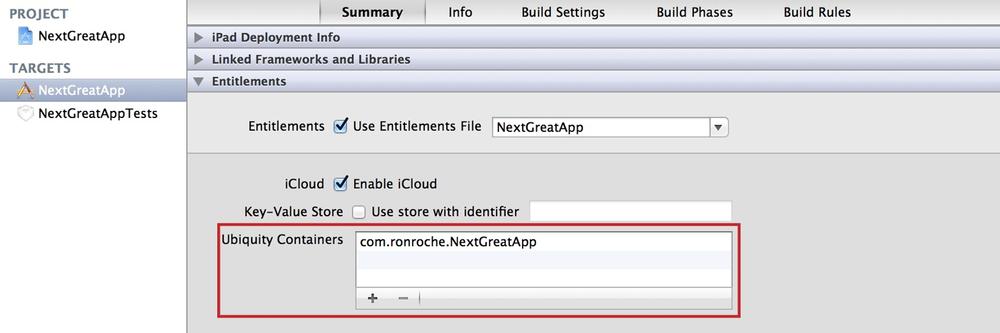
To enable iCloud document storage within your app, select the '+' sign within the âUbiquity Containersâ variable box. Your App ID will be added to the list (see Figure 4-16).
Your app has now been configured to utilize the iCloud Storage APIs for content storage within iCloud. For more information on developing iOS apps for iCloud, refer to the iCloud Documentation.
Outside of Appleâs Passbook app, your app (referred to in Appleâs documentation as a âcompanionâ app) may have the ability to read, update, or delete Passes. These operations require you to configure the Passes entitlement for your app. This section details the process of enabling Passes for an app by modifying the App ID, updating or creating new Provisioning Profiles, and configuring your Xcode appâs target to use the Passes entitlement. For more information on how to develop your app to interact with Passes, refer to the Passbook Programming Guide.
Here are things to note about the setup of an App ID for Passes:
To enable Passes, your App IDâs Bundle ID must be explicit as it is defined on the iOS Provisioning Portal (for example: com.acme.FinancialPlanner). Passes cannot be configured for a App ID that has the wildcard character in the Bundle ID (for example: com.acme.*). For more information regarding explicit versus wildcard App IDs (and how to migrate from an explicit to a wildcard App ID), see App IDs.
Only a Team Admin or Agent on the iOS Provisioning Portal can enable or disable Passes for an App ID.
All Provisioning Profiles linked to the App ID must be modified or created anew in order to be updated with the Passes entitlement. Download and install the updated Provisioning Profiles and re-build your app, as the existing Provisioning Profiles for your app will not have the Passes entitlement.
Disabling Passes from an App ID results in invalidating all Provisioning Profiles associated to that App ID. In other words, if you disable Passes (or any other service from an App ID), youâll have to renew any corresponding Provisioning Profiles that were associated to that App ID.
To configure an App ID for Passes, log in to the iOS Dev Center using the Safari web browser and go to the iOS Provisioning Portal. Follow these steps:
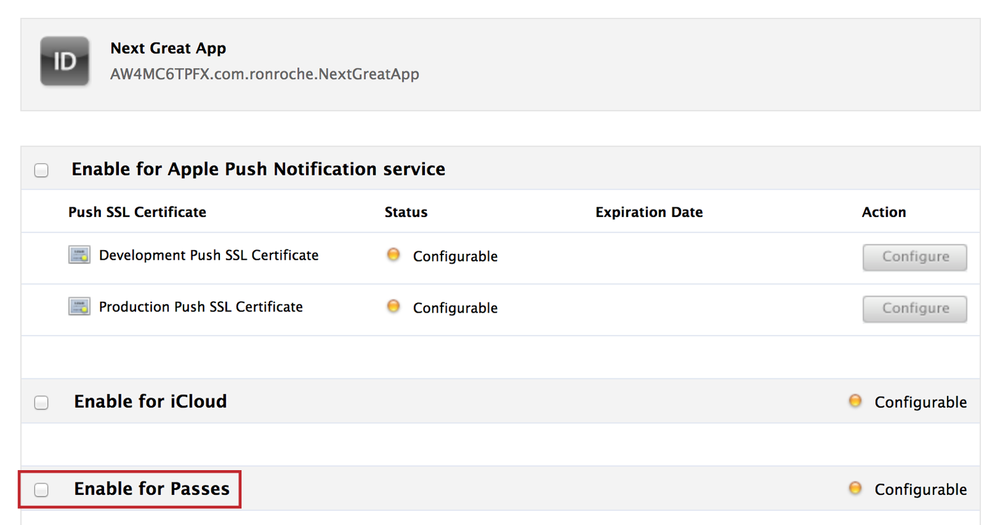
Go to the App IDs section and press Configure next to the App ID you wish to configure for Passes (see Figure 4-1).
Check the box next to Enable for Passes (see Figure 4-17).
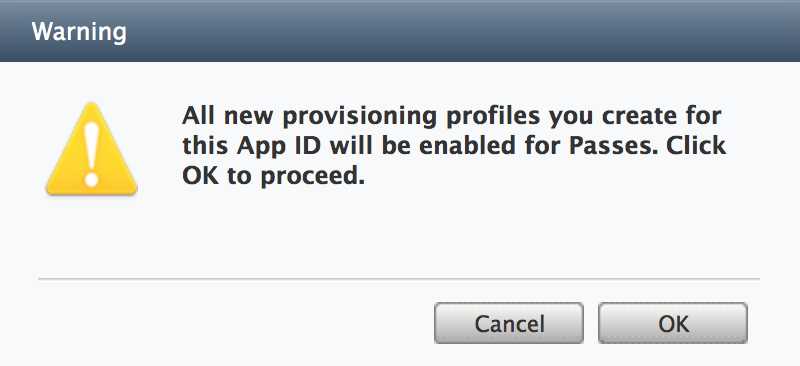
Press OK when you receive the Warning message regarding Provisioning Profiles (see Figure 4-18).
Your App ID is now enabled for Passes, press the Done button (see Figure 4-19).
Follow the steps in Modifying Provisioning Profiles for Additional Services to modify the existing Development, Ad Hoc, and App Store Provisioning Profiles that are associated to the App ID newly enabled for Passes. Another alternative would be to create new Provisioning Profiles associated to the App ID (see Development and Distribution Provisioning Profiles). It is important to note that you must do this for this each and every profile associated with the App ID including all Development, Ad Hoc and App Store Provisioning Profiles in order for the profile to be updated with the Passes entitlement.

The following example is a snippet from a Provisioning Profile (a .mobileprovision file) that has been configured for Passes:
<key>Entitlements</key><dict><key>application-identifier</key><string>VW6RC9TPBX.com.ronroche.NextGreatApp</string><key>com.apple.developer.pass-type-identifiers</key><array><string>PRLW8TB2LH.*</string></array><key>get-task-allow</key><false/><key>keychain-access-groups</key><array><string>VW6RC9TPBX.*</string></array></dict>
Prior to confirming your Xcode project (or workspace) target for Passes, verify the following:
You have enabled Entitlements for your appâs target (see Enabling Entitlements for an Xcode Target).
You have removed your existing Development, Ad Hoc, and App Store Provisioning Profiles from Xcode Organizer, because your current installed profiles do not have the Passes entitlement.
You have downloaded and installed your modified (or new) Development, Ad Hoc, and App Store Provisioning Profiles (all of which have the
com.apple.developer.pass-type-identifiersentitlements) into Xcode Organizer.
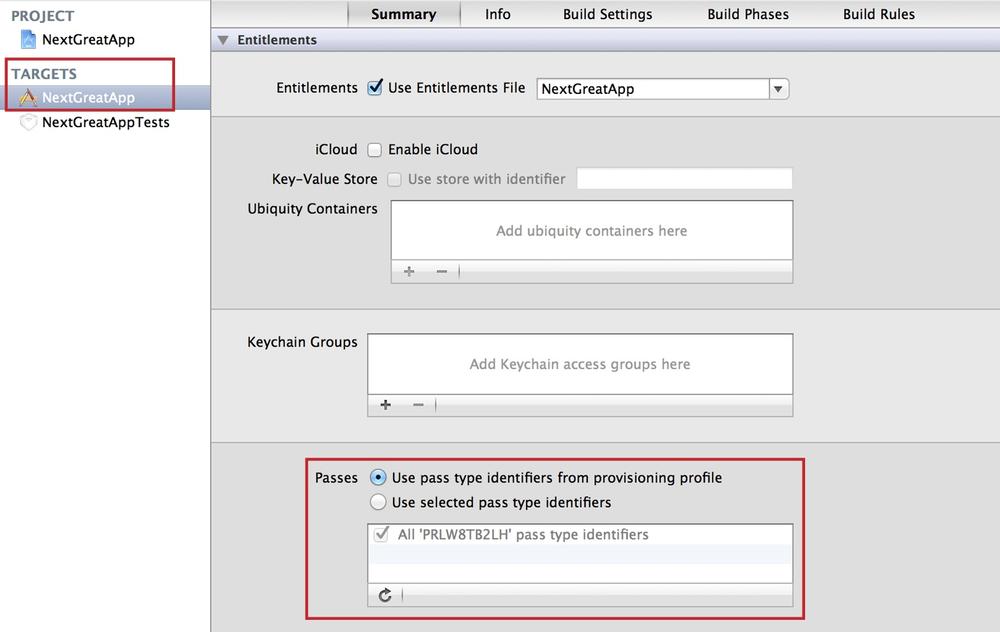
Within Xcode, follow these steps to verify the Passes entitlement is setup correctly for your app:
Select the root project folder.
Within the project editor, select your target in the TARGETS section.
Select the Summary tab, go to the Entitlements section.
For Passes, the âUse pass type identifiers from provisioning profileâ radio button is selected by default (see Figure 4-20). Verify an entry containing your that your App IDâs Bundle Seed ID is listed in the list box of pass type identifiers. This entry will appear when your Ad Hoc Distribution Provisioning Profile has been correctly installed (see Ad Hoc Distribution Provisioning Profile Setup).
To add additional security to your app, you can add the Data
Protection service which uses the encryption hardware built into iOS
devices. The process of adding Data Protection service includes enabling
the service for the App ID, choosing a level of security, and updating (or
creating new) Provisioning Profiles. As weâll cover below, updating the
Provisioning Profiles adds the com.apple.developer.default-data-protection
entitlement. For more information on developing iOS apps with Data
Protection, refer to the Advanced
App Tricks section of the iOS App Programming Guide.
Here are things to note about the setup of an App ID for Data Protection:
To enable Data Protection, your App IDâs Bundle ID must be explicit as it is defined on the iOS Provisioning Portal (for example: com.acme.FinancialPlanner). Data Protection cannot be configured for a App ID that has the wildcard character in the Bundle ID (for example: com.acme.*). For more information regarding explicit versus wildcard App IDs (and how to migrate from an explicit to a wildcard App ID), see App IDs.
Only a Team Admin or Agent on the iOS Provisioning Portal can enable or configure Data Protection for an App ID.
All Provisioning Profiles linked to the App ID must be modified or created anew in order to be updated with the Data Protection entitlement. Download and install the updated Provisioning Profiles and re-build your app, as the existing Provisioning Profiles for your app will not have the Data Protection entitlement.
Disabling the Data Protection service from an App ID results in invalidating all Provisioning Profiles associated to that App ID. In other words, if you disable Data Protection (or any other service from an App ID), youâll have to renew any corresponding Provisioning Profiles that were associated to that App ID.
To configure an App ID for Data Protection, log in to the iOS Dev Center using the Safari web browser and go to the iOS Provisioning Portal. Follow these steps:
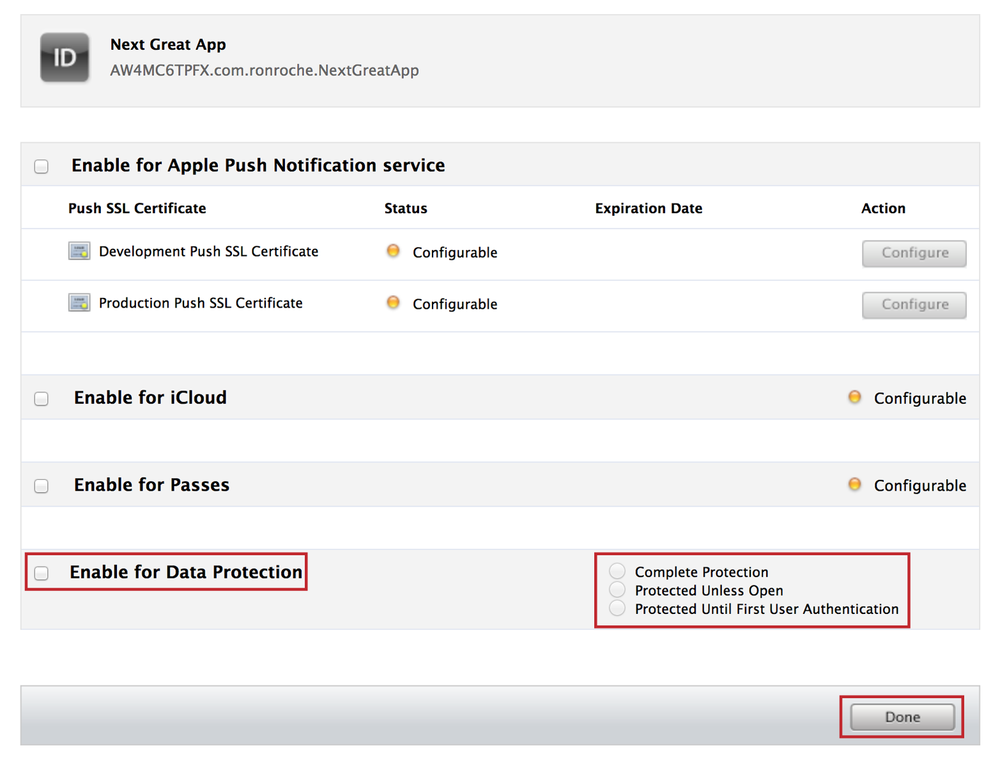
Go to the App IDs section and press Configure next to the App ID you wish to configure for Data Protection (see Figure 4-1).
Check the box next to Enable for Data Protection (see Figure 4-21), and select the radio button that corresponds to the level of protection you wish to enable. Press the Done button.
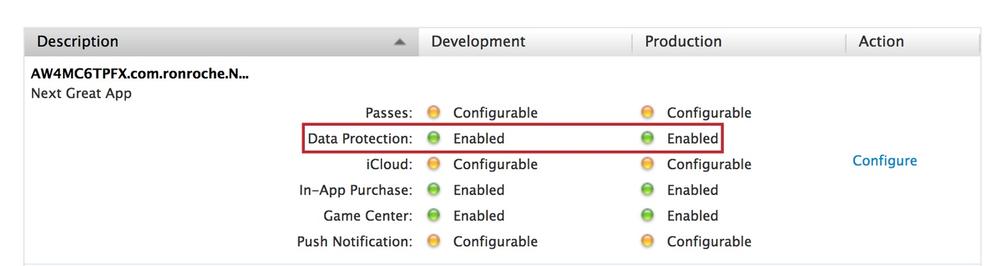
Your App ID is now configured for Data Protection (see Figure 4-22).
Follow the steps in Modifying Provisioning Profiles for Additional Services to modify the existing Development, Ad Hoc, and App Store Provisioning Profiles that are associated to the App ID newly enabled for Data Protection. Another alternative would be to create new Provisioning Profiles associated to the App ID (see Development and Distribution Provisioning Profiles). It is important to note that you must do this for this each and every profile associated with the App ID including all Development, Ad Hoc and App Store Provisioning Profiles in order for the profile to be updated with the Data Protection entitlement.
The following example is a snippet from a Provisioning Profile (a .mobileprovision file) that has been configured for Data Protection:
<key>Entitlements</key><dict><key>application-identifier</key><string>VW6RC9TPBX.com.ronroche.NextGreatApp</string><key>com.apple.developer.default-data-protection</key><string>NSFileProtectionComplete</string><key>get-task-allow</key><false/><key>keychain-access-groups</key><array><string>VW6RC9TPBX.*</string></array></dict>

The
com.apple.developer.default-data-protectionentitlement has been added to the list of Entitlements.
The entitlement in this example is of type
NSFileProtectionCompleteindicating the level of Data Protection chosen when the App ID was configured. Selecting one of the other options for the Data Protection level would display asNSFileProtectionCompleteUnlessOpen, orNSFileProtectionCompleteUntilFirstUserAuthentication.
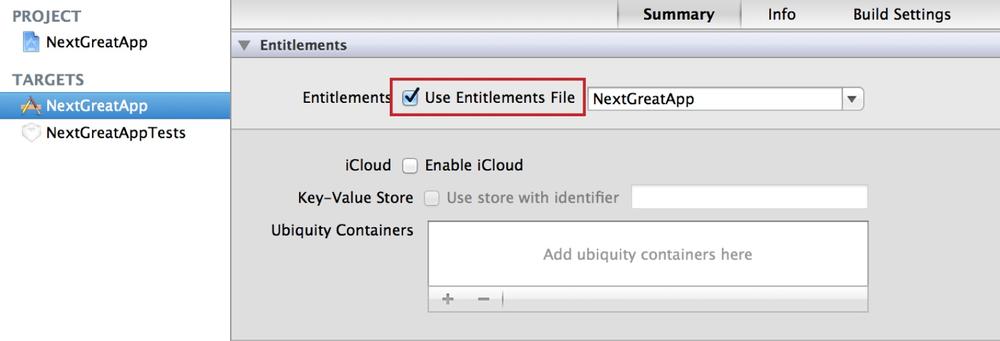
In addition to enabling and configuring an additional service for an App ID, several of these services (iCloud, Passes, and Data Protection) require you to enable entitlements for your appâs target before they can be used. Within Xcode, follow these steps to enable entitlements for your appâs target (see Figure 4-23):
Go to View â Navigators â Show Project Navigator.
Select the root project folder.
Within the project editor, select your target in the TARGETS section.
Select the Summary tab and within the Entitlements section, select âUse Entitlements Fileâ. The drop-down box will populate with your appâs Bundle ID.
Once your App ID has been configured to use additional services (APNS, iCloud, Passes, and Data Protection), the Provisioning Profiles associated to that App ID either need to be modified or re-created in order for an entitlement to be added. This change apples to the Development, Ad Hoc and App Store Provisioning Profiles. You must then download and re-build your app with the newly generated Provisioning Profile.
Here are things to note about Provisioning Profiles and additional services:
Going forward, all newly created Provisioning Profiles associated to the modified App ID will automatically include the corresponding entitlement.
Provisioning Profiles must be re-created or modified by using the iOS Provisioning Portal; do not use a text editor to manually add an entitlement.
Provisioning Profiles created prior to the associated App ID being enabled for an additional service will not work for the additional service.
Development Provisioning Profiles associated to the APNS-enabled App ID will contain the
aps-environmententitlement of typedevelopment. Ad Hoc and App Store Provisioning Profiles will contain theaps-environmententitlement of typeproduction.
To create new Provisioning Profiles, follow the steps in Development and Distribution Provisioning Profiles. As a Team Admin or Agent, follow these steps to modify the existing Development, Ad Hoc, and App Store Provisioning Profiles:
Log in to the iOS Dev Center and go to the iOS Provisioning Portal.
Go to the Provisioning section and select the Development or Distribution tab (depending on which profile you are updating).
Select Edit â Modify for the Provisioning Profile you wish to configure. Modify the profile in the smallest, least-intrusive way possible. The modification can be as simple and de-selecting and selecting a device association. The point here is to âtweakâ the profile so that the Submit button is highlighted. Once you press Submit, the Provisioning Profile is re-created with the enabled entitlement.
The profile will initially have a status of Pending. Refresh your browser (more than once if needed) and download the profile when it becomes available.
Remove your existing Development, Ad Hoc, and App Store Provisioning Profiles from Xcode Organizer, because your currently installed profiles do not have the entitlement(s) needed to use the newly enabled service.
Download and install the updated Provisioning Profile into Xcode Organizer and re-build your app with the updated Provisioning Profile.
Get Essential iOS Build and Release now with the O’Reilly learning platform.
O’Reilly members experience books, live events, courses curated by job role, and more from O’Reilly and nearly 200 top publishers.

