12.5. Deploying a Plug-in
Problem
You want to deploy a plug-in you’ve created.
Solution
Right-click the plug-in project, click Export, and follow the directions. Eclipse will handle the details.
Discussion
To deploy a plug-in, right-click the plug-in project and click
Export. Check “Deployable plug-ins and
fragments” in the Export dialog, and click Next to
open the Export Plug-ins and Fragments dialog shown in Figure 12-12. Select org.cookbook.ch12.MenuPlugIn (1.0.0). To create a single deployable
.zip file, use the Browse button to browse to
eclipse/workspace/org.cookbook.ch12/MenuPlugIn;
Eclipse will add the filename
MenuPlugIn_1_0_0.zip. Then click Finish.
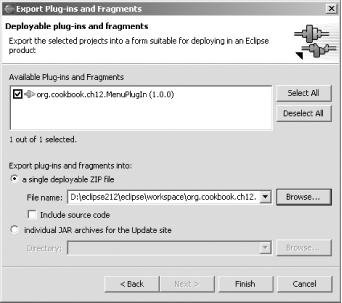
Figure 12-12. Exporting a plug-in
Clicking Finish creates MenuPlugIn_1_0_0.zip,
ready for deployment. This file contains two files:
MenuPlugIn.jar and
plugin.xml. This .zip file,
MenuPlugIn_1_0_0.zip, is what you deploy to
users—all they’ve got to do is to unzip it.
Tip
You can specify the name of the .jar file the
project will create when you create the project initially in the
third pane of the New Plug-in Project dialog.
Get Eclipse Cookbook now with the O’Reilly learning platform.
O’Reilly members experience books, live events, courses curated by job role, and more from O’Reilly and nearly 200 top publishers.

