3.2. Creating a Java Project
Problem
You want to begin programming, so you need to create a new Java project.
Solution
Select File→ New→ Project, or right-click the Package Explorer in the Java perspective, and select New→ Project.
Discussion
All Java code has to go into a project of some kind in Eclipse. Although we covered the basics of creating a new project in Chapter 1, we’ll take a more in-depth look at the process here.
To create a Java project, open the New Project dialog by selecting File→ New→ Project or by right-clicking the Package Explorer and selecting New→ Project. Select Java in the left pane and Java Project in the right pane, as shown in Figure 3-2, and click Next.
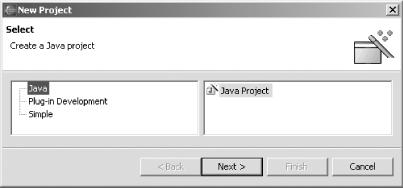
Figure 3-2. The New Project dialog
Give the project a name in the next dialog, as shown in Figure 3-3, and click Next.
Tip
The “Project contents” box shown in Figure 3-3 is where you specify the location of the project. It can be very useful to store the project where other software, such as the Tomcat web server, can find it. To select a custom location for the project, uncheck the “Use default” checkbox, and browse to a new directory.

Figure 3-3. Naming a project
The final dialog in this sequence, shown in Figure 3-4, contains four tabs; here’s what they do:
- Source
Enables you to specify source folders (discussed shortly) ...
Get Eclipse Cookbook now with the O’Reilly learning platform.
O’Reilly members experience books, live events, courses curated by job role, and more from O’Reilly and nearly 200 top publishers.

