Doctoring Photos
Techniques and tools for fixing up your photos after theyâve been taken.
Thereâs more to image preparation than simple crops and rotations. When presentation really matters, you may want to take a few extra minutes to make your auction photos look perfect.
Tip
Be careful not to doctor the photo so much that it misrepresents the item being sold. Try to strike a balance between making your photos look professional and setting a reasonable expectation with your bidders; see [Hack #39] for details.
The following tools are available in most of the more capable image editors, but their names and usage may vary slightly:
- Clone Tool
Use the clone tool to copy one part of an image to another part, useful for removing dust and unwanted reflections.
Start by choosing an area to clone. In Photoshop, click while holding the Alt key. In Paint Shop Pro, click while holding Shift. Then, start drawing on a different part of the image. The horizontal and vertical distance will be held constant, so if you move a half-inch to the left, youâll be cloning the area a half-inch to the left of the spot you originally selected. Figure 5-6 shows an image doctored with the clone tool.
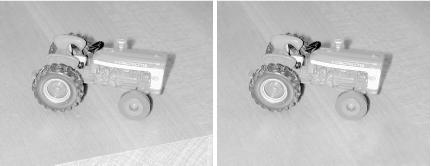
Figure 5-6. Use the clone tool to touch up small areas of your images; here, the table edge and a few scratches were removed with cloning
- Skew, Distort, and Perspective Tools
Photoshop supports a variety of linear ...
Get eBay Hacks now with the O’Reilly learning platform.
O’Reilly members experience books, live events, courses curated by job role, and more from O’Reilly and nearly 200 top publishers.

