Modifying an Image
After inserting a graphic, you can work on it in several ways: by attaching a link to the image, aligning it on the page, or adding a border and margin to it, for example. As with most objects on a Web page, you set image properties using the Property inspector (see Figure 5-4).
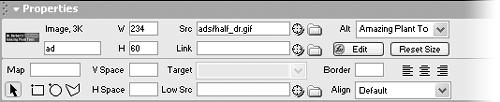
Figure 5-4. The Property inspector displays all the properties of a selected graphic, including its width, height, source, border, and even a tiny preview at upper-left.
Naming an Image
Just to the right of an image’s thumbnail on the Property inspector is a small field where you can type a name for that image. Most of the time, you’ll leave this field blank. However, if you plan to add interactive effects to it, such as the rollover effect discussed on page 126, or your own JavaScript programming, you must name your picture. Whatever name you choose should only use letters and numbers—no spaces or other punctuation. (When you do this, Dreamweaver adds both a name property and an ID property to the image tag. The name tag is still used by most browsers, but the more recent ID tag is fast becoming the standard way that JavaScript identifies an object on a page.)
Note
JavaScript uses the image name or ID that you type here for its own reference; no one actually sees this name in a Web browser. In other words, this isn’t the place to give your graphic a text label that shows up when your reader ...
Get Dreamweaver MX: The Missing Manual now with the O’Reilly learning platform.
O’Reilly members experience books, live events, courses curated by job role, and more from O’Reilly and nearly 200 top publishers.

