Although reading a book is a good way to learn the ins and outs of a program, nothing beats sitting in front of the computer and taking a program through its paces. Many of this book’s chapters, therefore, conclude with hands-on training: step-by-step tutorials that take you through the creation of a real, working, professionally designed Web site for the fictional online magazine Cosmopolitan Farmer.
The rest of this chapter, for example, introduces Dreamweaver by taking you step by step through the process of building a Web page. It shouldn’t take more than an hour. When it’s over, you’ll have learned the basic steps of building any Web page: creating and saving a new document, adding and formatting text, inserting graphics, and adding links.
If you’re already using Dreamweaver and want to jump right into the details of the program, feel free to skip this tutorial. And if you’re the type who likes to read first and try second, read Chapters 2 through 5, and then return to this chapter to practice what you’ve just learned.
Note
The tutorial in this chapter requires the example files from this book’s Web site, http://www.sawmac.com/dwmx/. Click the Tutorials link to go to the tutorials page. Download the files by clicking either the Tutorial 1 Mac files or Win files link, depending on the kind of machine you’re using (Mac or Windows).
After you’ve downloaded and decompressed the files, you should have a DWTutorial1 folder on your computer, containing the Web pages and graphics needed for this tutorial. If you’re having difficulties, the Web site contains detailed instructions for downloading the files you’ll be using with this book.
Whenever you build a new Web site or edit an existing one, you must begin by introducing Dreamweaver to it—a process called defining a site. This simple process is the most important first step when you start using Dreamweaver, whether you plan to work on a five-page Web site, build a thousand-page online store, or edit an existing Web site.
Whenever you want to use Dreamweaver to create or edit a Web site, your first step is always to show the program where the root folder is—the master folder for all your Web-site files. You do it like this:
Choose Site → New Site.
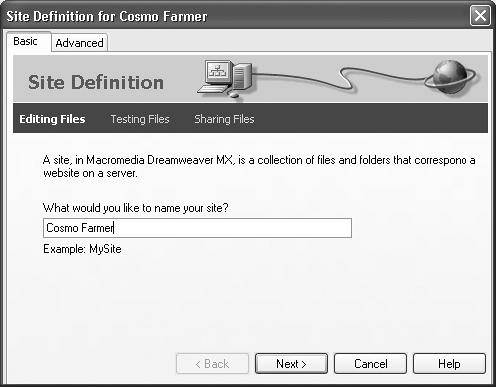
The Site Definition wizard appears, new in Dreamweaver MX (see Figure 1-6). Make sure the Basic tab is selected.
Figure 1-6. The Basic tab of the Site Definition window—new in Dreamweaver MX—takes you step by step through the process of setting up a new site. Each stage of the process—Editing Files, Testing Files, and Sharing Files—is clearly labeled. Depending on the type of site you’re building, and which Dreamweaver features you plan on using, you’ll be taken through a series of simple questions that help you set up your site.
Type Tutorial 1 in the Site Name field. Click Next.
The name you type here is solely for your own reference, to help you identify the site in Dreamweaver’s Site menu. It won’t appear on the Web.
In the next step, you’ll tell Dreamweaver whether you plan on building (a) regular Web pages or (b) pages that require a special server for creating the dynamic, database-driven Web sites discussed in Part 6 of this book.
Click “No, I do not want to use a server technology.” Click Next.
In this tutorial, you’ll be building a basic Web page.
In the next steps, you’ll tell Dreamweaver how you want to work on the files in your site and where you store those files. In this example, you’ll use the folder you downloaded from this book’s Web site; in other situations, you’ll choose (or create) a folder of your own.
Click “Edit local copies on my machine.”
Understanding why you made this choice takes a bit of explanation.
The most common method of working on the files of a Web site involves having two sets of files: the local site on your hard drive and the remote site on the Web (see the box below).
But there are other ways to work on Web sites. For example, if you work at a company with its own Web server in-house, you may want to work directly on the live, online Web files over the corporate network. In fact, there’s a third method: you can even edit your Web pages directly on the Internet.
But the first method is by far the best one. Working directly on the live version of the site—the one anyone with a Web browser can see—exposes your half-finished pages, complete with typos and missing pictures, to your audience. It’s a much better idea to perfect a page on your own computer, and then, when it’s finished, move it to the Web server.
Click the folder icon next to the label, “Where on your computer do you want to store your files?”
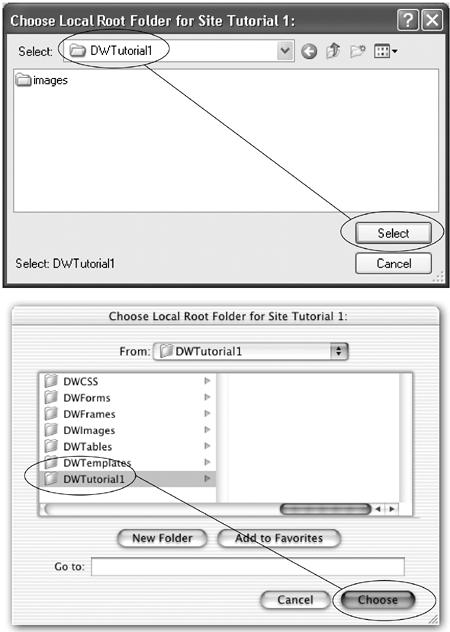
The Choose Local Root Folder window opens, so that you can choose a folder on your hard drive that will serve as your local root site folder—the folder on your computer where you’ll store the HTML documents and graphics files that make up your Web site.
Browse to and select the DWTutorial1 folder.
The Mac and Windows versions of Dreamweaver handle this ritual a bit differently; see Figure 1-7.
Figure 1-7. When it comes to selecting a local root folder, the Mac and Windows versions of Dreamweaver differ slightly. Top: In Windows, the folder name appears in the Select field at the top of the Choose Local Folder window. You click Select to define that folder as the local root. Bottom: On the Mac, you highlight the folder in the list in the middle of the window, and then click Choose to set that folder as the local root.
If you were starting a Web site from scratch, you could also create a new empty folder at this point. You would then save your Web pages and graphics into this folder as you built your site.
For more on root folders and organizing Web sites, see Part 4. For now, the fact to burn into your brain is that all the files that will constitute your Web site must live, while you’re working on them, in a single folder—the local root folder.
Click Next.
Now Dreamweaver asks how you want to connect to your remote server—the computer that will dish up the finished Web files to your adoring public.
Choose None from the first menu; click Next.
Dreamweaver can move your files to a Web server automatically, as you’ll learn in Chapter 16.
After clicking the Next button, you see a summary of your settings. If you made a mistake, click Back to move back to the appropriate step in the process to make changes.
Click the Done button.
A dialog box appears, letting you know that Dreamweaver is about to create a site cache for your Web site. That’s a small database (cache) that tracks pages, links, images, and other components of your site. The cache helps Dreamweaver’s site-management tools avoid breaking links, warn you when you’re about to delete important files, and help you reorganize your site quickly.
Tip
This dialog box will appear each time you define a new site. When it gets old, just turn on “Don’t show me this message again.”
Defining a site doesn’t actually do anything to your computer; it doesn’t create a home page or add a folder, for example. It merely prepares Dreamweaver for working on a site.
Tip
Dreamweaver lets you define multiple Web sites, a handy feature if you’re a Web designer with several clients, or if your company builds and manages more than one site. To define an additional site, choose Site→New Site and follow the steps on page 25. You can then switch from one site to another using the Site List in the Site window (see Figures 14-5 and 14-6).
As noted at the beginning of this chapter, Dreamweaver has many different windows that help you build Web pages. For this tutorial, though, you’ll need only three: the Insert bar, document window, and Property inspector (see Figure 1-2). (If you don’t see the Insert bar, choose Window→Insert; if the Property inspector isn’t visible choose Window→Properties.)
Before beginning the Web site construction in earnest, though, you’ll help yourself greatly by adjusting a few Dreamweaver preferences like this:
Choose Edit → Preferences.
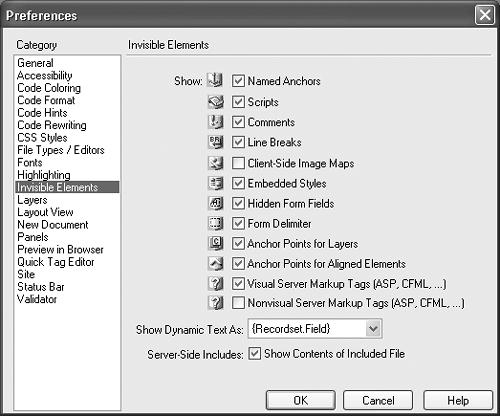
The Preferences dialog box opens (see Figure 1-8).
Figure 1-8. Dreamweaver’s Preferences dialog box is a smorgasbord of choices that let you customize the program to work and look they way you want. In this step, you’re making the normally invisible Line Break tags visible. As you’ll see, this makes importing and formatting paragraphs of text a much simpler process.
In the Category list on the left side of the Preferences dialog box, click Invisible Elements. Make sure the fourth option, Line Breaks, is turned on.
In the coming steps, you’ll see why this option is useful.
Click OK.
The dialog box closes; you’re ready to start building a Web site.
“Enough already! I want to build a Web page,” you’re probably saying. You’ll do that in this phase of the tutorial.
Choose File → New.
Although you may already have a blank document open, you should get to know the New Document dialog box—a new element in Dreamweaver MX (see Figure 1-9).
Figure 1-9. The New Document dialog box appears whenever you choose FileNew or press Ctrl+N (
 -N). It lets you create a whole range of different types of documents including basic Web pages, dynamic pages (see Part 6), templates (Chapter 18) and style sheets (Chapter 8), to name a few. Furthermore, it lets you change the default language for creating your pages from HTML to XHTML, the newer standard described on page 5. Just turn on Make Document XHMTL Compliant (lower right).
Tip
If you don’t want to deal with this window every time you create a new page, click the Preferences button. In the Preferences dialog box, turn off the “Show New Document Dialog on Control-N” checkbox.
While you’re at it, you can also specify what kind of file you want Dreamweaver to make whenever you press Ctrl+N (
-N). For example, if you most commonly create plain HTML files, choose HTML. But if you most often create dynamic pages (like the ASP.NET pages described on page 620), you can choose a different type of file—ASP.NET VB, for example.With these settings, pressing Ctrl-N (
-N) will instantly create a new blank document. (Choosing File→New, however, will still open the New Document window.)Make sure that Basic Page and HTML are selected as shown in Figure 1-9, and then click Create.
A new, blank document window appears.
Click inside the document window, and then choose File → Save. When the Save As dialog box appears, save the page as advertise.html in the DWTutorial1 folder
Make sure you save this page into the correct folder. In Phase 1, you defined the DWTutorial1 folder as the root of the site—the folder that holds all the pages and files for the site. If you save the page outside of this folder, Dreamweaver will get confused, and its site management features won’t work correctly.
Tip
Most operating systems let you save files with long names, spaces, and characters like #, $, &, and
. But some browsers and servers have trouble interpreting anything but letters and numbers; for example, Netscape 4.x can’t “see” any files with spaces in their names. Play it safe: use only letters, numbers, and—if you want a good substitute for a space—the underline or underscore character, like_this (Shift-hyphen).Your Web-page documents also need a file name extension, like index.html. Web servers rely on extensions like .htm, .html, .gif, and .jpg to know whether a file is a Web page, graphic, or some other type of file. Windows automatically adds the extension. But on the Mac, where you can save files without extensions, make sure its name ends in the suffix .html or .htm when you save a Dreamweaver document.
If the document window toolbar isn’t already open (see Figure 1-2), choose View → Toolbars → Document to display it.
The toolbar at the top of the document window provides easy access to a variety of tasks you’ll perform frequently, such as titling a page, previewing it in a Web browser, and looking at the HTML source code.
Click in the Title field in the toolbar; type Advertise with Cosmopolitan Farmer.
The Title field lets you set a page’s title—the information that appears in the title bar of a Web browser. The page title is also what shows up as the name of your Web page when someone searches the Web using a search engine like Yahoo or Google.
Tip
Try this simple experiment: Go to http://www.altavista.com and search for Untitled Document. You’ll find that the Web is strewn with thousands upon thousands of Web pages without titles, many of which were created with Dreamweaver.
That’s because when you create a new Web page, Dreamweaver assigns it the not-so-glamorous title “Untitled Document”—and all too many people forget to change that dummy text to something more meaningful. Not only does “Untitled Document” look very unprofessional on a Web page, but an untitled page looks terrible in the results list of a search engine.
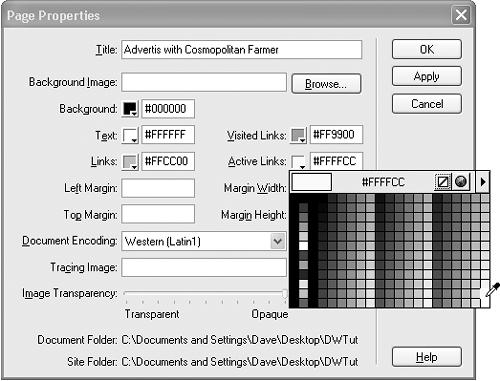
Choose Modify → Page Properties.
The Page Properties dialog box opens (see Figure 1-10), in which you can define the basic attributes of each Web page you create. It’s a good idea to do this as soon as you create and save a page.
Figure 1-10. The Page Properties dialog box lets you set general properties of a Web page, such as the color of text and links. Clicking a color box opens the color selector. You can choose one of the colors in the palette or even use the eyedropper to sample a color from your document window. You can even sample colors from anywhere on their screen—even from open documents in other applications.
You’ll notice that the title of the page is already set. You typed it into the toolbar in the previous step.
Click the small gray box next to the word Background. Using the eyedropper cursor, click a black square on the pop-up color palette.
When you create a new document in Dreamweaver, the page background is white, just as in a word processor. But if white pages don’t inspire your design sense, you’re not stuck. Using this pop-up palette, you can choose any background color you want (or, if you’re an HTML guru, you can type in the hexadecimal number of the color you want). Both the palette and the hexadecimal color-specifying field reappear fairly often in Dreamweaver.
In this case, you’ve just set the background color of the Web page to black.
Tip
You can even fill the background of your page with a graphic—to add a subtle pattern for texture, or to put the company logo in the background as a “watermark.”
To choose a background image, click the Browse button shown in Figure 1-10. This opens a window that lets you search for the graphic you want to use. Be careful with background images, however. If there’s a lot of contrast and detail in your background image, it can easily obscure the rest of the content on the page.
Click the small black box next to the Text label. From the pop-up color palette, choose white (or type #FFFFFF into the box beside the palette square).
Unless you intervene, text appears in black on a Web page. But since you just set the background of this page to black, the text needs to be a light color—white, in this case—to be readable. (White will just be the proposed color. You’ll be able to override this color on a case-by-case basis, as you’ll see later in this tutorial.)
In the Links color field, type #FFCC00; in the Visited Links field, type #FF9900; and in the Active Links color field, type #FFFFCC.
These are hexadecimal codes that specify specific Web-page colors; more on this notation on page 33.
Links come in three varieties: regular, visited, and active. An active link is one you’re clicking at this moment; a visited link is one you’ve already been to, as noted in a browser’s History list. And, finally, a regular link is a plain old link, unvisited, untouched. You can choose different colors for each of these link states.
While it may seem a bit like overkill to have three different colors for links, the regular and visited link colors can provide very useful feedback to Web visitors by indicating which links they’ve already followed and which remain to be checked out.
Check the margins. Adjust them, if you like.
Most browsers put a little bit of space between the contents of your Web page and the top and left sides of the browser window. The exact amount of this margin varies from browser to browser.
If you like, you can change the default setting so that the browser adds more space to the top and left side of the page—or eliminates the margin altogether.
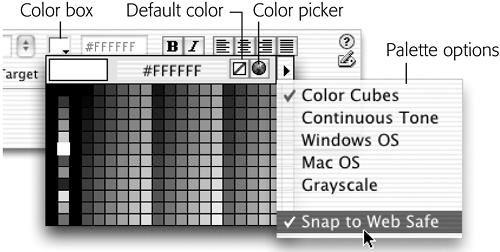
UP TO SPEEDUsing Dreamweaver’s Color Box
The innocent-looking gray box shown here is called the color box. You can use it choose a color for the selected Web-page element in any of three ways.
First, you can click one of the colors on the pop-up palette of color choices that appears when you click the box.
Second, you can use the eyedropper cursor that appears when you click the color box. This cursor is “loaded”; you can click any color visible on your screen—even outside the dialog box you’re in—to select a color, a trick that comes in handy when you want to use a color from a graphic you’ve placed in your document. You can even sample a color from another application’s window: just click with the eyedropper. (This click may take you out of Dreamweaver; just return to Dreamweaver to see that the color has been applied.)
Finally, you can click the Color Picker icon, identified here, to launch the Mac or Windows color-picker dialog box.
If you decide you don’t want to add color, or you want to remove a color you’ve already applied, click the Default Color button on the pop-up color palette. Without a specific color setting, Web browsers will use default colors for the element in question (black for text, for example).
Next to the color box in any Dreamweaver dialog box is a blank text field. If you know your Web colors, you can type their hex codes into this box, which is sometimes faster and more precise than clicking the rainbow palette.
In a hex code, a Web color is represented by a six-digit code like this: #FF0000. (Hexadecimal notation is a system computers use for counting; it’s what you’d use for counting, too, if you had 16 fingers. In this system, you count like this: 0, 1, 2, 3, 4, 5, 6, 7, 8, 9, A, B, C, D, E, F..) The best way to learn a color’s hex value is to choose it in the palette, and then look at the code that Dreamweaver writes into the text box next to it.
You can choose a different set of colors in the palette, too, using the Palette Options pop-up menu. You can choose Color Cubes, Continuous Tone, Windows OS, Mac OS, or Grayscale. The first two contain the Web-safe color palette (colors that most machines will reliably display in the same shades you pick) in different arrangements. The Windows OS and Mac OS palettes display the colors available on those respective operating systems when in 256 color mode. Finally, the grayscale palette offers 256 somber shades of gray; you’ll find them useful primarily when building Ingmar Bergman tribute sites.
Finally, when you use the eyedropper to sample a color, Dreamweaver uses the nearest Web-safe color—one of only 216 colors. When people surfed the Web with old monitors and old video cards, sticking to Web-safe colors was a good idea. Today, however, most computer screens can show thousands or millions of different colors—many more than are available from the Web-safe palette. In short, consider turning off the “Snap to Web Safe” option in the Palette Option menu. You’ll have a much wider range of colors to choose from—and all of them, these days, are safe.
Unfortunately, Internet Explorer and Netscape Navigator use different terms for the top and left margins, so you need to set all four of the Margin boxes here if you want to see the same size margins in the two browsers. In Internet Explorer, the numbers you put into Dreamweaver’s Left Margin and Top Margin boxes define the distance between your page contents and the left and top of the browser window, measured in pixels. In Netscape browsers, Dreamweaver’s Margin Width box defines the space from the left edge of the window, and Margin Height for the space from the top.
Tip
To completely eliminate margins, type 0 in each margin field. That’s a useful setup when you want a graphic, such as a banner, to butt directly up to the top and left edges of the browser window.
Setting all four of these options won’t cause any problems with the different browsers. Internet Explorer simply ignores the Netscape-specific code, and vice versa.
For this tutorial, you don’t need to set any margins, but keep this discussion in mind when you start building your own pages.
Click OK to close the window and apply these changes to the page.
You return to your document window (see Figure 1-11). If you see an asterisk next to the file name at the top of the document window, Dreamweaver is trying to tell you that you’ve made changes to the page since you last saved it.
Choose File → Save (or press Ctrl+S [
-S]).
Saving your work frequently not only prevents a serious headache if the power goes out as you finish that beautiful—unsaved—home page, but also ensures that you won’t have problems setting up links later. (Links are often dependent on where a page is saved in the folder structure of a site.)

Now you’ll add the real meat of your Web page: words and pictures.
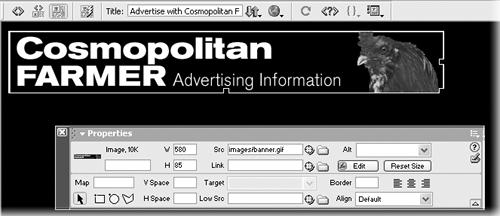
Under the Common tab of the Insert bar, click the Image button (Figure 1-14).
Figure 1-12. The Email link, Image button, and Horizontal Rule button are just three of the objects you can insert.
Alternatively, choose Insert→Image. Either way, the Select Image Source dialog box opens.
Browse to the images folder in the DWTutorial1 folder; double-click the graphics file called banner.gif.
The banner picture appears at the top of the page, as shown in Figure 1-12. A thin border appears around the image, indicating that it’s selected. The Property inspector changes to reflect the properties of the image.
Figure 1-13. When an image is selected in the document window, the Property inspector reveals its dimensions. In the top-left corner, a small thumbnail image appears, as does the word Image—to let you know an image is selected—and the image’s file size (in this case, 10 K). The other image properties are described in Chapter 5.
In the Alt field in the Property inspector, type Advertising Information.
An image’s Alt property is a text description of the graphic. It’s important to add a text label for each graphic on your Web page; two populations will thank you. First, there are the people who deliberately turn off pictures in their Web browsers, in exchange for a dramatic speed-up in the appearance of Web pages. Second, visually impaired people often use software that reads the text of Web pages out loud. In both cases, the Alt label you give each picture is all these visitors will have to go on.
Deselect the image by clicking anywhere in the document window outside of the image. Press Enter to create a new paragraph. Type Ad Sizes and Rates.
The Property inspector now displays text-formatting options.
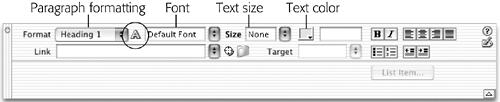
From the Format pop-up menu in the Property inspector, choose Heading 1 (see Figure 1-13).
Figure 1-14. If you don’t see font, size, and color options, click the HTML/CSS button (circled). See page 241 for details on its use.
This Format pop-up menu offers a number of different paragraph types. Because you’re about to type a heading for your page, you’ve used the Heading 1 style, which makes text big and bold.
Press Enter to create another new paragraph. Type this: Cosmopolitan Farmer offers 3 sizes and rates for advertisements.
This text is smaller than the headline above it. When you press Enter or Return at the end of a headline-formatted paragraph, Dreamweaver MX automatically formats it as a paragraph. (Want proof? Look at the Property inspector’s Format pop-up menu. It says “paragraph.”)
This new text is a bit dull, so you’ll spice it up like this:
Highlight the entire sentence you’ve most recently typed.
You can do so by dragging carefully across the entire line. (Unlike the Format pop-up menu, which affects an entire paragraph at a time, the Font pop-up menu, which you’re going to use next, only applies to selected text.)
From the Font pop-up menu in the Property inspector, choose “Arial, Helvetica, Sans-Serif.”
The sentence is now displayed in another font. (Why is more than one font listed for each choice in the Font pop-up menu? Turn to page 80 to find out.)
Next, you’ll want to italicize the name of your publication:
Select the words “Cosmopolitan Farmer,” and then click the button labeled I in the top row of the Property inspector.
The I button, of course, means italics. Dreamweaver italicizes your selection.
For added attractiveness, you can now add a horizontal line—a rule, as designers call it—underneath the text you’ve typed so far:
Click at the end of the last sentence to place the cursor there. Press Enter to create a blank line, and then click the Horizontal Rule button in the Insert bar (see Figure 1-14).
Dreamweaver inserts a line across the page. It’s highlighted, meaning that the Property inspector is showing its characteristics.
With the horizontal rule still selected, type 580 in the W field of the Property inspector. Press Enter.
The width of a freshly minted horizontal line is 100%—meaning that it spans the entire width of a browser window, no matter how wide the window is. You’ve just changed your selected line’s width to 580 pixels wide.
From the Align pop-up menu in the Property inspector, choose Left.
Normally, a horizontal rule is centered in the middle of a page. Now the line is aligned to the left, to match the alignment of the text and graphics on the page.
Next, you’ll add a subhead to the page, a graphic, and a set of bulleted information points.
Click below the horizontal rule and type Square Button. From the Format pop-up menu in the Property inspector, choose Heading 2.
The text for Square Button (one of the online ad sizes your Web site will be offering) changes style. It’s now bigger and bolder, though smaller than the first paragraph—the Heading 1—at the top of the page. Now add some additional formatting to this text:
Select the text you just typed; choose “Arial, Helvetica, Sans-Serif” from the Font pop-up menu in the Property inspector.
A quick way to select a paragraph is to click the <h2> that appears in the lower left-hand corner of the document window (the tag selector, which lets you quickly and accurately select HTML tags—in this case, the Heading 2 tag).
To add some visual variety to the page, you’ll color this heading.
With the text still selected, click the Color box in the Property inspector. From the pop-up palette, choose a light yellow color.
The text changes to the color you selected.
Click at the end of the line of text; press Enter.
Although the new line is formatted as a “paragraph” and not Heading 2, it still retains most of the formatting of the previous paragraph: same font, yellow color. You don’t want those settings for this paragraph, so you need to get rid of them.
From the Font pop-up menu in the Property inspector, choose Default Font.
Doing so doesn’t actually assign any font information to the paragraph. It simply erases whatever fonts had been assigned, leaving it up to a visitor’s browser to determine the font to use.
Now you’ll get rid of the color.
In the Property inspector, delete the hex number for the yellow color you selected earlier.
It begins with a # sign and looks something like this: #FFFFCC.
Alternatively, you could use the color box and select the Default Color swatch (see the box on page 34). However, you’ll find simply deleting a value from a field in the Property inspector is a quick way to get rid of an unwanted property.
Now you’ll add another image—a sample advertisement—to the page.
Click the Image button on the Insert bar (or choose Insert → Image). Browse to the images folder in the DWTutorial1 folder; double-click the file called square_ad.jpg.
A square ad for Cosmopolitan Farmer appears. It would look better if it were indented a bit.
Click to the right of the image to deselect it.
A tall, blinking insertion point should appear just to the right of the image.
Click the Indent button on the Property inspector (see Figure 1-15).
Figure 1-15. Many of the Property inspector text formatting options are similar to tools you’d find in a word processing program.
Dreamweaver indents the picture.
Hit the Enter key to create a new paragraph. Click the Bulleted List button in the Property inspector.
Next, you’ll be adding a series of bulleted items that explain the size and cost of a Square Button ad in Cosmopolitan Farmer.
Type $100 for one month ; hit Enter. Type Dimensions: 125 x 125 and hit Enter. Click the Bulleted List button again to end the list.
You can also click the Outdent button to do the same thing.
You’ve just added a list with two bulleted items and reset the formatting to a regular paragraph—no indent and no fancy formatting. Next, you’ll add another horizontal rule.
Click the Horizontal Rule button in the Insert bar.
Dreamweaver inserts a line across the page. It’s highlighted, meaning that it is selected.
Click in the W field of the Property inspector; type 580. From the Align pop-up menu in the Property inspector, choose Left.
As you did once before, you just created a horizontal rule of a specified width and aligned against the left edge of the window.
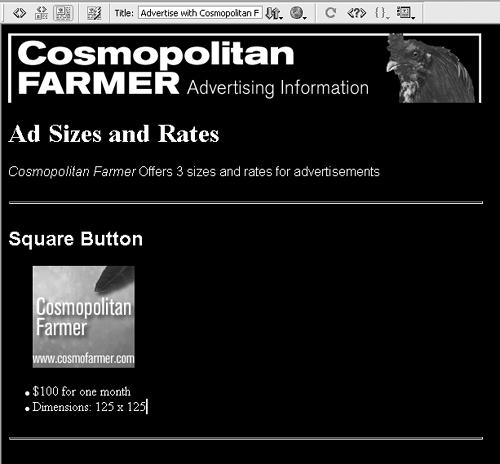
Your Web page in progress should now look like the one shown in Figure 1-16.
Choose File → Save.


Dreamweaver is as close as a Web-design program can be to a WYSIWYG application, meaning that for the most part, What You See in the document window Is What You’ll Get on the Web.
At least that’s how it’s supposed to work. But Dreamweaver may display more information than you’ll see on the Web (including “invisible” objects, table borders, and other elements that you won’t see in a Web browser), and may display less (it some times has trouble rendering complex designs and Cascading Style Sheet information).
Furthermore, much to the eternal woe of Web designers, different Web browsers display pages differently. Pages viewed in Netscape don’t always look the same in Internet Explorer. In some cases, the differences may be subtle (for example, text may be slightly larger or smaller). Other times, the difference is dramatic; Layers, for example, an advanced design technology discussed in Chapter 12, are notoriously finicky in Netscape, while much more predictable in Internet Explorer. Throughout this book, you’ll find tips and techniques to deal with this problem.
If you’re designing Web pages for use on a company intranet, and only have to worry about the one Web browser your IT department has put on everyone’s computer, you’re lucky. But most of us have to deal with the fact that our sites must withstand scrutiny by a wide range of browsers; it’s a good idea to preview your Web pages using whatever browsers you expect visitors to your Web sites to use. Fortunately, Dreamweaver lets you preview a Web page using any browser you have installed on your computer.
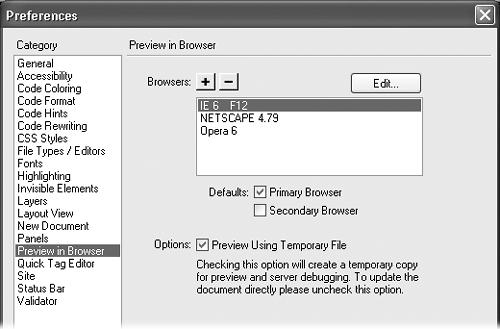
Before you can preview a page, you need to set up your list of browsers in the program’s preference window, like this:
Choose File → Preview in Browser → Edit Browser List.
The Preview in Browser preferences window opens (see Figure 1-17).
Figure 1-17. In the Preferences window, you can tell Dreamweaver which browsers you wish to use for previewing your Web pages. You can set the browser to be your primary browser, accessible by the F12 key, or your secondary browser, accessible by Ctrl+F12 (
-F12). To preview a page with a browser other than the primary or secondary, choose FilePreview in Browser and select the appropriate browser from the submenu.Click the + button.
The Add Browser or Select Browser window opens.
Click the Browse button. Search your hard drive to find the browser application you most frequently use and select it.
Dreamweaver inserts the browser’s default name in the Name field of the Add Browser window. If you wish to change its name for display purposes within Dreamweaver, select it and type a new name. (Don’t do this before selecting the browser, however; Dreamweaver erases anything you might have typed after you select a browser.)
Turn on the Primary Browser box. Click OK.
You’ve just designated the browser as your primary browser while working in Dreamweaver. You can now preview your pages in this browser with a simple keyboard shortcut: F12.
If you like, you can also choose a secondary browser, which you’ll be able to launch by pressing the Ctrl+F12 (
-F12) key combination.Now you’re ready to preview your document in a real, bona fide Web browser. Fortunately, Dreamweaver makes it easy:
Press the F12 key (or choose Edit → Preview in Browser and select a browser from the menu).
The F12 key is the most important keyboard shortcut you’ll learn. It opens your Web page in your primary browser, letting you preview your work.
Tip
The Document toolbar also has a preview button—the icon that looks like a globe. Click it to open a menu listing all the browsers you’ve set up in the Preview in Browser dialog box (Figure 1-17).
When you’re done previewing the page, go back to Dreamweaver.
Do so using your favorite way to switch programs on your computer—by using the Windows taskbar, the Dock in Mac OS X, or the Mac OS 9 Application menu.
WORKAROUND WORKSHOPWhen F12 Doesn’t Work on the Mac
In Mac OS 9, the F12 shortcut in Dreamweaver may not work. Mac OS 9’s “hot keys” function (which lets you launch favorite programs by pressing your F keys) intercepts Fkey presses in other applications, including Dreamweaver.
To turn off this feature so that you can use the predefined function-key commands in programs like Dreamweaver, choose ![]() →Control Panels→Keyboard. Turn off the Hot Function Key Settings checkbox and click OK.
→Control Panels→Keyboard. Turn off the Hot Function Key Settings checkbox and click OK.
(In Mac OS X, the F12 key is often the same as the Eject key—but Dreamweaver commandeers the keystroke for the Preview in Browser function.)
You’ve covered most of the steps you’ll need to finish this Web page. All you need to do now is add the rest of the ad sizes and rates, add some contact information, and add a copyright notice:
Click below the last horizontal rule in the document window; type Full Banner.
Notice that there’s no formatting. Since the text is a heading of the same importance as the “Square Button” paragraph above it, it would be nice to make it look the same.
Follow the formatting instructions in steps 13, 14, and 15 in Phase 4 of this tutorial.
This formats the text as a Heading 2 using the font combo of “Arial, Helvetica, Sans-serif” and the yellow color you selected earlier. You can also use the eye dropper tool to sample the yellow color straight from the first headline on the page as described on page 32.
Now it’s time to add another graphic—a sample full banner ad—and a set of bulleted information points, just as you did for the “Square Button” section of the page.
Click at the end of the paragraph and press Enter to create a new paragraph and repeat steps 16 and 17 in Phase 4.
Doing so strips away all formatting in this paragraph, creating a clean slate for adding and formatting new text or images.
On the Insert bar, click the Image button (or choose Insert → Image).
The Insert Image dialog box appears.
In the DWTutorial1 → images folder, double-click the file full_banner_ad.gif.
A full banner ad for Cosmopolitan Farmer appears. It would look better if it were indented a bit.
Click to the right of the image to deselect it and place the insertion point at the end of the line.
Whatever settings you change on the Property inspector, in other words, will now affect the paragraph that contains the graphic.
Click the Indent button on the Property inspector.
Dreamweaver indents the paragraph by a preset amount.
Finally, you’re ready to add the last bit of information about this advertising option.
Hit Enter to create a new paragraph; click the Bulleted List button in the Property inspector.
You’ve just added a bullet at the beginning of the paragraph.
Type $560 for one month, and then press Enter; type Dimensions: 468 x 60, and then press Enter.
You’ve just created two bulleted items.
Click the Bulleted List button again to end the list.
To wrap up, you’ll insert another horizontal line beneath your ad rates:
Click the Horizontal Rule button in the Insert bar.
Dreamweaver inserts the line; you’ll need to make it look like the other lines on the page.
With the horizontal rule still selected, click in the W field of the Property inspector and type 580 . From the Align pop-up menu in the Property inspector, choose Left.
The line moves to the left edge of the window, just like the other lines you inserted.
Choose File → Save.
You’re now ready to add the last elements to this page and finish this tutorial.
Click below the last horizontal rule in the document window; type Half Banner.
Repeat steps 2-12 above to add and format the final ad size and rates.
You’ll use the graphic called half_banner_ad.gif located in the images folder. The two bulleted items of text should read: “$230 for one month” and “Dimensions: 234 x 60.”
Click below the last horizontal rule on the page; type Contact Information. Choose Heading 1 from the Format pop-up menu in the Property inspector.
You’ve just created a big, bold heading.
Press the Enter key; choose Paragraph from the Format pop-up menu in the Property inspector. Choose “Arial, Helvetica, Sans-Serif” from the Font pop-up menu.
You’ve set up the formatting in advance for the typing you’re about to do:
Type The sales staff at Cosmopolitan Farmer would be happy to take your money. Contact us and we’ll make it so. Call us at 555-768-9090 or email our (don’t type a final period).
Web pages can contain email links—a link that opens your visitor’s email program, and automatically adds an email address to a new message. Dreamweaver has a built-in function for adding this type of link.
Click the Insert Email Link button in the Insert bar (see Figure 1-14), or choose Insert → Email Link.
The Insert Email Link dialog box opens.
Type Advertising Department in the Text field.
This is the text that will appear on the Web page.
Type adsales@cosmofarmer.com in the EMail field, and then click OK.
Notice that “Advertising Department” appears on the page underlined and in yellow. This is the formatting for links on this page. The email address adsales@cosmofarmer.com, however, is embedded into the link of the page. It may be invisible to your audience, but a Web browser knows it’s there.
Press Enter to create a new paragraph.
A blank line appears. You’ll add some text and a link to another Web site.
Type For more information on online advertising, visit the Internet Advertising Bureau.
Select the words “Internet Advertising Bureau.”
You’ll turn these words into a link that, when clicked, will send your visitor to another Web site.
In the Link field in the Property inspector, type http://www.iab.net and press the Enter key.
You’ve just added an external link. When you preview this page and click that link, you’ll be taken to the home page for the Internet Advertising Bureau.
Press Enter and add another 580-pixel horizontal rule to the page.
In other words, repeat steps 11 and 12 above. This line, like the other ones you’ve added, helps break up the page into distinct sections.
Click below that last line and type Copyright 2002, Cosmopolitan Farmer.
No page is complete without stamping your legal rights onto it. But that doesn’t mean you have to rub it in anyone’s face, so you’ll make the text a little less noticeable, like this:
Select your copyright-notice text; from the Size pop-up menu in the Property inspector, choose 2.
The text shrinks one size. (See page 83 for an explanation of why Dreamweaver doesn’t offer the traditional list of font point sizes.)
Choose File → Save. Press the F12 key to preview your work in your browser.
Congratulations! You’ve just built your first Web page in Dreamweaver, complete with graphics, formatted text, and links. If you’d like to compare your work with an actual, Internet-posted version of the same page, visit the tutorial page for this book, http://www.sawmac.com/dwmx/tutorials.
Much of the work building Web sites will involve using many of the procedures covered in this tutorial—defining a site, adding links, formatting text, and inserting graphics. The next few chapters cover these basics in greater depth and introduce other important tools, tips, and techniques for using Dreamweaver to build great Web pages.
Get Dreamweaver MX: The Missing Manual now with the O’Reilly learning platform.
O’Reilly members experience books, live events, courses curated by job role, and more from O’Reilly and nearly 200 top publishers.

