Chapter 1. Before the Journey
Prepare the Tools
There is an old Chinese saying: “To do a good job, one must first sharpen one’s tools.” So before you start designing a XOOPS theme, you must first get yourself (and your computer) prepared.
I’ll first describe the general workflow and list what tools you will need for each step.
General Workflow of Designing a XOOPS Theme
Step 1: Create a Web Design
As a designer, you are of course familiar with this procedure. Whether you start with pencil and paper or Photoshop is up to you. As long as your final output is (X)HTML and CSS, it will be fine.
Step 2: Convert the XHTML template to a XOOPS theme
In this step, you will need a copy of XOOPS installed on your computer. XOOPS requires PHP and MySQL, so you should first set up the environment. There are plenty of ways to do this, but the most simple way is to use XAMPP.
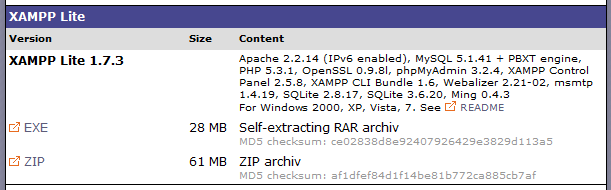
First, go to http://www.apachefriends.org/en/xampp.html. You can choose the appropriate version according to your operating system. For the illustration in Figure 1-1, I used Windows. I recommend you download the Lite version.
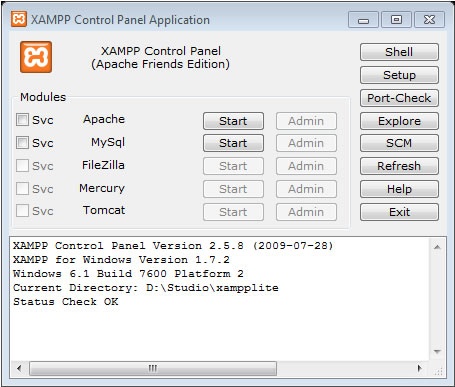
After you get the file, extract it or let it self-extract. Then, enter the folder where you extracted XAMPP Lite, and you will see xampp-control.exe, as shown in Figure 1-2.

Double-click to open it, and you will see an interface similar to that shown in Figure 1-3.
Click the Start button next to Apache and MySQL.
When you see the Running label next to Apache and MySQL, you have successfully set up the AMP (Apache + MySQL + PHP) environment on your computer.
The next thing to do is to install a copy of XOOPS. It is quite easy, as XOOPS has a very user-friendly installer. Download the archive, extract it, set up the database, run the installer and you’re done! There are many tutorials on how to do that, so I’m not going to go into details here.
Step 3: Testing and debugging
You might encounter various problems when you code your theme. Some of them may relate to the template itself—for example, you may make a mistake in the CSS code of the template. Others may be caused by an incorrect implementation of XOOPS template engine. You should make sure that the first type of bugs is fully eliminated before you implement the XOOPS template engine. Otherwise, it will take you twice the time to debug: you will have to consider the bugs in both the original template and the XOOPS template engine implementation.
XOOPS will not turn on the debug option by default. You need to turn it on and select an appropriate method for different purposes (System Options→Preferences→General Settings). See Figure 1-4.

For CSS debugging, I recommend two tools, and they are both add-ons for Firefox: Web Developer Toolbar and Firebug (Figure 1-5).
As a designer, you have probably already installed copies of major browsers so you can debug cross-browser-wise. But if not, you should do that now, too.
Get Designing for XOOPS now with the O’Reilly learning platform.
O’Reilly members experience books, live events, courses curated by job role, and more from O’Reilly and nearly 200 top publishers.

