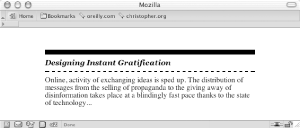
You want to stylize the borders on the top and bottom of a heading, as shown in Figure 1-16.
Use the border-top and
border-bottom properties when setting the style
for the heading:
h2 {
 font: bold italic 2em Georgia, Times, "Times New Roman", serif;
 border-bottom: 2px dashed black;
 border-top: 10px solid black;
 margin: 0;
 padding: 0.5em 0 0.5em 0;
 font-size: 1em;
}
p {
 margin: 0;
 padding: 10px 0 0 0;
}In addition to top and bottom borders, a block-level element also can
have a border on the left and right sides via the
border-left
and border-right
properties, respectively. The border-top,
border-bottom, border-left,
and
border-right properties are shorthand properties
that enable developers to set the width, style, and color of each
side of a border.
Without the two shorthand border declarations in the Solution, the CSS rule for the heading would be expanded by four extra declarations:
h2 {
 font: bold italic 2em Georgia, Times, "Times New Roman", serif;
 border-bottom-width: 2px ;
 border-bottom-style: dashed;
 border-bottom-color: black;
 border-top-width: 10px;
 border-top-style: solid;
 border-top-color: black;
 margin: 0;
 padding: 0.5em 0 0.5em 0;
 font-size: 1em;
}
Also available is a shorthand property for the top, bottom, left, and
right shorthand properties: border. The
border property sets
the same style for the width, style, and color of the border on each
side of an element:
h2 {
 border: 3px dotted #33333;
}
When setting the borders, make sure to adjust the padding to put enough whitespace between the borders and the text of the heading. This aids in readability. Without enough whitespace on a heading element, the text of the heading can appear cramped.
Recipe 2.8 for more information on styles of borders and the shorthand border property.
Get CSS Cookbook now with the O’Reilly learning platform.
O’Reilly members experience books, live events, courses curated by job role, and more from O’Reilly and nearly 200 top publishers.

