Chapter 1. Using HTML Basics
Introduction
Using CSS effectively requires using HTML effectively. To set you on the right path with HTML, this chapter runs through the basics of using HTML well. You’ll explore basic but critical techniques for creating an HTML page, validating the markup to make sure it’s free of any typos and errors, and taking advantage of new possibilities for adding video and audio with HTML5.
Note
If you feel you’re an old hand at this, feel free to skim the chapter. Even a review of the chapter should help you build some good habits that will ease your work.
Structuring Documents
To build a design for your web pages, first there must be content in a web document, usually a simple text file. That content within a text file needs to be tagged with what is called HyperText Markup Language, more commonly referred to as HTML. HTML provides structure to documents through the use of elements.
When you wrap these elements with tags, such as p for paragraphs and h2 for headings, throughout the content, the web page starts to form an inherent HTML document structure.
The browser then applies its own stylesheet to render what is known as the default rendering of the web page onto this document structure.
This default look and feel won’t win any design awards. It’s a starting point that allows the presentation or design to be associated through Cascading Style Sheets (CSS) and JavaScript more cleanly to provide appearance and movement to the web page.
Semantic Markup
This chapter is a primer on how to code semantic HTML. Semantic markup is the “radical” notion that we use the appropriate HTML element for its respective content.
For example, to denote a paragraph, we use the simple p tag at the beginning and end of the paragraph text:
<p>Lorem ipsum dolor sit amet, consectetuer adipiscing elit, sed diam nonummy
nibh euismod tincidunt ut laoreet dolore magna aliquam erat volutpat.</p>
Avoiding Old-Tag Soup
The semantic approach to HTML isn’t common on the Web. Since various HTML elements look different when they appear in a browser, web designers occasionally brew often-strange concoctions of HTML elements into what is commonly referred to as tag soup to achieve the desired look and feel.
To gain control of this look and feel, designers might add presentational HTML tags to otherwise semantically marked-up content, like so:
<p><font face="Georgia, Times, serif" size="+2">Lorem ipsum dolor</font><font face="Arial, Helvetica, sans-serif" size="1">sit amet, consectetuer adipiscing elit, sed diam<b>nonummy</b>nibh euismod tincidunt ut laoreet dolore magna aliquam erat volutpat.</font></p>
Those additional HTML tags are there to control the look and feel of just one paragraph.
When you use traditional HTML coding, every single element in a site’s HTML page would therefore need to be coded with additional elements to create the specific colors, fonts, alignment, and layout that a designer wants; such a process is extremely tedious and prone to errors.
Imagine you were designing a website that consisted of 20 pages, and you wanted to add certain design elements such as colors, fonts, sizing, and alignment to the site. Now imagine maintaining a 1,000-page website. How about a 1,000,000-page website?
A site’s HTML documents quickly become bogged down with additional code that makes both the content and the code all but unmanageable.
HTML Is Document Structure
So, it’s important to get the document structure right as much as possible with HTML. Through the use of semantic, lean coding, web developers save time in terms of maintenance while also allowing the framework on which stylesheets can be applied.
Note
If you feel knowledgeable enough about HTML and HTML5 already, the information in this chapter might already be in your domain. If that’s the case, you might want to skip through this chapter.
Picking a Text Editor
Problem
You want to choose a text editor for marking up content with HTML.
Solution
Numerous software applications are geared toward coding HTML. Some are free and some require payment.
Some basic text editors that come preinstalled with operating systems include:
- Notepad (Windows OS)
- TextEdit (Mac OS)
- gedit (Linux OS)
Here are some other free text editors that have more features:
- Notepad++ (Windows OS; http://notepad-plus.sourceforge.net/uk/site.htm)
- TextWrangler (Mac OS; http://www.barebones.com/products/TextWrangler/)
- jEdit (Windows OS, Mac OS, and Linux OS; http://www.jedit.org/)
For more professional-level, commercial integrated development environments (IDEs), try one of the following:
- Adobe Dreamweaver (Windows OS and Mac OS; http://www.adobe.com/products/dreamweaver/)
- Panic Software’s Coda (Mac OS; http://www.panic.com/coda/)
Discussion
For editing HTML, some applications come bundled with common operating systems such as Mac OS X and Windows. They are TextEdit and Notepad, respectively.
Warning
Do not use word processing programs for working with HTML. Although these programs are ideal for creating common documents that you need to print, they add extraneous formatting to your text that you don’t want or need.
Before using TextEdit, go to File→Preferences and check “Plain text” as the format option. Otherwise, the text editor might strip out the HTML elements.
If you use Notepad, select Format→WordWrap. This option allows long lines to be wrapped within the application window, making it easier to edit.
Note
For both TextEdit and Notepad, make sure to save the HTML file with an .html file extension. Do not append an additional .html extension onto the file. For example, example.txt.html or example.html.txt only leads to heartbreak.
Even though these code editors—which are free and already installed in the operating system—do not offer many options, many web designers rely on them for working with HTML.
More robust, still free
Another text editing option that is also free is TextWrangler from Bare Bones Software. TextWrangler is not as full-featured as the company’s flagship product, BBEdit, but it might suit your needs just the same. TextWrangler and BBEdit are Mac-only applications.
For Windows, there are options such as Notepad++ and TextPad (see http://www.textpad.com/).
If you use Unix, there are the vi/vim and Emacs editors. Another potential text editor is jEdit, which is also available for Mac and Windows.
IDE solutions
More full-featured products often cost more, but they provide a complete solution for dealing with almost every aspect of building websites. Popular products in this realm include Adobe Dreamweaver and Panic Software’s Coda.
See Also
http://www.notepad.org/logo.htm, to get a “Made with Notepad” graphical banner to place on your web page
Coding a Basic HTML Page
Problem
You want to create your first HTML page.
Solution
Start with basic content, such as the following:
My Basic Web Page
Epsum factorial non deposit quid pro quo hic escorol.
Next, add an html element around the entire document:
<html>
My Basic Web Page
Epsum factorial non deposit quid pro quo hic escorol.
</html>
Then place the head and body elements in the document, like so:
<html>
 <head>
 </head>
 <body>
My Basic Web Page
Epsum factorial non deposit quid pro quo hic escorol.
 </body>
</html>
Insert a title element in the head element:
<html>
<head>
<title>CSS Cookbook</title>
</head>
<body>
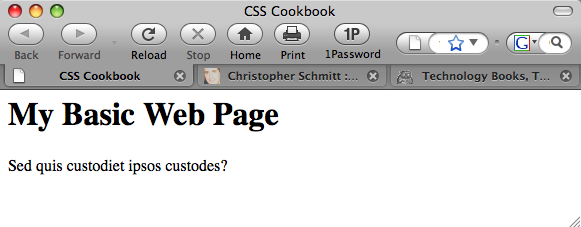
My Basic Web Page
Sed quis custodiet ipsos custodes?
</body>
</html>The heading (h1) and paragraph (p) elements go inside the body element, and the page should render as shown in Figure 1-1:
<html> <head> <title>CSS Cookbook</title> </head> <body><h1>My Basic Web Page</h1><p>Sed quis custodiet ipsos custodes?</p></body> </html>
Discussion
Every web page needs to have an HTML element wrapping the entire document. Within each HTML element are two required elements: head and body.
The head element contains the information about the document, often called meta information. The head element needs to have the title element within it. This text is usually set in the top portion of the browser window and is used when creating bookmarks. It’s important to be concise and to avoid long descriptions when using the title tag.
If the title element contains no text, browsers will use either the filename or the first few words of the document instead.
Note
Only text is allowed within the title element. Other HTML elements aren’t allowed.
The content of a web document is placed within the body element. If you need to edit or revise a web page, most of the time it is within this element.
For this example, the heading was set with an h1 element along with the standard p element for the paragraph.
See Also
Picking a Text Editor for choosing a text editor
Understanding DOCTYPEs and Effects on Browser Layout
Problem
You want to make your web page standards compliant and valid.
Solution
HTML 4.01 has three document types: Strict, Transitional, and Frameset.
Both HTML5 and XHTML 1.1 have one document type, but XHTML 1.0, like HTML 4.01, has three.
Only one document type definition (DTD) appears in the HTML document. Use any one of the following DOCTYPEs that best fits your project needs.
HTML 4.01 Strict DTD:
<!DOCTYPE HTML PUBLIC "-//W3C//DTD HTML 4.01//EN"
"http://www.w3.org/TR/html4/strict.dtd">
HTML 4.01 Transitional DTD:
<!DOCTYPE HTML PUBLIC "-//W3C//DTD HTML 4.01 Transitional//EN"
"http://www.w3.org/TR/1999/REC-html401-19991224/loose.dtd">
HTML 4.01 Frameset DTD:
<!DOCTYPE HTML PUBLIC "-//W3C//DTD HTML 4.01 Frameset//EN"
" http://www.w3.org/TR/1999/REC-html401-19991224/frameset.dtd">
HTML5 DTD:
<!DOCTYPE html>
XHTML 1.0 Strict DTD:
<!DOCTYPE html PUBLIC "-//W3C//DTD XHTML 1.0 Strict//EN"
"http://www.w3.org/TR/xhtml1/DTD/xhtml1-strict.dtd">
XHTML 1.0 Transitional DTD:
<!DOCTYPE html PUBLIC "-//W3C//DTD XHTML 1.0 Transitional//EN"
"http://www.w3.org/TR/xhtml1/DTD/xhtml1-transitional.dtd">
XHTML 1.0 Frameset DTD:
<!DOCTYPE html PUBLIC "-//W3C//DTD XHTML 1.0 Frameset//EN"
"http://www.w3.org/TR/xhtml1/DTD/xhtml1-frameset.dtd">
XHTML 1.1 DTD:
<!DOCTYPE html PUBLIC "-//W3C//DTD XHTML 1.1//EN"
"http://www.w3.org/TR/xhtml11/DTD/xhtml11.dtd">
Here’s a basic page with the HTML5 DTD and the required head, body, and html elements:
<!DOCTYPE html>
<html>
 <head>
  <title>CSS Cookbook</title>
 </head>
 <body>
  <h1>My Basic Web Page</h1>
  <p>Epsum factorial non deposit quid pro quo hic escorol.</p>
 </body>
</html>
Discussion
A DOCTYPE, short for document type definition, defines an HTML or XHTML document’s building blocks and tells the browsers and validators which version of HTML or XHTML your document uses.
The DOCTYPE declaration must appear at the beginning of every web page document, before the html element, to ensure that your markup and CSS are standards compliant and that browsers handle the pages based on the appropriate DTDs.
Quirks mode
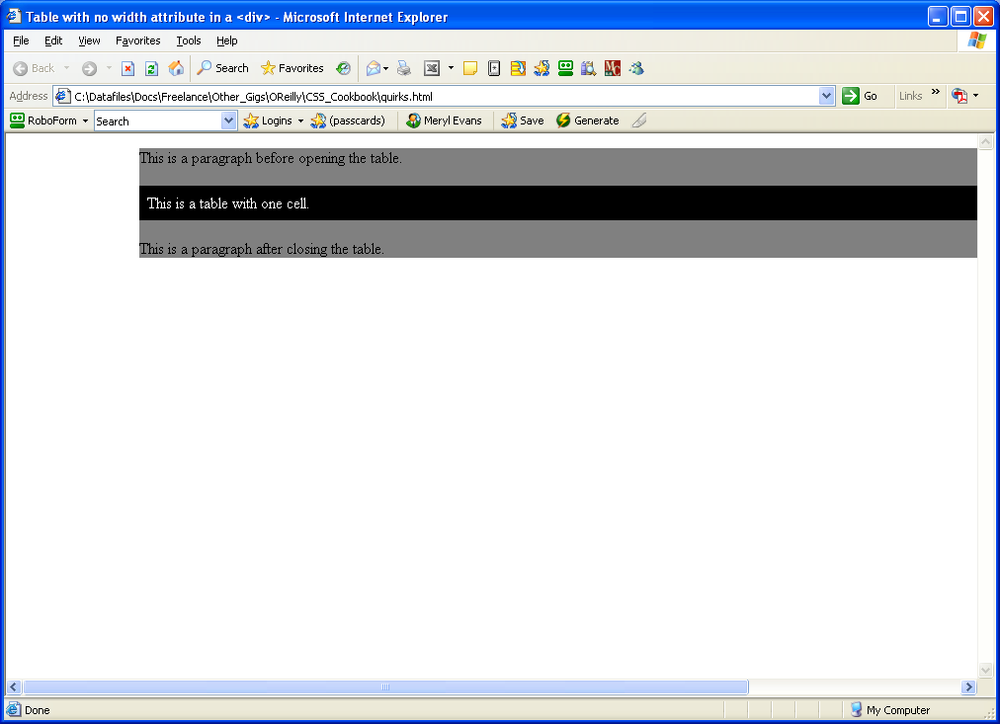
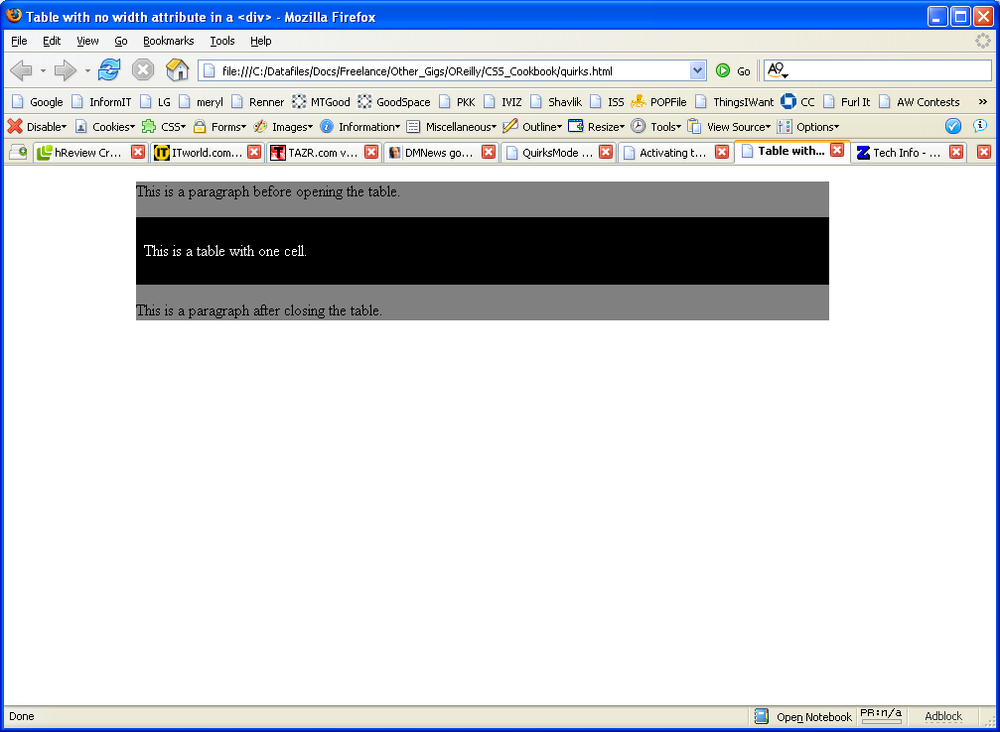
XHTML requires a valid DOCTYPE at the top of the document; otherwise, the pages won’t validate and the browsers will fall back into what is known as quirks mode.
Quirks mode occurs when a browser treats a web page as “buggy.” As a result, such pages are treated as though they were written in invalid markup, and therefore will be improperly rendered in modern browsers even if the XHTML and CSS are coded perfectly.
A web page that is without a DOCTYPE, with an older DOCTYPE, or with a typo-riddled DOCTYPE triggers quirks mode. So, when coding pages, make sure to check that the DOCTYPE is both added to the page and typed correctly to ensure that browsers do not render pages in quirks mode.
Note
If a web page has an HTML5 DOCTYPE, modern browsers will trigger standards mode, even though the actual markup isn’t coded with HTML5 elements. Internet Explorer for Windows 6 and 7 ignores HTML5 features.
Figures Figure 1-2 and Figure 1-3 show how a table contained within a div with a width of 100% goes into quirks mode in Internet Explorer 6, and how the page should look in standards mode.
Why not use the latest DOCTYPE?
Using newer DOCTYPEs such as HTML5 is an option. However, it’s not the only option. Unlike software application releases, newer DOCTYPEs don’t make older DOCTYPEs moot.
For example, you would be hard-pressed to install, much less run, Photoshop 4 on today’s computers. However, you can still use HTML4 syntax and DOCTYPEs without fear of browsers not rendering your content.
The smallest web page ever
The Solution provides an example of a relatively short HTML5 page. However, an even shorter and valid example can be made:
<!DOCTYPE html>
<title>Small HTML5</title>
<p>Hello world</p
These three HTML elements validate for HTML5 by checking out the page at http://validator.w3.org/check?uri=http%3A%2F%2Fjsbin.com%2Fowata&ss=1.
See Also
HTML5 specification for DTD at http://dev.w3.org/html5/spec/Overview.html#the-doctype; HTML 4.01 specification for DTD at http://www.w3.org/TR/html401/intro/sgmltut.html#h-3.3; W3C validators at http://www.w3.org/QA/Tools/#validators; DOCTYPEs article from A List Apart at http://www.alistapart.com/articles/doctype/; Article from QuirksMode at http://www.quirksmode.org/index.html?/css/quirksmode.html; Mozilla’s information on quirks mode, which explains the differences between the rendering modes and how it handles quirks mode, at https://developer.mozilla.org/en/Mozilla’s_Quirks_Mode; Opera’s DOCTYPE page at http://www.opera.com/docs/specs/doctype/
Marking Up Headers
Problem
You want to differentiate the importance of headings within the same document.
Solution
Use one of the six available headings, h1 through h6, as shown in Figure 1-4:
<!DOCTYPE html PUBLIC "-//W3C//DTD XHTML 1.0 Transitional//EN"
"http://www.w3.org/TR/xhtml1/DTD/xhtml1-transitional.dtd">
<html>
 <head>
  <title>CSS Cookbook</title>
 </head>
 <body>
  <h1>My Basic Web Page</h1>
  <p>Epsum factorial non deposit quid pro quo hic escorol.</p>

  <h2>Secondary Heading</h2>
  <p>Feles mala! cur cista non uteris? stramentum novum in ea posui.</p>

  <h3>Tertiary Heading</h3>
  <p>Por scientie, musica, sport etc., li tot Europa usa li sam
  vocabularium.</p>

  <h4>Quaternary Heading</h4>
  <p>Lex clavatoris designati rescindenda est.</p>

  <h5>Quinary Heading</h5>
  <p>Ire fortiter quo nemo ante iit.</p>

  <h6>Senary Heading</h6>
  <p>Interdum feror cupidine partium magnarum europe vincendarum.</p>

 </body>
</html>

Discussion
You can choose from among six different levels of headings when marking up titles for a document.
When marking up content, be sure to use the headings in order. For example, if you use the h2 element, the header underneath it should be wrapped in the h3 element (not h4 or h5). The title of the page should not be wrapped in the h2 element (use the h1 element). In short, don’t skip header tags!
It’s not important to use all of the headers when creating a document. However, be sure not to overuse the h1 element, as that might lower your search engine ranking. Use the h1 element once for the unique title of your blog post or page; then use h2 and h3 for the other portions of the document.
Note
If you need to use h4, h5, and h6 elements in your document, break up the content into separate pages or investigate the document structure. A document requiring six different heading levels might be so loaded down with content that it will fail to hold an average person’s attention span.
Also, if you are concerned about the look of the headings, do not worry. Through the power of CSS, the design of the headings (along with the rest of the page) can be modified.
Note
Using headers appropriately in a document benefits people using screen readers. For a demonstration, see the video at http://www.youtube.com/watch?v=AmUPhEVWu_E.
See Also
Chapter 3 for modifying headers and other common type treatments
Making Appropriate Quotations
Problem
You want to cite quotations with HTML, as shown in Figure 1-5.
Solution
Use the blockquote element when quoting a large amount of text:
<blockquote cite="http://www.example.com/">
 <p>Si fallatis officium, quaestor infitias eat se quicquam scire de factis
 vestris.</p>
</blockquote>
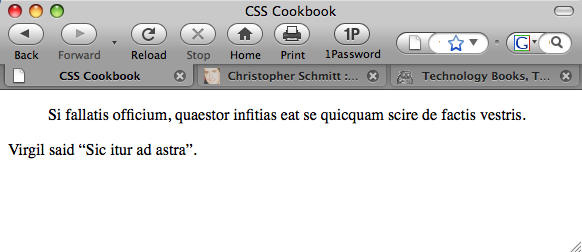
For citing phrases, use the q element:
<p>Virgil said<q>Sic itur ad astra</q>.</p>
Discussion
The blockquote element is a block-level element. This means that text tagged with a blockquote element separates itself from the rest of the text by forcing a line break above and below itself.
The q element is an inline element, which does not force a line break. Inline elements are useful for quoting small portions of text within a paragraph element.
Note
The q element is typically rendered with quotation marks around the text it envelops. However, these quotation marks do not appear in Internet Explorer for Windows.
The cite attribute is optional for both the blockquote and q elements. The value of a cite attribute is a URI where the source of the quote originated.
See Also
Chapter 3 for other common type treatments
Adding an Image
Problem
You want to add an image to a web page, as shown in Figure 1-6.
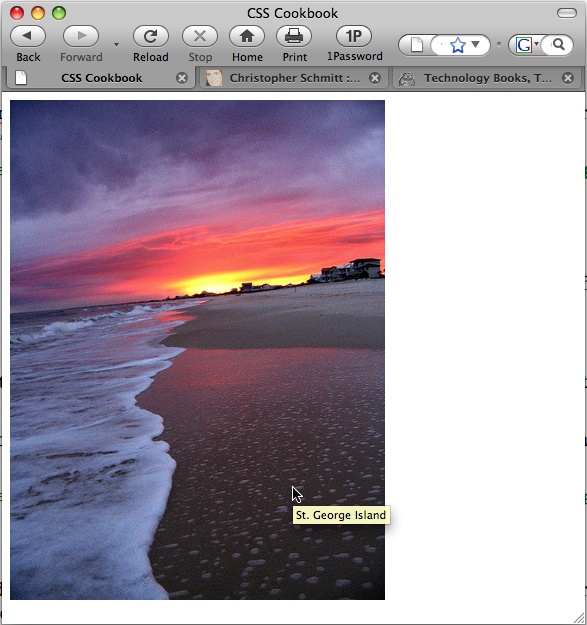
Solution
Use the img element to specify the location of the image file:
<img src="saint-george-island.jpg" />Add an alt attribute within the img element to provide alternative text in case images are turned off or people are surfing with an assistive technology such as a screen reader:
<img src="saint-george-island.jpg"alt="St. George Island beach at sunsetwith an approaching storm"/>
Discussion
The img element does not address content within the web document itself. It merely defines the location of its placement within the document and specifies its location relative to the HTML document.
Additional tips
Even though a picture is worth a thousand words, the value of the alt attribute should be a relatively short description.
As shown in Figure 1-6, some browsers display text next to a cursor, called a tool tip, within the title attribute of an image:
<img src="saint-george-island.jpg" alt="St. George Island beach at sunset
with an approaching storm" title="St. George Island beach" />
File formats
Common image formats supported by browsers include GIF and JPEG. Both formats have their own pros and cons in terms of which types of images are best for each.
Based on the compression scheme, which is the method with which an image’s file size is reduced, GIFs are better at areas of flat color and fewer gradients, and JPEGs are good for photos and subtle color changes.
All browsers support the PNG file format; however, alpha transparency is only now supported in Internet Explorer 8 for Windows. Alpha transparency allows for opacity or levels of transparency within an image, unlike the GIF format, which can assign only one color to be transparent. If an older version of IE renders a PNG image with alpha transparency, the transparent portions usually turn into blocks of solid white.
Character case sensitivity
When specifying an image file within HTML, make sure the filename does not contain spaces and the lower- and uppercase characters match. Although your computer OS might be OK with a difference in cases, chances are the web server hosting your web files will not, and may keep images from appearing in the browser.
See Also
Chapter 4 for designing web pages with images
Adding Audio with HTML5
Problem
You want to add audio to a web page with HTML5.
Solution
Use the audio element to specify an audio file, as shown in Figure 1-7:
<!DOCTYPE html>
<html lang="en">
 <head>
  <meta charset="utf-8">
  <title>CSS Cookbook</title>
 </head>
 <body>
  <h1>Audio Example</h1>
   <audio src="html5audio.ogg" autoplay controls>
    <a href="html5test.ogg">Download audio</a>
   </audio>
 </body>
</html>
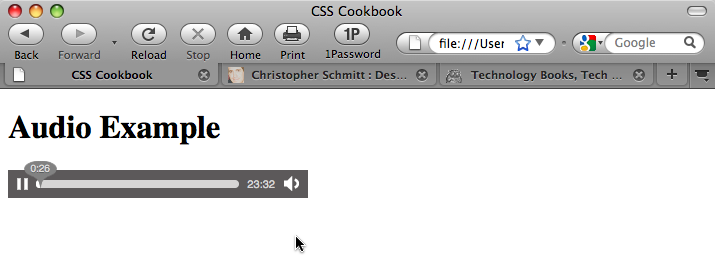
Discussion
The audio element has five attributes associated with it: src, autobuffer, autoplay, loop, and controls. If you don’t have the controls attribute, the audio player disappears.
Audio compatibility
At the time of this writing, no one audio file type plays across all the browsers that support the HTML5 audio element, as shown in Table 1-1.
| Firefox 3.5 | Safari 4 | Chrome 3 beta | Opera 10 | |
Ogg Vorbis | Y | Y | ||
MP3 | Y | Y | ||
WAV | Y | Y | Y |
To create a cross-browser solution, use the audio element along with the source element that cites both OGG and MP3 files. Then include Flash Player embed and object code afterward:
<audio controls autobuffer>
  <source src="html5audio.ogg" />
  <source src="html5audio.mp3" />
  <!-- include Adobe Flash player EMBED and OBJECT code here -->
</audio>
Note
If you do insert audio, setting the file to autoplay is not recommended, as it interferes with the experience for web surfers using screen readers.
See Also
Incorporating Video with HTML5 for adding video to web pages
Incorporating Video with HTML5
Problem
You want to add video to HTML5.
Solution
Use the HTML5 video element, as shown in Figure 1-8:
<!DOCTYPE html>
<html lang="en">
 <head>
  <meta charset="utf-8">
  <title>CSS Cookbook</title>
 </head>
 <body>
  <h1>Video Example</h1>
  <video src="html5video.ogg" width="320" height="240"
controls poster="html5video.jpg">
    <a href="html5video.ogg">Download movie</a>
  </video>
 </body>
</html>
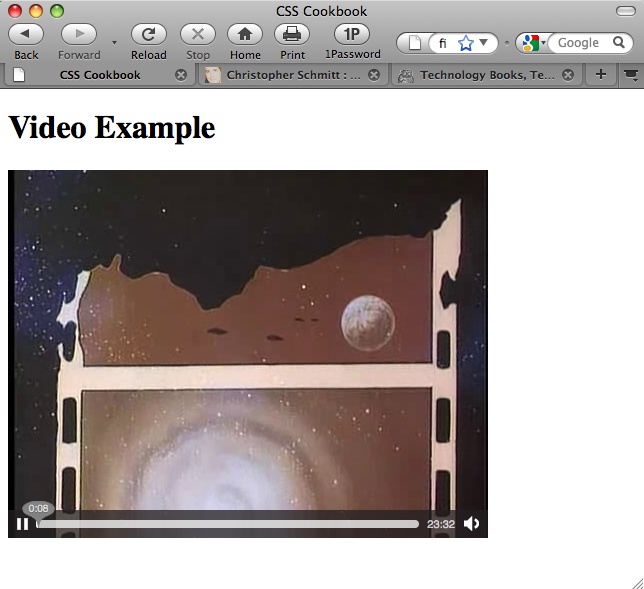
Discussion
You do not have to specify the width and height of the video element. If you do not set the video element with its respective attributes, the movie will play to the default values of the video file itself.
A video file might have its own poster, which is a static image that represents the video as a whole, similar to a thumbnail. However, you can override this poster by using the poster attribute. The poster image can be any file type the browser supports (e.g., GIF, JPEG, or PNG).
Note
Although the controls attribute is optional, for the sake of usability I suggest using it so as not to offend your site’s visitors.
You can place alternative text in between the video tags, including a link to download the video file, for browsers that do not recognize the video element. This method allows website visitors a method to view the content with third-party solutions other than browsers.
At the time of this writing, Safari 3.1 and later, Firefox 3.5 and later, Opera 10 beta, and Chrome 3 beta support the video element.
See Also
http://www.videolan.org/ for information on the export tools in the VLC software application, which you can use to convert common video files to OGG format (supported by Firefox and Opera)
Using strong and em Effectively
Problem
You want to emphasize certain words or phrases in a paragraph, as shown in Figure 1-9.

Solution
Use the strong and em elements to denote emphasis within a document:
<p>Ma quande lingues coalesce, li grammatica del<strong>resultant lingue</strong>es plu simplic e regulari quam ti del coalescent lingues. Li nov lingua franca va esser plu simplic e regulari quam li existent Europan lingues. It va esser tam simplic quam Occidental: in fact, it va esser Occidental. A<em>un Angleso</em>it va semblar un simplificat Angles, quam un skeptic Cambridge amico dit me que Occidental es.</p>
Discussion
The strong element’s default rendering is to make text bold, while the em element sets text in italics.
You would use em to draw attention to or contrast one or more words from the rest of a sentence. For example:
- Darth Vader translates loosely as Dark Father in Dutch.
- There are, not 57, but 50 states in the United States of America.
- If you join him, he will complete your training.
Strong is an alternative element to em to bring attention to words or phrases.
Although the use of em and strong helps to break up the monotony of text, be sure to use these elements sparingly as well as consistently so that you do not overuse or abuse their importance.
See Also
Chapter 3 for other common type treatments
Creating Lists
Problem
You want to create a list of items within a web page, as shown in Figure 1-10.
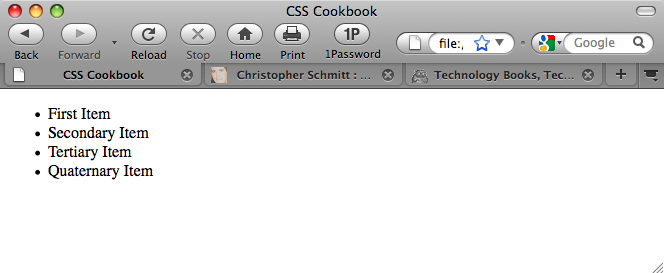
Solution
Use the ul element to wrap around a list of phrases:
<ul>
 First Item
 Secondary Item
 Tertiary Item
 Quaternary Item
</ul>
Then use the li element to wrap around each item within the list:
<ul><li>First Item</li><li>Secondary Item</li><li>Tertiary Item</li><li>Quaternary Item</li></ul>
Discussion
There are three types of lists in HTML: unordered, ordered, and definition lists.
Marking up unordered lists and ordered lists is fairly straightforward. Use two elements, ul and li, to mark up a series of items for an unordered list, which typically results in a circle appended to the left side of each list item.
Note
An unordered list is typically used to create the base of a navigation menu.
Ordered lists, which use an ol element instead of a ul element, have a numeral in sequential order prepended to the list.
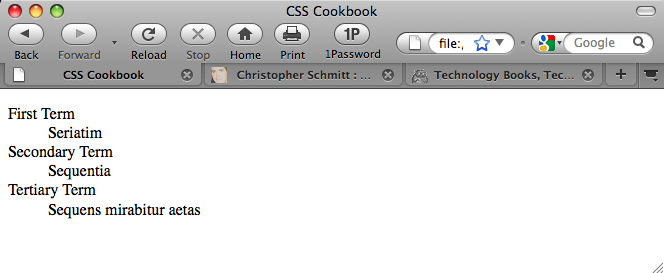
As shown in Figure 1-11, definition lists, which are used to define terms, work a little bit differently from unordered and ordered lists. Each item is broken down into two parts: the term (dt) and the definition (dd).
<dl><dt>First Term</dt><dd>Seriatim</dd><dt>Secondary Term</dt><dd>Sequentia</dd><dt>Tertiary Term<dt><dd>Sequens mirabitur aetas</dd></dl>
Making a Link to a Web Page
Problem
You want to link to another web page.
Solution
Using the anchor link:
<p>This book's <a href="http://www.csscookbook.com/">Web site</a> contains
links to download more materials.</p>
to link to another page in the same website, link to its file:
<p>Check out the <a href="about.html">About page</a> for more information.</p>Discussion
Along with the img element (see Adding an Image), some browsers display a tool tip if a title attribute and value are present within the anchor link, as shown in Figure 1-12:
<p>This book's <a href="http://www.csscookbook.com/"title="Link to the booksite">Web site</a> contains links to download more material.</p>

Linking to another web page on the same site
When you are creating links within the same site, use relative links instead of anchor links. Relative links are addresses that are valid only if you are visiting from certain web pages.
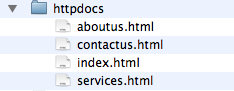
For example, suppose you have a website composed of four pages within the same root folder, the main directory that contains the website files, as shown in Figure 1-13:
- httpdocs/
- index.html
- aboutus.html
- contactus.html
- services.html
Including everything that is needed to point a web browser to a location in a link means that you created an absolute link, which looks like this:
<a href="http://www.csscookbook.com/services.html">Services Page</a>
If you want to create a link from the index page to another page on the same website, use a relative link. A relative link is a little bit leaner than an absolute link and, as in this example, can cite just the filename itself within the href attribute:
<a href="services.html">Services Page</a>Relative links contain neither the full http:// protocol nor the domain name.
When a browser navigates to a relative link, it uses the domain name of the page it is currently viewing to assemble the link to where it should go next.
Moving up folders
Just as your personal computer probably contains numerous folders holding numerous files for a project, websites are also composed of folder sets and files. To link from one document to another document within the same website, use relative links.
For example, say you have a main technical specs page within a specs folder, which itself is in a widget folder. The organization of the files on the server might look something like this:
- products/
- widget/
- specs/
- specs.html
To provide a link to the main widget page from the technical specs page, use ../ to tell the browser to go up to the parent directory:
<a href="../widget.html">Widget Page</a>If you want to go up two parent directories and link to the main products page from the technical specs page, you would format the link like so:
<a href="../../products.html">Product Page</a>
Using the root relative link
The process for using relative links to move between the folders of a large website can sometimes be tricky, if not convoluted. Another type of link to use in such a case is a root relative link.
Here is how you would use a root relative link to code the link from the technical specs page to the main product page in the preceding example:
<a href="/products/products.html">Product Page</a>The forward slash signifies the protocol and domain name of the URI, a sort of shorthand for links.
Linking to certain elements within a web page
You can also link to certain elements within an HTML document by creating anchors. You can create an anchor by assigning an id attribute to an HTML element:
<h2 id="hireme">Hire Me</h2>Then, link to that anchor by prefacing the id name with a hash symbol (#):
<a href="#hireme">Hire Me</a>When clicked, the browser navigates to the part of the document that has the corresponding id name.
Note
If a document is not longer than the browser’s viewport or window, there won’t be any noticeable change that the browser has skipped to an anchored link.
Designers use anchors to create a table of contents at the top of a web page that lets you quickly navigate to other parts of the document. This approach is particularly useful on web pages with a large amount of content to help users avoid excessive scrolling.
See Also
Chapter 7 on links and navigation
Coding Tables
Problem
You want to create a simple HTML table, as shown in Figure 1-14.

Solution
Use specific elements related to marking up tabular data:
<table border="1" cellspacing="1" cellpadding="1"><caption> Know Your IE6 Adoption Rate </caption><tr><th> </th><th>2002</th><th>2003</th><th>2004</th><th>2005</th><th>2006</th><th>2007</th><th>2008</th><th>2009</th></tr><tr><td>%</td><td>45</td><td>62</td><td>82</td><td>81</td><td>78</td><td>50</td><td>45</td><td>36</td></tr></table>
Discussion
First, add a table tag at the beginning and end of the tabular data. The table tag defines the table as a whole.
The optional caption element is for the summary of the tabular data and appears immediately after the opening table element.
Then, if your table has a header, add the thead tag to one or more rows as the table header. Use the tbody tag to wrap the table body so that it is distinct from the table header.
Next, add tr table row tags to mark off each table row. This element wraps groups of individual table cells. First you define a row, and then you add the enclosed cells.
Note
No tag exists for a table column. Only through building successive table rows do columns emerge.
After that, use the th tag for each cell you want to designate as a table header cell, which includes years and percentages in the Solution. You should enclose the specific cell content in the tag. By default, browsers make the text in header cells boldface.
Use the td tag to mark out individual cells in a table. Like the th tag, the td tag wraps specific cell content.
Note
For a simple, web-based HTML table generator to bypass handcrafting numerous table cells, try http://www.askthecssguy.com/kotatsu/index.html.
See Also
Chapter 9 on tables
Creating an HTML vCard (hCard)
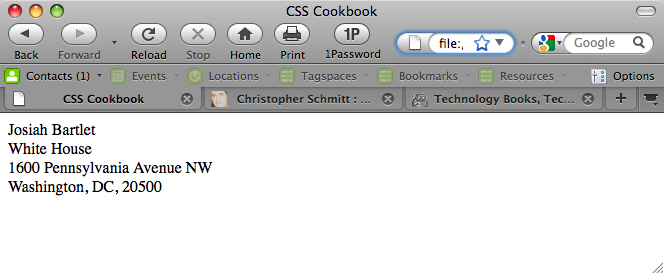
Problem
You want to include in a web page contact information such as that found on a business card, as shown in Figure 1-15.
Solution
Use class attributes with specific attributes listed in the hCard microformat specification (see http://microformats.org/wiki/hcard):
<divclass="vcard"> <spanclass="fn n">Josiah Bartlet</span> <divclass="org">White House</div> <divclass="adr"> <divclass="street-address">1600 Pennsylvania Avenue NW</div> <spanclass="locality">Washington</span>, <spanclass="region">DC</span>, <spanclass="postal-code">20500</span> </div> </div>
Discussion
The hCard microformat gives you a way to represent contact information, including people, organizations, and places, using XHTML class attributes. It is one of many standards detailed in the Microformats Project (see http://microformats.org/), the aim of which is to provide standards for coding machine-readable information into web pages using semantic HTML. Similar to a design pattern, an hCard standardizes the way in which information is represented, which allows third-party software to glean the information and put it to all kinds of good uses.
To save time and avoid typos, use the hCard Creator (see http://microformats.org/code/hcard/creator) to generate the HTML syntax.
Extending hCards
The H2VX web service (see http://http://h2vx.com/vcf/), which is available to use on the site and as a favelet, crawls the markup within a web page looking for hCard data from a web address. If it finds an hCard or hCards, it prompts the site visitor to download the data as a vCard.
The site visitor can then import the vCard into his favorite address book application, such as Outlook (Windows) or Address Book (Mac OS X).
Operator (see https://addons.mozilla.org/en-US/firefox/addon/4106) is a Firefox add-on that detects microformatted text on a web page and then provides you with options to do various things with the data, depending on the type of microformat used.
A similar plug-in is available for Safari at http://zappatic.net/safarimicroformats/.
See Also
The hCard validator at http://en.hcard.geekhood.net/; Marking Up an Event (hCalendar) for using HTML to mark up an event
Marking Up an Event (hCalendar)
Problem
You want to use HTML to mark up an event.
Solution
Use class and title attributes with specific attributes listed in the hCard microformat specification (see http://microformats.org/wiki/hcalendar):
<divclass="vevent"id="hcalendar-The-CSS-Summit"> <aclass="url"href="http://csssummit.com/"> <abbrclass="dtstart" title="2009-07-18T09:00-04:0000">July 18, 2009 9</abbr> - <abbrclass="dtend" title="2009-07-18T18:00-04:00">6pm</abbr> : <spanclass="summary">The CSS Summit</span> at <spanclass="location">Online Conference</span></a> </div>
Discussion
Based on the iCalendar file format used to exchange event data, the hCard microformat uses standardized HTML to encode event time and place information into a web document.
Each separate event is designated with the vevent class. This specifies the content as an hCalendar entry.
The beginning time of the event, dtstart and summary, is required for every hCalendar event, whereas the end-time dtend and location properties are optional.
An hCalendar cheat sheet, available at http://microformats.org/wiki/hcalendar-cheatsheet, provides a list of optional properties.
See Also
The hCalendar Creator (http://microformats.org/code/hcalendar/creator) and the Conference Schedule Creator (http://dmitry.baranovskiy.com/work/csc/) to easily create your own hCalendar; Creating an HTML vCard (hCard) for including contact information in a web page
Validating HTML
Problem
You want to make sure the HTML on your web page is properly coded.
Solution
Use the W3C validator (see http://validator.w3.org/) to input the URI of a web document to test its HTML validity, as shown in Figure 1-16.

Alternatively, you can enter code for testing by uploading a CSS file or by entering the CSS rules.
Discussion
The W3C hosts a robust HTML checker on its website. However, sometimes the output can be hard to understand. When validating, make sure to select More Options→Verbose Output.
This feedback option provides more background information regarding errors within your code, giving you a better chance at troubleshooting problems.
Creating an HTML validator bookmarklet
Take any page you visit on the Web directly to the W3C’s HTML validator through a bookmarklet. A bookmarklet is a tiny piece of JavaScript tucked away in the Address portion of a bookmark.
Create a new bookmark, name it “HTML Validator,” and then replace whatever is in the address field with this line:
javascript:void(document.location='http://validator.w3.org/check?
charset=%28detect+automatically%29&doctype=Inline&ss=1&group=0&
verbose=1&uri='+escape(document.location))
When visiting another site, clicking on the bookmarklet takes the page currently loaded in the browser and runs it through the CSS validator.
See Also
Validating CSS Rules for validating CSS rules
Get CSS Cookbook, 3rd Edition now with the O’Reilly learning platform.
O’Reilly members experience books, live events, courses curated by job role, and more from O’Reilly and nearly 200 top publishers.

