Chapter 7. Extending the UI with XBL
You now know that XUL is the basic tool set for creating your application interface, but even it has limitations. It is just a finite set of widgets that your programming needs may transcend. If you find that you reimplement many of the same groups of widgets in different applications, or if you want to extend your application's interface in some other way, you will find the eXtensible Binding Language (XBL) an invaluable tool.
This chapter describes what XBL is and how it is used. Basically, XBL provides a way to attach new content or behavior to your application by using XBL bindings. XBL can extend, add to, and reorganize user interfaces. XBL can also help you organize scattered XUL code into a set of self-contained widgets that make building and maintaining your Mozilla application much easier. Appendix C provides a reference for the XBL element set, with which new elements can be created.
7.1. What Is XBL?
XBL is an XML markup language invented specifically for creating widgets. XBL looks similar to XUL, and may even contain XUL or HTML and other markup (see the Section 7.1.3 section later in this chapter for more information about how other markup is used in XBL bindings), but its purpose is different. Flexibility and interoperability are the point of XBL.
If the XUL textbox is inadequate, for example, you can use XBL to create and attach a new widget called <datafield/>, possibly based on textbox, that provides special attributes and functionality for validating input data against a database.
A binding is a single XBL language entity that can contain content as other markup (such as XUL) behavior that is represented as methods and properties, and event-handling capabilities. Bindings can be anything from small widget objects to large, complex blocks of code with extensive functionality. Figure 7-1 shows the different components that make up a binding: fields, properties, functions, event handlers, and content. The section Section 7.2, later in this chapter, provides more detail about a binding's structure.
Figure 7-1. Mozilla XBL binding structure

Bindings differ from XUL overlays because they are fully self-contained, reusable, and generally have no dependencies outside of the binding itself. Although XUL is used most often as content in an XBL binding, XBL can also bind to and from HTML and XML. If you have worked with Java or C#, you may recognize some parallels between XBL bindings and Java objects.
7.1.1. XBL Terminology
The following terms are used to describe XBL and its use in the XPFE:
XBL
An acronym for the eXtensible Binding Language. In some contexts, the term XBL refers to actual code (e.g., “the XBL in this example . . . ”). XBL is an XML syntax.
Binding
A single unit of the XBL language, one or more of which is contained in a binding document. Most bindings are made up of content and implementation, although each are mutually exclusive; if you add event handlers to that list, each one can appear on its own in a binding.
Binding document
An XBL file with an .xml extension that contains one or more bindings.
Bound document
A XUL (or HTML) document that has one or more bindings attached to it as content.
Bound element
A bound element is a widget or element that uses a particular binding. It can be an existing element in the XUL or HTML set or a newly invented one.
Anonymous content
Content (e.g., XUL elements) contained in a binding that is hidden from the document object (DOM). Refer to the section Section 7.4, later in this chapter, for a more detailed discussion of its characteristics and how to programmatically gain access to the content.
Attachment and detachment
Attachment is the process through which a binding is associated with a bound element. It is essentially a way of telling the element which binding to use. Detachment is the process of removing that link and with it, the binding display.
Insertion point
The point in anonymous content at which children of the bound element are inserted. The section Section 7.4.4, later in this chapter, details the insertion process.
Inheritance
During inheritance, characteristics of one object are passed on to another object. In XBL, this process is multifaceted. Bindings can inherit from other bindings, anonymous content can inherit attributes from the bound element, and a binding implementation can inherit the behavior of another widget. All concepts are explained in the section Section 7.5, later in this chapter.
7.1.2. An XBL Document
XBL documents are files saved with an .xml filename extension. Most bindings implement XUL content and behavior with script, so XBL files reside in your XUL application's chrome content area and have full access to XPConnect-wrapped XPCOM objects.
Several bindings often reside inside the same XBL file. Performance benefits from this arrangement, if you have multiple related bindings, because only one XBL document needs to be loaded, rather than multiple documents. Organization is another factor. Mozilla has dozens of bindings that are interrelated by either inheritance or filename identifiers. Individual pieces to a menu widget reside in a file called menu.xml, button bindings are in button.xml, and so forth. Keeping these bindings together is wise.
The XBL document's root container is the <bindings> tag. Inside this element is one or more individual child bindings, defined by the <binding> tag. A simple XBL document is as follows:
<?xml version="1.0"?>
<bindings id="dataBindings" ...>
  <binding />
  <binding />
</bindings>
An XBL document is a valid XML document. The XML preamble you are used to seeing in XUL files is present. It also contains the single root element (in this case, <bindings>) and the child nodes that define the bindings (empty).
Bindings are the atomic units of an XBL document. An XBL document may define any number of individual bindings, each of which is bound (i.e., associated with other XML/XUL elements by way of CSS class definitions) somewhere in the interface. In other words, an XBL document may be a set of unrelated or barely related bindings that are picked up by the XUL interface.
7.1.3. Namespaces and XBL
Because XBL is a binding language for other markup, remember to distinguish between the XBL markup (such as <binding> and <handler>) and markup from another language (such as XUL). Namespaces are a feature of the XML language that was invented to handle this separation of intermingled markup, and XBL uses namespaces. For more information on namespaces, refer to the W3C at http://www.w3.org/TR/REC-xml-names/.
Namespaces are declared in the root element of an XML document. The most common implementation is the declaration of two namespaces: a default namespace for XBL and a namespace for the other markup. This code shows the root of a bindings document in which the XUL namespace declaration (xmlns:xul) and the XBL default namespace are declared:
<bindings id="dataBindings"
  xmlns=http://www.mozilla.org/xbl
  xmlns:xul=
    http://www.mozilla.org/keymaster/gatekeeper/there.is.only.xul>
An NCName is the part of a namespace declaration that qualifies the markup type for that particular namespace. It is placed after a colon, and in many XPFE documents, is the markup language name (xul, xbl, or rdf). The XBL namespace is the default in this instance because it does not declare a namespace prefix (NCName).
You can choose to namespace your document in a different way. For example, if you have a large mass of XUL code in your binding and do not wish to use the xul: prefix repeatedly, you can declare the XBL namespace as xmlns:xbl; you won't need to use prefixes on the XUL content since it is set as the default. Another option is to namespace a parent element:
<box xmlns="http://www.mozilla.org/keymaster/gatekeeper/there.is.only.xul">
This code enables all children inside the <box> to be in the scope of the XUL namespace; therefore the explicit xul: tag prefix declaration is not necessary.
7.1.4. XBL and HTML
Although XUL usually makes up the content of an XBL binding in Mozilla, HTML is another valid and popular binding format. Using the XBL with HTML combination can be advantageous. With it, web pages (rendered in Mozilla) can be more feature-rich and move beyond the limitations of the HTML specification's finite element set. It means a possible mingling of one or many markup languages, including HTML, XUL, and RDF.
The following snippet, in which a simple binding defines the name of the browser in an HTML div, gives you a feel for its potential:
<binding id="browser">
  <content>
    <html:div>Mozilla 1.0</html:div>
    <children />
  </content>
</binding>
The bound element in HTML is called browser_name and is attached to the anonymous content in the HTML document's inline style.
<head>
  <title>Browser Information</title>
  <style>
  browser_name  {
   -moz-binding: url("brand.xml#browser");
  }
  </style>
</head>
<body>
<h1><browser_name /> Guide</h1>
...
Although the <browser_name/> element is not a valid HTML element, one of XBL's great capabilities is that Mozilla finds the binding, reads the content there, and makes the substitution. The browser name can be included in several places in the HTML document. Like a poor man's DTD, the binding lets you change the definition of browser_name in one place and propagate that change to every instance of its use. This feature is useful because it requires the touching of fewer files during code maintenance.
7.2. Anatomy of a Binding
The best way to understand a binding is to watch one evolve from start to finish. This section examines a binding from its inception, into the construction of the binding, and through its use in a XUL document. At the end of the section, you should be able to take the pieces and construct your own binding, so try to follow it like a step-by-step guide.
Design is important in XBL. The implementation can sometimes be tricky; for example, when you intend to reuse the binding elsewhere or when others use it in a way you don't foresee. Ideally, a binding should be as small as possible to facilitate reuse. And it's a good idea to separate your binding into smaller pieces -- perhaps smaller “subbindings” -- so you can recombine when necessary. You could design the <datafield/> widget mentioned in the introduction -- for example, as a combination of the XUL <textfield/> widget and your own new binding, <validator/>, which you could then use elsewhere.
The widget constructed in this section is a good example of a small, reusable binding. It is a special text input widget called inputfield -- a self-contained extension to a XUL textbox that can be used on its own or as part of another binding. The binding combines a <label> and a <textbox>, allows child elements, and offers functions that work with the data and style of the <textbox>.
7.2.1. CSS Attachment
Attachment is the process through which the binding is connected to the bound document that uses it. This process is most commonly achieved through CSS, but can also be done by using the DOM. The section Section 7.4, later in this chapter, details the interaction between XBL and the document object model. The CSS connection begins where the bound element is placed in the XUL file:
<inputfield/>
Remember that XML ignores elements it doesn't recognize, so this new element won't be rendered until you add information to the stylesheet; a binding is attached with the special -moz-binding attribute. The style selector must be associated with the bound element in the XUL file. In the following example, the binding is attached to every <inputfield> tag because the element name itself is used as the style selector. However, -moz-binding can also be inside a class selector, an ID selector, or any other CSS selector you wish to use:
inputfield {
  -moz-binding: url("inputfield.xml#inputfield");
}
It also can be from an inline style:
<inputfield
  id="ifd"
  style="-moz-binding: url("inputfield.xml#inputfield")"/>
The constituent parts of this style rule are the -moz-binding property, the url binding locator that takes the bindings file (and possibly the path to it) as a parameter, and the id of the binding denoted with the # notation. For the binding to take, the XBL file must contain a binding with the same id.
<binding id="inputfield">
  <!-- binding content / behavior / handlers -->
</binding>
The ID of inputfield matches the value specified in the URL after the # symbol. When the UI is drawn in Mozilla, the binding content, behavior, and handlers are applied to the bound document at the point where the <inputfield> element appears in the document. Figure 7-2 shows a visual representation of the constituent parts of a binding attachment occurring via CSS.
Figure 7-2. CSS binding attachment components
In this example, we use our own new element name called <inputfield>, but you can also extend existing XUL widgets by including:
<box id="inputfield" flex="1"/>
Because they are bound through CSS, bindings cannot be guaranteed to be loaded until the whole document is loaded, which means that any inline scripts accessing bindings should be considered incorrect because you cannot guarantee that the binding is loaded.
XBL content is considered “invisible” in the context of the document object because it is not contained directly in the XUL document. Refer to the later section Section 7.4 for more information on this concept.
Because a document binding can have multiple instances, something must happen to make the content unique in each one. When a binding is attached to a document, its content is automatically cloned in memory. Every instance of a binding shares the same fields, properties, methods, and event handlers because separate copies of those are simply not necessary. These elements cannot be changed dynamically, but the content document model can.
7.2.2. The XBL Content Element
The <binding> element requires an id attribute to make the binding unique within the entire document. In the general XML specification, there can only be one element in a document that has a certain ID string. As in XUL, if you use an ID twice, the last one parsed is the only one seen. This situation can lead to unexpected behavior. Figure 7-3 shows the appearance of an inputfield binding.
Figure 7-3. The inputfield alone in the XUL document
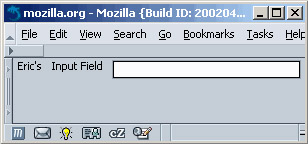
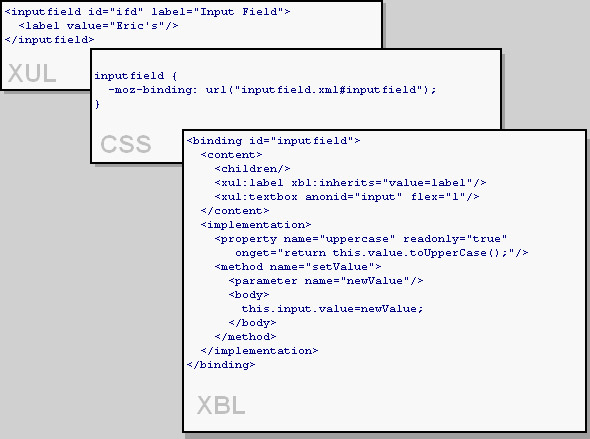
An <inputfield> has a <label> attached to it, shown here as "Input Field." It also has a regular <textbox>. The “Eric's” label is not part of the binding, but is still displayed inside of it as a child. Child content is discussed later in the section “Extra Binding Content and Insertion Points.” The binding content is defined as:
<content>
      <children/>
      <xul:label xbl:inherits="value=label"/>
      <xul:textbox anonid="input" flex="1"/>
    </content>
<children/>, the first element in the binding, lets any elements that existed in the original XUL document pass through the binding's display if it exists inside the <inputfield> tag.
<inputfield id="ifd" label="Input Field">
    <label value="Eric's"/>
  </inputfield>
In this case, the XUL label is inserted into the anonymous content at the point of the <children/> element when the binding is rendered. This ability is useful for changing the ordering of content and adding extra content within a binding.
You can limit which tags are displayed as child content by using something like:
<children includes="treehead|treechildren"/>
These filtering capabilities open the possibility of multiple <children/> in your binding.
The next content element is <xul:label/>. Notice how the XML namespace of xul is used in the content. Using this notation is the most common way to apply namespace XUL elements in bindings.
The label element has an XBL-namespaced inherits attribute. This code translates an attribute used on the original bounded tag into something usable by a content element:
<inputfield id="ifd" label="Input Field">
The final element in the content is a typical XUL textbox that has a namespace like the label. The anonid attribute on the textbox is fabricated and used here to avoid bugs and scope issues with the id attribute in content. The id attribute should be used only on the <binding> and <bindings> tags, but anonid works well as direct DOM access to this element and is shown in the next section.
7.2.3. The Implementation Element
The next part of the binding, and also the most complex, is the behavior. The <implementation> element contains the <constructor>, <destructor>, <field>, <property>, and <method> -- all of which handle the binding's implementation features.
All elements can contain JavaScript, which changes the binding into a dynamic widget that does more than display content on the screen. The binding implementation accepts user input, dynamically changes the UI, interacts with remote sites through web protocols, and surfaces Mozilla library functions in widgets.
7.2.3.1. Constructor
In the example binding, some variables and style rules are set up for access by the rest of the binding to make the code cleaner. These rules are set up by using the constructor:
<constructor><![CDATA[
    this.input=document.getAnonymousElementByAttribute
      (this,"anonid","input");
 // Initialize color and backgroundColor to something besides a "" value
    this.input.inputField.style.backgroundColor="white";
    this.input.inputField.style.color="black";
    this.input.inputField.setAttribute("onchange","");
 ]]></constructor>
The first JavaScript command accesses the <textbox> with the anonid label and puts it into the this.input variable. getAnonymousElementByAttribute is a custom DOM method used to access anonymous content. The section Section 7.4.1, later in this chapter, talks more about the XBL DOM methods.
The use of the this keyword and the “dot notation” comes from Java. If you have programmed in Java, these bindings can be considered similar to Java classes. They are self-contained and can be extended. Using this is not necessary but it's common practice and clarifies that the variable or property is a member of the binding, especially if you define elements in the binding's constructor.
In the next two commands, an object called inputField contains the style object property. You may be familiar with this structure in HTML elements, and in fact, this inputField is a version of the HTML <input> textbox. The <textbox> in XUL derives from that HTML element.
The color and backgroundColor are set here manually to return something other than the initial value of a blank string when they are accessed. The last line in the <constructor> sets up the onchange event handler for the textbox. This event handler is also used in a property for this binding.
7.2.3.2. Destructor
This section of a binding executes anything that needs to be done immediately before a binding is unloaded. Here is an example:
<destructor>
  this.input=null;
</destructor>
The code you see here is not necessary in this binding, but it shows you the format for executing code in the destructor. Destructors are great to use when you have loaded a component in the binding and want to set the variable representing the component to null to avoid memory leaks. If you have a lot of bindings that load and then unload components while a Mozilla session is still running, a significant amount of memory can be eaten up unless you take this kind of step.
7.2.3.3. Properties
Like Java properties, an XBL <property> has getters and setters, so they can behave differently when you read or write data. Here is a subset of properties used in this binding:
<property name="value" readonly="true">
  <getter>
    return this.input.value;
  </getter>
</property>
<property name="uppercase" readonly="true"
          onget="return this.value.toUpperCase( );"/>
<property name="backgroundColor">
  <getter>
    return this.input.inputField.style.backgroundColor;
  </getter>
  <setter>
    this.input.inputField.style.backgroundColor=val;
    return val;
  </setter>
</property>
At this point, the characteristics of properties to watch out for include the readonly attribute, the getter and setter elements, and the existence of a val keyword that is used internally for accessing a property's current value. For your reference, this binding's property extracts are used for getting the value of the input field, returning an uppercase version of the inputted text, and getting or setting the input field's background color.
7.2.3.4. Methods
Methods in XBL are self-contained functions represented by the <method> tag and encapsulated within the <implementation> element. They usually provide a binding object with a specific function like copying and saving some data or showing and hiding widget controls. Like properties, they can be called from within the binding, from another binding that subclasses that binding, and directly from the bound element.
<method name="clear">
  <body>
    this.input.value='';
  </body>
</method>
<method name="setValue">
  <parameter name="newValue"/>
  <body>
    this.input.value=newValue;
  </body>
</method>
The method code is contained in a <body> tag, and each method can have 0 or more parameters, which gather the values passed into the method when called.
7.2.4. Handlers
Handlers in XBL mimic regular document events like onclick and onmousedown, and provide a means for trapping them within your binding and carrying out tasks associated with them.
<handlers>
  <handler event="mouseover">
    this.input.focus( );
  </handler>
</handlers>
Each handler is contained in a <handler> tag and the event name is placed in the event attribute -- minus the “on” prefix. The handler in the code shown above places the focus in the inputfield when the mouse goes over it. See the section “Event Handling,” later in this chapter, for more details.
7.2.5. Style
The sample binding's last piece of the puzzle is style. Any XUL elements used in the content inherit the default styles for those widgets, but if you want to add more, you can include your own stylesheet like this:
<resources>
  <stylesheet src="inputfield.css"/>
</resources>
Notice the <resources> container element, which is a prerequisite for this feature. The use of stylesheets in bindings is covered more thoroughly at the end of the chapter in the section Section 7.7.
At this point, you should be familiar with the pieces that make up a binding, which, at the top level, are the content, implementation, event handlers, and extra resources. The binding that you have constructed is small, yet it shows all the main concepts involved in structuring a binding. With some personalizing, it could be included in potentially any application.
7.3. Adding Behavior to Bindings
Like XUL widgets, XBL uses JavaScript to provide functionality to bindings by accessing XPCOM methods via XPConnect. Like binding content, behavior is optional in a binding. Each can exist without the other. At times, you might want only implementations, such as a base binding that contains certain properties that are inherited by other bindings.
The <implementation> element is the container for all other elements that make up a binding's behavioral portion. Example 7-1 shows an empty implementation shell that highlights the element's contained hierarchy.
Example 7-1. XBL implementation element
<implementation>
  <constructor />
  <destructor />
  <method name="">
    <parameter name="" />
    <body />
  </method>
  <property>
    <getter />
    <setter />
  </property>
  <field />
</implementation>
The code in Example 7-1 shows the <implementation> element having a constructor, destructor, method, property, and field as possible children. Each component can exist in quantities of zero or more, with the exception of the constructor and destructor, of which there can be only zero or one. The rest of this section describes each binding implementation component in more detail.
7.3.1. Binding Methods
Bindings can exist solely as content generators, acting passively when they are drawn. But you can also create bindings that provide new capabilities and more interactive functions or that execute routines in your application.
In the spirit of self-containment, functions can be added to a binding that carry out functionality related to that binding. These functions are the behavior of a binding. The ideal way to add behavior is to add methods to your binding with the <method> element. Each parameter for a method defined in the <method> element is contained within its own <parameter> tag.
<method name="dumpString">
  <parameter name="aString1"/>
  <parameter name="aString2"/>
  <body>
    <![CDATA[
      if (!aString1 && aString2)
        return;
      return dump(aString1+" "+aString2+"\n");
    ]]>
  </body>
</method>
To use the method to print text to the command shell, call the name that is specified in the name attribute. All methods created in a binding are added to the binding element object and called as members of that object, as shown here:
<mybinding id="myNewWidget">
  <image src="http://www.mozdev.org/sharedimages/header.gif" />
</mybinding>
<button label="test method"
    oncommand="document.getElementById('myNewWidget')
        .dumpString('hello', 'there!');"/>
Using the <![CDATA XML entity is also important. The purpose of <![CDATA is to escape JavaScript that may otherwise cause conflicts with the XML parser. Having characters like quotes and slashes in XML is problematic when they are not escaped. Using <!CDATA with large portions of JavaScript in a binding can improve performance and minimize bugs.
Methods were designed for language neutrality with the type attribute and getter and setter elements. Currently, bindings support only JavaScript, which is the default when no type is specified. However, this may change as other scripting engines are plugged into Gecko.
7.3.1.1. Attachment and detachment
Two special methods exist in XBL that allow you to manipulate what happens when a binding is added or removed from a document. These methods use the native <constructor> and <destructor> tags. A constructor is valuable, for example, when you need to initialize a binding object or prefill the UI based on stored values. Destructors can clean up when a binding is discarded.
When bindings are attached, their content is inserted into the document at the point you specify. After insertion -- or, more specifically, after the attachment occurs -- the code in the <constructor> executes. Similarly, you can use the <destructor> element to execute functions when a binding is destroyed.
<implementation>
  <constructor>
    <![CDATA[ dump("\n********\nCreate\n********\n");]]>
  </constructor>
  <destructor>
    <![CDATA[ dump("\n********\nDestroy\n********\n");]]>
  </destructor>
</implementation>
This example prints some text to output, but you can include code that carries out variable initialization or anything else you want to occur at these stages of the binding's life. Bound elements constructed before the document load event execute this script before the document load event fires. In the case of extended bindings, base handlers are fired first, followed by derived handlers.
7.3.2. Binding Properties
Properties on a binding are included by using the <property> element. Fundamentally, properties are used to hold and manipulate values that are used elsewhere in the binding, such as when a text widget has its displayed value changed periodically by the application. Currently, there are two classifications for properties, one of which gets a raw value directly on the element.
<property name="someAttribute">
  false;
</property>
This example always sets the attribute named someAttribute to false. Though still supported, this use of the <property> element was replaced by a new element called <field>. Although it is not in the XBL 1.0 specification, the <field> element is implemented and used in the Mozilla code base. It has the same syntax but a different name. We recommend using the <field> element.
<field name="someAttribute">
  false;
</field>
The second property usage defines functions that are carried out when getting and setting a property's value. Take this anonymous content with a label child:
<xul:box align="left" flex="1">
  <xul:label xbl:inherits="value=title"/>
  <xul:spacer flex="1"/>
</xul:box>
This content simply shows some text on the screen. The bound element that uses this content looks like this:
<mybinding id="my-binding" title="For Those Who Love to Use XBL" />
The XUL label used in the binding inherits the title attribute value that is set on the bound element. Example 7-2 shows how to set this title and its retrieval. Both access the bound element, and any changes filter down to the label.
Example 7-2. An XBL property setting and getting a value
<property name="title">
  <setter>
    <![CDATA[
      this.setAttribute('title',val); return val;
    ]]>
  </setter>
  <getter>
    <![CDATA[
      return this.getAttribute('title');
    ]]>
  </getter>
</property>
The script keyword val is used internally to represent the latest property value. The request to change the property or retrieve its value can come from another property in the same binding (this.<propertyName>), from a binding method, or from a method in the bound document that accesses the binding object directly. This JavaScript sets the value of a property named title on the binding object:
var titleElement = document.getElementById("my-binding");
titleElement.title = "The Adventures of an XBL hacker";
You can use the onget and onset attribute as an alternative to <getter> and <setter> elements. Properties are initialized after the content is generated but before the binding attached event is set off. This ensures that all properties are available once that event occurs.
Although it is most commonly used just for getting and setting values on the property, nothing stops you from putting more code in the <properties> element that carries out other actions on the binding. One scenario shown in Example 7-3 is if you have a property that holds a search value, you can send that text to the Google [1] API, and fill another widget in the UI with the results every time the value is updated.[2]
Example 7-3. Performing a Google search when setting a property
<property name="searchString">
  <setter>
    <![CDATA[
      var s = new SOAPCall( );
      var q = val;
      if (!s)
        return "Error creating SOAPCall object";
      var soapversion = 0;
      var method = "doGoogleSearch";
      var object = "urn:GoogleSearch";
      var headers = [ ];
      var params = [
        new SOAPParameter(this.googleKey, "key"),
        new SOAPParameter(q, "q"),
        new SOAPParameter(this.start, "start"),
        new SOAPParameter(this.maxResults, "maxResults"),
        new SOAPParameter(this.filter, "filter"),
        new SOAPParameter(this.restrict, "restrict"),
        new SOAPParameter(this.safeSearch, "safeSearch"),
        new SOAPParameter(this.lr, "lr"),
        new SOAPParameter("utf8", "ie"),
        new SOAPParameter("utf8", "oe")
      ];
      s.encode(soapversion, method, object, headers.length, headers,
        params.length, params);
      s.transportURI = "http://api.google.com/search/beta2"
      var response = s.invoke( );
      if (response.fault)
        return { msg : "SOAP call error", fault : response.fault };
      // At this point you would pass the results back to the UI
      return response.message;
    ]]>
  </setter>
</property>
The value of the search string is set to the value that has been given to the property: var q = val. This value is then added to the parameter list (SOAPParameter) for the SOAP call, along with other parameters that are obtained from other properties in the binding (e.g., this.maxResults).
Notes
7.4. XBL and the DOM
This section introduces the DOM interfaces in XBL, illustrates how they work, and explains the core concepts involved in XBL interaction with the DOM, such as scope characteristics and insertion points.
7.4.1. The XBL DOM Interfaces
XBL has two core DOM interfaces, DocumentXBL and ElementXBL. These extensions to the Document and Element interfaces are not part of the formal DOM specifications. All methods can be accessed and used from JavaScript. Here is a list of these interface methods.
7.4.1.1. DocumentXBL methods
The DocumentXBL interface gains access to and interacts with an XBL document. The methods of this interface are as follows:
loadBindingDocument(URL)
XBL documents are loaded only the first time a bound document uses a binding from it. You can get around this problem and load the binding documents synchronously by using this method. It returns an XBL document for use within a bound document. If your document is large and you need to optimize performance, this method may provide better performance.
document.loadBindingDocument('chrome://package/content/myBindings.xml');
getBindingParent(element)
For use only within a binding, this method returns the bound element -- i.e., the top-level node of the binding, when passed an element within a binding.
var listbox = document.getBindingParent(this);
var cellValue = listbox.childNodes[3].firstChild.label;
getAnonymousNodes(element)
Returns an array with the input binding's top-level content nodes. Refer to the section Section 7.4.3, later in this chapter, for more details.
getAnonymousElementByAttribute(element, attribute, value)
Returns a single anonymous element when passed an element, an attribute from that element, and its value. Refer to the section Section 7.4.3 for more details.
7.4.1.2. ElementXBL methods
The ElementXBL interface adds and removes bindings from a bound element. The methods of this interface are as follows:
addBinding(element, URL)
Dynamically attaches a binding, given as a parameter, to an element. Refer to the following sections for more details.
removeBinding(element, URL)
Dynamically removes the given binding. Refer to the following sections for more details.
7.4.1.3. Dynamically adding a binding
The section Section 7.2 covered the attachment of a binding to a bound element using CSS. This technique is the most common method, but you can also attach bindings with the addBinding method.
Using this method as an alternative to CSS attachment is useful when you do not want to attach a binding in all circumstances. In an application based on user input, you may not want to load a binding until certain values are entered. For example, in a membership database, the information that appears on screen may depend on the user's level of membership. The following snippets show how it is used.
<mybinding id="myNewWidget" class="attached" />
To load a binding, add these two lines in your script.
var binding = document.getElementById("myNewWidget");
document.addBinding(binding, "chrome://mypackage/content/myBindings.xml#super");
Notice that the URL used to access the binding takes the same format as in the CSS property -- i.e., the path to the file and the id of the binding qualified by #.
Neither addBinding nor removeBinding are implemented at the time of writing. They are covered because they are part of the XBL 1.0 specification. When implemented, they offer crucial alternatives for attaching and detaching bindings, making XBL a more interactive technology.
7.4.1.4. Removing bindings
The best way to remove a binding attached via CSS is to change the style rule for that element. You can change the class to one that does not have a different or null binding reference, for example. Then a stylesheet can be set up to provide binding references for both an attached and unattached element.
This example shows how to remove a reference to a binding by resetting it to an empty reference:
mybinding.attached {
  -moz-binding : url("mybindings.xml#my-binding");
}
mybinding.unattached {
  -moz-binding : url("");
}
When you want to detach the binding from an element, you can do this:
var mywidget = document.getElementById("binding1");
mywidget.setAttribute("class","unattached");
An element can have only one binding attached at a time, so this is a programmatic trick for knocking the “real” binding out of its place with an empty one, rather than actually removing it.
-moz-binding:url("") can be used at this time as a hack around the -moz-binding:none binding. The later binding does not currently work in Mozilla.
The other method used to detach a binding, which is more intuitive from a DOM perspective, uses the removeBinding method:
var binding = document.getElementById("myNewWidget");
document.removeBinding(binding, "chrome://mypackage/content/myBindings.xml#super");
This method ensures that other style information is not lost if you have it attached to a particular class.
When a binding is removed, the anonymous content is destroyed and the methods, properties, and event handlers no longer apply.
In the case of an inheritance chain (see the Section 7.5 section later in this chapter for more details), the bindings are destroyed from the bottom upwards. This means that if there is tear-down code in the form of a destructor, it is executed last on the base binding.
7.4.2. Binding Parents
Although a document cannot access the content of bindings attached to it, a binding can access the document it is attached to (bound document). This gives bindings the ability to provide more than just additional content to the document. It also means that you can find information about the context of bound element in a document and provide information about it from within the binding.
From the perspective of nodes inside the anonymous content, you can use DOM properties to find a higher-level node and then in turn use that to get to other nodes:
parentNode
This property is the bound element for the top-most element in the anonymous content. This bound element resides in the document that the binding is attached to.
ownerDocument
For all elements in the anonymous content, this is the document the bound element resides in.
While higher-level nodes can be accessed from anonymous content, parents do not have explicit access to their anonymous children using the DOM childNodes property. Using firstChild or nextSibling will also not work.
Example 7-4 illustrates both properties in use.
Example 7-4. Accessing a bound document from a binding
<binding id="my-binding">
  <content>
    <xul:vbox>
      <xul:button label="A" id="button1"
        oncommand="alert(this.parentNode.parentNode.nodeName)"/>
      <xul:button label="B" id="button2"
        oncommand="alert(this.ownerDocument.firstChild.nodeName)"/>
    </xul:vbox>
  </content>
</binding>
Example 7-4 is a binding with two buttons, each of which brings up an alert when activated. The alert simply shows the name of an element that is accessed in the code attached to the button. In Button A, the parent node is the containing box. One level further is the bound element, <mybinding> -- the parent node of the box parent. The alert dialog raised by the alert shows “mybinding.” Once a binding is applied, the binding's owner (ownerDocument) is the bound document. Assuming that Button B is a XUL window, the alert, when activated, shows "window." This property can be used to access properties of the document object.
7.4.3. Accessing Anonymous Nodes
Content bound to a document can introduce different levels of scope. Some of the scope is available at the document level, and some is at the binding level. With content in different scopes, there are limits to which standard DOM methods can be used to access other elements and objects in and above a binding. XBL contains some special methods to help work around some of the limitations caused by these barriers, such as not being able to change binding content dynamically or access certain property values.
The two XBL-specific interfaces that exist on the document to get a handle on this content are getAnonymousNodes and getAnonymousElementByAttribute. The advantage of using these interfaces is that they provide a bridge between behavior and content. Use them when you want to dynamically manipulate content or get a value -- for example, when accessing a particular textbox contained in binding, reminiscent of the one used earlier in the chapter when you were introduced to the <inputfield /> binding.
7.4.3.1. getAnonymousNodes
The method getAnonymousNodes(element) takes a node as a parameter and returns a list of nodes that are in the anonymous content. The following code uses script in the <getter> to access the anonymous node and return a value contained in it.
<getter>
  <![CDATA[
    var list = document.getAnonymousNodes(this)[0];
    return list.selectedItem.getAttribute('label');
  ]]>
</getter>
If we assume that this binding's content is a XUL menu list, then this code gets the label attribute of the menu item that is currently selected in that list (list.selectedItem). The list variable contains the value returned by the getAnonymousNodes function, which is passed the binding node (this). The method returns an array, so the item is accessed via the first index of 0.
7.4.3.2. getAnonymousElementByAttribute
The method getAnonymousElementByAttribute(element, attr, value) returns a single anonymous node rather than a list. This node is qualified by an element name, a particular attribute, and the value of that attribute, and returns this specific node. This retrieval provides faster access to anonymous content elements when you know an attribute's value.
<property name="emailID" onget="return document.getAnonymousElementByAttribute(this, 'id', 'emailAddressNode');" readonly="true"/>
This example uses an id attribute to retrieve a specific node. You can use this method when multiple elements of the same type exist and you need to get access to a particular one -- for example, a particular field on a database entry submission form like an email address or a telephone number.
Although these two functions (getAnonymousNodes and getAnonymousElementsByAttribute) were probably designed to be used within a binding scope, they can be used both inside and outside a binding to access anonymous content. Bindings are meant to be self-contained, and getting anonymous nodes outside a binding breaks this philosophy. However, these functions can act as a bridge between scopes if you are careful.
7.4.4. Extra Binding Content and Insertion Points
All examples in the chapter have so far dealt with standard binding content rendering within a bound document. The processes outlined in this section can, in one sense, be seen as abnormal because they allow ordering of the content to change based on insertion points defined in the binding. This process is done with the XBL <children> element
7.4.4.1. Working with children of the bound element
Zero or more children can be contained in anonymous content. These children are marked up with the XBL-specific <children> tag. They can be either the content of the element using the binding or anonymous content generated by the base binding. If the <children> tag contains its own elements, then it will be used as the default content. If the element the binding is attached to contains children, the default content will be ignored.
The location of the <children> tags determines the content's insertion point. Insertion points play an important role in the generation of content within a template because they affect how the content is displayed and accessed by the DOM.
<binding id="my-binding">
  <content>
    <xul:vbox>
      <children />
    </xul:vbox>
  </content>
</binding>
This stripped-down binding has only a vertical box as its own content and looks to the children of the bound element for more content by using the <children> element. Here is the XUL content that uses the binding:
<mybinding id="myNewWidget" flex="1" class="attached">
  <label value="this is child 1" />
  <label value="this is child 2" />
</mybinding>
When the binding is attached and the content is drawn, the insertion point for the two labels is inside the container vertical box inside the binding. This scenario could be used when a binding is used multiple times. Each time, it needs to be rendered differently with extra content that can be provided this way.
7.4.4.2. Selective inclusion
Sometimes multiple siblings are located within a box in the XUL, but you want to use only some of them in the binding, such as when a user logs into a system and content is displayed depending on its level of membership. In these cases, you can be selective about which children should be included in the binding. Example 7-5 shows how to use the includes attribute on the <children> element.
Example 7-5. Selective inclusion of child content in a binding
<binding id="my-binding">
  <content>
    <xul:vbox class="insideBox">
      <xul:description value="Top" />
      <xul:box>
        <children includes="image" />
      </xul:box>
      <xul:description value="Bottom" />
    </xul:vbox>
  </content>
</binding>
The children element in Example 7-5 essentially tells, “Of all the content contained in the bound element, insert only the image element at this particular insertion point.” Here is the XUL code that goes with this example:
<mybinding id="myNewWidget" flex="1">
  <image src="http://www.mozdev.org/sharedimages/header.gif" />
  <label value="a non includes element" />
</mybinding>
The image is the only child taken from the XUL content and the label is ignored.
If you have children that are not defined in the includes attribute, then the binding is discarded and not used. If the bound element uses another element in addition to an image element, the binding is discarded and only the explicit content is used. If the image element isn't used at all, the binding is discarded.
<mybinding id="myNewWidget" flex="1">
  <image src="http://www.mozdev.org/sharedimages/header.gif" />
  <label value="an element" />
</mybinding>
This example renders the image and the label and discards the binding. The anonymous content does not appear because the binding is discarded and only the explicit content is used.
7.5. Inheritance
In XBL, inheritance is the process in which one object included in another object is allowed to use properties from that parent object. These properties can be many things, depending on the implementation, ranging from methods to attribute property values. Inheritance is a concept familiar in programming languages, most notably object-oriented ones. It's not something alien to markup, however, and it is deployed effectively in XBL. This section examines three forms of XBL inheritance: binding, attribute, and implementation. As you will see, inheritance promotes self-contained (modular) and flexible bindings that permit shared content across and within XBL documents.
7.5.1. Binding Inheritance
Binding inheritance occurs when one binding is linked to another binding or XUL element and uses some or all properties of it, whether they are content or behavior. A binding can inherit from another binding that exists in the same or different file. In one way, this useful feature makes a binding like a class, with content and methods that can be used elsewhere. Bindings become modules, which prevents code duplication, makes maintenance easier, and gets slotted in and out of documents.
Linkage or inheritance is enabled by the extends attribute on the <binding> element. This attribute contains the URL of the binding that you inherit from. This URL is made up of the location and name of the file that contains the binding (the # symbol), and the id of the specific binding being used. In this way, it is similar to the access method used in CSS attachment.
Although it is in the XBL 1.0 specification, Mozilla hasn't fully implemented type="inherits" on the children tag yet, so the best way to work with binding inheritance is to use the extends attribute. Example 7-6 shows a few bindings used in the implementation of the listbox cell in the Mozilla tree. It illustrates how extends is used to inherit from another binding.
Example 7-6. Binding inheritance
<binding id="listbox-base">
  <resources>
    <stylesheet src="chrome://global/skin/listbox.css"/>
  </resources>
</binding>
<binding id="listcell"
    extends="chrome://global/content/bindings/listbox.xml#listbox-base">
  <content>
    <children>
      <xul:label class="listcell-label"
          xbl:inherits="value=label,flex=flexlabel,crop,disabled"
          flex="1" crop="right"/>
    </children>
  </content>
</binding>
<binding id="listcell-iconic"
    extends="chrome://global/content/bindings/listbox.xml#listcell">
  <content>
    <children>
      <xul:image class="listcell-icon" xbl:inherits="src=image"/>
      <xul:label class="listcell-label"
          xbl:inherits="value=label,flex=flexlabel,crop,disabled"
          flex="1" crop="right"/>
    </children>
   </content>
</binding>
In Example 7-6, listcell-iconic inherits listcell. In turn, listcell inherits list-box-base, which holds resources. The listcell binding is a cell with text only and the listcell-iconic binding has text and an image. Thus, the user has a choice of using a list cell binding with an icon or no icon. Yet both of these bindings have access to the stylesheet resource declared in the base binding. If listcell-iconic is used, the duplicate xul:label is ignored in the inherited binding and the stylesheet inherited from the base binding via the inherited binding is used. We've used this technique to illustrate how resources in multiple bindings are shared.
With binding extensions that use the extends attribute, you can also extend a XUL element as a model, using extensions as a proxy to mimic that XUL element. The element may not be included directly in the anonymous content, but its characteristics are still present on the bound element. If you use the XUL namespace xul: in the same way you use it for XUL content in a binding, you can inherit the XUL element properties as illustrated in Example 7-7.
Example 7-7. Inheriting XUL widget characteristics using extends
<binding id="Widget1" extends="xul:vbox">
  <content>
    <xul:description value="Top" />
    <children includes="image" />
    <xul:description value="Bottom" />
  </content>
</binding>
In Example 7-7, the binding has all of the attributes and behavior of a XUL box. Because you extend a box element, the base widget <mybinding> is now a vertical box. The anonymous content is laid out according to the box model, and all attributes that are recognized on the bound element are applied to the box.
7.5.2. Attribute Inheritance
Also known as “attribute forwarding,” attribute inheritance is a way for anonymous content to link to the attributes from the bound element. When the bound element attribute is changed, this modification filters down to the binding attribute list. The code in Example 7-8 shows anonymous content where multiple attributes are picked up by the xbl:inherits attribute, with each one separated by a comma.
Example 7-8. XBL attribute inheritance
<xul:box class="insideBox" xbl:inherits="orient, flex, align">
  <xul:description value="Top" />
    <xul:box>
      <children includes="image" />
    </xul:box>
    <xul:description value="Bottom" />
  </xul:box>
</xul:box>
The element that inherits the attributes can be anywhere in the chain of anonymous content. In this case, it is on the top-level box. It assumes the value given to these attributes in the bound element. Here is the XUL that uses the binding content from Example 7-8:
<mywidget orient="vertical" flex="1" align="center" />
The xul:box element inherits the attribute values vertical, 1, and middle, respectively, from the bound element (mywidget). The box in the anonymous content contains three children: two text (description) elements and an image contained in another box. The default orientation for a box is horizontal, but these child elements are now positioned vertically.
You may notice that the inherits attribute is preceded with the xbl: prefix, unlike other attributes in the XBL element set. Why is this unique? It guarantees that the effect is on the binding and not directly on the element that uses it. This ensures that the element can have an inherits attribute of its own if needed. This scenerio is unlikely and you might wonder why this rule does not apply to other attributes used on XBL elements. To achieve correct binding, the XBL namespace must be declared on an element at a higher level than the element using it, most commonly the <bindings> container, as explained earlier. Here is what the code will look like:
<binding id="my-bindings"
    xmlns="http://www.mozilla.org/xbl"
    xmlns:html="http://www.w3.org/1999/xhtsml"
    xmlns:xbl="http://www.mozilla.org/xbl">
7.5.3. Implementation Inheritance
The third type of inheritance, inheritance of behavior, is also achieved by using the extends attribute and is useful when you want to use methods or properties in another binding. Example 7-9 shows how one binding inherits implementation from another in the same file.
Example 7-9. Inheritance of behavior between bindings
<binding id="Widget1" extends="test.xml#Widget2">
  <content>
    <xul:box class="insideBox">
      <xul:description value="Top" />
      <xul:box>
        <children includes="image" />
      </xul:box>
      <xul:description value="Bottom" />
    </xul:box>
  </content>
</binding>
<binding id="Widget2">
  <implementation>
    <constructor>
      this.init( );
    </constructor>
    <method name="init">
      <body>
      <![CDATA[ dump("This is Widget2");]]>
      </body>
    </method>
  </implementation>
</binding>
The Widget1 binding in Example 7-9 pulls in Widget2 using extends. Widget2 has implemented a constructor that dumps some text to output. When Widget1 is bound and it does not find any implementation to initiate, it looks to the inherited binding and, in this case, dumps “This is Widget2” to output.
In a bindings inheritance tree, more than one implementation could have a method with the same name. In this case, the most derived binding -- the one nested deepest in the inheritance chain -- is the one used. It is even possible for some common DOM functions used on the bound element outside of the anonymous content to find imitators when implementing the attached bindings.
<method name="getElementById">
  <parameter name="id" />
  <body>
    <!-- implementation here -->
  </body>
</method>
If you glance through the source code for the Mozilla chrome, you may notice that many of the standard XUL widgets used were extended by using XBL. The button is a good example.
On its own, the button can display text with the value attribute and an image with the src attribute. Usually, this is sufficient, and you can color the button and change the text font with CSS. But you may want to take advantage of inherent behaviors in other elements or inherit from other bindings. Mozilla buttons are a mix of <box>, <text>, and <image> elements, and they take on the characteristics of each.
7.6. Event Handling
Event handlers are attributes that listen for events. They intercept events raised by certain user actions, such as button clicks. When intercepted, control is given to the application to carry out some functionality.
Mouse and keyboard actions are included in these events. XBL uses all events that are available on an element in XUL and calls them by their name, minus the on prefix. Thus, for example, the onmouseclick event handler becomes mouseclick in XBL. Refer to Appendix C for a full list of these events, which also describes the difference between XUL and XBL event handling.
The <handler> element contains a single event. Sets of individual <handler> elements need to be included in a <handlers> element. The event that sets off the action is contained in the event attribute.
<handlers>
  <handler event="mousedown" action="dumpString('hello', 'there!')" />
</handlers>
This code uses the action attribute to point to script that is executed when the event is triggered. The alternative way to set up the actions is to put the executable script between the handler tags, like you can with the XUL <script> element. If you use this “embedded” syntax, wrap your script in a CDATA section so it gets interpreted and executed properly:
<handlers>
  <handler event="mousedown">
    <![CDATA[
      var list = document.getElementById('someElement');
      list.setAttribute('style', 'display:block;');
    ]]>
  </handler>
</handlers>
You cannot use both inline and external scripts in an XBL event handler. If this instance does occur, the action attribute is used. Like code decisions in other contexts, which one you use depends on whether you want to reuse the code. In our experience, using inline scripts is best in most circumstances unless useful code libraries can be accessed in external scripts.
7.6.1. The Time and Venue
Event handlers in XBL allow for fine-tuning, using built-in attributes that control when, where, and how they are executed. Events are not limited to bindings. They can be registered with other UI elements that pre-empt behavior when, for example, a create or load event occurs. This registration occurs when using the attachto attribute.
<handler event="create" attachto="window" action="returnNode( )">
The handler is designed to update the list in the binding when the application is loaded up and the window shows. Other possible values for attachto are document and element.
//FIXME did we loose content here?
The attachto feature is disabled for Mozilla 1.0, but it is included here for completeness and to highlight XBL's full capabilities.
Another nice feature of event handlers in XBL is the existence of extra modifiers on mouse and key events using the modifiers and the key or keycode attributes. The value is a list of one or more modifier keys separated by a comma. The most common combination is the use of the alt, control, or shift modifiers. The key codes have special identifiers like VK_INSERT and VK_UP.
<handler event="keypress" modifiers="control, alt" keycode="VK_UP" action="goUp( )">
Finally, when talking about event handlers, the phase attribute allows you to control the point in the event's lifecycle when the code is to be executed.
<handler event="mouseup" phase="capturing" action="goUp( )">
The possible values are bubbling (the default), targeting, and capturing.
Here is an example of a handler implementation that fills a tooltip when the popup element displaying it is shown:
<handler event="popupshowing">
  <![CDATA[
    var label = "";
    var tipNode = document.tooltipNode;
    if (tipNode && tipNode.hasAttribute("tooltiptext"))
      this.label = tipNode.getAttribute("tooltiptext");
  ]]>
</handler>
This event handler first checks that the current popup is in fact a tooltip via the document's tooltipNode property and then extracts the text from it. This text is assigned to the binding's label, which will propagate via inheritance to the text display content widget used in the binding, which could be a label or description element.
7.7. Resources for Bindings
This chapter stresses that bindings used in XUL documents are designed to be modular, self-contained widgets that have a certain appearance and carry out a specific set of functionality. This final section extends the notion of XBL as an organization of content, behavior, and event handling by describing extra resources (such as stylesheets and pictures) that are available in the XBL framework for use in your bindings. If you are creating templates, for example, you should consider using these approaches to application development.
7.7.1. Stylesheets in XBL
You can include stylesheets in an XBL document by using the XBL-specific element <stylesheet>. The example below shows the color-picker stylesheet as it would be included in a <resources>-containing element, allowing styles contained therein to be used by the bindings that referenced it.
<stylesheet src="chrome://xfly/skin/color-picker.css" />
The <stylesheet> element is intended for the styling of bound elements and anonymous content. It can be used on anonymous content generated by the binding and in explicit children in documents that use the bindings. Typically, you would include this element in a binding and inherit it to style other bindings when there are many bindings that have a similar appearance.
<binding id="popup-base">
  <resources>
    <stylesheet src="chrome://global/skin/popup.css" />
  </resources>
</binding>
Then you can access the stylesheet in your binding by using the extends attribute:
<binding id="popup" extends="chrome://global/content/bindings/popup.xml#popup-base">
Beyond this static usage of stylesheets, two attributes, applyauthorstyles and styleexplicitcontent, can affect the appearance of a binding element if a stylesheet is applied to it. Although they are part of the XBL 1.0 specification, these attributes were not implemented at the time of writing. They are attributes of the <binding> element.
applyauthorstyles
A Boolean value that determines the use of stylesheets from the document that contains the bound element. The default is false.
styleexplicitcontent
A Boolean value that indicates whether the stylesheets loaded in the XBL document can be applied to a bound element's explicit children and not just the bound element itself. The default is false.
Stylesheets take effect from the inside scope and move outwards. This means that styles on a binding can be overridden easily by styles attached to elements contained in anonymous content.
The <image> XBL element works much like a XUL element and pulls in the image by using the src attribute.
<binding id="images">
  <resources>
    <image src="plane.png"/>
    <image src="boat.png"/>
    <image src="bicycle.png"/>
  </resources>
</binding>
If an element calls this binding, the pictures would lay out side-by-side horizontally in the bound document.
[1] This example is modified code taken from http://www.segment7.net/mozilla/GoogleAPI/GoogleAPI.html, and is covered by a three-clause BSD license. More on SOAP and the SOAP API in Mozilla can be found at http://lxr.mozilla.org/mozilla/source/extensions/xmlextras/docs/Soap_Scripts_in_Mozilla.html.
[2] The Google API requires a Google Key, and more information can be found at http://www.google.com/apis/.
Get Creating Applications with Mozilla now with the O’Reilly learning platform.
O’Reilly members experience books, live events, courses curated by job role, and more from O’Reilly and nearly 200 top publishers.

