Chapter 1. Getting Started
In the first edition of this book, I may have dated myself a bit by starting this chapter off with the following paragraph:
The modern world is networked in a way that could barely be imagined a few decades ago. Today, the Internet reaches into virtually every business and almost every home. Our children and even our grandparents speak of dot-coms, email, and web sites. The Internet is now part of our culture.
Almost four years have passed since then, which does not seem like much time at all. But in the networking and computer fields, that’s a very long time indeed. Our children and grandparents now speak of dot-bombs, MP3s, broadband, voice over IP, instant messaging, and outsourcing. Even the once-killer app email has been surpassed by the gratification of instant messaging. Things have certainly changed, which leaves us to wonder what the next few years will bring.
No matter what happens, Cisco is likely to continue its dominance of the networking world. Even that little router sitting on your cable or DSL connection at home could very well be a Cisco device. Routers and switches are the glue that holds the Internet together. And Cisco is the most prominent router manufacturer, holding the largest share of the market. Their routers come in all shapes and sizes, from inexpensive units for homes and small offices to equipment that costs hundreds of thousands of dollars, used by very large ISPs and telcos. Almost all of their devices—from the smallest to the largest—run the Internetwork Operating System (IOS) . Therefore, they share the same command set, the same user interface, and the same configuration techniques. While a small home network router doesn’t have the features or the capacity of an ISP’s router, you configure them pretty much the same way. Both routers use access lists, have similar security mechanisms, support the same set of protocols in the same way, and so on.
As Cisco continues developing its product line, it’s clear that the Internetwork Operating System (IOS) is a key part of its strategy. As new products come out, they all have the familiar IOS interface.
IOS is an extremely powerful and complex operating system with an equally complex configuration language. There are many commands, with many options, and if you get something wrong you can easily take your company offline. That’s why I’ve decided to provide a quick-reference guide to IOS. As large a book as this is, though, it’s impossible to cover all of IOS. Therefore, I’ve limited the discussion to IOS configuration for the TCP/IP protocol family. I’ve included all the commands that you need to work with TCP/IP and the lower-level protocols on which it relies. In the last edition, I apologized for not including other protocols such as IPX due to the lack of space in a handy reference. Today, there is hardly a need for such an apology, as TCP/IP has become the standard networking protocol for all but the most legacy network environments.
This book is intended as a quick reference, not as a step-by-step exposition of routing protocols or as an IOS tutorial. I haven’t focused on thorough explanation; instead, I’ve tried to give lots of examples of the things people most frequently need to do when configuring a Cisco router, with just enough explanation to get you by. I’ll start with the user interface (Chapters 1, 2, and 3), then talk about configuring lines and interfaces (Chapters 4, 5, and 6), access lists (Chapter 7), and routing protocols (Chapters 8, 9, and 10). Chapter 11, new in this edition, addresses quality of service issues, while Chapter 12 describes dial-on-demand routing. Chapter 13 covers a variety of networking topics, including bridging, Network Address Translation (NAT), tunnels, and Multiprotocol Label Switching (MPLS). Chapter 14, also new to this edition, describes working with switches and VLANs. Chapters 15 and 16 cover IOS security and troubleshooting, respectively. Chapter 17 is the quick reference. Chances are, by the time the next edition of this book appears, the quick-reference section will be pretty well thumbed and worn out.
At first, the Cisco user interface appears cryptic. After learning the interface’s structure, you’ll become much more comfortable with it. Once you have learned some special features, you’ll be able to work with the router’s configuration easily.
IOS User Modes
IOS has two primary modes of operation: user mode and privileged mode. When you first connect to the router, you are placed in user mode. The Cisco documentation refers to this as the user exec mode; I am going to omit “exec” throughout this book. The user mode is indicated by the prompt:
Router>
The show commands in user mode
are limited to a few basic levels. You cannot edit or view configurations at this stage; you can only view the router status and other miscellaneous information. To obtain a basic listing of commands, type a question mark:
Router>?Editing the router’s configuration requires you to be in the privileged exec mode, which I call “privileged mode
.” Use the enable command to enter this mode:
Router>enablePassword: Router#Privileged mode prompt
You can always tell whether you are in user mode or privileged mode by looking at the prompt. The user mode prompt has a > at the end; the privileged mode prompt always has a # at the end, regardless of the submode.
If you are familiar with Unix, you can equate privileged mode to “root” access. You could also equate it to the administrator level in Windows 2000 or the supervisor in NetWare. In this mode, you have permission to access everything inside the router, including configuration commands. However, you can’t type configuration commands directly. Before you can change the router’s actual configuration, you must enter a submode of the privileged mode by giving the command configure terminal (see "Command-Line Completion" later in this chapter for a shortcut). This command can be entered only when you are in privileged mode.
Router#configure terminalEnter configuration commands, one per line. End with Ctrl-ZRouter(config)#Configuration mode
To exit configuration mode, you can use the command exit or type Ctrl-z. To exit privileged mode, you can use the disable command. So to exit both configuration and enable mode, use the following sequence of commands:
Router(config)#exitRouter#disableRouter>
Privileged mode has several submodes in addition to configuration mode; each has its own prompt. To enter these submodes, you must first enter configuration mode by giving the configure terminal command. Here’s a summary of the most common modes and prompts (there are many others):
- Global configuration mode
Prompt:
Router(config)#This level allows you to enter commands directly into the router configuration. From this level, you can enter any of the other three levels listed here. Once you are done entering commands into the configuration, use Ctrl-z,
exit, or theendcommand to return to the privileged prompt. The device’s hostname is a good example of a configuration item you would find in the global configuration mode .- Interface configuration mode
Prompt:
Router(config-if)#At this level, you are entering interface-specific commands. To enter this mode from the configuration prompt, use the command
interfacefollowed by an interface name, such asethernet0,serial0, orserial1. Interface commands are discussed in Chapter 5. Use theexitcommand to exit this prompt and return to the configuration prompt.- Line configuration mode
Prompt:
Router(config-line)#From this prompt, you can enter line-specific commands. To enter this mode from the configuration prompt, use the command
line, followed by a line type—such asvty,console,tty, orasync—and a line number. The line configuration commands are discussed in Chapter 4. Once again, use theexitcommand to exit this mode and return to the configuration prompt.- Router configuration mode
Prompt:
Router(config-router)#From this prompt, you can enter only routing commands. To enter this mode from the configuration prompt, use the
routercommand, followed by a routing protocol, such asriporigrp. These commands differ widely depending on the routing protocol being used. Routing configuration commands are discussed in Chapters 8 through 10. Use theexitcommand to exit this mode and return to the configuration prompt.
Figure 1-1 is a flowchart that illustrates the transitions between the most common command modes and submodes. (This list is not comprehensive.) The arrows are labeled with the commands that cause the transitions between the modes.
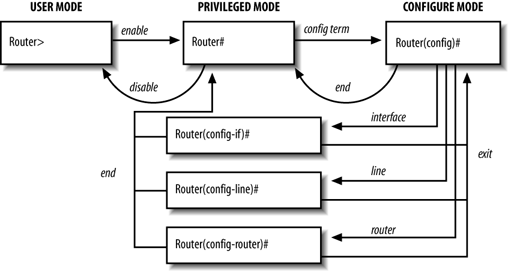
Configuration submodes provide a context in which certain commands are legal and others disallowed. It’s one way that IOS tries to prevent you from making mistakes when configuring a router. In the quick-reference section, I list each command with the context (or mode) in which it can be given. Contexts are clearly important on the command line, where the prompt shows the submode you’re in. They are equally important in configuration files, where there are no such hints; you just have to know.
Command-Line Completion
Command-line completion makes the IOS interface much more user-friendly. It saves you extra typing and helps out when you cannot remember a command’s syntax. In a previous example, we used the command configure terminal:
Router#configure terminalBut you could have saved wear and tear on your hands by typing:
Router#conf tIOS expands the command conf t to configure terminal, completing the command for you. It may seem like extra work to learn these short versions of the commands, but doing so really pays off, especially for the commands you use frequently. But if you haven’t learned the shortcut, you can try pressing Tab. In this case, you could have pressed Tab after typing conf; the router fills in the best completion, which is configure. If you press Tab and the router doesn’t fill in the rest of the command, type a few more letters and press Tab again.
Here is another example:
Router#show running-configThis long command can be shortened to:
Router#sh ruThe router knows that show is what you wanted, because show is the only command that begins with “sh”; likewise, the only subcommand of show that begins with “ru” is running-config.
If the router does not understand a command, it repeats the entire command line and places a caret (^) under the point at which it ran into trouble. For example:
Router>show itnerface e0
>show itnerface e0
       ^
% Invalid input detected at '^' marker.
The caret symbol is pointing to the “t” in “itnerface”, which is the command the router does not understand. We can quickly fix that by retyping the command:
Router>show interface e0We now get the correct output! Since we also know how to use shortcuts, we can type:
Router>sh int e0With this command we get the same result as with its lengthy counterpart. Command-line completion saves a lot of typing, and it helps you keep your sanity when you’re working with long commands.
Get to Know the Question Mark
Previously, I said that you can get the available commands by typing ? at the prompt. You can also use this trick to find the subcommands of any command. For example, if you know you want to use the copy command but cannot remember which subcommand you need, type:
Router#copy ?
  WORD            Copy from flash device - format <dev:>[partition:][filename]
  flash           Copy from system flash
  flh-log         Copy FLH log file to server
  mop             Copy from a MOP server
  rcp             Copy from an rcp server
  running-config  Copy from current system configuration
  startup-config  Copy from startup configuration
  tftp            Copy from a TFTP server
Another use of the question mark is to find all commands that match what you have typed so far. For example, if you know the first part of a command, type it, and then type a question mark. The router will return a list of all the matching commands. In the following example, we remember that the configure command begins with “co”, but that’s it. The router gives us the matching commands:
Router#co?
configure  connect  copy
Note the important difference between these two examples. In the first example, there was a space before the question mark, which gave us the next command that complements copy. Had there not been a space, the router would have tried to complete the word “copy” for us, not given us the next available commands. In the next example, we did not add the space, so the router tried to complete “co” with all the commands it could find that start with “co”.
What if you don’t see the command you’re looking for? Bear in mind that the router returns only commands that are relevant to the mode you are currently in. For example, if you are in user mode, you are given only commands that apply to that mode.
Command-Line Editing Keys
IOS provides a number of keyboard shortcuts that let you edit the line you’re typing. They should be familiar to any user of Unix or Emacs, though the details are a little different in some cases. Table 1-1 lists the command-line editing keys.
|
Keys |
Commands |
|
Ctrl-a |
Returns the cursor to the beginning of the current line. |
|
Ctrl-b |
Moves the cursor back one character. (Equivalent to the left-arrow key.) |
|
Ctrl-d |
Deletes the character to the left of the cursor. |
|
Ctrl-e |
Moves the cursor to the end of the line. |
|
Ctrl-f |
Moves the cursor forward one character. (Equivalent to the right-arrow key.) |
|
Ctrl-k |
Deletes all the characters from the current cursor position to the end of the line. |
|
Ctrl-n |
Goes to the next command in the session history. (Equivalent to the down-arrow key.) |
|
Ctrl-p |
Goes to the previous command in the session history. (Equivalent to the up-arrow key.) |
|
Ctrl-t |
Switches the current character with the character to the left of the cursor. |
|
Ctrl-r |
Redraws or redisplays the current line. |
|
Ctrl-u |
Clears the line. |
|
Ctrl-w |
Deletes the word to the left of the cursor. |
|
Ctrl-x |
Deletes from the cursor position to the beginning of the line. |
|
Ctrl-y |
Pastes the most recently deleted characters at the current cursor position. |
|
Ctrl-z |
Exits the current configuration mode and returns at the previous configuration mode. |
|
Tab |
Tries to finish the current command. (Command completion.) |
|
Up arrow |
Moves back through the history of commands. |
|
Down arrow |
Moves forward through the history of commands. |
|
Left arrow |
Moves the cursor to the left. |
|
Right arrow |
Moves the cursor to the right. |
|
Ctrl-^, then x |
Aborts the sequence. Breaks out of any executing command. |
Pausing Output
Using the terminal command, you can set an important feature of the user interface: the pausing of lengthy output. For example, if you run a command that has more than one page of output, the router will pause after 24 lines with a —More— prompt. The value 24 is the default terminal length. Depending on the size of your terminal window, this might not be adequate. You can change the length and width using the terminal command, like this:
Router>terminal length 10Router>terminal width 80
These commands set the terminal length to 10 and the width to 80, which means the router will pause after 10 lines of output and that each of these lines will be 80 characters long. You can disable the pausing altogether by setting the terminal length to 0:
Router>terminal length 0show Commands
As you work with IOS, you’ll become intimately familiar with the show commands. They are among the most useful commands you will ever use; they allow you to view just about any settings within the router. Issuing the command show ? produces output like this:
Router>show ?
  clock     Display the system clock
  history   Display the session command history
  hosts     IP domain-name, lookup style, nameservers, and host table
  sessions  Information about Telnet connections
  snmp      snmp statistics
  terminal  Display terminal configuration parameters
  users     Display information about terminal lines
  version   System hardware and software status
The show command has many different subcommands. However, notice that we are in user mode. In privileged mode, the show command has a lot more subcommands, which would take up a few pages if we listed them here. The important thing to remember is that show commands often have more than one keyword. For example, the command show ip route works by itself, but many other options can be applied to it. For example:
router#show ip route ?
  Hostname or A.B.C.D  Network to display information about or hostname
  bgp                  Border Gateway Protocol (BGP)
  connected            Connected
  egp                  Exterior Gateway Protocol (EGP)
  eigrp                Enhanced Interior Gateway Routing Protocol (EIGRP)
  igrp                 Interior Gateway Routing Protocol (IGRP)
  isis                 ISO IS-IS
  odr                  On Demand stub Routes
  ospf                 Open Shortest Path First (OSPF)
  rip                  Routing Information Protocol (RIP)
  static               Static routes
  summary              Summary of all routes
  supernets-only       Show supernet entries only
  <cr>
I certainly haven’t explained routing enough for you to understand the output of this command. However, you can see how to find show keywords with the question mark. The <cr> shown in the previous example indicates that you can hit Enter at this point and the command will work.[*] In other words, show ip route is a valid command. The other keywords are optional.
In each section of this book, I emphasize the appropriate show commands for the topic. For the topics covered in this chapter, the following show commands are extremely useful:
show versionshow historyshow users
The show version command gives a lot more information than just the version of IOS that the router is currently running. You will see this command pop up a few more times later in this book. For now, you can see that it tells us the router type, the IOS image, the system uptime, the current IOS version, all the available interfaces, and the amount of memory on the router:
Router#show version
Cisco Internetwork Operating System Software
IOS (tm) C3550 Software (C3550-I9Q3L2-M), Version
12.1(22)EA1a, RELEASE SOFTWARE (fc1)
Copyright (c) 1986-2004 by cisco Systems, Inc.
Compiled Fri 20-Aug-04 00:30 by yenanh
Image text-base: 0x00003000, data-base: 0x006C5C6C

ROM: Bootstrap program is C3550 boot loader

3550 uptime is 3 weeks, 6 days, 13 hours, 11 minutes
System returned to ROM by power-on
System image file is
"flash:c3550-i9q3l2-mz.121-22.EA1a/c3550-i9q3l2-mz.121-22.EA1a.bin"

cisco WS-C3550-24 (PowerPC) processor (revision P0)
with 65526K/8192K bytes of memory.
Processor board ID CAT0849Z07W
Last reset from warm-reset
Running Layer2/3 Switching Image

Ethernet-controller 1 has 12 Fast Ethernet/IEEE 802.3
interfaces

Ethernet-controller 2 has 12 Fast Ethernet/IEEE 802.3
interfaces

Ethernet-controller 3 has 1 Gigabit Ethernet/IEEE
802.3 interface

Ethernet-controller 4 has 1 Gigabit Ethernet/IEEE
802.3 interface

24 FastEthernet/IEEE 802.3 interface(s)
2 Gigabit Ethernet/IEEE 802.3 interface(s)

The password-recovery mechanism is enabled.
384K bytes of flash-simulated non-volatile
configuration memory.
Base ethernet MAC Address: 00:12:D9:56:67:00
Motherboard assembly number: 73-5700-12
Power supply part number: 34-0966-04
Motherboard serial number: CAT08490BLH
Power supply serial number: LIT08410CCQ
Model revision number: P0
Motherboard revision number: A0
Model number: WS-C3550-24-SMI
System serial number: CAT0849Z07W
Configuration register is 0x10F
The show history command gives a log of the router commands you have used. The length of this history log depends on the size set by the terminal history command. The default is 10 lines.
Router#show history
  show history
  show terminal
  show users
  enable
  show version
The show users command gives a complete listing of all currently connected users:
Router#show users
    Line     User      Host(s)               Idle Location
   2 tty 2   steve1    idle
5 tty 5 john2 Async interface 2[*] Just for the record, “cr” stands for carriage return. This hails from the days of the typewriter. When you type on a typewriter, the carriage moves to the right as you type. When you press Return (the key is called “Enter” on most PC keyboards), the typewriter’s carriage would move back to the starting position—in other words, it returned.
Get Cisco IOS in a Nutshell, 2nd Edition now with the O’Reilly learning platform.
O’Reilly members experience books, live events, courses curated by job role, and more from O’Reilly and nearly 200 top publishers.

