Now that everything is in its place, itâs time to actually write some code. At this point the only programming skills required are HTML and JavaScript. Weâre going to build this base of this liveblog application without any server-side code at all.
To get started, use your favorite text editor and create a file in apps/src/main/webapp/river.html. Add the following code to your file:
<!DOCTYPE HTML>
<html>
  <head>
    <script type="text/javascript" src="http://www.google.com/jsapi"></script>
	<script type="text/javascript">
	  google.load("dojo", "1.3.2");
	</script>
    <script type="text/javascript" src="river.js"></script>
  </head>
  <body>
	<h3>Live Feed</h3>
	<div id="stream">
	</div>
  </body>
</html>
As you can see, weâre borrowing some bandwidth from Google by using
their Ajax libraries API
(http://code.google.com/apis/ajaxlibs/) to host all of
the Dojo JavaScript that weâre going to use. After including their main
API script (http://www.google.com/jsapi), we load the
latest version of the base Dojo framework.
The rest of the file is pretty straightforward. Aside from the last
JavaScript include, which we will be creating in just a bit, this is just
all standard HTML. The most important bit is the DIV tag with the
stream id. This is the place on the page where weâre
going to be posting our live updates.
Now that we have a page that will display the feed, we need to be able to post content to it. Create a file called apps/src/main/webapp/river-post.html and add the following code:
<html>
  <head>
    <script type="text/javascript" src="http://www.google.com/jsapi"></script>
	<script type="text/javascript">
	  google.load("dojo", "1.3.2");
	</script>
    <script type="text/javascript" src="river.js"></script>
  </head>
  <body>
	<div>
	  <p>
		<label for="author">Author</label> <br />
		<input type="text" id="author" value="" placeholder="Your Name" />
	  </p>
	  <p>
		<textarea rows="10" cols="50" id="content"></textarea>
	  </p>
	  <p>
		<input type="button" id="river-post-submit" value="Post" />
	  </p>
	</div>
  </body>
</html>
This file has all of the same JavaScript as the river.html file, but it also has some HTML form elements. Although this is where weâll post the content to the realtime feed, weâre not actually POSTing or submitting the form. Weâll be sending all the data through JavaScript using cometd.
While the Cometd software and the Bayeux protocol handle all of the complicated parts of this process, a small bit of JavaScript is needed to get everything running. Open apps/src/main/webapp/river.js and weâll add the needed code piece by piece.
function submitPost(e) {
	dojox.cometd.publish('/river/flow', {
		'content': dojo.byId('content').value,
		'author': (dojo.byId('author').value ?
				   dojo.ById('author').value :
				   'Anonymous')
	} );
	dojo.byId('content').value ='';
}
The first function to add to the file is
submitPost. This is what is used to send the content to
the server, much like submitting a standard web form. However, rather than
POSTing the data, we grab the values
of the form fields created in
river-post.html and publish them
via dojox.cometd.publish.
The function dojox.cometd.publish is what is used
to publish (send) data to a named channel. The channel is the first
parameter and is always a string, in this case
/river/flow. The second parameter is for the JSON data
that gets sent to the server.
function setupRiver() {
	dojox.cometd.init('cometd');
	var catcher = {
		handler: function(msg) {
			if (msg.data.content) {
				var p = dojo.create("p", {style: 'opacity: 0' } );
				dojo.create('strong', { innerHTML: msg.data.author }, p);
				dojo.create('p', { innerHTML: msg.data.content }, p);
				dojo.place(p, "stream", 'first');
				dojo.fadeIn({ node: p, duration: 300 }).play();
			}
		}
	};

	if(dojo.byId('river-post-submit'))
		dojo.connect(dojo.byId('river-post-submit'), "onclick", "submitPost");
	else
		dojox.cometd.subscribe("/river/flow", catcher, "handler");
}
This simple little function is the most complicated part of the JavaScript that we need to create for this application. This one function handles the main setup for both the liveblog viewer and the content creation process.
The first thing that happens is the call to
dojox.cometd.init, which initializes the connection to
the cometd server. This handles the handshake required by the Bayeux
protocol along with details such as determining the best transport method
for your browser, reconnecting if something goes wrong, and everything
else that weâd rather not worry about. The lone parameter is the path to
the cometd server itself. This is the same path we set up when we put the
servlet-mapping tag into
web.xml.
Next, we create a small object called catcher,
which is what receives any messages sent from the server. These messages
are passed to the handler function as JSON objects. The
full Bayeux message response is sent from the server, but the only part
weâre concerned with is the data. This data object is
the very same JSON object published previously in the
submitPost function. Youâll remember there were two
members in that object: author and
content.
In this function, we use the base dojo framework to create some DOM elements to display the posted content. After creating a couple of P elements and a STRONG tag to show the author name, we use dojo animation to make the HTML fade in. Itâs just an extensible way of printing the HTML content to the page.
Since this file gets included by both
river.html and
river-post.html, this function may
execute two different actions depending on which page is loaded. When a
user is looking at the
river-post.html file, weâll be
able to access the âPostâ form button via JavaScript. We simply connect
that buttonâs onclick event to the submitPost function
we created earlier. When we donât have that form element, we assume that
weâre going to view the liveblog feed and subscribe to the
/river/flow channel.
Finally, we need to add the code that gets this whole process up and running. Add the following code to the bottom of your river.js file:
google.setOnLoadCallback(
	function() {
		dojo.require("dojox.cometd");
		dojo.addOnLoad(setupRiver);
		dojo.addOnUnload(dojox.cometd, "disconnect");
	}
);
Because weâre loading the dojo files from remote servers, we need to
wait to run our setup functions until all of the code has been loaded.
Luckily, the Google Ajax libraries API provides the callback function
google.setOnLoadCallback to let us know when that has
happened. In that callback function, we tell Dojo which features weâre
going to need, which in this case is only the cometd extension. Then, we
instruct dojo to call our setupRiver function when it
is ready to continue. The very last step is to instruct the cometd library
to disconnect when we unload (or navigate away from) this page.
At this point we have all the code in place for a fully functional liveblog, so I try it out. Running the app is simple. From a terminal window, navigate to the apps directory and enter the following command:
~ cometd-java/apps $ mvn jetty:runNow the server should be up and running. To fully test this out, youâll want to open one browser, say Safari or Internet Explorer, and point it to http://127.0.0.1:8080/river.html. Then, open another browser, say Firefox, and point it to http://127.0.0.1:8080/river-post.html. Figure 4-4 shows a liveblog session in action (see Figure 4-4).

Once youâve loaded up the browsers, you should see the two web pages we created. As you start posting content, you should notice how quickly the content shows up in the other browser window. Keep in mind that this involves a trip through the server, and itâs not just drawing content from one window to the other dynamically; all of the content is posted to the Web and loaded back in the browser in realtime. If you opened up another browser, say Opera or Chrome, and pointed it at http://127.0.0.1:8080/river.html, youâd see the content refresh in two browsers just as quickly as the one.
So what is happening here?
In our JavaScript file, when we called
dojox.cometd.init, we made a connect request to the
cometd server. This request handles all of the dirty work of Bayeuxâs
fairly complicated handshake process. At this point the server instructs
the client (our JavaScript file) on how to interact with the server. This
is where the server declares the timeout, interval, and all the other
variables we set up in our server configuration. As programmers, we can
safely ignore all of those things now because the dojox.cometd framework
takes care of everything.
The next thing we did was call
dojox.cometd.subscribe and subscribe to the
/river/flow channel. This function starts making
requests to the server using long polling at the intervals described
earlier. If the server ever tells us to back off, the framework will
handle that appropriately. Once again, we can focus on building our
application and not the housekeeping required by the protocol.
The handshake and subscribe processes are detailed in Figure 4-5.

At this point, our browser-based client is maintaining a long-polling-based connection to the server. When data is available, it will be sent through the existing connections.
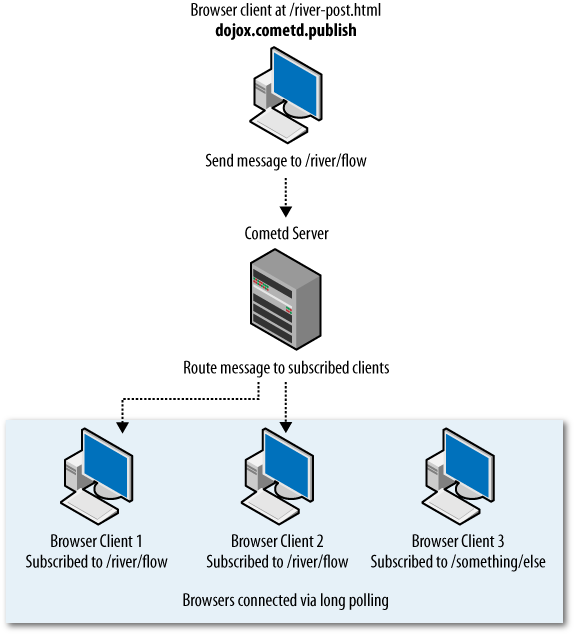
In the demo, we use a second browser to send messages to the server,
which then routes the messages to the subscribed clients. To send a
message to the server, pass the data encoded as a JSON object to the
dojox.cometd.publish. This function just requires the
JSON object and the channel name of where the data should be delivered.
Then, we clear out the content field to allow the blogger to quickly post
more content.
When that message makes it to the server, the server then routes it
back to all of the subscribed clients. In this case, itâs sent back to the
handler function of the catcher
object, which we specified when we subscribed to the channel. This simple
function just draws the HTML to the screen and returns.
The whole publish to message routing process is illustrated in Figure 4-6.
There is big a reason you need to open these files up in separate browsers and not just different tabs in the same browser when testing. Most modern browsers limit the amount of concurrent connections to just two connections per server. This means that if you have two connections open to the server and try to open another connection in the same browser, even if itâs in a new tab, the browser will wait until one of the original connections disconnects. When weâre doing long polling, that means weâll be waiting a long time between connections.
Cometd actually helps with this issue by using the
advice part of the protocol to instruct the client to
fall back to regular polling at standard intervals. Although this helps
keep connections alive, it means weâre not getting truly realtime
content because of the length of time between requests. In practice for
normal users, this isnât as much of an issue, but when building sites,
it poses a bit of a problem. The solution is simple: use totally
different browsers.
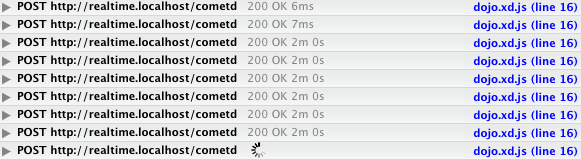
You can easily check to see if the cometd libraries have fallen
back to standard polling at long intervals by examining the transfers
with the Firefox extension Firebug (http://getfirebug.com). Firebug has many features that
make debugging web applications much easier, such as the ability to
examine the network activity, including connections that are still
active. When you load up and enable Firebug, the
Console tab will show you the different POST requests
currently active (see Figure 4-7). If one of
them is constantly active, long polling is working. If the connection
returns immediately, itâs fallen back. To fix this, navigate away from
the page for a minute; it should go right back to long polling when you
return.
While the browser is looking at a page in a long polling section, you may notice the status bar say something to the effect of âcompleted 5 of 6 items,â as if the browser is still loading an asset. It is! Itâs waiting on your long polling operation to finish, and it will keep waiting until it does. Although the status bar may claim the page load is incomplete, for all intents and purposes, everything is ready to go.
Get Building the Realtime User Experience now with the O’Reilly learning platform.
O’Reilly members experience books, live events, courses curated by job role, and more from O’Reilly and nearly 200 top publishers.

