Although most users use ssh and
scp for simple logins and file transfers,
respectively, this only scratches the surface of what SSH can do.
Next we’ll examine the following:
A complete description of public-key cryptography (or "PK crypto”) is beyond the scope of this chapter. If you’re completely unfamiliar with PK crypto, I highly recommend the RSA Crypto FAQ (available at http://www.rsasecurity.com/rsalabs/faq/) or, even better, Bruce Schneier’s excellent book, Applied Cryptography (Wiley).
For our purposes, it’s enough to say that in a public-key scheme (illustrated in Figure 4-1), each user has a pair of keys. Your private key is used to sign things digitally and to decrypt things that have been sent to you. Your public key is used by your correspondents to verify things that have allegedly been signed by you and to encrypt data that they want only you to be able to decrypt.
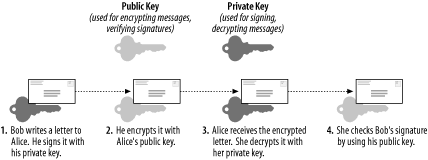
Along the bottom of Figure 4-1, we see how two users’ key pairs are used to sign, encrypt, decrypt, and verify a message sent from one user to the other. Note that Bob and Alice possess copies of each others’ public keys, but that each keeps their private key secret.
As we can see, the message’s journey includes four different key actions:
Bob signs a message using his private key.
Bob encrypts it using Alice’s public key. (Aside from the fact that Bob has probably kept a copy of the original message, he can not decrypt this message — only Alice can!)
Alice receives the message and decrypts it with her private key.
Alice uses Bob’s public key to verify that it was signed using his private key.
Compared to block ciphers such as blowfish and IDEA, in which the same key is used both for encryption and decryption, this may seem convoluted. Unlike block ciphers, though, for which secure key exchange is problematic, PK crypto is easier to use securely.
This is because in PK schemes two parties can send encrypted messages to each other without first exchanging any secret data whatsoever. There is one caveat: public-key algorithms are slower and more CPU-intensive than other classes of cryptographic algorithms, such as block ciphers and stream ciphers (e.g., 3DES and RC4, respectively). As it happens, however, PK crypto can be used to generate keys securely that can be used in other algorithms.
In practice, therefore, PK crypto is often used for authentication (“are you really you?”) and key negotiation (“which 3DES keys will we encrypt the rest of this session with?”), but seldom for the bulk encryption of entire sessions (data streams) or files. This is the case with SSL, and it’s also the case with SSH.
As described in the beginning of the chapter (“How SSH Works”), at the very beginning of each SSH session, even before the end user is authenticated to the server, the two computers use their respective host keys to negotiate a session key. How the Diffie-Hellman Key Exchange Protocol works is both beyond the scope of this discussion and complicated (for more information, see the Internet Draft “draft-ietf-secsh-transport-07.txt”, available at http://www.ietf.org). You need only know that the result of this large-prime-number hoe-down is a session key that both parties know but which has not actually traversed the as-yet-unencrypted connection.
This session key is used to encrypt the data fields of all subsequent packets via a “block cipher” agreed upon by both hosts (transparently, but based on how each SSH process was compiled and configured). Usually, one of the following is used: Triple-DES (3DES), blowfish, or IDEA. Only after session encryption begins can authentication take place.
This is a particularly interesting and useful characteristic of SSH: since end-user authentication happens over an encrypted channel, the authentication mechanism can be relatively weak — e.g., a standard Unix username/password combination (which is inherently weak, since its security depends on the secrecy of a single piece of data: the username/password combination, which may not even be difficult to guess).
As we’ve discussed, using such authentication with SSH is exponentially more secure than, for example, Telnet, since in SSH, both authentication credentials and actual session data are protected. But SSH also supports much stronger authentication methods.
Before we dive into RSA/DSA authentication, let’s return to key negotiation for a moment and ask: how can key negotiation be transparent, given that it uses PK crypto and that private keys are usually passphrase protected? SSH uses two different kinds of keypairs: host keys and user keys.
A host key is a special key pair that doesn’t have a
passphrase associated with it. Since it can be used without anybody
needing to enter a passphrase first, SSH can negotiate keys and set
up encrypted sessions completely transparently to users. Part of the
SSH installation process is the generation of a host key (pair). The
host key generated at setup time can be used by that host
indefinitely, barring root compromise. And since the host key
identifies the host, not individual users, each host needs only one
host key. Note that host keys are used by all computers that run SSH,
regardless of whether they run only the SSH client
(ssh), SSH daemon (sshd),
or both.
A user key is a key associated with an individual user and used to authenticate that user to the hosts to which she initiates connections. Most user keys must be unlocked with the correct passphrase before being used.
User keys provide a more secure authentication mechanism than
username/password authentication (even though all authentication
occurs over encrypted sessions). For this reason, SSH by default
always attempts PK authentication before falling back to
username/password. When you invoke SSH (i.e., a local
ssh or scp command), this
is what happens:
SSH checks your
$HOME/.sshdirectory to see if you have a private key (namedid_dsa).If you do, SSH will prompt you for the key’s passphrase and will then use the private key to create a signature, which it will then send, along with a copy of your public key, to the remote server.
The server will check to see if the public key is an allowed key (i.e., belonging to a legitimate user and therefore present in the applicable
$HOME/.ssh/authorized_keys2file).If the key is allowed and identical to the server’s previously stored copy of it, the server will use it to verify that the signature was created using this key’s corresponding private key.
If this succeeds, the server will allow the session to proceed.
If any of the previous actions fail and if the server allows it, the server will prompt the user for username/password authentication.
Tip
The previous steps refer to the DSA authentication used in SSH Protocol v.2; RSA authentication is slightly more complicated but, other than using different filenames, is functionally identical from the user’s perspective.)
PK authentication is more secure than username/password because a digital signature cannot be reverse-engineered or otherwise manipulated to derive the private key that generated it; neither can a public key. By sending only digital signatures and public keys over the network, we ensure that even if the session key is somehow cracked, an eavesdropper still won’t be able to obtain enough information to log on illicitly.
Okay, we’ve established that PK authentication is more secure than username/password, and you’re ready to enter the next level of SSH geekdom by creating yourself a user key pair. Here’s what you do.
First, on your client system (the machine you wish to use as a remote
console), you need to run
ssh-keygen
. It calls for some choices; among other
things, we can specify the following:
Either RSA or DSA keys
Key length
An arbitrary “comment” field
The name of the key files to be written
The passphrase (if any) with which the private key will be encrypted
Now that RSA’s patent has expired, choosing the algorithm is somewhat arbitrary, at least from a legal standpoint. But which algorithm we choose determines for which SSH protocol that key can be used: SSH Protocol v.1 uses RSA keys and SSH Protocol v.2 uses DSA keys. SSH Protocol v.2 is obviously more current and is the version submitted to the IETF for consideration as an Internet Standard. Furthermore, recent SSH vulnerabilities have tended to involve SSH Protocol v.1.
RSA itself hasn’t been the culprit; the protocol and the ways it’s been implemented in the protocol have. This may simply be because v.1 has been around longer and that people have had more time to “beat up” on it. Either way, there’s no reason to expect that even after more scrutiny, v.2 will prove to be less secure than v.1. Also, the various developers of SSH are focusing their energies on Protocol v.2. Therefore, my personal preference is to use SSH Protocol v.1 only when I don’t have a choice (e.g., when connecting to someone else’s older SSH servers).
Anyhow, when running ssh-keygen use the
-d flag to set DSA as the algorithm; otherwise,
RSA is the default.
Key length is a more important
parameter. Adi Shamir’s
“Twinkle” paper describes a
theoretical but plausible computer capable of cracking RSA/DSA keys
of 512 bits or less via brute force (http://cryptome.org/twinkle.eps), so I highly
recommend you create 1024-bit keys. 768 is okay, but not noticeably
faster to use than 1024. 2048, however, is probably overkill: it
isn’t significantly more secure (depending,
admittedly, on whom you ask), but it slows things down noticeably.
The default key length is 1024, but you can use the
-b flag followed by a number to specify a
different one.
The “comment” field is not used by
any SSH process: it’s strictly for your own
convenience. I usually set it to my email address on the local
system. That way, if I encounter the key in
authorized_keys files on my other systems, I
know where it came from. To specify a comment, use the
-C flag.
The passphrase and filenames can, but needn’t be,
provided in the command line (using -N and
-f, respectively). If either is missing,
you’ll be prompted for them.
Example 4-3 gives a sample
ssh-keygen session.
Example 4-3. Sample ssh-keygen session for a 1024-bit DSA key
mbauer@homebox:~/.ssh >ssh-keygen -d -b 1024 -C mbauer@homebox.pinheads.comGenerating DSA parameter and key. Enter file in which to save the key (/home/mbauer/.ssh/id_dsa): Enter passphrase (empty for no passphrase):*************************Enter same passphrase again:*************************Your identification has been saved in /home/mbauer/.ssh/id_dsa. Your public key has been saved in /home/mbauer/.ssh/id_dsa.pub. The key fingerprint is: 95:a9:6f:20:f0:e8:43:36:f2:86:d0:1b:47:e4:00:6e mbauer@homebox.pinheads.com
In Example 4-3, I’m creating a DSA
key pair with a key length of 1024 bits and a comment string of
“mbauer@homebox.pinheads.com”. I
let ssh-keygen prompt me for the file in which
to save the key. This will be the name of the private key, and the
public key will be this name with
“.pub” appended to it.
In this example, I’ve accepted the default filename
of id_dsa (and therefore also
id_dsa.pub). I’ve also let
ssh-keygen prompt me for the passphrase. The
string of asterists
(*************************)
won’t actually appear when you enter your
passphrase; I inserted those in the example to indicate that I typed
a long passphrase that was not echoed back on the screen.
By the way, passphrases are an “all or nothing” proposition: your passphrase should either be empty (if you intend to use the new key as a host key or for scripts that use SSH) or should be a long string that includes some combination of upper- and lowercase letters, digits, and punctuation. This isn’t as hard as it may sound. For example, a line from a song with deliberate but unpredictable misspellings can be easy to remember but difficult to guess. Remember, though, that the more random the passphrase, the stronger it will be.
That’s all that must be done on the client side. On
each remote machine you wish to access from this host, just add the
new public key to $HOME/.ssh/authorized_keys2
(where $HOME is the path of your home
directory). authorized_keys2 is a list of public
keys (one per very long line) that may be used for login by the user
in whose home directory authorized_keys2
resides.
To add your
public key to a remote host on
which you have an account, simply transfer the file containing your
public key (id_dsa.pub in the previous example)
to the remote host and concatenate it to your
authorized_keys2 file. How you get the file
there doesn’t matter a whole lot: remember,
it’s your public key, so if it were to be copied by
an eavesdropper en route, there would be no need for concern. But if
you’re paranoid about it, simply enter the
following:
scp ./id_dsa.pubremotehostname:/your/homedir
(See the earlier section, Section 4.2.4.) Then to add it to
authorized_keys2, log on to the remote host and
enter the following:
cat id_dsa.pub >> .ssh/authorized_keys2(assuming you’re in your home directory). That’s it! Now whenever you log in to that remote host using SSH, the session will look something like Example 4-4.
Example 4-4. ssh session with DSA authentication
bauer@homebox:~/ >ssh -2 zippy.pinheads.comEnter passphrase for DSA key '/home/mbauer/.ssh/id_dsa': Last login: Wed Oct 4 10:14:34 2000 from homebox.pinheads.com Have a lot of fun... mbauer@zippy:~ > _
Notice that when I invoked ssh in Example 4-4, I
used the -2 flag: this instructs SSH to try SSH
Protocol v.2 only. By default Protocol v.1 is used, but v.1 only
supports RSA keys, and we just copied over a DSA key. Note also that
the key is referred to by its local filename: this is a reminder that
when we use RSA or DSA authentication, the passphrase we enter is
only used to “unlock” our locally
stored private key and is not sent over the network in any form.
There’s one last thing I should mention about the Example 4-4. It makes two assumptions about the remote server:
That I have the same username as I do locally
That the remote server recognizes SSH Protocol v.2.
If the first assumption isn’t true, I need either to
use the -l flag to specify my username on the
remote host or, instead, to use scp-style
username@hostname syntax — e.g.,
mick@zippy.pinheads.com.
If Protocol v.2 isn’t supported by the remote
sshd daemon, I’ll have to try
again without the -2 flag and let SSH fall back to
username/password authentication, unless I’ve got an
RSA key pair whose public key is registered on the remote machine.
To do all this with RSA keys, we follow pretty much the same steps, but with different filenames:
Create an RSA user -key pair with
ssh-keygen, for example:ssh-keygen -b 1024 -C mbauer@homebox.pinheads.com
On each remote host to which you wish to connect, copy your public key onto its own line in the file
authorized_keysin your$HOME/.sshdirectory. (The default filenames for RSA keys areidentityandidentity.pub.)
Again, if you run ssh without the
-2 flag, it will try RSA authentication by
default.
What happens if you forget your RSA or DSA key’s
passphrase? How will you get back in to the remote machine to change
the now-unusable key’s
authorized_keys
file? Not to worry: if you attempt
RSA or DSA authentication and fail for any reason, SSH will revert to
username/password authentication and prompt you for your password on
the remote system. If, as administrator, you wish to disable this
“fallback” mechanism and maintain a
strict policy of RSA/DSA logins only, change the parameter
PasswordAuthentication to no in
sshd_config
on each remote host running
sshd.
As long as we’re talking about the server side of
the equation, note that by default, sshd allows
both RSA and DSA authentication when requested by an
ssh client process. The
sshd_config parameters used to allow or disallow
these explicitly are RSAAuthentication and
DSAAthentication, respectively.
Establishing one or more user keys improves authentication security and harnesses more of SSH’s power than username/password authentication. It’s also the first step in using SSH in shell scripts. There’s just one small obstacle to automating the things we’ve done with PK crypto: even though the challenge-response authentication between client and server is transparent, the process of locally unlocking one’s private key by entering a passphrase isn’t. How can we safely skip or streamline that process?
There are several ways. One is to use a
passphrase-less
key, in which case SSH will skip the passphrase prompt and
immediately begin the transparent challenge-response authentication
to the server whenever the key is used. (We’ll talk
more about passphrase-less keys in a moment.) Another way is to use
ssh-agent.
ssh-agent
is, essentially, a private-key cache in RAM that allows you to use
your private key repeatedly after entering its passphrase just once.
When you start ssh-agent and then load a key
into it with ssh-add, you are prompted for the
key’s passphrase, after which the
“unlocked” private key is held in
memory in such a way that all subsequent invocations of
ssh and scp will be able to
use the cached, unlocked key without reprompting you for its
passphrase.
This might sound insecure, but it isn’t. First, only
an ssh-agent process’ owner can
use the keys loaded into it. For example, if
“root” and
“bubba” are both logged in and each
have started their own ssh-agent processes and
loaded their respective private keys into them, they cannot get at
each other’s cached keys; there is no danger of
bubba using root’s credentials to run
scp or ssh processes.
Second, ssh-agent listens only to local
ssh and scp processes; it
is not directly accessible from the network. In other words, it is a
local service, not a network service per se. There is no danger,
therefore, of an outside would-be intruder hijacking or otherwise
compromising a remote ssh-agent process.
Using ssh-agent is fairly straightforward:
simply enter ssh-agent and execute the commands
it prints to the screen. This last bit may sound confusing, and
it’s certainly noninstinctive. Before going to the
background, ssh-agent prints a brief series of
environment-variable declarations appropriate to whichever shell
you’re using that must be made before you can add
any keys (see Example 4-5).
Example 4-5. Invoking ssh-agent
mbauer@pinheads:~ >ssh-agentSSH_AUTH_SOCK=/tmp/ssh-riGg3886/agent.3886; export SSH_AUTH_SOCK; SSH_AGENT_PID=3887; export SSH_AGENT_PID; echo Agent pid 3887; mbauer@pinheads:~ > _
In Example 4-5, I’m one-third of the way there:
I’ve started an ssh-agent
process, and ssh-agent has printed out the
variables I need to declare using BASH syntax.
All I need to do now is select everything after the first line in the example and before the last line (as soon as I release the left mouse button, this text will be copied) and right-click over the cursor on the last line (which will paste the previously selected text into that spot). I may need to hit Enter for that last echo to be performed, but that echo isn’t really necessary anyhow.
Note that such a cut and paste will work in any xterm, but for it to
work at a tty (text) console, gpm will need to
be running. An alternative approach is to redirect
ssh-agent’s output to a file,
make the file executable, and execute the file within your current
shell’s context (Example 4-6).
Example 4-6. Another way to set ssh-agent’s environment variables
mbauer@pinheads:~ >ssh-agent > tempmbauer@pinheads:~ >chmod u+x tempmbauer@pinheads:~ >. ./temp
Once ssh-agent is running and
SSH_AUTH_SOCK and
SSH_AGENT_PID have been declared and exported,
it’s time to load your private key. Simply type
ssh-add, followed by a space and the name (with
full path) of the private key you wish to load. If you
don’t specify a file, it will automatically attempt
to load $HOME/.ssh/identity. Since
that’s the default name for an RSA user -private
key, if yours is named something else or if you wish to load a DSA
key, you’ll need to specify its name, including its
full path. For example:
mbauer@pinheads:~ > ssh-add /home/mbauer/.ssh/id_dsaYou can use ssh-add
as many times (to load as many keys) as you like. This is useful if
you have both an RSA and a DSA key pair and access different remote
hosts running different versions of SSH (i.e., some that support only
RSA keys and others that accept DSA keys).
ssh-agent is useful if you run scripts from a
logon session or if you need to run ssh and/or
scp repeatedly in a single session. But what
about cron
jobs? Obviously,
cron can’t perform
username/password or enter a passphrase for PK authentication.
This is the place to use a passphrase-less
key pair. Simply run ssh-keygen as described
earlier, but instead of entering a passphrase when prompted, hit
Enter. You’ll probably also want to enter a filename
other than identity or
id_dsa, unless the key pair is to be the default
user key for some sort of special account used for running automated
tasks.
To specify a particular key to use in either an
ssh or scp session, use the
-i flag. For example, if I’m
using scp in a cron job
that copies logfiles, my scp line might look
like this:
scp -i /etc/script_dsa_id /var/log/messages.* scriptboy@archive.g33kz.org
When the script runs, this line will run without requiring a passphrase: if the passphrase is set to Enter, SSH is smart enough not to bother prompting the user.
But remember, on the remote-host side I’ll need to
make sure the key in /etc/script_dsa_id.pub has
been added to the appropriate authorized_keys2
file on the remote host, e.g.,
/home/scriptboy/.ssh/authorized_keys2
.
Now it’s time to take a step back from all this PK
voodoo to discuss a simple feature of
SSH that is especially important for
scripting: remote commands. So far we’ve been using
the command ssh strictly for remote shell
sessions. However, this is merely its default behavior; if we invoke
ssh with a command line as its last argument(s),
SSH will execute that command line rather than a shell on the remote
host.
For example, suppose I want to take a quick peek at my remote system’s log (see Example 4-7).
Example 4-7. Running cat on a remote host (if no passphrase is needed)
mbauer@homebox > ssh mbauer@zippy.pinheads.com cat /var/log/messages | more

Oct  5 16:00:01 zippy newsyslog[64]: logfile turned over
Oct  5 16:00:02 zippy syslogd: restart
Oct  5 16:00:21 zippy ipmon[29322]: 16:00:20.496063  ep0 @10:1 p \
   192.168.1.103,33247 -> 10.1.1.77,53 PR udp len 20 61  K-S K-F

etc.
In Example 4-7 the host
“zippy” will send back the contents
of its /var/log/messages file to my local
console. (Note that output has been piped to a local
more process.)
Two caveats are in order here. First, running remote commands that
require subsequent user interaction is tricky and should be
avoided — with the exception of shells, ssh
works best when triggering processes that don’t
require user input. Also, all authentication rules still apply: if
you would normally be prompted for a password or passphrase, you
still will. Therefore, if using SSH from a cron
job or in other noninteractive contexts, make sure
you’re either using a passphrase-less key or that
the key you are using is first loaded into
ssh-agent.
Before we leave the topic of SSH in scripts, I would be remiss if I
didn’t mention
rhosts
and shosts
authentication. These are mechanisms by which access is automatically
granted to users connecting from any host specified in any of the
following files: $HOME/.rhosts,
$HOME/.shosts,
/etc/hosts.equiv, and
/etc/shosts.equiv.
As you might imagine, rhosts access is wildly insecure, since it relies solely on source IP addresses and hostnames, both of which can be spoofed in various ways. Therefore, rhosts authentication is disabled by default. shosts is different: although it appears to behave the same as rhosts, the connecting host’s identity is verified via host -key checking; furthermore, only root on the connecting host may transparently connect via the shost mechanism.
By the way, combining
rhosts access with RSA or
DSA authentication is a good thing to do, especially when using
passphrase-less keys: while on its own the rhosts mechanism
isn’t very secure, it adds a small amount of
security when used in combination with other things. In the case of
passphrase-less RSA/DSA authentication, the rhosts mechanism makes it
a little harder to use a stolen key pair. See the
sshd(8) manpage for details on using rhosts and
shosts with SSH, with or without PK authentication.
And now we arrive at the payoff:
port
forwarding. ssh gives us a mechanism for
executing remote logins/shells and other commands;
sftp and scp add file
copying. But what about X? POP3? LPD? Fear not, SSH can secure these
and most other TCP-based services!
Forwarding X applications back to your remote console is extremely
simple. First, on the remote host, edit (or ask your admin to edit)
/etc/ssh/sshd_config
, and set
X11Forwarding
to yes (in OpenSSH Version 2x, the default is
no). Second, open an ssh session using the
authentication method of your choice from your local console to the
remote host. Third, run whatever X applications you wish.
That’s it!
Needless to say (I hope), X must be running on your local system; if
it is, SSH will set your remote DISPLAY variable
to your local IP address and the remote application will send all X
output to your local X desktop. (If it doesn’t, in
your remote shell, set the environment variable
DISPLAY to
your.client.IP.address
:0 and
export it.)
Example 4-8 is a sample X-forwarding session (assume the remote host “zippy” allows X11Forwarding).
Example 4-8. Forwarding an xterm from a remote host
mick@homebox:~/ >ssh -2 mbauer@zippy.pinheads.comEnter passphrase for DSA key '/home/mick/.ssh/id_dsa': Last login: Wed Oct 4 10:14:34 2000 from homebox.pinheads.com Have a lot of fun... mbauer@zippy:~ >xterm &
After the xterm & command is issued, a new
xterm window will open on the local desktop. I could just as easily
(and can still) run Netscape, GIMP, or anything
else my local X server can handle (provided the application works
properly on the remote host).
X is the only category of service that SSH is hardcoded to
automatically forward. Other services are easily forwarded using the
-L flag (note uppercase!). Consider the session
displayed in Example 4-9.
Example 4-9. Using ssh to forward a POP3 email session
mick@homebox:~/ >ssh -2 -f mbauer@zippy -L 7777:zippy:110 sleep 600Enter passphrase for DSA key '/home/mick/.ssh/id_dsa': mick@homebox:~/ >mutt
The first part of the ssh line looks sort of
familiar: I’m using SSH Protocol v.2 and logging on
with a different username (mbauer) on the remote
host (zippy) than locally
(mick@homebox). The -f flag
tells ssh to fork itself into the background after starting the
command specified by the last argument, in this case sleep 600. This means that the ssh process will sleep for ten
minutes instead of starting a shell session.
Ten minutes is plenty of time to fire up mutt
or some other POP3 client, which brings us to the
real magic: -L defines a “local
forward,” which redirects a local TCP port on our
client system to a remote port on the server system. Local forwards
follow the syntax
local_port_number:remote_hostname:remote_port_number
where local_port_number is an arbitrary
port on your local (client) machine,
remote_hostname is the name or IP address
of the server (remote) machine, and
remote_port_number is the number of the
port on the remote machine to which you wish to forward connections.
Note that any users may use ssh to declare local forwards on high ports ( >= 1024), but only root may declare them on privileged ports ( < 1024). Returning to the previous example, after ssh goes to sleep, we’re returned to our local shell prompt and have 10 minutes to send and receive email with a POP3 client. Note that our POP3 software will need to be configured to use “localhost” as its POP3 server and TCP 7777 as the POP3 connecting port.
After we execute the commands in Example 4-9, mutt
should connect to TCP port 7777 on the local system
(homebox), whereupon our local ssh process will
nab each POP3 packet, encrypt it, and send it to the sshd process
listening on TCP port 22 on the remote host
(zippy). Zippy’s sshd will decrypt each packet
and hand it off to the POP3 daemon (probably
inetd) listening on zippy’s
TCP port 110, the standard POP3 port. Reply packets, of course, will
be sent backward through the same steps — i.e., encrypted by the
remote sshd process, sent back to our local ssh process, decrypted,
and handed off to our local mutt process.
After the 10-minute sleep process ends, the ssh
process will try to end too; but if a POP3 transaction using the
local forward is still active, then ssh will
return a message to that effect and remain alive until the forwarded
connection is closed. Alternately, we can open a login shell rather
than running a remote command like sleep; this
will keep the session open until we exit the shell.
We’ll just need to omit the -f
flag and use a different virtual console or window to start mutt,
etc. If we do use -f and sleep, we
aren’t obliged to sleep for exactly 600
seconds — the sleep interval is unimportant, as long as it leaves
us enough time to start the forwarded connection.
Note
"Connection-oriented” applications such as FTP and X only need enough time to begin, since SSH won’t close a session while it’s active — i.e., while packets are traversing it regularly.
But “connectionless” applications such as POP3 and HTTP start and stop many brief connections over the course of each transaction, rather than maintaining one long connection; they don’t have the one-to-one relationship between transactions and TCP connections that exists with connection-oriented services. Therefore, you’ll need to sleep SSH for long enough so connectionless applications can do everything they need to do, rather than just long enough to begin.
You can run any remote command that will achieve the desired pause,
but it makes sense to use sleep because that’s the
sort of thing sleep is for: it saves us the trouble of monopolizing a
console with a shell process and typing that extra
exit command. One more tip: if you use a given
local forward every time you use ssh, you can
declare it in your very own ssh configuration
file in your home directory, $HOME/.ssh/config.
The syntax is similar to that of the -L flag on
the ssh command line:
LocalForward 7777 zippy.pinheads.com:110
In other words, after the parameter name
LocalForward, you should have a space or tab, the
local port number, another space, the remote host’s
name or IP address, a colon but no space, and the remote port number.
You can also use this parameter in
/etc/ssh/ssh_config
if you wish it to apply to all
ssh processes run on the local machine. In
either case, you can define as many local forwards as you
need — e.g., one for POP3, another on a different local port for
IRC, etc.
Get Building Secure Servers with Linux now with the O’Reilly learning platform.
O’Reilly members experience books, live events, courses curated by job role, and more from O’Reilly and nearly 200 top publishers.

