So if youâve got to this point, youâve built out the core of the conference management application. And this core does quite a few things, allowing us to track and manage all of the sponsors, speakers, and attendees for a specific event as well as across various events. If you were developing this core from scratch, it may take you a month or more to get to this point, but with the ease of working with the various SugarCRM GUI developer tools such as Studio and Module Builder, we could pull this off in a few hours and be ready for the stakeholders to start playing with the newly built application right away. This fact alone makes building such an application on the SugarCRM platform a no-brainier, and alleviates all sorts of extra work for you as a developer.
Even with all of that built, thereâs still more that can be done to better streamline the workflow of the application. It would be great to not only bring information about the data in the system and its changing state, but also to automate common and tedious tasks within the system to make it easier to use. Luckily, SugarCRM has a rich and powerful API for building these sorts of customizations with ease, and in this chapter weâll look at how to do a few of these through easy-to-build custom PHP code.
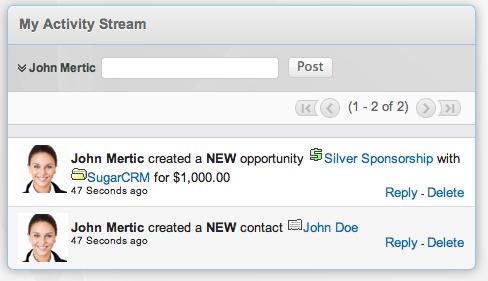
The Activity Stream was a feature added back in Sugar 5.2 that brought social networking inside of your organization, enabling your organization to communicate just like they were using Twitter or Facebook. Figure 4-1 shows the Activity Steam dashlet. Having this integrated into SugarCRM gives the added benefit of hooking module activities to it as well so that the application can post when records are added or changed based upon the criteria you provide. This will be especially handy in Chapter 5, where we will be adding new records from forms outside of your application, perhaps from the conference website.
Out of the box, support comes with having these alerts being posted to the Activity Stream for the Contacts, Opportunities, and Leads modules, which immediately enables the Sponsorship management portion of our application to leverage this ability. But what about Speaker and Attendee management? Letâs see how we can add some custom code to make this happen.
The first item to tackle is showing when we have new attendee registrations added to the application. This involves adding a short segment of code that registers the logic hook and that will post the update to the Activity Stream. After that, the next task will be to go into the Activity Streams administrator settings and enable the Attendees module to show in the Activity Stream.
To start, letâs add the logic hook that will be used to push items into the Activity Stream. The file is named AttendeeFeed.php, and it will located in the custom/modules/pos_Attendees/SugarFeeds/ directory.
<?php

require_once('modules/SugarFeed/feedLogicBase.php');

class AttendeeFeed extends FeedLogicBase
{
    public $module = 'pos_Attendees';

    public function pushFeed($bean, $event, $arguments)
    {
        $text = '';
        if(empty($bean->fetched_row)) {
            $text =  '[' . $bean->module_dir . ':' . $bean->id . ':' . $bean->name.']
    just registered.';
        }

        if(!empty($text)){
            SugarFeed::pushFeed2($text, $bean);
        }

    }
}
The key here is the pushFeed() method, which contains the logic for determining if the record should be pushed into the Activity Stream or not. This method is called on every save of an Attendee record, so the method needs to check if a previous record exists. This is simple to do by checking if an existing record was fetched before the save (and the contents of the record is stored in the $bean->fetched_row array). If it is, we define the string to add in a format that can be parsed as a link in the Activity Stream itself.
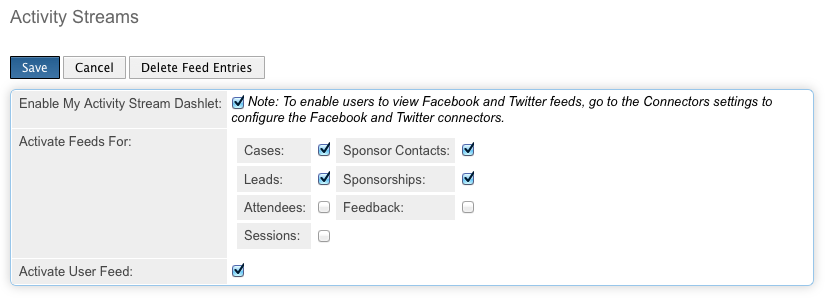
To enable the Attendees module in the Activity Stream, simply go to the Admin > Activity Streams panel and checkbox the âAttendeesâ option to enable it. Figure 4-2 shows the administration panel.
Now, if a new attendee is saved, a record will be added to the Activity Stream for it.
We can do the same thing for speaker proposals as well. This one here will have a few more options; not only will this push when a new session proposal comes in, but it will also post to the Activity Stream when itâs been accepted or rejected.
<?php

require_once('modules/SugarFeed/feedLogicBase.php');

class SessionsFeed extends FeedLogicBase
{
    public $module = 'pos_Sessions';

    public function pushFeed($bean, $event, $arguments)
    {
        $text = '';
        if(empty($bean->fetched_row)) {
            $text =  'Newly added session abstract [' . $bean->module_dir . ':' .
    $bean->id . ':' . $bean->name.']';
        }
        else {
            if(!empty($bean->fetched_row['status'] )
    && $bean->fetched_row['status'] != $bean->status
    && $bean->status == 'Accepted'){
                $text =  'Session [' . $bean->module_dir . ':' . $bean->id . ':' .
    $bean->name. '] has been accepted';
            }
            if(!empty($bean->fetched_row['status'] )
    && $bean->fetched_row['status'] != $bean->status
    && $bean->status == 'Declined'){
                $text =  'Session [' . $bean->module_dir . ':' . $bean->id . ':' .
    $bean->name. '] has been declined';
            }
        }

        if(!empty($text)){
            SugarFeed::pushFeed2($text, $bean);
        }
    }
}
So this logic hook has two parts to it. The first check is the same sort of thing done above with the Attendees Activity Stream hook, checking to see if this is a newly added record to the Sessions module and if so then write out to the Activity Stream about the newly created record. If the record is already existing one, the next step is to see if the status has changed to one of the two action values. If it has changed to âAcceptedâ, then it will write out a message to the Activity Stream that the session has been accepted, and if it has changed to âDeclinedâ, then the message instead will reflect it being declined. Weâll then enable the module for Activity Streams just as we did in the Attendees module above.
Weâll build upon this example later in this chapter to have additional business logic for changes to Sessions records, automating the notification of speakers of the status of their proposals automatically.
For users working the system, it can be a pretty encouraging thing to see how attendees feel the conference is going (especially if the feedback is positive). We can do this with the same approach we used in the Attendees module, by making an Activity Stream logic hook to write a message with the feedback that is to be added.
<?php
require_once('modules/SugarFeed/feedLogicBase.php');
class FeedbackFeed extends FeedLogicBase
{
public $module = 'pos_Feedback';
public function pushFeed($bean, $event, $arguments)
{
$text = '';
if(empty($bean->fetched_row)) {
$text = 'New feedback added ( rating: ' . $bean->rating . ' ): ' .
$bean->description.'';
}
if(!empty($text)){
SugarFeed::pushFeed2($text, $bean);
}
}
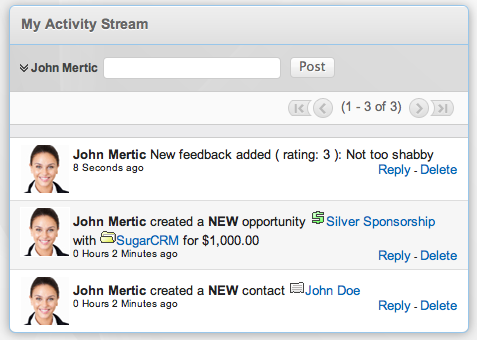
}The message to be written to the Activity Stream will have the rating the attendee gave, along with any feedback they have provided as a part of their review. This will become an even more useful tool in Chapter 5 when we build an external form that attendees can post their feedback to that will automatically add it to our application and put an entry in the Activity Stream for it. See Figure 4-3 for an example of this.
With that, we have more fully integrated all of the modules in our application into the Activity Streams, which has given users of the system a more realtime view of the changes happening to records in the system. Letâs now see how we can use the same logic hook technique to automate a common task in this application: speaker proposal acceptance and rejection.
A common task in conference management is accepting and rejecting talks proposed by the various speakers. This involves reviewing the proposals sent in, making decisions on whether to accept or reject them, and then notifying the speakers either way on the decision. While SugarCRM cannot take away the human decision element of this process, it can automate the notification process. Letâs see how:
<?php
// Do not store anything in this file that is not part of the array or the hook
//version.  This file will be automatically rebuilt in the future.
 $hook_version = 1;
$hook_array = Array();
// position, file, function
$hook_array['before_save'] = Array();
$hook_array['before_save'][] = Array(1, 'pos_Sessions push feed',
'custom/modules/pos_Sessions/SugarFeeds/SessionsFeed.php','SessionsFeed', 'pushFeed');
$hook_array['before_save'][] = Array(1,
'Session Accepted Hook', 'custom/modules/pos_Sessions/NotifySpeakerHook.php',
'NotifySpeakerHook', 'sendAcceptEmail');
$hook_array['before_save'][] = Array(2,
'Session Declined Hook', 'custom/modules/pos_Sessions/NotifySpeakerHook.php',
'NotifySpeakerHook', 'sendDeclineEmail');


?>
First off, weâll need to add to the existing logic_hooks.php file in the custom/modules/pos_Sessions/ directory, adding two entries for before_save logic hooks to send out these emails.
For the hook itself, weâll add a new class named NotifySpeakerHook, which will be defined in the file custom/modules/pos_Sessions/NotifySpeakerHook.php.
<?php

class NotifySpeakerHook
{
    public function sendAcceptEmail(SugarBean $bean, $event, $arguments)
    {
        if (!empty($bean->fetched_row['status'] )
                && $bean->fetched_row['status'] != $bean->status
                && $bean->status == 'Accepted') {
            $job = new SchedulersJob();
            $job->data = serialize(array(
                $bean->id,
                'Your proposal has been accepted!',
                "Congratulations, your proposal entitled '{$bean->name} for the " .
                    "conference has been accepted.",
                ));
            $job->execute_time = TimeDate::getInstance()->nowDb();
            $job->retry_count = 3;
            $job->name = "Send Speaker Email for {$bean->name}";
            $job->target = 'class::EmailSpeakerNotices';
            $queue = new SugarJobQueue();
            $queue->submitJob($job);
        }
    }

    public function sendDeclineEmail(SugarBean $bean, $event, $arguments)
    {
        if(!empty($bean->fetched_row['status'] )
                && $bean->fetched_row['status'] != $bean->status
                && $bean->status == 'Declined'){
            $job = new SchedulersJob();
            $job->data = serialize(array(
                $bean->id,
                'Your proposal has not been accepted',
                "We are sorry to inform you that your proposal entitled ".
                      "{$bean->name} has not been accepted for the conference."
                );
            $job->execute_time = TimeDate::getInstance()->nowDb();
            $job->retry_count = 3;
            $job->name = "Send Speaker Email for {$bean->name}";
            $job->target = 'class::EmailSpeakerNotices';
            $queue = new SugarJobQueue();
            $queue->submitJob($job);
        }
    }
}
There are two hook functions for sending either the acceptance or rejection email based upon whether the status has changed to âAcceptedâ or âDeclinedâ. Both of these methods trigger sending the email, which to help with save performance weâll do asyncronously leveraging the Job Queue, which is a new feature in Sugar 6.5
Note
Using the job queue requires having the Scheduler being setup and running on your instance. You can find instructions for doing this at http://support.sugarcrm.com/04_Find_Answers/02KB/02Administration/100Schedulers/Introduction_to_Cron_Jobs.
Using the Job Queue requires us to define the action for the Job to execute in a seperate class, which impliments the RunnableSchedulerJob interface. This interface requires us to impliment two methods, setJob which is simply us defining the job to execute, and then run() which actually runs the job. Define this class in the custom/Extensions/modules/Schedulers/Ext/ScheduledTasks/ directory with the filename EmailSpeakerNotices.php.
<?php

class EmailSpeakerNotices implements RunnableSchedulerJob
{
    public function setJob(SchedulersJob $job)
    {
        $this->schedulerJob = $job;
    }

    public function run($data)
    {
        list($recordID, $emailSubject, $emailBody) = unserialize($data);

        $bean = BeanFactory::getBean('pos_Sessions',$recordID);
        if ( $bean === FALSE ) {
            $this->schedulerJob->retry_count = 0; // Don't retry since the underlying data is bad
            $this->schedulerJob->failJob('Session Record ID not found');
        }
        $emailObj = BeanFactory::getBean('Emails');
        $defaults = $emailObj->getSystemDefaultEmail();
        $mail = new SugarPHPMailer();
        $mail->setMailerForSystem();
        $mail->From = $defaults['email'];
        $mail->FromName = $defaults['name'];
        $mail->ClearAllRecipients();
        $mail->ClearReplyTos();
        $mail->Subject=from_html($emailSubject);
        $mail->Body=from_html($emailBody);
        $mail->prepForOutbound();

        $speaker = BeanFactory::getBean('pos_Speakers',$bean->pos_speake680dpeakers_ida);
        $speaker->retrieve($bean->pos_speake680dpeakers_ida);
        if ( $speaker !== FALSE && !empty($speaker->email1) ) {
            $mail->AddAddress($speaker->email1);
        }

        //Now create the Email record to record what was sent by this job.
        if (@$mail->Send()) {
            $emailObj->to_addrs= '';
            $emailObj->type= 'archived';
            $emailObj->deleted = '0';
            $emailObj->name = $mail->Subject ;
            $emailObj->description = $mail->Body;
            $emailObj->description_html = null;
            $emailObj->from_addr = $mail->From;
            $emailObj->parent_type = $speaker->module_dir;
            $emailObj->parent_id = $speaker->id;
            $emailObj->date_sent = TimeDate::getInstance()->nowDb();
            $emailObj->modified_user_id = '1';
            $emailObj->created_by = '1';
            $emailObj->team_id = '1';
            $emailObj->status = 'sent';
            $emailObj->save();
        }
        else {
            $this->schedulerJob->failJob('Email could not be sent to '.$speaker->email1);
        }
    }
}
Note
Just like any time you add files inside the custom/Extensions/ directory, you will need to run the âQuick Rebuild and Repairâ process in the Admin -> Repair section to have the changes you make here take effect.
The job goes ahead and does the work of sending out the email to recipent for us in the background when the Scheduler process runs. One thing we do in this process is create an archived email in the application underneath the speaker record. This gives us a record of the email being successfully being sent out to the Speaker.
In this chapter, we saw how logic hooks can be used to help automate the workflow of the application to provide increased visibility of events happening in the system. Increased visibility was achieved through incorporating our custom modules with Activity Streams, letting users see what is happening in the application in realtime. We also saw how to automate the speaker notification process through logic hooks that can send out emails when the status changes. Finally, we saw how to modify the display of the Sessions DetailView to provide a roll-up of the feedback for it, giving a calculated average rating based upon the feedback given for the record.
Now that we saw how easy it is to interject custom PHP code into the application, letâs now build upon this with seeing how to integrate external applications into this one through Web Services.
Get Building on SugarCRM now with the O’Reilly learning platform.
O’Reilly members experience books, live events, courses curated by job role, and more from O’Reilly and nearly 200 top publishers.

