In this chapter, we will dive into some of the more advanced topics that you will need to know about when developing applications with OSGi, unleashing its full potential.
In OSGi, package imports and exports are versioned. We discussed the syntax of version ranges before but did not delve into the details of how to version in the first place. The OSGi Alliance published a paper about semantic versioning, which describes a set of rules that define what version bumps are required for certain code changes. Adhering to these rules when releasing your bundles will help to detect backward compatibility problems when you, or users of your bundle, upgrade to newer versions. Semantic versioning makes it much easier to reason about versions. As with many things in OSGi, it’s about finding problems early during development and deployment, instead of unexpected runtime behavior. Being able to safely depend on a version range as large as possible also increases decoupling. If a component works with a wide range of versions of another component, it’s more loosely coupled than when it could only work with a very strict version.
In semantic versioning, there are four parts that make up a version: major.minor.micro.qualifier. The qualifier does not have much semantics; it can contain any string. The major.minor.micro format does have clear semantics:
- Major
- API change that breaks consumers of the API
- Minor
- API change that breaks providers of the API
- Micro
- Changes that don’t affect backward compatibility
So what exactly does it mean to break an API?
When talking about API changes, we make a difference between consumers and providers of the API. A consumer of an interface uses, but doesn’t implement, the interface. If we are using the org.osgi.service.log.LogService interface for logging in our code, we are a consumer of that interface. If we would implement our own logging implementation by implementing the LogService interface, we would become a provider of that interface.
Some interfaces are implemented by, at most, a few implementations but used by many. LogService is an example of this; there are only a handful of libraries that implement the LogService interface, but the interface is used everywhere code needs to log something. We call such interfaces provider types.
Other interfaces are used the other way around: they are implemented many times but are only used by a handful of implementations. javax.servlet.Filter is an example of this; many servlet filters are created by developers, but they are only consumed by a handful of application servers. We call such interfaces consumer types.
A change to a consumer type typically affects much more code compared to breaking a provider type. When a method is added to a provider type like LogService, we only have to fix a handful of libraries that implement this interface. The endless list of consumers of the LogService are not affected; they will still compile. Adding a method to javax.servlet.Filter would be more problematic. Everyone who implemented a servlet filter would have to implement this method to compile to the new interface version!
When it comes to semantic versioning, the rules are different for provider and consumer types. The rules are described in Tables 4-1 and 4-2.
Table 4-1. Versioning rules for provider types
| Change | Version affected |
|---|---|
Add method | Minor |
Remove method | Major |
Change method signature | Major |
Change method implementation (for classes) | Micro |
Table 4-2. Versioning rules for consumer types
| Change | Version affected |
|---|---|
Add method | Major |
Remove method | Major |
Change method signature | Major |
Change method implementation (for classes) | Micro |
In BND, we can explicitly specify what type a class or interface is by using the annotations @ProviderType and @ConsumerType. These annotations are compile-time only and serve as metadata for the tooling. When these annotations are used, BND can make a better choice on what rules to apply during baselining, which is discussed below. If no @ProviderType or @ConsumerType is specified, BND assumes the worst case scenario, which is consumer type.
The semantic versioning rules are not very complex. It’s easy to forget to bump versions during development, however, and tracking back the correct version bump at release time is often difficult if there were many changes by multiple developers. Bumping the version should also be done as soon as possible during development. If we bump a version, and some other bundles need to update their package imports, we want to see this right away at development time.
Bndtools has built-in support for doing this automatically. When the first version of a bundle is released in Bndtools, it’s stored in a release repository (in the cnf project by default). When we then start making changes to code, Bndtools will immediately tell us that version bumps of both export packages and the bundle are required. It will also tell us what type of bump is required (major/minor/micro).
Bndtools does this by comparing the released bundle (the baseline) with the just built bundle, and applies the semantic versioning rules described earlier. After a code change, we will immediately see errors in our project, whose descriptions will tell us what to do. After bumping the version, we can keep making changes without any more errors until we apply a change that requires a higher version bump. For example, after bumping the minor version, we can make other minor changes to that package without bumping the version again.
After releasing the bundle, Bndtools will start baselining against the newly released bundle.
So far we have been talking about semantic versioning on exported packages. This is what’s most important, because we only import packages, never bundles. Technically it is good enough to make any change to the bundle version when something inside the bundle is changed. Applying semantic versioning is a nice bonus and communicates to users what to expect from a backward-compatibility perspective.
The bundle version should be an aggregation of the export package version bumps. If we have at least one major bump in one of the exported packages, the bundle version should have a major bump as well. If we only have minor bumps in the exported packages, the bundle version is bumped a minor version as well.
Unit testing your code is very easy when OSGi is applied in the correct way. Most of the code doesn’t depend on framework classes, and working with services automatically forces you to write code to interfaces instead of implementation classes, which is one of the most important steps toward (unit) testability. Basically there is nothing that makes it difficult to write unit tests when using OSGi, and you can use your favorite unit testing and mocking framework to do so.
For most code that we write, unit testing is not sufficient. How would you test queries in a data access service? Or how would you test service dynamics or configuration? Mocking the database and the framework would make it impossible to test the real important parts of code. For these situations, you need to run tests in a more realistic environment. In an OSGi environment, that means running tests in an OSGi framework. Because an OSGi framework is easy to bootstrap, this is easy to accomplish, and there are several frameworks to make this task even more trivial. Because we focus on the use of Bndtools in this book, we will also use the integration testing features from BND. BND integration tests can run headless on a CI server as well.
Integration tests in Bndtools are written as normal JUnit tests. While running them, they will be packaged as a bundle and installed in a real OSGi framework. The unit test code is basically just code in a bundle like all other code, but BND reports test results the same way as normal JUnit tests. Besides simply writing the test code, we also have to configure the runtime with just the set of bundles that we need to execute the test. Let’s walk through this for a simple test case before we look into more advanced scenarios.
It is a best practice to create a separate Bndtools project for each set of integration tests that test one small part of the system (an OSGi service in most cases). This makes it easier to configure a small runtime for each set of integration tests. In many cases, we create one test project per Bndtools project; if we have an org.example.demo project, we will also create org.example.demo.test.
We will create an integration test for the Greeter service we created in the previous chapter. If you didn’t follow the hands-on part, don’t worry, the example will be easy to understand nevertheless.
Start by creating a new Bndtools project, and choose the Integration Test project template wizard. A template test class is already created. As you can see, the test class extends TestCase just like any plain JUnit test. However, the next line is more interesting:
privatefinalBundleContextcontext=FrameworkUtil.getBundle(this.getClass()).getBundleContext();
The FrameworkUtil class gives access to the OSGi framework, in this case to retrieve the BundleContext. This obviously only works when the code runs in a real OSGi framework. More than that, the Bundle for the current class (the test class itself) is looked up. This means that the test itself is running in a bundle as well.
Having the BundleContext, we can do anything we like in the OSGi framework. In many cases, we will use the BundleContext in an integration test to look up the service that we are testing. The following is a simplified example that ignores the possibility of the service not being available:
publicclassGreeterTestextendsTestCase{privatefinalBundleContextcontext=FrameworkUtil.getBundle(this.getClass()).getBundleContext();publicvoidtestGreeter()throwsException{ServiceReference<Greeter>serviceReference=context.getServiceReference(Greeter.class);Greetergreeter=context.getService(serviceReference);Stringgreeting=greeter.sayHello();assertEquals("Hello modular world",greeting);}}
Note that this code is clearly wrong! As with any code that uses the low-level services API, you should be doing all the null checks and deal with the possibility that a service was not registered yet. This becomes very tricky when the test involves multiple services, which is the case in most nontrivial examples. That’s a lot of work for a test! Instead of doing all that hard work ourselves, we could use the service tracker specification, or even better, Apache Felix Dependency Manager in the tests. The following example uses Apache Felix Dependency Manager to make the test class itself a component and wait until its dependencies (the services we want to test) are injected:
publicclassGreeterTestextendsTestCase{privatefinalBundleContextcontext=FrameworkUtil.getBundle(this.getClass()).getBundleContext();privateCountDownLatchlatch;privateGreetergreeter;publicvoidstart()throwsInterruptedException{latch.countDown();}@OverrideprotectedvoidsetUp(){latch=newCountDownLatch(1);DependencyManagerdm=newDependencyManager(context);dm.add(dm.createComponent().setImplementation(this).add(dm.createServiceDependency().setService(Greeter.class)));try{latch.await(10,TimeUnit.SECONDS);}catch(InterruptedExceptione){fail("Service dependencies were not injected.");}}publicvoidtestGreeter()throwsException{System.out.println(greeter.sayHello());}}
Amdatu offers a test base class that your test class can extend to make testing even easier. The implementation of the base class is not listed here because it is quite large, but an example of the actual test class follows. The base class is based on Apache Felix Dependency Manager and automatically injects an instance of the service being tested in the test class. You can also configure managed services and declaratively inject other services into the test:
importorg.amdatu.mongo.MongoDBService;// Other imports omitted for brevitypublicclassMongoProductServiceTestextendsBaseOSGiServiceTest<ProductService>{privatevolatileMongoDBServicemongoDBService;privateDBCollectioncollection;publicMongoProductServiceTest(){super(ProductService.class);}@OverridepublicvoidsetUp()throwsException{// Configure a Managed ServicePropertiesproperties=newProperties();properties.put("dbName","webshoptests");configureFactory("org.amdatu.mongo",properties);// Inject more service dependencies into the testaddServiceDependencies(MongoDBService.class);// Wait for services to become available (timeout after 10 seconds)super.setUp();// Optionally do some additional setup using the injected servicescollection=mongoDBService.getDB().getCollection("products");collection.remove(newBasicDBObject());}// The actual tests, using real servicespublicvoidtestListCategories(){collection.save(newBasicDBObject("category","books"));collection.save(newBasicDBObject("category","books"));collection.save(newBasicDBObject("category","games"));List<String>categories=instance.listCategories();assertEquals(2,categories.size());}}
The test code that we have seen is clearly not a normal unit test; it uses the BundleContext and service registry. To run this test, we need to configure a runtime. Open the bnd.bnd file of the test project and open the Run tab. Here we can configure our test runtime just like we configure a normal runtime. Add the bundle that contains the Greeter service to the Run Requirements and click Resolve. Now right-click the bnd file and choose Run as → OSGi JUnit test. In the IDE you will just see JUnit test results, but under the covers, the following things happen:
- The test bundle is packaged.
- The OSGi framework is started.
- Bundles on the Run Bundles list will be installed.
- Test bundles will be looked up.
- Tests are executed (within the runtime).
If you add an OSGi shell (such as the Gogo shell) to the Run Requirements and set a breakpoint in your test, you can actually just take a look at the running runtime like it is a normal OSGi application (in fact, it is). You might be wondering how your tests are found and executed in the runtime. This is caused by an additional header in the bnd.bnd file. Take a look at the source of the file, and you will find the following header:
Test-Cases: ${classes;CONCRETE;EXTENDS;junit.framework.TestCase}This is another example of the whiteboard pattern. The test framework will look for bundles with this header. Also note that this header is a BND macro, it will be processed at bundle build time. Take a look at the generated bundle to see the result.
Running integration tests from the IDE is easy. But what about running a headless build on a continuous integration server? Bndtools automatically creates ANT build files for each project that you create. The ANT build already includes support for integration testing. Open a terminal in your project folder and simply run ANT:
ant test
This means that every Bndtools project can be built and tested on a continuous integration server out of the box.
Configuration is part of almost every production application. We probably don’t have to explain why it’s a bad idea to hardcode configuration settings such as database passwords. In an OSGi context, configuration is mostly about configuring services because services are the core of the programming model. We could very well have a service responsible for database access, and that service should be configured with the correct database configuration.
In a modular world, configuration becomes even more important for another reason. Modules can very well become reusable modules, usable in many different systems. It’s not hard to imagine how a flexible, configurable component is more reusable. When building reusable modules, it’s important that the way those modules are configured is flexible as well. In many non-OSGi applications, you will find configuration in several different forms: some libraries need property files, (proprietary) XML, system properties, a Java API, and so on. It would be a lot simpler if all configuration could be passed to the system in a single way. OSGi Compendium has a specification for this: Configuration Admin.
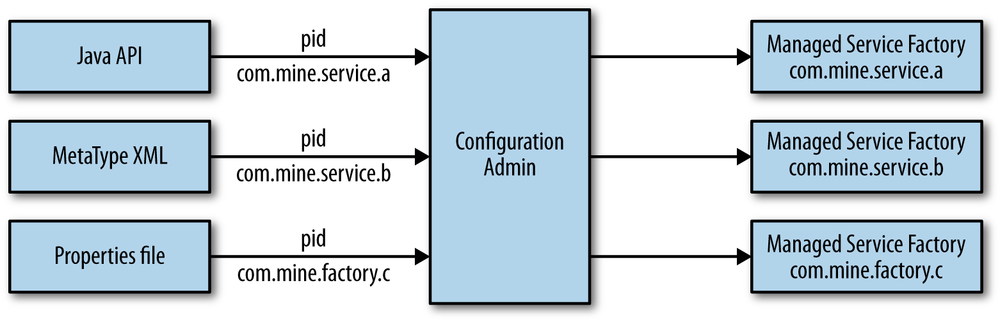
Configuration Admin specifies a Java API to configure services, and interfaces for configurable services. Configuration Admin is more or less a middle man for configuration. Instead of passing configuration directly to your code, configuration is passed to Configuration Admin using the service.pid of the service that needs to be configured. The service.pid is the persistent ID of a service; in contrast to the service.id, it is known even before the service is available. Configuration Admin will then configure services in a standardized way using this configuration. By introducing this middle man, we decouple the way configuration is passed to the system from the actual configuration of services. Using extensions, it is possible to pass configuration to Configuration Admin using the Java API directly, using MetaType (an XML standard for configuration), properties files, or even the web console. Figure 4-1 shows the decoupling between configuration and the configured services.
The simplest and most common form of configurable services are ManagedServices. A ManagedService is a single service that accepts configuration. A ManagedService is a normal service, with the addition of implementing the ManagedService interface. This interface has one method:
voidupdated(Dictionaryproperties)throwsConfigurationException
The updated method receives a Dictionary of properties and is called by Configuration Admin. In many cases, the updated method is used to simply set instance variables of the service that contain the configurable properties. Make sure the updated method is thread-safe. It might be called by a Configuration Admin thread while the service is being called by another thread.
A simple example of a Managed Service is the following Greeter. The Greeter can be configured with a message that will be used when the hello method is invoked:
publicclassConfigurableGreeterimplementsGreeter,ManagedService{privatefinalStringDEFAULT_MESSAGE="Default greeting";privateStringmessage=DEFAULT_MESSAGE;@Overridepublicvoidupdated(Dictionaryproperties)throwsConfigurationException{if(properties!=null){ObjectmessageProperty=properties.get("message");if(messageProperty!=null){message=(String)messageProperty;}else{// Invalid configuration, throw exception.thrownewConfigurationException("message","Required property message missing");}}else{// Configuration deleted, fall back to defaults.message=DEFAULT_MESSAGE;}}@OverridepublicvoidsayHello(){System.out.println(message);}}
Note that you cannot use any injected service dependencies from the updated method because they might not be injected yet.
The service is implementing both its own service interface Greeter and the ManagedService interface. Make sure you always check the Dictionary for null because Configuration Admin will call the updated method with null if no configuration is available yet. Even if you require configuration to always be present, there might be a race condition where the Managed Service is registered before the configuration. This service also works when no configuration is available. The updated method should throw a ConfigurationException when the configuration is invalid, e.g., when the message property is missing.
In some cases configuration is required; see Required Configuration for that.
Before we can start using a Managed Service, it needs be registered as a service like any other service. Because an OSGi service is only registered using a single interface, we will have to do something extra. We will register the service twice, once as a Greeter and once as a ManagedService. The Managed Service also requires the service property service.pid to be set.
Using Apache Felix Dependency Manager, the activator could be the following:
publicclassActivatorextendsDependencyActivatorBase{@Overridepublicvoidinit(BundleContextcontext,DependencyManagermanager)throwsException{Propertiesproperties=newProperties();properties.setProperty(Constants.SERVICE_PID,"example.managedservice.greeter");manager.add(createComponent().setInterface(newString[]{Greeter.class.getName(),ManagedService.class.getName()},properties).setImplementation(ConfigurableGreeter.class));}@Overridepublicvoiddestroy(BundleContextcontext,DependencyManagermanager)throwsException{}}
Now that we have seen how to create and publish Managed Services, we need to know how to configure those services. Configuration Admin comes with a simple Java API to do so. Remember that you will not use this API in most situations, but will use external files such as MetaType XML for this. Especially during integration testing, it is convenient to use the Configuration Admin API directly. Let’s look at the API first:
// ConfigAdmin is just another service that you can inject or lookupConfigurationAdminconfigAdmin;Configurationconfiguration=configAdmin.getConfiguration("example.managedservice.greeter",null);Propertiesproperties=newProperties();properties.setProperty("message","Hello modular world!");configuration.update(properties);
Using this API, we can write an integration test for the configurable Greeter. The example is based on the Amdatu test base class again like we have seen in Writing Integration Tests. First we test if the Greeter service works correctly without configuration. After that, we use the Configuration Admin service to create a new configuration for the Greeter service. After setting the configuration, the test waits for a second for Configuration Admin to process the configuration update before we test the now configured Greeter service again:
publicclassGreeterTestextendsBaseOSGiServiceTest<Greeter>{privatevolatileConfigurationAdminconfigurationAdmin;publicGreeterTest(){super(Greeter.class);}@OverridepublicvoidsetUp()throwsException{addServiceDependencies(ConfigurationAdmin.class);super.setUp();}publicvoidtestConfiguredGreeter()throwsException{assertEquals("Default greeting",instance.sayHello());Configurationconfiguration=configurationAdmin.getConfiguration("example.managedservice.greeter",null);Propertiesproperties=newProperties();properties.setProperty("message","Hello modular world!");configuration.update(properties);TimeUnit.SECONDS.sleep(1);assertEquals("Hello modular world!",instance.sayHello());}}
Using the Amdatu test base class, we can even further simplify the test. The base class has helper methods to configure services. These helper methods basically do the same as what we did in the previous example:
publicclassGreeterTestextendsBaseOSGiServiceTest<Greeter>{publicGreeterTest(){super(Greeter.class);}publicvoidtestConfiguredGreeter()throwsException{assertEquals("Default greeting",instance.sayHello());configure("example.managedservice.greeter","message","Configured greeting");TimeUnit.SECONDS.sleep(1);assertEquals("Configured greeting",instance.sayHello());}}
In the example in the previous section, the configuration is not required to be set for the service to become available. However, in some cases, configuration is required for a service to function correctly. To stick with the example of a service that does database access, without database connection information, the service can’t do much useful work. Of course we could throw exceptions when this happens, but this makes using the service much more cumbersome. It’s much more convenient to have a service that only becomes available when it is configured correctly. A service that has a required dependency on configuration.
Apache Felix Dependency Manager can do this with a single line of code while creating a component. Take the following modified Activator for the Greeter service as an example:
publicclassActivatorextendsDependencyActivatorBase{@Overridepublicvoidinit(BundleContextcontext,DependencyManagermanager)throwsException{manager.add(createComponent().setInterface(Greeter.class.getName(),null).setImplementation(ConfigurableGreeter.class).add(createConfigurationDependency().setPid("example.managedservice.greeter")));}@Overridepublicvoiddestroy(BundleContextcontext,DependencyManagermanager)throwsException{}}
As you can see, we only register one component now, the Greeter itself, and not a separate Managed Service. By adding a configuration dependency, Apache Felix Dependency Manager will take care of setting this up.
When we want to test this using the Amdatu test base class, we have to make sure to configure the service before calling the super.setUp method. The setUp method waits for services to become available, so our test will not even start until the configuration is available:
publicclassGreeterTestextendsBaseOSGiServiceTest<Greeter>{publicGreeterTest(){super(Greeter.class);}@OverridepublicvoidsetUp()throwsException{configure("example.managedservice.greeter","message","Hello modular world!");super.setUp();}publicvoidtestConfiguredGreeter()throwsException{assertEquals("Hello modular world!",instance.sayHello());}}
For some services, it is required to have multiple instances of the service. Again, if we take a generic database access service as an example, we could have the requirement of working with multiple databases in a single application. For each configured database, we should have a new instance of the service. In Service Properties, we have seen how we can distinguish service instances with the same interface using service properties.
Managed Service Factories can be used to implement this use case. A Managed Service Factory is similar to a Managed Service in the way that it can be configured using Configuration Admin. However, instead of configuring itself, it creates and configures a new service instance every time the factory receives new configuration.
A Managed Service Factory must implement the ManagedServiceFactory interface from OSGi Compendium. The interface has three methods:
StringgetName()voidupdated(Stringpid,Dictionaryproperties)throwsConfigurationExceptionvoiddeleted(Stringpid)
The getName method only gives a descriptive name of the factory and has no technical consequences. The updated and deleted methods are more interesting. The updated method is invoked when configuration is added or updated. The updated method receives a PID, which is the unique ID of the configuration object representing this configuration. If it is a new PID, the Managed Service Factory can create a new service instance and register it to the service registry. The service created by the Managed Service Factory should not be a Managed Service itself, because it will only be reconfigured using the Managed Service Factory.
When the updated method is called with a PID that is already known to the Managed Service Factory, configuration for an existing configuration object is being updated. In most cases, this should result in updating an existing service. In case of an error in the configuration (e.g., a missing required property), the Managed Service Factory should throw a ConfigurationException. When configuration is removed from Configuration Admin for a given PID, the deleted method will be invoked, and from this method, the services registered for this PID should be deregistered.
As you can see, it is important for a Managed Service Factory to keep track of the PIDs known by the Managed Service Factory. You will have to write code for this yourself, as you will see in the example.
Let’s take a look at a revised Greeter, where we can have multiple Greeters with different messages. The Greeter implementation itself can now be simpler because we don’t need to implement the ManagedService interface:
publicclassGreeterImplimplementsGreeter{privatevolatileStringmessage;@OverridepublicStringsayHello(){returnmessage;}publicvoidsetMessage(Stringmessage){this.message=message;}}
The Managed Service Factory requires a little bit more code. The Managed Service Factory in this example creates and registers new Greeter services. With this example, there can be multiple greeters, recognizable by service properties. Take a look at the following example before we will walk through it step by step:
publicclassGreeterFactoryimplementsManagedServiceFactory{privatevolatileDependencyManagerdependencyManager;privatefinalMap<String,Component>components=newConcurrentHashMap<>();@OverridepublicStringgetName(){return"Greeter Factory";}@Overridepublicvoidupdated(Stringpid,Dictionaryproperties)throwsConfigurationException{Stringmessage=(String)properties.get("message");if(message==null){thrownewConfigurationException("message","Required property 'message' missing");}GreeterImplgreeter;ComponentgreeterComponent=null;synchronized(components){if(components.containsKey(pid)){greeter=(GreeterImpl)components.get(pid).getService();}else{Stringtype=(String)properties.get("type");if(type==null){thrownewConfigurationException("message","Required property 'type' missing");}greeter=newGreeterImpl();greeterComponent=dependencyManager.createComponent().setInterface(Greeter.class.getName(),properties).setImplementation(greeter);components.put(pid,greeterComponent);}}// Calling services from a synchronized block can lead to deadlocks,// so Dependency Manager must be called outside.if(greeterComponent!=null){dependencyManager.add(greeterComponent);}}greeter.setMessage(message);}@Overridepublicvoiddeleted(Stringpid){Componentcomponent=null;synchronized(components){component=components.remove(pid);}// Calling services from a synchronized block can lead to deadlocks,// so Dependency Manager must be called outside.if(component!=null){dependencyManager.remove(component);}}}
To make service registration easy, we are using Apache Felix Dependency Manager in the Managed Service Factory. A DependencyManager object is injected by Apache Felix Dependency Manager into the dependencyManager field. Apache Felix Dependency Manager does this automatically if it finds a field of type DependencyManager; you do not have to declare this explicitly. This factory implementation also keeps map of strings (the PIDs) and the Apache Felix Dependency Manager component instances. This housekeeping is required because we have to keep track of which PIDs we know about for update and delete purposes. Because the factory can create multiple service instances, it would be useful to add some service properties to the services so that we know the difference between the services created. For this we use the configuration property type, which is added to the service that gets registered. Note that this implementation doesn’t support changes to the type property after initial registration to keep the example concise.
In the updated method, we first do some input validation on the message configuration property. If the message property is not available, we throw a ConfigurationException.
Next we have to decide if an existing Greeter service should be updated with a new message, or if we have to create a new service instance. For this, we look up the PID in the map of registered services. If we have to create a new service, we use Apache Felix Dependency Manager to create a new component. The service is just a Greeter service, there is nothing special about this instance. However, we do add the type service property.
Note that the PID passed to both the updated and deleted methods is the PID of a Configuration object. This is not the same and not related to the PID of the actual service that we create.
At the bottom of the updated method, we finally do the actual configuration of the service by calling the setMessage method.
When a Configuration object is deleted, the deleted method will be invoked with the PID of the deleted Configuration object. We have to take care of deregistration of the service.
Implementing a Managed Service Factory is considerably more work than a Managed Service. However, it gives a lot of freedom on what happens when configuration is found. If you want to take a look at a more real-world example, the open source Amdatu Mongo project is a nice example. We will use this in a later chapter to create MongoDB services, but it is interesting to look at the code to see how a slightly more complex Managed Service Factory would look, although the mechanisms remain the same.
The OSGi Compendium contains another configuration-related specification: MetaType. The goal of MetaType is to provide metadata about configuration. Based on this, metadata user interfaces can be generated for your configuration. For example, this can be used with Apache Felix Web Console. Later in this book, we will discuss Apache Felix Web Console in more detail, but it is a browser-based management environment for OSGi applications. It provides a shell, bundle and service overview, configuration panels, etc., all in a browser. When MetaType is provided with your Managed Service, Web Console will automatically provide a user interface to edit the configuration properties.
Using MetaType is very easy; just provide an extra XML file within your bundle. The following example could be a MetaType file for the Greeter Managed Service:
<?xml version="1.0" encoding="UTF-8"?><metatype:MetaDataxmlns:metatype="http://www.osgi.org/xmlns/metatype/v1.0.0"><OCDdescription="Greeter Service"name="Greeter"id="example.managedservice.greeter"><ADname="Greeting message"id="example.managedservice.greeter.message"required="true"type="String"default="Hello"/></OCD><Designatepid="example.managedservice.greeter"><Objectocdref="example.managedservice.greeter"/></Designate></metatype:MetaData>
There are three parts in this file:
-
AD(Attribute Definition) - Describes an configuration property and its type.
-
OCD(Object Class Definition) - Grouping of a set of attributes; provides a description for the set of attributes.
-
Designate - Connects MetaType to a Managed Service or Managed Service Factory PID. Note that the PID is independent of the package and class name of the Managed Service.
A MetaType file must be provided at the following location in a bundle:
OSGI-INF/metatype/metatype.xml
In Bndtools, you can do so by adding an include resource definition in your bnd file. Assuming that you created the MetaType file in a subdirectory of your Bndtools project metatype/metatype.xml, the following line in the bnd file would add it to the bundle:
-includeresource: OSGI-INF/metatype=metatype
If you now add Apache Felix Web Console to your run requirements, you can access it on http://localhost:8080/system/console. Your configuration properties specified in MetaType should now show up (and be editable) on the configuration tab.
We have seen the Configuration Admin Java API and the Metatype XML format. We did not discuss how to provide configuration to a real application yet. Because anyone can implement some kind of extension on top of Configuration Admin, the possibilities are endless. We will discuss some common ways:
- Apache Felix File Install
- Apache ACE
A common way to provide externalized configuration to an application is to use Apache Felix File Install. When the File Install bundle is installed, it will watch a directory for bundles and configuration files. Bundles found in the directory will be installed, and configuration is passed to Configuration Admin. Apache Felix File Install uses simple property files for configuration. The name of the file should be the configuration’s PID, and have the extension .cfg. For a Managed Service with PID com.example.someservice, you would create a file com.example.someservice.cfg. The contents of the file should be simple key/value pairs. By default, Apache Felix File Install watches a directory load and can be configured to watch other directories using the felix.fileinstall.dir system property.
Because a Managed Service Factory can receive multiple configurations, Apache Felix File Install uses a slightly different filenaming schema. Configuration files should be postfixed -somename, e.g., com.example.someservice.factory-myexample.cfg.
When configuration managed by Apache Felix File Install is modified, it will write the modified configuration back to the property file.
In more advanced (e.g., in the cloud) deployment scenarios, Apache Felix File Install doesn’t suffice. We will discuss Apache ACE as a provisioning solution later on in this book. Apache ACE can be used to provision configuration as well, with some more advanced options, such as postprocessing the configuration files.
OSGi has a standard API available for logging. The specification consists of two services: one for writing log messages and one for reading. The API for writing log messages is similar to other logging frameworks. There are several implementations of the LogService that can be used directly, some of them offering features such as Gogo and Web Console integration.
Logging in a modular application is not any different from logging in a nonmodular application. The same rules about what to log and what not to log apply. In a dynamic services environment, there are some more events that we might want to log; for example, services coming and going.
From an application developer perspective, you will mostly only use the API for writing log messages. Reading log messages is handled by implementations. The LogService API has only four methods:
// Log a message at the given levellog(int,String)// Log a message with an exception at the given levellog(int,String,Throwable)// Log a message for a specific servicelog(ServiceReference,int,String)// Log a message with an exception for a specific servicelog(ServiceReference,int,String,Throwable)
The log levels are defined by LogService as well:
-
LogService.LOG_DEBUG -
LogService.LOG_INFO
-
LogService.LOG_WARNING -
LogService.LOG_ERROR
Download Apache Felix Log and add it to the run configuration of your project. The LogService is an OSGi service, so we can use Apache Felix Dependency Manager (or another dependency injection framework) to inject the LogService in our code. In general, a dependency on LogService should be optional; most code can still execute without any problem without the availability of logging.
The following code shows an Apache Felix Dependency Manager activator example:
dependencyManager.add(createComponent().setImplementation(MyComponent.class).add(createServiceDependency().setService(LogService.class)));
And the component that uses the LogService:
publicclassMyComponent{privatevolatileLogServicelogService;publicvoiddoSomething(){logService.log(LogService.LOG_INFO,"Log example");}}
Assuming that you are using the Gogo shell, you can now retrieve log messages using the shell:
g! log 1 info
In any system, it is important to log messages at the correct logging level. Not only would it clutter the logs if less important messages are logged at a high logging level, but it might also impact performance. Debug level messages are not very useful in production, but logging thousands of them can have a very negative effect on performance.
Although log levels can be specified in most Log Service implementations, the OSGi Log Service specification unfortunately contains a section that makes all log messages affect performance, even log messages at levels that are not further processed by the logging implementation. The specification states that all log messages should be forwarded to Event Admin, in case any listener is interested. Even if there are no listeners for these log messages, sending them to Event Admin still costs CPU cycles.
It is very common to have extensions (or plug-ins) in an OSGi application. We have already discussed the whiteboard pattern, which is the most common way to deal with extensions. The whiteboard pattern is based on services; an extension would register a new service of a given interface so that the service will be picked up by the mechanism that manages the extensions.
The whiteboard pattern is great because it is quite simple; you register extensions as services and service trackers to pick up those services. In some rare cases, the need to register services might feel like a burden. This might be the case when you have bundles with no code besides an activator that registers a service. This is a sign that the Extender pattern might be a better solution. A real-life example of this is bundles with only web resources (HTML files, etc.) in them. Those web resources should be exposed on a certain context path.
The Extender pattern listens for bundle registrations. For each bundle registration, it then checks if the extender applies to that specific bundle. If the bundle should be extended, it then uses that bundle to do so, for example registering its web resources to a servlet. The decision about whether the bundle does or does not apply for extension is mostly based on some kind of marker. Although any kind of marker can be used, it is most common to use a manifest header for this. By using a marker, we can easily discard bundles that don’t apply for extension without scanning the bundle contents.
Let’s create a trivial implementation of an extender that exposes web resources using a servlet. We didn’t discuss servlets or the HTTP Service yet, but that shouldn’t matter too much for this example. If you want to know more about the HTTP Service, you can skip forward to Chapter 8. Also note that you should not use this example in production. If you want to have a production ready implementation of this example, take a look at the Amdatu Resource Handler.
Using this example extender, we should be able to create bundles containing only web resources such as HTML, CSS, and JavaScript files. The extender should make these files accessible on the Web on a defined context path. We could of course simply do this with a servlet in each of those web resource bundles, but this would lead to duplicate code. Instead we want to write the registration code only once (in the extender) and provide plain resource bundles.
First we define an example resource bundle:
-META-INF
   -MANIFEST.MF
-static
   -index.html
   -css
      -style.css
In the manifest, we add one extra header:
X-WebResource: /myweb
Note that this header is just an example for our extender; this is by no means a standardized header. First of all, this header will be used as a marker to tell the extender that this is a bundle that should be extended. Second, it provides the path within the bundle that contains the web resources.
We now create an activator with a bundle dependency. A bundle dependency creates a callback to bundles changing states. Optionally a filter can be provided to only match bundles with specific headers in their manifest. This is exactly what we will use to only pickup bundles with the X-WebResource header. Besides the filter, a state mask can be specified. In most cases, we are only interested in ACTIVE bundles because the extension should be removed when the bundle is stopped:
publicclassActivatorextendsDependencyActivatorBase{@Overridepublicvoidinit(BundleContextcontext,DependencyManagermanager)throwsException{manager.add(createComponent().setInterface(Object.class.getName(),null).setImplementation(WebResourceHandler.class).add(createBundleDependency().setFilter("(X-WebResource=*)").setCallbacks("bundleAdded","bundleRemoved").setStateMask(Bundle.ACTIVE)));}@Overridepublicvoiddestroy(BundleContextcontext,DependencyManagermanager)throwsException{}}
The WebResourceHandler component has bundle add and remove callbacks. The state mask only matches active bundles. The WebResourceHandler will register a new component (a servlet) to the DependencyManager for each bundle found. Because the components created are part of the extender bundle instead of the resource bundles, it is important to also take care of deregistration of the components. When a resource bundle is stopped, its servlet should be deregistered as well:
publicclassWebResourceHandler{privatevolatileDependencyManagerdm;privatefinalMap<Long,Component>components=newConcurrentHashMap<>();publicvoidbundleAdded(Bundlebundle){System.out.println("Resource Bundle found: "+bundle.getSymbolicName()+" with resources: "+bundle.getHeaders().get("X-WebResource"));ResourceServletservlet=newResourceServlet(bundle);Propertiesproperties=newProperties();properties.put("alias",bundle.getHeaders().get("X-WebResource"));Componentcomponent=dm.createComponent().setInterface(Servlet.class.getName(),properties).setImplementation(servlet);components.put(bundle.getBundleId(),component);dm.add(component);}publicvoidbundleRemoved(Bundlebundle){System.out.println("Bundle removed: "+bundle.getSymbolicName());Componentcomponent=components.get(bundle.getBundleId());dm.remove(component);components.remove(bundle.getBundleId());}}
The DependencyManager instance is injected by DependencyManager itself (because WebResourceHandler is a component as well). To be able to deregister components when their bundles are stopped, we keep a Map of bundleId and Component to track the created components.
When a new resource bundle is found, we read the X-WebResource header from the bundle. With that we register a new servlet on the alias of the X-WebResource value. This kind of servlet registration requires Apache Felix Whiteboard, as discussed in Injecting Multiple Service Implementations and the Whiteboard Pattern.
The servlet itself is very simple. On a GET request, we simply look up the resource from the bundle and return it back to the client. This example is not necessarily the most efficient way of streaming the resources, and should just be used as an example of an extender:
publicclassResourceServletextendsHttpServlet{privatefinalBundlebundle;publicResourceServlet(Bundlebundle){this.bundle=bundle;}@OverrideprotectedvoiddoGet(HttpServletRequestreq,HttpServletResponseresp)throwsServletException,IOException{StringreqPath=req.getPathInfo();ObjectresourcesPath=bundle.getHeaders().get("X-WebResource");URLresource=bundle.getResource(resourcesPath+reqPath);try(InputStreaminputStream=resource.openStream()){// Use Apache Commons IO to copy the inputstream to outputIOUtils.copy(inputStream,resp.getOutputStream());}}}
Event Admin is an intra-bundle event publisher and subscriber model. You can compare this to other messaging systems such as JMS. Event Admin routes events within an OSGi framework over multiple bundles. This allows intra-bundle messaging without setting up interfaces and services to do so, which offers complete decoupling between event publishers and subscribers. The event publisher and subscriber pattern is specially convenient when many fine-grained events are used.
An example of Event Admin usage is the framework itself. Events are sent for framework events such as starting and stopping bundles.
In general, an event listener is only interested in specific types of events; for example, an event listener that handles new orders should not receive framework events. To facilitate this, Event Admin works with topics. A topic represents the type of event. Events are sent to specific topics, and listeners can choose to listen to only specific topics.
A topic name is a hierarchical namespace where each level is separated by a /. For example: org/example/products/added. The EventAdmin implementation can use this hierarchy for efficient filtering.
Messages can be sent either synchronously (using the EventAdmin.sendEvent method) or asynchronously (using the EventAdmin.postEvent method).
One of the available Event Admin implementations comes from Apache Felix. As usual, the bundle can be found on the Apache Felix website or in the Amdatu dependencies repository.
Add the Apache Felix EventAdmin bundle to your run configuration, and you’re ready to send and receive events.
To send events, we need a reference to the EventAdmin service:
publicclassSenderExample{privatevolatileEventAdmineventAdmin;publicvoidstart(){Map<String,Object>greeting=newHashMap<>();greeting.put("message","Modular greetings");greeting.put("from","the authors");// Send asynchronous messageeventAdmin.sendEvent(newEvent("examples/events/greetings",greeting));// Send asynchronous messageeventAdmin.postEvent(newEvent("examples/events/greetings",greeting));}}
The example shows that the sendEvent and postEvent methods accept a type org.osgi.service.event.Event. The event type is created with a string that represents the topic name and a map containing the event properties. The event properties map can contain any type as values, but there are some limitations. Custom types are supported, but only when events are send within the OSGi framework because no serialization is required then. Some EventAdmin implementations support sending events to native (e.g., C/C++) applications. A native implementation must support strings, the primitive Java types, and single dimensional arrays. Other types might be supported, but this is not required.
If you use custom event types, you should make those types available for other bundles by exporting them; they wouldn’t be usable by any other bundles otherwise. You can argue that introducing special event types creates some coupling between an event provider and consumer; this is a trade-off.
Event properties and their values should, as a best practice, be immutable. Mutable event types could potentially be modified by event listeners, and subsequent listeners would see the modified data.
Listening for events is easy as well. You need to register an OSGi service using interface org.osgi.service.event.EventHandler. EventAdmin will pick up this service whiteboard style; no explicit registration is required. The service should be registered with a service property EventConstants.EVENT_TOPIC that specifies the topic name to listen to:
publicclassReceiverExampleimplementsEventHandler{@OverridepublicvoidhandleEvent(Eventevent){Stringmessage=(String)event.getProperty("message");Stringfrom=(String)event.getProperty("from");System.out.println("Message received from "+from+": "+message);}}publicclassActivatorextendsDependencyActivatorBase{@Overridepublicvoidinit(BundleContextbc,DependencyManagerdm)throwsException{Propertiesprops=newProperties();props.put(EventConstants.EVENT_TOPIC,"examples/events/greetings");dm.add(createComponent().setInterface(EventHandler.class.getName(),props).setImplementation(ReceiverExample.class));}@Overridepublicvoiddestroy(BundleContextbc,DependencyManagerdm)throwsException{}}
If an exception occurs in an event handler, the EventAdmin implementation is required to handle the exception, and event delivery should continue. Most EventAdmin implementations log errors to the LogService if available. Some implementations, like the one from Apache Felix, can blacklist misbehaving event handlers.
Aspect Oriented Programming (AOP) can be very useful to dynamically add some new functionality to existing code. This is often used to inject so-called cross cutting concerns such as security, logging, and caching into code. Although a full AOP solution such as AspectJ could be used in an OSGi environment, it is not necessary in most cases. In most cases, we only need the concept of interceptors on services; e.g., intercept each call to a service to add caching or perform additional security checks or logging. Although there is not an out-of-the-box OSGi feature for this, we can use Apache Felix Dependency Manager to do this.
With Apache Felix Dependency Manager, an aspect is just another service with a higher service priority than the original service. The original service is injected into the aspect so that method calls can be delegated to the original service.
A trivial example is an aspect for LogService that rewrites each log message to uppercase. The aspect just takes care of the uppercasing, while the logging itself is still delegated to the original service:
publicclassUppercaseLogAspectimplementsLogService{privatevolatileLogServicelogService;@Overridepublicvoidlog(intlevel,Stringmessage){logService.log(level,message.toUpperCase());}@Overridepublicvoidlog(intlevel,Stringmessage,Throwableexception){logService.log(level,message.toUpperCase(),exception);}@Overridepublicvoidlog(ServiceReferencesr,intlevel,Stringmessage){logService.log(sr,level,message.toUpperCase());}@Overridepublicvoidlog(ServiceReferencesr,intlevel,Stringmessage,Throwableexception){logService.log(sr,level,message.toUpperCase(),exception);}}
Note that the activator is slightly different from an activator that registers a normal service:
publicclassActivatorextendsDependencyActivatorBase{@Overridepublicvoiddestroy(BundleContextbc,DependencyManagerdm)throwsException{}@Overridepublicvoidinit(BundleContextbc,DependencyManagerdm)throwsException{dm.add(createAspectService(LogService.class,null,10).setImplementation(UppercaseLogAspect.class));}}
A consumer that uses LogService just injects LogService. The aspect is used automatically without the consumer knowing about this:
publicclassAspectTester{privatevolatileLogServicelogService;publicvoidstart(){logService.log(LogService.LOG_INFO,"some lower case log message");}}publicclassActivatorextendsDependencyActivatorBase{@Overridepublicvoiddestroy(BundleContextbc,DependencyManagerdm)throwsException{}@Overridepublicvoidinit(BundleContextbc,DependencyManagerdm)throwsException{dm.add(createComponent().setImplementation(AspectTester.class).add(createServiceDependency().setService(LogService.class)));}}
Although aspect services are only a very small part of AOP, they do offer a powerful mechanism to dynamically add behavior to existing services. Similar to servlet filters, aspects can be chained. The order of aspects can be controlled by setting a different service ranking on each aspect.
If you are familiar with EJB or CDI interceptors or Spring AOP, this should be very familiar as well.
An OSGi framework has a persistent store where installed bundles and bundle state are stored. On Apache Felix, this folder is named felix-cache by default. Because of the bundle cache, all installed bundles in a framework will still remain installed after a framework restart. The bundle cache can be used to store data as well. You can access the bundle cache in code from the BundleContext. The following example serializes its state to the bundle cache when the bundle is stopped and deserializes it again when the bundle is started. Note that this survives framework restarts as well:
publicclassBundleCacheExampleimplementsMessageLog{privatestaticfinalStringDATA_FILE_NAME="greetinglog.ser";privatevolatileBundleContextcontext;privateList<String>messageLog=newArrayList<>();publicvoidreceiveMessage(Stringmsg){messageLog.add(msg);}@OverridepublicList<String>listMessages(){returnmessageLog;}@SuppressWarnings("unchecked")/*** Serialize the list of messages to the bundle cache.*/publicvoidstart(){FiledataFile=context.getDataFile(DATA_FILE_NAME);if(dataFile.exists()){try(FileInputStreamfin=newFileInputStream(dataFile);ObjectInputStreamin=newObjectInputStream(fin)){messageLog=(List<String>)in.readObject();}catch(IOException|ClassNotFoundExceptionexception){thrownewRuntimeException("Error deserializing greeting log",exception);}}}/*** Deserializes a list of messages from the bundle cache.*/publicvoidstop(){FiledataFile=context.getDataFile(DATA_FILE_NAME);try(FileOutputStreamfout=newFileOutputStream(dataFile);ObjectOutputStreamout=newObjectOutputStream(fout)){out.writeObject(messageLog);}catch(IOExceptione){thrownewRuntimeException("Error serializing greeting log",e);}}}
The example uses the Java Serialization API to write the list of messages to disk and to read the list of messages from disk when the bundle is restarted. Because this is bundle state, it makes sense to write the serialization file to the bundle cache. This is done using the BundleContext.getDataFile(String fileName) method; it returns a File instance that represents the file in the bundle cache. As a developer, you don’t really have to know where the bundle cache is stored; the framework will take care of this.
Get Building Modular Cloud Apps with OSGi now with the O’Reilly learning platform.
O’Reilly members experience books, live events, courses curated by job role, and more from O’Reilly and nearly 200 top publishers.

