The Finder is a special application in Mac OS X, because it oversees the Aqua environment and allows easy access to all other applications. It never stops running while you’re logged in. The Mac OS icon represents the Finder, just as the TextEdit icon represents the TextEdit application. You can activate the Finder any time you want by clicking this icon in the Dock — it’s always available (it may be invisible, but it’s easy to find).
Although the Finder is special, it acts like other applications in most ways. It has a menu, submenus, windows, utility windows, and so on that can be manipulated just like those provided in other applications. We begin our in-depth discussion of the Finder with the Finder window.
The Finder window is the primary interface
that you will use for viewing and manipulating files in the Mac OS X
(Unix) hierarchical filesystem. The Finder window supports three
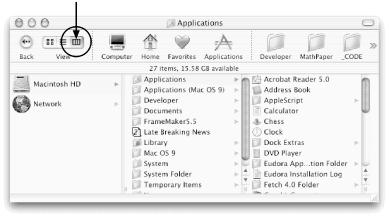
different views (panes) of files: icon view,
list view, and column view.
A user can select his favored view by clicking one of the three
mutually exclusive view-control
buttons
at the left of the
Finder’s toolbar. We present the same Finder window
showing three different views of the commonly used
/Applications folder in Figure 1-20, Figure 1-21, and Figure 1-22.
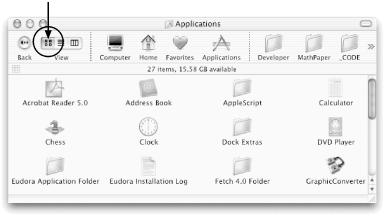

No matter which view you choose, the Finder window’s content area consists of three main parts: the toolbar, the status bar, and the view pane. The toolbar and status bar can be hidden via the Finder’s View menu, but the view pane is always visible. The Finder status bar displays the number of items (files and folders) in the selected folder and the space available on disk. The Finder toolbar contains several types of buttons for viewing and manipulating files and folders, including the three view-control buttons discussed previously. Like the Back button on a web browser, the Back button in the Finder toolbar returns you to the previous view.
For
quick access, file and folder icons can be placed in the toolbar to
the right of the view-control buttons. After being dropped in the
toolbar, these icons work like shortcuts (although that term
isn’t used). The first icon (Computer) in this area
of the toolbar represents your computer, the second icon (Home)
represents your Home folder (~), the third icon (Favorites)
represents your ~/Library/Favorites folder, and
the fourth icon (Applications) represents the system
/Applications folder. If you single-click on any
one of these icons, the view will change to the represented folder.
You can add a file or folder icon (e.g., Developer in Figure 1-22) by simply dragging it from the view pane and
dropping it in the toolbar. To remove a file or folder icon-button
from the toolbar, drag it off and drop it on the desktop.
You should use the toolbar mainly to store icons representing folders and document files that you access frequently. The toolbar can also store file icons representing applications, but the Dock is usually a better place to do that because there isn’t much space in the toolbar and because the Finder is file-oriented, not application-oriented. A single-click on any folder icon in the toolbar opens that folder in the browser. A single-click on a document file icon in the toolbar opens that file in the associated application. A single-click on an application icon launches that application, as in the Dock. Thus, files, folders, and applications that you access regularly are only a click away.
You can radically change the contents of the toolbar via the View → Customize Toolbar menu command. We’ll revisit this in the step-by-step exercises later in this chapter.
As with all Mac OS X applications, the Finder menu structure is hierarchical. When the Finder is active, the menu bar at the top of the screen displays eight menus: Apple, Finder, File, Edit, View, Go, Window, and Help. The menu bar and the contents of the seven Finder menus are shown in Figure 1-23. Most of these menu commands are obvious; we’ll utilize some of the not-so-obvious ones in the step-by-step exercises later in this chapter.
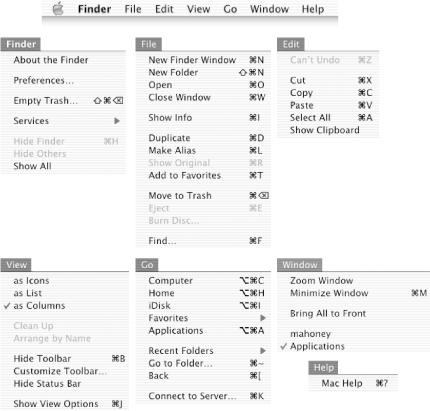
To see the contents of a menu, single-click on the menu name in the title bar. The menu will stay open, or stick (no pressing is required). The submenu displayed will be attached to the title bar, and you can then choose a menu command by clicking it. Alternatively, you can press down on a menu title in the menu bar, drag the mouse down to the desired menu option, and then release the mouse button to select it.
There are several useful Finder utility windows and dialogs that can be displayed via menu commands. Perhaps the most useful is the modeless Info dialog, which shows up when the user chooses File → Show Info and provides detailed information about individual files and folders. The Edit → Show Clipboard menu command brings up the Clipboard, which displays the cut or copied contents currently available for pasting. The Finder’s Clipboard, Preferences, and About windows are all modeless and will stick around while you work elsewhere in the Finder. The Go → Go to Folder menu command brings up the Go to Folder dialog, a document modal sheet attached to the main Finder window (a Finder’s view is considered a document in a window). These windows will be discussed later in this chapter.
Get Building Cocoa Applications: A Step by Step Guide now with the O’Reilly learning platform.
O’Reilly members experience books, live events, courses curated by job role, and more from O’Reilly and nearly 200 top publishers.

