Chapter 1. Hello, Gradle!
Ant and Maven have occupied opposing positions on the build continuum, to the benefit and detriment of their users over the past decade. Ant chooses to offer extreme flexibility to the user, imposing no conventions whatsoever, and not wanting to impose any heavyweight dependency management infrastructure on the build. Apache Ivy later added badly needed dependency management to Java builds, but still didn’t address the lack of conventions inherent in Ant. Maven, on the other hand, offered rigid standards and support for dependency management, but its standards were often overbearing, and deviating from them often proved more difficult than expected.
Ant and Maven have shared considerable success in the Java marketplace, despite important shortcomings in both tools. On the one hand, Gradle presents itself as a sensible middle ground between both extremes, offering thoughtful conventions for your build to follow, and making it easy for you to extend or redefine those conventions when you want to. Gradle provides out-of-the-box build conventions and at the same time realizes that no one set of standards can accurately reflect every build. Gradle therefore intends to be a means of developing organization- and project-specific build standards. It is best thought of not as a set of opinions on build standards, but as a toolkit for developing and extending those standards with a rich, descriptive language.
Gradle also gives you options in the way it handles build dependencies. If your project’s idiom is to declare a few top-level dependencies by name and let your build tool determine what other libraries must be present to support your declared dependencies (“transitive dependency management”), Gradle will let you do that, interfacing with both Maven and Ivy repositories. If you want to download JAR files and manage dependencies by hand in a local project directory, Gradle will not penalize you in any way. Both approaches are first-class options. This flexibility is important in many cases, but especially when migrating builds to Gradle: regardless of the legacy build’s opinions on dependency management, Gradle will not oppose them.
Gradle is rich in features, but is not such an opinionated framework that it will fight you when you want to do things your own way. It offers conventions to those who want them, flexibility to those who need it, and a toolkit for turning that flexibility into domain-specific build standards that you can write on your own. Apart from its nuanced position on the convention/configuration continuum, it offers no shortage of helpful, high-productivity features absent from other build tools. We will explore these together throughout the book.
Build Files in Groovy
A potentially complex build file demands an expressive format. XML was an easy choice for a build tool a decade ago, when it was a new technology, developers were enthusiastic about it, and no one yet knew the pain of reading it in large quantities. It seemed to be human-readable, and it was very easy to write code to parse it. However, a decade of experience has shown that large and complex XML files are only easy for machines to read, not for humans. Also, XML’s strictly hierarchical structure limits the expressiveness of the format. It’s easy to show nesting relationships in XML, but it’s hard to express program flow and data access the way most common programming language idioms express them. Ultimately, XML is the wrong format for a build file.
Gradle expresses its build files in Groovy. Groovy is a dynamic language of the JVM, similar in many respects to Java, but with some important differences. Every Gradle build file is an executable Groovy script. As a beginning Gradle user, you don’t even need to be aware that you’re writing Groovy code, but as your needs become more sophisticated, the power of the Groovy language may become very important. Unlike the build file formats of Ant and Maven, Gradle’s Groovy-based build files allow you to do general-purpose programming tasks in your build file. This relieves much of the frustration developers have faced in lacking control flow in Ant or being forced into plug-in development in Maven to accomplish nonstandard tasks.
Domain-Specific Build Languages
Every developer maintaining a complex build has wanted at some point to write just a little bit of code in the build file. Sometime you just need an iterator, and other times you’d like to express a moderately complex conditional without resorting to major build file surgery. But is the unlimited ability to code your way through a complex build a good thing? It might open broad new vistas of flexibility, but the result might ultimately be a catastrophe of maintainability. Since Gradle build files are Groovy scripts, Gradle gives you the option to break into scripting mode at any point in your build, but doing this to excess is generally not encouraged.
Instead, Gradle intends to present the user not with mere Groovy, but with a domain-specific language (DSL) tailored to the task of building code. A Gradle user could learn this language, not previously having known Groovy, and use Gradle effectively. This DSL describes the build using idioms appropriate to the task of building software, not necessarily to general-purpose programming. General-purpose coding is always available as a fallback, but Gradle gently nudges the user toward using the idioms of its DSL first, and coding second.
When the standard Gradle DSL doesn’t have the language to describe what you want your build to do, you can extend the DSL through plug-ins. For example, Gradle out of the box contains the language needed to describe how to build Java code and create a WAR file from the output. However, it doesn’t contain the language needed to run database migration scripts or deploy code to a set of cloud-based QA servers. Through Gradle plug-ins, you can add new task definitions, change the behavior of existing tasks, add new objects, and create new keywords to describe tasks that depart from the standard Gradle categories. Even through the simple mechanism of a custom Gradle task, you can introduce small pieces of build vocabulary, turning an otherwise undesirable chunk of imperative code into a clean declaration.
If you are coming from Maven, your understanding of a plug-in may be quite different from Gradle’s plug-in concept. In Maven, a plug-in is a means of extending the tool with a particular, fine-grained action to be performed during your build, often associated with one or more phases in Maven’s elaborate lifecycle model. In Gradle, a plug-in may provide configurable build actions by introducing one or more tasks, but it is fundamentally a means of extending the build DSL to include the domain encompassed by the plug-in.
Using and extending the Gradle DSL are usually preferable to writing code in your build file. While you are always free to solve problems in a locally optimized way by writing Groovy code inside your build, the most maintainable builds will eventually refactor this code into organized plug-ins that expose new build language idioms to the build files that use them. Thus you can express the activities of your build in a high-level, declarative language that is meaningful in your business and technology domain.
Getting Started
Gradle is easy to install. For all platforms, the procedure is as follows:
Visit http://gradle.org/downloads.html and download the current release
Unzip the downloaded file into a directory of your choosing
Add the environment variable
GRADLE_HOME, pointing to the install directory (this is optional, but it makes the next step easier)Add
$GRADLE_HOME/binto your path
MacOS Installation with Brew
Gradle is maintained in the community-supported MacOS package manager, Homebrew, or “brew” for short. To install Gradle using brew, simply type the following from a Terminal window:
$ sudo brew install gradle
Brew will install and build any dependencies, then place the Gradle executable in your path.
Linux and MacOS Installation
To install Gradle on *nix operating systems like Linux and MacOS, follow this command-line script:
$ wget http://repo.gradle.org/gradle/distributions/gradle-1.0-bin.zip
--2011-03-18 10:58:46--  http://repo.gradle.org/gradle/distributions/
gradle-1.0-bin.zip
Resolving repo.gradle.org... 50.16.203.43
Connecting to gradle.artifactoryonline.com |50.16.203.43|:80... connected.
HTTP request sent, awaiting response... 200 OK
Length: 26899590 (26M) [application/zip]
Saving to: `gradle-1.0-bin.zip'

100%[=============================================================>]
26,899,590   171K/s   in 2m 56s

2011-03-18 11:01:42 (149 KB/s) - `gradle-1.0-bin.zip' saved [26899590/26899590]

$ sudo unzip -q gradle-1.0-bin.zip -d /usr/local/
$ echo "export GRADLE_HOME=/usr/local/gradle-1.0" >> .profile
$ echo "export PATH=$PATH:$GRADLE_HOME/bin" >> .profile
Note
You can also download the Gradle distribution directly from the Gradle web site and unzip that file. Also, you may prefer another mechanism of setting environment variables on your installation. Feel free to use whatever works for you.
Windows Installation
To install Gradle on Windows, do the following:
Download the Gradle ZIP file from the Gradle web site and double-click on it to unzip. Drag the folder to a location of your choosing. In this example, we’ll assume you put it in C:\gradle-1.0.
Next, right-click on the My Computer icon and select Properties.
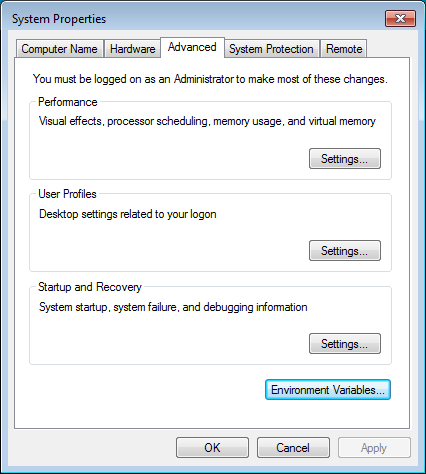
In the System Control Panel window, select Advanced System Settings from the links on the left.
In the Advanced System Settings dialog box (Figure 1-1), click on the Environment Variables button.
Note
The screenshots shown here are taken from Windows 7 SP1. Your version of Windows may vary.
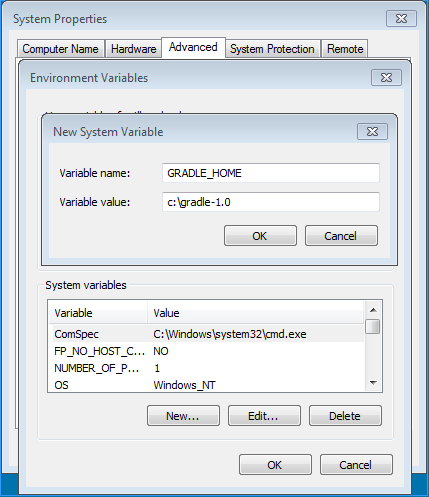
In the Environment Variables dialog box, click the New button under System Variables (Figure 1-2). Name the environment variable
GRADLE_HOME, and give it the valueC:\gradle-1.0. (If you unzipped Gradle into a different directory, put that directory here.)
In that same dialog box, select the Path variable under System Variables (Figure 1-3), then click Edit. Add the text
;%GRADLE_HOME%\binto the end of the Path variable value.

The Hello World Build File
Now that we have Gradle installed, we can start using it. Let’s build the simplest build file that we possibly can to get an idea of the basics.
Note
Unless otherwise noted, all of the examples in this book will assume that you are running Gradle from the command line. See the installation procedures in Getting Started for help getting started.
Create a file called build.gradle that looks like Example 1-1.
You will see the following output as a result of the Hello World build:
$ gradle -q helloWorld
hello, world
Note that the build file isn’t required to include anything, and doesn’t rely on any external dependencies. It also doesn’t do much, other than printing out a message. Before we move on to building some Java code, let’s try one more example. This time, we’ll use two tasks plus a dependency to get the same work done (Example 1-2).
taskhello<<{'hello,'}taskworld(dependsOn:hello)<<{println'world'}
To run this build, we execute the second task, world. It produces remarkably similar output
to the first:
$ gradle -q world
hello, world
Building a Java Program
Of course, the Hello World example is contrived; nobody really wants to execute a build that only prints messages to the console. Let’s have a look at how easy it can be to build Java code. In the spirit of this introduction, we’ll make it a very simple Java program, just to showcase how simple Gradle can make a build if you are comfortable following its conventions.
The build file looks as shown in Example 1-3.
The source code looks as shown in Example 1-4.
package org.gradle.example.simple;

public class HelloWorld {
   public static void main(String args[]) {
     System.out.println(“hello, world”);
   }
}
Importantly, the directory layout of the project looks as shown in Example 1-5.
.
├── build.gradle
    └── src
        └── main
            └── java
                └── org
                    └── gradle
                        └── example
                            └── simple
                                └── HelloWorld.java
This build file automatically introduces a number of tasks for us
to run. Just run gradle build, and
you’ll see the output shown in Example 1-6.
.
├── build
│   ├── classes
│   │   └── main
│   │       └── org
│   │           └── gradle
│   │               └── example
│   │                   └── simple
│   │                       └── HelloWorld.class
│   ├── dependency-cache
│   ├── libs
│   │   └── minimal-java-build-file.jar
│   ├── reports
│   │   └── tests
│   │       ├── css3-pie-1.0beta3.htc
│   │       ├── index.html
│   │       ├── report.js
│   │       └── style.css
│   ├── test-results
├── build.gradle
├── run-example.bsh
└── src
    └── main
        └── java
            └── org
                └── gradle
                    └── example
                        └── simple
                            └── HelloWorld.java
Notice not only that the Java code has been compiled and its class file placed in a directory we didn’t have to configure, but also that test report files have been generated (ready to receive actual unit test results when we write tests later), and a JAR has been built using the project directory name as the filename. This is all a result of the conventions of Gradle’s Java plug-in. We didn’t have to make a single decision or write a line of configuration. And let it not go without saying that we can run our nascent Java application as shown in Example 1-7.
$ java -cp build/classes/main/ org.gradle.example.simple.HelloWorld
hello, world
There is a much longer story to tell about the Java plug-in, which will be covered in a separate volume. If you want to get started now, you should also check out the online documentation.
Note
If you had to write a real-world build file to build and run a Java program, you would want to use the application plug-in, which is a core plug-in available with every installation of Gradle.
The Gradle Command Line
The preceding examples have shown Gradle running from the command line, and the majority of this book will continue that pattern. Gradle is designed to support first-class IDE integration at a deep architectural level, but the command line is anything but a second-class citizen. In this book, we will work primarily from the command line.
We won’t go over all possible command line options, but here’s what you need to be productive right away:
--helpor-hPrints out the help messages describing all command-line options.
-Dproperty=valueDefines a system property. This is a useful mechanism for passing parameters into a build from the command line. Example:
-Dcustom.config=my-config.properties.--infoor-iSets the Gradle log level to INFO, which causes a few more informative messages to be emitted over the default setting.
--debugor-dTurns out debug logging for the build, including stack traces. This generates a lot of output, but can be quite useful for troubleshooting build problems.
--dry-runor-mEvaluates and runs the build file, but does not execute any task actions.
--quietor-qSuppresses most output, showing error messages only.
--guiLaunches the Gradle GUI.
--stacktraceor-sEmits an abbreviated stack trace when an exception is thrown by the build. Normally, stack trace logging is suppressed, so this is a helpful switch when debugging a broken build. The stack trace is abbreviated by removing frames related to purely internal Groovy method calls.
--full-stacktraceor-SEmits a longer version of the
--stacktraceoutput, including all internal Groovy method calls. These are usually not of interest to the build developer.propertiesEmits all the properties of the build’s Project object. The Project object is an object representing the structure and state of the current build.
tasksEmits a list of all tasks available in the current build file. Note that plug-ins may introduce tasks of their own, so this list may be longer than the tasks you have defined.
Get Building and Testing with Gradle now with the O’Reilly learning platform.
O’Reilly members experience books, live events, courses curated by job role, and more from O’Reilly and nearly 200 top publishers.

