CREATING A SIMPLE TABLE VIEW
The best way to understand how to use a Table view in your application is to create a new Single View Application project and then manually add a Table view to the View window and wire it to a View Controller. That way, you can understand the various building blocks of the Table view.
Without further ado, use the following Try It Out to create a new project and see how to put a Table view together!
TRY IT OUT: Using a Table View
![]()
- Create a new Single View Application (iPhone) project and name it TableViewExample. You will also use the project name as the Class Prefix and ensure that you have the Use Automatic Reference Counting option unchecked.
- Select the TableViewExampleViewController.xib file to edit it in Interface Builder.
- Drag the Table View from the Object Library and drop it onto the View window (see Figure 8-2).

FIGURE 8-2
- Right-click the Table view and connect the dataSource outlet to the File's Owner item (see Figure 8-3). Do the same for the delegate outlet.
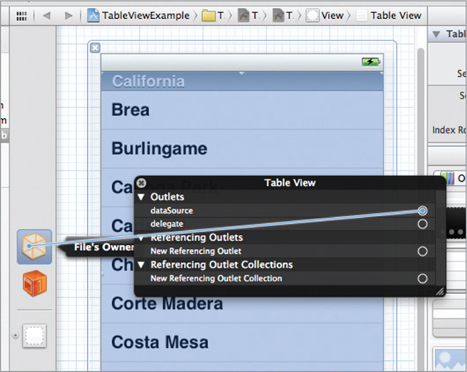
FIGURE 8-3
- In the TableViewExampleViewController.h file, add the following statement that appears in bold:
#import <UIKit/UIKit.h> @interface TableViewExampleViewController : UIViewController ...
Get Beginning iOS 5 Application Development now with the O’Reilly learning platform.
O’Reilly members experience books, live events, courses curated by job role, and more from O’Reilly and nearly 200 top publishers.

