Chapter 3. Installing Asterisk
I long to accomplish great and noble tasks, but it is my chief duty to accomplish humble tasks as though they were great and noble. The world is moved along, not only by the mighty shoves of its heroes, but also by the aggregate of the tiny pushes of each honest worker.
In the previous chapter, we discussed preparing a system to install Asterisk. Now it’s time to get our hands dirty!
Although a large number of Linux[42] distributions and PC architectures are excellent candidates for Asterisk, we have chosen to focus on a single distribution in order to maintain brevity and clarity throughout the book. The instructions that follow have been made as generic as possible, but you will notice a leaning toward CentOS directory structure and system utilities. We have chosen to focus on CentOS (arguably, the most popular distro for Asterisk) because its command set, directory structure, and so forth are likely to be familiar to a larger percentage of readers (we have found that many Linux administrators are familiar with CentOS, even if they don’t prefer it). This doesn’t mean that CentOS is the only choice, or even the best one for you. A question that often appears on the mailing lists is: “Which distribution of Linux is the best to use with Asterisk?” The multitude of answers generally boils down to “the one you like the best.”[43]
What Packages Do I Need?
Most Asterisk configurations are composed of three main packages : the main Asterisk program (asterisk), the Zapata telephony drivers (zaptel), and the PRI libraries (libpri). If you plan on a pure VoIP network, the only real requirement is the asterisk package, but we recommend installing all three packages; you can choose what modules to activate later. The zaptel drivers are required if you are using analog or digital hardware, or if you’re using the ztdummy driver (discussed later in this chapter) as a timing source. The libpri library is optional unless you’re using ISDN PRI interfaces, and you may save a small amount of RAM if you don’t load it, but we recommend that it be installed in conjunction with the zaptel package for completeness.
In the first edition of this book, we recommended that you install the additional asterisk-sounds package. This was a separate compressed archive that you would download, extract, and then install. As of Asterisk version 1.4.0, there are now two sets of sounds packages: the Core Sound package and the Extra Sound package. Since Asterisk supports several different audio formats, these packages can be obtained in a number of different sound formats, such as G.729 and GSM. The reason for all of the different formats is that Asterisk can use the sound format that requires the least amount of CPU transcode. For example, if you have a lot of connections coming in on VoIP channels that are running GSM, you would want to have the GSM version of the sound files. You can select one or more sound prompt types in the menuselect screen (discussed later in this chapter). We recommend that you install at least one type of sounds file from both the Core Sound package and Extra Sound package menu items. Since we may make use of some of the Extra Sound files throughout this book, we will assume you have at least one of the formats installed.
Linux Package Requirements
To compile Asterisk, you must have the GCC compiler (version 3.x or later) and its dependencies on your system. Asterisk also requires bison, a parser generator program that replaces yacc, and ncurses for CLI functionality. The cryptographic library in Asterisk requires OpenSSL and its development packages.
Zaptel requires libnewt and its development packages for the zttool program (see Using ztcfg and zttool later in this chapter). If you’re using PRI interfaces, Zaptel also requires the libpri package (again, even if you aren’t using PRI circuits, we recommend that you install libpri along with zaptel).
If you install the Software Development packages in CentOS, you will have all of these tools. If you are looking to keep things trim, and wish to install the bare minimum to compile Asterisk and its related packages, Table 3-1 will prove useful.
Note
In the following table, the -y switch to the yum
application means to answer yes to all prompts, and using it will
install the application and all dependencies without prompting you.
If this is not what you want, omit the -y switch.
If you just want to install all of the above packages in one go, you can specify more than one package on the command line, e.g.:
# yum install -y gcc ncurses-devel libtermcap-devel [...]
| Package name | Installation command | Note | Used by |
| GCC 3.x | yum install -y gcc | Required to compile zaptel, libpri, and asterisk | libpri, zaptel, asterisk |
| ncurses-devel | yum install -y ncurses-devel | Required by menuselect | menuselect |
| libtermcap-devel | yum install -y libtermcap-devel | Required by asterisk | asterisk |
| Kernel Development Headers | yum install -y kernel-devel | Required to compile zaptel | zaptel |
| Kernel Development Headers (SMP) | yum install -y kernel-smp-devel | Required to compile zaptel | zaptel |
| GCC C++ 3.x | yum install -y gcc-c++ | Required by asterisk | asterisk |
| OpenSSL (optional) | yum install -y openssl-devel | Dependency of OSP, IAX2 encryption, res_crypto (RSA key support) | asterisk |
| newt-devel (optional) | yum install -y newt-devel | Dependency of zttool | zaptel |
| zlib-devel (optional) | yum install -y zlib-devel | Dependency of DUNDi | asterisk |
| unixODBC; unixODBC-devel (optional) | yum install -y unixODBC-devel | Dependency of func_odbc, cdr_odbc, res_config_odbc, res_odbc, ODBC_STORAGE | asterisk |
| libtool (optional; recommended) | yum install -y libtool | Dependency of ODBC-related modules | asterisk |
| GNU make (version 3.80 or higher) [a] | yum install -y make | Required to compile zaptel and asterisk | asterisk |
[a] It is a common problem among new installs on some Linux distriebutons to see GNU make versions of 3.79 or lower. Note that Asterisk will no longer build correctly unless you have at least version 3.80 of GNU make. | |||
Obtaining the Source Code
The best place to get source code for Asterisk and it’s packages is directly from the http://www.asterisk.org web site or FTP server.
The Asterisk code base is under a constant state of change. Developers use a sofware revision tool called Subversion (SVN)[44] to manage the code base. Subversion allows a community of developers to collaborate with each other on complex programming projects.
There are two main areas where Asterisk is developed, and these are referred to as the Branch and the Trunk. In the Trunk, new features, architectural changes, and any of the brand-new stuff that is going on is performed. This place in the code base contains all the new toys, but at any time can be in a nonworking state, and is absolutely forbidden from production use (see figure).

Just like a tree, a Trunk will have Branches. These Branches have the major revision numbers such as 1.0, 1.2, and 1.4 (in the future we will likely see 1.6, 1.8, 1.8.2, 1.8.4. 1.8.6, 1.8.8. 1.8.8.2…um…etc…).[45] Within the Branch there are no major architectural changes or new features—simply bug and security fixes. In a production environment, stability is far more important than feature evolution.
Roughly every 14 months (although Asterisk does not follow a formal release timeline like many commercial software packages), a version of Asterisk is released intended for use in production environments. The first version of Asterisk was 1.0, which was released at the very first AstriCon in Atlanta in September of 2004. Asterisk 1.2 was released at IP4IT in November 2005, and Asterisk 1.4 was released in December of 2006.
Obtaining Asterisk Source Code
The easiest way to obtain the most recent release is through the use of the program wget.
Note that we will be making use of the /usr/src/ directory to extract and compile the Asterisk source, although some system administrators may prefer to use /usr/local/src. Also be aware that you will need root access to write files to the /usr/src/ directory and to install Asterisk and its associated packages.
Note
See Chapter 13 for information on running Asterisk as non-root. All security professionals will recommend that you run your daemons as a non-root user in case there are security vulnerabilities in the software. This helps to lower (but obviously does not eliminate) the risk of someone compromising the root user.
To obtain the latest release source code via wget, enter the following commands on the command line:
#cd /usr/src/# wget http://downloads.digium.com/pub/asterisk/asterisk-1.4-current.tar.gz# wget http://downloads.digium.com/pub/libpri/libpri-1.4-current.tar.gz# wget http://downloads.digium.com/pub/zaptel/zaptel-1.4-current.tar.gz
Note
The latest versions of the asterisk, libpri, and zaptel packages may not necessarily be the same version number.
Alternatively, during development and testing you will probably want to work with the latest branch. To check it out from SVN, run:
# svn co http://svn.digium.com/svn/asterisk/branches/1.4 asterisk-1.4If you retrieved the described source code via the release files on the Digium FTP server, then extract the files as described in the next section before continuing on with compiling.
Extracting the Source Code
The packages you downloaded from the FTP server are compressed archives containing the source code; thus, you will need to extract them before compiling. If you didn’t download the packages to /usr/src/, either move them there now or specify the full path to their location. We will be using the GNU tar application to extract the source code from the compressed archive. This is a simple process that can be achieved through the use of the following commands:
#cd /usr/src/#tar zxvf zaptel-1.4-current.tar.gz#tar zxvf libpri-1.4-current.tar.gz#tar zxvf asterisk-1.4-current.tar.gz
Tip
In bash (and other shell systems which support it), you can
use an extremely handy feature called Tab completion. This will allow you to type part of a
filename and have the rest of it completed automatically. For
example, if you type tar zxvf
zap that will
complete the full zaptel filename for you. If
more than one filename matches the pattern and you hit Tab twice, it
will list the files matching that pattern.<tab>
These commands will extract the packages and source code to
their respective directories. When you extract the asterisk-1.4-current.tar.gz file, you will
find that the file will extract to the current version of Asterisk, i.e. asterisk-1.4.4.
Tip
It’s always a good idea to keep the source code of the most recently working version of a package in case you have to “roll back” out of a new bug introduced, or some other strange behavior you can’t solve immediately.
Menuselect
In the 1.4.0 version of Asterisk and its related packages, a new build system, autoconf, was implemented. This has changed the build process slightly, but has given more flexibilty to control what modules are being built at build time. This has an advantage in that we only have to build the modules we want and need instead of building everything.
Along with the new build system, a new menu-based selection system
was introduced, courtesy of Russell Bryant. This new system permits a
finer-grained selection to which modules are built before compiling the
software and no longer requires the user to edit
Makefiles. So instead of discussing how to use menuselect in every
“Compiling ...” section, we will discuss it here, so when you see
make menuselect you will understand
what to do once inside the menuselect configuration screen.
In Figure 3-1, we see the opening menuselect screen for the Asterisk software. Other packages will look extremely similar, but with less options. We can navigate up and down the list using the arrow keys. We can select one of the menu options by pressing Enter or by using the right arrow key. The left arrow key can be used to go back.
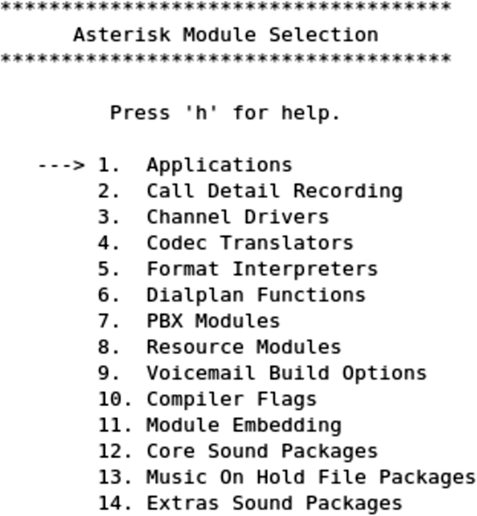
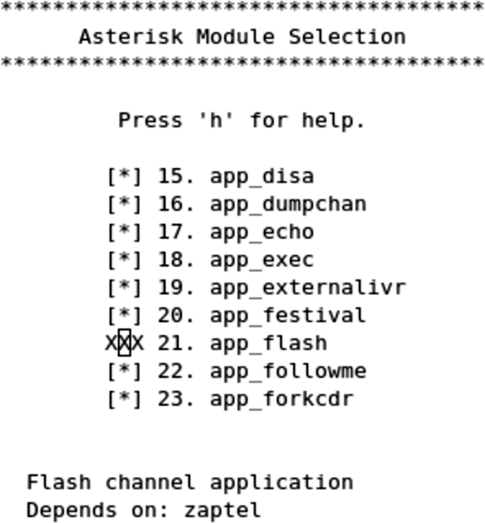
Figure 3-2 shows a list of possible
dialplan applications that can be built for use in Asterisk. Modules to
be built are marked as [*]. A module
is marked as not being built by [ ].
Modules that have XXX in front of
them are missing a package dependency which must be satisfied before it
will be available to be built. In Figure 3-2, we can see that the
app_flash module cannot be built due to a missing
dependency of Zaptel (i.e., the Zaptel module has not been built and
installed on the system since the last time ./configure was run). If you have
satisfied a dependency since the last time you ran ./configure, then run it
again, and rerun menuselect. Your module should now be available for
building.
After you have finished making changes to menuselect, type
x to save and quit. qq
Compiling Zaptel
Figure 3-3 shows the layers of interaction between Asterisk and the Linux kernel with respect to hardware control. On the Asterisk side is the Zapata channel module, chan_zap. Asterisk uses this interface to communicate with the Linux kernel, where the drivers for the hardware are loaded.
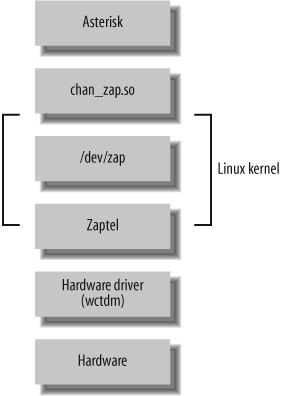
The Zaptel interface is a kernel loadable module that presents an abstraction layer between the hardware drivers and the Zapata module in Asterisk. It is this concept that allows the device drivers to be modified without any changes being made to the Asterisk source itself. The device drivers are used to communicate with the hardware directly and to pass the information between Zaptel and the hardware.
Tip
While Asterisk itself compiles on a variety of platforms, the Zaptel drivers are Linux-specific—they are written to interface directly with the Linux kernel. There is a project at http://www.solarisvoip.com that provides Zaptel support for Solaris. There is also a project that is working to provide Zapata drivers for BSD, located at http://www.voip-info.org/tiki-index.php?page=FreeBSD+zaptel.
First we will discuss the ztdummy driver, used on systems that require a timing interface but that do not have hardware. Then we will look at compiling and installing the drivers. (The configuration of Zaptel drivers will be discussed in the next chapter.)
Tip
Before compiling the Zaptel drivers on a system running a Linux 2.4 kernel, you should verify that /usr/src/ contains a symbolic link named linux-2.4 pointing to your kernel source. If the symbolic link doesn’t exist, you can create it with the following command (assuming you’ve installed the source in /usr/src/):
# ln -s /usr/src/'uname -r' /usr/src/linux-2.4Computers running Linux 2.6 kernel-based distributions do not usually require the use of the symbolic link, as these distributions will search for the kernel build directory automatically. However, if you’ve placed the build directory in a nonstandard place (i.e., somewhere other than /lib/modules/ <kernel version> /build/), you will require the use of the symbolic link.
While Asterisk and the other related packages run on Linux 2.4.x kernels, development is done first and foremost on 2.6.x kernels and support for 2.4.x kernels is not guarenteed in the future.
The ztdummy Driver
In Asterisk, certain applications and features require a timing device in order to operate (Asterisk won’t even compile them if no timing device is found). All Digium PCI hardware provides a 1 kHz timing interface that satisfies this requirement. If you lack the PCI hardware required to provide timing, the ztdummy driver can be used as a timing device. On Linux 2.4 kernel-based distributions, ztdummy must use the clocking provided by the UHCI USB controller.
Note
Many older systems (and some newer ones) use an OHCI USB controller chip, which is incompatible with ztdummy. However, if you’re using a 2.6 kernel there is no need to worry about which USB controller chip your system has.
The driver looks to see that the usb-uhci module is loaded and that the kernel version is at least 2.4.5. Older kernel versions are incompatible with ztdummy.
On a 2.6 kernel-based distribution, ztdummy does not require the use of the USB controller. (As of v2.6.0, the kernel now provides 1 kHz timing[46] with which the driver can interface; thus, the USB controller hardware requirement is no longer necessary.)
The Zapata Telephony Drivers
Compiling the Zapata telephony drivers for use with your Digium hardware is
straightforward; however, the method employed between the 1.2 and 1.4
versions is slightly different due to the new build environment. First
we need to run ./configure in order
to determine what applications and libraries are installed on the
system. This will ensure that everything Zaptel needs is installed.
The following commands will build Zaptel and its modules:
#cd /usr/src/zaptel-version# make clean# ./configure# make menuselect#make# make install
Tip
While running make clean is
not always necessary, it’s a good idea to run it before
recompiling any of the modules, as it will remove the compiled
binary files from within the source code directory. You can also use
it to clean up after installing if you don’t like to leave the
compiled binaries floating around. Note that this removes the
binaries only from the source directory, not from the system.
In addition to the executables, make
clean also removes the intermediary files (i.e., the
object files) after compilation. You don’t need them occupying space
on your hard drive.
If you’re using a system that makes use of the
/etc/rc.d/init.d/ or
/etc/init.d/ directories (such as CentOS and
other Red Hat-based distros), you may wish to run the make config command as well. This will install the startup scripts and
configure the system, using the chkconfig command to load the
zaptel module automatically at startup:
# make configUsing ztcfg and zttool
Two programs installed along with Zaptel are ztcfg and zttool. The ztcfg program is used to read the configuration in /etc/zaptel.conf to configure the hardware. The zttool program can be used to check the status of your installed hardware. For instance, if you are using a T1 card and there is no communication between the endpoints, you will see a red alarm. If everything is configured correctly and communication is possible, you should see an “OK.” The zttool application is also useful for analog cards, because it tells you their current state (configured, off-hook, etc.). The use of these programs will be explored further in the next chapter.
Compiling libpri
The libpri libraries do not make use of the autoconf build environment or the
menuselect feature as they are unnecessary; thus, the installation is
simplified. libpri is used by various makers of
Time Division Multiplexing (TDM) hardware, but even if you don’t have the hardware
installed, it is safe to compile and install this library. You must
compile and install libpri before Asterisk, as it
will be detected and used when Asterisk is compiled. Here are the
commands (replace version with your version
of libpri):
#cd /usr/src/libpri-#versionmake clean#make#make install
Compiling Asterisk
Once you’ve compiled and installed the zaptel and
libpri packages (if you need them), you can move on
to Asterisk. This section walks you through a standard installation and
introduces some of the alternative make arguments that you may find
useful.
Standard Installation
Asterisk is compiled with gcc through the use of the
GNU make program. To get started
compiling Asterisk, simply run the following commands (replace
version with your version of
Asterisk):
#cd /usr/src/asterisk-#versionmake clean# ./configure# make menuselect#make install#make samples
Be aware that compile times will vary between systems. On a current-generation processor, you shouldn’t need to wait more than five minutes. At AstriCon (http://www.astricon.net), someone reported successfully compiling Asterisk on a 133 MHz Pentium, but it took approximately five hours. You do the math.
Run the make samples
command to install the default configuration files. Installing
these files (instead of configuring each file manually) will allow you
to get your Asterisk system up and running much faster. Many of the
default values are fine for Asterisk. Files that require editing will
be explained in future chapters.
Tip
If you already have configuration files installed in
/etc/asterisk/ when you run the make samples command,
.old will be appended to the end of each of
your current configuration files, for example,
extensions.conf will be renamed
extensions.conf.old. Be careful, though,
because if you run make samples
more than once you will overwrite your original configuration
files!
The sample configuration files can also be found in the configs/ subdirectory within your Asterisk sources directory.
If you’re using a system that makes use of the
/etc/rc.d/init.d/ or
/etc/init.d/ directories, you may wish to run the
make config command as well. This
will install the startup scripts and configure the system (through the
use of the chkconfig command) to
execute Asterisk automatically at startup:
# make configAlternative make Arguments
There are several other make
arguments that you can pass at compile time. While some of these will
be discussed here, the remainder are used internally within the file
and really have no bearing or use for the end user. (Of course, new
functions may have been added, so be sure to check the Makefile for other
options.)
Let’s take a look at some useful make arguments.
make
          clean
The make clean command
is used to remove the compiled binaries from within
the source directory. This command should be run before you attempt
to recompile or, if space is an issue, if you would like to clean up
the files.
make distclean
The make distclean command
is used to remove the compiled binaries and to clean the
source directory back to its original state after being extracted
from the compressed archive.
make update
The make update
command is used to update the existing code from the Digium SVN
server. If you downloaded the source code from the FTP server, you
will receive a notice stating so.
make
          webvmail
The Asterisk Web Voicemail script is used to give a graphical interface to your voicemail account, allowing you to manage and interact with your voicemail remotely from a web browser.
When you run the make
webvmail command, the Asterisk Web Voicemail script will
be placed into the cgi-bin/ directory of your
HTTP daemon. If you have specific policies with respect to security,
be aware that it uses a setuid
root Perl script. This command will install only on a
CentOS or Fedora box, as other distributions may have different
paths to their cgi-bin/ directories. (This, of
course, can be changed by editing the HTTP_CFGDIR variable in the
Makefile at line 133 at the time of this
writing.)
make progdocs
The make progdocs
command will create documentation using the
doxygen software from comments placed within
the source code by the developers. You must have the appropriate
doxygen software installed on your system in
order for this to work. Note that doxygen
assumes that the source code is well documented, which, sadly, is
not always the case, although much work was published since the
first edition of this book! The information contained within
the doxygen system will be useful
only to developers.
make config
The make config command
will install Red Hat-style initialization scripts, if
the /etc/rc.d/init.d or
/etc/init.d directories are found to exist. If
they do exist, the scripts are installed with file permissions equal
to 755. If the script detects
that /etc/rc.d/init.d/ exists, the chkconfig --add asterisk command will also
be run to cause Asterisk to be started automatically at boot time.
This is not the case, however, with distributions that only use the
/etc/init.d/ directory. Running make config will not do anything to an
already running Asterisk process, or start one if it’s not
running.
This script currently is really only useful on a Red Hat-based system, although initialization scripts are available for other distributions (such as Gentoo, Mandrake, and Slackware) in the ./contrib./init.d/ directory of your Asterisk source directory.
Using Precompiled Binaries
While the documented process of installing Asterisk expects you to compile the source code yourself, there are Linux distributions (such as Debian) that include precompiled Asterisk binaries. Failing that, you may be able to install Asterisk with the package managers that those distributions of Linux provide (such as apt-get for Debian and portage for Gentoo).[47] However, you may also find that many of these prebuilt binaries are quite out of date and do not follow the same furious development cycle as Asterisk.
Finally, there do exist basic, precompiled Asterisk binaries that can be downloaded and installed in whatever Linux distribution you have chosen. However, the use of precompiled binaries doesn’t really save much time, and we have found that compiling Asterisk with each install is not a very cumbersome task. We believe that the best way to install Asterisk is to compile from the source code, so we won’t discuss prebuilt binaries very much in this book―and besides, don’t you want to be l33t?[48] In the next chapter, we’ll look at how to initially configure Asterisk and several kinds of channels.
Installing Additional Prompts
Additional prompts are installed via the menuselect application in your Asterisk source directory. There are three sets of audio packages: Core Sound, Extra Sound, and Music On Hold File. Each set of packages is broken down into different formats (and the Core Sound packages are available in multiple languages). Using the menuselect application, you can select combinations of audio packages for use in your environment. Some of the formats available include:
WAV
μlaw
alaw
GSM
G.729
G.722 (wideband, 16-bit)
As of this writing, the Core Sound packages are available in the following languages:
English
Spanish
French
Warning
Selecting any sounds in menuselect will cause the system to download the files from the Digium FTP server upon install. The size of these files ranges anywhere from 2 MB to 27 MB, so be aware of this when installing offline, or on slow and expensive links.
Common Compiling Issues
There are many common compiling issues that users often run into. Here are some of the more common problems, and how to resolve them.
Asterisk
First, let’s take a look at some of the errors you may encounter when running the configure script.
configure: error: no acceptable C compiler found in $PATH
If you receive the following error while attempting to run the configure script, you must install the gcc compiler and its dependencies:
configure: error: no acceptable C compiler found in $PATH
The following packages are required for gcc:
gcc
cpp
glibc-headers
glibc-devel
glibc-kernheaders
These can be installed manually, by copying the files off of
your distribution disks, or through the yum
package manager, with the command yum
install gcc.
configure: error: C++ preprocessor “/lib/cpp” fails sanity check
The following error will be displayed if no C++ preprocessor is found installed on the system. You must install the gcc-c++ package and its dependencies:
configure: error: C++ preprocessor "/lib/cpp" fails sanity check
The
following packages are required for the gcc-c++
preprocessor; installed by running yum
install gcc-c++:
gcc-c++
libstdc++-devel
configure: error: *** termcap support not found
The following error may be encountered during initialization of the configure script if the libtermcap-devel package is not installed:
configure: error: *** termcap support not found
The following file is required in order to compile Asterisk;
it can be installed with the yum install
libtermcap-devel command:
libtermcap-devel
Zaptel
You may also run into errors when compiling Zaptel. Here are some of the most commonly occurring problems, and what to do about them. If your error is not listed below, see the previous section as your error may be covered there.
make: cc: Command not found
You will receive the following error if you attempt to build Zaptel without the gcc compiler installed:
make: cc: Command not found
make: *** [gendigits.o] Error 127
Be sure to install gcc and its dependencies. For more information, see configure: error: no acceptable C compiler found in $PATH in the previous section.
FATAL: Module wctdm/fxs/fxo not found
The TDM400P cards require the PCI bus to be version 2.2. If you attempt to load the Zapata telephony drivers with an older version, you may get the following errors:
The only way to resolve these errors is to use a newer motherboard that supports PCI version 2.2:
Unresolved symbol link when loading ztdummy
The ztdummy driver requires that a UHCI USB controller be available on Linux 2.4 kernels (the USB controller is not a requirement on Linux 2.6 kernels, because they are capable of generating the 1 kHz timing reference). There exists a secondary kind of controller, known as OHCI, which is not compatible with the ztdummy driver. If the UHCI USB controller is not accessible on Linux 2.4 kernels, the following error will occur:
/lib/modules/2.4.22/misc/ztdummy.o: /lib/modules/2.4.22/misc/ztdummy.o: unresolved
symbol unlink_td
/lib/modules/2.4.22/misc/ztdummy.o: /lib/modules/2.4.22/misc/ztdummy.o: unresolved
symbol alloc_td
/lib/modules/2.4.22/misc/ztdummy.o: /lib/modules/2.4.22/misc/ztdummy.o: unresolved
symbol delete_desc
/lib/modules/2.4.22/misc/ztdummy.o: /lib/modules/2.4.22/misc/ztdummy.o: unresolved
symbol uhci_devices
/lib/modules/2.4.22/misc/ztdummy.o: /lib/modules/2.4.22/misc/ztdummy.o: unresolved
symbol uhci_interrupt
/lib/modules/2.4.22/misc/ztdummy.o: /lib/modules/2.4.22/misc/ztdummy.o: unresolved
symbol fill_td
/lib/modules/2.4.22/misc/ztdummy.o: /lib/modules/2.4.22/misc/ztdummy.o: unresolved
symbol insert_td_horizontal
/lib/modules/2.4.22/misc/ztdummy.o: insmod /lib/modules/2.4.22/misc/ztdummy.o failed
/lib/modules/2.4.22/misc/ztdummy.o: insmod ztdummy failed
You can verify that you have the correct style of USB
controller and its associated drivers with the lsmod command:
# lsmod
Module                  Size  Used by
usb_uhci               26412  0
usbcore                79040  1 [hid usb-uhci]
As you can see in the example above, you are looking to make sure that the usbcore and usb_uhci modules are loaded. If these modules are not loaded, be sure that USB has been activated within your BIOS and that the modules exist.
If the USB drivers are not loaded, you can still check which
type of USB controller you have with the dmesg command:
# dmesg | grep -i usbTo verify that you indeed have a UHCI USB controller, look for the following lines:
uhci_hcd 0000:00:04.2: new USB bus registered, assigned bus number 1
hub 1-0:1.0: USB hub found
uhci_hcd 0000:00:04.3: new USB bus registered, assigned bus number 2
hub 2-0:1.0: USB hub found
Depmod errors during compilation
If you experience depmod errors
during compilation, you more than likely don’t have a symbolic link
to your Linux kernel sources. If you don’t have your Linux kernel
sources installed, retrieve the sources for your installed kernel,
install them, and create a symbolic link against
/usr/src/linux-2.4. The following is an
example
of a depmod error:
depmod: *** Unresolved symbols in /lib/modules/2.4.22/kernel/drivers/block/
loop.o
Loading Asterisk and Zaptel Quickly
If you run make config in the
Asterisk or Zaptel source directories, then the initialization scripts used to control Asterisk or Zaptel will be copied
to /etc/rc.d/init.d/. The scripts can be used to
easily load and unload Asterisk and Zaptel. They will also run the
chkconfig command for you so Asterisk
and Zaptel will be started automatically upon system boot. The following
shows their usage:
# service zaptel# service asterisk
Each initialization script has several options that can be utilized to control the PBX or the drivers. Tables 3-2 and 3-3 show the commands run by the script as if you had typed them into the command-line interface (CLI) yourself:
Loading Zaptel Modules Without Scripts
In this section, we’ll take a quick look at how to load the zaptel and ztdummy modules without the CentOS initialization script. The zaptel module does not require any configuration if it’s being used only for the ztdummy module. If you plan on loading the ztdummy module as your timing source (and thus, you will not be running any PCI hardware in your system), now is a good time to load both drivers.
Systems Running udevd
In the early days of Linux, the system’s /dev/ directory was populated with a list of devices with which the system could potentially interact. At the time, nearly 18,000 devices were listed. That all changed when devfs was released, allowing dynamic creation of devices that are active within the system. Some of the recently released distributions have incorporated the udev daemon into their systems to dynamically populate /dev/ with device nodes.
To allow Zaptel and other device drivers to access the PCI hardware installed in your system, you must add some rules. Using your favorite text editor, open up your udevd rules file. On CentOS, for example, this file is located at /etc/udev/rules.d/50-udev.rules. Add the following lines to the end of your rules file:
# Section for zaptel

device
   KERNEL="zapctl",     NAME="zap/ctl"
   KERNEL="zaptimer",   NAME="zap/timer"
   KERNEL="zapchannel", NAME="zap/channel"
   KERNEL="zappseudo",  NAME="zap/pseudo"
   KERNEL="zap[0-9]*",  NAME="zap/%n"
Save the file and reboot your system for the settings to take effect.
Note
You may not have to actually edit anything in your system, as the Zaptel installation script will try to install the rules for you; however, we have left this here as a reference for those systems that are not automatically configured.
Loading Zaptel
The zaptel module must be loaded before any of the other modules are
loaded and used. Note that if you will be using the
zaptel module with PCI hardware, you must
configure /etc/zaptel.conf before you load it.
(We will discuss how to configure zaptel.conf for
use with hardware in Chapter 4.) If you are
using zaptel only to access
ztdummy, you can load it with the modprobe command, as follows:
# modprobe zaptelIf all goes well, you shouldn’t see any output. To verify that
the zaptel module loaded successfully,
use the lsmod command.
You should be returned a line showing the zaptel
module and the amount of memory it is using, as in the
following:
# lsmod | grep zaptel
zaptel                201988  0
Loading ztdummy
The ztdummy module is an interface to a device that provides timing, which
in turn allows Asterisk to provide timing to various applications and
functions that require it. Use the modprobe command to load the
ztdummy module after zaptel
has been loaded:
# modprobe ztdummyIf ztdummy loads successfully, no output
will be displayed. To verify that ztdummy is
loaded and is being used by zaptel, use the
lsmod command. The following output
is from a computer running the 2.6 kernel:
# lsmod | grep ztdummy
    Module                  Size  Used by
    ztdummy                 3796  0
    zaptel                201988  1 ztdummy
If you happen to be running a 2.4 kernel-based computer, your
output from lsmod will show that
ztdummy is using the
usb-uhci module:
 # lsmod | grep ztdummy
    Module                  Size  Used by
    ztdummy                 3796  0
    zaptel                201988  0 ztdummy
    usb-uhci               24524  0 ztdummy
Loading libpri Without Script
The libpri libraries do not need to be loaded like modules. Asterisk looks for libpri at compile time and configures itself to use the libraries if they are found.
Starting Asterisk Without Scripts
Asterisk can be loaded in a variety of ways. The easiest way is to start Asterisk by running the binary file directly from the Linux command-line interface. If you are running a system that uses the init.d scripts, you can easily start and restart Asterisk that way as well. However, the preferred way of starting Asterisk is via the safe_asterisk script.
Console Commands
The Asterisk binary is, by default, located at
/usr/sbin/asterisk. If you run
/usr/sbin/asterisk, it will be loaded as a
daemon. There are also a few switches you should be aware of that
allow you to (re)connect to the Asterisk CLI, set the verbosity of CLI
output, and allow core dumps if Asterisk crashes (for debugging with
gdb). To explore the full range of options, run
Asterisk with the -h switch:
# /usr/sbin/asterisk -hHere is a list of the most commonly used options:
-cConsole. This will start Asterisk as a user process (not as a server), and will connect you to the Asterisk CLI. This option is good when you are debugging your startup parameters, but should not be used for a normal system (if Asterisk is already running, this option will not work and will issue a complaint).
-vVerbosity. This is used to set the amount of output for CLI debugging. The more “v”s, the more verbose.
-gCore dump. If Asterisk were to crash unexpectedly, this would cause a core file to be created for later tracing with gdb. You generally do not use this in production, unless you are writing code for Asterisk and want to debug any resulting crashes.
-rRemote. This is used to reconnect remotely to an already running Asterisk process. (The process is remote from the standpoint of the console connecting to it but is actually a local process on the machine. This has nothing to do with connecting to a remote process over a network using a protocol such as IP, as this is not supported.) This is the most common option and it is what you would use to connect to Asterisk on a system where it is running as a daemon/service that was started by init at boot time.
-x "<CLI
            command>"
Execute. Using this command in combination with -
rallows you to execute a CLI command without having to connect to the CLI and type it manually. An example would be to send a restart, which you would do by typingasterisk -rx "reload"from the command line.
Let’s look at some examples. If you want to start Asterisk as a user program (because you are tweaking your config and will be starting and stopping it several times), and you want a verbosity level of 3, use the following command:
# /usr/sbin/asterisk -cvvvIf the Asterisk process is already running (for example, if you have installed Asterisk as part of the init process of the system), use the reconnect switch, like so:
# /usr/sbin/asterisk -vvvrIf you want Asterisk to dump a core file after a crash, you can
use the -g switch when starting
Asterisk:
# /usr/sbin/asterisk -gTo execute a command without connecting to the CLI and typing it
(perhaps for use within a script), you can use the -x switch in combination with the -r switch:
#/usr/sbin/asterisk -rx "restart now"#/usr/sbin/asterisk -rx "database show"# /usr/sbin/asterisk -rx "sip show peers"
If you are experiencing crashes and would like to output to a debug file, use the following command:
# /usr/sbin/asterisk -vvvvc | tee /tmp/debug.logNote that you do not have to use the v switch if you do not want the system to
provide detailed output of what is going on. On a busy system, you may
not want to get any output, as it can interfere with whatever you are
doing on the console.
Directories Used by Asterisk
Asterisk uses several directories on a Linux system to manage the various aspects of the system, such as voicemail recordings, voice prompts, and configuration files. This section discusses the necessary directories, all of which are created during installation and configured in the asterisk.conf file.
/etc/asterisk/
The /etc/asterisk/ directory contains the Asterisk configuration files. One file, however—zaptel.conf—is located in the /etc/ directory. The Zaptel hardware was originally designed by Jim Dixon of the Zapata Telephony Group as a way of bringing reasonable and affordable computer telephony equipment to the world. Asterisk makes use of this hardware, but any other software can also make use of the Zaptel hardware and drivers. Consequently, the zaptel.conf configuration file is not directly located in the /etc/asterisk/ directory.
/usr/lib/asterisk/modules/
The /usr/lib/asterisk/modules/ directory contains all of the Asterisk loadable modules. Within this directory are the various applications, codecs, formats, and channels used by Asterisk. By default, Asterisk loads all of these modules at startup. You can disable any modules you are not using in the modules.conf file, but be aware that certain modules are required by Asterisk or are dependencies of other modules. Attempting to load Asterisk without these modules will cause an error at startup.
/var/lib/asterisk
The /var/lib/asterisk/ directory contains the astdb file and a number of subdirectories. The astdb file contains the local Asterisk database information, which is somewhat like the Microsoft Windows Registry. The Asterisk database is a simple implementation based on v1 of the Berkeley database. The db.c file in the Asterisk source states that this version was chosen for the following reason: “DB3 implementation is released under an alternative license incompatible with the GPL. Thus, in order to keep Asterisk licensing simplistic, it was decided to use version 1 as it is released under the BSD license.”
The subdirectories within /var/lib/asterisk/ include:
- agi-bin/
The agi-bin/ directory contains your custom scripts, which can interface with Asterisk via the various built-in AGI applications. For more information about AGI, see Chapter 8.
- firmware/
The firmware/ directory contains firmware for various Asterisk-compatible devices. It currently contains only the iax/ subdirectory, which holds the binary firmware image for Digium’s IAXy.
- images/
Applications that communicate with channels supporting graphical images look in the images/ directory. Most channels do not support the transmission of images, so this directory is rarely used. However, if more devices that support and make use of graphical images are released, this directory will become more relevant.
- keys/
Asterisk can use a public/private key system to authenticate peers connecting to your box via an RSA digital signature. If you place a peer’s public key in your keys/ directory, that peer can be authenticated by channels supporting this method (such as the IAX2 channels). The private key is never distributed to the public. The reverse is also true: you can distribute your public key to your peers, allowing you to be authenticated with the use of your private key. Both the public and private keys—ending in the .pub and .key file extensions, respectively—are stored in the keys/ directory.
- mohmp3/
When you configure Asterisk for Music on Hold, applications utilizing this feature look for their MP3 files in the mohmp3/ directory. Asterisk is a bit picky about how the MP3 files are formatted, so you should use constant bitrate (CBR) encoding and strip the ID3 tags from your files.
- sounds/
All of the available voice prompts for Asterisk reside in the sounds/ directory. The contents of the basic prompts included with Asterisk are in the sounds.txt file located in your Asterisk source code directory. Contents of the additional prompts are located in the sounds-extra.txt file in the directory to which you extracted the asterisk-sounds package earlier in this chapter.
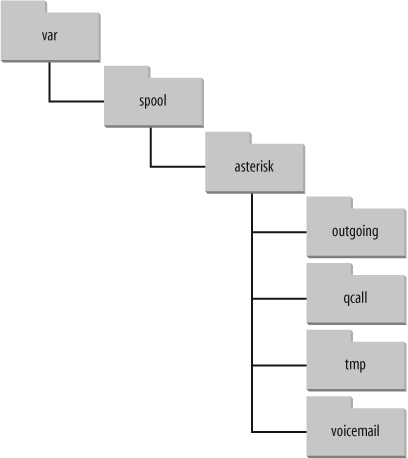
/var/spool/asterisk/
The Asterisk spool directory contains several subdirectories, including dictate/, meetme/, monitor/, outgoing/, system/, tmp/, and voicemail/ (see Figure 3-4). Asterisk monitors the outgoing directory for text files containing call request information. These files allow you to generate a call simply by moving the correctly structured file into the outgoing/ directory.
Call files being placed into the outgoing/ directory can contain useful information, such as the Context, Extension, and Priority where the answered call should start, or simply the application and its arguments. You can also set variables and specify an account code for Call Detail Records. More information about the use of call files is presented in Chapter 9.
The dictate/ directory is the default
location where the Dictate()
application looks for files.
The meetme/ directory is the location where
MeetMe() conference recordings are
saved.
Recordings from either one-touch recording (the w and W
flags to the Dial() application),
the MixMonitor(), or Monitor() applications are stored in the
monitor/ directory.
system/ is used by the System() application for temporary storage
of data.
The tmp/ directory is used, funny enough, to hold temporary information. Certain applications may require a place to write files to before copying the complete files to their final destinations. This prevents two processes from trying to write to and read from a file at the same time.
All voicemail and user greetings are contained within the voicemail/ directory. Extensions configured in voicemail.conf that have been logged in to at least once are created as subdirectories of voicemail/.
/var/run/
The /var/run/ directory contains the process ID (PID) information for all active processes on the system, including Asterisk (as specified in the asterisk.conf file). Note that /var/run/ is OS-dependent and may differ.
/var/log/asterisk/
The /var/log/asterisk/ directory is where Asterisk logs information. You can control the type of information being logged to the various files by editing the logger.conf file located in the /etc/asterisk/ directory. Basic configuration of the logger.conf file is covered in Appendix D.
/var/log/asterisk/cdr-csv
The /var/log/asterisk/cdr-csv
directory is used to store the CDRs in comma-separated value
(CSV) format. By default information is stored in the Master.csv file, but individual
accounts can store their own CDRs in separate files with the use of
the accountcode option (see Appendix A for more information).
AsteriskNOW™
In the following sections we will provide a gentle introduction to the AsteriskNOW software, which gives you a complete PBX system with graphical configuration screen all built into one!
What Is AsteriskNOW?
AsteriskNOW is an open source software appliance, a customized Linux distribution that includes Asterisk, the Asterisk GUI, and all other software needed for an Asterisk system. The Asterisk GUI gives you the ability to easily configure your Asterisk system without being a technical expert.
Note: The complete software appliance distribution is provided under the GPL and may legally be used for any purpose, commercial or otherwise.
Before You Begin
AsteriskNOW installation is easy, because the appliance includes only those components necessary to run, debug, and build Asterisk. You no longer have to worry about kernel versions and package dependencies. AsteriskNOW is a custom Linux distribution for Asterisk based on rPath Linux.
What You Will Need
A system on which you can install AsteriskNOW
A CD writer and associated software
Connection to the Internet
Firefox browser
Note
The Asterisk GUI currently requires the Firefox browser (available at http://www.mozilla.com/en-US/ for optimum performance. Wider browser support will be available with future versions.
Installation
You should observe all normal precautions when preparing and installing a new distribution. Any existing operating systems on your hard drive will be removed by the Express Installation. If you are not sure that you are ready to alter your system, try one of the alternate installations (discussed in Alternate Installations”) to give AsteriskNOW a try. For more help on Asterisk and rPath see the For More Information” section at the end of the chapter.
Quick installation
The essential installation of AsteriskNOW is really quite simple and gives you the ability to get up and running in a short amount of time. Use this quick installation procedure if you are comfortable with accepting the defaults. Any help you may need is provided with the installation screens. If you would like more information on the installation procedure, refer to the Extended procedure” section below:
Download the AsteriskNOW ISO file (http://www.asterisknow.org/downloads) and create a CD image from the file. This step is required before installation can begin. The process for creating a CD image will vary depending upon the CD authoring software you are using.
Insert your newly created AsteriskNOW CD into the CD-ROM drive of the PC.
Boot from the CD by restarting the PC. A basic AsteriskNOW boot menu with several options will be provided:
To install or upgrade in graphical mode, press Enter.
To install or upgrade in Linux text mode, type
linux textand then press Enter.
The recommended, and default, installation mode is graphical. If you do not make an entry, the installation will continue in graphical mode.
From here, follow the self-explanatory, onscreen prompts to guide you through the installation process.
When installation is complete, the system will prompt you to reboot. After rebooting, a URL to access the Asterisk GUI will be displayed.
You are now ready to configure and run AsteriskNOW.
Extended procedure
Download the AsteriskNOW ISO file (http://www.asterisknow.org/downloads) and create a CD image from the file. This step is required before installation can begin. The process for creating a CD image will vary depending upon the CD authoring software you are using.
Insert your newly created AsteriskNOW CD into the CD-ROM drive.
Boot from the CD by restarting the PC. A basic AsteriskNOW boot menu with several options will be provided:
To install or upgrade in graphical mode, press Enter.
To install or upgrade in Linux text mode, type
linux textand then press Enter.
The recommended, and default, installation mode is graphical. If you do not make an entry, the installation will continue in graphical mode.
After a bit of processing, the initial installation screen is displayed. The initial screen is similar to the following illustration:
From the initial installation screen you can read the release notes or the Help information. When you are ready, click Next to continue the installation.
The next installation screen lets you choose the type of installation. The two modes of installation available are:
- Express Installation
The Express Installation installs all of the software needed to install Asterisk. Debugging and development tools are installed with this installation type.
- Expert
Select this installation type if you want to have complete control over all installation options. Among the options you can control are software package selection, partitioning, and language selection.
The default installation type is Express Installation. This installation type assumes an English language reader and that you aren’t concerned with the finer points. Choose Expert if you don’t read English, and/or want more control over the installation details. For the purposes of this procedure, Express Installation is discussed.
Choose your installation type and then click Next.
The Automatic Partitioning screen is displayed. The Automatic Partitioning screen gives you several options to choose from before the software partitions your drive. This gives you the opportunity to choose which data (if any) is removed from your system, and how the drive is partitioned. The following options are available:
- Remove All Linux Partitions
This option will only remove any Linux partitions created from a previous Linux installation.
- Remove All Partitions
Select this option if you want to remove all partitions on your system, including those created by other operating systems (such as Windows).
- Keep All Partitions
You should choose this option if you want to retain all of your current data and partitions. You will need enough hard drive space for your Asterisk implementation. Twenty GB is a realistic minimum, but the minimum space is dependent on the needs of the system you want to create.
In most cases, you will want to choose Remove All Partitions. A hard drive dedicated to your Asterisk implementation is the best way to ensure maximum performance. Select the Review checkbox on the Automatic Partitioning screen if you want to review or modify your partition selections.
A list of the hard drives available for use is listed on the Automatic Partitioning screen. Select the checkbox next to the hard drive(s) you want to use for your system. Click Next to continue with the installation.
If you selected Remove All Partitions or Remove All Linux Partitions, a warning dialog will be displayed that asks if you want to proceed. Click Yes to proceed, or No to change your partition selection.
If you selected Review on the Automatic Partitioning screen, a screen will be displayed with the partitions created. You can modify your partitions on this screen. To proceed, click Next.
The Network Configuration screen is displayed.
You can configure the network devices associated with your system on the Network Configuration screen. Any network devices attached to your system are automatically detected by the installation program and displayed in the Network Devices list. You can either accept the device(s) automatically selected by the installation program, or you can edit them by selecting Edit.
The Time Zone Selection screen is displayed.
The Time Zone Selection screen offers several ways for you to select the time zone appropriate for your installation. You can either use the world map, which displays major cities, select from a list of locations and time zones, or select the System Clock Uses UTC to use the system time. Once you have selected a time zone, click Next.
The Administrator Password screen is displayed.
You must set a password for the AsteriskNOW administrator account, “admin”. This password will be used to log on to the system, as well as the Asterisk GUI. Set and confirm an administrator password, and then click Next to proceed.
The About to Install screen is displayed, giving you an opportunity to delay or abort the installation process. If you are ready to continue with the installation, click Next.
The Installing Packages screen is displayed.
While AsteriskNOW is being installed, the Installing Packages screen will be displayed. The installation will continue for a few minutes.
Once the installation is complete, the system will prompt you to reboot. Remove the installation disk you created, and click Reboot. After rebooting, a URL to access the Asterisk GUI will be displayed.
Accessing the GUI
Once you have completed your installation and rebooted your machine, you will be able to access the Asterisk GUI. The URL used to access the Asterisk GUI is the IP address or hostname displayed after rebooting your machine. Enter this IP address in your browser URL. You will be able to refine your AsteriskNOW installation by accessing the Asterisk GUI.
Alternate Installations
You can also try out AsteriskNOW using the available VMware Player image (http://www.vmware.com/download/player/), Xen universal guest domain image (http://wiki.rpath.com/wiki/Xen_Solutions_Using_rPath_Technologies) or the LiveCD (just burn and boot). All alternate installations can be downloaded from the AsteriskNOW download page.
Note: When using the LiveCD, the default username is “admin” with “password” as the password.
For More Information
An AsteriskNOW Users’ Guide is currently under development by the Asterisk community on the Asterisk Forums. For additional information on AsteriskNOW, including step-by-step installation screenshots and configuration screenshots showing the setup wizard, please refer to http://www.asterisknow.org, and visit the Asterisk Forums at http://forums.digium.com. For more information and help with rPath Linux, please see rPath’s wiki, http://wiki.rpath.com.
Conclusion
In this chapter, we have reviewed the procedures for obtaining, compiling, and installing Asterisk and the associated packages. In the following chapter, we will touch on the initial configuration of your system with regard to various communications channels, such as analog devices attached to FXS and FXO ports, SIP channels, and IAX2 endpoints.
[42] And some non-Linux operating systems as well, such as Solaris, *BSD, and OS X. You should note that while people have managed to successfully run Asterisk on these alternative systems, Asterisk was, and continues to be, actively developed for Linux.
[43] We will be using CentOS Server 4.4 in this book, which we usually install with nothing except the Editors package selected. If you are not sure what distribution to choose, CentOS is an excellent choice. CentOS can be obtained from http://www.centos.org.
[44] Subversion is an excellent code management system, available at http://subversion.tigris.org/. It also has an equally excellent Creative Commons released book, Version Control with Subversion, by Ben Collins Sussman et al. (O’Reilly), available online at http://svnbook.red-bean.com/.
[45] As of the release date of this book, there has been no determination that the next Asterisk release will be 1.6. It could just as easily be 2.0. Therefore, when discussing new features, you’ll see us talk about what’s in Trunk or what will be in the next release—without mentioning the specific version.
[46] Note that this is configurable in the kernel, so it is possible certain distributions may not have this set to 1,000 Hz; CentOS, however, does have this set at the correct frequency.
[47] Gentoo doesn’t actually use a precompiled binary, but rather pulls the source from a repository, and builds and installs the software using its own package management system. But the version you get is still dependant upon the maintainers packaging it for you, when you could simply build it yourself!
[48] l33t is a funny way of saying “elite,” known as leetspeak (computer slang). Even more funny is a well-written, serious article by Microsoft about leetspeak at http://www.microsoft.com/athome/security/children/leetspeak.mspx.
Get Asterisk: The Future of Telephony, 2nd Edition now with the O’Reilly learning platform.
O’Reilly members experience books, live events, courses curated by job role, and more from O’Reilly and nearly 200 top publishers.

