DVDs do not have to play motion video; they also can simply display a still image, or a simple slide show with a collection of images, possibly with optional accompanying audio tracks and subtitles. If you want a fancier slide show, with features such as transitions, motion effects, and pans and zooms, you will need to use a separate application such as Adobe Premiere Pro or After Effects to prepare the presentation, and then save the final version as a movie to import into Encore as a video clip. However, if it’s something simple you’re looking for, Encore will do the trick with either still image tracks or slide shows.
Tracks with a single still image are useful for presenting information such as titles and credits. They also can be used for DVD music (audio-only) discs to provide visual accompaniment, such as a title screen with the album cover, for each piece of music. Slide shows are useful for showing a number of related images, one after another, while allowing the viewer to just sit back and watch.
To create a still image or slide show track, do the following:
Select one or more still images in the project window. If you want to create a still image track, just select one asset. If you want to create a slide show, feel free to select more than one.
Place them in a timeline. Choose Timeline → New Timeline, or drag the image asset (or assets) into the video track of an existing timeline (see Figure 4-17). If you have more than one asset selected and choose Timeline → New Timeline, Encore creates a new timeline for each image. If you drag multiple selections to a single timeline, however, Encore concatenates these still images one after another based on their order in the Project tab. In either case, Encore presents a small dialog asking how long you want the duration of each still image to be. By default, Encore sets the duration of a still image on the timeline to 6 seconds.
Remember, to view the full timeline, you can simply press Ctrl-0 to zoom the contents of the timeline to fit in the current window size.
Edit the Timeline if Needed. You can trim the duration of a still with the Selection tool, or choose Edit → Preferences → Timelines and specify a new Default Still Length for future still images placed in a timeline. Note that if you trim a still image from a slide show timeline, the images to the right do not ripple over. Instead, you’re left with black space, that you must manually correct if needed. If you insert a still image in between two images on the timeline, however, the images to the right will ripple to support the addition.
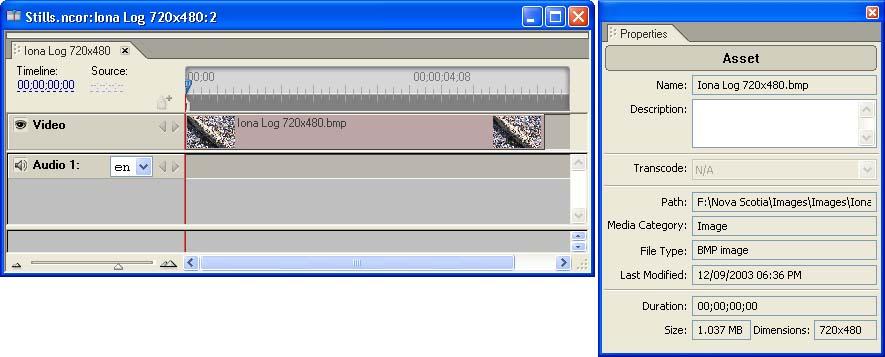
Note that with slide shows, Encore automatically adds chapter points at the start of each image, as shown in Figure 4-18. These will always mark the beginning of the still image in the timeline, and will adjust automatically if there is an addition or deletion.
When you play slide slow through the timeline, each image will be displayed for its duration, and then the display will cut to the next image.

There are currently no transitions in Encore (such as fades or wipes), so if you need that sort of effect, you should create the slide show in Adobe Premiere Pro and export it as a video file into Encore. You can leave gaps between the images; they will be displayed as a black screen.
When creating images for use in timelines, remember that you should create your images at the same native project resolution used for video (i.e., 720 x 480 for NTSC or 720 x 576 for PAL). If you do import an image at another resolution, however, Encore will not give you an error message. Instead, Encore provides you with several options to scale each image when used in a timeline, as specified in the Still Clip properties palette, as shown in Figure 4-19.
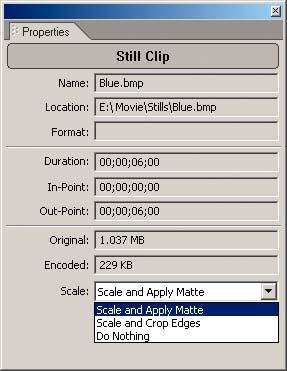
To change how an image is scaled, click it in the timeline to select it and display the Still Clip properties palette. Or select a group of images in the timeline to set the scale properties for all of them at once.
Scale is the final option, at the bottom of the Properties palette. There are three choices for the Scale option:
- Scale and Apply Matte
This proportionally scales the still image until the entire image fits in the frame, and then applies a black matte to any areas that are not filled. This ensures the entire image is visible, but may introduce matte lines at the top and bottom or sides of the screen.
- Scale and Crop Edges
This proportionally scales the image until the entire frame is filled, and then crops any extraneous parts of the image as necessary. This ensures that there are no matte lines, but may crop the image.
- Do Nothing
This keeps the original resolution of the still image, centering it inside the frame. If the size exceeds the frame resolution of the broadcast standard, the edges are cropped. If the image is smaller than the required frame resolution, it is matted in black.
Note that the Scale option does not alter the aspect ratio of the still image. However, if you need a refresher on how Encore stretches or squeezes images based on the broadcast resolution, review the section on screen and pixel aspect ratios in Chapter 3.
Get Adobe Encore DVD: In the Studio now with the O’Reilly learning platform.
O’Reilly members experience books, live events, courses curated by job role, and more from O’Reilly and nearly 200 top publishers.

