Pages are interactive when they're responsive to actions from the web page reader. The interaction could be clicking a button or link, dragging a div element, or filling in a form. Most of the time, the page context provides enough information for readers to figure out what to do, but not always. For example, web page form fields with labels such as "last name" may be easy to figure out, but others, such as "Enter fiduciary amount" may not.
Printing out detailed information within the page, however, can be messy, and forcing folks to go to another page is a pain. Opening new windows may help, but they separate the action from the object. That's where just-in-time (JIT) help comes in.
In JIT help, typically a box is displayed with text describing the item or providing additional instructions. The box could open at the point of focus or at a standard place on the page regardless of the element getting focus. The help is displayed based on actions, such as hovering the mouse over a form field.
Form element labels can be self-explanatory, such as "first name" or "age," but every once in a while you come across one like "Post Slug" (from Wordpress, a blogging application) that leaves people scratching their heads as they check through the help documentation. Rather than sending people to a separate page, a better approach would be to add information into the page itself. Unfortunately, though, there may not be enough room. The Wordpress edit page is a good example of too many form elements and too little space.
The simplest help for forms is to capture the focus events for each form element and then display the appropriate description text block. Rather than guessing which elements might need help, assume they all do, and provide for each one. The information can be preloaded into the page or pulled up from a web service using an Ajax call.
Example 4-4 shows a simple application of JIT form help. Since the application is so small, I've combined the script, stylesheet, and web page elements into one file. The code for the page attaches an onfocus event handler for each form element, including the submit button. When the form element receives the focus event. Its name is sent as part of a web service query using XMLHttpRequest. The web service returns the element's definition, which is then displayed in a separate page element, a div element identified as "help" using the innerHTML property.
Example 4-4. JIT onfocus form help
<!DOCTYPE html PUBLIC "-//W3C//DTD XHTML 1.0 Strict//EN"
    "http://www.w3.org/TR/xhtml1/DTD/xhtml1-strict.dtd">
<html xmlns="http://www.w3.org/1999/xhtml" xml:lang="en" lang="en">
<head>

<meta http-equiv="Content-Type" content="text/html; charset=utf-8" />
<title>Form Field Help</title>
<style type="text/css">
#help
{
    left: 300px;
    padding: 10px;
    position: absolute;
    top: 20px;
}
form
{
    margin: 20px;
}
input
{
    margin: 10px;
}
</style>
<script type="text/javascript" src="addingajax.js">
</script>
<script type="text/javascript">
//<![CDATA[

var xmlhttp;

aaManageEvent(window, 'load', function(  ) {
   for (var i = 0; i < document.forms[0].elements.length; i++) {
      aaManageEvent(document.forms[0].elements[i],"focus",showHelp);
   }
});

function showHelp(evnt) {
  evnt = (evnt) ? evnt : window.event;
  if (!xmlhttp)  xmlhttp = getXmlHttpRequest(  );
  if (!xmlhttp) return;
   var objId = (evnt.currentTarget) ? evnt.currentTarget.id : evnt.srcElement.id;
  var qry = "item=" + objId;
  var url = 'help.php?' + qry;
  xmlhttp.open('GET', url, true);
  xmlhttp.onreadystatechange = printHelp;
  xmlhttp.send(null);
}

function printHelp(  ) {
   if(xmlhttp.readyState == 4 && xmlhttp.status == 200) {
      document.getElementById('help').innerHTML=xmlhttp.responseText;
   }
}

//]]>
</script>


</head>
<body>
<form action="ch04-04.htm" method="post">
<fieldset>
<legend>Personal info</legend>
<label for="firstname">First Name:</label><br />
<input id="firstname" name="firstname" type="text" /><br />

<label for="lastname">Last Name:</label><br />
<input id="lastname" name="lastname" type="text" /><br />

<input type="submit" value="Save" />
</fieldset>
</form>
<div id="help">
</div>
</body>
</html>
This is a very simple approach to dynamically providing help. With just the two fields, neither of which really need additional explanation, you wouldn't normally use this approach, but the simplicity does provide a clear demonstration. The server component of the Ajax application is equally as simple:
<?php
//If no search string is passed, then we can't search
$item = $_REQUEST['item'];
if(empty($item)) {
echo "";
} else {
//Remove whitespace from beginning & end of passed search.
$search = trim($item);
switch($item) {
case "firstname" :
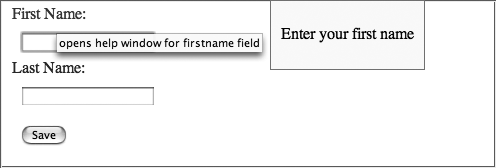
$result = "<p>Enter your first name</p>";
break;
case "lastname" :
$result = "<p>Enter your last name</p>";
break;
default :
$result = "";
break;
}
echo $result;
}
?>However, if you have several forms spread out over several pages, providing the same help system to all of the pages allows you to make modifications in the help text in one place instead of in each of several different pages. This approach then becomes much more viable. Additionally, if the application caches the lookup information when it's retrieved the first time, the connections to the server are decreased:
function printHelp(  ) {
   if(xmlhttp.readyState == 4 && xmlhttp.status == 200) {
      document.getElementById('help').innerHTML=xmlhttp.responseText;
      helpObj[helpItem] = xmlhttp.responseText;
   }
}
With the caching modification, the application tests for the existence of the help item in the associative array cache.
Another improvement is to make the help more "on-demand," rather than putting it up only when the page reader enters a field. One way to do this is to capture the click event for the labels rather than the focus event for the fields, and display help when the labels are clicked:
function setUp(  ) {
   var items = document.getElementsByTagName('label');
   for (var i = 0; i < items.length; i++) {
       aaManageEvent(items[i],"click",showHelp);
   }
}
For this approach to work, the labels are given identifiers, rather than the form fields:
<form action="ch04-05.htm" method="post">
<label id="elem1">First Name:</label><br />
<input type="text" /><br />
<label id="elem2">Last Name:</label><br />
<input type="text" /><br />
<input type="submit" Value="Save" />
</form>
A problem with using the labels is there's no way to know that they're clickable. One way around this is to add a mouseover effect to the label, setting the mouse pointer to a question mark. Do this by adding a CSS stylesheet setting to change the mouse pointer to the help cursor (typically a question mark) whenever it is placed over a label:
label { cursor: help; }Of course, you still have to know to move your mouse over the label to get the cursor. Plus, you have to be using a mouse to realize that the label has a different cursor, and you must have script enabled.
A more unobtrusive and intuitive approach would be to surround the labels with a hypertext link, set the target attribute to a new window name, and display the help based on the mouseover event rather than the click. If scripting is enabled, the mouseover displays the help. If scripting is not enabled, the hypertext link opens a separate window with the help information. This change makes the JIT help "keyboard-enabled" and more accessible for screen readers.
There are two problems with the link workaround. One is that XHTML 1.0 Strict does not support the target attribute. The other is that you need to warn folks using a screen reader or other assisting device that they will open a new window if they click the link.
You could avoid both of these problems by opening the help within the same page, but that is not a good solution for providing help in a form, especially a form that has been partially filled in. A popular approach to this problem is to attach a rel="external" key/value attribute pair to the links to open in new windows and use JavaScript to create a new window when the link is clicked. However, one of the primary reasons for having the help open in a new window is because scripting is disabled.
There are also people who will want to click the link anyway because they're using screen readers that may not pick up the help that's generated dynamically. Again, we don't want to overwrite their half-filled form. For them, we could either decide to blow off the XHTML 1.0 Strict validation (tempting), or create the JavaScript to intercept the click and open the new window.
I can't tell you which is the best option, as only you can determine what's important for your applications and your clients. For now, I've extended the addingajax.js file to add the link interception routine based on the rel="external" attribute, which at least gives us this option. Example 4-5 shows the new library entries, including the window onload event handler to process the links.
Example 4-5. New library entries to provide an XHTML variation of the anchor target attribute
function externalLinks(  ) {
 var anchors = document.getElementsByTagName("a");
 for (var i=0; i<anchors.length; i++) {
   var anchor = anchors[i];
   if (anchor.getAttribute("href") &&
       anchor.getAttribute("rel") == "external")
     anchor.target = "_blank";
 }
}

aaManageEvent(window,'load',externalLinks);
Tip
A third option to the XHTML Strict and target problem is to extend the XHTML by creating a custom DTD. For discussion of this, see Wayne Burkett's weblog post, "Extending XHTML: Target and Strict," at http://dionidium.com/2004/05/xhtml-tests.
Though the page's static contents now validate, this approach does add invalid markup dynamically. A second way to code this function, one that bypasses the validation issue completely, is to use the following with each anchor:
aaManageEvent(anchor,'click',function(  ) {
      window.open(this.href);
      aaCancelEvent(event);
});
This code opens a new window without adding invalid markup statically or dynamically. This approach does require accessing the event object in order to process the cancel event method call.
While we're improving the application, we can add some frills to our help to make it seem a little more polished. We will change the background color and add a border. The stylesheet is moved into its own file, jit.css:
#help
{
    background-color: #FFFF8F;
    border: 1px solid #82887e;
    left: 300px;
    padding: 10px;
    position: absolute;
    top: 20px;
    visibility: hidden;
}
form
{
    margin: 20px;
        width: 500px;
}
input
{
    margin: 10px;
}
label
{
    cursor: help;
}
a
{
    text-decoration: none;
}
The JavaScript is also pulled into a separate file, jit.js. The new script, shown in Example 4-6, adds caching and event management on the labels. The JavaScript to show the help is split out into a separate function and called from both the XMLHttpRequest processing function, as well as the showHelp function—if the element's help is cached.
Example 4-6. The Just-In-Time form help using Ajax
var xmlhttp;
var helpItem;
var helpObj = new Object(  );

aaManageEvent(window,"load", function(  ) {
   var items = document.getElementsByTagName('label');
   for (var i = 0; i < items.length; i++) {
       aaManageEvent(items[i],"mouseover",showHelp);
       aaManageEvent(items[i],"mouseout",hideHelp);
   }
});

// retrieve the help info
function showHelp(evnt) {
  evnt = (evnt) ? evnt : window.event;
  // get XMLHttpRequest object if not set
  if (!xmlhttp) xmlhttp = aaGetXmlHttpRequest(  );
  if (!xmlhttp) return;

  helpItem = (evnt.currentTarget) ? evnt.currentTarget.id : evnt.srcElement.id;
  var qry = "item=" + helpItem;

  // if cached item, print existing and return
  if (helpObj[helpItem]) {
      printHelp(  );
      return;
  }

  // invoke help system
  var url = 'help.php?' + qry;
  xmlhttp.open('GET', url, true);
  xmlhttp.onreadystatechange = getHelp;
  xmlhttp.send(null);
}

// hide help field
function hideHelp(  ) {
   document.getElementById('help').style.visibility="hidden";
}

// display help field with help
function getHelp(  ) {
   if(xmlhttp.readyState == 4 && xmlhttp.status == 200) {
      helpObj[helpItem] = xmlhttp.responseText;
      printHelp(  );
   }
}
function printHelp(  ) {
  var help = document.getElementById('help');
  help.innerHTML = helpObj[helpItem];
  help.style.visibility="visible";
}
In the web page, the CSS and JavaScript files are linked in, and the form labels are wrapped in hypertext links with the individual help item attached to the URL for each, as shown in Example 4-7. The links also have an explicit title with clear information that clicking the links will open a second window, in addition to the rel="external" attribute/value.
Example 4-7. JIT help page—valid, accessible, and active
<!DOCTYPE html PUBLIC "-//W3C//DTD XHTML 1.0 Strict//EN"
    "http://www.w3.org/TR/xhtml1/DTD/xhtml1-strict.dtd">
<html xmlns="http://www.w3.org/1999/xhtml" lang="en" xml:lang="en">
<head>
<meta http-equiv="Content-Type" content="text/html; charset=utf-8" />
<title>Form Field Help</title>
<link rel="stylesheet" href="jit.css" type="text/css" media="screen" />
<script type="text/javascript" src="addingajax.js">
</script>
<script type="text/javascript" src="jit.js">
</script>
</head>
<body>

<form action="ch04-05.htm" method="post">
<fieldset>
<legend>Personal info
<a href="help.php?item=firstname" " title="opens help window for firstname field"
rel="external">
<label id="firstname" for="first">First Name:</label></a><br />
<input type="text" id="first" name="first" /><br />

<a href="help.php?item=lastname" accesskey="l" title="opens help window for
lastname field" rel="external">
<label id="lastname" for="last">Last Name:</label></a><br />
<input type="text" id="last" name="last" /><br />

<input type="submit" value="Save" />
</fieldset>
</form>

<div id="help">
</div>
</body>
</html>
Figure 4-1 shows the page with one of the help items displayed.
Lots of code for a simple effect, but the pieces are in place to make this into a library of JavaScript functions to provide JIT help for more than forms. JIT help is almost equivalent to another effect known as the tooltip. All that remains now is expanding the functionality to other objects and positioning the displayed material where the event occurs.
As I stated in the beginning of this chapter, if you've been out to the Netflix or Blockbuster Online sites, you've seen how moving the mouse over a movie-related link or image pops up information about the movie, as well as a link to add the movie to the queue. This is probably one of the best uses of tooltips I've seen. It quickly provides more detailed information about an object rather than forcing users to go to another page. This is especially advantageous if the site user is browsing through many items. Tooltips can be used for anything: a shop, getting more detailed information about a row of data returned from a database, camera information associated with a photo, and so on—anytime you want to provide information about an object within a browsing context.
The only modifications required to convert the JIT application in the prevous section into a tooltip is to provide a bubble-like background for the text and position it so that it's close to where the mouseover event occurs. Sounds simple, but it begins to add to the amount of code.
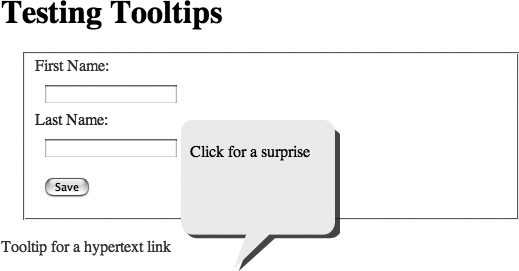
The following web page fragment is very similar to that shown in Example 4-7, with the addition of two more page elements: an h1 header and a standalone link. These are added to demonstrate that any page element can get a tooltip, not just form elements:
<body>

<h1 id="header">Testing Tooltips</h1>

<form action="ch04-08.xhtml" method="post">
<fieldset>
<legend>Personal info</legend>
<a href="help.php?item=firstname" accesskey="f" title="opens help window for
firstname field" rel="external">
<label id="firstname" for="first">First Name:</label></a><br />
<input type="text" id="first" name="first" /><br />

<a href="help.php?item=lastname" accesskey="l" title="opens help window for
lastname field" rel="external">
<label id="lastname" for="last">Last Name:</label></a><br />

<input type="text" id="last" name="last" /><br />

<input type="submit" value="Save" />
</fieldset>
</form>
<p><a href="" id="link">Tooltip for a hypertext link</a></p>
<div id="help">
</div>
</body>
In the stylesheet, the tooltip help block is set to a bubble background:
#help
{
    background-image: url(back.png);
    background-repeat: no-repeat;
    height: 200px;
    padding: 10px 0 0 10px;
    position: absolute;
    visibility: hidden;
    width: 150px;
}
The most significant change to the new application is in the JavaScript. For each element that has a tooltip, the mouseover event is captured in order to display the tip. The mouseout event is captured to then hide it. When the mouseover event fires, the mouse cursor position is captured so that the help element can be moved to approximately the same page location. Its position is also modified relevant to the bubble size, to put the pointed part of the "bubble" as close to the cursor position as possible. The only variation is with the top element. Since it's at the top of the page, the vertical position of the tooltip is adjusted so that the tip's top won't go beyond the page top.
Example 4-8 shows the new JavaScript file.
Example 4-8. Providing tooltips for form and other elements
var xmlhttp;                // global XMLHttpRequest obj
var helpItem;               // current help item
var helpObj = new Object(  ); // cached help items
var posX; var posY;

// setup tooltip event
function addTooltip(ttObj) {
   aaManageEvent(ttObj,"mouseover",showHelp);
   aaManageEvent(ttObj,"mouseout",hideHelp);
}

// attach tooltip events to objects
aaManageEvent(window,"load",function(  ) {
   var items = document.getElementsByTagName('label');
   for (var i = 0; i < items.length; i++) {
      addTooltip(items[i]);
   }

   addTooltip(document.getElementById('title'));
   addTooltip(document.getElementById('link'));
});
// get help from the server
function showHelp(evnt) {
  evnt = (evnt) ? evnt : window.event;

  // get position
  posX = evnt.clientX;
  posY = evnt.clientY;

  // get XMLHttpRequest object if not set
  if (!xmlhttp) xmlhttp = aaGetXmlHttpRequest(  );
  if (!xmlhttp) return;

  helpItem = (evnt.currentTarget) ? evnt.currentTarget.id : evnt.srcElement.id;
  var qry = "item=" + helpItem;

  // if cached item, print existing and return
  if (helpObj[helpItem]) {
      printHelp(  );
      return;
  }

  // invoke help system
  var url = 'help.php?' + qry;
  xmlhttp.open('GET', url, true);
  xmlhttp.onreadystatechange = getHelp;
  xmlhttp.send(null);
}


// hide help bubble
function hideHelp(  ) {
//I would suggest changing the class name instead of directly manipulating
style properties//
   document.getElementById('help').style.visibility="hidden";
}
// display help
function getHelp(  ) {
   if(xmlhttp.readyState == 4 && xmlhttp.status == 200) {
      helpObj[helpItem] = xmlhttp.responseText;
      printHelp(  );
   }
}

//position tooltip
function printHelp(  ) {
  var help = document.getElementById('help');
  help.innerHTML = helpObj[helpItem];
  y = posY - 130;
  if (y < 0) y = 10;

  help.style.top = y + "px";
  help.style.left = (posX + 10) + "px";
  help.style.visibility="visible";
}
View the tooltips in action in Figure 4-2.
Again, it seems a lot of code to create a simple effect, but it's also code that can be easily repackaged for use in a separate library. All you have to do is provide a way to create the tooltip object, passing in the location and content, and the tooltip object takes care of the rest. You could package more of the functionality, passing in just an element, and the tooltip object can take care of the event handling, though you'll most likely need to provide the content unless you embed the contents as elements in the page rather than pulling it in from a web service.
Tip
An even simpler approach is to use an existing tooltip library. One such library is Tooltip.js, which is based on Prototype and script.aculo.us. You can download the most recent version of the library at http://tooltip.crtx.org.
For effects such as those found on Netflix and Blockbuster, you'll need to provide an image that has a transparent background. The only way to do this is to use a transparent GIF or a PNG image, though the latter doesn't work that well with IE (not even with IE 7, which adds some odd color effects). You'll have to layer your effect, providing a header and footer image, and a separate body image that can repeat along the vertical axis so that it can be resized based on the length of the contents.
One other important item to remember when providing this type of functionality is that tooltips don't work if scripting is disabled. However, one workaround is to provide hypertext links around the element to open a separate page and use anchors for individual help items.
Get Adding Ajax now with the O’Reilly learning platform.
O’Reilly members experience books, live events, courses curated by job role, and more from O’Reilly and nearly 200 top publishers.

