Chapter 1. Query Construction
Select queries are an essential part of any database system. These queries, which passively gather data (without changing the source data), are what we rely on to answer our questions about our data. In its most basic form, a select query merely returns records from a table verbatim. That’s not of much interest, since viewing the table itself would provide the same information. It’s when you add criteria, joins, and useful SQL functions and methods that select queries become valuable.
This chapter provides several tips for getting select queries to go the extra mile. Recipes in this chapter explain how to prompt for criteria at runtime, how to use logic operators to get the criteria just the way you need them, and how to handle duplicate records.
To make queries easier to read and work with, you’ll also find a recipe on using aliases, which provides a neat method to give nicknames to your tables. Another recipe explains how to use union queries to work around the problem of how to combine data from different tables so it can be treated as one source.
Finding Unmatched Records
Problem
I have a table that lists expenses incurred by employees. Some of these records do not match any records in the Employees table. How can I easily get a list of these unmatched expense records without having to examine every record in the table?
Solution
A special type of join called a left join (see Creating a Left Join) is used to identify records in one table that do not have matches within another table. The match, of course, has to be tested on a common field between tables—usually the unique key field of the parent table. The technique depends on having the criterion call for the matching field to be Null in the parent table. In other words, the query should return records from the child table in which no record (a Null) is found in the parent table.
Confused? Luckily, you can spare yourself the challenge of creating that query by using the Find Unmatched Query Wizard. The wizard will create the underlying SQL and run the query for you.
Figure 1-1 shows two tables: one lists employees, and the other lists expenses for which employees need to be reimbursed.
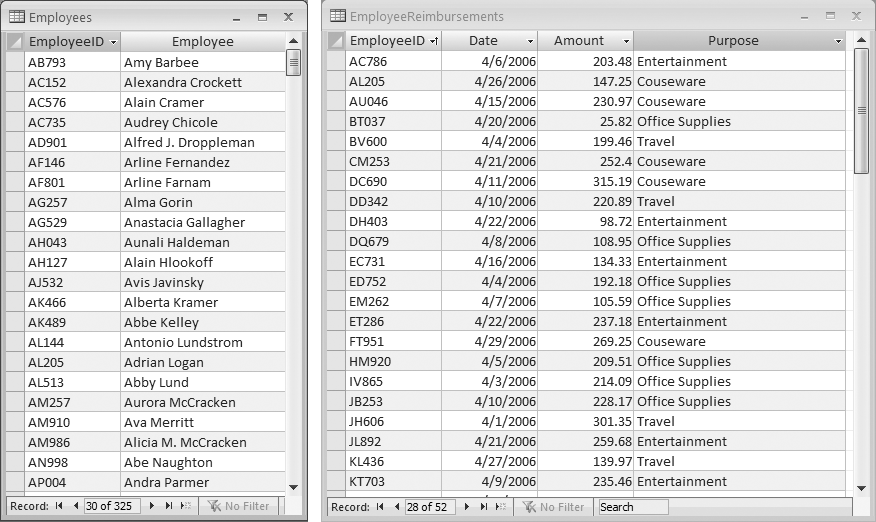
A number of records in the Employee Reimbursements table are “orphan” records— that is, they do not match any employee records in the table on the left (the parent table). The Find Unmatched Query Wizard will identify these records for you. From the Query tab in the Access database window, click the New button, or use the Insert → Query menu option to display the New Query dialog box shown in Figure 1-2. Select Find Unmatched Query Wizard, and click the OK button.
The wizard runs through a few screens. You’ll need to:
Select the table or query that contains the records you want to identify. In this example, the EmployeeReimbursements table contains the records of interest (that is, the records that have no matches to the employee records themselves).
Select the table that contains the records to match against.
From each table, select the field to match on. Often this is the key field in one table and a foreign key in the other table.
Select which fields from the table or query chosen in the first step should be included in the returned records.
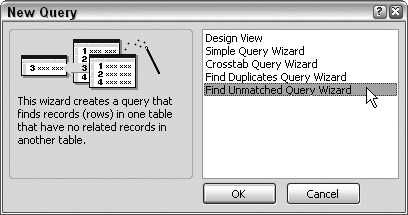
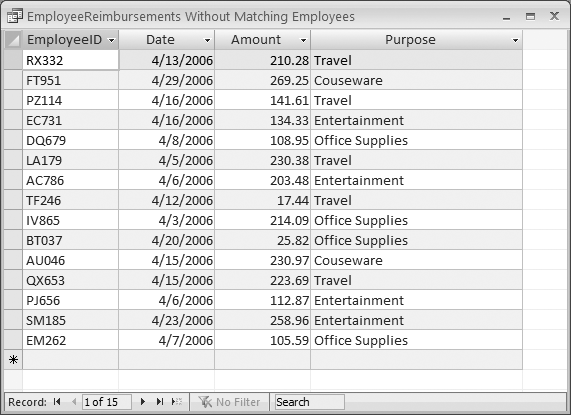
Figure 1-3 shows the returned records from the EmployeeReimbursements table that do not have matches in the Employees table, based on the EmployeeID field.
Discussion
The wizard assembled this SQL statement:
	SELECT EmployeeReimbursements.*
	FROM EmployeeReimbursementsLEFT JOIN
	Employees ON
	EmployeeReimbursements.EmployeeID =
	Employees.EmployeeID
	WHERE (((Employees.EmployeeID) Is Null));
The SQL looks for records that do not exist in the matching table (i.e., that return a Null). It is not possible to include any fields from the matching table because no records are returned from the matching table; all the returned fields are from the table in which unmatched records are expected.
See Also
Making AND and OR Do What You Expect
Problem
Logic operators are not conceptually difficult to follow, but combining and nesting them does add complexity. If you don’t construct complex SQL statements very carefully, they may return incorrect or incomplete results, sometimes without reporting any errors.
Solution
Logic operators provide the flexibility to construct criteria in any way that suits your requirements. The AND operator returns true when all conditions are met; the OR operator returns true as long as one condition is met. In terms of how this applies to SQL construction, OR is used to set criteria for which one condition must be met, while AND is used to set criteria for which all the conditions must be met. Some examples are presented in Table 1-1.
|
SQL statement |
Description |
SELECT DISTINCT State, City,
Count(LastName) AS Customers
FROM tblCustomers
GROUP BY State, City
HAVING State="NY" AND City="Yonkers"
|
This gives a count of customers located in Yonkers, NY. Only customer records in which both the state is New York and the city is Yonkers are counted. |
SELECT DISTINCT State, City,
Count(LastName) AS Customers
FROM tblCustomers
GROUP BY State, City
HAVING State="NY"AND City="Yonkers" OR
City="Albany"
|
This gives a count of customer records for which the state is New York and the city is either Yonkers or Albany. This produces an unintended result. The |
SELECT DISTINCT State, City,
Count(LastName) AS Customers
FROM tblCustomers
GROUP BY State, City
HAVING State="NY" AND (City="Yonkers" OR
City="Albany")
|
This correctly returns customer records for customers located only in Yonkers, NY and Albany, NY. Enclosing the cities and the |

Discussion
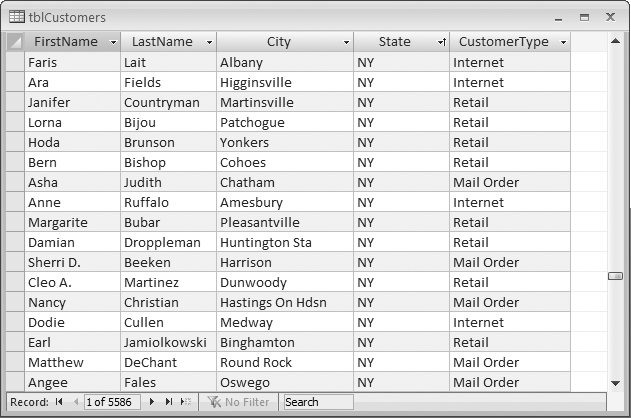
OR is applied amongst records; AND is applied across fields. What does this mean? Figure 1-5 shows the tblCustomers table that is used as the example in this recipe. The OR operation involves evaluating the value in a particular field in each record. A single record cannot contain both Albany and Yonkers in its City field; it can contain at most one of those values. So, searching for customers in Albany or Yonkers requires looking for these values in the City field of each record (or, in our example, at least those records in which the state is New York). Thought of another way, when using OR, you can apply the statement multiple times to the same field. For example:
City="Albany" OR City="Syracuse" Or City="Yonkers"
The AND operator, however, is not used on the same field. A SQL condition like this:
City="Albany" AND City="Yonkers"
would make no sense. No records can be returned because there cannot be any records in which the single City field holds two values. Instead, AND is applied to pull together the values of two or more fields, as in:
State="New York" AND City="Yonkers"
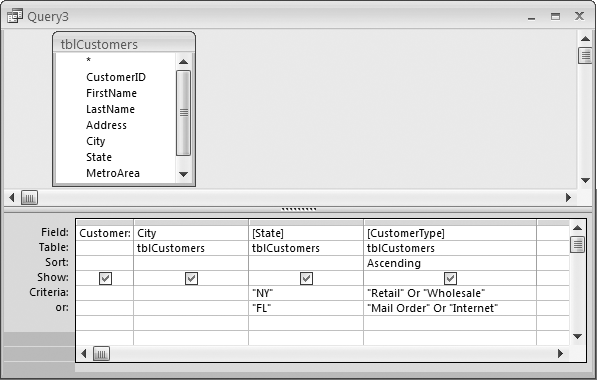
The query grid in Access is flexible enough to handle any combination of OR and AND operators. Figure 1-6 shows how the grid is used to return customer records from New York where the customer type is Retail or Wholesale, as well as customer records from Florida where the customer type is Internet or Mail Order. Internet and Mail Order customers from New York will not be returned, nor will Retail or Wholesale customers from Florida.
Along a single Criteria row, all of the conditions set in the different fields must be met (i.e., this is an AND operation). The SQL statement Access generates bears this out:
	SELECT [FirstName] & " " & [LastName] AS Customer,
	City, State, CustomerType
	FROM tblCustomers
	WHERE
	(((State)="NY") AND
	((CustomerType)="Retail" Or (CustomerType)="Wholesale"))
	OR
	(((State)="FL") AND
	((CustomerType)="Mail Order" Or (CustomerType)="Internet"))
	ORDER BY tblCustomers.CustomerType;
As you can see, the SQL condition for NY is followed by AND to get Retail and Wholesale customers from that state.
Working with Criteria Using the IN Operator
Problem
Using multiple OR operators in the query grid makes for an unmanageable experience. If too many values and ORs are placed in a grid column, the column may expand to be bigger than the viewable area.
Solution
A way to save space in the query grid is to use the IN operator. IN is used in conjunction with a list of values from which any value can be returned. This essentially means that the IN operator works in the same fashion as the OR operator. It is not required that all conditions be met; meeting one of the conditions suffices.
Here is a SQL statement that returns records for students that took at least one of the listed courses:
	SELECT Students.Student, Student_Grades.Course,
	Student_Grades.Instructor
	FROM Students INNER JOIN Student_Grades ON
	Students.StudentID = Student_Grades.StudentID
	WHERE
	(((Student_Grades.Course)="Beginner Access"))
	OR
	(((Student_Grades.Course)="Beginner Excel"))
	OR
	(((Student_Grades.Course)="Advanced Access"))
	OR
	(((Student_Grades.Course)="Advanced Excel"));
Using IN provides a more streamlined SQL statement. Notice how the WHERE section has shrunk:
	SELECT Students.Student, Student_Grades.Course,
	Student_Grades.Instructor
	FROM Students INNER JOIN Student_Grades ON
	Students.StudentID = Student_Grades.StudentID
	WHERE Student_Grades.Course In
	("Beginner Access","Beginner Excel",
	"Advanced Access","Advanced Excel");
Discussion
The IN operator provides a syntax convenience. It makes it easier to eyeball a set of criteria values to which OR logic is applied. Figure 1-7 shows an example of using IN to return records where the instructor is either Brown or Maxwell.
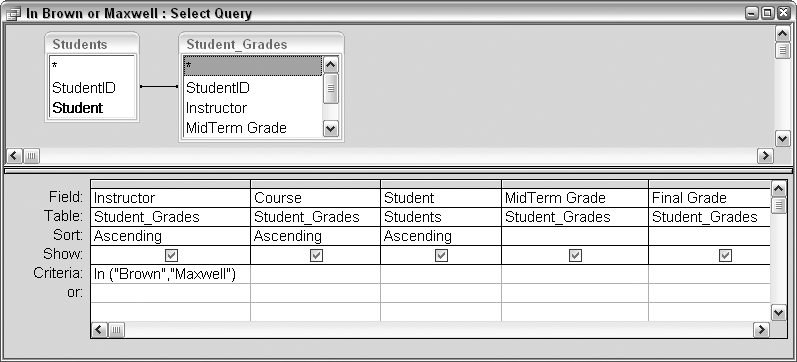
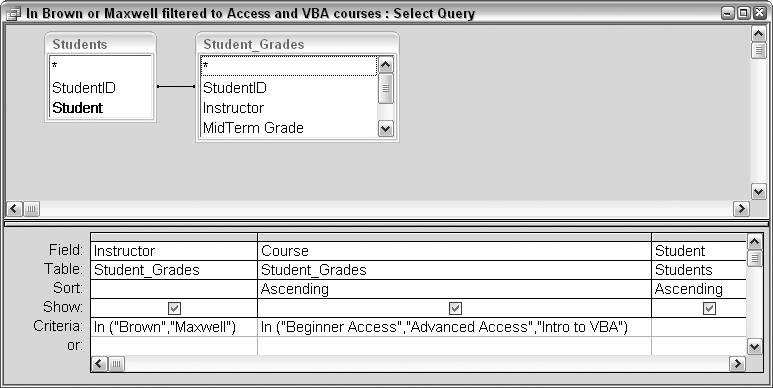
That’s simple enough to follow: when the instructor is either Brown or Maxwell, the record is returned. Figure 1-8 shows an example of using IN in two fields.
The example shown in Figure 1-8 returns records in which either Brown or Maxwell taught Beginner Access, Advanced Access, or Intro to VBA. In other words, all combinations of these instructors and courses are returned.
Adding criteria to other fields will further cut down the number of returned records. The next example adds new criteria to the row. The Instructor and Course fields still have IN operators, but now only records that have a MidTerm Grade and a Final Grade of 85 or better are returned. Here is the SQL statement for this query:
	SELECT Student_Grades.Instructor, Student_Grades.Course,
	Students.Student, Student_Grades.[MidTerm Grade],
	Student_Grades.[Final Grade]
	FROM Students INNER JOIN Student_Grades ON
	Students.StudentID = Student_Grades.StudentID
	WHERE (((Student_Grades.Instructor) In
	("Brown","Maxwell")) AND ((Student_Grades.Course) In
	("Beginner Access","Advanced Access","Intro to VBA")) AND
	((Student_Grades.[MidTerm Grade])>=85) AND
	((Student_Grades.[Final Grade])>=85))
	ORDER BY Student_Grades.Course, Students.Student;
The IN operator is handy when using subqueries. A subquery returns a set of records to which the rest of a query can apply further criteria. The following SQL statement returns information for those students who got a 90 or better in either Advanced Access or Advanced Excel and took either Beginner Access or Beginner Excel last year:
	SELECT Student_Grades.Instructor, Student_Grades.Course,
	Students.Student, Student_Grades.[MidTerm Grade],
	Student_Grades.[Final Grade]
	FROM Students INNER JOIN Student_Grades ON
	Students.StudentID = Student_Grades.StudentID
	WHERE (((Student_Grades.Course) In
	("Advanced Access","Advanced Excel")) AND
	((Student_Grades.[Final Grade])>=90) AND
	((Students.StudentID) In
	(Select Stud_ID From LastYear Where
	(Course="Beginner Access") Or (Course="Beginner Excel"))))
	ORDER BY Student_Grades.Course, Students.Student;
The IN operator is applied to the LastYear table through a subquery. Here is the portion of the SQL that does this:
	((Students.StudentID) In
	(Select Stud_ID From LastYear Where
	(Course="Beginner Access") Or (Course="Beginner Excel"))))
The Select statement within the larger SQL statement is where the subquery starts. The subquery returns StudentIDs that have matches in the LastYear table (on the Stud_ID field) for those students who took Beginner Access or Beginner Excel.
Excluding Records with the NOT Operator
Problem
I have a large number of client names in my data. I need to return a list of clients that are not on the Hold list. Most clients are OK, so most will be returned in the query. How do I keep out the few clients who are on hold?
Solution
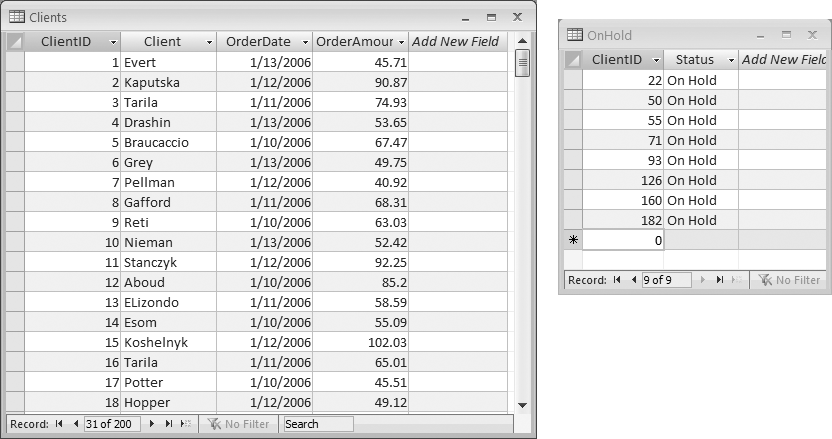
The method here is to exclude records from being returned, rather than the typical approach of identifying records that are to be returned. Figure 1-9 shows two data-base tables. The table on the left is a list of client orders. The table on the right is a list of clients (by ClientID) who are “on hold”—that is, clients whose accounts are in arrears and whose orders should not be shipped. Running a query that causes the clients identified in the OnHold table to be excluded from the Clients table is the key to this recipe.
A subquery works well here to gather the records from the second table into the query result. Using the NOT operator provides the twist to make the records excluded instead of included.
The NOT operator is placed in front of the subquery to reverse the logic. If NOT were left out, the query would return records that match in both tables. When NOT is applied, only those records from the Clients table that do not have matching records in the OnHold table are returned. Here is the SQL statement:
	SELECT Clients.ClientID, Clients.Client,
	Clients.OrderDate, Clients.OrderAmount
	FROM Clients
	WHERE (((Clients.ClientID)
	NOT In (Select ClientID from OnHold)));
Discussion
NOT is a logic operator that reverses a Boolean state, so NOT true equals false, and NOT false equals true. When a query calls for matching criteria, preceding the criteria construct with NOT flips this around and calls for records that specifically do not match the criteria.
Our sample Clients table has 200 records, and the OnHold table has 8 records. The result is that the query returns 192 records—that is, all orders for clients who are not on hold.
Parameterizing a Query
Problem
I need to construct a query that takes a criterion, but the criterion’s value will not be known until the query is run. When it’s time to run the query, the user needs a way to supply the criterion without going into the design of the query.
Solution
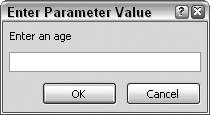
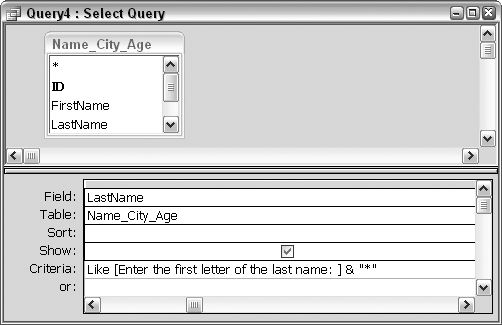
A query can be designed to accept parameters at the time it is run. Typically, an input box will appear in which the user enters the value for the criterion. A query can have any number of criteria entered in this fashion. A set of brackets defines the question asked in the input box. The brackets and the prompt to the user are placed in the Criteria row of the query grid for the given field. For example, using "[Enter an age]” as the criterion for a field instructs Access to present this prompt in a dialog box, as shown in Figure 1-10.
Discussion
When a query is run, a traditional form is often displayed to enable users to enter parameter values or make selections from a list. But the ability to place parameters directly in the structure of a query provides a great alternative to having to build a form that gathers input. When the criteria are simple, just using brackets in the query design will suffice.
Figure 1-11 shows the query design that prompts the user to enter an age. When the query is run, the dialog shown in Figure 1-10 will appear, and the returned records will be filtered to those that match the entered value.
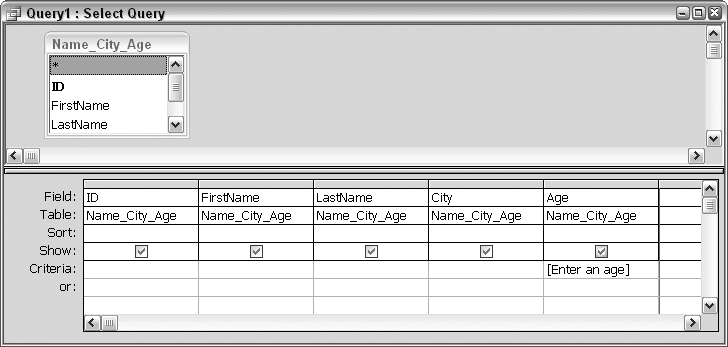
Here is the actual SQL statement that is built using the query grid:
	SELECT Name_City_Age.ID, Name_City_Age.FirstName,
	Name_City_Age.LastName, Name_City_Age.City,
	Name_City_Age.Age
	FROM Name_City_Age
	WHERE (((Name_City_Age.Age)=[Enter an age]));
Note that in the WHERE clause the phrase “Enter an age” appears enclosed in brackets.
Tip
Although the phrase “Enter an age” is used here to define the criterion for a field named Age, there is no strict requirement to use the word “age” in the bracketed phrase. We could just as well have used “Enter a number”; it wouldn’t matter because the text in the brackets does not have to contain the name of the field for which it is used.
A query can have multiple parameters, and these parameters fit in with the structure of the SQL WHERE clause. A common criterion structure is to use a range of values to determine which records to return. In the current example, a query might need to return all records that fit within a range of ages. The Between/And SQL construct is used for this purpose. Figure 1-12 shows the modification in the query design.
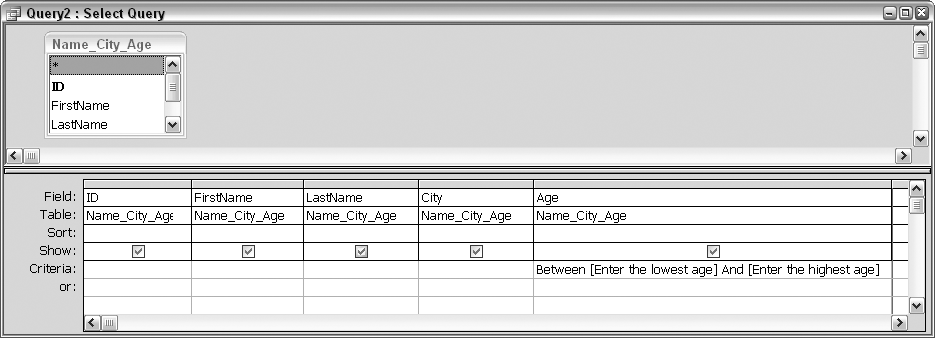
Here’s the updated SQL:
	SELECT Name_City_Age.ID, Name_City_Age.FirstName,
	Name_City_Age.LastName, Name_City_Age.City,
	Name_City_Age.Age
	FROM Name_City_Age
	WHERE (((Name_City_Age.Age) Between
	[Enter the lowest age] And
	[Enter the highest age]));
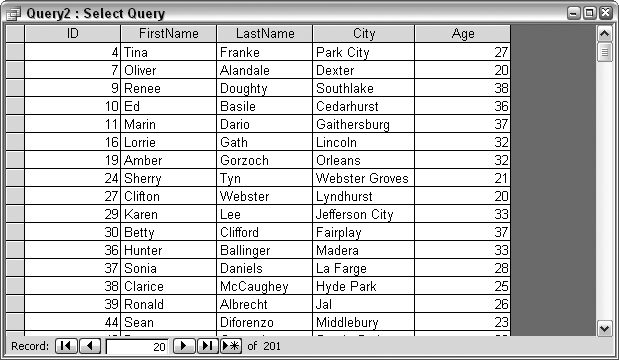
When this query is run, two prompts will appear: one asks for the lowest age, and the other asks for the highest age. Figure 1-13 shows a sample of returned records when the range was defined as between the ages of 20 and 40.
The SQL Like operator can also be used with a bracketed prompt. Like is used with a wildcard to return records in which the criterion fits a pattern. For example, in a query that returns all those whose last names start with the letter D, the WHERE portion of the SQL statement looks like this:
WHERE (((LastName) Like "D*"));
Using the Like operator with a parameter prompt requires the brackets, of course, and careful placement of the wildcard character (*) and the quotation marks, as follows:
	WHERE (((LastName) Like
	[Enter the first letter of the last name: ] & "*"));
Figure 1-14 shows how this is entered in the query grid.
To return a smaller set of results, you can match on a more complex pattern; for example, the user can enter “De” to have names such as Deere returned, but not names such as Dole. In this case, you’ll need to adjust the phrasing of the prompt accordingly. Phrasing prompts correctly is as much art as it is SQL.
The example here uses an asterisk wildcard. Any number of characters can be returned in place of that wildcard, but the character(s)entered as the parameter are what fine-tunes the record filtering.
Specifying a data type for the parameter
In certain situations, you must indicate the data type of the parameter. You do this when:
Parameter data types are entered in the Query Parameters dialog (see Figure 1-15).
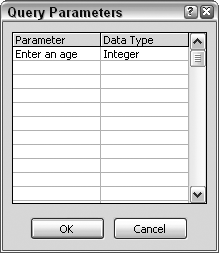
To display the dialog, select the Query → Parameters menu option. In the left side of the dialog, enter the prompts that you’ve established in the design grid. Then select the data types in the right side of the dialog.
Returning a Top or Bottom Number of Records
Problem
I have a large table of data that contains thousands of records and several dozen fields. I create models based on various fields and/or ranges of values in the fields. I use queries to set up the sums using SQL aggregates and expressions. This is exactly what I need, but the problem is that the number of records slows down the processing. When I’m testing calculations, I don’t need all the records. How can I pull out just a handful of them to use for testing?
Solution
The SQL TOP predicate is just what is called for here. It lets you specify how many records to return, either as an exact number or as a percentage of the total number of records in the underlying table or query.
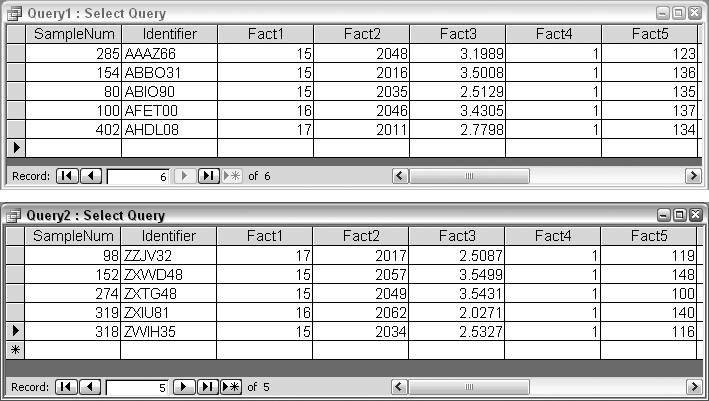
Let’s say you have a standard select query such as the one shown in Figure 1-16. The SQL statement is:
	SELECT SampleNum, Identifier, Fact1, Fact2,
	Fact3, Fact4, Fact5, Fact6, Fact7, Fact8
	FROM ConsumerTrendData;

To specify a subset of records to search through to test the query—say, 40—use the TOP predicate, as follows:
	SELECT TOP 40 SampleNum, Identifier, Fact1,
	Fact2, Fact3, Fact4, Fact5, Fact6,
	Fact7, Fact8
	FROM ConsumerTrendData;
TOP comes directly after the SELECT keyword, and is followed by the number of records to return. Instead of reducing the number of returned records based on criteria, TOP reduces the number of returned records without any bias.
When working with the Access query grid, you can opt to use TOP by going into the query properties. To do this, use the View → Properties menu option while designing the query. The properties sheet that opens may display the properties for a field. If this is the case, click on the top pane of the query designer (above the grid)but not on any tables—in other words, click on the empty area. This will ensure that the properties sheet displays the query properties (see Figure 1-17).
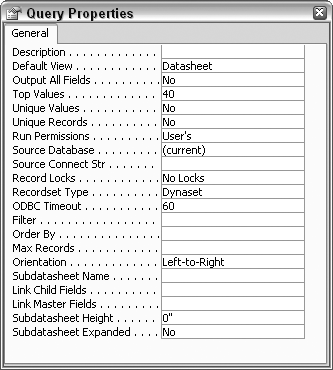
One of the properties is Top Values. In Figure 1-17, you can see that the value of 40 is already entered.
Discussion
To return a percentage of the records, you can place a percent sign (%) after the entered number in the Top Values property on the properties sheet, or you can enter the word PERCENT directly in the SQL statement. Here, for example, is the SQL to return the top 20 percent of the records:
	SELECT TOP 20 PERCENT SampleNum, Identifier,
	Fact1, Fact2, Fact3, Fact4, Fact5,
	Fact6, Fact7, Fact8
	FROM ConsumerTrendData;
Using TOP to return the “top” X number of records begs the question of what makes the hierarchy of records in a table. Only the application of an index or sort provides any structure to the records. We often use AutoNumber fields, which order the records. But what happens when we sort on another field? The “top” records change.
Using the TOP predicate requires that the use of a sort, or lack thereof, always be considered. Here is an example of returning the top five records of a sorted table:
	SELECT TOP 5 SampleNum, Identifier, Fact1,
	Fact2, Fact3, Fact4, Fact5, Fact6,
	Fact7, Fact8
	FROM ConsumerTrendDataORDER BY Identifier;
Now that we’ve sorted the data in ascending order (the default sort direction)with the ORDER BY clause, asking for the top five records has some relevance. Turning this upside down would provide the bottom five records. But how could we do that? There is no “bottom” predicate. Instead, we simply change the sort to descending using the DESC keyword:
	SELECT TOP 5 SampleNum, Identifier, Fact1,
	Fact2, Fact3, Fact4, Fact5, Fact6,
	Fact7, Fact8
	FROM ConsumerTrendData
	ORDER BY Identifier DESC;
This example requests a descending sort on the Identifier field. Requesting the top five records will now return what were the bottom five records when we did an ascending sort. Figure 1-18 shows the results of running these two queries. The sort on the Identifier field is ascending in one query and descending in the other.
Returning Distinct Records
Problem
When running select queries, you may need to control whether duplicate records are returned in the query result. However, there could be disagreement about what constitutes uniqueness and duplication. Often, a few fields may contain duplicate information among records, and it’s the additional fields that bring unique values to the records. How can queries be managed with regard to controlling how duplicate information is handled?
Solution
Figure 1-19 shows a table in which there are records that are near duplicates. None are exact duplicates since the CustomerID field ensures uniqueness. However, the two records for Vickie Storm could be seen as duplicates, as all fields except the CustomerID field hold duplicate information. The records for Ebony Pickett also contain some duplicate information, although two different cities are listed.
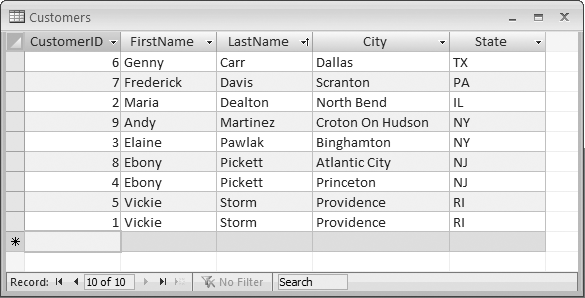
SQL provides ways of handling how records such as these are returned or excluded when select queries are run. Access makes use of the SQL predicates Distinct and DistinctRow:
-
Distinct Bearing in mind that not all fields need to be included in a select query,
Distinctwill exclude duplicates when the duplication occurs within just the selected fields, regardless of whether the complete set of record fields would prove the records to be unique.-
DistinctRow DistinctRowis used to manage duplicates in a query that joins tables. Assuming unique records in the parent table,DistinctRowlets you avoid having duplicates returned from the child table.
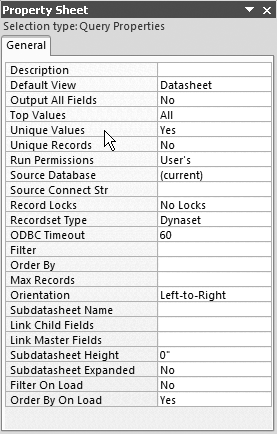
You can incorporate these predicates by using the query designer or writing them directly into the SQL statement. With a query in design mode, use the View → Properties menu option to display the Query Properties dialog box, shown in Figure 1-20. Two properties are of interest here: Unique Values and Unique Records. These can both be set to No, but only one at a time can be set to Yes.
Setting Unique Values to Yes places the DISTINCT predicate in the SQL statement. For example:
	SELECT DISTINCT Customers.FirstName,
	Customers.LastName, Customers.Address,
	Customers.City, Customers.State
	FROM Customers;
Similarly, setting the Unique Records property to Yes places the DISTINCTROW predicate just after the SELECT keyword.
Discussion
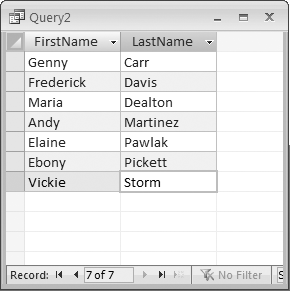
For our sample table, a simple select query of the Customers table on just the FirstName and LastName fields would return nine records, without regard to the fact that the returned results would show two records for Ebony Pickett and two records for Vickie Storm. Using Distinct in the SQL statement will change the returned count to seven records. In particular, this SQL statement:
	Select Distinct FirstName, LastName From Customers
	Order By LastName
produces the result shown in Figure 1-21.
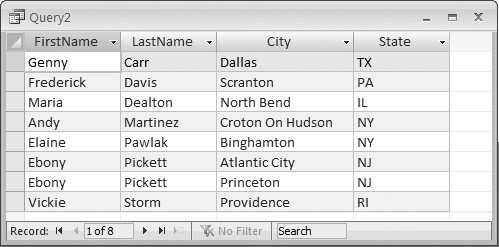
When the City and State fields are added to the SQL statement, like this:
	Select Distinct FirstName, LastName, City, State
	From Customers
	Order By LastName
eight records are returned (see Figure 1-22). The additional record appears because Ebony Pickett is listed in two unique cities. As far as the query goes, there are now two unique Ebony Pickett records, and they are both returned. Vickie Storm still has just one record returned, however, because the source data for her city and state are identical in both of her records.
Using DistinctRow
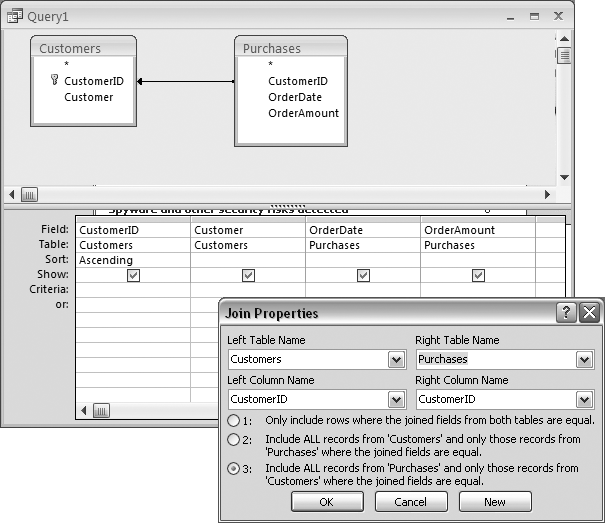
Now, let’s take a closer look at using DistinctRow, which manages duplicates in multitable joins. Figure 1-23 shows two tables: a Customers table (this table does not contain any duplicates) and a table of purchases related back to the customers.
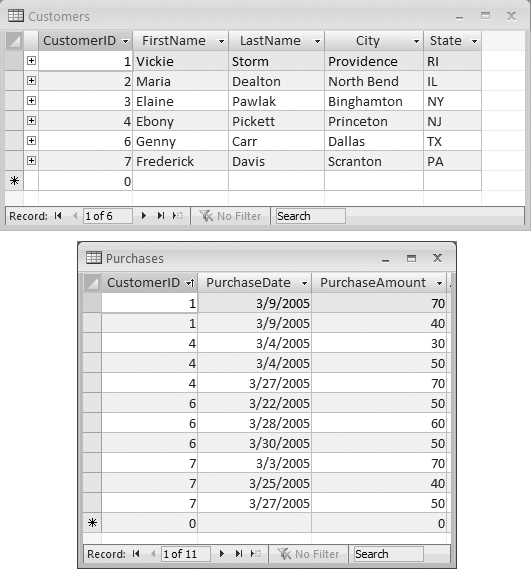
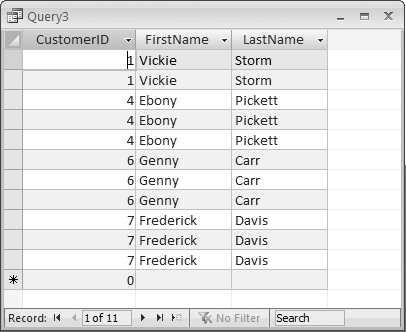
Say you want to find out which customers have placed orders. A SQL statement that joins the tables but does not use DistinctRow will return a row count equivalent to the number of records in the child (Purchases)table. Here is a simple SQL statement that returns the names of the customers who placed each of the orders:
	SELECT Customers.CustomerID, Customers.FirstName,
	Customers.LastName
	FROM Customers INNER JOIN Purchases ON
	Customers.CustomerID = Purchases.CustomerID;
The result of running this query is shown in Figure 1-24. No fields from the Purchases table have been included, but the effect of the multiple child records is seen in the output—a customer name is listed for each purchase.
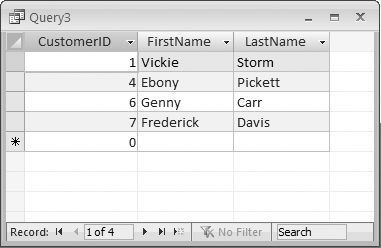
Adding the DistinctRow predicate ensures that the returned master records are free of duplicates:
	SELECT DistinctRow Customers.CustomerID,
	Customers.FirstName, Customers.LastName
	FROM Customers INNER JOIN Purchases ON
	Customers.CustomerID = Purchases.CustomerID;
The result is shown in Figure 1-25.
Returning Random Records
Problem
For efficient analysis work, I need to pull random records out of my source table. Each time I run a query, I’d like to have the records returned in an unknown order.
Solution
The technique to apply here is to sort the records on a random value using the Rnd function. Figure 1-26 shows a table with three fields. To return the records in a random order, pass the name of one of the fields as the argument to the Rnd function in the ORDER BY clause of the SQL statement.
For example, using the Temperature field, the SQL statement necessary to return the records in random order is:
	SELECT Samples.Location, Samples.Temperature, Samples.Date
	FROM Samples
	ORDER BY Rnd(Samples.Temperature);
Figure 1-27 shows the result of running the query. Bear in mind that each time the query is run, the records will be returned in a different order.
Discussion
Using the Rnd function on one field while performing an ascending or descending sort on another field provides an interesting, sometimes useful result. For example, this SQL statement performs sorts on two fields (one ascending and one random):
	SELECT Samples.Location, Samples.Temperature,
	Samples.Date
	FROM Samples
	ORDER BY Samples.Location, Rnd(Samples.Temperature);
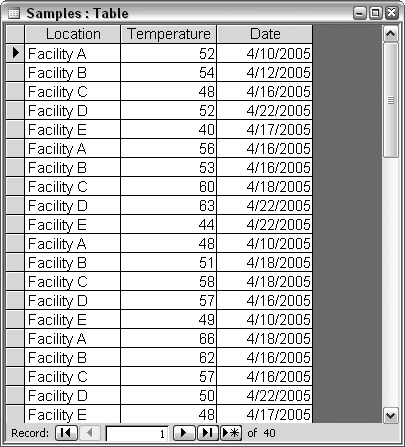
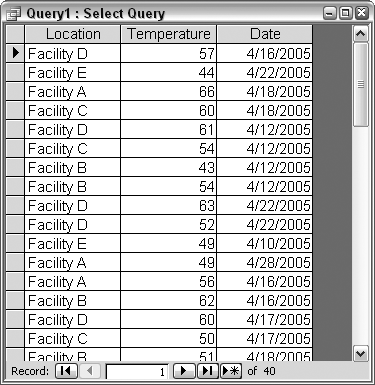
Figure 1-28 shows the result of running this query. An ascending sort is done on the Location field, so Facility A records float to the top. However, the temperatures are sorted randomly. Thus, each time this query is run, all the Facility A records will be on top, but the Facility A records will be randomly sorted based on the way the Temperature field is handled.

Fine-Tuning Data Filtering with Subqueries
Problem
I need to determine which records in a table have above-average values for a particular quantitative field. How can I calculate the average and filter the records in one query?
Solution
The AVG aggregate function calculates the average value of a field across the records included in a query. While that is a straightforward operation, comparing the value in each record to the average presents a challenge. One way to do this is to use a subquery. A subquery is literally a query within a query, typically located within the WHERE section of the main query.
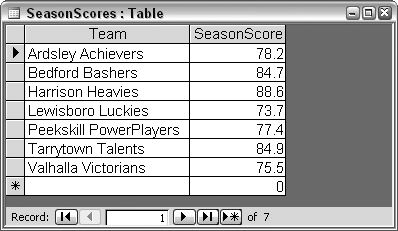
Figure 1-29 shows a table of teams and their scores for the season. The task is to identify which teams have a season score that is greater than the average of all the scores.
A little finesse with SQL is required to identify the teams that beat the average. The AVG aggregate function (see Finding the Sum or Average in a Set of Data)is needed, but it is not applied in the typical way in the query grid. unmatched_Figure 1-30 shows how the query is entered into the query grid. Select View → Totals while designing the query to display the Total row in the grid. Then, create an additional column in the grid based on the SeasonScore field. Don’t select AVG in the Total row; instead, select Where from the drop-down list, and enter the subquery in the Criteria row.
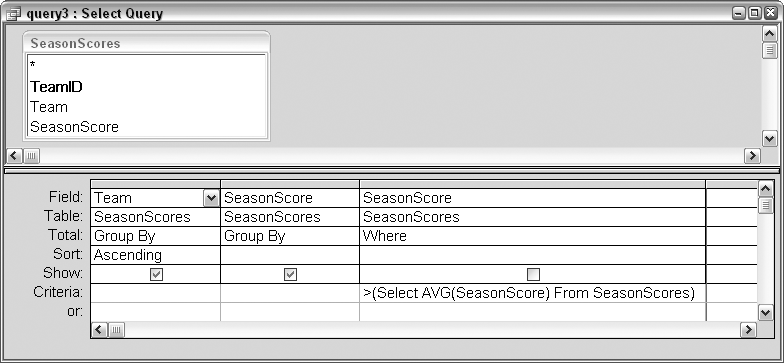
In this example, the greater-than sign (>) precedes the subquery, since we are looking for scores that are greater than the average. The AVG function appears in the subquery itself, which has the following syntax:
Select AVG(SeasonScore) From SeasonScores
Here’s the full SQL statement:
	SELECT Team, SeasonScore
	FROM SeasonScores
	WHERE (((SeasonScore)>
	(Select AVG(SeasonScore) From SeasonScores)))
	GROUP BY Team, SeasonScore
	ORDER BY Team;
Discussion
In the preceding example, the subquery resides in the WHERE section of the outer query. An alternative is to have the subquery act as one of the fields in the outer query’s SELECT section. Figure 1-31 shows two tables and a query. On the left is the SeasonScores table presented earlier. On the right is a related child table that lists game dates and locations for each team in the first table. The query, whose result is shown underneath the tables, has returned the date of the last game played by each team.
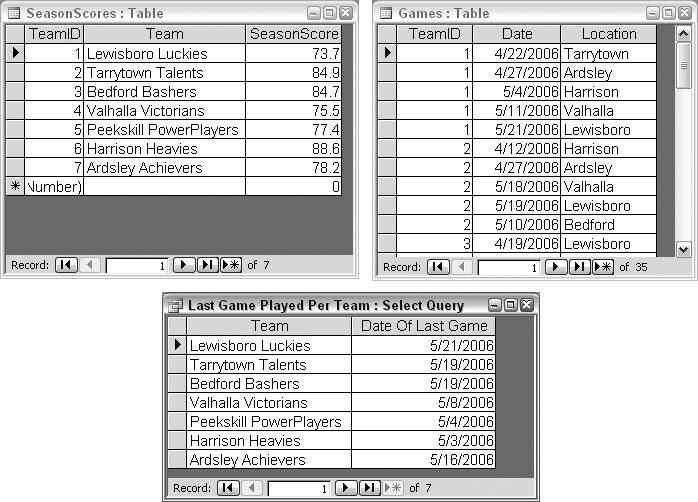
Here is the SQL statement of the Last Game Played Per Team query in Figure 1-31:
	SELECT SeasonScores.Team,
	(Select Max(Date) From Games Where
	Games.TeamID = SeasonScores.TeamID)
	AS [Date Of Last Game]
	FROM SeasonScores;
The subquery is placed where a field would typically go. It is encased in parentheses and is given an alias for the field name (Date Of Last Game) outside of the subquery. Within the subquery is the join between the two tables.
Tip
There are other ways to return the same information, using different query constructs—for example, the tables could be joined and a Max of Date could be used. Working it in as a subquery serves here to illustrate a new method.
Removing excessive queries
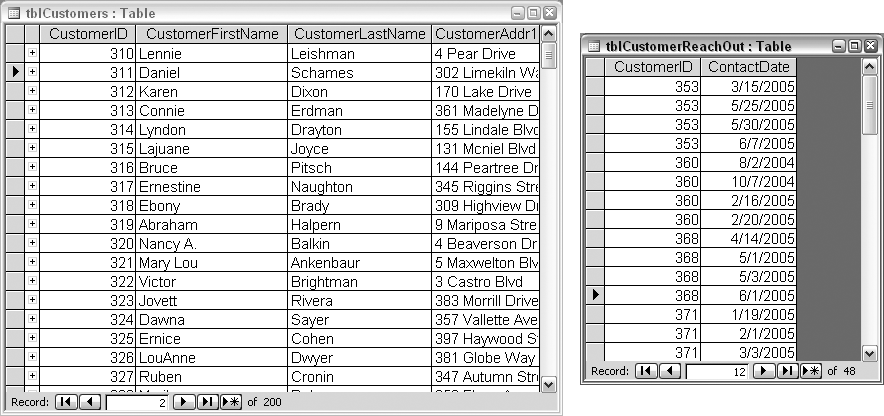
One of the advantages of using subqueries is the avoidance of nested queries. Let’s look at an example. Say you have two tables: tblCustomers, which contains customer names; and tblCustomerReachOut, which contains the dates at which customers were contacted. The CustomerID field is present in both tables, as shown in Figure 1-32. Now, consider the task of gathering a list of customers who have not been contacted in more than 60 days.
Let’s look at a common approach to extracting the desired information. First, a query is constructed that returns—from the table of contact dates—records in which the last contact date is more than 60 days from the present date, as shown in Figure 1-33.
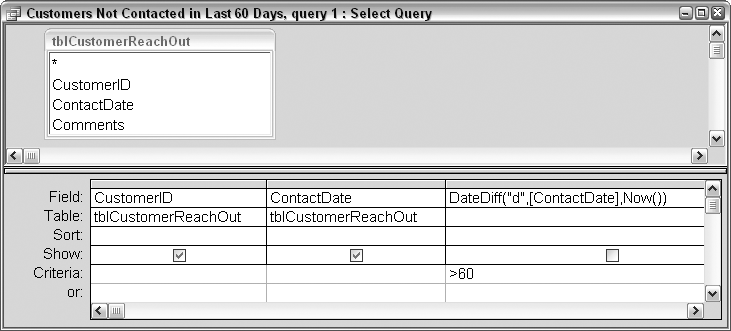
The query in Figure 1-33 is then queried from another query. This next query effectively takes the records from the first query and matches them with customer names from the tblCustomers table. This second query is shown in Figure 1-34.
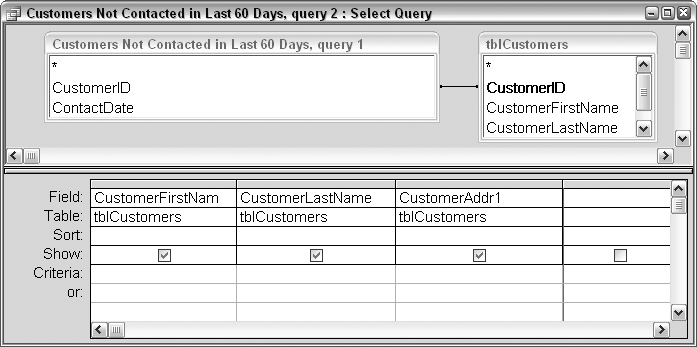
To summarize, two queries have been constructed, though one would do the trick. When this inefficient design is perpetuated repeatedly in a database, the database can become laden with dozens of queries that seem isolated on the surface. When viewing a list of all the queries in a database (on the Queries tab), there is no immediate method to know which queries are called by others. Nested queries do work, but they’re often unnecessary.
In contrast to the approach just described, here is the SQL of a query/subquery construction that returns the same records:
	SELECTDISTINCT tblCustomers.CustomerFirstName,
	tblCustomers.CustomerLastName, tblCustomers.CustomerAddr1
	FROM tblCustomers
	WHERE (((tblCustomers.CustomerID)
	In (Select tblCustomerReachOut.CustomerID FROM tblCustomerReachOut
	WHERE DateDiff("d",[ContactDate],Now())>60)));
This SQL statement uses a subquery to return the CustomerIDs from the tblCustomerReachOut table for customers who were last contacted more than 60 days earlier (the DateDiff function is used to calculate the elapsed time). The returned CustomerIDs are matched with related records in the tblCustomers table, thereby returning the customer names. Note that the SQL statement uses the DISTINCT predicate (discussed in Returning Distinct Records), as the returned records from the tblCustomerReachOut table can include duplicate CustomerIDs. This makes sense because customers are likely to be contacted more than once. Using the DISTINCT predicate ensures that the final returned list of names will not contain duplicates.
Combining Data with Union Queries
Problem
I need to combine sets of data so I can run analyses on them. The sets of data are identical but sit in different tables. There’s no way to combine the data in the query grid. I could use append queries to copy data from the various tables to a master table, but this is inefficient. The data in the smaller tables changes from time to time, and having to rerun the appends is a nuisance. Isn’t there a way to simply combine the data at any time as needed, so the latest data in the smaller tables is always present?
Solution
A union query is the perfect vehicle for combining identically structured data. To create a union query, place Union SQL clauses between the Select statements that query the tables.
Figure 1-35 shows three tables with an identical structure. Let’s take a look at how to combine the data from these three tables.
Union queries must be written in the SQL pane of the query designer. It is not possible to represent them in the query grid. Here’s a SQL statement written in the SQL pane of the query designer:
	SELECT * From SeasonScores_Putnam
	Union
	SELECT * From SeasonScores_Rockland
	Union
	SELECT * From SeasonScores_Westchester;

Running the query returns a single set of data, shown in Figure 1-36.
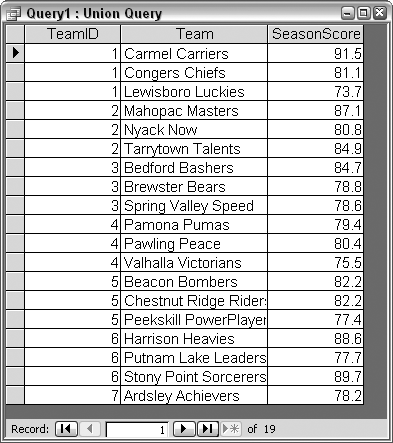
All the records from the three tables are now together in one place. This query can be saved and then used as the source for other queries and further analysis. For example, this saved query can be used in a query that calculates an average or some other summarization. If and when any data changes back in the source tables, the new data will flow through to the output of this union query, as each time it is rerun, it uses the latest data from the source tables.
Discussion
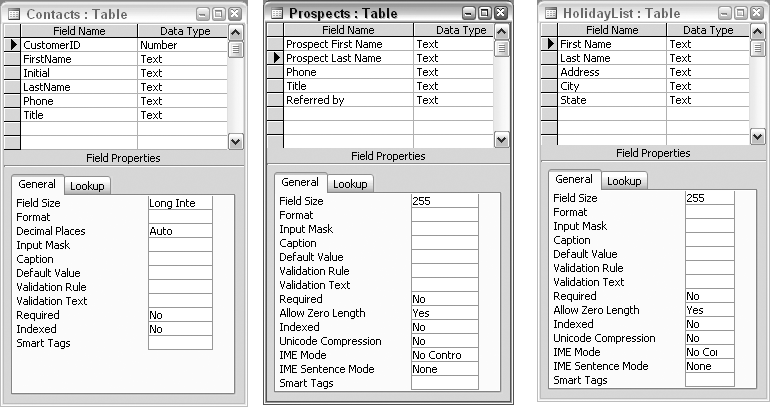
A hard-and-fast rule is that all the selects feeding into a union query must have the same number of fields. In the previous example, this was a given because the three source tables were identical in structure. However, imagine assembling a list of names from various data tables, such as a Contacts table, a Prospects table, and a HolidayList table.
Figure 1-37 shows the design of these three tables. Each table has a field for a first name and a last name, although the fields are not named exactly the same. Also note that the number of fields is not consistent among all the tables. To avoid this being an issue, you must specify actual field names in the Select statements and ensure that you specify the same number of fields from each table.
A union SQL statement that will combine the first and last names from these tables can be written like this:
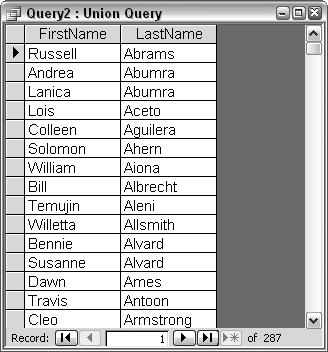
	SELECT FirstName, LastName From Contacts;
	Union
	Select [First Name], [Last Name] From HolidayList
	Union
	Select [Prospect First Name], [Prospect Last Name]
	From Prospects
	Order By LastName, FirstName
The result of the query is shown in Figure 1-38. The field names presented in the query (FirstName and LastName) are taken from the first Select statement.
While each source table on its own may be free of duplicates, it is possible that some duplicates will occur in the combined output. For example, the same person might be in the Contacts table and the Prospects table. SQL provides a way to handle duplicates that appear when union queries are run.
By default, a union query will drop duplicates. If you want to include them in the result, you’ll need to use the Union All construct, as shown here:
	SELECT FirstName, LastName From Contacts;
	Union All
	Select [First Name], [Last Name] From HolidayList
	Union All
	Select [Prospect First Name], [Prospect Last Name]
	From Prospects
	Order By LastName, FirstName
Including the All keyword forces duplicates to be preserved in the query result.
Inserting On-the-Fly Fields in Select Queries
Problem
I need to include additional information in a query’s output. The information is sometimes based on the fields in the query, but at other times, it just needs to be inserted as a fixed message. How can I do this?
Solution
In the Field row of the Access query design grid, you can enter a name that will appear in the output as a field name, as any standard field name would. Follow this with a colon (:)and the value that will go into the new field, and you have created a new output field that exists only during the run of the query. This field is not saved back into any source tables. The value that goes into the new field can be dependent on other fields in the query, or it can be completely independent.
Figure 1-39 shows a table of clients and balances due.
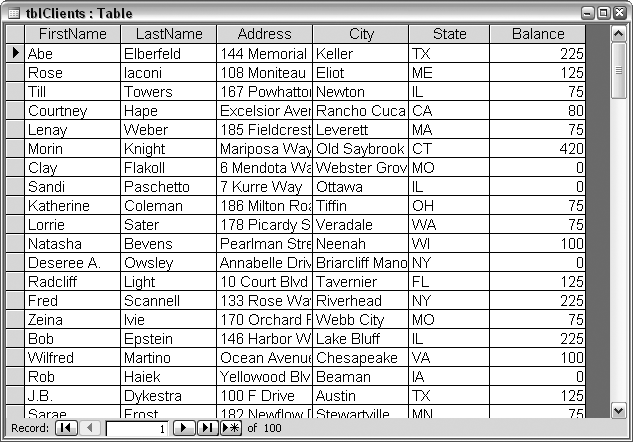
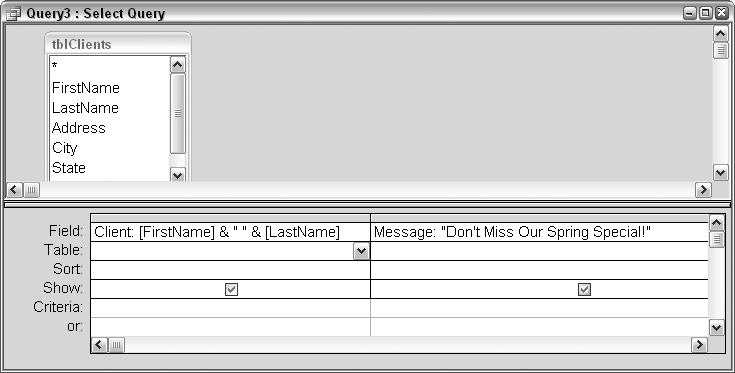
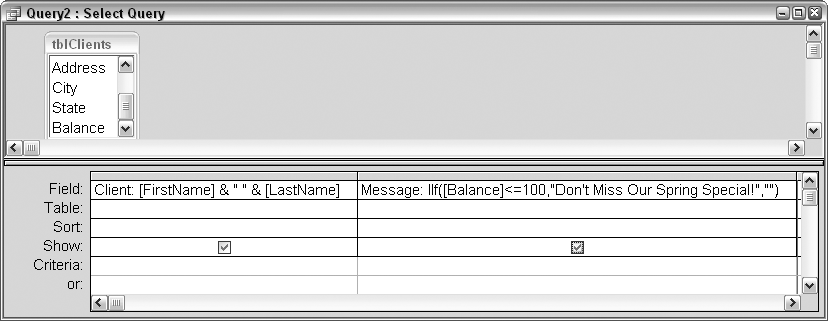
Figure 1-40 shows a query based on the table. In the query are two created fields that do not actually exist in the table. The first is named Client. The value for the Client field comes from a concatenation of the FirstName and LastName table fields.
Another new field—Message—provides a fixed string when the query is run. The Message field is populated with an expression that has nothing to do with any table fields.
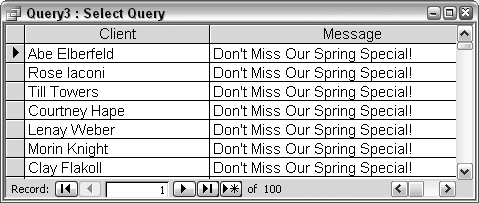
As shown in Figure 1-41, the query result contains two fields that list the clients’ full names and the fixed message.
Discussion
Using expression-based fields in queries provides ways to treat records with some intelligence. A useful example involves using an expression to return a message for certain records based on the value of a table field. Figure 1-42 shows how the IIf function is incorporated into our derived Message field. Now, the message about the Spring Special will appear only in records that have a balance of 100 or less.
Here is the SQL statement for the query in Figure 1-42:
	SELECT [FirstName] & " " & [LastName] AS Client,
	IIf([Balance]<=100,"Don't Miss Our Spring Special!","")
	AS MessageFROM tblClients;
When you run this query, you’ll find that clients with balances over 100 do not have the message written into their records. What is the point of this? This technique may be useful in a mail merge, for example. When creating letters or statements to clients, you may wish to advertise the Spring Special to just those customers with a low balance or a balance of zero.
Using Aliases to Simplify Your SQL Statements
Problem
Table names precede field names in SQL statements, so queries that use multiple fields and tables wind up being very long. Is there a way to use shortcut identifiers instead for the table names?
Solution
Yes, there is! In a SQL statement, any table name can be given an alias. The place to do this is after the FROM keyword, where the table name is entered. Follow the table name with an alias of your choosing (make sure it is not a reserved word, an existing field name, etc.). Then, use the alias instead of the table name in the other areas of the SQL statement. Let’s look at an example.
Using the Access query grid to assemble the query results in this SQL statement that addresses a single table:
	SELECT tblCustomers.CustomerCompanyName,
	tblCustomers.CustomerFirstName,
	tblCustomers.CustomerLastName,
	tblCustomers.CustomerAddr1,
	tblCustomers.CustomerAddr2,
	tblCustomers.CustomerCity,
	tblCustomers.CustomerState,
	tblCustomers.CustomerZip,
	tblCustomers.CustomerHomePhone,
	tblCustomers.CustomerWorkPhone
	FROM tblCustomers;
Here is the same query, this time using the alias C for tblCustomers. The alias is placed just after the table name in the FROM section, and all references to the table name in the rest of the query just use the alias:
	SELECT C.CustomerCompanyName,
	C.CustomerFirstName, C.CustomerLastName,
	C.CustomerAddr1, C.CustomerAddr2, C.CustomerCity,
	C.CustomerState, C.CustomerZip, C.CustomerHomePhone,
	C.CustomerWorkPhone
	FROM tblCustomers C;
This SQL statement is much shorter and easier to follow.
Discussion
Aliases are also useful—perhaps even more so—with queries that address multiple tables. Here is the SQL statement of a query that addresses three tables (tblCustomers, tblInvoices, and tblInvoicePayments). Inner joins connect the tables on key fields:
	SELECT tblCustomers.CustomerCompanyName,
	tblCustomers.CustomerFirstName,
	tblCustomers.CustomerLastName,
	tblCustomers.CustomerAddr1,
	tblCustomers.CustomerAddr2,
	tblCustomers.CustomerCity,
	tblCustomers.CustomerState,
	tblCustomers.CustomerZip,
	tblInvoices.InvoiceNumber,
	tblInvoices.InvoiceDate,
	tblInvoices.Status,
	tblInvoices.Hours, tblInvoices.Rate,
	tblInvoicePayments.PaymentAmount,
	tblInvoicePayments.PaymentDate,
	tblInvoicePayments.PaymentType
	FROM (tblCustomers INNER JOIN tblInvoices ON
	tblCustomers.CustomerID = tblInvoices.CustomerID)
	INNER JOIN tblInvoicePayments ON
	tblInvoices.InvoiceID = tblInvoicePayments.InvoiceID;
Now, here is the same SQL statement, but with aliases of C for tblCustomers, I for tblInvoices, and P for tblInvoicePayments:
	SELECT C.CustomerCompanyName, C.CustomerFirstName,
	C.CustomerLastName, C.CustomerAddr1,
	C.CustomerAddr2, C.CustomerCity, C.CustomerState,
	C.CustomerZip, I.InvoiceNumber, I.InvoiceDate,
	I.Status, I.Hours, I.Rate, P.PaymentAmount,
	P.PaymentDate, P.PaymentTypeFROM (tblCustomers C INNER JOIN tblinvoices I ON
	C.CustomerID=I.CustomerID) INNER JOIN
	tblInvoicePayments P ON I.InvoiceID=P.InvoiceID;
Clearly, the SQL statement with aliases is shorter. Again, each table is assigned its alias just after its name appears in the FROM and INNER JOIN sections.
Creating a Left Join
Problem
I have a table of students and a table of courses they have taken. Not every student has taken a course. I want a listing of all the students and any courses they have taken, including students who have not yet taken a course. However, when I run the query normally, I only get back records of students who have taken at least one course.
Solution
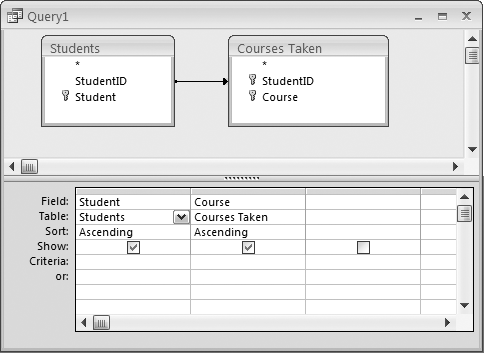
Figure 1-43 shows the standard query you would use to query from two tables. This query will return all records from Students who have related records in Courses Taken. If, for a given student, there is more than one record in Courses Taken, the number of related records in Courses Taken is the number of records that will be returned for that given student. But students with no matched courses are left out of the returned records altogether.
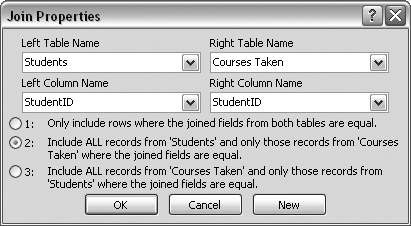
Figure 1-43 shows an inner join. To ensure that all records from the master table (Students) appear in the results, the query must be changed to a left join. This is easy to do when the query is in design mode: either use the View → Join Properties menu option, or double-click on the line that connects the table to display the Join Properties dialog box, shown in Figure 1-44.
In the Join Properties dialog box are three numbered options. The first one is the standard inner join. The second one creates a left join. The third option creates a right join (see Creating a Right Join). Select the second option and click OK. Now, when the query is run, all records from the Students table will appear, as shown in Figure 1-45.
Discussion
A left join returns all records from the master table, and probably all records from the child table (here, Courses Taken). This last fact depends on whether referential integrity exists between the tables. In other words, if referential integrity is enforced, each record in the Courses Taken table must match to a record in the Students table. Then, even though there are student records with no matching courses, all course records must belong to students and hence are returned in the query.

If referential integrity is not applied, any records in Courses Taken that do not relate to records in the Students table will not be included in the query’s returned records.
Creating a Right Join
Problem
I have a parent table and a child table. The parent table contains customers, and the child table contains purchases, but some records in the Purchases table do not belong to any customer. I need to run a query that returns all the records from the Purchases table, even if there is no matching customer. At the very least, this will help me identify purchases that are not being billed to anyone.
Solution
The request here is for a right join. In a right join, all records are returned from the child table, including those that have no match in the parent table. For any such records to exist in the child table, referential integrity must not exist between the tables. The presence of orphan records is possible only when such records can exist outside the confines of referential integrity with the parent table.
Figure 1-46 shows how a right join is created: use the third option in the Join Properties dialog box (displayed via the View → Join Properties menu command).
Discussion
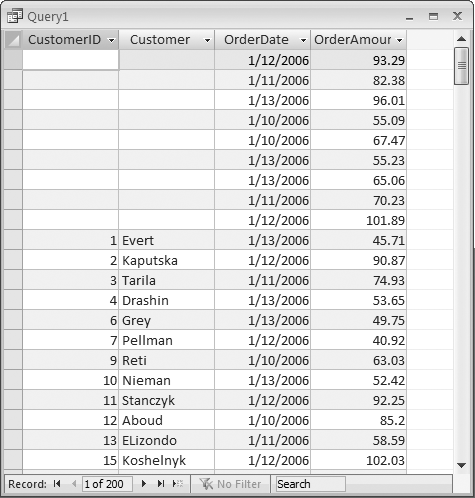
When a right join query is run, the number of returned records matches the number of records in the child table (assuming no criteria were used). For fields from the parent table, there will be blank data for the records in which there is no match between tables. Figure 1-47 shows the result of running the right join query.
Creating an Outer Join
Problem
I wish to combine the output of both a left join and a right join into a single query, but I can’t get Access to do this type of "outer join.”
Solution
A left join will return all the records from the table on the right side (the parent)and any related records from the table on the left side (the child). A right join will return all the records from the table on the left side and any related records from the table on the right side. An outer join combines these two outputs into one.
Access doesn’t directly support outer joins, but because it is reasonable to create left and right joins, these two constructs can be brought together with a union query (see Combining Data with Union Queries).
Figure 1-48 shows two database tables. Not all the teams in the Teams table have matching records in the Games table, and the Games table contains some records that have no relation to the teams in the Teams table.
To create an outer query, you must be in the SQL pane of the query designer. The following is the SQL that would simulate an outer query for these tables by combining the output of a left join with a right join:
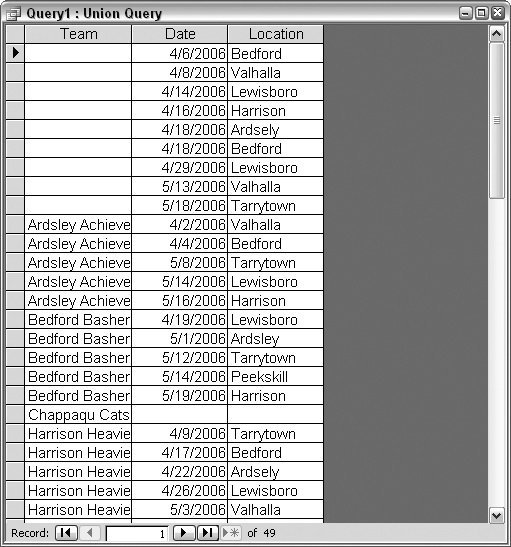
	SELECT Teams.Team, Games.Date, Games.Location
	FROM Games LEFT JOIN Teams ON
	Games.TeamID=Teams.TeamID
	UNION
	SELECT Teams.Team, Games.Date, Games.Location
	FROM Games RIGHT JOIN Teams ON
	Games.TeamID = Teams.TeamID
	ORDER BY Team, Date;
Discussion
When the query is run (see Figure 1-49), there are, as expected, some blanks in the fields from the Teams table and the Games table (from Figure 1-48). The majority of records are matched. Running a standard inner join query on these tables returns 35 records—the count of records that match. This outer join result returns 49 records. There are 14 records that have blanks for the source from one table or the other.

Get Access Data Analysis Cookbook now with the O’Reilly learning platform.
O’Reilly members experience books, live events, courses curated by job role, and more from O’Reilly and nearly 200 top publishers.

