Chapter 4. Blocking Bad Data
Even the best database designer has spent sleepless nights worrying about the errors that could be lurking in a database. Bad data is a notorious problem—it enters the database, lies dormant for months, and appears only when you discover you’ve mailed an invoice to a customer named “Blank Blank” or sold a $4.99 bag of peanuts for $499.
The best way to prevent these types of problems is to stop bad data from making it into your database in the first place. In other words, you need to set up validation rules that reject suspicious values as soon as someone types them in. Once bad data has entered your database, it’s harder to spot than a blueberry in a swimming pool.
This chapter covers the essential set of Access data validation tools:
Duplicates, required fields, and default values are the basics of data integrity.
Input masks format ordinary text into patterns, like postal codes and phone numbers.
Validation rules lay down strict laws for unruly fields.
Lookups limit values to a list of preset choices.
There’s one validation technique that this chapter doesn’t cover: using data macros. Data macros are specialized routines that spring into action when someone makes a change in your database. They’re remarkably powerful, but you can’t use them until you learn the basics of macro programming. In the meantime, the validation tools you’ll pick up in this chapter are simpler and easier to maintain.
Note
You’ll learn how to build macros in Chapter 15. You’ll learn how to use macros to perform validation with data events in Chapter 16.
Data Integrity Basics
All of Access’s data validation features work via the Design view you learned about in Chapter 2. To put them in place, you choose a field and then tweak its properties. The only trick is knowing which properties are most useful. You’ve already seen some in Chapter 2, but the following sections fill in a few more details.
Tip
Remember, Access gives you three ways to switch to Design view. Once you right-click the table tab title, you can then choose Design View from the menu, use the Home→View button on the ribbon, or use the tiny view buttons at the Access window’s bottom-right corner. And if you’re really impatient, then you don’t even need to open your table first—just find it in the navigation pane, right-click it there, and then choose Design View.
Preventing Blank Fields
Every record needs a bare minimum of information to make sense. However, without your help, Access can’t distinguish between critical information and optional details. For that reason, every field in a new table is optional, except for the primary-key field (which is usually the ID value). Try this out with the Dolls table from Chapter 1; you’ll quickly discover that you can add records that have virtually no information in them.
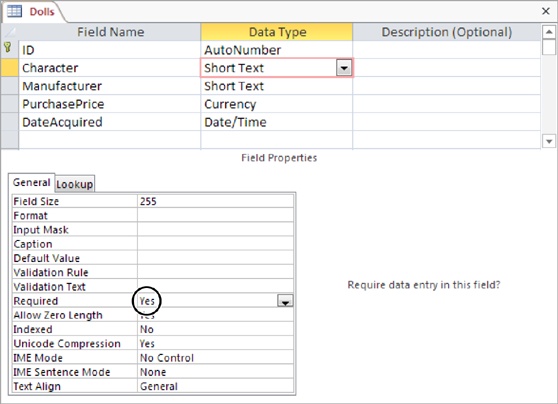
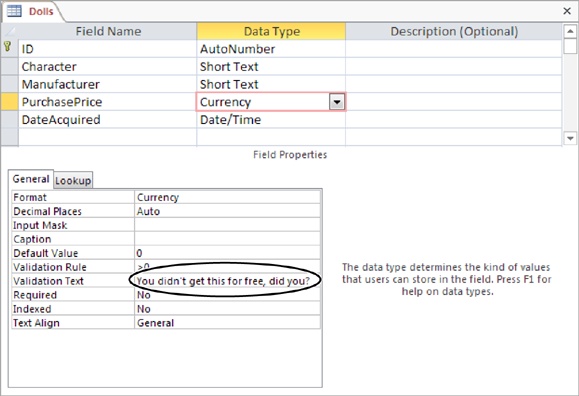
You can easily remedy this problem. Just select the field that you want to make mandatory in Design view, and then set the Required field property to Yes (Figure 4-1).
Access checks the Required field property whenever you add a new record or modify a field in an existing record. However, if your table already contains data, there’s no guarantee that it follows the rules.
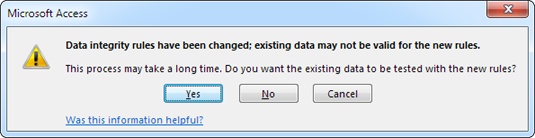
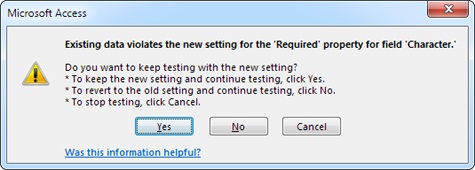
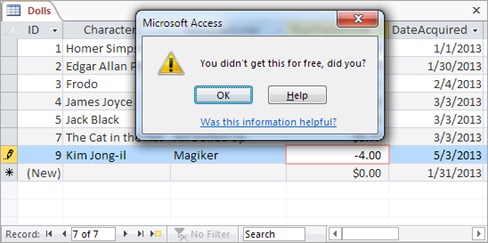
Imagine you’ve filled the Dolls table with a few bobbleheads before you decide that every record requires a value for the Character field. You switch to Design view, choose the Character field, and then flip the Required field property to Yes. When you save the table (by switching back to Datasheet view or closing the table), Access gives you the option of verifying the bobblehead records that are already in the table (Figure 4-2). If you choose to perform the test and Access finds the problem, it gives you the option of reversing your changes (Figure 4-3).
Blank Values and Empty Text
Access supports this Required property for every data type. However, with some data types you may want to add extra checks. That’s because the Required property prevents only blank fields—fields that don’t have any information in them at all. However, Access makes a slightly bizarre distinction between blank values and something called empty text.
A blank (null) value indicates that no information was supplied. Empty text indicates that a field value was supplied, but it just happens to be empty. Confused yet? The distinction exists because databases like Access need to recognize when information is missing. A blank value could indicate an oversight—someone may just have forgotten to enter the value. On the other hand, empty text indicates a conscious decision to leave that information out.
To try this out in your datasheet, create a Short Text field that has Required set to Yes. Try inserting a new record and leaving the record blank. (Access stops you cold.) Now, try adding a new record, but place a single space in the field. Here’s the strange part: Access automatically trims out spaces, and by doing so, it converts your single space to empty text. However, you don’t receive an error message because empty text isn’t the same as a blank value.
The good news is that if you find this whole distinction confusing, then you can prevent both blank values and empty text. Just set Required to Yes to stop the blank values, and set Allow Zero Length to No to prevent empty text.
Note
A similar distinction exists for numeric data types. Even if you set Required to Yes, you can still supply a number of 0. If you want to prevent that action, use the validation rules described later in this chapter (Validation Rules).
Setting Default Values
So far, the fields in your tables are either filled in explicitly by the person who adds the record or are left blank. But there’s another option—you can supply a default value. Now, if someone inserts a record and leaves the field blank, Access applies the default value instead.
You set a default value by using the Default Value field property. For example, for a numeric AddedCost field, you could set this to be the number 0. For a text Country field, you could use the text “U.S.A.” as a default value. (When you use text for a default value, you must wrap the text in quotation marks.)
Access shows all your default values in the new-row slot at the bottom of the datasheet (Figure 4-4). It also automatically inserts default values into any hidden columns (Setting Default Values). But default value settings don’t affect any of your existing records—they keep whatever value they had when you last edited them.
Access inserts the default value when you create a new record. (You’re then free to change that value.) You can also switch a field back to its default value by using the Ctrl+Alt+Space shortcut while you’re editing it.
Tip
One nice feature: You can use the default value as a starting point for a new record. For example, when you create a new record in the datasheet, you can edit the default value, rather than replacing it with a completely new value.
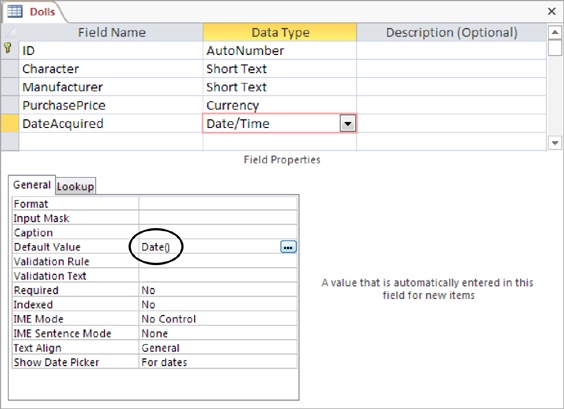
You can also create more intelligent dynamic default values. Access evaluates dynamic default values whenever you insert a new record, which means that the default value can vary based on other information. Dynamic default values use expressions (specialized database formulas) that can perform calculations or retrieve other details. One useful expression, Date(), grabs the current date that’s set on your computer. If you use Date() as the Default Value for a date field (as shown in Figure 4-5), Access automatically inserts the current date whenever you add a new record.
Preventing Duplicate Values with Indexes
In a properly designed table, every record must be unique. To enforce this restriction, you should choose a primary key (The Primary Key), which is one or more fields that won’t be duplicated.
Here’s the catch. As you learned in Chapter 2, the safest option is to create an ID field for the primary key. So far, all the tables you’ve seen have included this detail. But what if you need to make sure other fields are unique? Imagine you create an Employees table. You follow good database design principles and identify every record with an automatically generated ID number. However, you also want to make sure that no two employees have the same Social Security number (SSN), to prevent errors like accidentally entering the same employee twice.
Tip
For a quick refresher about why ID fields are such a good idea, refer to 6. Include an ID Field. In the Employees table, you certainly could choose to make the SSN the primary key, but it’s not the ideal situation when you start linking tables together (Chapter 5), and it causes problems if you need to change the SSN later on (in the case of an error), or if you enter employee information before you’ve received the SSN.
You can force a field to require unique values with an index. A database index is analogous to the index in a book—it’s a list of values (from a field) with a cross-reference that points to the corresponding section (the full record). If you index the SocialSecurityNumber field, Access creates a list like the following and stores it behind the scenes in your database file.
SOCIAL SECURITY NUMBER | LOCATION OF FULL RECORD |
001-01-3455 | … |
001-02-0434 | … |
001-02-9558 | … |
002-40-3200 | … |
Using this list, Access can quickly determine whether a new record duplicates an existing SSN (see the box below for an explanation of how this works). If the SSN is a duplicate, then Access doesn’t let you insert the record.
So how do you apply an index to a field? The trick is the Indexed field property, which is available for every data type except Attachment and OLE Object. When you add a field, the Indexed property is set to No, which means Access doesn’t create an index. To add an index and prevent duplicates, you can change the Indexed property in Design view to Yes [No Duplicates]. The third option, Yes [Duplicates OK], creates an index but lets more than one record have the same value. This option doesn’t help you catch repeated records, but it can still help speed up searches (see the box below for more).
Note
As you know from Chapter 2, primary keys also disallow duplicates, using the same technique. When you define a primary key, Access automatically creates an index on that field.
When you close Design view after changing the Indexed field property, Access prompts you to save your changes. At this point, it creates any new indexes it needs. You can’t create a no-duplicates index if you already have duplicate information in your table. In that situation, Access gives you an error message when you close the Design window and it attempts to add the index.
Multifield Indexes
You can also use indexes to prevent a combination of values from being repeated. Imagine you create a People table to track your friends and their contact information. You’re likely to have entries with the same first or last name. However, you may want to prevent two records from having the same first and last name. This limitation prevents you from inadvertently adding the same person twice.
Note
This example could cause endless headaches if you honestly do have two friends who share the same first and last names. In that case, you’ll need to remove the index before you’re allowed to add the name. So think carefully about legitimate reasons for duplication before you create any indexes.
To ensure that a combination of fields is unique, you need to create a compound index, which combines the information from more than one field. Here’s how to do it:
In Design view, choose Table Tools | Design→Show/Hide→Indexes.
The Indexes window appears (Figure 4-6). Using the Indexes window, you can see your current indexes and add new ones.
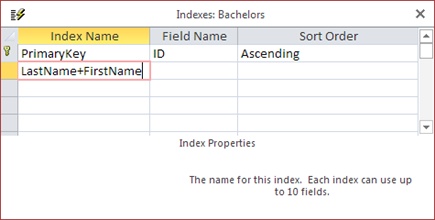
Choose a name for your index. Type this name into the first blank row in the Index Name column.
The index name has no real importance—Access uses it to store the index in the database, but you don’t see the index name when you work with the table. Usually, you’ll use the name of one or both of the fields you’re indexing (like LastName+FirstName).
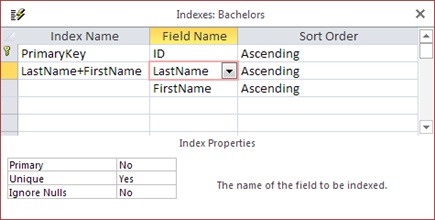
Choose the first field in the Field Name column in the same row (like LastName).
It doesn’t matter which field name you use first. Either way, the index can prevent duplicate values. However, the order does affect how searches use the index to boost performance. You’ll learn more on Creating a Simple Query with the Query Wizard.
In the area at the bottom of the window, set the Unique box to Yes.
This creates an index that prevents duplicates (as opposed to one that’s used only for boosting search speeds).
You can also set the Ignore Nulls box to Yes, if you want Access to allow duplicate blank values. Imagine you want to make the SSN field optional. In this case, you should set Ignore Nulls to Yes. If you set Ignore Nulls to No, then Access lets only one record have a blank SSN field, which probably isn’t the behavior you want.
Tip
You can also disallow blank values altogether using the Required property, as described on Data Integrity Basics.
Ignore the Primary box (which identifies the index used for the primary key).
Move down one row. Leave the Index Name column blank (which tells Access it’s still part of the previous index), but choose another field in the Field Name column (like FirstName).
If you want to create a compound index with more than two fields, then just repeat this step until you’ve added all the fields you need. Figure 4-7 shows what a finished index looks like.
Input Masks
As you’ve already learned, databases prize consistency. If you have a field named Height, you better be sure every value in that field uses the same type of measurements; otherwise, your data isn’t worth its weight in sock lint. Similarly, if you have a PhoneNumber field, you better make sure every phone number has the same format. If some phone numbers are written with dashes, spaces, and parentheses (like (844) 547-1123), while others are a bit different (say, 847-547-1123), and a few leave out the area code information altogether (547-1123), then you’ve got a small problem on your hands. Because of the lack of consistency, you’ll have a hard time working with this information (say, searching for a specific phone number or sorting the phone numbers into different categories based on area code).
To help you manage values that have a fixed pattern—like phone numbers—you can use an input mask. Essentially, an input mask (or just mask for short) gives you a way to tell Access what pattern your data should use. Based on this pattern, Access changes the way values are entered and edited to make them easier to understand and less error-prone. Figure 4-8 shows how a mask lets Access format a series of characters as they’re being typed into a field.
You can add a mask to any field that uses the Short Text data type. Masks give you several advantages over ordinary text:
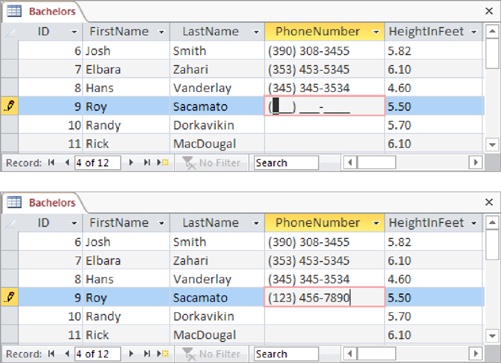
Masks guide data entry. When empty, a masked edit control shows the placeholders where values need to go. A phone number mask shows the text “(_ _ _) _ _ _-_ _ _ _” when it’s empty, clearly indicating what type of information it needs.
Masks make data easier to understand. You can read many values more easily when they’re presented a certain way. Most people can pick out the numbers in this formatted Social Security number (012-86-7180) faster than in this unformatted one (012867180).
Masks prevent errors. Masks reject characters that don’t fit the mold. For example, if you’re using the telephone mask, you can’t use letters.
Masks prevent confusion. With many types of data, you have several ways to present the same information. You can enter phone numbers both with and without area codes. By presenting the mask with the area code placeholder, you’re saying that this information is required (and where it goes). It’s also obvious that you don’t need to type in parentheses or a dash to separate numbers, because those details are already there. You’ll see the same benefit if you use masks with dates, which can be entered in all sorts of different combinations (Year/Month/Day, Month-Day-Year, and so on).
Masks are best suited for when you’re storing numeric information in a Short Text field. This scenario occurs with all sorts of data, including credit card numbers, postal codes, and phone numbers. These types of information shouldn’t be stored in number fields, because they aren’t meant to be interpreted as a single number. Instead, they’re meant to be understood as a series of digits. (If you do make the mistake of storing a phone number in a number field, you’ll find out that people can type in perfectly nonsensical phone numbers like 0 and –14 because these are valid numbers, even if they aren’t valid phone numbers. But an input mask on a Short Text field catches these errors easily.)
Masks can’t help you with more sophisticated challenges, like data values that have varying lengths or subtle patterns. For instance, a mask doesn’t help you spot an incorrect email address.
Using a Readymade Mask
The easiest way to get started with masks is to use one of the many attractive options that Access has ready for you. This method is great, because it means you don’t need to learn the arcane art of mask creation.
Here’s what you need to do to pick out a prebuilt mask:
In Design view, select the Short Text field where you want to apply the mask.
For this test, try a PhoneNumber field.
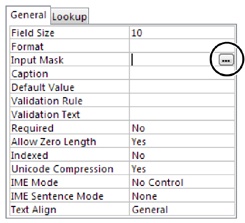
Look for the Input Mask field property. Click inside the field.
When you do, a small ellipsis (…) button appears at the right edge, as shown in Figure 4-9.
Click the ellipsis button.
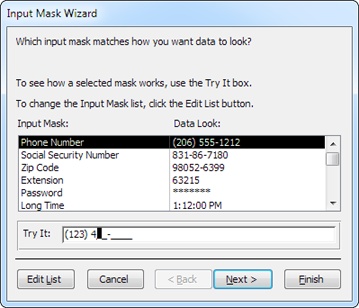
The Input Mask Wizard starts (see Figure 4-10).
Choose the mask you want from the list of options.
In this case, choose the first item in the list (Phone Number).
Tip
Don’t see what you want? You’ll need to create your own, using the tips on Creating Your Own Mask. If you see one that’s close but not perfect, select it. You can tweak the mask in the wizard’s second step.
Figure 4-10. The Input Mask Wizard starts with a short list of commonly used masks. Next to every mask, Access shows you what a sample formatted value looks like. Once you select a mask, you can check it out in the Try It text box. The Try It text box gives you the same behavior that your field will have once you apply the mask.Click Next.
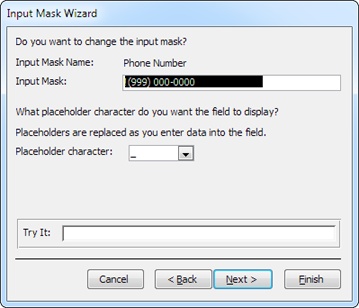
The wizard’s second step appears (see Figure 4-11).
If you want, you can change the mask or the placeholder character.
To change the mask, you’ll need to learn what every mask character means. Creating Your Own Mask explains it all.
You use the placeholder to show the empty slots where you enter information. The standard choice is the underscore. Optionally, you can use a space, dash, asterisk, or any other character by typing it in the “Placeholder character” box.
Click Next.
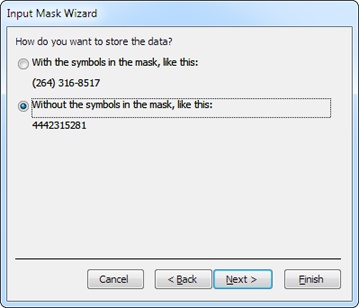
If you’re adding a mask to a Short Text field, then the wizard’s final step appears (see Figure 4-12).
If you’re adding a mask to a date field, then Access doesn’t need to ask you how to store the information—it already knows. In this case, you can jump to step 9 and click Finish.
Choose how you want to store the value in this field.
The standard choice is to store just the characters you’ve typed into the field. If you use this option, the placeholders aren’t included. For example, the phone number (416) 123-4567 is stored as 4161234567. This option saves a little space, and it also lets you change the mask later on to present the information in a slightly different way.
You could also store the mask complete with all the extra characters. Then a phone number is stored complete with hyphens, dashes, and spaces, like (416) 123-4567. This approach isn’t nearly as flexible because you can’t change the mask later.
Click Finish.
The final mask appears in the Input Mask field property.
Before going any further, you may want to make sure that the length you’ve reserved for your field matches the mask. In the phone number example, you need a Field Size of 10 if you’ve chosen to store unformatted values (because there are 10 digits), or a Field Size of 14 for the whole shebang, complete with placeholders (one dash, one space, and two parentheses).
Switch back to the Datasheet view, and click Yes when Access asks you to save changes.
Your input mask is now in place.
Note
Access uses the input mask information to control how information is entered into the datasheet. However, it’s possible for someone to circumvent the mask by entering the information in other ways. (Things that can bypass a mask, either deliberately or accidentally, include an update query, a Visual Basic code routine, or a custom record-editing form.) In other words, a mask isn’t an absolute guarantee against invalid data—if you want such a guarantee, then you need a validation rule instead (Validation Rules).
Creating Your Own Mask
The Input Mask wizard provides a fairly limited set of choices. If you want to use a mask with your own type of information (like a special customer code that your business uses), then you have to create your own mask.
Creating a mask is fairly easy, but it can take a bit of fiddling before you nail down exactly the result you want. You have two basic options:
Type or edit the mask directly in the Input Mask field property.
Launch the Input Mask wizard, choose a mask to use as a starting point, and then tweak it in step 2. This approach has the advantage that you can test your mask in the Try It box before you save it as part of your table.
Every mask is built out of three types of characters:
In the previous example, the phone number mask was !(999) 000-0000. The characters 9 and 0 are placeholders—they represent where you type in the digits of the phone number. The parentheses, space, and dash are just formatting niceties—they’re the literals. And the exclamation mark is the only special character. It tells Access that characters should be entered into the mask from left to right, which is the standard option and the only one that really makes sense for a phone number.
To help you sort all this out, refer to the following tables. Table 4-1 shows all the placeholders you can use in an input mask. Table 4-2 shows other special characters. Everything else is automatically a literal character.
DESCRIPTION | |
0 | A required digit (0 through 9). |
9 | An optional digit (0 through 9). |
# | An optional digit, a plus sign (+), or a minus sign (-). |
L | A required letter. |
? | An optional letter. |
A | A required letter or digit. |
a | An optional letter or digit. |
& | A required character of any type (including letters, numbers, punctuation, and so on). |
C | An optional character of any type (including letters, numbers, punctuation, and so on). |
CHARACTER | DESCRIPTION |
! | Indicates that the mask is filled from left to right when characters are typed in. This is the default, so this character isn’t required (although the prebuilt masks include it). |
< | Converts all characters that follow to lowercase. |
> | Converts all characters that follow to uppercase. |
\ | Indicates that the following character should be treated as a literal. For example, the # character has a special meaning in masks. Thus, if you want to actually include a # in your mask, you need to use \#. Sometimes, this character is used before a placeholder even when it’s not needed. You may see a phone mask that has the character sequence \- instead of just -. Both are equivalent. |
Password | Creates a password entry box. Any character you type in the box is stored as the character but displayed as an asterisk (*). When using this option, you can’t include anything else in your mask. |
Here are a few sample masks to get you started:
(000) 000-0000. A phone number that requires the area code digits. This mask is different from the phone number mask that the Input Mask Wizard uses. That mask replaces the first three 0 characters with 9, making the area code optional.
00000-9999. A U.S. Zip code, which consists of five required digits followed by a hyphen and (optionally) four more digits.
L0L 0L0. A Canadian postal code, which is a pattern of six characters that alternate between characters and digits, like M6S 3H2.
99:00 >LL. A mask for entering time information into a Date/Time field. It’s made up of two digits for the hour and two digits for the minute. The last two characters are always displayed in uppercase (thanks to the > character) and are meant to be AM or PM. (Technically, this mask doesn’t prevent the user from flouting the system and typing in two different characters. However, if you enter a time like 12:30 GM, Access complains that it can’t convert your entry into the Date/Time data type, as required for the field.)
099.099.099.099. An IP (Internet Protocol) address, which identifies a computer on a network. An IP address is written as four values separated by periods. Each value must have at least one digit and can have up to three. This pattern is represented in the mask by 099 (one required digit, followed by two optional digits).
Password. A mask that allows ordinary, unlimited text, with one difference. All characters are displayed as asterisks (*), to hide them from prying eyes.
Masks can also have two optional bits of information at the end, separated by semicolons (;).
The second section is a number that tells Access whether it should store the literal characters for the mask in the record. (This is the last question that the Input Mask Wizard asks.) If you leave this piece out or use the number 1, Access stores only the characters that someone types in. If you use the number 0, then Access stores the full text with the literals.
The third section supplies the placeholder character. If you leave this section out, Access uses the familiar underscore.
Here’s a mask that uses these two extra bits of information:
(000) 000-0000;1;#
Here, the second section is 1, and the third section is #. This mask is for phone numbers. It uses the number sign for a placeholder, and it includes the following literals: two parentheses, a space, and a dash. These literals aren’t stored in the field.

Validation Rules
Input masks are a great tool, but they apply to only a few specific types of information—usually fixed-length text that has a single, unchanging pattern. To create a truly bulletproof table, you need to use more sophisticated restrictions, like making sure a number falls in a certain range, checking that a date hasn’t yet occurred, or verifying that a text value starts with a certain letter. Validation rules can help you create all these restrictions by drawing on the full power of the SQL language.
Note
You’ll get a more thorough introduction to SQL starting in Chapter 6. Fortunately, you need only a dash of SQL to write a validation rule. The key ingredient is a validation expression, and you’ll see several practical examples of expressions that you can drop straight into your tables.
A validation rule’s premise is simple. You set up a restriction that tells Access which values to allow in a field and which ones are no good. Whenever someone adds a new record or edits a record, Access makes sure the data lives up to your validation rules. If it doesn’t, then Access presents an error message and forces you to edit the offending data and try again.
Applying a Field Validation Rule
Each field can have a single validation rule. The following steps show you how to set one up. You’ll start out easy, with a validation rule that prevents a numeric field from accepting 0 or any negative number (and in the following sections you’ll hone your rule-writing abilities so you can tackle other data types).
Here’s how to add your validation rule:
In Design view, select the field to which you want to apply the rule.
All data types—except Long Text, AutoNumber, and OLE Object—support validation. The validation rule in this example works with any numeric data type (like Number or Currency).
In the Validation Rule field property, type a validation expression (Figure 4-14).
An expression is a bit of SQL that performs a check on the data you’ve entered. Access performs its validation check when you finish entering a piece of data and try to navigate to another field or another record. For example, >0 is a validation rule that forces the value in a number field to be larger than 0. You’ll learn more validation rules in the following sections.
Type some error-message text in the Validation Text field property.
If you enter a value that fails the validation check, Access rejects the value and displays this error text in a window. If you don’t supply any text, then Access shows the validation rule for the field (whatever you entered in step 2), which is more than a little confusing for most mere mortals.
Right-click the tab title and then choose Datasheet View.
If your table has existing records, Access gives you the option of checking them to make sure they meet the requirements of your validation rule. You decide whether you want to perform this check, or skip it altogether.
Once you’re in Datasheet view, you’re ready to try out your validation rule (Figure 4-15).
Writing a Field Validation Rule
As you can see, it’s easy enough to apply a validation rule to a field. But creating the right validation rule takes more thought. To get the result you want, you need to take your first step into the sometimes-quirky world of SQL.
Although validation is limited only by your imagination, Access pros turn to a few basic patterns again and again. The following sections give you some quick and easy starting points for validating different data types.
Note
Access uses your validation rule only if a field contains some content. If you leave it blank, then Access accepts it without any checks. If this isn’t the behavior you want, then just set the Required property to Yes to make the field mandatory, as described on Data Integrity Basics.
Validating Numbers
For numbers, the most common technique is to check that the value falls in a certain range. In other words, you want to check that a number is less than or greater than another value. Your tools are the comparison signs < and >. Table 4-3 shows some common examples.
SAMPLE EXPRESSION | DESCRIPTION | |
Less than | <100 | The value must be less than 100. |
Greater than | >0 | The value must be greater than 0. |
Not equal to | <>42 | The value can be anything except 42. |
Less than or equal to | <=100 | The value must be less than or equal to 100. |
Greater than or equal to | >=0 | The value must be greater than or equal to 0. |
Equal to | =42 | The value must be 42. (Not much point in asking anyone to type it in, is there?) |
Between | The value must be 0, 100, or somewhere in between. |
Validating Dates
As with numbers, date validation usually involves checking to see if the value falls within a specified range. Here, your challenge is making sure that your date is in the right format for an expression. If you use the validation rule >Jan 30, 2013, Access is utterly confused, because it doesn’t realize that the text (Jan 30, 2013) is supposed to represent a date. Similarly, if you try >1/30/2013, then Access assumes the numbers on the right are part of a division calculation.
To solve this problem, use Access universal date syntax, which looks like this:
#1/30/2013#
A universal date always has the date components in the order month/day/year, and it’s always bracketed by the # symbol on either side. Using this syntax, you can craft a condition like >#1/30/2013#, which states that a given date must be larger than (fall after) the date January 30, 2013. January 31, 2013, fits the bill, but a date in 2012 is out.
The universal date syntax can also include a time component, like this:
#1/30/2013 5:30PM#
Note
When comparing two dates, Access takes the time information into consideration. For example, the date #1/30/2013# doesn’t include any time information, so it’s treated as though it occurs on the very first second of the day. As a result, Access considers the date value #1/30/2013 8:00 AM# larger, because it occurs 8 hours later.
Once you’ve learned the universal date syntax, you can use any of the comparison operators you used with numbers. You can also use these handy functions to get information about the current date and time:
Date()gets the current date (without any time information, so it counts as the first second of the day).Now()gets the current instant in time, including the date and time information.
Note
A function is a built-in code routine that performs some task, like fetching the current date from the computer clock. You’ll learn about many more date functions, which let you perform advanced tasks like finding the day of the week for a date, on Date Functions.
Table 4-4 has some examples.
SAMPLE EXPRESSION | DESCRIPTION | |
Less than | <#1/30/2013# | The date occurs before January 30, 2013. |
Greater than | >#1/30/2013 5:30 PM# | The date occurs after January 30, 2013, or on January 30, 2013, after 5:30 p.m. |
Less than or equal to | <=#1/30/2013# | The date occurs before January 30, 2013, or on the first second of January 30, 2013. |
Greater than or equal to | >=#1/30/2013# | The date occurs on or after January 30, 2013. |
Greater than the current date | >=Date() | The date occurs today or after. |
Less than the current date | <Date() | The date occurs yesterday or before. |
Greater than the current date (and time) | >Now() | The date occurs today after the current time, or any day in the future. |
Less than the current date (and time) | <Now() | The date occurs today before the current time, or any day in the past. |
Validating Text
With text, validation lets you verify that a value starts with, ends with, or contains specific characters. You perform all these tasks with the Like operator, which compares text to a pattern.
This condition forces a field to start with the letter R:
Like "R*"
The asterisk (*) represents zero or more characters. Thus, the complete expression asks Access to check that the value starts with R (or r), followed by a series of zero or more characters.
You can use a similar expression to make sure a piece of text ends with specific characters:
Like "*ed"
This expression allows the values talked, walked, and 34z%($)#ed, but not talking, walkable, or 34z%($)#.
For a slightly less common trick, you can use more than one asterisk. The following expression requires that the letters a and b appear (in that order but not necessarily next to each other) somewhere in the text value:
Like "*a*b*"
Or consider this example, that tests for an email address by allowing any amount of text, followed by an @ sign, followed by more text, followed by a period, and then followed by the last bit of text:
Like "*@*.*"
Along with the asterisk, the Like operator also supports a few more characters. You can use ? to match a single character, which is handy if you know how long text should be or where a certain letter should appear. Here’s the validation rule for an eight-character product code that ends in 0ZB:
Like "?????0ZB"
The # character plays a similar role, but it represents a number. Thus, the following validation rule defines a product code that ends in 0ZB and is preceded by five numbers:
Like "#####0ZB"
You can combine the ? or # with * to allow a variable amount of text, but require a certain number of characters. For example, the expression ?* tells Access to accept one character, followed by zero or more additional characters.
Using this technique, you can build a slightly smarter email expression that requires a minimum of four characters arranged around the special character @ and the period. (So a bogus value like @. is no longer allowed, but a@b.cd is good.) Here’s what the expression looks like:
Like "*?@*?.*??"
And finally, you can restrict any character to certain letters or symbols. The trick is to put the allowed characters inside square brackets.
Suppose your company uses an eight-character product code that always begins with A or E. Here’s the validation rule you need:
Like "[AE]???????"
Note that the [AE] part represents one character, which can be either A or E. If you wanted to allow A, B, C, D, you’d write [ABCD] instead, or you’d use the handy shortcut [A-D], which means “allow any character from A to D, including A and D.”
Here’s one more validation expression, which allows a seven-letter word and doesn’t allow numbers or symbols. It works by repeating the [A-Z] code (which allows any letter) seven times.
Like "[A-Z][A-Z][A-Z][A-Z][A-Z][A-Z][A-Z]"
As you can see, text validation expressions aren’t always pretty. Not only can they grow to ridiculous sizes, but there are lots of restrictions they can’t apply. You can’t, for instance, let the length of the text vary between a minimum and maximum that you set. And you can’t distinguish between capitalized and lowercase letters.
Tip
You can get around many of these limitations by using some of the functions that Access provides. On Text Functions, you’ll learn how to use functions that can snip out bits of text, test lengths, check capitalization, and more.
Combining Validation Conditions
No matter what the data type, you can also combine your conditions in two different ways. Using the And keyword, you can create a validation rule that enforces two requirements. This trick is handy, because each field can have at most a single validation rule.
To use the And keyword, just write two validation rules, and put the word “And” in between. It doesn’t matter which validation rule is first. Here’s a validation rule that forces a date to be before today but later than January 1, 2000:
<Date() And >#1/1/2000#
You can also use the Or keyword to accept a value if it meets either one of two conditions. Here’s a validation rule that allows numbers greater than 1000 or less than –1000:
>1000 Or <-1000
Creating a Table Validation Rule
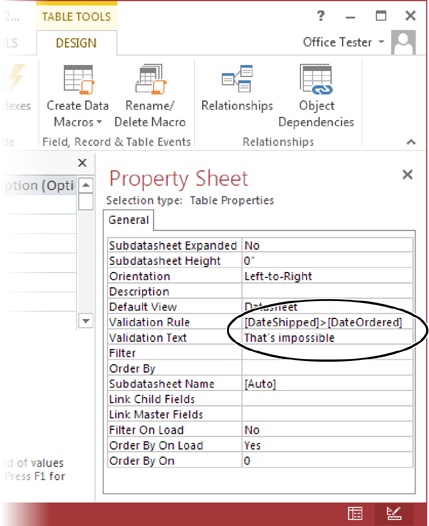
Field validation rules always apply to a single field. However, database designers often need a way to compare the values in different fields. Suppose you have an Orders table that logs purchases from your monogrammed sock store. In your Orders table, you use two date fields: DateOrdered and DateShipped. To keep everything kosher, you need a validation rule that makes sure DateOrdered falls before DateShipped. After all, how can you ship a product before someone orders it?
Because this validation rule involves two fields, the only way to put it in place is to create a validation rule for the whole table. Table validation rules can use all the SQL tricks you’ve learned about so far, and they can pull the values out of any field in the current record.
Here’s how to create a table validation rule:
Switch to Design view, if you’re not there already.
If the Property Sheet isn’t visible, choose Table Tools | Design→Show/Hide→Property Sheet.
A box with extra settings appears on the right side of the window (Figure 4-16).
In the Property Sheet tab, set the Validation Rule.
A table validation rule can use all the same keywords you learned about earlier. However, table validation rules usually compare two or more fields. The validation rule
[DateOrdered] < [DateShipped]ensures that the value for the Date-Ordered field is older than the one used for DateShipped.When referring to a field in a table validation rule, you need to wrap square brackets around your field names. That way, Access can tell the difference between fields and functions (like the
Date()function you learned about on Preventing Duplicate Values with Indexes).Set the Validation Text.
This message is the error message that’s shown if the validation fails. It works the same as the validation text for a field rule.
When you insert a new record, Access checks the field validation rules first. If your data passes the test (and has the right data types), then Access checks the table validation rule.
Lookups
In a database, minor variations can add up to big trouble. Suppose you’re running International Cinnamon, a multinational cinnamon bun bakery with hundreds of orders a day. In your Orders table, you have entries like this:
Quantity     Product
10           Frosted Cinnamon Buns
24           Cinnamon Buns with Icing
16           Buns, Cinnamon (Frosted)
120          FCBs
...
(Other fields, like the ID column and the information about the client making the order, are left out of this example.)
All the orders shown here amount to the same thing: different quantities of tasty cinnamon and icing confections. But the text in the Product column is slightly different. This difference doesn’t pose a problem for ordinary human beings (for example, you’ll have no trouble filling these orders), but it does create a small disaster if you want to analyze your sales performance later. Since Access has no way to tell that a Frosted Cinnamon Bun and an FCB are the same thing, it treats them differently. If you try to total up the top-selling products or look at long-range cinnamon sales trends, then you’re out of luck.
Note
This example emphasizes a point that you’ve seen before. Namely, databases are strict, no-nonsense programs that don’t tolerate minor discrepancies. For your databases to be useful, you need to make sure you store topnotch information in them.
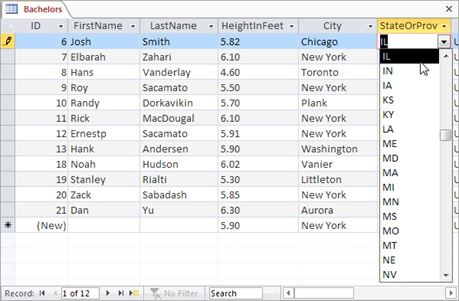
Lookups are one more tool to help standardize your data. Essentially, a lookup lets you fill a value in a field by choosing from a readymade list of choices. Used properly, this tool solves the problem in the Orders table—you simply need a lookup that includes all the products you sell. That way, instead of typing the product name in by hand, you can choose Frosted Cinnamon Buns from the list. Not only do you save some time, but you also avoid variants like FCBs, thereby ensuring that the orders list is consistent.
Access has two basic types of lookup lists: lists with a set of fixed values that you specify, and lists that are drawn from a linked table. In the next section, you’ll learn how to create the first type. Then, in Chapter 5, you’ll graduate to the second.
Creating a Simple Lookup with Fixed Values
Simple lookups make sense if you have a simple, short list that’s unlikely to change. The state prefix in an address is a perfect example. In this case, there’s a set of just 50 two-letter abbreviations (AL, AK, AZ, and so on).
To try out the process in the following list of steps, you can use the Bachelors table included with the online examples for this chapter (look for the DatingService.accdb database file). Or, you can jump straight to the completed lookup by checking out the DatingServiceLookup.accdb file:
Open the table in Design view.
If you’re using the DatingService.accdb example, then open the Bachelors table.
Find the field where you want to add the lookup.
In the Bachelors table, it’s the State field.
Make sure your field has the correct data type.
Short Text and Number are the most common data types that you’ll use in conjunction with the lookup feature.
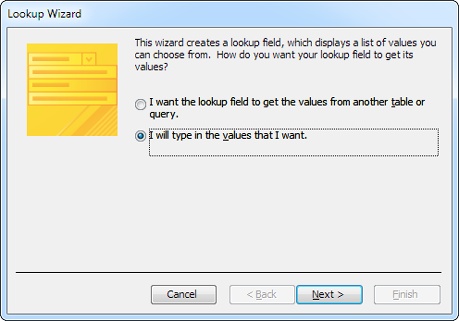
From the data type list, choose Lookup Wizard.
This action doesn’t actually change your data type. Instead, it tells Access you want to run the Lookup Wizard based on the current data type. When you select this option, the first step of the Lookup Wizard appears (Figure 4-17).
Choose “I will type in the values that I want.”
Lookups with Related Tables describes your other choice: drawing the lookup list from another table.
Click Next.
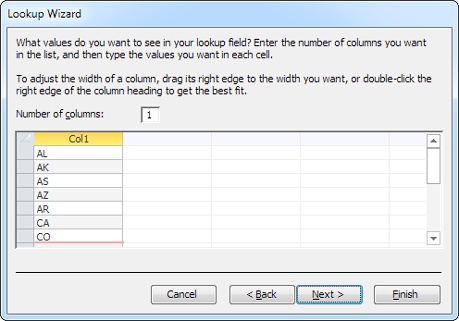
The second step of the wizard gives you the chance to supply the list of values that should be used, one per row (Figure 4-18). In this case, it’s a list of abbreviations for the 50 U.S. states.
You may notice that you can supply multiple columns of information. For now, stick to one column. You’ll learn why you may use more on Lookups with Related Tables.
Click Next.
The final step of the Lookup Wizard appears.
Choose whether you want the lookup column to store multiple values.
If you allow multiple values, then the lookup list displays a checkbox next to each item. You can select several values for a single record by choosing more than one item.
Warning
Once you configure a field to allow multiple values and you save your table, you can’t back out. Access won’t let you modify the field’s Allow Multiple Values setting to convert it back to a single-value field.
In the State field, it doesn’t make sense to allow multiple values—after all, a person can physically inhabit only one state (discounting the effects of quantum teleportation). However, you can probably think of examples where multiple selection does make sense. For example, in the Products table used by International Cinnamon, a multiple-value lookup would let you create an order for more than one product. (You’ll learn more about multiple-value selections and table relationships in Chapter 5.)
Click Finish.
Switch to Datasheet view (right-click the tab title, and then choose Datasheet View), and then save the table changes. Figure 4-19 shows the lookup in action.
Adding New Values to Your Lookup List
When you create a lookup that uses fixed values, the lookup list provides a list of suggestions. You can choose to ignore the lookup list and type in a completely different value (like a state prefix of ZI), even if it isn’t on the list. This design lets you use the lookup list as a timesaving convenience without limiting your flexibility.
In many cases, you don’t want this behavior. In the Bachelors table, you probably want to prevent people from entering something different in the State field. In this case, you want the lookup to be an error-checking and validation tool that actually stops entries that don’t belong.
Fortunately, even though this option is mysteriously absent in the Lookup wizard, it’s easy enough to add after the fact. Here’s what to do:
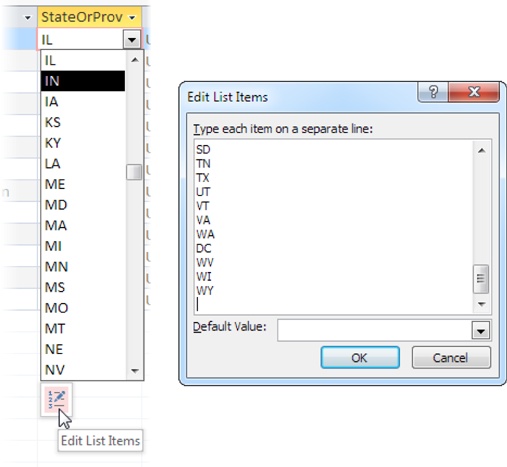
In Design view, go to the field that has the lookup.
In the Field Properties section, click the Lookup tab.
The Lookup tab provides options for fine-tuning your lookup, most of which you can configure more easily in the Lookup wizard. In the Row Source box, for example, you can edit the list of values you supplied. (Each value is on the same line, in quotation marks, separated from the next value with a semicolon.)
Set the “Limit to List” property to Yes.
This action prevents you from entering values that aren’t in the list.
Optionally, set Allow Value List Edits to Yes.
This action lets people modify the list of values at any time. This way, if something’s missing from the lookup list, you can add it on the fly (Figure 4-20).
Get Access 2013: The Missing Manual now with the O’Reilly learning platform.
O’Reilly members experience books, live events, courses curated by job role, and more from O’Reilly and nearly 200 top publishers.

