In the past, people have tried a variety of techniques to organize information. Theyâve used Rolodexes, punch cards, cardboard boxes, vertical files, Post-it notes, 10,000-page indexes, and (when all else failed) large piles on top of flat surfaces. But after much suffering, people discovered that computers were far better at dealing with information, especially when that informationâs large, complex, or changes frequently.
Thatâs where Microsoft Access comes into the picture. Access is a tool for managing databasesâcarefully structured catalogs of information (or data). Databases can store just about any type of information, including numbers, pages of text, and pictures. Databases also range wildly in sizeâthey can handle everything from your list of family phone numbers to a ginormous product catalog for Aunt Ethelâs Discount Button Boutique.
In this book, youâll learn how to design complete databases, maintain them, search for valuable nuggets of information, and build attractive forms for quick and easy data entry. Youâll even delve into the black art of Access programming, where youâll pick up valuable tricks and techniques that you can use to automate common tasks, even if youâve never touched a line of code before.
Best of all, this book was written from scratch for Access 2007, the latest and greatest incarnation of Microsoftâs bestselling database software. Access 2007âs quite a bit different from previous versions, with a slick new interface that has computer geeks buzzing. And for once, itâs not just a gimmick. As youâll see in this book, once you master Accessâs new style, youâll be able to build great databases in record time.
The modern world is filled with information. A Web search for a ho-hum topic like âcanned carrotsâ nets more than a million Web pages. As a result, itâs no surprise that people from all walks of life need great tools to store and manage information.
Itâs impossible to describe even a fraction of the different databases that Access fans create every day. But just to get you thinking like a database maven, here are some common types of information that you can store handily in an Access database:
Catalogs of books, CDs, rare wine vintages, risqué movies, or anything else you want to collect and keep track of
Mailing lists that let you keep in touch with friends, family, and co-workers
Business information, like customer lists, product catalogs, order records, and invoices
Lists of guests and gifts for weddings and other celebrations
Lists of expenses, investments, and other financial planning details
Think of Access as a personal assistant that can help you organize, update, and find any type of information. This help isnât just a convenienceâit also lets you do things you could never accomplish on your own.
Imagine youâve just finished compiling a database for your collection of 10,000 rare comic books. On a whim, you decide to take a look at all the books written in 1987. Or just those that feature Aquaman. Or those that contain the words âspecial editionâ in the title. Performing these searches with a paper catalog would take days. On an average computer, Access can perform all three searches in under a second.
Access is also the king of small businesses, because of its legendary powers of customization. After all, you can use virtually any database product to create a list of customer orders. But only Access makes it easy to build a full user interface for that database (as shown in Figure I-1).
As youâll see, there are actually two separate tasks youâll perform with Access:
Designing your database. This task involves creating tables to hold data, queries that can ferret out important pieces of information, forms that make it easy to enter information, and reports that produce attractive printouts.
Dealing with data. This task involves adding new information to the database, updating whatâs there, or just searching for the details you need. In order to do this work, you use the tables, queries, forms, and reports that youâve already built.
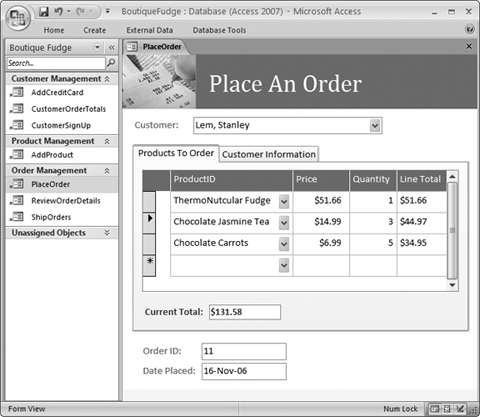
Figure I-1. This sales database includes handy forms that sales people can use to place new orders (shown here), customer service representatives can use to sign up new customers, and warehouse staff can use to review outgoing shipments. Best of all, the people who are using the forms in the database donât need to know anything about Access. As long as a database pro (like your future self, once youâve finished this book) has designed these forms, anyone can use them to enter, edit, and review data.
Most of this bookâs dedicated to task #1âcreating and perfecting your database. This jobâs the heart of Access, and itâs the part that initially seems the most daunting. Itâs also what separates the Access masters from the neophytes.
Once youâve finished task #1, youâre ready to move on to task #2âactually using the database in your day-to-day life. Although task #1 is more challenging, youâll (eventually) spend more time on task #2. For example, you might spend a couple of hours creating a database to keep track of your favorite recipes, but youâll wind up entering new information and looking up recipes for years (say, every time you need to cook up dinner).
Access isnât the only Office product that can deal with lists and tables of information. Microsoft Excel also includes features for creating and managing lists. So whatâs the difference?
Although Excelâs perfectly good for small, simple amounts of information, it just canât handle the same quantity and complexity of information as Access. Excel also falters if you need to maintain multiple lists with related information (for example, if you want to track a list with your business customers, and a list of the orders theyâve made). Excel forces you to completely separate these lists, which makes it harder to analyze your data and introduces the possibility of inconsistent information. Access lets you set up strict links between tables, which prevents these problems.
Access also provides all sorts of features that donât have any parallel in the spreadsheet world, such as the ability to create customized search routines, design finetuned forms for data entry, and print a variety of snazzy reports.
Of course, all this isnât to say that Access is better than Excel. In fact, in many cases you might want Excel to partner up with Access. Excel shines when crunching reams of numbers to create graphs, generate statistics, or predict trends. Many organizations use Access to store and manage information, and then export a portion of that information to an Excel spreadsheet whenever they need to analyze it. Youâll learn how to take this step in Chapter 19.
Microsoft provides another database productâthe industrial-strength SQL Server, which powers everything from Microsoftâs own search engine to the NASDAQ stock exchange. Clearly, SQL Server is big business, and many Access fans wonder how their favorite database software compares.
One of the most important differences between Access and database products like SQL Server is that Access is a client-side database. In non-techie terms, that means that Access runs right on your personal computer. Database engines like SQL Server are server-based: They store the data on a high-powered server computer, which you access from a garden variety PC. (This interaction happens over a local network.)
Server-based databases are much more complex to set up and maintain, but they provide enhanced performance and rock-solid stability, even when thousands of people use them at once. However, the only people that require high-end databases like SQL Server are large organizations. Amazon.com wouldnât last five minutes if it had to rely on an Access database. But Access works just fine for most small and mid-sized businesses. Itâs also perfect for personal use. (If you still have lingering doubts about whether Access can meet your needs, check out the box âWhen Access Is Not Enoughâ in Section 3.2.)
Another important difference between Access and server-side database products is that Access is an all-in-one solution for storing and interacting with data. Server-side database engines like SQL Server focus exclusively on storing data (and sending that data to other computers when they request it). However, this single-minded design has a sizable price. An ordinary person canât directly edit a database thatâs stored by SQL Server. Instead, you need to use yet another program that can talk to SQL Server and ask for the information it needs. In most cases, this program needs to be hand-built by a savvy programmer. In other words, if youâre using SQL Server, you need to write a whole application before you can effectively use your database.
Sometimes, Access fans do turn into SQL Server gurus. You can start with a modest Access database and then step up to SQL Server when your needs exceed what Access provides. The process isnât always seamless, but itâs possible. You can even keep using Access as a front-end to manage your SQL Server database. You can learn about this trick in Chapter 20.
Ever since Microsoft Office conquered the world (way back in the 1990s), programs like Word, Excel, and Access havenât changed a lot. Although a genuinely useful new feature appears once in a while, Microsoft spends more time wedging in odd gimmicks like a talking paper clip.
Access 2007 breaks this pattern and introduces some of the most dramatic changes Office fans have seen since Office 95. The most obvious change is the thoroughly revamped user interface (the windows, toolbars, menus, and keyboard shortcuts you use to interact with Access). After spending far too long trying to simplify the haphazard, toolbar-choked interfaces in most Office applications, Microsoft finally worked up the courage to redesign it all from scratch.
The Access 2007 ribbon is a super-toolbar that replaces the various toolbars and menus in previous versions.
Note
Access doesnât show the ribbon until you create a database. If you canât stand the suspense any longer, and you want to be able to look at the ribbon on your monitor as you read the next couple of pages, follow the instructions in Section 1.2.1 to create a blank database.
The ribbonâs divided into task-specific tabsâHome, Create, External Data, and so on. Initially, Access starts out with four tabs (although other tabs appear when you perform specific tasks). When you launch Access, you start at the Home tab. Click Create (as shown in Figure I-2), and you get access to a slew of powerful commands that let you add new database components.
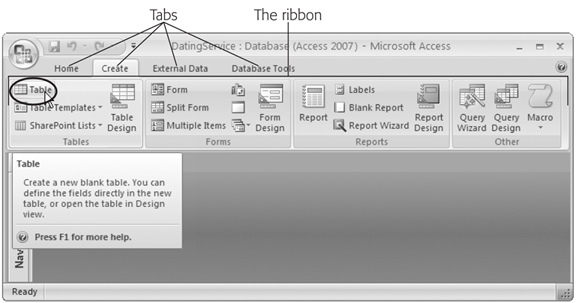
Figure I-2. The ribbonâs full of craftsman-like detail. When you hover over a button, you donât see a paltry two- or threeword description in a yellow box. Instead, you see a friendly pop-up box with a complete mini-description. Here, the mouse is hovering over the Table command.
Tip
Want to reclaim the screen real estate that the ribbon occupies? Just double-click the current tab, and the ribbon collapses, leaving only the row of tab titles visible. Double-click the tab again to pop the buttons back into sight. Section 1.4.2 has more about this feature.
Hereâs a quick snapshot of the four basic ribbon tabs:
Home gathers together a variety of common commands, including the familiar copy-and-paste tools and formatting commands for tweaking fonts and colors. Youâll also find handy features like sorting, searching, and filtering, all of which youâll tackle in Chapter 3.
Create has commands for inserting all the different database objects youâll learn about in this book (see Section 1.2 for the lowdown). These include the tables that store data, the queries that search it, the forms that help you edit it, and the reports that help you print it.
External Data has commands for importing data into Access and exporting it to other programs. Youâll also find features for integrating with Microsoft Share-Point Server. Youâll use these commands in Part Six.
Database Tools features the pro tools youâll use to analyze a database, link tables, and scale up to SQL Server. Youâll also find the commands for inserting Visual Basic code, which youâll explore in detail in Part Five.
Itâs worth spending some time getting accustomed to the tab-based ribbon. Try clicking one tab after the other, rifling back and forth through the four sections to see what they hold. Youâll learn more about all these commands as you make your way through this book.
Tip
If you have a scroll mouse, you can breeze through the tabs even faster by moving the mouse pointer over the ribbon, and then moving the scroll wheel up or down.
One nice ribbon tab feature is that they never changeâin other words, you donât see commands mysteriously moving around or winking out of existence. Microsoft designed the ribbon to be predictable, so commands always remain in the same place. However, commands will change their arrangement a bit if you resize the Access window, so that they better use the available space (Figure I-3).

Figure I-3. This super-skinny Access window doesnât have much room for ribbon buttons. All the same commands that you saw in Figure I-2 are still in the ribbon, but now you see only small icons with no text. When youâre in doubt about a button, hover over it to see its name.
If youâre a diehard keyboard lover, youâll be happy to hear that you can trigger ribbon commands with the keyboard. The trickâs using keyboard accelerators, a series of keystrokes that starts with the Alt key (the same keys you used to use to get to a menu). When using a keyboard accelerator, you donât hold down all the keys at the same time. (As youâll soon see, some of them have enough letters to tie your fingers up better than the rowdiest game of Twister.) Instead, you hit the keys one after the other.
The trick to keyboard accelerators is to understand that once you hit the Alt key, you do two things, in this order:
Pick the correct ribbon tab.
In that tab, choose a command.
Before you can trigger a specific command, you must select the right tab (even if youâre already there). Every accelerator requires at least two key presses after you hit the Alt key. Youâll need even more if you need to dig through a submenu.
By now, this whole process probably seems hopelessly impractical. Are you really expected to memorize dozens of different accelerator key combinations?
Fortunately, Access is ready to help you out with a new feature called KeyTips. Hereâs how it works: Once you press the Alt key, letters magically appear over every tab in the ribbon. Once you hit a key to pick a tab, letters appear over every button in that tab. You can then press the corresponding key to trigger the command. Figure I-4 shows how it works.
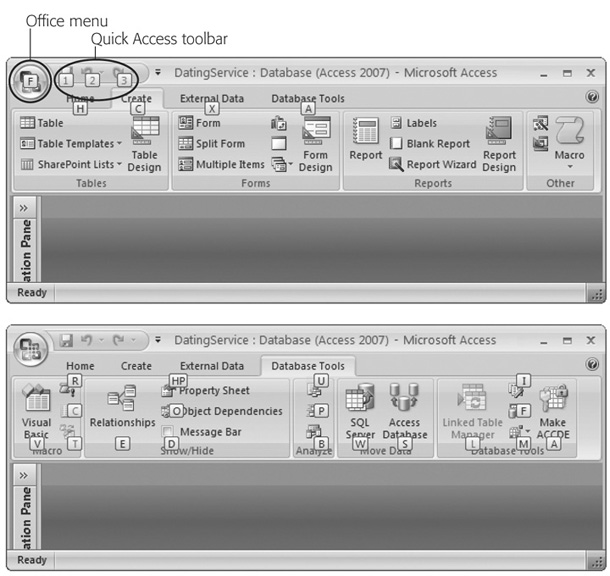
Figure I-4. Top: When you press Alt, Access pins KeyTips next to every tab, over the Office menu, and over the buttons in the Quick Access toolbar (more about the Office menu and the Quick Access toolbar in a moment). Bottom: If you follow up with A (for the Database Tools tab), youâll see letters next to every command in that tab. Now you can hit another key to run a command (for example, W moves your data to SQL Server). Donât bother trying to match letters with tab or button namesâthe ribbonâs got so many features packed into it that in many cases, the letters donât mean anything at all.
Note
In some cases, a command may have two letters, and you need to press both keys, one after the other. You can back out of KeyTips mode at any time without triggering a command by pressing the Alt key again.
Some other shortcut keys donât use the ribbon. These key combinations start with the Ctrl key. For instance, Ctrl+C copies highlighted text, and Ctrl+S saves your current work. Usually, you find out about a shortcut key by hovering over a command with the mouse. Hover over the Paste button in the ribbonâs Home tab, and you see a tooltip that tells you its timesaving shortcut key is Ctrl+V. And if youâve worked with a previous version of Access, youâll find that Access 2007 keeps most of the same shortcut keys.
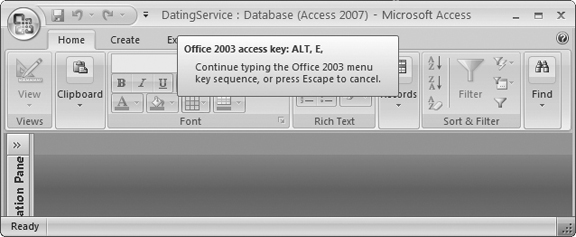
Figure I-5. By pressing Alt+E, youâve triggered the âimaginaryâ Edit menu. You canât actually see it (because it doesnât exist in Access 2007). However, the tooltip lets you know that Access is paying attention. You can now complete your action by pressing the next key for the menu command.
One small part of the traditional Access menuâs left in Access 2007âsort of. The traditional File menu that lets you open, save, and print files has been transformed into the Office menu. You get there using the Office button, which is the big, round logo in the windowâs top-left corner (Figure I-6).
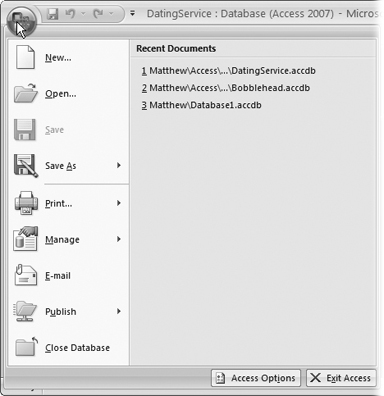
Figure I-6. The Office menuâs bigger and easier to read than a traditional menu. When you click it, it displays a list of menu commands (on the left) and a list of the databases you used recently (on the right).
You generally use the Office menu for three things:
Opening, creating, and saving your database. Youâll do plenty of this in Chapter 1.
Printing your work (Chapter 3) and sending it off to other people by email (Chapter 19).
Configuring how Access behaves. Choose Access Options at the bottom of the menu to get to the Access Options dialog box, an all-in-one hub for configuring Access settings.
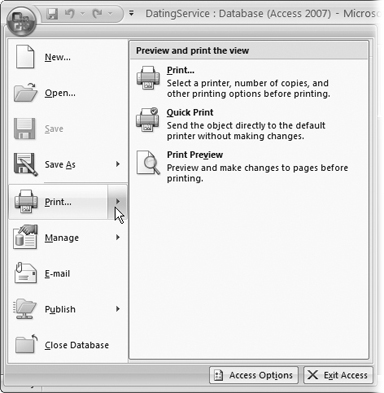
Thereâs one menu quirk that takes a bit of getting used to. Some Office menu commands hide submenus that have more commands. Take the Print command. You can choose Print from the Office menu to fire off a quick printout of your work. But if you click the right-pointing arrow at the edge of the Print command (or if you hover over it for a moment), then you see a submenu with more options, as shown in Figure I-7.
Keen eyes will have noticed the tiny bit of screen real estate that sits on the Office buttonâs right side, just above the ribbon (Figure I-8). This bit of screen holds a series of tiny icons, like the toolbars in older versions of Access. This areaâs the Quick Access toolbar (or QAT to Access nerds).
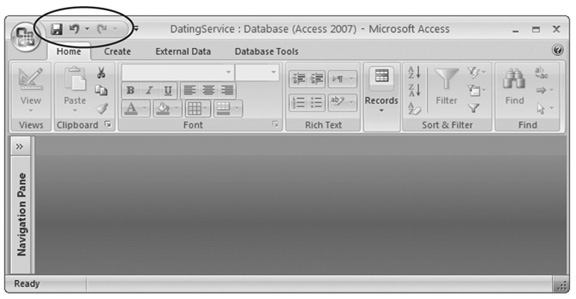
Figure I-8. The Quick Access toolbar puts the Save, Undo, and Redo commands right at your fingertips. Access singles out these commands because people use them more frequently than any other commands. But as youâll learn in the Appendix, you can add anything you want here.
If the Quick Access toolbar were nothing but a specialized shortcut for three commands, it wouldnât be worth the bother. However, the nifty thing about the Quick Access toolbar is that you can customize it. In other words, you can remove commands you donât use, and can add your own favorites. The Appendix shows how.
Microsoftâs deliberately kept the Quick Access toolbar very small. Itâs designed to give a carefully controlled outlet for those customization urges. Even if you go wild stocking the Quick Access toolbar with your own commands, the rest of the ribbon remains unchanged. (And that means a co-worker or spouse can still use your computer without suffering a migraine.)
Access 2007âs most impressive enhancement is the new interface. But the new look isnât the only significant change. When Microsoft decided to rework Access 2007, they created a development team that was seven times larger than the team that created Access 2003. All this extra manpower allowed them to make a number of long-awaited changes. Here are some of the highlights:
A new and improved database engine. Longtime Access pros know that Access uses the Jet engine to manage operations (like inserting and updating data) behind the scenes. Jetâs part of the Microsoft operating system, so itâs rarely changed. But Access 2007 now has its own customized version of Jet, which let Access creators add new features and fine-tune performance. The new database engine goes hand-in-hand with a new database file format, as youâll see in Section 1.2.2.
Note
Donât worry, Access 2007 is 100 percent backward compatible with earlier versions. That means you can keep using old-style Access 2003 databases in Access 2007, although you canât use a few features (like attachments and complex data, described next) until you upgrade to the new file format.
Attachments. One of the niftiest new features in Access is the Attachment data type, which lets you store entire files in your database, including pictures, documents, and spreadsheets. (Movies, music, and other hefty media files need not apply, as all Access databases have a 2 GB database size limit.) Youâll learn how to use attachments in Section 2.3.8.
Easy-to-design forms and reports. Creating an attractive data-entry form or print report used to take a lot of fiddling. In Access 2007, itâs much easier thanks to automatic layoutâa feature that groups related pieces of information together in neat columns or tables. Thereâs even a new Layout view that lets you add formatting and see the results immediately.
Complex data. Complex dataâs an optional new feature that lets you store several values in one field (or data âslotâ). Complex data can simplify your life when you need to link tables together. For example, using complex data, you can associate several authors with a single book. The key reason for introducing complex data is to support the SharePoint integration feature (next on this list).
Note
Complex data isnât for everyone. Some database experts may find it an unnecessary and potentially confusing frill. In Chapter 5 youâll learn how to link tables, and youâll decide whether complex data is a useful shortcut you want to use.
SharePoint integration. SharePoint services are a popular set of features designed to help teams of people share information and collaborate in an organization. These features are built into the Windows Server 2003 operating system. Using Access 2007, you can manage and modify information thatâs stored in a SharePoint list.
Note
You wonât want to use SharePoint if youâre content with the tools Access provides. However, youâll love the SharePoint integration features if youâre already using SharePoint to store information or if you need to share data with lots of people, and an ordinary Access database just canât keep up. Youâll learn more about how Access and SharePoint can work together in Chapter 21.
Better security when dealing with code. As youâll learn in Part Five, database pros use macros and handwritten programming code routines to pull off tricky tasks. However, Access is notoriously suspicious of any code, because it has no way to verify that code wonât do something dangerous (like deleting your files). As a result, Access has an aggravating habit of disabling all your code just to be safe. In Access 2007, you can use the new trust center to specify what databases youâre ready to trust, based on who created them or where theyâre stored. Access 2007 is also smarter about recognizing safe code (code that canât possibly cause damage), which it allows even in untrusted databases.
Despite the many improvements in software over the years, one feature hasnât improved a bit: Microsoftâs documentation. In fact, with Office 2007, you get no printed user guide at all. To learn about the thousands of features included in this software collection, Microsoft expects you to read the online help.
Occasionally, these help screens are actually helpful, like when youâre looking for a quick description explaining a mysterious new function. On the other hand, if youâre trying to learn how to, say, create an attractive chart, youâll find nothing better than terse and occasionally cryptic instructions.
This book is the manual that should have accompanied Access 2007. In these pages, youâll find step-by-step instructions and tips for using almost every Access feature, including those you havenât (yet) heard of.
This book is divided into seven parts, each containing several chapters.
Part One: Storing Information in Tables. In this part, youâll build your first database and learn how to add and edit tables that store information. Then youâll pick up the real-world skills you need to stop mistakes before they happen, browse around your database, and link tables together.
Part Two: Manipulating Data with Queries. In this part, youâll build queriesâspecialized commands that can hunt down the data youâre interested in, apply changes, and summarize vast amounts of information.
Part Three: Printing Reports. This part shows you how to use reports to take the raw data in your tables and format it into neat printouts, complete with fancy formatting and subtotals.
Part Four: Building a User Interface with Forms. In this part, youâll build formsâcustomized windows that make data entry easy, even for Access newbies.
Part Five: Programming Access. Now that youâve mastered the essentials of databases, youâre ready to delve into the black art of Access programming. In this part, youâll use macros and Visual Basic programming to automate complex tasks and solve common challenges.
Part Six: Sharing Access with the Rest of the World. In this part, youâll learn how to pull your data out of (or put your data into) other types of files, like text documents and Excel spreadsheets. Youâll also see how to use Access to interact with some of Microsoftâs most powerful server software: the database engine SQL Server and the collaboration software SharePoint Server.
Part Seven: Appendix. This book wraps up with an appendix that shows how to customize the Quick Access toolbar to get easy access to your favorite commands.
Throughout this book, youâll find sentences like this one: âChoose Create âTables âTable.â This methodâs a shorthand way of telling you how to find a feature in the Access ribbon. It translates to the following instructions: âOn the ribbon, click the Create tab. On the tab, look for the Tables section. In the Tables box, click the Table button.â (Look back to Figure I-2 to see the button youâre looking for.)
As you saw back in Figure I-3, the ribbon adapts itself to different screen sizes. Depending on your Access windowâs size, the button you need to click may not include any text. Instead, it shows up as a small icon. In this situation, you can hover over the mystery button to see its name before deciding whether or not to click it.
If you resize the Access window so that itâs really small, you might run out of space for a section altogether. In that case, you get a single button that has the sectionâs name. Click this button, and the missing commands appear in a drop-down panel (Figure I-9).
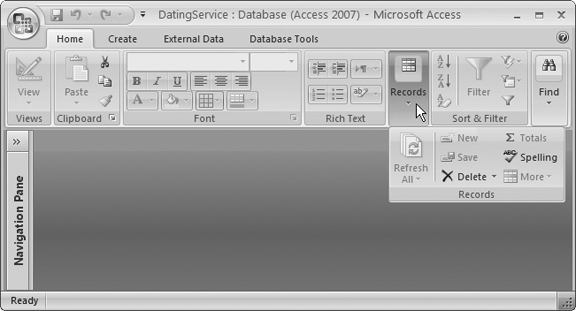
Figure I-9. In this example, Access doesnât have the room to display the Home tabâs Views, Records, or Find sections, so theyâre all replaced with buttons. If you click any of these buttons, then a panel appears with the content youâre looking for.
Although nice, predictable tabs are a great idea, some features obviously make sense only in specific circumstances. Say you start designing a table. You may have a few more features than when youâre entering data. Access handles this situation by adding one or more contextual tabs to the ribbon, based on your current task. These tabs have additional commands that are limited to a specific scenario (Figure I-10).
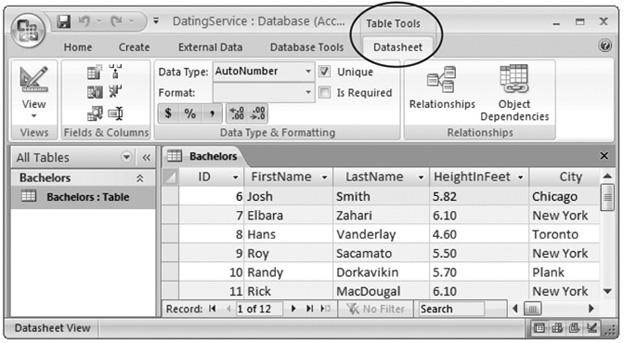
Figure I-10. When youâre designing a table, a new contextual tab appears, named Datasheet, under the heading Table Tools. Contextual tabs always appear on the ribbonâs right side.
When dealing with contextual tabs, the instructions in this book always include the title of the tab section (itâs Table Tools in Figure I-10). Hereâs an example: âChoose Table Tools | Datasheet âFields & Columns âNew Fields.â Notice that this instructionâs first part includes the contextual tab title (Table Tools) and the tab name (Datasheet), separated by the | character.
From time to time youâll encounter buttons in the ribbon that have short menus attached to them. Depending on the button, this menu appears as soon as you click the button, or it appears only if you click the buttonâs drop-down arrow, as shown in Figure I-11.
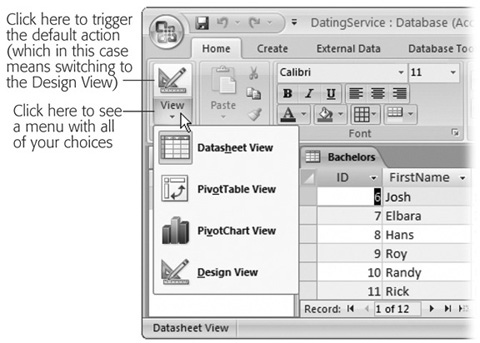
Figure I-11. Access lets you switch between several different views of your database. Click the bottom part of the View button to see the menu of choices shown here, or click the top part to switch to the next view in the list, with no questions asked.
When dealing with this sort of button, the last step of the instructions in this book tells you what to choose from the drop-down menu. For example, say youâre directed to âHome âViews âView âDesign View.â That tells you to select the Home tab, look for the Views section, click the drop-down part of the View button (to reveal the menu with extra options), and then choose Design View from the menu.
Note
Be on the look out for drop-down arrows in the ribbonâtheyâre tricky at first. You need to click the arrow part of the button to see the full list of options. If you click the other part of the button, then you donât see the list. Instead, Access fires off the standard command (the one Access thinks is the most common choice), or the command you used most recently.
As youâve already seen, the ribbon has taken the spotlight from traditional toolbars and menus. However, in a couple of cases, youâll still use the familiar Windows menu, like when you use the Visual Basic editor (in Chapter 16). In this case, the arrows refer to menu levels. The instruction âChoose File âOpenâ means âClick the File menu heading. Then, inside the File menu, click the Open command.â
Youâll find the same thing when you use the Office menu. Instructions for the Office menu look something like this: âChoose Office button âOpen.â That translates to âClick the Office button in the windowâs top-left corner to show the Office menu. Next, choose Open from the menu.â
Every time you take your hand off the keyboard to move the mouse, you lose a few microseconds of time. Thatâs why many experienced computer fans use keystroke combinations instead of toolbars and menus wherever possible. Ctrl+S, for one, is a keyboard shortcut that saves your current work in Access (and most other programs).
When you see a shortcut like Ctrl+S in this book, itâs telling you to hold down the Ctrl key, and, while itâs down, press the letter S, and then release both keys. Similarly, the finger-tangling shortcut Ctrl+Alt+S means hold down Ctrl, then press and hold Alt, and then press S (so that all three keys are held down at once).
This book gives you three kinds of instructions that require you to use your computerâs mouse or trackpad. To click means to point the arrow cursor at something on the screen and thenâwithout moving the cursor at allâpress and release the left-side clicker button on the mouse (or laptop trackpad). To double-click, of course, means to click twice in rapid succession, again without moving the cursor at all. And to drag means to move the cursor while holding down the button.
As you read this book, youâll see a number of examples that demonstrate Access features and techniques for building good databases. Many of these examples are available as Access database files in a separate download. Just surf to http://www.missingmanuals.com, click the link for this book, and then click the âMissing CDâ link to visit a page where you can download a zip file that includes the examples, organized by chapter.
At http://www.missingmanuals.com, youâll find news, articles, and updates to the books in the Missing Manual and For Starters series.
But the Web site also offers corrections and updates to this book (to see them, click the bookâs title, and then click Errata). In fact, youâre invited and encouraged to submit such corrections and updates yourself. In an effort to keep the book as up to date and accurate as possible, each time we print more copies of this book, weâll make any confirmed corrections youâve suggested. Weâll also note such changes on the Web site, so that you can mark important corrections into your own copy of the book, if you like.
In the meantime, weâd love to hear your own suggestions for new books in the Missing Manual and For Starters lines. Thereâs a place for that on the Web site, too, as well as a place to sign up for free email notification of new titles in the series.
When you see a Safari® Enabled icon on the cover of your favorite technology book, that means the book is available online through the OâReilly Network Safari Bookshelf.
Safari offers a solution thatâs better than e-books. Itâs a virtual library that lets you easily search thousands of top tech books, cut and paste code samples, download chapters, and find quick answers when you need the most accurate, current information. Try it for free at http://safari.oreilly.com.
Get Access 2007: The Missing Manual now with the O’Reilly learning platform.
O’Reilly members experience books, live events, courses curated by job role, and more from O’Reilly and nearly 200 top publishers.

