Chapter 4. Linking Tables to Combine Data
IT’S TIME TO LEARN THE MOST POWERFUL technology of all: the very heart of Access and most other modern database managers. So far, this book has dealt only with flat databases—those with only one table, or with several tables that aren’t linked in any way. Each record in a flat database can hold bits of information (fields) about an individual item, and your forms, searches, and sorts are limited to shifting that information around in various ways. Flat databases are perfectly good for some purposes, as explained in the box in Gem in the Rough: When Flat Is Fine.
Ultimately, however, flat databases have a severe limitation: They can’t understand how different masses of information are somehow related to each other the way you can. For example, a Customer database, if it has just that one table, can store information on thousands and thousands of customers and perform sorts and reports on it in seconds. Same thing with tables for Orders and Products. But say you have a nationwide business where you want to increase your sales by targeted marketing for each region of the country. You need the answer to a broader question like, “What do my customers on the West Coast purchase differently from my customers on the East Coast?” You can see the connection between your Customers’ state of residence, the products they buy, and the total amounts ordered in each state, but you need your database to go through all those records and come up with the answer for you.
The problem is, you know the information is in there somewhere, but you have no idea how to tell your database to total up the orders (from the Orders table) for each product (in the Products table) and sort them by state (from the Customers table). Well, that’s exactly what you’ll learn how to do in this chapter. In Access, it’s not hard at all to create the connections—known as relationships—between the tables in a database.
In this chapter, you’ll learn how to design and create linked-table, that is, relational databases. You’ll learn:
Why relational databases are faster and more efficient.
What kinds of links you can create.
How linked tables let you view one table’s datasheet inside another table’s datasheet.
How to create forms that include subforms, which display information from a linked table.
Why Relate?
Relational databases have all the advantages of nonlinked databases and none of their disadvantages. Just as in a flat database, you can keep all your information in one file. But unlike a flat database, you can add more records without changing your table designs, you don’t risk errors or inconsistencies, and you don’t waste disk space with lots of empty columns.
In relational databases, you split up different kinds of information into separate tables. Next, you relate the tables, two at a time, by telling Access about a field that’s the same in both tables. The shared field lets Access pick out which records in one table go with which records in the other table. For example, the CustomerID field you’ve seen in the Customers table (Phase 3: Naming Your Table and Setting a Primary Key) serves as a link between each customer and the orders he or she places. Since they’re unique and unchanging, primary key fields are often also shared fields.
At the beginning of this chapter, you saw an example of a database that calls for linking tables of Customers, Orders, and Products. Even a seemingly simple database, like the Contact Management template that comes with Access, relies on relationships between people and call records. Open it up in the Database window and choose Window → Relationships to see for yourself. How can you tell if your own information needs the relational treatment? Basically, if you’re creating a database for a home-based business or volunteer project, you probably need to link your tables together.
Dig out those notes you took when you were planning your tables in Chapter 2 (Planning Your Tables), and see if any of the following points apply:
You need to store several kinds of data. If you’re running a small business and need to keep information about customers, orders, and inventory, non-linked tables will make you do a lot of extra work. The worst thing you can do is shove all that information into a single table. Combining vastly different kinds of information in a single table is a prescription for disaster. If your table includes information about customers, orders, and inventory, you’ll have a hard time finding anything. Think of a five-inch-thick file folder and multiply by 10.
Different kinds of information change at different times. The names and addresses of individual customers change only occasionally, but the list of orders from each customer may change daily or even hourly. If you keep customer names and addresses in the same table as customer orders, then each customer record must have enough fields to hold the largest number of orders you’ll get from any customer. If even one customer places more orders than that, then you have to change your table design to add more fields for the extra orders.
You need to combine different kinds of data. You may often want to look at a report of orders from each customer. If your customer and order records are in the same table, you can produce such a report, but your table’s a mess. If your customer and order records are in separate, nonlinked tables, then your tables are fine but you can’t combine their information to show which orders came from each customer.
Even after reading the beginning of this chapter, perhaps you still can’t see why you’d separate your information into tables that you’ll have to link together anyway. Seeing is believing, so the example files for this chapter include an example of how not to create a database.
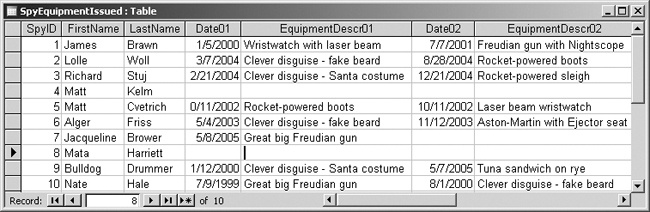
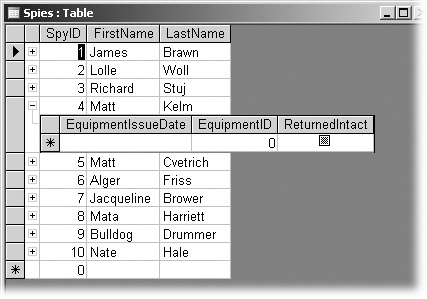
The SpiesAndStuff_bad database simply contains the names and ID numbers for the Acme Spy Agency, plus information about the equipment issued to each spy. Oh, and the dates each spy checked equipment in and out all in one table.
As shown here, the table illustrates all the disadvantages of nonlinked design. You have to enter the same data (like equipment description) over and over. If you make a typing error, the information in different records is inconsistent and you have no way to know which is correct. For example, James Brawn was issued a “Great Big Freudian Gun with nightscope” (item #99), while Jacqueline Brower was issued a Great Big Freudian Gun—with no mention of a nightscope.
Meanwhile, veteran spies like James Brawn have been on so many missions that you run out of columns for more equipment. Newer spies like Matt Kelm and Mata Harriett have no information in their equipment columns—a waste of time and disk space. And what do forms or reports come out looking like? Try creating one at your own peril.
Unfortunately, there’s no easy way to fix a database like this. You have to create the necessary separate tables: one for spies, one for equipment and its IDs and descriptions, and one for records of equipment issued and returned.
A Relational Database Tour
Download (Example Databases) and open the SpiesAndStuff_End database to walk through a preview of how a relational database works. By the end of this chapter, you’ll know how to create all the features you see in this database. After you’ve opened the SpiesAndStuff_End database, choose Tools → Relationships to inspect how it links tables together (see Figure 4-1).
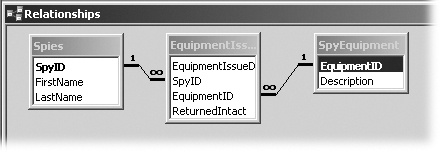
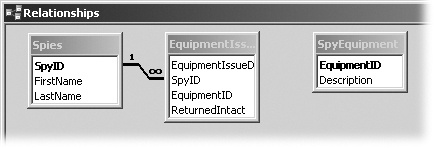
This database contains three tables:
The Spies table lists each spy’s secret ID number as well as his or her first and last names.
The EquipmentIssued table lists the date you issued the equipment, the secret ID number of the spy to whom you issued it, the secret inventory ID number of the equipment, and whether or not the spy returned it intact.
The SpyEquipment table lists the secret inventory ID number and the description of each piece of equipment.
The Relationships window shows that the Spies table is linked to the EquipmentIssued table in a one-to-many relationship, meaning that you can issue equipment to each spy as many times as needed. Likewise, the SpyEquipment table is linked to the EquipmentIssued table in a one-to-many relationship, meaning that you can issue each piece of equipment as many times as needed. For more information about the different types of relationship, see the box below.
Common Fields
A common field is a field that lets you match records in one table with records in another table when you link the tables together. All the tables you link together must include the common field: Without it, Access has no way to match up records. For example, in your spy database, both the Spies table and the EquipmentIssued table have a SpyID field. When you issue equipment to a spy, the equipment-issue record has these fields:
EquipmentIssueDate. The date you issued the equipment.
SpyID. The secret ID of the spy who got the equipment. The same field also appears in the Spies table. When you link the Spies table to the EquipmentIssued table, this field lets Access determine which equipment-issue records go with which spy. If an equipment-issue record has a SpyID value of 1, then you know that the equipment was issued to spy #1, James Brawn.
EquipmentID. The secret inventory ID of the equipment. The same field also appears in the SpyEquipment table. When you link the EquipmentIssued table to the SpyEquipment table, this field lets Access match up the equipment-issue data (date and spy ID) with descriptions of the equipment that you issued.
ReturnedIntact. This Yes/No field shows if the spy returned the equipment in one piece, which almost never happens.
Therefore, you can see that the EquipmentIssued table has not one, but two common fields. The SpyID field lets you link the EquipmentIssued table to the Spies table, while the EquipmentID field lets you link it to the SpyEquipment table.
Tip
You may wonder why equipment descriptions aren’t included in the EquipmentIssued table and are in their own separate table instead. The reason is that separating the descriptions into their own table minimizes repetition of the information and makes for a more efficient database. Instead of repeating equipment descriptions, EquipmentIssued repeats only the equipment inventory numbers.
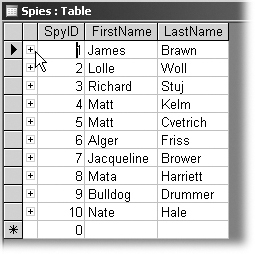
Close the Relationships window. Next, you’ll see what an individual table in a relational database looks like. In the Database window, double-click the Spies table. Access displays the Spies datasheet (see Figure 4-2), which looks like any datasheet in a flat database. The little + signs indicating links are the only giveaway.
Subdatasheets and Subforms
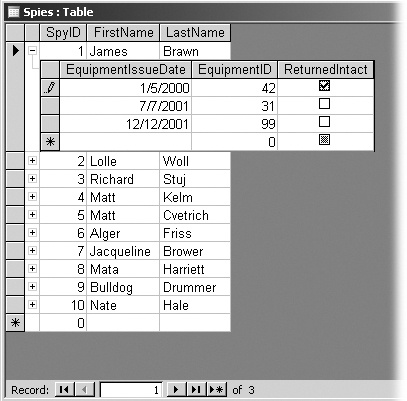
With the Spies datasheet open, at the left end of the row for James Brawn, click the + sign. Access opens a subdatasheet that shows records of all the equipment you’ve issued to James Brawn (see Figure 4-3). You’ll learn about subdatasheets later in this chapter, in the section “Using Subdatasheets” in Using Subdatasheets to View Related Items.
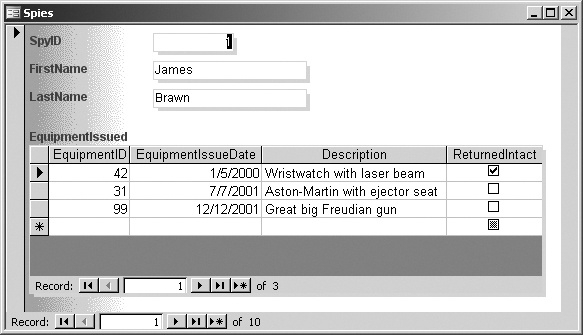
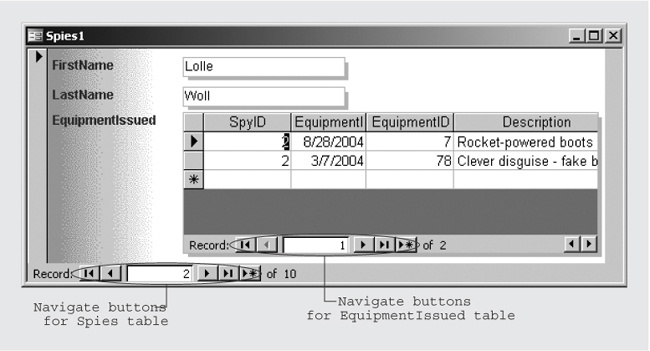
Access’s subdatasheets give you the flexibility to link many layers of information in one database. They also make it easy to create new forms for very specialized purposes. Close the Spies datasheet and, on the Database window’s Objects bar, click Forms. Next, double-click the Spies form. For each record you display in the form, Access shows a subform with all the related records in the EquipmentIssued table (see Figure 4-4).
At the bottom of the Spies form, click Next Record (the right-arrow button) to look at the record of your next spy, Lolle Woll. The subform updates to show equipment you’ve issued to Fraulein Woll. Click Last Record (the right arrow pointing at a vertical line) to see the record of Nate Hale, your only spy who returns equipment intact.
When you’ve finished inspecting the subdatasheet and subform, close the SpiesAndStuff_End database.
Linking Tables in the Relationships Window
Your first step in creating a linked-table database is, unsurprisingly, to set up some links. Download (from the “Missing CD” page described in Example Databases) and open the SpiesAndStuff_Start database.
The tutorial on the following pages shows you how to create relationships between existing tables in this database. You can work with any database of your own as long as:
Your database has more than one table, and you’ve thought through which records you wish to link and why. For example, you need to connect customers to orders so that you can show customer information on an order form. Review Chapter 2 for advice on organizing your tables.
You’ve sketched out (on paper or onscreen) your one-to-many relationships. Review the box in Learning the Lingo: Relationship Types if you’re not sure which records to link.
Each table that you want to link has a common field with the table to which you link it. The common field should be a unique value like SpyID or EquipmentID. (See Up to Speed: Primary Key Primer for a refresher on primary keys.)
Adding Tables to the Relationships Window
After you’ve done your planning, your next step is to add the tables to the Relationships window where you can create the links. To add tables to the Relationships window:
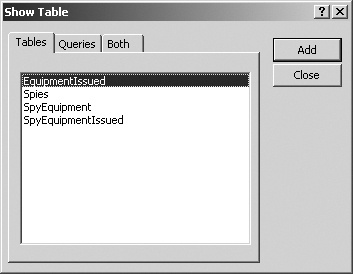
Choose Tools → Relationships to open the Relationships window. Then choose Relationships → Show Table.
Access displays the Show Table dialog box (see Figure 4-5).
In the dialog box, click Spies, and then click the Add button.
Access adds the table to the Relationships window.
Using the same method, add the EquipmentIssued and SpyEquipment tables to the Relationships window.
When you’ve finished, the Relationships window contains all three tables but doesn’t yet show any links between them. You’ll create the links next.
Adding Relationships Between Tables
You need to create relationships between tables before you can have Access combine information from the different tables in your forms, reports, and so on. Once you’ve added tables to the Relationships window, you’re ready to create those relationships by linking the tables together. Here’s how it’s done:
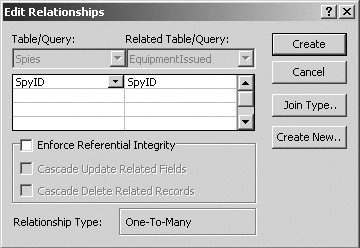
Drag the SpyID field from the Spies table onto the SpyID field in the EquipmentIssued table.
Access displays the Edit Relationships dialog box (Figure 4-6), showing the specifics of the relationship you just created.
Figure 4-6. The Edit Relationships dialog box lets you view and change the features of a link. At the bottom of the dialog box, Access tells you what kind of link it’ll create: Most of the time, your links will be one-to-many.Tip
Normally, the field you use to link tables has the same name in both tables, but it doesn’t have to. You can use differently named fields to link two tables as long as they’re the same data type and, if they’re Number fields, their FieldSize is set to the same value. Regardless of their names, the two fields must contain the same information (like spy ID numbers); otherwise, there’s no way for the link to work.
Click the checkbox labeled Enforce Referential Integrity to turn it on.
As discussed in the box in Gem in the Rough: Integrity in Relationships, enforcing referential integrity prevents you from accidentally deleting linked records.
Click Create.
Access creates the link between Spies and EquipmentIssued. See Figure 4-7 for the result.
This link includes only records from Spies and EquipmentIssued that have matching values in the SpyID field. This type of link is called an inner join, and it’s what Access automatically creates unless you tell it otherwise. See the box in Power Users’ Clinic: More Ways to Join Up for the full story.
Drag the EquipmentID field from the SpyEquipment table onto the EquipmentID field of the EquipmentIssued table. In the dialog box, turn on Enforce Referential Integrity, and then click Create.
Access creates a one-to-many relationship (link) between the SpyEquipment table and the EquipmentIssued table.
You’ve just created all the relationships you need to make this database work. In the next section, you’ll learn how to go back and remove or edit these links as your database grows and evolves.
Modifying or Deleting Relationships
You may need to change or delete a relationship if you made a mistake in setting its properties or simply created the wrong relationship. Fortunately, relationships in Access (just as in life, sadly enough) aren’t set in stone. You can change them or delete them at any time:
To change a relationship, in the Relationships window, double-click its link line. Access displays the Edit Relationships dialog box. Make any changes you want, and then click OK to close the dialog box.
To delete a relationship, in the Relationships window, click its link line. Press the Delete key and then click Yes. Access deletes the relationship.
Tip
If the Show Table dialog box is visible, you must close it before Access will let you click anything in the Relationships window.
In addition to deleting relationships, you can remove an entire table from the Relationships window by deleting any links it has with other tables, and then clicking the table and pressing Delete.
Printing Relationships
If your database has lots of relationships, you may want to print a diagram of the relationships so you can study and analyze them when you’re away from your computer. Seeing the big picture on paper can help you figure out where additional links should be made or how you should modify your database design.
Make sure that your printer is turned on and ready to print. With the Relationships window open, choose File → Print Relationships. Access displays a print preview of the relationships diagram.
Choose File → Print, and then click OK to make Access print the relationships diagram. Close the Print Preview window when you’re done.
Using Subdatasheets to View Related Items
One of the reasons Access is so flexible is that it lets you create subdatasheets to link tables together in multiple ways. Subdatasheets are also what let you create forms within forms (see the box in Power Users’ Clinic: Forms Within Forms). Are you ready for the really good news about subdatasheets? Here’s what you have to do to create them: Nothing. Nada. Nichts. Rien.
After you’ve set up a relationship between two tables, Access automatically adds a subdatasheet of the “many” table to the datasheet of the “one” table. A subdatasheet is simply a datasheet nested within a datasheet, which specifically shows information related or linked to the original datasheet. Just like Datasheet view in Chapter 3, a subdatasheet gets is own Subdatasheet view.
Here’s how to see the subdatasheets that Access has created in the SpiesAndStuff_End database:
On the Database window’s Objects bar, click Tables, and then double-click the Spies table.
Access displays the datasheet for the Spies table. Notice that there’s a + sign at the left end of each row in the datasheet.
Click the + sign for spy #6, Alger Friss.
Access displays a subdatasheet that shows all the equipment issued to Mr. Friss. The + sign turns into a - sign.
Click the + sign for spy #2, Lolle Woll.
Access displays the subdatasheet for Fraulein Woll (see Figure 4-8). You can keep clicking + signs to open up any number of subdatasheets at once. (Your monitor may get a bit crowded, though.)
To close a subdatasheet, click its - sign.
Figure 4-8. The subdatasheets show all the records from a linked table that have the same values in the link field as the selected records in the main table. If the linked table has no records that match a record in the main table, Access still displays the subdatasheet, but it’s empty.Close the datasheet window when you’re done.
Creating Subforms
You can create subforms when you want to view a record in a form with all its linked records in another table—and even add records to the linked table at the same time. Creating subforms isn’t as effortless as creating subdatasheets, but it’s still pretty easy. After you’ve linked tables, you can create forms that draw fields from both tables. If the tables have a one-to-many relationship, the form displays information from the “many” side of the relationship in a subform.
By way of example, you can create a form with an embedded subform in the SpiesAndStuff_Start database you’ve been using in this chapter. By combining fields from the Spies table (the “one” table) and the EquipmentIssued table (the “many” table), this hierarchical form lets you enter a new spy and issue the new recruit some equipment—all on one convenient screen. (See the box in Power Users’ Clinic: Forms Within Forms for the inside scoop on hierarchical forms.)
On the Database window’s Objects bar, click Forms, and then double-click “Create form by using wizard.”
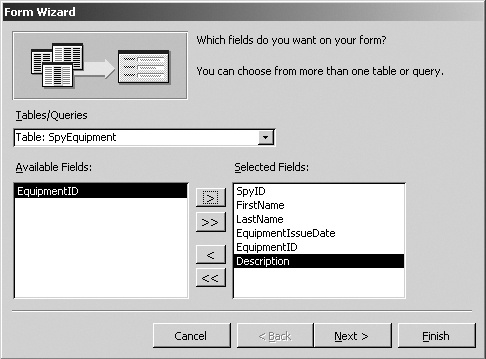
Access displays the first Form Wizard screen (see Figure 4-9).
From the Tables/Queries list box, choose Table: Spies, and then click the double right arrow button to move all the fields into the Selected Fields list.
You’ve just added all the fields in the Spies table to your new form. You also need a couple of fields from the EquipmentIssued table.
From the Tables/Queries list box, choose Table: EquipmentIssued. In the Available Fields list, double-click EquipmentIssueDate and EquipmentID.
Access moves the fields into the Selected Fields list.
From the Tables/Queries list box, choose Table: SpyEquipment. In the Available Fields list, double-click Description, and then click Next.
Access moves the Description field into the Selected Fields list, and then displays the second Form Wizard screen (see Figure 4-10).
Tip
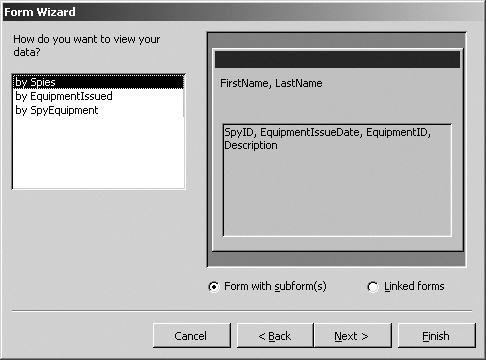
The second Form Wizard screen lets you choose whether you want linked-table data to appear in a subform or a linked form. A subform shows information in an area on the main form. If you choose a linked form, a button appears on the main form and, when clicked, opens the linked form in a separate small window.
Because you want Spies table data to appear on the main part of the form, leave “by Spies” selected under “How do you want to view your data?,” and then click Next.
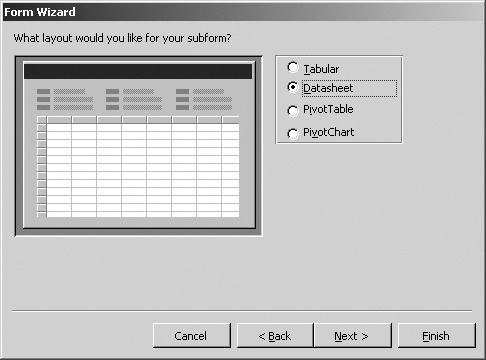
Access displays the third Form Wizard screen (see Figure 4-11). It asks how you want the subform to display your data.
Click the Datasheet radio button, and then click Next.
Access displays the fourth Form Wizard screen, in which you select a form style.
Click Blends, and then click Next.
Access displays the last Form Wizard dialog box. This dialog box lets you name both your form and its subform (or linked form). You can then view the form or open it in the Design window for modification.
The form and subform names that Access suggests are fine, so click Finish.
Access displays your new form (see Figure 4-12). In the main form, it shows information for the first Spies table record, spy #1 James Brawn. In the subform, it shows all spy equipment issued to Mr. Brawn.
Figure 4-12. Using the Form Wizard, you can create a form with an embedded subform. You can use the navigation buttons at the bottom of the main form window to move from record to record in the Spies table. You can use the navigation buttons at the bottom of the subform window to move from record to record in the EquipmentIssued table.
Adding Information in a Subform
Subforms are more than just a good way to look at linked-table data; they’re also a good way to enter it. Suppose that as you’re looking at the form for James Brawn, he comes in and asks for a clever disguise. You consider giving him a chiffon evening dress, but it’s not that kind of spy agency, so you decide to give him item #87, a Santa costume. To add information to James Brawn’s subform:
At the bottom of the subform window, click New Record (the right arrow pointing at an asterisk).
Access moves the insertion point to the first column of a blank row at the bottom of the subform datasheet.
In the EquipmentIssueDate field, type 3/21/2005, and then press Tab.
Access moves the insertion point into the EquipmentID column of the subform’s datasheet.
Are you ready to see something cool?
For the equipment ID, type 87, and then press Tab.
Based on the equipment ID you entered, Access automatically looks up the equipment description in the SpyEquipment table and fills in the next column.
At the bottom of the subform window, click First Record (the left arrow pointing at a vertical line).
Access saves your new record in the linked table and moves the insertion point back to the first equipment record for James Brawn.
Close the Form window when you’re done. Notice that the Database window lists not only the main form you created, but also its subform.
Get Access 2003 for Starters: The Missing Manual now with the O’Reilly learning platform.
O’Reilly members experience books, live events, courses curated by job role, and more from O’Reilly and nearly 200 top publishers.

