If graphics is the heart of WebGL, animation is its soul. With animation, an otherwise static WebGL scene comes to life, making it richer, more informative, and more entertaining. WebGL gives us the ability to render graphics at 60 frames per second; it sure would be a waste of that power if nothing on the screen were moving!
WebGL doesn’t have much in the way of built-in animation capability. However, Three.js has some great animation utilities, and we are starting to see other libraries emerge to fill the vacuum. We will have a look at one, Tween.js, in this chapter. If your application is sufficiently complex, you may find the need to build your own animation framework. Given its relative importance in the world of WebGL, we are going to devote a chapter to learning as much as we can about this topic.
We have already seen simple animation in previous chapters, such as spinning cubes, rotating planets, and dancing textures that simulate the sun. Admittedly, we created some nice effects, but most of the animations were done as ad hoc hacks to support learning graphics. In this chapter, we will take a more formal approach to animating our WebGL scenes. Let’s start by talking about core concepts.
Ultimately, animation is about something on the screen changing over time: cars driving, lights blinking, facial expressions changing. These are different effects, achieved through various techniques, but in the end, they all result in making changes to the rendered scene over time.
Computer-generated animation traces its roots back to film and cartoon cel animation. You are probably aware that a film’s moving picture is composed of a series of still images, or frames, that, when presented in rapid succession, trick the eye into perceiving a smooth, moving image. In cartoons, a series of transparent overlays, or cels, are placed on a still background to create the illusion of the cel’s contents moving against that background. This technique of presenting a succession of discrete frames, tied to a specific fraction of a second in time, is known as frame-based animation.
Early computer animation systems emulated this technique from film by presenting a succession of still images on the display, or, in vector-based graphics, a series of vector-based images generated by the program for each frame. Historically, film was shot and played back at a rate of 24 images per second, known as a frame rate of 24 frames per second (FPS). This speed was adequate for large projection screens in low light settings. However, in the world of computer-generated animation and 3D games, our senses are actually able to perceive and appreciate changes that occur at higher frame rates, upward of 30 and up to 60 or more FPS. Despite this, many animation systems, such as Adobe Flash, originally adopted the 24 FPS convention due to its familiarity for traditional animators (not to mention having to live with the practical constraints at the time—namely, slow computers that had a hard time actually presenting the images that fast). These days, the frame rates have changed—Flash supports 60 FPS if the developer requests it—but the concept of discrete frames remains.
Frame-based animation has one serious drawback: by tying it to a specific frame rate, the animator has ensured that the animation will never be able to be presented at a higher frame rate, even if the computer can support it. This was no big deal for film, where the hardware was fairly uniform throughout the industry. However, in computer animation, performance can vary wildly from one device to the next. If you create your animations at 24 FPS, but your computer can handle 60, you effectively deprive the user of resolution and smoothness.
Another technique, known as time-based animation, solves this problem. In time-based animation, a series of vector graphics images is connected to particular points in time, not specific frames in a sequence with known frame rates. In this way, the computer can present those images and the interpolated frames in between them (see the next section) as frequently as possible and deliver the best images and smoothest transitions. We actually saw an example of time-based animation at work in our shader-based sun in Chapter 3: elapsed time was used as the driving function to change the pixels on the sun’s surface. All of the examples developed for this and subsequent chapters use time-based animation.
Vector graphics differs fundamentally from bitmapped graphics. Rather than presenting an image on the screen, a program makes calls to a drawing library using primitives such as lines and polygons. Because of this, animators can take advantage of a very powerful animation technique known as tweening to save time. Tweening is the process of generating vector values that lie in between a pair of other vector values. With tweening, an animator does not need to supply the vector values of the graphic for each frame; he can supply them, say, every half second or at preferred positions, called keyframes, and the computer generates (tweens) the intervening values.
Note
Bitmap-based tweening is also possible, but its use is very limited to effects such as a morph between two images.
Tweening is accomplished using a mathematical technique called interpolation. Interpolation refers to the generation of a value that lies between two values, based on a scalar value input such as a time or fraction value. Interpolation is illustrated in Figure 4-1. For any values A and B, and a fraction u between 0 and 1, the interpolated value P can be calculated by the formula A + u * (B-A). This is the simplest form of interpolation, known as linear interpolation because the mathematical function used to calculate the result could be graphed with a straight line. Other, more complex interpolation functions, such as splines (a type of curve) and polynomials, are also used in animation systems.
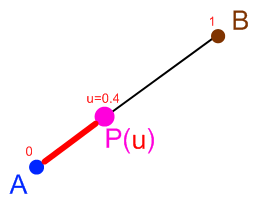
Figure 4-1. Linear interpolation (available at http://content.gpwiki.org/images/0/06/Linear_interlopation_diagram.png)
In 3D animation, interpolation is used to calculate tweens of 3D positions, rotations, colors, scalar values (such as transparency), and more. With a multicomponent value such as a 3D vector, a linearly interpolated tween simply interpolates each component piecewise. For example, the interpolated value P at u=0.5 for the 3D vector AB from (0, 0, 0) to (1, 2, 3) would be (0.5, 1, 1.5).
A very simple animation, such as moving an object from one point on the screen to another, can be achieved by specifying the two end points and a time duration. Over that duration, u values are continually recalculated as a fraction between 0 and 1 (elapsed time, divided by the duration) and the resultant tween computed as an interpolation based on u.
More complex animations take the tween concept to the next level, using keyframes. Rather than specifying a single pair of values to tween, a keyframe animation consists of a list of values, with potentially different durations in between each successive value. Example 4-1 shows sample keyframe values for an animation that move an object from the origin up and away from the camera. Over the course of one second, the object moves upward in the first quarter of a second, then up some more and away from the camera in the remaining three-quarters of a second. The animation system will calculate tweens for the points (0, 0, 0) to (0, 1, 0) over the first quarter second, then tweens for (0, 1, 0) to (0, 2, 5) over the remaining three quarters of a second. Keyframe animations can work with linear interpolation, or more complex interpolation such as spline-based; the data points representing the keys can be treated as points in a line graph or as the graph of a more complicated function such as a cubic spline.
Example 4-1. Sample keyframe data
var keys = [0, 0.25, 1];
var values = [new THREE.Vector3(0, 0, 0),
    new THREE.Vector3(0, 1, 0),
    new THREE.Vector3(0, 2, 5)];
Note that the term keyframe animation is used in both frame-based and time-based systems—a holdover from frame-based nomenclature. Keyframing works equally well in both types of animation system.
The animation strategies we have discussed so far can be used to move simple objects in place (i.e., with rotation) or around the screen, and they can also be used to create complex motions in composite objects using a transform hierarchy. We saw this in play in the preceding chapter in the solar system model as the Earth moved in orbit around the sun, and the moon around the Earth. Watch the model in action, and you will see the moon trace a rather complicated path around the sun. This is the net effect of individually animating the combined transforms.
In the case of the solar system, the moon’s eccentric path around the sun is a bit of an accident, the natural outcome of the hierarchy of celestial bodies. But we can take advantage of this same capability to create an intentional effect in our animations. Let’s say we want to create a robot that walks and waves its arms. We would model the robot as a hierarchical structure: the robot body contains an upper body and lower body, the upper body contains arms and a torso, the arms contain upper arms and lower arms, and so on. By properly constructing the hierarchy and animating the right parts, we can get the robot to moves its arms and legs. We will do just that later in this chapter. The technique of constructing bodies by combining a hierarchy of discrete parts and animating them in combinations is known as articulated animation.
Articulated animation works very well for inorganic objects—robots, cars, machines, and so on. It breaks down badly for organic objects. Plants swaying in the breeze, animals bounding, and people dancing all involve changes to the geometry of a mesh—for example, skin ripples, muscles bulge. It is nearly impossible to do this well with the Tinkertoy approach that is articulated animation. So we turn to another technique called skinned animation, or single mesh animation.
Skinned animation involves deforming the actual vertices of a mesh, or skin, over time. There is still a hierarchy underlying the animation, known as a skeleton. It is like the body of the robot, but it is only used as the underlying mechanism for animating; we don’t see it on the screen. Changes to the skeleton, combined with additional data describing how the skeleton influences changes to the skin in various regions of the mesh, drive the skinned animation. We will demonstrate an example of a skinned animation in a later chapter.
We have one final animation concept to cover briefly before we get our hands dirty: morph target animation, or simply, morphing. Morphing involves vertex-based interpolations used to change the vertices of a mesh. Typically, a subset of the vertices of a mesh is stored, along with their indices, as a set of morph targets to be used in a tween. The tween interpolates between each of the vertex values in the morph targets, and the animation uses the interpolated values to deform the vertices in the mesh. Morph targets are excellent for facial expressions and other fine details that are not so easy to implement in a skinned animation; they are quite compact and don’t require a highly detailed skeleton with numerous facial bones.
In addition, they allow the animator to create very specific expressions by tweaking the mesh right down to the vertex level. Figure 4-2 illustrates the use of morphing to create facial expressions. Each different expression, such as the pursed lips or the smile, is represented by a set of vertices including the mouth and surrounding areas.
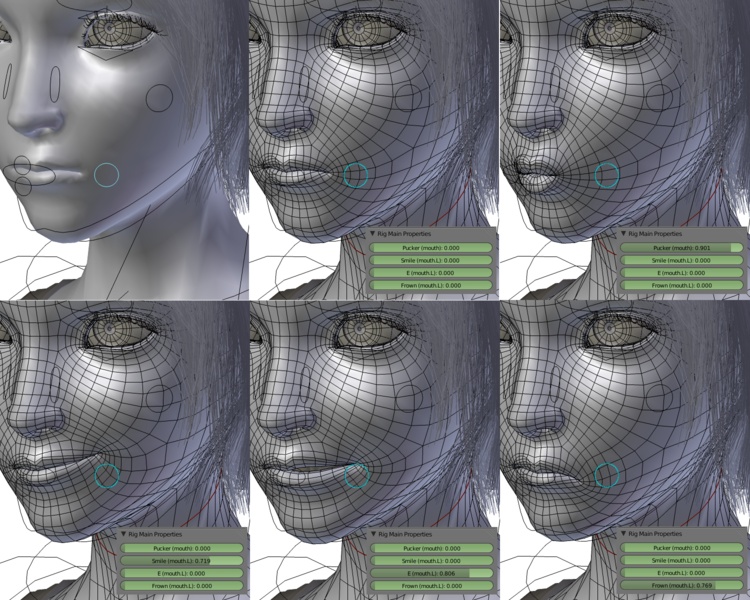
Figure 4-2. Facial morphs (http://en.wikipedia.org/wiki/File:Sintel-face-morph.png, Creative Commons Attribution-Share Alike 3.0 Unported license)
It’s pretty straightforward to implement a basic animation engine on your own. Still, there are a lot of details to get right, especially if you want to have nonlinear interpolation functions, and bells and whistles like ease in/ease out, where the animation appears to accelerate to its main speed and decelerate out of it. Tween.js, an open source tweening library created by Soledad Penadés (https://github.com/sole), is gaining popularity in web development, particularly for use with the Three.js tookit.
Tween.js is really handy for quickly building simple tweens with ease in/out functionality. I personally find that it breaks down for use in complex animations. But it’s a great place to get started. Let’s build our first animations using Tween.js. Go get the latest GitHub repository at https://github.com/sole/tween.js and we’ll get going.
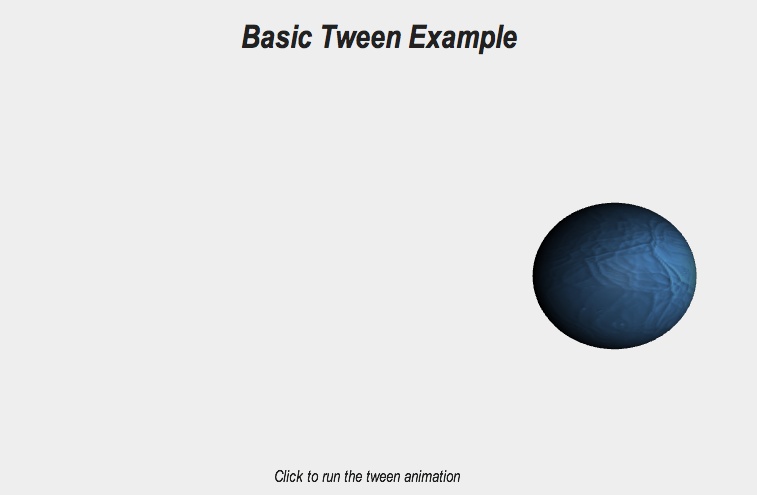
Figures 4-3 and 4-4 show before-and-after screenshots of our first animation. Open the example file Chapter 4/tween-basic.html, and click in the content area to run the animation. You should see the ball move slowly from the left side of the page to the right. Click again and it will move slowly back to the left.
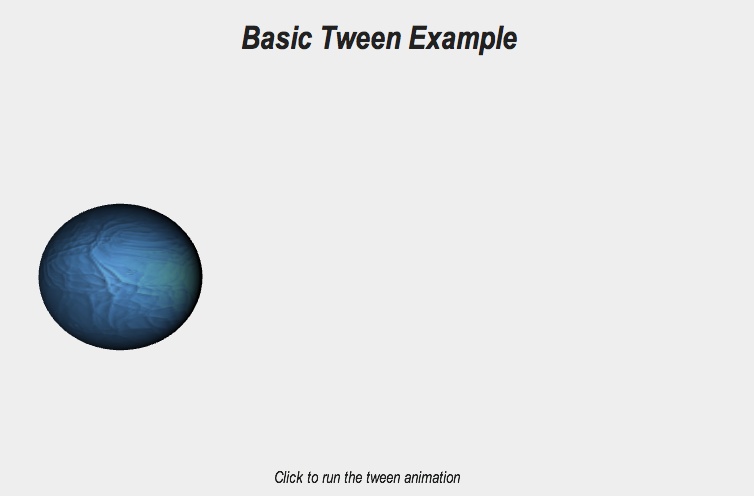
Figure 4-3. Basic tween example (before); texture map from http://www.textures123.com/free/game-texture.html
The code for this page is listed in Example 4-2, and the JavaScript implementation can be found in file Chapter 4/tween-basic.js.
Example 4-2. Basic tween example using Tween.js
...
// Our custom initializer
TweenApp.prototype.init = function(param)
{
    // Call superclass init code to set up scene, renderer,
    default camera
    Sim.App.prototype.init.call(this, param);

    // Create a point light to show off the MovingBall
    var light = new THREE.PointLight( 0xffffff, 1, 100);
    light.position.set(0, 0, 20);
    this.scene.add(light);

    this.camera.position.z = 6.667;

    // Create the MovingBall and add it to our sim
    var movingBall = new MovingBall();
    movingBall.init();
    this.addObject(movingBall);

    this.movingBall = movingBall;
}

TweenApp.prototype.update = function()
{
    TWEEN.update();

    Sim.App.prototype.update.call(this);

}

TweenApp.prototype.handleMouseUp = function(x, y)
{
    this.movingBall.animate();
}

// Custom MovingBall class
MovingBall = function()
{
    Sim.Object.call(this);
}

MovingBall.prototype = new Sim.Object();

MovingBall.prototype.init = function()
{
    // Create our MovingBall
    var BALL_TEXTURE = "../images/ball_texture.jpg";
    var geometry = new THREE.SphereGeometry(1, 32, 32);
    var material = new THREE.MeshPhongMaterial(
            { map: THREE.ImageUtils.loadTexture(BALL_TEXTURE) } );
    var mesh = new THREE.Mesh( geometry, material );
    mesh.position.x = −3.333;

    // Tell the framework about our object
    this.setObject3D(mesh);
}

MovingBall.prototype.animate = function()
{
    var newpos;
    if (this.object3D.position.x > 0)
    {
        newpos = this.object3D.position.x - 6.667;
    }
    else
    {
        newpos = this.object3D.position.x + 6.667;
    }

    new TWEEN.Tween(this.object3D.position)
    .to( {
        x: newpos
    }, 2000).start();
}
Continuing with our use of Sim.js (introduced in the preceding chapter), we create an application object, TweenApp. We’ll skip over the usual object framing and go right to TweenApp.init(). It creates a light, positions the camera for viewing, and then creates an object of type MovingBall (subclass of Sim.Object). MovingBall is where most of the action is going to take place. But note one more thing about TweenApp: it calls the Tween.js update function, TWEEN.update(), every frame. TWEEN.update() goes through its current list of active animations, updating each one. If we don’t call this function, we won’t see any animations.
On to MovingBall: the fun here is in the animate() method. First, we apply a little logic to obtain an end position for the animation. If the ball is on the left side, the end position will be on the right, and vice versa. Then we create the tween (code highlighted in bold) and run the animation. Over the course of two seconds, the ball will move smoothly across the screen.
There are actually three things going on here: (1) we create a new TWEEN.Tween object, passing in the target object to animate (i.e.,
the mesh’s position vector); (2) we call its to()
method, which sets the target parameters of the animation—in this case, this will
animate this.object3D.position.x (ah…the magic
of JavaScript property introspection!) over two seconds; and (3) we call the tween
object’s start() method, to start the
animation. One subtlety here is that TWEEN.Tween.to() returns this, allowing methods to be chained, in the style of
jQuery. So, in one compact line of code we have created the tween, connected it to
our target object, set the target animation parameters, and fired up the animation.
Pretty cool.
Our preceding example showed the basics of tweening with Tween.js, but it felt a little flat. The ball moved from one side of the screen to another at a constant rate, with no dynamic changes. It worked, but it didn’t feel very natural. We can make more compelling animations by incorporating easing—nonlinear functions applied to the start and end of the animation that make it appear to accelerate to its main speed and decelerate out of it.
Run the example depicted in Figure 4-5. See how the ball moves downward at a constant speed initially, then slows down and lands softly at the bottom. Click again; see it move up slowly and then pick up speed to the top. The downward animation is an example of an ease out effect, the upward an example of ease in.
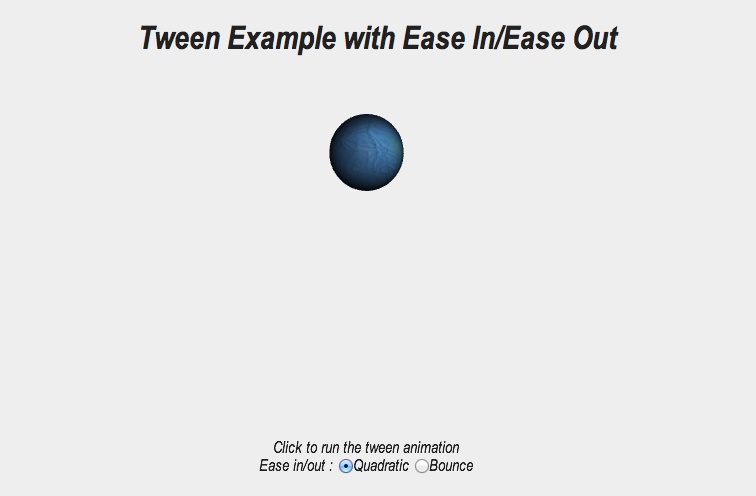
Now click on the radio button labeled Bounce. This will tell the application to use a different style of easing. Click on the content area and watch the ball bounce as it hits the bottom; click again and the ball will bounce its way up. We are still using ease out on the way down—the ball starts at a constant speed, then seems to speed up, then finally bounces a few times—and ease in on the way up. But this time we are applying a different easing function. Let’s have a look at an excerpt from the code (see Example 4-3).
Example 4-3. Using Tween.js easing functions
MovingBall.prototype.animate = function()
{
    var newpos, easefn;
    if (this.object3D.position.y > 0)
    {
        newpos = this.object3D.position.y - 6.667;
        easefn = MovingBall.useBounceFunction ?
                TWEEN.Easing.Bounce.EaseOut :
                TWEEN.Easing.Quadratic.EaseOut;
    }
    else
    {
        newpos = this.object3D.position.y + 6.667;
        easefn = MovingBall.useBounceFunction ?
                TWEEN.Easing.Bounce.EaseIn :
                TWEEN.Easing.Quadratic.EaseIn;
    }

    new TWEEN.Tween(this.object3D.position)
    .to( {
        y: newpos
    }, 2000)
    .easing(easefn).start();

}

MovingBall.useBounceFunction = false;
From the preceding example, we have modified MovingBall.animate() and added a
static variable, useBounceFunction, which flags
whether to use the bounce easing functions. animate() now contains additional logic to determine which Tween.js
easing functions to use. TWEEN.Easing.Bounce.EaseOut and the other similarly named easing
functions are just that: JavaScript functions. Under the covers, Tween.js applies
the easing function to the time value, effectively slowing, speeding up, stopping,
and/or reversing time before passing it to the tweening evaluator. Once again, the
function calls are chained together, because each one returns this, making for a compact coding style.
Note
The Tween.js easing functions are based on the ActionScript animation work of Robert Penner (http://www.robertpenner.com/index2.html). They offer a wide range of powerful easing equations, including linear, quadratic, quartic, sinusoidal, and exponential. Mr. Penner has created a handy page for trying them out using a simple 2D animation, http://gizma.com/easing/. Experiment with them and see what kind of effects you can achieve. These equations have also now been incorporated into the popular jQuery animate() function.
Easing is a great tool for adding a more realistic look to your tween animations. It can even do a fair job approximating physics—such as in our bouncing ball example—without the hard work and computational overhead of adding a physics engine to your application. I have also discovered that, combined with interaction, easing can provide for a much more organic and intuitive user experience. By connecting ease in/out tweens to input actions, you can create iOS-style drag and swipe behaviors that feel almost physical, with apparent inertia, momentum, and other lifelike qualities. We’ll be talking about this in the next chapter.
As we have just seen, tweens can be great for quickly creating simple effects. Tween.js actually lets you chain animations together into a sequence so that you can compose simple effects into more powerful ones. However, as you begin building complex animation sequences you are going to want a more general solution. With that in mind, we take leave of Tween.js and move on to creating animations based on a keyframe system.
Articulated animations move objects by moving their transforms (i.e., positioning and rotating them). Typically not just one transform is animated, but several are animated in a hierarchy. There is no more fun example of articulated animation in action than a robot, so let’s animate one. Figure 4-6 depicts a cartoon bot, ready for action.
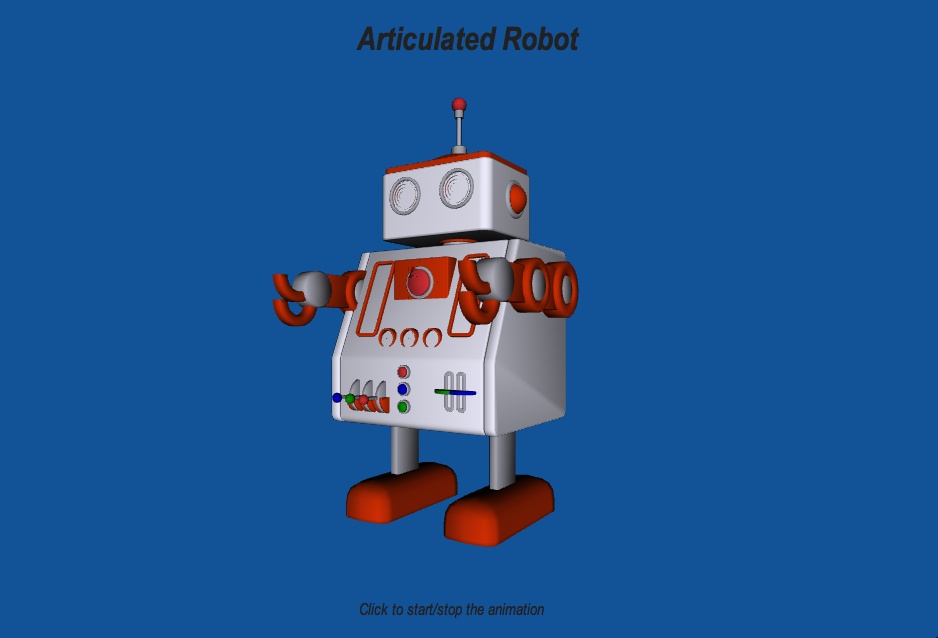
Figure 4-6. Articulated animation using keyframes; model by 3DBS, http://www.turbosquid.com/FullPreview/Index.cfm/ID/475463
Launch the file Chapter 4/keyframe-robot.html to see the robot go. He rotates automatically on page load so that we can get a good look at him from all sides. Click on the content area to start the animation and you will see him go through a walk cycle: the legs alternate taking steps; the body rocks back and forth; the head bobs; the wind-up key rotates. Let’s get into the code to see how it’s done.
Thus far, I have been steering clear of talking about modeling formats, because we are going to devote the better part of a chapter to the subject later on. However, at this point, we really need to get into it; otherwise, we would have to build the robot’s appearance by hand, programming cubes, cylinders, and such…and the results would be less than pretty. So, I decided to buy a model from TurboSquid (http://www.turbosquid.com), a leading 3D art site. TurboSquid offers models in several different file formats, at a wide range of prices, including free. I purchased a “cartoon robot” in the COLLADA file format, an open format defined by the Khronos Group (the same folks who brought us WebGL).
After the usual setup code, we create a new Robot class to implement the robot. First up, we load the model. The excerpt listed in Example 4-4 (file Chapter 4/keyframe-robot.js) shows the code to load the model.
Example 4-4. Loading the robot model
Robot.prototype.init = function()
{
    // Create a group to hold the robot
    var bodygroup = new THREE.Object3D;
    // Tell the framework about our object
    this.setObject3D(bodygroup);

    var that = this;
    // GREAT cartoon robot model -
    http://www.turbosquid.com/FullPreview/Index.cfm/ID/475463
    // Licensed
    var url = '../models/robot_cartoon_02/robot_cartoon_02.dae';
    var loader = new Sim.ColladaLoader;
    loader.load(url, function (data) {
        that.handleLoaded(data)
    });
}

Robot.prototype.handleLoaded = function(data)
{
    if (data)
    {
        var model = data.scene;
        // This model in cm, we're working in meters, scale down
        model.scale.set(.01, .01, .01);

        this.object3D.add(model);

        // Walk through model looking for known named parts
        var that = this;
        THREE.SceneUtils.traverseHierarchy(model,
            function (n) { that.traverseCallback(n); });

        this.createAnimation();
    }
}

Robot.prototype.traverseCallback = function(n)
{
    // Function to find the parts we need to animate. C'est facile!
    switch (n.name)
    {
        case 'jambe_G' :
            this.left_leg = n;
            break;
        case 'jambe_D' :
            this.right_leg = n;
            break;
        case 'head_container' :
            this.head = n;
            break;
        case 'clef' :
            this.key = n;
            break;
        default :
            break;
    }
}
Our Robot class uses a helper object, Sim.ColladaLoader, to load the COLLADA model file located in models/robot_cartoon_02/robot_cartoon_02.dae. (This class is actually a modified version of the Three.js COLLADA file loader code, adapted to work around a few issues.) We provide a callback function so that the loader can notify us when the file has been downloaded and parsed. The callback, handleLoaded(), grabs the content from data.scene, saves it into a local variable model, and scales the model to meter-sized units, because it was modeled in centimeters. We know this by inspecting the COLLADA file. Open it with a text editor and look at line 9:
<unit meter="0.01" name="centimeter"/>
We then insert the model into the scene by adding it as a child of our main group. Before we can animate the model, we need to do one more thing: get access to certain children of the top-level model group in order to animate them. The Three.js utility function THREE.SceneUtils.traverseHierarchy() lets us iterate through the object hierarchy to find what we need. In this case, I had to dust off my college French (presumably the native tongue of the artist) to find the legs, head, and wind-up key. Note the one English name: that was something I had to actually add to the model to group all the objects for the head together so that they would animate as a group. With that done, we are now ready to animate the model.
Three.js comes with built-in animation support. Have a look at the sources under the Three.js tree in src/extras/animation and get familiar with the utilities. They are general and powerful—but at the same time I personally find them overkill when it comes to simple keyframing. To explore the basics of keyframe animation, we are going to instead use my own homegrown objects from the Sim.js library.
Our HTML file includes the script sim/animation.js, which defines two classes. Sim.KeyFrameAnimator is responsible for running an animation containing one or more interpolators. It contains methods to start, stop, and run the animation, a duration parameter, and a loop flag so that you can make the animation run indefinitely. The animation is run out of the animator’s update() method, which loops through its list of interpolators to perform a time-based interpolation.
Sim.Interpolator contains a list of
keys and values. As with Tween.js, the values are objects that can contain anything:
a scalar, a position value, a rotation value, or whatever you like (just make sure
the objects’ properties have the same names in every value object). The interp() method performs the
interpolation, calling its helper method tween() as needed. Sim.Interpolator also takes a target parameter (i.e., an object to copy the interpolated values
into). Currently, Sim.Interpolator implements
only simple linear interpolation.
Example 4-5 shows the code to set up the
animation. We create a new Sim.KeyFrameAnimator,
initializing it with our interpolator keys and values. Under the covers, the
constructor will create instances of Sim.Interpolator objects, one for each entry in the interps array. We set loop to true so that the animation
will go on indefinitely (or until we explicitly call stop()). Finally we set the duration to a predefined constant value (in this case, just over one
second). Once that value is reached, the animation will resume from the beginning
automatically, creating the loop.
Example 4-5. Creating the animation
Robot.prototype.createAnimation = function()
{
    this.animator = new Sim.KeyFrameAnimator;
    this.animator.init({
        interps:
            [
                { keys:Robot.bodyRotationKeys,
                    values:Robot.bodyRotationValues,
                    target:this.object3D.rotation },
                { keys:Robot.headRotationKeys,
                    values:Robot.headRotationValues,
                    target:this.head.rotation },
                { keys:Robot.keyRotationKeys,
                    values:Robot.keyRotationValues,
                    target:this.key.rotation },
                { keys:Robot.leftLegRotationKeys,
values:Robot.leftLegRotationValues, target:this.left_leg.rotation },
                { keys:Robot.rightLegRotationKeys,
values:Robot.rightLegRotationValues, target:this.right_leg.rotation },
            ],
        loop: true,
        duration:RobotApp.animation_time
    });

    this.animator.subscribe("complete", this, this.onAnimationComplete);

    this.addChild(this.animator);
}
Now let’s look at the interpolator data, shown in Example 4-6. This is defined as a set of properties of the Robot class.
Example 4-6. Keyframe interpolator data
Robot.headRotationKeys = [0, .25, .5, .75, 1];
Robot.headRotationValues = [ { z: 0 },
                                { z: -Math.PI / 96 },
                                { z: 0 },
                                { z: Math.PI / 96 },
                                { z: 0 },
                                ];

Robot.bodyRotationKeys = [0, .25, .5, .75, 1];
Robot.bodyRotationValues = [ { x: 0 },
                                { x: -Math.PI / 48 },
                                { x: 0 },
                                { x: Math.PI / 48 },
                                { x: 0 },
                                ];

Robot.keyRotationKeys = [0, .25, .5, .75, 1];
Robot.keyRotationValues = [ { x: 0 },
                                { x: Math.PI / 4 },
                                { x: Math.PI / 2 },
                                { x: Math.PI * 3 / 4 },
                                { x: Math.PI },
                                ];

Robot.leftLegRotationKeys = [0, .25, .5, .75, 1];
Robot.leftLegRotationValues = [ { z: 0 },
                                { z: Math.PI / 6},
                                { z: 0 },
                                { z: 0 },
                                { z: 0 },
                                ];

Robot.rightLegRotationKeys = [0, .25, .5, .75, 1];
Robot.rightLegRotationValues = [ { z: 0 },
                                { z: 0 },
                                { z: 0 },
                                { z: Math.PI / 6},
                                { z: 0 },
                                ];
Note the numeric values for each array of keys. Sim.Interpolator.interp() takes fractional values as input. The time
values generated by Sim.KeyFrameAnimator’s update
method are normalized to the interval [0..1],
based on the passed-in duration value: in other
words, 0 is the start time of the animation,
1 the end time (or end of a loop cycle, if
loop is set to true), regardless of the actual duration of the animation. In this
way, we can change the duration of the animation without having to recode all the
keys.
In this example, we use five keys for each interpolator, slicing the time interval (cycle) equally into quarters. There is nothing that forces us to use the same number of keys, or the same numeric values for the keys; each set can be different. It just so happens that in this example we want most things to happen at half- and quarter-cycle intervals, so our keys are all the same. The head bobs forward and then back to center over half a cycle, then backward and to center over the second half cycle. The legs alternate moving forward and back by staggering their rotations: the leg left moves from resting rotation to forward over the first quarter cycle, then back to resting at the half cycle; the right leg waits until the half cycle to rotate forward and back. The key simply rotates smoothly in a circle. Finally, the entire body bobs first to the right, then to the left, as the legs move.
This example illustrates the power of the transform hierarchy working in concert with
keyframes to create the articulated animation. Transforming an object transforms its
descendants, too: rotating the top-level object3D rotates the entire
robot model; rotating a leg rotates the foot along with it; rotating the head group
moves the entire head.
Note
You may have noticed that the x- and z-axes for the rotation values are flipped from what you would expect. I can only assume that the artist originally built this model for still renders, not articulated animation. But with a simple x-y swap we have made it work.
That’s it for our articulated animation example, and we have still only scratched the surface of using keyframes. Keyframes don’t have to use simple linear interpolation; they can employ more powerful types that use nonlinear tweens and easing. In addition to rotations, they can be used to animate position, scale, scalar values (colors, light intensities, etc.), 2D transforms for textures, and more. We will see some of these capabilities in action as we explore how to animate materials, lights, and textures.
Animation is really about making changes to the pixels on the screen over time. Those changes don’t have to be confined to the transform hierarchy; we can also animate materials and lights to create cool effects.
Most Three.js objects are dynamic in nature: if you change a property such as a position or rotation, you will see that change in the next rendered frame. This is true of materials and lights: changes to the transparency or color value of a material, or the color or intensity of a light, will take immediate effect. Let’s combine this idea with keyframe animation and have some fun.
Launch the file Chapter 4/keyframe-material.html and you will see a simple scene with a grid floor and some primitives. Each primitive demonstrates animating a different material property: the red sphere’s opacity, the blue cube’s color, and the yellow cylinder’s specular highlights. Click the checkboxes to turn these features on and off. Figure 4-7 shows a screenshot.
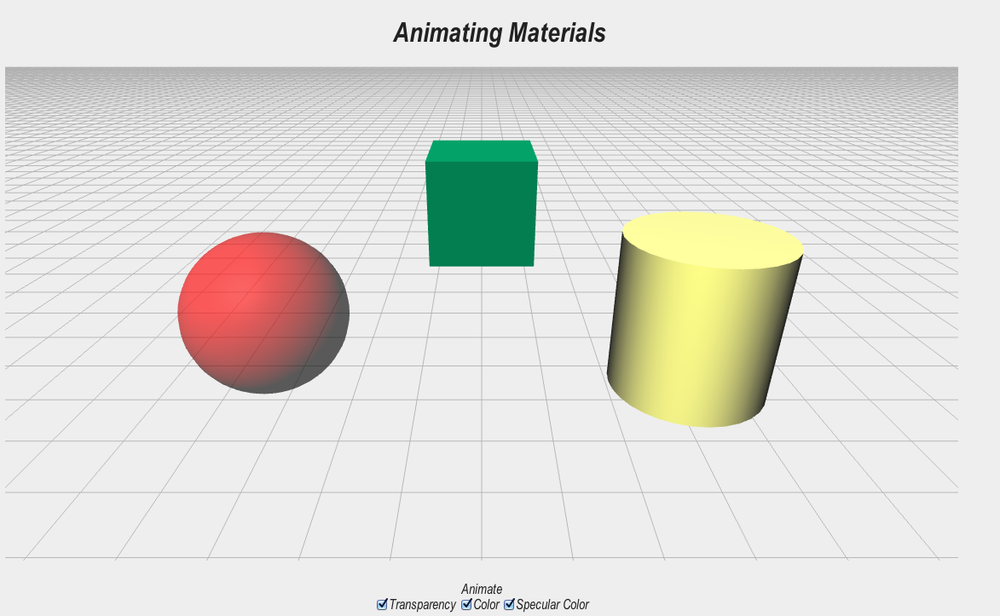
The code for doing this is really simple: just a set of keyframes targeting the respective material properties. Example 4-7 shows the interpolation data for animating the cube’s color.
Example 4-7. Interpolation data for animating colors
this.colorAnimator = new Sim.KeyFrameAnimator;
this.colorAnimator.init({
    interps:
        [
            {
                keys:[0, .5, 1],
                values:[
                        { r : 0, g : .333, b : 1 },
                        { r : 0, g : 1, b : .333 },
                        { r : 0, g : .333, b : 1 },
                        ],
                target:this.cubematerial.color
            },
        ],
    loop: true,
    duration:MaterialApp.animation_time
});
The preceding keyframes animate the cube color from mostly blue to mostly green; pretty basic stuff. Now, this example is contrived, but imagine the following real-world example: you are building a data visualization program where you want to highlight significant data. By animating color, you can quite easily create blinking and glowing effects for that data, without needing to write shaders or use textures. Material animation is a simple yet very powerful weapon in the WebGL arsenal.
Note
Our color animation here uses linear interpolation of the red, green, and blue components of an RGB color. This works very well in this particular case, but RGB interpolation in general can be problematic. Many systems offer color interpolation in other spaces, such as HSV. The RGB values are converted to HSV space, the interpolation is performed, and the result is converted back to RGB. You may require this level of sophistication in your work. Luckily, Three.js has utilities to convert to different color spaces. See the files src/core/Color.js and src/extras/ColorUtils.js.
Animating lights is just as simple as animating materials. Three.js allows you to change intensity, color, and distance properties on the fly. Let’s look at an example of animating basic light properties. Launch the file Chapter 4/keyframe-lights.html. You will see a highly realistic textured bust of a human male, slowly rotating (see Figure 4-8). Play with the checkboxes at the bottom of the page to see the different effects of animating various light properties.
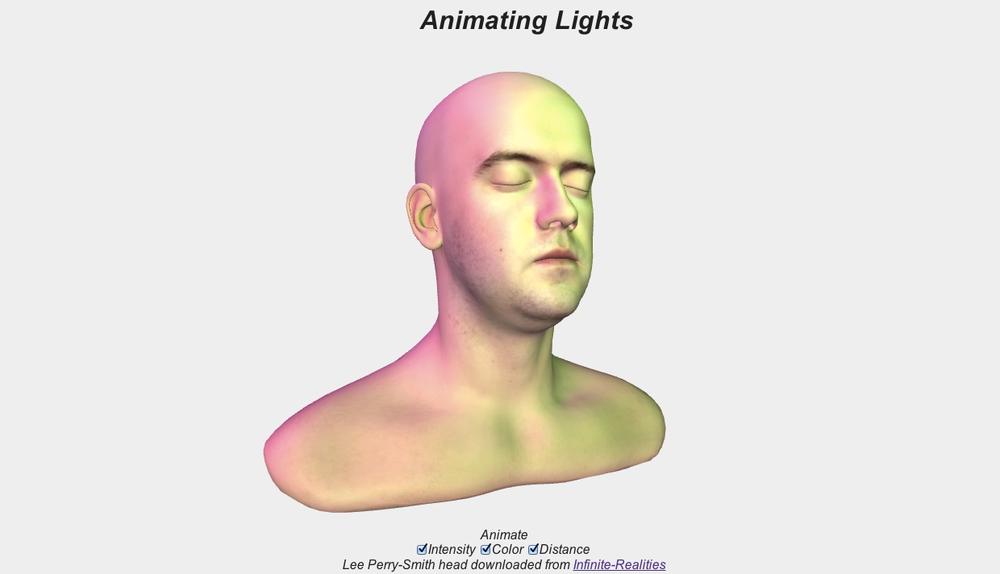
Figure 4-8. Animating light intensity, color, and distance; head model used with permission from Infinite-Realities (http://www.ir-ltd.net/)
Lights are a great way to add mood to a scene. By animating them, you can convey time of day, place, and emotional state. Recall that lights also have position and other properties for creating movement. Taken together, these features offer a wide range of possibilities for enhancing games and creating cinematic effects in your web pages.
We still have to talk about one more tool in our animation palette: textures. Texture animation can make a WebGL scene really “hot” with lots of moving pixels, and convey a vast amount of dynamic information. Imagine a moving theater marquee, Times Square style, and you’ll get the picture. Texture animation can also provide quick-and-dirty effects that would otherwise require computationally expensive vertex manipulation, or labor-intensive shader writing.
Our sun model was essentially a texture animation, since the pixels on the surface of the object were moving. A shader-based texture is also known as a procedural texture, because the surface pixels of the object are calculated in code. Procedural textures don’t have to be written in a shader; later on in the book, we will see how they can be written with JavaScript code and the Canvas API. But before we get into procedural textures, let’s talk about a much simpler way to animate textures using texture transforms.
A texture transform, as the name implies, uses a transformation (position and scale) on the texture. In this case, it is a 2D transformation. Using a texture transform, we can offset the pixels in the texture in x and y, and we can scale them such that we are zoomed in on the texture, or zoomed out. Combine this with keyframe animation and you have some inexpensive power at your fingertips. Let’s look at an example.
Figure 4-9 shows the texture animation implemented in file Chapter 4/keyframe-texture.html. Launch the file, and click in the content area to start and stop the animation. You will see a waterfall against a rock face. The waterfall effect is achieved by simply animating the y offset of the texture map, essentially transforming the position of the texture’s UV coordinates. This is one of those “cheap cinematic tricks” you have seen in many 3D games but probably didn’t realize that it was just a 2D animation hack. (Pay no attention to that man behind the curtain!) Let’s see how it’s done.

Figure 4-9. Waterfall using an animated texture; water texture by Patrick Hoesly (http://www.flickr.com/photos/zooboing/4441454031/sizes/o/in/photostream/), attribution 2.0 Generic (CC BY 2.0); rock texture created using FilterForge (http://filterforge.com/), license required for commercial use in your own projects
Example 4-8 shows the code fragment for animating the texture transform. THREE.Texture has an offset property, which defines the 2D positional transform to be applied to the texture’s UV coordinates. offset is a 2D vector with x and y coordinates; these are automatically added to the current UV coordinates for each vertex by the built-in code for most Three.js shaders; all you need to do is set them. In this example, our interpolator simply animates y values from 1 (the default) to 0, making the water in the texture appear to fall downward.
Example 4-8. Animating a texture transform in Three.js
this.animator = new Sim.KeyFrameAnimator;
this.animator.init({
    interps:
        [
            {
                keys:[0, 1],
                values:[
                        { y: 1},
                        { y: 0},
                        ],
                target:this.texture.offset
            },
        ],
    loop: true,
    duration:Waterfall.animation_time
});
One more thing: we need to make sure that the texture map’s wrapping mode is set so that bits wrap around once we have gone outside the regular UV space, instead of falling off the edge of the texture. We do this with the following line of code:
map.wrapS = map.wrapT = true;
Before we conclude our look at animation, I want to touch briefly on skinning and morphs. These are more in-depth topics, involving the tools pipeline, and as such we are not going to dive into writing our own examples here. Instead, I will point you to the Three.js sample files; there are several great skinning and morph examples. Also, have a look at the source code for the Three.js animation utilities under src/extras/animation. Animation.js and its counterparts implement a rich system that supports keyframe animation with several types of interpolation, as well as skinning and morph targets. Have fun with it!
In this chapter, we took a close look at animating WebGL content. Tween.js is a great utility for creating simple one-shot tween effects, and combining those into more complex tween sequences. We used a more general keyframing technique based on the Sim.js utilities to animate an articulated model, a robot with many moving parts. We also explored how to use keyframes to animate materials, lights, and textures to achieve a broad range of effects. As you ramp up your WebGL development, your animation work will likely include all of these tools, as well as skinning and morphs using Three.js.
Get WebGL: Up and Running now with the O’Reilly learning platform.
O’Reilly members experience books, live events, courses curated by job role, and more from O’Reilly and nearly 200 top publishers.

