Chapter 4. Resource and vCenter Management
Resource management is key in any virtualized environment. In the context of VMware ESX and vSphere, resource management includes clustering, high availability (HA), and the distributed resource scheduler (DRS). This chapter takes a look at the available technologies and how they work together to help you manage your environment effectively. We’ll explore:
- VMware clusters
Clusters within the ESX environment allow you to pool multiple physical ESX hosts to create a virtual pool of resources from the combined resources of all of the ESX hosts. The three main elements of VMware clustering are the DRS, fault tolerance (FT, available in ESX 4.x), and HA pieces.
- VMware HA
This provides you with a cost-effective and intelligent engine that can provide high availability within your ESX cluster. For example, if you have a four-node cluster and one node in the cluster goes down, you can configure HA to automatically start up the virtual machines from the failed node on any remaining node that has available resources.
- VMware DRS
The distributed resource scheduler actively monitors all virtual machines in a cluster and manages their resources. DRS can be configured to provide you, the administrator, with guidelines on which virtual machines can benefit from being moved to another host. You can also configure DRS to automatically take care of the migration through VMotion.
In this chapter we will discuss various aspects of these technologies and how to configure, set up, and maintain resources in vCenter.
4.1. Understanding Virtual Machine Memory Use Through Reservations, Shares, and Limits
Solution
Specify the minimum and maximum amounts of RAM that should be available to your virtual machines.
Discussion
Much like CPU resource management, which we’ll discuss later in this chapter, memory management involves configuring reservations, shares, and limits. In this recipe, we will look at each resource setting and discuss their differences:
- Available memory
Allocates a particular amount of RAM on the ESX Server to the virtual machine when it is created. This amount reflects the initial amount of memory available for the virtual machine, but the value can grow or shrink as the virtual machine takes on work and contends with other virtual machines for memory.
- Memory reservations
Set a minimum amount of memory, measured in megabytes, that will always be available for a virtual machine.
- Memory shares
Work the same as CPU shares (described in Recipe 4.3) and are specified in increments of Low (500 shares), Normal (1,000 shares), High (2,000 shares), or Custom, which allows you to enter a custom value.
- Memory limits
Allow you to set a limit on the maximum amount of RAM that the virtual machine can consume. Memory limits are measured in megabytes (MB). The memory limit on the virtual machine should be enough to satisfy the requirements of the operating system inside the virtual machine. The initial available memory limit is specified when creating the virtual machine, but it can rise in accordance with the options discussed in this chapter.
You’ll start to see the benefits of using limits when you build your first virtualization cluster with a small number of virtual machines. This will allow you to manage user expectations and monitor your servers for actual usage so you can make adjustments later. However, you may notice performance degrade as you add more virtual machines to the cluster.
VMware also controls memory through the vmmemctl driver, which runs on a virtual machine and works with the server to reclaim unused memory and reassign it back to the resource pool for other virtual machines to utilize. This is called ballooning and kicks in when memory resources may be low or running out on the cluster.
Reservations help virtual machines to meet response time and workload requirements, but they can also lead to wasted idle resources. For example, if you give your virtual machine 1GB of memory but it’s only using 256MB, the remaining memory will not be available to the other virtual machines to use.
A server can allocate more memory than the amount specified in a reservation, but it will never allocate more than the limit. When you use reservations and limits together, you should set the reservation for each machine to 50% of its limit and make sure it’s set high enough for the operating system and applications to avoid surrender requests from the memory ballooning driver.
We recommend that you use limits only to satisfy specific needs. For other purposes, use shares instead. As with CPU shares, you can also leave the memory shares set to Normal as a base to start. However, if you have a mission-critical application that might have higher resource requirements, you can give it a High or Custom share value to ensure that the virtual machine will win the resources it needs when contention occurs.
You can set any of these memory measurements for a virtual machine as follows:
Load the vCenter client and log into your vCenter server.
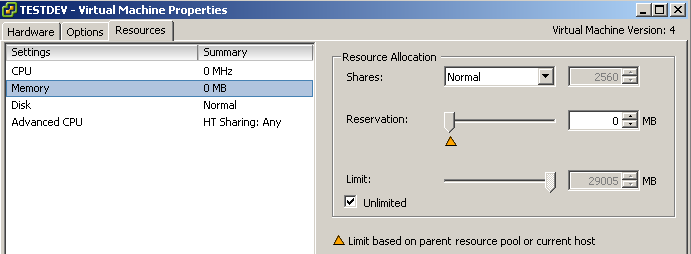
Right-click on the virtual machine and select Edit Settings from the menu. This will bring up another window where you can configure the virtual machine’s memory resources (see Figure 4-1).
Click on the Resources tab. Here you can set specific memory, CPU, advanced CPU, and disk variables. We will specifically look at the memory options, so click Memory in the lefthand menu.
In the righthand pane, you can specify Shares, Reservation, and Limit values for memory resources, as seen in Figure 4-1. When you’ve completed your configurations, click the OK button to save the changes and have them applied to the virtual machine.
4.2. Configuring Virtual Machine CPU Limits
Solution
Apply CPU limits using vCenter.
Discussion
CPU limiting within the ESX environment is a way to restrict the CPU consumption, measured in megahertz (MHz), for specific virtual machines. Setting a limit on a virtual machine’s CPU consumption allows better management of contention issues within your environment. It also allows you to know what the CPU on that virtual machine is capable of achieving when operating at full strength.
However, setting the CPU limit too high or too low can cause performance issues on the virtual machine. The limit should be balanced such that there is enough CPU power at the machine’s disposal to handle load spikes and high application usage, but not so high that CPU cycles are being wasted.
It’s important to observe your virtual machines and adjust their CPU limits accordingly. For example, if you set a virtual machine’s CPU limit at 1,000MHz but notice that its usage never exceeds 700MHz, you might consider adjusting the CPU limit on that virtual machine to 800MHz. By doing this, you are effectively freeing up 200MHz for other virtual machines and not wasting the cycles. That said, virtual machines’ CPU usage is generally low, and the DRS will do a good job of managing those resources; if you set your virtual machine’s limit to 1,000MHz the unused cycles will be put back into the pool of resources.
Adding a CPU limit to a virtual machine is simple using the vCenter client:
Load the vCenter client and log into your vCenter server.
Right-click on the virtual machine on which you wish to adjust the CPU limit and select Edit Settings from the menu. This will bring up another window in which you can configure the virtual machine’s CPU limit.
Click on the Resources tab. From here you can set specific values for memory, CPU, advanced CPU, and disk variables. We will specifically look at the CPU limit variable in this recipe. Click the CPU option in the left window pane to configure this setting (Figure 4-2).
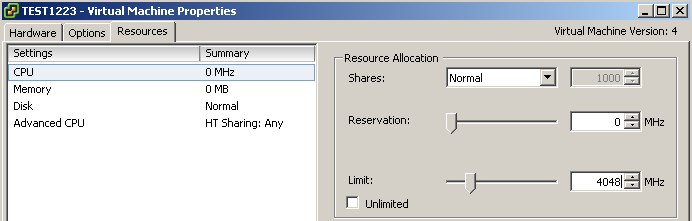
A slider bar next to the Limit label allows you to configure a CPU limit by dragging the bar; alternatively, you can enter an amount in the box or click the up and down arrows. As you can see in this example, we have given virtual machine TEST1223 a CPU limit of 4,048MHz—all of the CPU resources available in the DRS cluster. We could achieve the same effect by checking the Unlimited box. Keeping the Unlimited box checked will allow you to also use the other variables that we will discuss later in this chapter.
Once you are satisfied, click the OK button to make the change.
4.3. Configuring Virtual Machine CPU Shares
Problem
You want to apportion CPU, memory, or disk resources among machines unequally, while remaining flexible in case resources change.
Solution
Configure CPU shares using the vCenter client.
Discussion
CPU shares allow you to regulate how many competitions a virtual machine will “win” when trying to access resources within the pool. For example, when contention occurs within the ESX host or cluster, a virtual machine with 2,000 shares will receive more CPU resources than a virtual machine with, say, 1,000 shares. Shares are configured relative to the other shares; thus, only the proportion of shares matters, not the values of the shares. Three virtual machines with share values of (1,000, 2,000, 3,000) will act exactly the same as three virtual machines with share values of (1, 2, 3). You may choose to use any number scheme you prefer, although we suggest leaving ample space between the numbers to make future additions to your resource pool easier to configure within your existing scheme (this way, you won’t have to renumber the share values of all or many of your existing virtual machines).
When there is no contention for resources, shares mean very little to the operations of the virtual machines.
One benefit of using shares rather than limits or reservations is that when you upgrade the ESX host’s memory or CPU, you will not have to adjust the resources used by each virtual machine: because each virtual machine keeps the same number of shares, new resources will automatically be apportioned in the same ratios as the old ones.
Using shares really comes in handy when planning your environment to ensure your resource pool is balanced. Of course, you can change a virtual machine’s settings at any time if you specifically have to allocate it X amount of resources, and at that point shares may not be useful.
Typically, VMware recommends that you use shares instead of setting reservations, although we will discuss setting fixed reservations in the next recipe just in case you find yourself in a situation that requires it.
Let’s take a look at configuring shares on a virtual machine using the vCenter client:
Load the vCenter client and log into your vCenter server.
Right-click on the virtual machine to which you wish to assign the shares and select Edit Settings from the menu. This will bring up another window in which you can configure the virtual machine’s CPU share values.
Click on the Resources tab. From here, you can set specific values for memory, CPU, advanced CPU, and disk variables. We will look at the CPU Shares variable in this recipe. To configure it, click the CPU option in the left window pane (Figure 4-3).
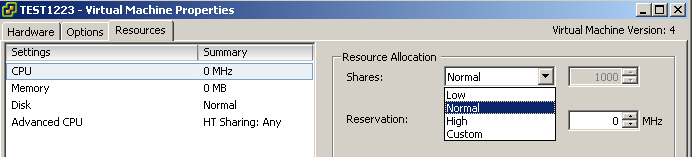
In the drop-down box next to the Shares label you can choose between Low (500 shares), Normal (1,000 shares), High (2,000 shares), and Custom. Giving a virtual machine more shares increases its chances of “winning” when virtual machines compete for more CPU cycles.
Generally, you can start with the Normal share selection until you reach a point of contention, at which point you can go back and adjust your virtual machines based on their usage and requirements.
Once you have selected the appropriate level for your virtual machine, click the OK button to save this change.
4.4. Configuring Virtual Machine CPU Reservations
Problem
You want to reserve some percentage of the CPU on the ESX Server for particular virtual machines.
Solution
Configure CPU reservations on the virtual machines using the vCenter client.
Discussion
In addition to shares and limits, you can also set reservations on your virtual machines. A reservation is a set number in MHz that you allocate to a particular virtual machine. Typically, this is between 5% and 10% of the processor’s capacity, but it will vary based on your environment.
Setting a reservation guarantees that a certain minimum amount of resources will be available to the virtual machine, so that it can power on (if these resources do not exist or are not available, the virtual machine will not power on). Once the virtual machine is started, the reservation amount is taken away from the pool of resources over which other virtual machines compete. In other words, each of the virtual machines will take its individual reservation first, and then compete with the other virtual machines for the remainder of the (unreserved) resources.
You can add a reservation to a virtual machine through the vCenter client:
Load the vCenter client and log into your vCenter server.
Right-click the virtual machine you wish to modify and select Edit Settings from the menu. This will bring up another window, which you will use to configure the virtual machine’s CPU reservation.
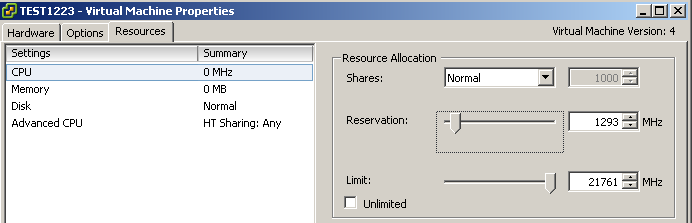
Click on the Resources tab. From here you can set specific values for memory, CPU, advanced CPU, and disk variables. We will look at the CPU Reservation variable in this recipe; to configure it, click the CPU option in the left window pane (Figure 4-4).
CPU reservations are the second available option. Notice there is a slider bar as well as a box in which you can specify how much CPU to allocate to the virtual machine: you can either drag the bar to the desired amount, type a value in the box, or click the up and down arrows (also shown in Figure 4-4).
Once you have selected the appropriate level for your virtual machine, click the OK button to save this change.
4.5. Setting Up Resource Pools
Solution
Create resource pools and assign resources to them.
Discussion
Resource pools are a great way to manage and divide resources among groups or departments within your organization.
Before resource pools can be enabled on a cluster you will need to ensure DRS is enabled (see Recipe 4.10).
To enable a resource pool on a cluster, log into your vCenter server and follow these steps:
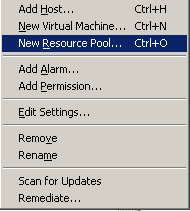
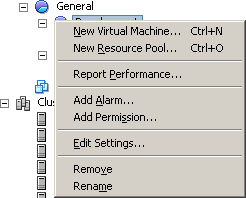
Right-click on the cluster in which you wish to create the resource pool and choose “New Resource Pool” (Figure 4-5).
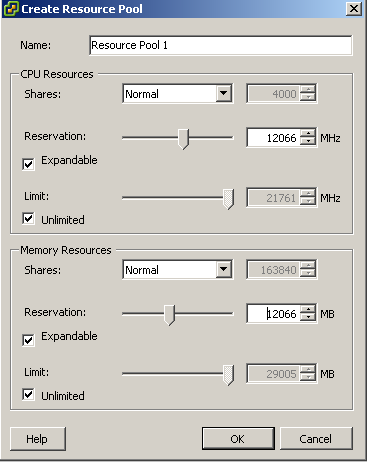
You will now be presented with a new window from which you can configure the resource pool (Figure 4-6).
The CPU and memory resource allocations for the resource pool work similarly to the way they work for virtual machines. For example, we have given this resource pool a reservation of 12,066MB of memory and 12,066MHz of CPU. Because we left the Expandable option checked, the pool can burst above the 12,066MHz reservation if required and if the resources are available in the cluster. Refer to Recipes 4.6 and 4.7 for more detailed information.
You can adjust these values to suit your needs and divide your resource pools between production, development, etc.
When you’re finished, click the OK button and the resource pool will be added.
Adding new virtual machines to the resource pool can be done in two ways:
See Also
4.6. Understanding Resource Pools
Solution
Investigate the various resource pool options and how to utilize them.
Discussion
Resource pools can be used to create partitions of available CPU and memory. By using resource pools, you can better manage and utilize resources across different departments or within a group of servers.
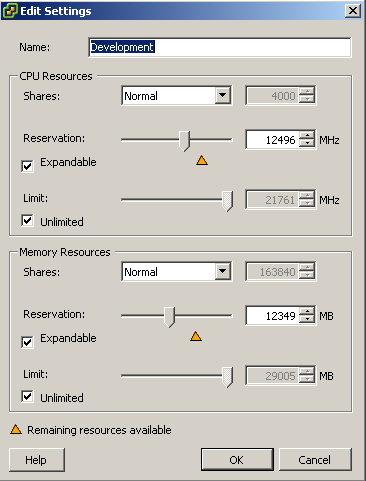
For example, perhaps you want to give your production team 20GHz of CPU and 20GB of memory, and your development team 10GHz of CPU and 10GB of memory. You can accomplish this by creating resource pools and assigning the virtual machines for the given departments to their respective pools (Figure 4-7).

Notice that in Figure 4-7 we have a master resource pool called General and two subresource pools called Development and Production. In this configuration, the subresource pools are assigned resources from the master (General) resource pool. In this example, the Development and Production subresource pools have been assigned the amounts shown in Figure 4-8.
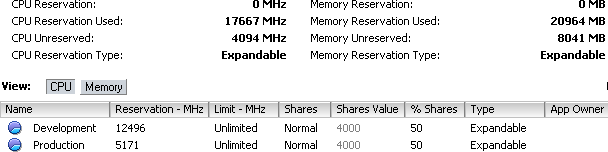
Let’s take a closer look at the reservations we’ve given each resource pool:
- General resource pool
The General resource pool has 4,094MHz and 8,041MB of unreserved resources available for the development and production subpools to use. It is not handed out all at once at the start, but rather is made available as needed (see the next recipe for details).
- Development subresource pool
We have given the Development resource pool a total of 12,496MHz of reserved CPU.
- Production subresource pool
The Production resource pool has only 5,171MHz of reserved CPU.
In this example, if the resources required by the Production pool exceed 5,171MHz of CPU, it will borrow resources from the master resource pool, which has 4,094MHz available.
4.7. Expandable Reservations in Resource Pools
Solution
Investigate expandable reservations and when and how they should be used.
Discussion
Expandable reservations give extra flexibility when you allocate resources to a specific resource pool. You can assign a minimum set of resources to each subresource pool and allow it, by defining the reservation as Expandable, to get more resources from the ESX Server as needed. Thus, on a day when the development team is racing to do a lot of bug fixing to meet a deadline, its subresource pool may expand beyond the normal limits. On another day, the production subresource pool may get more resources.
However, be aware that once a reservation has been exceeded/expanded, those additional resources will not be freed up again until the virtual machine is shut down and you explicitly reduce its reservation. You should also be careful when using expandable resource pools to ensure that your virtual machines do not become dependent on extra resources being available. If a subresource pool routinely expands far beyond its original allocation, you should increase the original allocation and add more hardware resources if necessary.
Notice that in Figure 4-9 we have two resource pools, Development and Production, which are each set to Expandable. Examining this figure further, you’ll see that we have 4,094MHz of CPU and 8041MB of memory unreserved at the top level of our resource pool. Since both of our subresource pools are set to Expandable, when they use the reservations we have set for them they can borrow from the unreserved values available in the top-level resource pool.

Expandable reservations also come in handy when a resource pool has used all its resources and a virtual machine needs to be powered on: if the resource pool has no available resources left, it can borrow resources from the top-level pool to ensure that the virtual machine can be powered on.
Let’s look at how to configure expandable reservations on a resource pool:
Load the vCenter client and log into your vCenter server.
Right-click on the resource pool you wish to edit and select Edit Settings (Figure 4-10).
The Edit Settings screen (Figure 4-11) lets you adjust the memory and CPU resources reserved for the selected resource pool. Notice that you can set expandable reservations on both CPU and memory resources, independently. To enable expandable resources, put a check in the Expandable box.
Once you’re finished, click OK to have the changes applied.
See Also
4.8. Creating a Cluster
Problem
You want to create a cluster to manage the resources offered by multiple ESX Servers together.
Solution
Use the vCenter client to create a VMware cluster.
Discussion
Creating a cluster inside vCenter allows you to combine multiple ESX hosts in a centralized group, placing all of their CPU and memory resources into a general pool for use by virtual machines. When you add an ESX host to a cluster, the resources will automatically become available for use by the virtual machines.
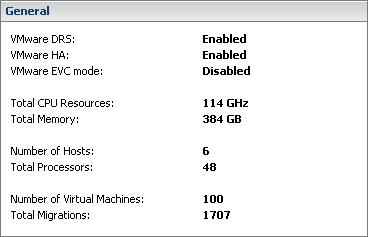
For example, Figure 4-12 shows six ESX hosts, each of which has 64GB of memory and two quad-core CPUs (i.e., eight CPUs per ESX host, for a total of 48). Because clustering pools the resources, you effectively have an enormous unified pool of CPUs and memory for the virtual machines to run. Combining a cluster with HA and DRS will further enhance your environment.
Note
You do not need a license to create ESX clusters. However, to take advantage of HA and DRS you will need to obtain a license key from VMware.
VMware allows for a maximum of 16 ESX hosts in a vCenter 2.5x cluster. In vCenter 4.x you can have up to 32 ESX hosts in a cluster.
VMware has done a really nice job of making it simple to add a new cluster in vCenter:
Load the vCenter client and log into your vCenter server.
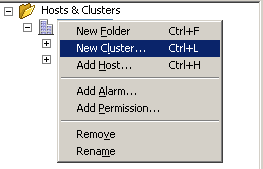
Right-click on the datacenter name and select New Cluster, as shown in Figure 4-13.
The New Cluster wizard will launch to guide you through the process of creating the new cluster. The first screen in the wizard will ask you to enter a name for the cluster and indicate whether or not to enable two features:
- VMware HA
This feature is available only to users who have a license for the HA product extension. When you enable VMware HA, it will detect and provide rapid recovery of virtual machines if an ESX host fails. This is an optional feature and doesn’t need to be enabled to create a basic cluster.
- VMware DRS
This feature also requires a license. DRS allows vCenter server to manage hosts as an aggregate pool of resources. Clusters can be broken down into smaller groups by using resource pools. VMware DRS also allows vCenter to manage resources on virtual machines, even placing them on different hosts if used in conjunction with VMotion. This is an optional feature that is not required to create a cluster.
When you’ve made your selections, press the Next button to continue. Additional cluster features (including DRS and HA) can be enabled or disabled at a later time using processes described elsewhere in this chapter.
Next, you will be asked where to store the swapfiles for the virtual machines. VMware gives you two options here:
Store the swapfile in the same directory as the virtual machine. (Recommended.)
Store the swapfile in the datastore specified by the host. (This option is not recommended because you could experience degraded performance.)
Make your selection, then press the Next button to continue.
Finally, review the summary and click Finish to initiate the build of the cluster.
You can now add ESX hosts to the cluster (see Recipe 4.9).
4.9. Adding Hosts to a Cluster
Solution
Use the vCenter client to add new hosts to an existing ESX cluster.
Discussion
Adding additional ESX Servers to an already established cluster is easy in vCenter:
Load the vCenter client and log into your vCenter server.
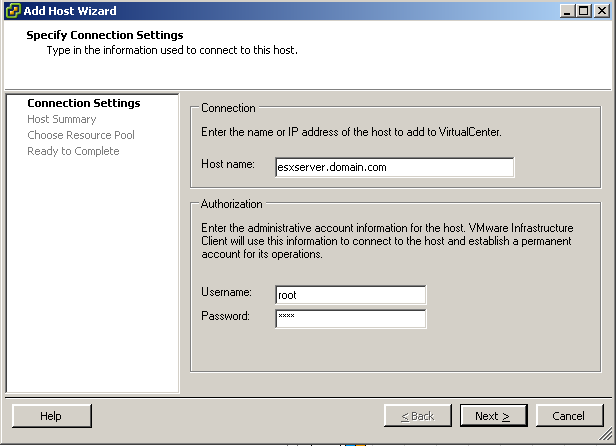
Right-click on the datacenter name and select Add Host. This launches the Add Host wizard in a new window (Figure 4-14).
The first screen in the Add Host wizard will ask you for some basic information:
- Hostname
Enter the hostname of the server, such as esx01.yourdomain.com. Although ESX allows you to use an IP address, you should always use a fully qualified domain name as the hostname to ensure maximum compatibility, as ESX relies heavily on DNS.
- Username
Enter the username of the user who has administrative privileges. Typically this is the root user, although this can be changed if required.
- Password
Enter the password for the username just entered.
When you are satisfied with your entries, click the Next button.
Next, you will be presented with an informational summary showing you the name, model, version, and vendor of the host that is being added and listing any virtual machines on that host. Click Next to continue.
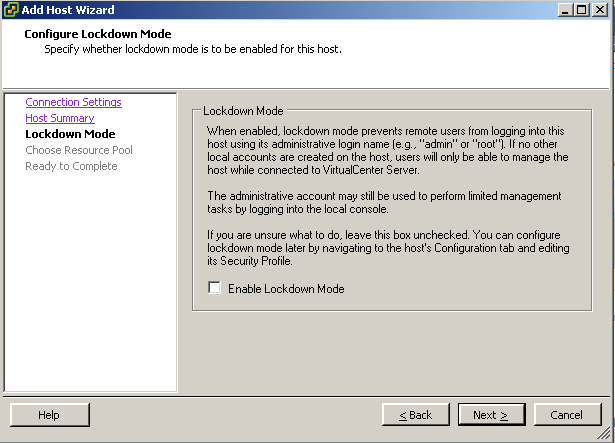
If you are adding an ESX host, skip to step 5. If you are adding an ESXi host, at this point you will be asked whether you want to enable lockdown mode (Figure 4-15).
Lockdown mode, when enabled, prevents remote users from logging into the ESXi host using administrative accounts such as root or admin. If this mode is enabled and no other accounts exist, the ESXi host can be managed only from vCenter. However, the administrative accounts will be able to log into the console on the ESXi host. This feature can be changed at a later time, so if you are unsure you can leave it unchecked and enable lockdown mode later, if security becomes a concern.
Click Next to continue the installation.
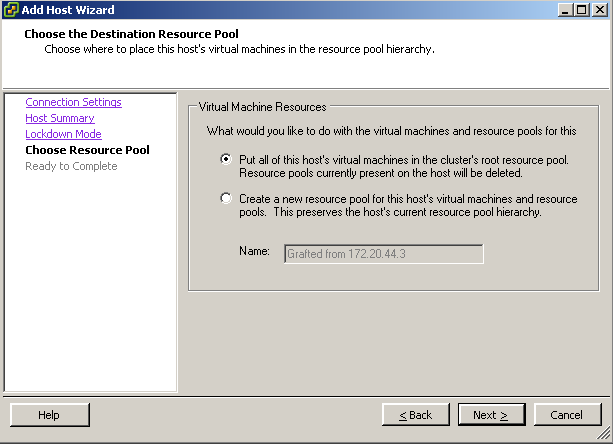
The next screen in the wizard is the resource pool configuration screen. You will be presented with two options, as shown in Figure 4-16. These options are pretty self-explanatory, but we’ll take a quick look at them anyway:
- “Put all of this host’s virtual machines into the cluster’s root resource pool. Resource pools currently present on the host will be deleted.”
Assuming you have a resource pool set up in your cluster, this option will take all the virtual machines from the single ESX resource pool and move them into the cluster’s pool. Once that operation is completed, it will remove the resource pools from the single ESX Server. Be careful here—remember that the virtual machines currently in the pool are getting their resources based on their pool’s settings, and adding virtual machines to the pool could take resources away from the existing virtual machines.
- “Create a new resource pool for this host’s virtual machines and resource pools. This preserves the host’s current resource pool hierarchy.”
This option allows you to keep the resource pools you have already set up on your single ESX host. It will create new resource pools within the cluster that match those currently available on the ESX host.
Once you have selected which resource pool option you want to use, click the Next button to continue.
You will now be presented with a summary. Use the Back button if you need to make any changes, and when you’re satisfied click the Finish button to add the ESX host to the cluster.
If HA is enabled on the cluster in which the host is being added, the host will automatically be configured for HA. If you are not adding the host to an HA cluster, the host will run standalone.
See Also
4.10. Enabling DRS in a Cluster
Solution
Use the vCenter client tool to enable DRS.
Discussion
Enabling DRS inside an already created cluster is easy using the vCenter client. If you have VMware Infrastructure 3 Enterprise, DRS is integrated already. With the standard version of VMware Infrastructure, DRS is an optional add-on. Regardless of which version you have, we’ll walk you through the steps of enabling DRS and explain the different settings along the way:
Load the vCenter client and log into your vCenter server.
Right-click on your cluster and select Edit Settings from the menu. This will bring up another window with configuration options for the cluster. We are going to be looking at the General area as well as the VMware DRS area and its subsections.
Click the General label in the lefthand window. You will now be able to rename your cluster and enable or disable HA and DRS on the cluster (Figure 4-17). Put a check next to “Enable VMware DRS.”
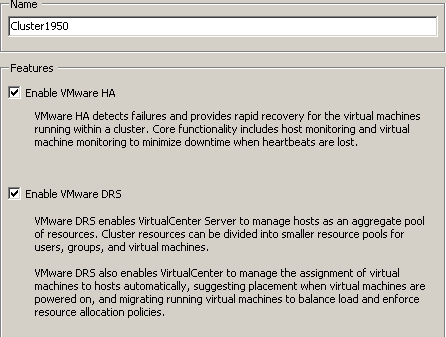
Click the General label in the lefthand window. You will now be able to rename your cluster and enable or disable HA and DRS on the cluster (Figure 4-17). Put a check next to “Enable VMware DRS.”
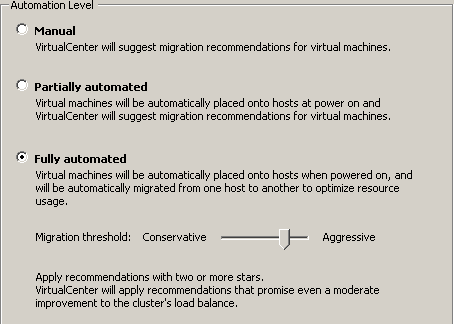
Click on the VMware DRS item in the menu tree on the left and you will be presented with a choice between three different automation levels (Figure 4-18).
The choices are:
- Manual
When you power on a virtual machine, DRS will display a list of suggested hosts for placement. Also, if it determines that there is a better host for a virtual machine, DRS will suggest migration through a manual migration.
- Partially automated
When you power on a virtual machine, DRS will automatically put it on the host it feels is the best. As with the manual level of automation, when a cluster node becomes unbalanced DRS will give you a list of suggested hosts for placement of the virtual machine(s).
- Fully automated
When you power on a virtual machine, DRS will automatically place it on the most suitable host. When a cluster becomes unbalanced, DRS will automatically start the VMotion process and automatically move the virtual machine(s) without involving the system administrator.
The migration threshold, shown below the automation options, is based on a star system of 1 through 5, where 1 is the most conservative and 5 is the most aggressive:
- Level 1
This is the most conservative level of automation and applies only to 5-star recommendations.
- Level 2
This level of automation applies to recommendations with 4 or more stars and aims to improve the cluster’s load balance.
- Level 3
This is the default level of automation and applies to recommendations with 3 or more stars.
- Level 4
This level of automation applies to 2 or more stars.
- Level 5
This is the most aggressive method of automation and applies to recommendations with any number of stars.
Essentially, the higher the automation level you use, the more minor and frequent migrations you will see if DRS deems improvements can be made. A less aggressive selection will result in changes only when DRS deems that they will make a large improvement to the cluster’s load balance.
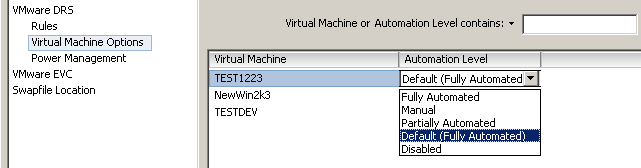
Within the DRS environment you can also set a per-virtual-machine automation level, which will override the automation level set on the entire cluster. By setting the automation levels on this more granular basis, you can fine-tune your cluster for your specific needs (Figure 4-19).
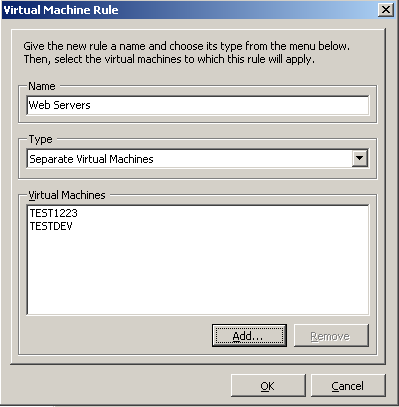
Another important feature of DRS is the ability to set rules and guidelines for virtual machines within the cluster. Along with the star system, these affect the choices made by DRS. You can specify two kinds of rules for your virtual machines:
Affinity rules allow you to specify certain virtual machines that should be run on the same host and in multi-virtual-machine environments when better performance can be achieved by such a configuration. For example, machines that communicate frequently may perform better when run on the same host.
Anti-affinity rules allow you to force virtual machines to run on separate hosts. This can be important when you have two servers that are in a failover or load-balancing environment and you want them to always run on separate ESX nodes in the cluster.
In Figure 4-20, we have set an anti-affinity rule telling DRS that we want the virtual machines TESTDEV and TEST1223 to run on separate physical ESX nodes. DRS will always ensure that those virtual machines are separate from one another.
Some tips about using DRS follow:
When removing a host from a cluster, always put that host in maintenance mode.
When you have your automation level set to Manual and DRS makes strong recommendations (typically level 4 or 5), follow them. Otherwise, balance and fairness within the cluster will deteriorate.
Let DRS automatically handle most virtual machines, and set the override on virtual machines you do not want DRS to automatically handle.
4.11. Understanding Cluster States and Warnings
Solution
Familiarize yourself with the various states in vCenter and what they mean.
Discussion
VMware has three separate warnings that give the administrator basic information about the state of the cluster, virtual machine, or ESX host.
For example, if there is no network redundancy on the service console port, you will see a yellow triangle on your cluster. The detailed configuration issues will then be listed on the Summary tab of the cluster, telling you what configuration warnings exist.
Let’s take a look at the three different statuses that VMware provides for clusters:
- Green (valid)
Clusters are considered valid as long as they have no configuration issues, resource overcommitments, or failed ESX hosts. A valid cluster will have a working configuration and all resources will be available for use by the virtual machines. In addition to all the resources being available, a valid cluster will also have one host available for standby in case an ESX host fails.
A cluster can become invalid or overcommitted if a single or multiple hosts fail. A cluster can also become invalid if vCenter is unable to power on a virtual machine, if an HA cluster’s capacity is lower than the configured failover, or if the primary hosts in the cluster do not respond in a timely fashion to HA heartbeat checks.
- Yellow (overcommitted)
This warning shows a potential risk of resources. For example, removing a host from the cluster might cause the reserve of available resources to fall below the level needed by the virtual machines. Minor configuration issues, such as no network redundancy on the service port network group, may also trigger this status.
- Red (invalid)
A cluster can become invalid when there are not enough resources available to handle all the virtual machines in the cluster. Clusters can also become invalid because of configuration issues such as HA becoming disabled on an ESX host or one of the ESX hosts in the cluster going down without being properly taken offline in vCenter (and thereby taking away necessary resources).
Depending on the type of failure that causes the cluster to become invalid, you may attempt to resolve the issue by adding more resources, reconfiguring HA on the ESX host, or powering off unneeded virtual machines so that the resource requirements of the other virtual machines can be satisfied.
It’s very important to remedy an invalid cluster as soon as possible to avoid the cluster becoming imbalanced.
4.12. Reconfiguring HA on a Host
Solution
Use vCenter to reconfigure HA on the desired host.
Discussion
At times, such as after an upgrade or change to the cluster, HA may become unavailable or just stop working on your ESX host.
Using the vCenter client, you can easily repair the host by following these few steps:
Log into vCenter server and select the server from the inventory list.
Right-click on the server on which you wish to reconfigure HA and select “Reconfigure for VMware HA” from the menu (Figure 4-21). This will initiate a reinstallation of the HA scripts on the ESX host.
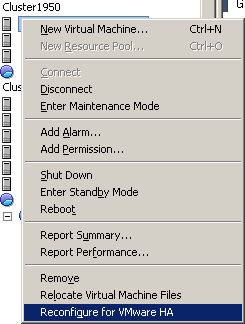
The reconfiguration process typically takes one to two minutes, depending on how busy the server is and the quality of the network connections. When the process starts you will see an item in the Recent Tasks area at the bottom of the vCenter client window, showing you the status of the reconfiguration (Figure 4-22).

Reconfiguration processes sometimes fail. If this is the case, the status field will display “An error occurred during configuration of the HA Agent on the host.” If this happens, simply reinitiate the reconfiguration using the steps outlined in this section to solve the problem.
4.13. Using ESX 4.x CPU/RAM Hot Add/Hotplug Support
Solution
Utilizing technology within VMware ESX 4.x, you can add CPUs, memory, and devices to a virtual machine while it is running.
Discussion
vSphere 4.x Enterprise, Enterprise Plus, and Advanced customers have the ability to hotplug or hot add CPUs, memory, and devices to their virtual machines without powering them off. These new technologies illustrate the improvements VMware is making in its products in an effort to reduce downtime on mission-critical applications and servers.
Hot add support in ESX 4.x is limited to a specific set of guest operating systems: Windows Server 2003; Windows Vista; Windows Server 2008; Windows 7; Red Hat Linux 4.x and 5.x; SLED 9, 10, and 11; and Ubuntu 6.x, 7.x, and 8.x. For complete details on the OSs supported, please refer to the Guest Operating System Installation Guide found on VMware’s website (http://vmware.com/pdf/GuestOS_guide.pdf).
To enable hot add support on a virtual machine:
Log into your vCenter server, right-click on the virtual machine on which you wish to enable support, and select Edit Settings.
Click Advanced and select Memory/CPU Hotplug.
Select “Enable memory hot add” for the virtual machine, and then select “Hot add CPU support” for the virtual machine.
Click OK when you’re finished to finalize the changes.
Warning
VMware Tools must be installed on the guest OS for this procedure to work correctly.
4.14. Surviving a vCenter Server Failure or Outage
Problem
Your vCenter server has gone down or refuses to start, and you want to continue operations until the problem can be fixed.
Solution
This recipe discusses what pieces of ESX will continue to run when your vCenter server is down or offline.
Discussion
When your vCenter server needs an upgrade or maintenance, or when it suffers a crash, it’s important to know what pieces of the environment can and will function without the benefit of a vCenter server orchestrating and managing the various resources within the environment.
When the vCenter server is offline, your virtual machines will continue to function, along with HA. However, other key pieces will be unavailable or will work in a degraded mode. Tables 4-1 through 4-8 list the impacts that a vCenter server outage can have on an environment.
VI function | Available | Comment |
Restart virtual machine | Yes | No impact |
Admission control | No | |
Add new host to cluster | No | vCenter is required to resolve IP addresses of cluster members |
Allow hosts to rejoin the cluster | Yes | Resolved host information is stored on the ESX host itself in /etc/FT_HOST |
Get VMware Cookbook now with the O’Reilly learning platform.
O’Reilly members experience books, live events, courses curated by job role, and more from O’Reilly and nearly 200 top publishers.

