Chapter 4. Physics
In this chapter, you will modify the game logic to improve the paddle controls and create a realistic puck animation. The paddle control logic should be allowed to slide, not only in the X direction, but also in the Y direction. Both paddles should move freely along the y-axis up to the middle line on their side of the screen. The puck should glide along the table with a little table friction so that it slows down after being hit. The collision detection logic needs to work with circular objects, as well as the walls that surround the table. The score logic will also need to be modified to only trigger when the puck enters the goal boxes located in the middle of each back wall.
Paddle Physics
You will start by modifying the game logic of the paddles so they can be controlled in both the horizontal and vertical directions. You also want the paddles to be animated into new positions on the screen so they don’t instantly appear wherever you touch. That worked fine for the Paddles game but in the case of air hockey, the speed of the paddle should be tracked in order to animate realistic collisions with the puck. You will create a new class that will help manage the logic and state of the paddles. In an effort to reuse code, you will wrap all the paddle logic into a new Paddle class. This object will be used to manage and control both of the paddles.
Create a new object by selecting File→New→New File... from the menu or by Control-clicking in the Project Navigator and selecting New File... from the pop-up menu. Select the iOS/Cocoa Touch template, choose the Objective-C class, and click Next. Name the new object “Paddle,” make sure the Subclass is set to NSObject, and then click Next again. Now you can specify the location where you want to save this new file. Verify the location you are saving is the same location as all the other files inside the Paddles folder, make sure the Group is set to the same folder where the source code files are located in the Project Navigator and then click Create.
Open the Paddle.h interface file and modify the contents of the file to appear as follows:
#import <Foundation/Foundation.h>

@interface Paddle : NSObject
{
    UIView *view;    // paddle view with current position
    CGRect boundary; // confined boundary
    CGPoint pos;     // position paddle is moving to
    float maxSpeed;  // maximum speed
    float speed;     // current speed
    UITouch *touch;  // touch assigned to this paddle
}

@property (assign) UITouch *touch;
@property (readonly) float speed;
@property (assign) float maxSpeed;

// initialize object
-(id) initWithView: (UIView*) paddle Boundary: (CGRect) rect
          MaxSpeed: (float) max;

// reset position to middle of boundary
-(void) reset;

// set where the paddle should move to
-(void) move: (CGPoint) pt;

// center point of paddle
-(CGPoint) center;

// check if the paddle intersects with the rectangle
-(bool) intersects: (CGRect) rect;

// get distance between current paddle position and point
-(float) distance: (CGPoint) pt;

// animate puck view to next position without exceeding max speed
-(void) animate;

@end
Notice that you are tracking a lot more things about the paddle than just position. You have to initialize the paddle with the image view that represents the paddle image and a boundary rectangle and maximum speed that limits the paddle movement. The image view will be configured to either be viewPaddle1 or viewPaddle2, which have already been set up in Interface Builder. The boundary rectangle will limit movement of the paddle to a specific rectangle. This will be a rectangle at the top half of the screen for player one or at the bottom of the screen for player two. Attempts to move outside of this rectangle will be stopped at the edge. This object will also move the paddle to the touch point instead of having it instantly appear where the player touches. The maximum speed lets you specify how far the paddle can move in a single frame of animation.
Open the paddle implementation file and add in the following @synthesize declarations for the Paddle properties, along with the initWithView and dealloc methods. This code should be placed inside the class definition, which is between the @implementation and @end compiler directives:
@synthesize touch;
@synthesize speed;
@synthesize maxSpeed;

-(id) initWithView: (UIView*) paddle Boundary: (CGRect) rect
MaxSpeed: (float) max
{
    self = [super init];

    if (self)
    {
        // Custom initialization
        view = paddle;
        boundary = rect;
        maxSpeed = max;
    }

    return self;
}

- (void)dealloc
{
    [super dealloc];
}
The initWithView method stores a reference to the UIView paddle image, CGRect for the boundary, and the maximum speed. The image view and boundary cannot be changed once initialized. However, the maximum speed is implemented as a property that can be assigned at any time. Although you won’t be changing the speed of the paddle yet, this will become a useful feature when implementing computer players.
Add the following code to the implementation file, which will handle resetting the paddle position and setting where the paddle should move:
// reset to starting position
-(void) reset
{
    pos.x = boundary.origin.x + boundary.size.width / 2;
    pos.y = boundary.origin.y + boundary.size.height / 2;
    view.center = pos;
}

// set where paddle will be moving to
-(void) move: (CGPoint) pt
{
    // adjust x position to stay within box
    if (pt.x < boundary.origin.x)
    {
        pt.x = boundary.origin.x;
    }
    else if (pt.x > boundary.origin.x + boundary.size.width)
    {
        pt.x = boundary.origin.x + boundary.size.width;
    }

    // adjust y position to stay within box
    if (pt.y < boundary.origin.y)
    {
        pt.y = boundary.origin.y;
    }
    else if (pt.y > boundary.origin.y + boundary.size.height)
    {
        pt.y = boundary.origin.y + boundary.size.height;
    }

    // update the position
    pos = pt;
}
Notice the reset method will place the paddle in the center of the defined boundary. This will be useful for when the round needs to be reset and the paddle object placed back into the center position. The position of the image view is also immediately updated to the new location. This is the only time the paddle will instantly appear in a new position. The move method also caps the position the paddle should move to so that it doesn’t fall outside the boundary rectangle.
Add the following code, which provides a method to get the center point of the image view, a method to check for intersection of a specified rectangle, and a distance method:
// center point of paddle
-(CGPoint) center
{
    return view.center;
}

// check if the paddle intersects with the rectangle
-(bool) intersects: (CGRect) rect
{
    return CGRectIntersectsRect(view.frame, rect);
}

// get distance between current paddle position and point
-(float) distance: (CGPoint) pt
{
    float diffx = (view.center.x) - (pt.x);
    float diffy = (view.center.y) - (pt.y);
    return sqrt(diffx*diffx + diffy*diffy);
}
The distance formula is a standard calculation between two points and is often used in games. You will use this calculation for a couple things. First, you will use it to calculate how far the paddle is from the point it should move to. This will let you know if movement should be limited to the specified maximum speed for a single frame of animation. Second, you will use this method to determine if the paddle and puck object collide.
Finally, add the following code, which will animate the puck into its new position:
// animate to moveto position without exceeding max speed
-(void) animate
{
    // check if movement is needed
    if (CGPointEqualToPoint(view.center,pos) == false)
    {
        // calculate distance we need to move
        float d = [self distance: pos];

        // check the maximum distance paddle is allowed to move
        if (d > maxSpeed)
        {
            // modify the position to the max allowed
            float r = atan2(pos.y - view.center.y,
                            pos.x - view.center.x);
            float x = view.center.x + cos(r) * (maxSpeed);
            float y = view.center.y + sin(r) * (maxSpeed);
            view.center = CGPointMake(x,y);
            speed = maxSpeed;
        }
        else
        {
            // set position of paddle as it does not exceed
            // maximum speed
            view.center = pos;
            speed = d;
        }
    }
    else
    {
        // not moving
        speed = 0;
    }
}
The animate function does the bulk of the paddle logic. The first thing it checks is if it needs to do any work by comparing the position of the paddle view to the position it needs to move to. If they are equal then the paddle does not need to be moved and you just set the calculated speed to zero, which represents no movement. If the paddle does need to be moved, then the distance to that point is calculated. If that distance does not exceed the maximum speed, then the paddle view can be set to the new position and the speed is set to the distance moved. If the paddle exceeds the maximum speed then an interval step needs to be calculated to move the paddle.
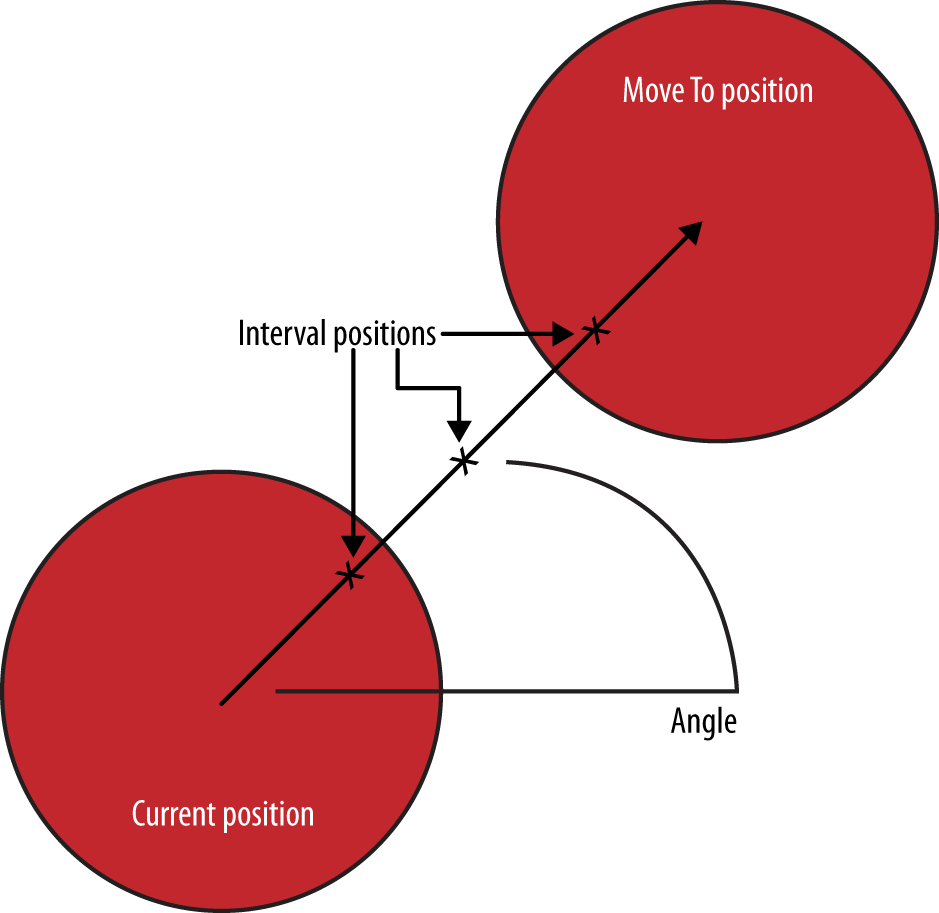
If you ever wondered why you learned trigonometry in school, you now know it was to animate an air hockey paddle across the screen. The interval step is calculated using the atan2 function, which calculates the angle in radians between the current paddle position and the position the paddle is moving to. You could draw a line from the current position at this calculated angle, and the position the paddle needs to move to would intersect it. The interval positions that need to be calculated will also fall on this line, as shown in Figure 4-1, and each step will have a distance of the maximum speed. The cos and sin functions can be used to calculate a position from the origin 0,0 at any specified angle. The position calculated will have a distance of 1 from the origin, which is why you need to multiply it by the maximum speed so it has the correct distance. This results in a point that is based around the origin, but you want a position that is based from the current position. In order to do that, you just need to add the x and y components of the current position to this new position. This leaves you with a position that is offset from the current position at the correct angle and distance. The new position represents how far the paddle should move in a single frame of animation. The view position is then updated to this new interval position and the calculated speed is set to the maxSpeed variable.
You will now plug in the new paddle object so it controls the paddles on the screen. Add the following to the top of the PaddlesViewController.m implementation file, which defines a maximum speed and the boundaries for each player’s paddle:
#define MAX_SPEED 15

struct CGRect gPlayerBox[] =
{   //  x,  y       width,  height
    {   40, 40,     320-80, 240-40-32 }, // player 1 box
    {   40, 240+33, 320-80, 240-40-32 }  // player 2 box
};
In order to verify that I calculated the boundary rectangles correctly, you can add some debug code, which will draw them as red boxes on the screen. Add the following code into viewDidLoad before the newGame method call:
// debug code to show player boxes
for (int i = 0; i < 2; ++i)
{
    UIView *view = [[UIView alloc] initWithFrame:
                                   gPlayerBox[i] ];
    view.backgroundColor = [UIColor redColor];
    view.alpha = 0.25;
    [self.view addSubview: view];
    [view release];
}
At the top of the PaddlesViewController.h file, you need to import the Paddle.h file so the paddle objects can be added into the interface. Create two paddle objects, paddle1 and paddle2, inside the PaddlesViewController interface. These paddle objects will be responsible for controlling the two paddles. The paddle1 object will control player one’s paddle, located at the top half of the screen. The paddle2 object will control player two’s paddle at the bottom half of the screen. Add the following code into the interface definition:
// Paddle helpers
Paddle *paddle1;
Paddle *paddle2;
You may have noticed that the paddle object included a UITouch property. This will be used to specify the touch that is currently assigned to the paddle. As such, you can remove the touch1 and touch2 variables from the interface.
Modify the viewDidLoad method to allocate and initialize the paddle objects. You will initialize them with the views that represent the paddle images. You will also set the paddle boundary to be one of the global player boxes that you just defined. The maximum speed is also specified, which was also defined at the top of this file. Add the following code after the debug code you just added and before the call to newGame, as that method will eventually use the paddle objects:
// create the paddle helpers
paddle1 = [[Paddle alloc] initWithView: viewPaddle1
                              Boundary: gPlayerBox[0]
                              MaxSpeed: MAX_SPEED];

paddle2 = [[Paddle alloc] initWithView: viewPaddle2
                              Boundary:gPlayerBox[1]
                              MaxSpeed: MAX_SPEED];
If the view ever gets unloaded then the paddle images would become invalid which is why it is important to also deallocate the paddle helper objects. Add the following code into both the viewDidUnload and dealloc functions:
// free helpers
[paddle1 release];
[paddle2 release];
In order to make sure the paddle objects are positioned correctly each time the round starts, you need to call the reset method for each paddle. This will place both paddles into the center of their assigned boundary rectangles. You can remove all the existing puck reset code, as you will address that later. For now, just replace the entire reset method to be the following:
- (void)reset
{
    // reset paddles
    [paddle1 reset];
    [paddle2 reset];
}
I want to move your attention over to the touch handling logic. The current implementation moves the paddle images directly to the touch position. This needs to change so the new paddle objects are in charge of movement. The other thing you want to do is position the paddle in front of the touch point otherwise the player’s finger would cover up most of the image. I suggest offsetting the paddle about 32 points in front of the touch. That means player one’s paddle will be offset down the screen and player two’s paddle will be offset up the screen. In addition, you need to store the UITouch object in the paddle object itself instead of tracking them inside the view controller. Modify the touchesBegan method to be as follows:
// handle our touch began events
- (void)touchesBegan:(NSSet *)touches withEvent:(UIEvent *)event
{
    // iterate through our touch elements
    for (UITouch *touch in touches)
    {
        // get the point of touch within the view
        CGPoint touchPoint = [touch locationInView: self.view];

        // if paddle not already assigned a specific touch then
        // determine which half of the screen the touch is on
        // and assign it to that specific paddle
        if (paddle1.touch == nil && touchPoint.y < 240)
        {
            touchPoint.y += 32;
            paddle1.touch = touch;
            [paddle1 move: touchPoint];
        }
        else if (paddle2.touch == nil && touchPoint.y >= 240)
        {
            touchPoint.y -= 32;
            paddle2.touch = touch;
            [paddle2 move: touchPoint];
        }
    }
}
The logic for when touches are moved across the screen hasn’t really changed much. You just need to check the touch object that is now stored in the paddle object to see if it is the correct touch. You will also offset the touch position, as you did before, so the paddle is positioned in front of the touch. Modify the touchesMoved method to be as follows:
// handle touch move events
- (void)touchesMoved:(NSSet *)touches withEvent:(UIEvent *)event
{
    // iterate through our touch elements
    for (UITouch *touch in touches)
    {
        // get the point of touch within the view
        CGPoint touchPoint = [touch locationInView: self.view];

        // if paddle not already assigned a specific touch then
        // determine which half of the screen the touch is on
        // and assign it to that specific paddle
        if (paddle1.touch == touch)
        {
            touchPoint.y += 32;
            [paddle1 move: touchPoint];
        }
        else if (paddle2.touch == touch)
        {
            touchPoint.y -= 32;
            [paddle2 move: touchPoint];
        }
    }
}
The logic for when the touch ends is the same, with the exception that you need to set the touch property of the player’s paddle. Modify the touchesEnded method to be as follows:
// handle touches end events
- (void)touchesEnded:(NSSet *)touches withEvent:(UIEvent *)event
{
    // iterate through our touch elements
    for (UITouch *touch in touches)
    {
        if (paddle1.touch == touch) paddle1.touch = nil;
             else if (paddle2.touch == touch) paddle2.touch = nil;
    }
}
You now need to animate the paddles so the paddle images will actually move towards the positions that were set in the touch handlers. For now, you are going to remove all the other logic including the puck animate function. Change the animate function to the following:
// animate the puck and check for collisions
- (void) animate
{
// moves paddle
[paddle1 animate];
[paddle2 animate];
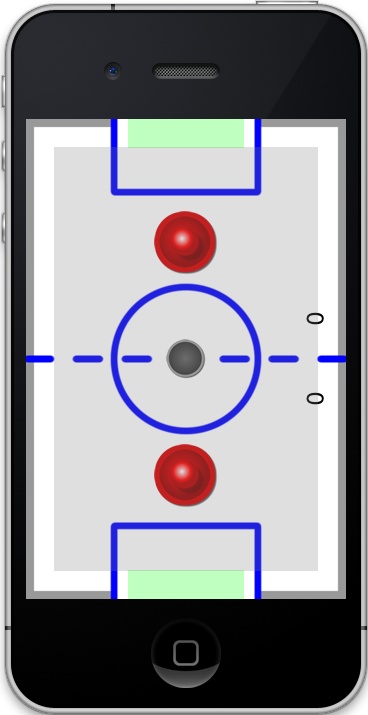
}Now let’s build and run the application and check if there are any problems. Try and move each of the paddles outside of their associated boundaries, as shown in Figure 4-2. You should notice that the center point of the paddle never leaves the red rectangle. It is restricted to each of the four walls even if you drag outside of the rectangle area. This is exactly what you want. However, you may notice an interesting issue that comes about when you have two players playing at each end of the device. It appears that player two’s paddle located at the bottom is positioned directly in front of the player’s touch position, but player one’s paddle seems to be positioned with a little more overlap under the finger.

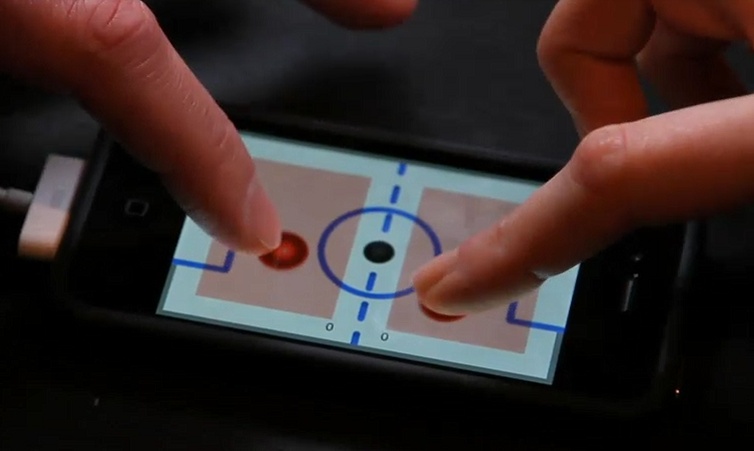
This issue was first brought to my attention when I filmed the O’Reilly Breakdown video series for Realistic iPhone Game Development (http://oreilly.com/catalog/0636920020639/). I had just reached this point of the lesson and was testing out the multi-touch with two players. Courtney Nash, my co-host, was in control of player one’s paddle at the top of the screen. My paddle was correctly placed in front of my touch point, but Courtney noticed that her paddle seemed to be covered up by her finger (see Figure 4-3).
It seemed like it was a bug in the code, so I checked the touch methods to make sure the touch points were being offset by the same distance from the touch point. The code was correct. I then tested in the Simulator and the paddles were perfectly placed in front of the mouse pointer for both players. It appears that this issue only happens on the device. So what was happening?
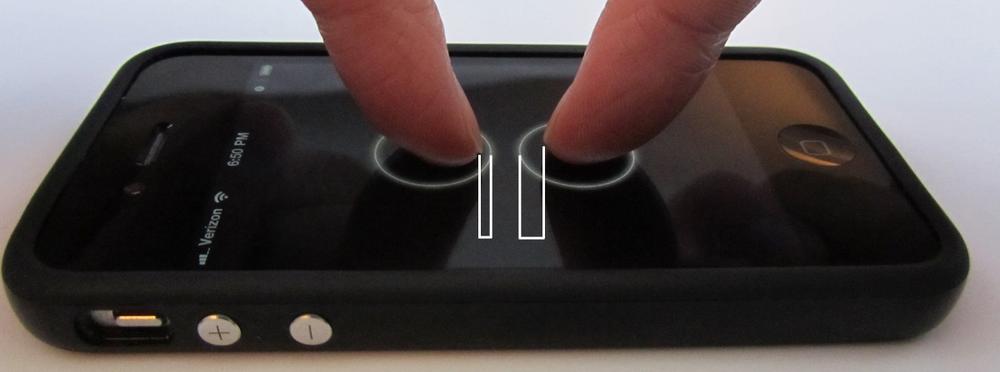
My best guess is that iOS is offsetting your touch point towards the direction of the status bar. Of course, I have no way of knowing exactly how iOS has implemented touch handling internally but I wanted to dig a little deeper into problem. I created an iPhone application that would help me investigate this issue. The application draws a circle around all the touch points on the screen and it also supports every device orientation. I placed two fingers on the screen just like you would do in a head-to-head two-player game of air hockey and noticed that the touch point was in fact offset towards the top. As you can see in Figure 4-4, my finger-tip on the left side of the photo is closer to the bottom edge of its circle than the other finger-tip is to the top edge of its containing circle. If you would like a copy of this program, please download it from my website at http://toddmoore.com/.
Another test I did that helped verify this condition was rotating the iPhone orientation into a landscape orientation and then placing my finger onto the screen as if it were still in portrait mode. I noticed the circle was offset such that it was positioned to the left side of my touch, which was in the direction of the status bar. I also tested this on the iPad and experienced the same results. The question now is how can you fix this so that player one can see their paddle? If you could get the entire area that the touch covers then you could place the paddle at the appropriate position, however, iOS only gives you a single touch point so you really have no way of knowing. The only solution possible is to offset the top paddle a little farther down the screen.
Modify the touch method’s logic to offset the top paddle by offsetting it an addition 16 points to a total of 48. This appears to be a decent number and you have enough of a margin from the player box where you can still position the paddle against the goal box. Modify the touch logic as follows:
// handle our touch began events
- (void)touchesBegan:(NSSet *)touches withEvent:(UIEvent *)event
{
    // iterate through our touch elements
    for (UITouch *touch in touches)
    {
        // get the point of touch within the view
        CGPoint touchPoint = [touch locationInView: self.view];

        // if paddle not already assigned a specific touch then
        // determine which half of the screen the touch is on
        // and assign it to that specific paddle
        if (paddle1.touch == nil && touchPoint.y < 240)
        {
            touchPoint.y += 48;
            paddle1.touch = touch;
            [paddle1 move: touchPoint];
        }
        else if (paddle2.touch == nil && touchPoint.y >= 240)
        {
            touchPoint.y -= 32;
            paddle2.touch = touch;
            [paddle2 move: touchPoint];
        }
    }
}

// handle touch move events
- (void)touchesMoved:(NSSet *)touches withEvent:(UIEvent *)event
{
    // iterate through our touch elements
    for (UITouch *touch in touches)
    {
        // get the point of touch within the view
        CGPoint touchPoint = [touch locationInView: self.view];

        // if paddle not already assigned a specific touch then
        // determine which half of the screen the touch is on
        // and assign it to that specific paddle
        if (paddle1.touch == touch)
        {
            touchPoint.y += 48;
            [paddle1 move: touchPoint];
        }
        else if (paddle2.touch == touch)
        {
            touchPoint.y -= 32;
            [paddle2 move: touchPoint];
        }
    }
}
This problem really illustrates why it is so important to test on a real device. I would have never seen this issue in the Simulator, as there the paddle is correctly positioned at the mouse pointer. The device is completely different than the Simulator, especially when it comes to touch.
Now that you have verified the paddles stay within the red rectangles, go ahead and comment out that code in viewDidLoad. It will be good to keep this code around in case you need to later support a different resolution, such as the iPad. It is time now to focus on the puck.
Puck Physics
It is time to put the puck into motion and get it colliding into things with a sense of realism. I spent a lot of time thinking through the best way to handle the puck. The puck logic was a lot more challenging than other parts of the code, as there were a lot of interesting issues that came up along the way. The first thing to realize about the puck: it’s the only thing that collides into other objects. The collisions need to appear realistic, in that it bounces off the paddles at the correct angle, as well as all of the walls. The simple rectangle intersection formula that was used in the Paddles game will not be sufficient in determining collisions. The puck and paddles are circular so treating them as rectangles would result in collisions triggering before the objects actually touched and that wouldn’t look realistic. There needs to be a little more math necessary in order to properly handle collisions. The puck should also glide like it is on a sheet of ice with a little bit of friction so it slows down after a paddle strike. Finally, the goal boxes require that the puck enter into them to score a point, but if missed then the puck should bounce off the back wall.
Just like you did for the paddles, you are going to create a new object that handles the manipulation of the puck image on the screen. Create a new object called “Puck” that inherits from NSObject just like the Paddle does. Modify the Puck interface definition to appear as follows:
#import <Foundation/Foundation.h>
#import "paddle.h"

@interface Puck : NSObject
{
    UIView *view;   // puck view this object controls
    CGRect rect[3]; // contains our boundary, goal1, and goal2 rects
    int box;       // box the puck is confined to (index into
                   //rect)
    float maxSpeed; // maximum speed of puck
    float speed;    // current speed of puck
    float dx, dy;   // current direction of puck
    int winner;     // declared winner (0=none, 1=player 1 won
                    // (0=none, 1=player 1 won point,
                    // 2=player 2 won point)
}

// read only properties of puck
@property (readonly) float maxSpeed;
@property (readonly) float speed;
@property (readonly) float dx;
@property (readonly) float dy;
@property (readonly) int winner;

// initialize object
-(id) initWithPuck: (UIView*) puck
          Boundary: (CGRect) boundary
             Goal1: (CGRect) goal1
             Goal2: (CGRect) goal2
          MaxSpeed: (float) max;

// reset position to middle of boundary
-(void) reset;

// returns current center position of puck
-(CGPoint) center;

// animate the puck and return true if a wall was hit
-(bool) animate;

// check for collision with paddle and alter path of puck if so
-(bool) handleCollision: (Paddle*) paddle;

@end
You will notice a few similarities to the Paddle object interface that you already created. The object is initialized with the image view that it will control, a boundary rectangle to confine the object, and a maximum speed that it can travel. The difference being you pass in two goal boxes which allow the puck to enter in and ultimately score a point. Let’s talk a little bit about how I decided to handle the puck implementation.
I originally implemented the puck to take an array of rectangles that represented the walls the puck could collide into. I created two walls for the left and right side of the table just like in the Paddles game. I then added two horizontal walls next to each goal so the puck would bounce back into play if the goal was missed. This left me with a total of six walls that the puck could collide into and bounce off. The Paddles game was fresh in my mind and it seemed like a decent approach. I was going to take it a step further and have a Wall object that contained the rectangle of the wall and a new direction of the puck if a collision resulted. Creating this object would let me keep both the wall and collision information in a single object. This seemed like a decent solution, but after I got into it more I quickly realized that the design had serious limitations. The first being, if I didn’t make my walls wide enough, the puck could get pushed right through them. This could happen when the puck was trapped in the corner against the paddle. Sure, I could have made the walls wider but it got me thinking that I would really need to do a lot of testing in order to make sure all the walls behaved correctly. The second issue came with the goal box, as the puck would enter in at an angle, clip the edge of the back wall, and always bounce out. It would never bounce in and that was bad because it didn’t seem realistic at all. There had to be a better solution, and so I scrapped that approach and decided to start over.
I really liked the approach used with the Paddle object, in that you only had a single rectangle that the object was restricted to. There wasn’t much chance of a coding error because the logic was so simple. The paddle can’t leave the box. Period. I started thinking that maybe there was a way I could do something similar with the puck. If I used the same approach as I used for the paddles, then the puck could be confined by a single rectangle that represented most of the screen. This would work great to keep the puck inside the table. I just had to figure out how to handle the special conditions for goal boxes.
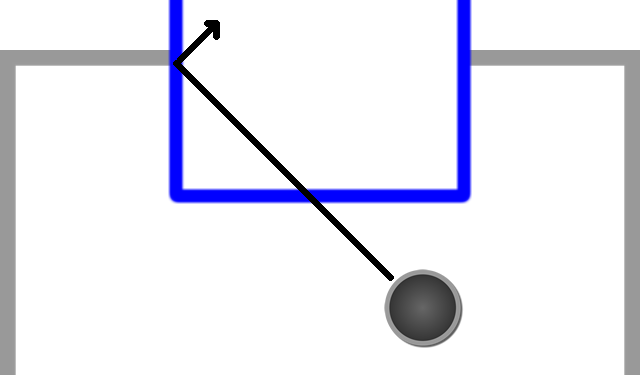
My first thought for the goal boxes was to just ignore wall collisions when the puck was in between the left and right points of the goal boxes. Basically there would be a middle region down the center of the screen where the puck wouldn’t test collision detection against the walls and that would allow the puck to slide right into the goal box and score a point. This was a better approach and much simpler in design than using six walls in my previous design. However, this design had the same problem of my earlier design, in that the puck would not bounce into the goal. The puck would always slide in most of the way but then collision detection would engage and the puck would just appear back on the table when a point should have been given. The design I wanted would allow the puck to hit either edge of the goal box opening and bounce in for a score, as demonstrated in Figure 4-5.
Along the same lines of having more than one wall, I wondered if the puck could have more than one rectangle that it could be restricted to. What if I had two additional rectangles that represented the goal boxes? Maybe the puck could somehow be allowed to travel from the main table area into these additional areas. So, the puck starts by being confined by the table’s rectangle, but if it slides into a goal box rectangle then that becomes its new home. Once the puck slides into the goal box it would then be restricted to this new boundary and ultimately score a point. This would solve the issue of not bouncing into the goal box. The puck could slide in and hit either left or right side of the goal box and still bounce in to score a point. This is the approach you will take in implementing the puck.
Open the Puck.m implementation file for the Puck object. Add the synthesize declaration for the puck properties, along with the initialization and deallocation methods inside the implementation definition:
@synthesize maxSpeed, speed, dx, dy, winner;

-(id) initWithPuck: (UIView*) puck
          Boundary: (CGRect) boundary
             Goal1: (CGRect) goal1
             Goal2: (CGRect) goal2
          MaxSpeed: (float) max
{
    self = [super init];

    if (self)
    {
        // Custom initialization boundary
        view = puck;
        rect[0] = boundary;
        rect[1] = goal1;
        rect[2] = goal2;
        maxSpeed = max;
    }

    return self;
}

- (void)dealloc
{
    [super dealloc];
}
You are saving all three rectangular areas into a single array. The puck will always be confined to one of these rectangles. Just like you did with the Paddle object, you need to add a reset function that will be called at the start of every round. Instead of dropping the puck in the center, as you did with the paddles, you will drop the puck at a random place along the center line. You can just use the rectangles that were passed in to determine the center line of the table and the goal box rectangle to determine a random position to drop within the circle that is drawn on the table. You will also write a method to get access to the current center position of the puck. Add the following implementation after the dealloc method:
// reset to starting position
-(void) reset
{
    // pick a random position to drop the puck
    float x = rect[1].origin.x + arc4random() %
              ((int) rect[1].size.width);
    float y = rect[0].origin.x + rect[0].size.height / 2;
    view.center = CGPointMake(x, y);

    box = 0;
    speed = 0;
    dx = 0;
    dy = 0;
    winner = 0;
}

-(CGPoint) center
{
    return view.center;
}
Now you need to add the animate function—and this is a big one. This function will handle moving the puck across the table while restricting its movement to one of the defined boundaries. It will also return true if a wall was hit. You need this in order for the game to play the collision sound, which is currently the sound used in the Paddles game. I’ll get to improving the sounds in the next chapter.
The animate method applies friction to the puck so it slows down if it is moving. To do this, the speed is multiplied by 0.99, so every frame of animation causes the puck to get slower. Initially I had implemented the animate method so the puck could come to a complete stop. This turned out to be a bad idea as the puck could end up sitting partially in the goal box where the paddle couldn’t reach it. There would be no way to continue the game if this happened and it would force the players to reset the game, which is certainly not what you want. I had to make a decision: do I write special conditional logic where the puck would always keep moving inside the goal boxes, or do I just always keep the puck in motion? Obviously, the puck didn’t start in motion, but I decided that once the puck was put into motion it could just stay moving, albeit very slowly. This worked perfectly and solved the goal box issue. In the code, you will notice I check if the speed is moving, and if so, the speed is reduced, but never below 0.1. This allows for the puck to not be moving at start, but once it is hit the puck will continue and stay in motion until the round is reset.
The direction of the puck is represented with dx and dy variables just like in the Paddles game. The new position of the puck is calculated by taking the current position of the puck view and offsetting it by direction multiplied by speed. The result is stored in the pos variable and used in a series of boundary checks.
The box variable specifies which rectangle the puck is currently confined to. If box is equal to 0 then it is inside the main rectangle. As previous discussed, you want the puck to slide into a goal box and then be confined to that goal box. Once it goes in, it doesn’t come out. Just like a roach motel. The first two checks are implementing this behavior, so that if the puck is in the main table area (box == 0) and is now contained by either of the goal boxes (rect[1] or rect[2]), then the puck changes the active rectangle to the containing goal box. Once this occurs, the puck can no longer go back into the main box and eventually this results in a score...but not immediately. I’ll get to that in the next part of the code:
-(bool) animate
{
    // if there is a winner there is no more animation to do
    if (winner != 0) return false;

    bool hit = false;

    // slow the puck speed due to table friction but always keep
    // it in motion after initial hit
    // otherwise it could get trapped inside a player's goal
    if (speed > 0)
    {
        speed = speed * 0.99;
        if (speed < 0.1) speed = 0.1;
    }

    // move the ball to a new position based on current direction
    // and speed
    CGPoint pos = CGPointMake(view.center.x + dx * speed,
                              view.center.y + dy * speed);


    // check if we are in the goal boxes
    if ( box == 0 && CGRectContainsPoint( rect[1], pos ) )
    {
        // puck now in goal box 1
        box = 1;
    }
    else if ( box == 0 && CGRectContainsPoint( rect[2], pos) )
    {
        // puck now in goal box 2
        box = 2;
    }
    else if (CGRectContainsPoint( rect[box], pos ) == false)
    {
        // handle wall collisions in our current box
        if (view.center.x < rect[box].origin.x)
        {
            pos.x = rect[box].origin.x;
            dx = fabs(dx);
            hit = true;
        }
        else if (pos.x > rect[box].origin.x +
                         rect[box].size.width)
        {
            pos.x = rect[box].origin.x + rect[box].size.width;
            dx = -fabs(dx);
            hit = true;
        }

        if (pos.y < rect[box].origin.y)
        {
            pos.y = rect[box].origin.y;
            dy = fabs(dy);
            hit = true;
            // check for win
            if (box == 1) winner = 2;
        }
        else if (pos.y > rect[box].origin.y +
                         rect[box].size.height)
        {
            pos.y = rect[box].origin.y + rect[box].size.height;
            dy = -fabs(dy);
            hit = true;
            // check for win
            if (box == 2) winner = 1;
        }
    }

    // Put puck into new position
    view.center = pos;

    return hit;
}
The next part of the animate method confines the puck to the rectangle it is currently housed in. The puck is confined to the rectangle much like the paddles are confined to their rectangle. The position of the puck is changed to always fall on the edge of the defined rectangle. The direction of the puck is altered to bounce off the defined walls. If it hits the left side of the wall then the direction of dx becomes positive. If it hits the right wall, then dx is altered to be negative. If it hits the top wall, dy is altered to be positive. If it hits the bottom wall, dy is altered to be negative.
The puck object is in charge of declaring a winner. There are two special cases where this occurs and those are when it hits the top of the wall while in box one or the bottom of the wall if in box two. These walls represent the back of the goal boxes and if the puck hits that edge then a winner is declared. If the back wall of goal box one is hit then this means player two has scored. If the back wall of goal box two is hit then this is a score for player one. This allows each player to see the puck slide completely into the goal before assigning the point and resetting the round. After all that, the current position of the puck is set to the calculated position and the method returns if any walls were hit.
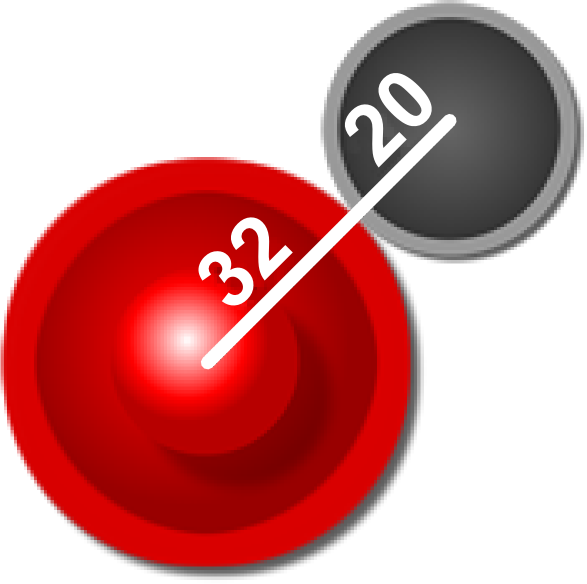
The collision detection from the Paddles game wouldn’t work well because the objects are circular. You need a way to detect when two circles overlap. I started thinking about how to create an algorithm that could detect when two circles intersect. It turns out the solution to this is rather simple. What if you just calculated the distance between each center point and then compared it to the total radius of both? It would basically have the same effect as detecting if two circles intersect. If the center point is less than or equal to the sum of both radii then that is an intersection. If the distance is greater than that amount then there is no way they can be overlapping. The paddle is 64 points across so it has a radius of 32 and the puck is 40 points across so it has a radius of 20. Adding both those numbers together gives us the maximum distance that the two circles could be apart but still touching, as shown in Figure 4-6. Any distance that is equal or less than this amount means the puck has collided with a paddle.
You will use the distance formula to calculate how far apart the paddle and puck are from each other. If a collision occurs, you need to alter the direction of the puck so that it bounces off the paddles in a realistic way. You also need to calculate a new position to put the puck into so that it no longer intersects. If the puck kept intersecting with the paddle then it might result in a huge burst of speed. That’s exactly what I discovered when I started testing. Small hits could send the puck away at a much faster speed than seemed natural and it wasn’t until I fired up the debugger and put a breakpoint within the collision check that I noticed it was being called more than once per hit. The only way to solve this was to move the puck so that it was outside the radius of the paddle so that the next frame of animation would not result in another collision with the same paddle:
// check for collision with paddle and alter path of puck if so
-(bool) handleCollision: (Paddle*) paddle
{
    // max distance that a puck and paddle could be for
    // intersection is half of each size
    // paddle is (64x64)=32 and puck is (40x40)=20
    // = max distance of 52
    static float maxDistance = 52;

    // get our current distance from center point of rectangle
    float currentDistance = [paddle distance: view.center];

    // check for true contact
    if (currentDistance <= maxDistance)
    {
        // change the direction of the puck
        dx = (view.center.x - paddle.center.x) / 32.0;
        dy = (view.center.y - paddle.center.y) / 32.0;

        // adjust ball speed to reflect current speed
        // plus paddle speed
        speed = 0.2 + speed / 2.0 + paddle.speed;

        // limit to max speed
        if (speed > maxSpeed) speed = maxSpeed;

        // re-position puck outside the paddle radius
        // so we don't hit it again
        float r = atan2(dy,dx);
        float x = paddle.center.x + cos(r) * (maxDistance+1);
        float y = paddle.center.y + sin(r) * (maxDistance+1);
        view.center = CGPointMake(x,y);

        return true;
    }

    return false;
}
Now that you have the puck object, it is time to integrate it with the view controller. Just as you needed to do with the Paddle object, import the Puck.h file at the top of the PaddlesViewController.h interface file. Insert the puck object declaration below the existing paddle helpers so that it appears as follows:
// Paddle and puck helpers
Paddle *paddle1;
Paddle *paddle2;
Puck *puck;
You need to define the rectangles used to confine the puck to the main area of the table or one of the two goal boxes. Add this code to the top of the PaddlesViewController implementation after the existing gPlayerBox declaration:
// puck is contained by this rect
struct CGRect gPuckBox =
{ // x, y         width, height
    28, 28,      320-56, 480-56
};

// goal boxes that puck can enter
struct CGRect gGoalBox[] =
{
    {   102, -20,   116, 49   }, // player 1 win box
    {   102, 451,   116, 49   }  // player 2 win box
};
Just as you did for the Paddle rectangles, add debug code that draws the goal boxes and puck boundary on the screen. Add the following after the existing debug code inside the viewDidLoad method:
// debug code to show goal boxes
for (int i = 0; i < 2; ++i)
{
    UIView *view = [[UIView alloc] initWithFrame:
gGoalBox[i] ];
    view.backgroundColor = [UIColor greenColor];
    view.alpha = 0.25;
    [self.view addSubview: view];
    [view release];
}

// debug code to show puck box
UIView *view = [[UIView alloc] initWithFrame: gPuckBox ];
view.backgroundColor = [UIColor grayColor];
view.alpha = 0.25;
[self.view addSubview: view];
[view release];
Notice that when you run with the debug code enabled, you will see that the goal boxes slightly overlap with the main puck box, as shown in Figure 4-7. This was by design so that it wouldn’t be possible to hit the edge of these areas and have the puck mistakenly bounce out. This ensures the puck will always slide into the goal box and ultimately stay in the goal box until hitting the back wall. So did I think about that initially? Nope, while testing the game I witnessed the puck bounce off the edge of the goal box without a paddle being in the way. All part of the journey of writing a game.
Go ahead and allocate the puck object with the other two paddle objects. You will initialize it with the viewPuck image view, boundary rectangle, goal boxes, and maximum speed. Add the following into the viewDidLoad method after the paddle allocations:
puck = [[Puck alloc] initWithPuck:viewPuck
                     Boundary:gPuckBox
                     Goal1:gGoalBox[0]
                     Goal2:gGoalBox[1]
                     MaxSpeed: MAX_SPEED];
Add the releasing of the puck object to the dealloc and viewDidUnload methods:
[puck release];
You need to reset the puck position so that it will be randomly placed in the center of the screen when the round starts. Replace the contents of the reset method with the following:
- (void)reset
{
    // reset paddles and puck
    [paddle1 reset];
    [paddle2 reset];
    [puck reset];
}
Now you need to put the puck into motion and check for paddle collisions. Remember that the collision, animate, and goal checking methods return true if a collision occurred, so you can use that to play the existing sounds for now. Replace the contents of the animate method with the following:
// animate the puck and check for collisions
- (void) animate
{
    // move paddles
    [paddle1 animate];
    [paddle2 animate];

    // Handle paddles collisions which return true if a collision
    // occurred
    if ([puck handleCollision: paddle1] ||
        [puck handleCollision: paddle2])
    {
        // play paddle hit
        [self playSound: SOUND_PADDLE];
    }

    // animate our puck which returns true if a wall was hit
    if ([puck animate])
    {
        [self playSound: SOUND_WALL];
    }

    // Check for goal
    if ([self checkGoal])
    {
        [self playSound: SOUND_SCORE];
    }
}
After checking for paddle collisions and animating the puck you will then check for a goal. However, this method is still based off of the previous Paddles game, which will end the round as soon as the puck enters the goal box. You want the puck to go all the way in and hit the back wall of the goal box before signalling the end of the round. In order to do that, you will use the new winner property of the puck. Modify the checkGoal method to be the following:
- (BOOL) checkGoal
{
    // check if ball is out of bounds and reset game if so
    if (puck.winner != 0)
    {
        // get integer value from score label
        int s1 = [viewScore1.text intValue];
        int s2 = [viewScore2.text intValue];

        // give a point to correct player
        if (puck.winner == 2) ++s2; else ++s1;

        // update score labels
        viewScore1.text = [NSString stringWithFormat: @"%u", s1];
        viewScore2.text = [NSString stringWithFormat: @"%u", s2];

        // check for winner
        if ([self gameOver] == 1)
        {
            // report winner
            [self displayMessage: @"Player 1 has won!"];
        }
        else if ([self gameOver] == 2)
        {
            // report winner
            [self displayMessage: @"Player 2 has won!"];
        }
        else
        {
            // reset round
            [self reset];
        }

        // return TRUE for goal
        return TRUE;
    }

    // no goal
    return FALSE;
}
Before you test out the game, go ahead and comment out all the debug code in the viewDidLoad method. This will ensure that those views do not conflict with the touch handling of the game. You can always uncomment the code if you need to make adjustments later. The viewDidLoad method with the debug code commented out should appear as follows:
- (void)viewDidLoad
{
    [super viewDidLoad];

    [self initSounds];

    /*
    // debug code to show player boxes
    for (int i = 0; i < 2; ++i)
    {
        UIView *view = [[UIView alloc] initWithFrame:
    gPlayerBox[i] ];
        view.backgroundColor = [UIColor redColor];
        view.alpha = 0.25;
        [self.view addSubview: view];
        [view release];
    }

    // debug code to show goal boxes
    for (int i = 0; i < 2; ++i)
    {
        UIView *view = [[UIView alloc] initWithFrame: gGoalBox[i] ];
        view.backgroundColor = [UIColor greenColor];
        view.alpha = 0.25;
        [self.view addSubview: view];
        [view release];
    }

    // debug code to show puck box
    UIView *view = [[UIView alloc] initWithFrame: gPuckBox ];
    view.backgroundColor = [UIColor grayColor];
    view.alpha = 0.25;
    [self.view addSubview: view];
    [view release];
    */

    // create our paddle helpers
    paddle1 = [[Paddle alloc] initWithView: viewPaddle1
                                  Boundary: gPlayerBox[0]
                                  MaxSpeed: MAX_SPEED];

    paddle2 = [[Paddle alloc] initWithView: viewPaddle2
                                  Boundary:gPlayerBox[1]
                                  MaxSpeed: MAX_SPEED];

    puck = [[Puck alloc] initWithPuck:viewPuck
                             Boundary:gPuckBox
                                Goal1:gGoalBox[0]
                                Goal2:gGoalBox[1]
                             MaxSpeed: MAX_SPEED];

    [self newGame];
}
You should also remove the old variables that are no longer being used from the PaddlesViewController interface file. This includes the dx, dy, and speed variables that are now contained by the Puck helper object. The checkPuckCollision and increaseSpeed methods should also be removed from the implementation as they are no longer needed. The PaddlesViewController.h file should now appear as follows:
#import <UIKit/UIKit.h>
#import "AudioToolbox/AudioToolbox.h"
#import "Paddle.h"
#import "Puck.h"

@interface PaddlesViewController : UIViewController
{

    // Paddle and puck helpers
    Paddle *paddle1;
    Paddle *paddle2;
    Puck *puck;

    NSTimer *timer;

    UIAlertView *alert;

    SystemSoundID sounds[3];
}
@property (nonatomic, retain) IBOutlet UIView *viewPaddle1;
@property (nonatomic, retain) IBOutlet UIView *viewPaddle2;
@property (nonatomic, retain) IBOutlet UIView *viewPuck;
@property (nonatomic, retain) IBOutlet UILabel *viewScore1;
@property (nonatomic, retain) IBOutlet UILabel *viewScore2;

- (void)resume;
- (void)pause;

@end
You have finished up a lot of coding in this chapter and now have a full working game of two-player air hockey. Go ahead and run the game and test it out. You should notice the puck slides across and collides into objects in a realistic manner. This is nothing like the original Paddles game, and shows how you can reuse existing game logic to speed up development.
You now have a game that looks like air hockey, plays like air hockey, but sounds nothing like air hockey. You are still using the sounds from the Paddles game, which really takes away from the realism. In the next chapter, I will discuss how to record and edit realistic sound effects, which will be used to replace the existing sounds.
Get Tap, Move, Shake now with the O’Reilly learning platform.
O’Reilly members experience books, live events, courses curated by job role, and more from O’Reilly and nearly 200 top publishers.

