Chapter 1. Setup and Management
1.0. Introduction
When you buy a Raspberry Pi, you are essentially buying an assembled printed circuit board. It does not even include a power supply or operating system.
The recipes in this chapter are concerned with getting your Raspberry Pi set up and ready for use.
Because the Raspberry Pi just uses standard USB keyboards and mice, most of the setup is pretty straightforward, so we will concentrate on those tasks that are specific to the Raspberry Pi.
1.1. Selecting a Model of Raspberry Pi
Solution
If you want a Raspberry Pi for general use, then you should buy a model B, revision 2 (the latest). With twice as much memory, it will cope with most tasks much better than the model A.
If, on the other hand, you are embedding a Raspberry Pi in a project for a single purpose, then using a model A and saving a few dollars may well be an option.
Discussion
Figure 1-1 shows model A and model B side by side.
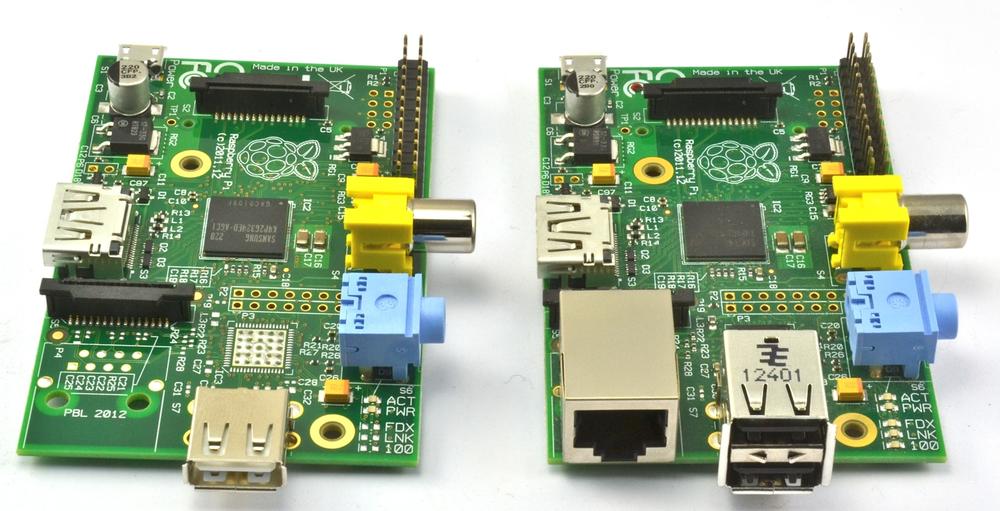
As you can see from Figure 1-1, both use the same circuit board, but model A has a single USB socket and no RJ45 Ethernet socket. You can also see the bare solder pads behind the USB socket where the Ethernet controller chip should be.
The differences between the models are summarized in Table 1-1. This table also includes the original model B, revision 1 board, which was soon updated with revision 2. You can tell if you have a revision 1 board because it has a black audio socket rather than the blue socket of the revision 2 board.
| Model | RAM | USB sockets | Ethernet port | |
A | 256 MB | 1 | no | |
B rev2 | 512 MB | 2 | yes | |
B rev1 | 256 MB | 2 | yes |
The lack of a network interface on the model A is not a problem because all the Raspberry Pi models will accept a USB WiFi adapter (Recipe 2.5). Since the adapter would use the only USB socket, you would also need a USB hub to increase the number of USB sockets. However, with a model B Raspberry Pi, you can put a USB WiFi adapter in one USB socket and a wireless keyboard/mouse dongle in the other.
See Also
For more information on the Raspberry Pi models, see http://en.wikipedia.org/wiki/Raspberry_PI.
1.2. Enclosing a Raspberry Pi
Problem
You need an enclosure for your Raspberry Pi.
Solution
The Raspberry Pi does not come with an enclosure unless you buy one as part of a kit. This makes it a little vulnerable, as there are bare connections on the underside of the circuit board that could easily short if the Raspberry Pi is placed on something metal.
It is a good idea to buy some protection for your Raspberry Pi in the form of a case.
Discussion
There is a vast array of case styles to choose from, including:
- Simple, two-part, click-together plastic boxes
- VESA mountable boxes (for attaching to the back of a monitor or TV)
- Lego-style boxes
- 3D printed box designs
- Laser-cut, snap-together acrylic designs
The case you buy is very much a matter of personal taste. However, some of the things you need to consider are:
- Do you need to have access to the GPIO connector? This is important if you plan to attach external electronics to your Raspberry Pi.
- Is the case well ventilated? This is important if you plan to overclock your Raspberry Pi (Recipe 1.14) or run it hard, playing videos or games, as these will all generate more heat.
See Also
Adafruit has a nice range of Raspberry Pi enclosures.
You will also find many styles of cases at other Raspberry Pi suppliers and on eBay.
1.3. Selecting a Power Supply
Solution
The basic electrical specification for a power supply suitable for a Raspberry Pi is that it supplies a regulated 5V DC (direct current) and can supply a current of up to 700mA. It must also have a micro USB plug on the end of the lead.
If you buy your power supply from the same place as the Raspberry Pi, then the seller should be able to tell you if it will work with the Raspberry Pi.
If you are going to be using a WiFi dongle, or other USB peripherals that use significant amounts of power, then I would get a power supply capable of 1.5A or even 2A. Also beware of very low-cost power supplies that may not provide an accurate or reliable 5V.
Discussion
The power supply and connector are actually the same as those found in many smartphone chargers. If they are terminated in a micro USB plug, then they are almost certainly 5V (but check). The only question, then, is if they can supply enough current.
If they can’t, then a few bad things can happen:
- They may get hot and be a potential fire risk.
- They may just fail.
- At times of high load (say, when the Pi is using a WiFi dongle), the voltage may dip, and the Raspberry Pi may reset itself.
So, look for a power supply that says it can supply 700 mA or more. If it specifies a number of watts (W) rather than mA, then divide the number of watts by 5 to get the mA figure. So, a 5V 10W power supply can supply 2A (2,000 mA).
Using a power supply with, say, a maximum current of 2A will not use any more electricity than a 700mA power supply. The Raspberry Pi will just take as much current as it needs.
In Figure 1-2, I have measured the current taken by a Raspberry Pi model B, revision 2, as it starts up, with and without a WiFi dongle and HDMI video connection using the Raspian Wheezy distribution.
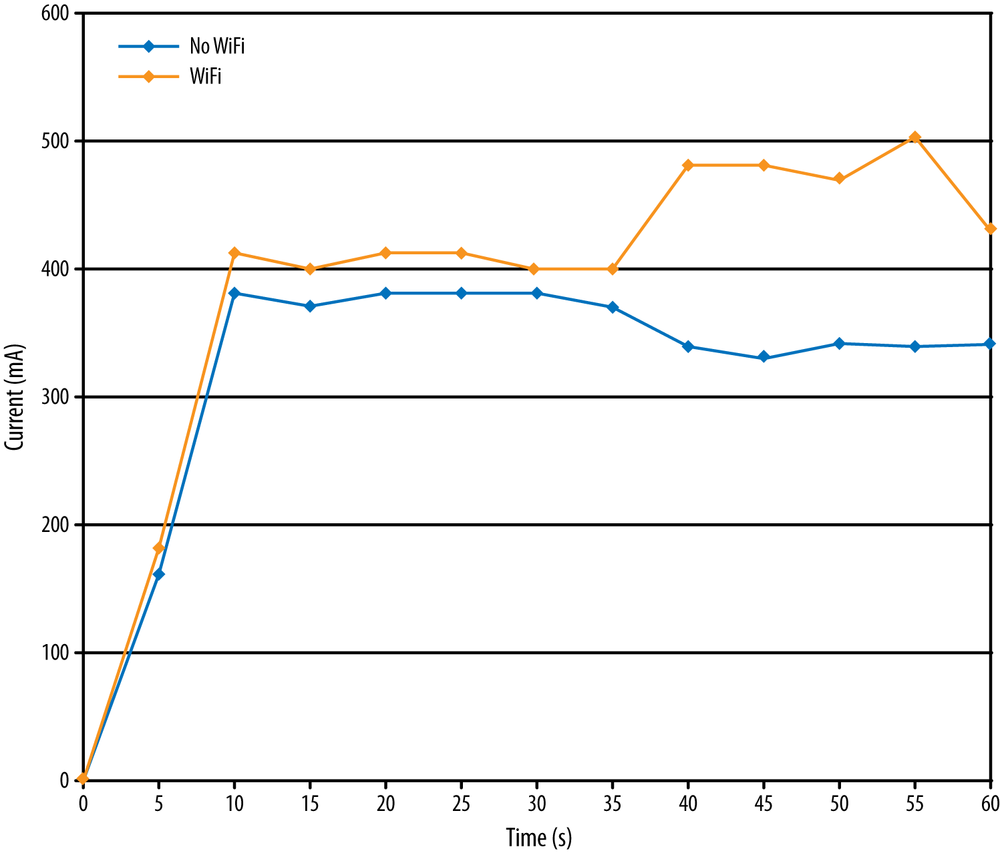
You can see that actually the current rarely gets above 500mA. However, the processor isn’t really doing very much here. Were you to start playing HD video, the current would increase considerably. When it comes to power supplies, it’s usually better to have something in reserve.
See Also
You can buy a module that will turn off the power when the Raspberry Pi shuts down at http://www.pi-supply.com/.
1.4. Selecting an Operating System Distribution
Problem
There are a number of different Raspberry Pi distributions. You are not sure which one to use.
Solution
The answer to this question depends on what you intend to do with your Raspberry Pi.
If you plan to build hardware projects with the Raspberry Pi, then use Raspbian or Occidentalis (from Adafruit). Of these, Raspbian is the official and most commonly used distribution for Raspberry Pi, but Occidentalis requires less setup to start hacking hardware.
If you plan to use your Raspberry Pi as a media center, there are a number of distributions specifically for that purpose (see Recipe 4.1).
In this book, we use the Raspbian distribution almost exclusively, although most of the recipes will work with any Debian-based distribution.
Discussion
SD cards—especially a 4 GB SD card, which is recommended for most distributions—are not expensive, so get a few and try out a few distributions. If you do this, it is a good idea to keep your own files on a USB flash drive so that you don’t have to keep copying them onto each SD card.
Note that if you are using one of the upcoming recipes, to write your own SD card, then you need to either have a computer that has an SD card slot (many laptops do) or buy an inexpensive USB SD card reader.
1.5. Writing an SD Card with NOOBS
Solution
Download the NOOBS archive file from http://www.raspberrypi.org/downloads, extract it, and place it on an SD card.
Note
NOOBS downloads the software it needs, so if you are using a Raspberry Pi model A without a network connection, then you may find it best to use one of recipes that installs the whole operating system (Recipes 1.6, 1.7, or 1.8).
Once you have downloaded the NOOBS archive file, extract it and copy the folder contents onto the SD card. Note that if the archive extracts to a folder called NOOBS_v1_2_1 or similar, it is the contents of the folder that should be copied to the root of the SD card, not the folder itself.
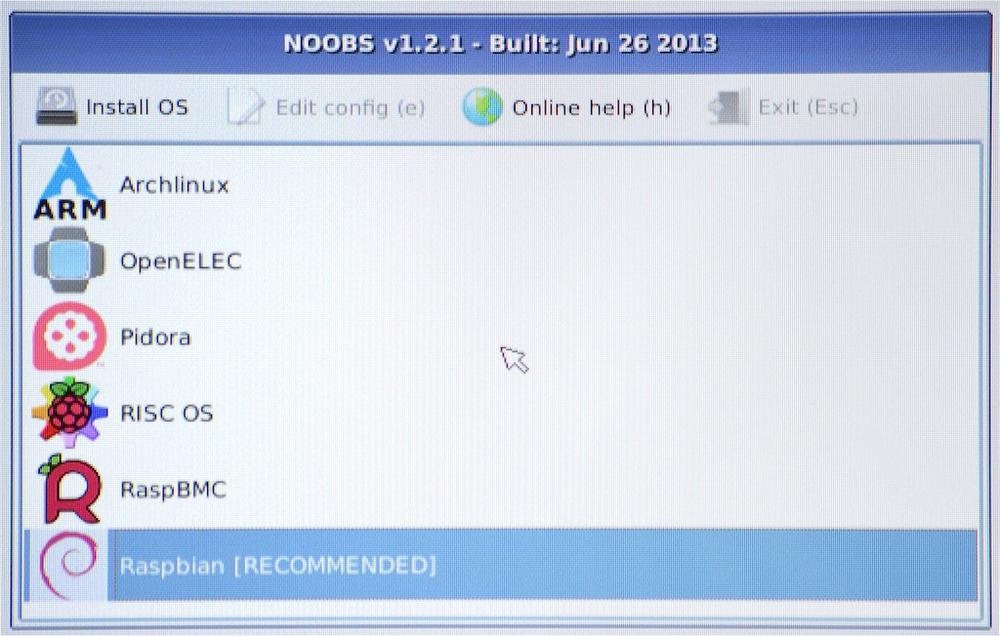
Put the SD card containing the extracted NOOBS files into your Raspberry Pi and then power up your Raspberry Pi. When it boots, the window shown in Figure 1-3 will appear. From this screen, you can select which distribution you want to install. Raspbian will be selected as the default, and this is the best choice to start off with.
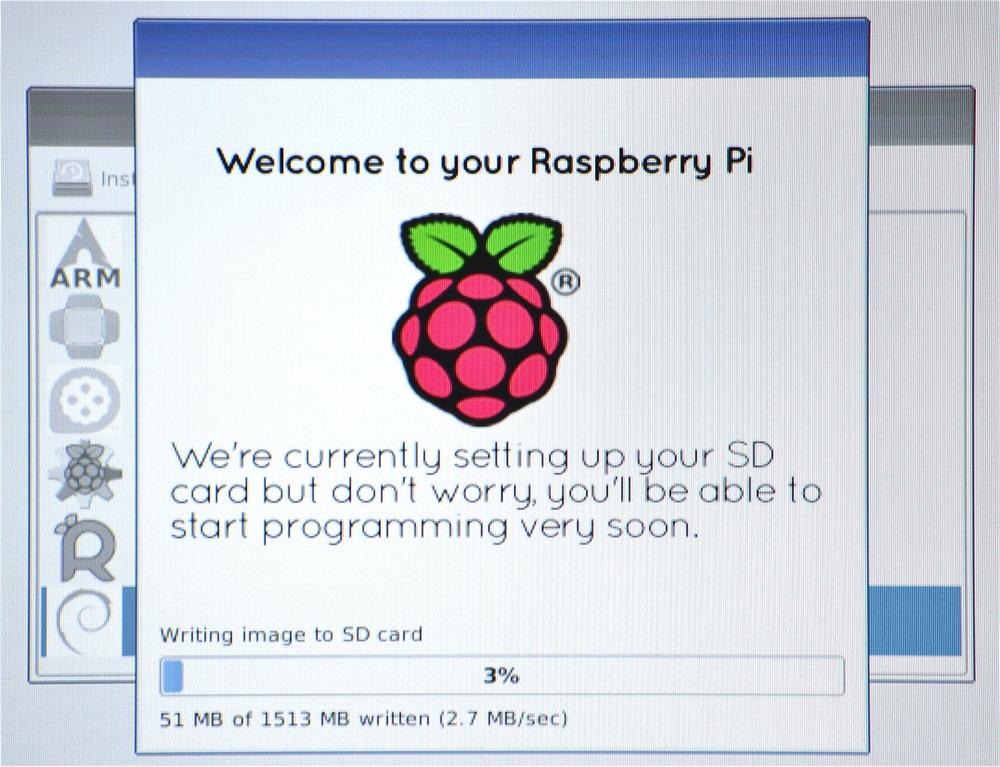
You will get a warning message that the SD card will be overwritten (which is fine) and then as the distribution is installed onto the SD card, you will see a progress screen accompanied by helpful information about the distribution (Figure 1-4).
Once the file copying is complete, you will get the message Image applied successfully. When you hit return, the Raspberry Pi will reboot and then raspi_config will automatically run so that you can configure the new installation (Recipe 1.12).
Discussion
For NOOBS to install correctly onto an SD card, the card must be formatted as FAT. Most SD cards are supplied already formatted in FAT. If you are reusing an old card and need to format it as FAT, then use your operating system’s tool for formatting removeable media.
Alternatively, the Raspberry Pi foundation recommends the SD Association’s formatting tool, which is available for Mac and Windows.
1.6. Writing an SD Card Manually (Mac)
Problem
The Raspberry Pi is not generally supplied with an operating system. You want to use a Mac to write an operating system distribution onto an SD card.
Solution
Download an iso disk image for the distribution that you have selected (see Recipe 1.4). Then use a utility script to write it onto an SD card.
There are a number of different utility programs that have been written to help you create an SD card. A popular one is available on GitHub.
- Download it and extract the folder contained in the zip file to some convenient location.
- Copy the iso image file you downloaded into this folder. Let’s assume it is something like Occidentalis_v02.iso.
- Eject any external hard disks or USB flash drives and insert the SD card.
-
Open a Terminal session, change directory (
cdcommand) to the installer folder, and run this command:
sudo ./install Occidentalis_v02.iso
If you are using a different iso image file, then use that filename instead. This command launches the SD installer, and you’ll see something like Figure 1-5.
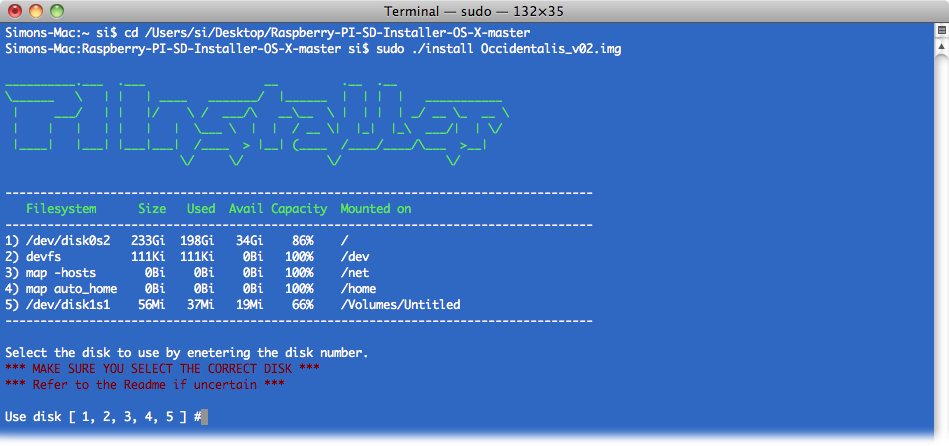
You now need to enter a number corresponding to the SD card. This is why it’s a good idea to eject all other removable storage media, because if you pick the wrong option, the utility will trash whatever is on that drive. So, before continuing, make sure that you know which number corresponds to your SD card.
After you have made the selection, if all is well, writing will commence. This usually takes a few minutes.
Discussion
You can also buy preformatted SD cards with a distribution already installed on them. However, these are sometimes not the latest version, so it’s a good idea to know how to write your own SD cards.
When selecting an SD card to write to, always select one that is at least 4 GB.
See Also
See also Recipe 1.5 for how to write an SD card image by using NOOBS.
All the (*)Ware has an alternative utility for writing an SD card from a Mac.
More details about writing an SD card are available at http://bit.ly/1cqhXym.
1.7. Writing an SD Card Manually (Windows)
Problem
The Raspberry Pi is not generally supplied with an operating system. You want to use a Windows PC to write an operating system distribution onto an SD card.
Solution
Download an iso disk image for the distribution that you have selected (see Recipe 1.4). Then use the Fedora ARM Installer to put it onto an SD card.
Start by downloading the Fedora ARM Installer.
Note that this will only work on Windows Vista and newer.
- Extract the folder contained in the zip file to some convenient location (say, the desktop).
- Eject any external hard disks or USB flash drives and insert the SD card.
- Run fedora-arm-installer.exe as a user who has administrator rights.
This tool has a nice user interface (Figure 1-6).
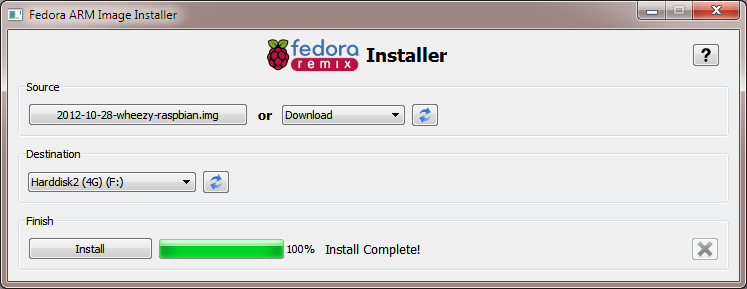
Simply navigate to wherever you downloaded the iso file in the Source section, select the SD card from the Destination drop-down, and after checking that you have definitely selected the SD card and not some other disk drive, click Install.
Discussion
You can also buy preformatted SD cards with a distribution already installed on them. However, these are sometimes not the latest version, so it is a good idea to know how to write your own SD cards.
When selecting an SD card to write to always select one that is at least 4GB.
See Also
See also Recipe 1.5 for how to write an SD card image by using NOOBS.
More details and options for writing an SD card are available at http://elinux.org/RPi_Easy_SD_Card_Setup.
1.8. Writing an SD Card Manually (Linux)
Problem
The Raspberry Pi is not generally supplied with an operating system. You want to use a Linux PC to write an operating system distribution onto an SD card.
Solution
Download an iso disk image for the distribution that you have selected (see Recipe 1.4). Then use the Ubuntu ImageWriter tool to put it onto an SD card. For other Linux distributions, consider using NOOBS (Recipe 1.5).
First, install the ImageWriter tool by opening a Terminal session and entering the following command:
$ sudo apt-get install usb-imagewriter
This tool has a nice user interface (Figure 1-7).
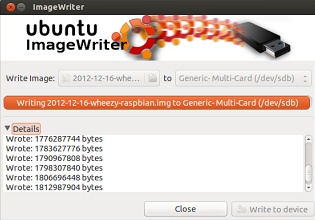
Navigate to wherever you downloaded the iso file in the Write Image section, select the SD card from the “to” drop-down, and after checking that you have definitely selected the SD card and not some other disk drive, click “Write to Device.”
Discussion
You can also buy preformatted SD cards with a distribution already installed on them. However, these are sometimes not the latest version, so it is a good idea to know how to write your own SD cards.
When selecting an SD card to write to, always select one that is at least 4 GB.
See Also
See also Recipe 1.5 for how to write an SD card image by using NOOBS.
More details and options for writing an SD card are available at http://elinux.org/RPi_Easy_SD_Card_Setup.
1.9. Connecting the System
Problem
You have everything that you need for your Raspberry Pi, and you want to connect it all together.
Solution
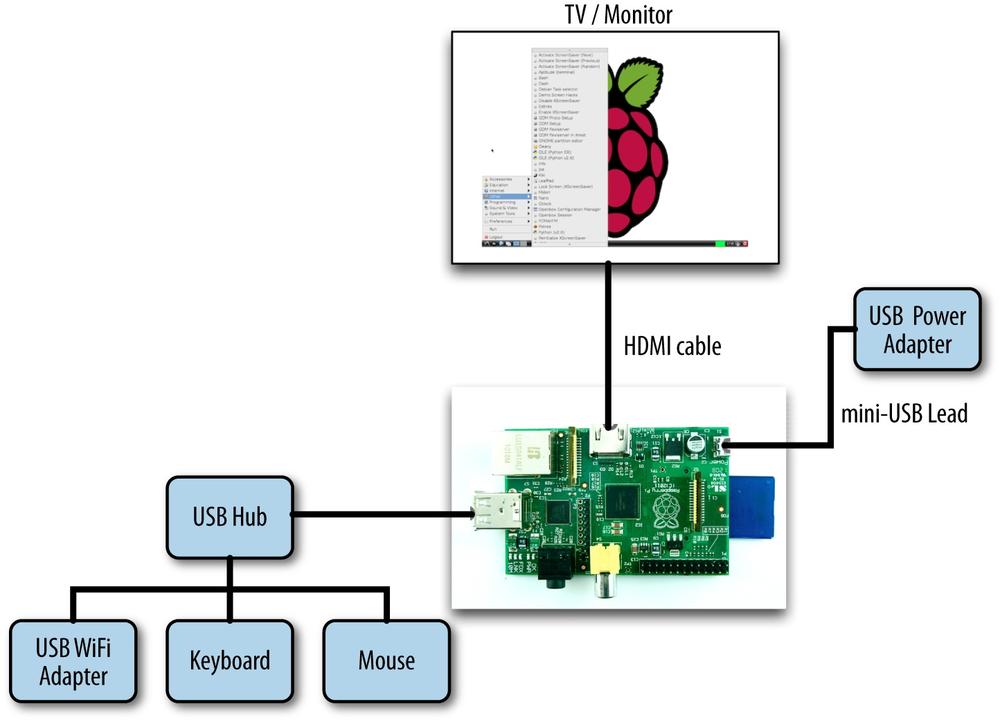
Unless you are embedding your Raspberry Pi in a project or using it as a media center, you need to attach a keyboard, mouse, monitor, and probably a WiFi dongle. As this adds up to more than three connections, even with a Raspberry Pi model B, you’ll need a USB hub to provide enough USB sockets.
Figure 1-8 shows a typical Raspberry Pi system.
Discussion
If you use a wireless keyboard/mouse combination with a single USB dongle, then the other free USB socket (assuming you have a Raspberry Pi model B) could be used for a WiFi dongle. However, in all likelihood a USB hub is going to be useful when you want to attach an external USB disk or USB flash drive.
The Raspberry Pi is perfectly happy with pretty much any keyboard or mouse, wired or wireless. The exception to this is Bluetooth wireless keyboards and mice, which will not work with the Raspberry Pi.
1.10. Connecting a DVI or VGA Monitor
Solution
Many people have been caught out by this problem. Fortunately, it is possible to buy adapters for monitors with a DVI or VGA input, but not HDMI connectors.
DVI adapters are the simplest and cheapest. They can be found for less than $5 if you search for “HDMI male to DVI female converter.”
Discussion
Using VGA adapters is more complex, as they require some electronics to convert the signal from digital to dialog, so beware of leads that do not contain these. The official converter is called Pi-View and is available wherever the Raspberry Pi is sold. Pi-View has the advantage of having been tested and found to work with Raspberry Pi. You may find cheaper alternatives on the Internet, but often these won’t work.
See Also
elinux has tips on what to look for in an converter.
1.11. Using a Composite Video Monitor/TV
Problem
The text on your low-resolution composite monitor is illegible. You need to adjust the resolution of the Raspberry Pi for a small screen.
Solution
The Raspberry Pi has two types of video output, HDMI and composite video. Of these, the HDMI is much better quality. So if you’re intending to use a composite video as your main screen, you may want to think again.
If you are using such a screen—say, because you need a really small screen—then you need to make a few adjustments to fit the video output to the screen. You need to make some changes to the file /boot/config.txt. You can edit it on the Raspberry Pi by issuing the following command in a Terminal session:
$ sudo nano /boot/config.txt
If the text is too small to read and you do not have an HDMI monitor, then you can also edit the file by removing the SD card from the Raspberry Pi and inserting it into your computer. The file will then be in the top-level directory on the SD card, so you can use a text editor on your PC to modify it.
You need to know the resolution of your screen. For a lot of small screens, this will be 320 by 240 pixels. Find the two lines in the file that read:
#framebuffer_width=1280
#framebuffer_height=720
Remove the # from the front of each line and change the two numbers to the width and height of your screen. In the following example, these lines have been modified to be 320 by 240:
framebuffer_width=320
framebuffer_height=240
Save the file and restart your Raspberry Pi. You should find that everything has become a lot easier to read. You will probably also find that there is a big thick border around the screen. To adjust this, see Recipe 1.13.
Discussion
There are many low-cost CCTV monitors that can make a great companion for the Raspberry Pi when you’re making something like a retro games console (Recipe 4.6). However, these monitors are often very low resolution.
See Also
For another tutorial on using composite monitors, see this Adafruit’s tutorial.
Also, see Recipe 1.13 and Figure 1-10 to adjust your picture when you’re using the HDMI video output.
1.12. Using All the Storage on the SD Card
Problem
When an operating system is written to a Raspberry Pi’s SD card, the partition size is fixed by the image you install so you cannot use the whole of the SD card. This leaves little room for your own files.
Solution
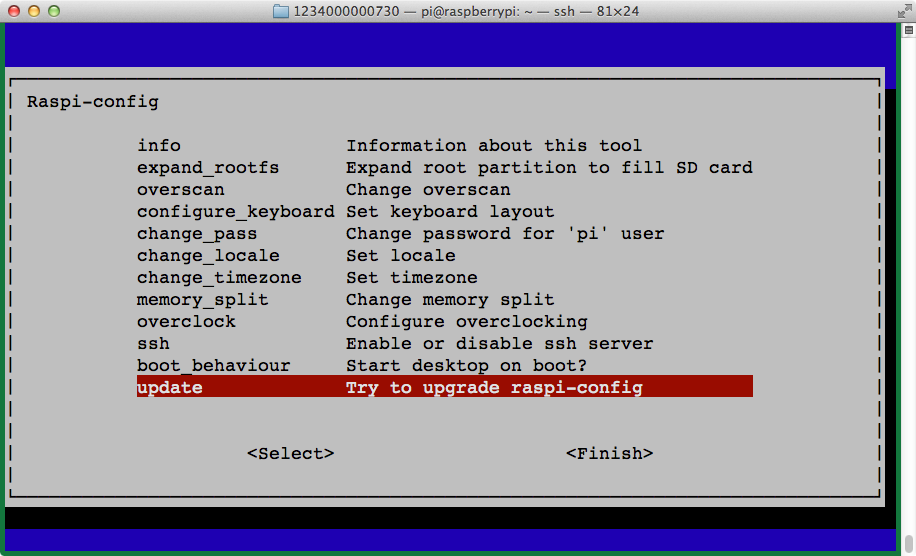
To fix this, you need to run the raspi-config tool. This program automatically runs the first time that you boot your Raspberry Pi with a new SD card. You can also start it any time you need to adjust the configuration by opening a Terminal session and issuing the command:
$ sudo raspi-config
Scroll down to the option expand_rootfs, and then use the cursor keys to press the Select button (Figure 1-9).
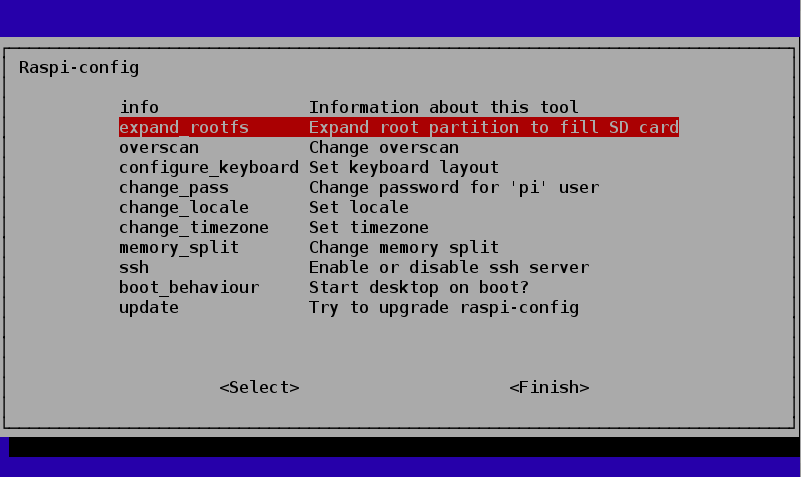
You will see a confirmation message, and then your Raspberry Pi will need to restart for the change to take effect.
You should now be able to use the full capacity of the SD card.
Discussion
Adjusting the root partition is definitely worth doing, especially for storing temporary files, but keeping your documents and personal files on a USB flash drive avoids the need to transfer files when you update your operating system.
See Also
You can find much more information about the raspi-config tool at http://elinux.org/RPi_raspi-config.
1.13. Adjusting the Picture Size on your Monitor
Problem
When you first connect a Raspberry Pi to a monitor, you may find that some of the text cannot be read because it extends off the screen, or the picture isn’t using all the space available on the screen.
Solution
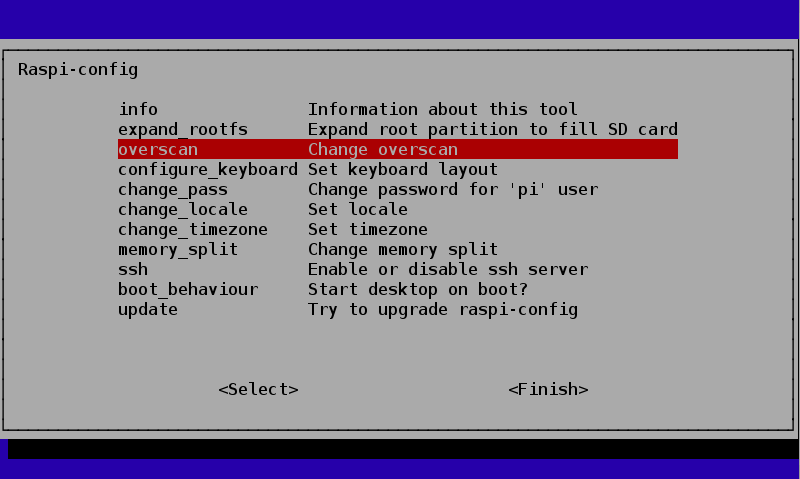
If your text extends off the screen, use the raspi-config tool to turn overscan off.
To do this, run raspi-config by opening a Terminal session and issuing the command:
$ sudo raspi-config
Then use the cursor keys to scroll down to the option overscan, and turn overscan off (Figure 1-10).
If your problem is that there is a large black border around the picture, then you can reduce this (and possibly eliminate it entirely) by editing the file /boot/config.txt using the command:
$ sudo nano /boot/config.txt
Look for the section dealing with overscan. The four lines you need to change are shown in the middle of Figure 1-11.
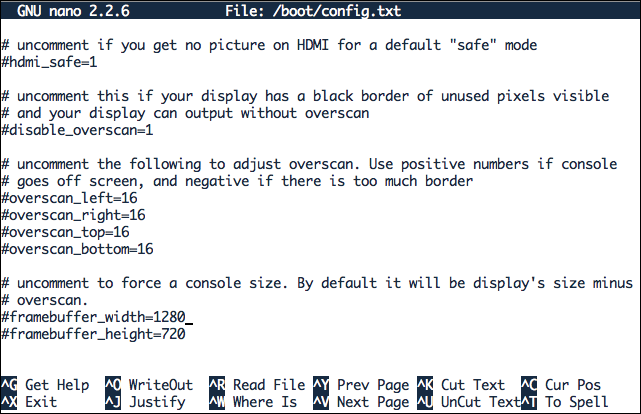
For the lines to take effect, you first need to uncomment them by removing the # character from the start of each line.
Then, using trial and error, change the settings until the screen fills as much of the monitor as possible. Note that the four numbers should be negative. Try setting them all to –20 to start with.
Discussion
Having to repeatedly restart the Raspberry Pi to see the effects of the changes in resolution is a little tedious. Fortunately, you will only have to do this procedure once. Many monitors and TVs work just fine without any adjustments being necessary.
See Also
You can find much more information about the raspi-config tool at http://elinux.org/RPi_raspi-config.
1.14. Maximizing Performance
Solution
You can increase the clock frequency of a Raspberry Pi to make it run a little faster. This will make it use a bit more power and run a little hotter (see the Discussion next).
The method of overclocking described here is called dynamic overclocking because it automatically monitors the temperature of the Raspberry Pi and drops the clock speed back down if things start to get too hot.
To make your Pi overclock, run the raspi_config utility by issuing the following command in a Terminal:
$ sudo raspi-config
Select the overclock option in the menu, and you are presented with the options in Figure 1-12.
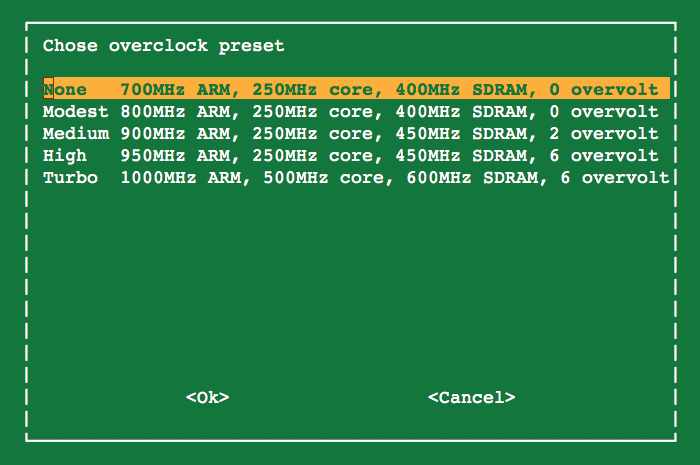
Select an option. If you find that your Raspberry Pi starts to become unstable and hangs unexpectedly, then you may need to choose a more conservative option or turn overclocking off by setting it back to None.
Discussion
The performance improvements from overclocking can be quite dramatic. To measure these, I used a Raspberry Pi model B, revision 2, without a case at an ambient room temperature of 15 degrees C.
The test program was the following Python script. This just hammers the processor and is not really representative of the other things that go on in a computer, such as writing to the SD card, graphics, and so on. But it does give a good indication of raw CPU performance if you want to test the effect of overclocking on your Raspberry Pi.
importtimedeffactorial(n):ifn==0:return1else:returnn*factorial(n-1)before_time=time.clock()foriinrange(1,10000):factorial(200)after_time=time.clock()(after_time-before_time)
Check out the results of the test in Table 1-2.
| Speed test | Current | Temperature (degrees C) | |
| 700 MHz | 15.8 seconds | 360 mA | 27 |
| 1 GHz | 10.5 seconds | 420 mA | 30 |
As you can see, the performance has increased by 33%, but at a cost of drawing more current and a slightly higher temperature.
You can now buy self-adhesive heatsinks that fit onto the big chip at the center of the Raspberry Pi to help keep it cool. Some of these do not actually connect the heatsink to the chip with a thermally conductive compound and are therefore mostly for show. A well-ventilated enclosure (Recipe 1.2) may well be more effective. There have also been some efforts to add water-cooling to the Raspberry Pi. Frankly, this is just silly.
See Also
You can find much more information about the raspi-config tool at http://elinux.org/RPi_raspi-config.
1.15. Changing Your Password
Solution
You can use the raspi-config tool to change your password.
Run the raspi_config utility by issuing the following command in a Terminal (see Recipe 3.2):
$ sudo raspi-config
Then select the change_pass option in the menu and follow the prompts shown in Figure 1-13.
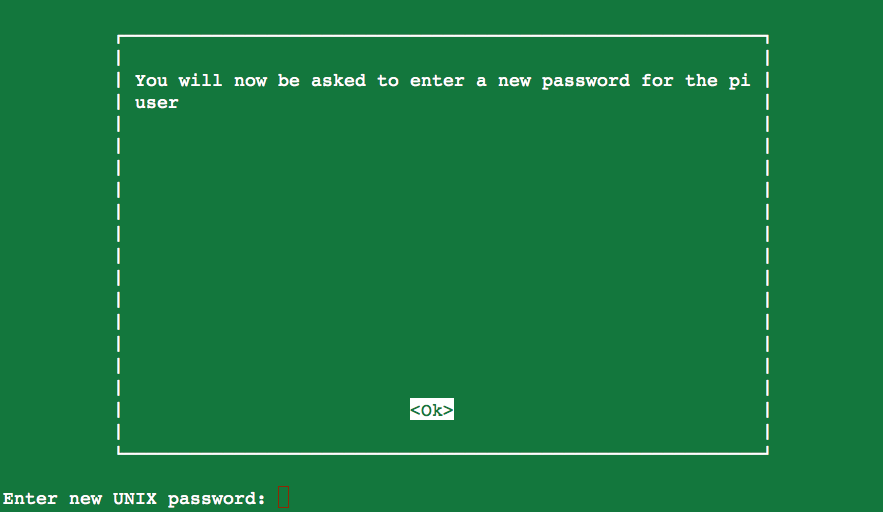
Changing your password is one occasion where you do not have to restart your Raspberry Pi for the changes to take effect.
Discussion
You can also change the password from a Terminal session simply by using the passwd command as follows:
$ passwd
Changing password for pi.
(current) UNIX password:
Enter new UNIX password:
Retype new UNIX password:
passwd: password updated successfully
See Also
You can find much more information about the raspi-config tool at http://elinux.org/RPi_raspi-config.
1.16. Setting the Pi to Boot Straight into a Windowing System
Problem
Every time you reboot your Raspberry Pi, you have to log in and then start the desktop manually. You want to make this automatic.
Solution
You can use the raspi-config tool to change the boot behavior so that the Raspberry Pi automatically logs you in and starts the desktop.
Run the raspi_config utility by issuing the following command in a Terminal:
$ sudo raspi-config
Then select the boot_behaviour option in the menu and follow the prompts shown in Figure 1-14.
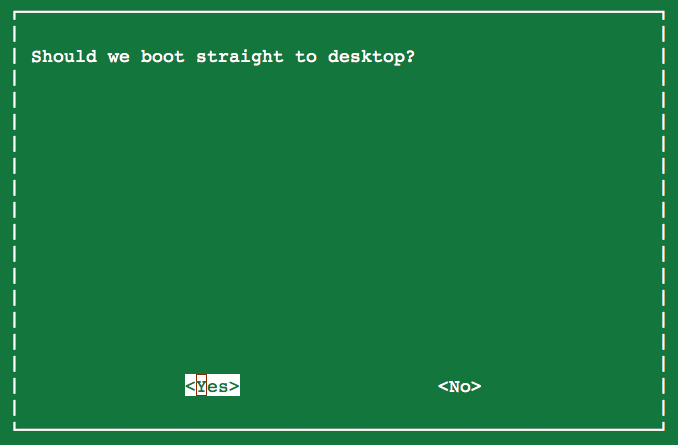
After you change the boot option, you are prompted to restart your Raspberry Pi for the changes to take effect.
Discussion
Clearly there are security implications in allowing the Raspberry Pi to log you in to the windowing environment automatically. But because the Raspberry Pi will generally be used as a personal computer, rather than being shared, the convenience usually outweighs any such disadvantages.
See Also
You can find much more information about the raspi-config tool at http://elinux.org/RPi_raspi-config.
1.17. Shutting Down Your Raspberry Pi
Solution
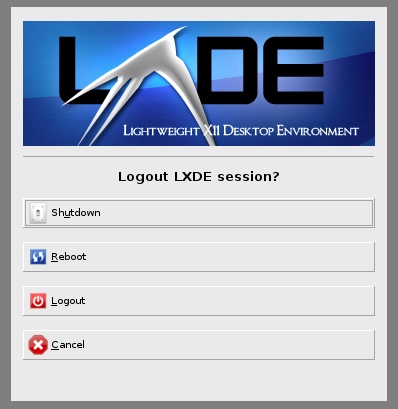
Click on the red Logout button in the bottom-right corner of the desktop. This will display a number of options (Figure 1-15).
- Shutdown
- Shuts down the Raspberry Pi. You will need to unplug the power and plug it in again to get the Raspberry Pi to boot up again.
- Reboot
- Reboots the Raspberry Pi.
- Logout
- Logs you out and displays a prompt to enter your login credentials so that you can log back in.
- Cancel
- Allows you to change your mind and continue using the Raspberry Pi.
You can also reboot from the command line by issuing the command:
sudo halt
You may have to do this after installing some software. When you do reboot, you see the message shown in Figure 1-16, which illustrates the multiuser nature of Linux and warns that all users connected to the Pi.

Discussion
Unlike shutting down most computers, shutting down a Rasperry Pi does not actually turn off the power. It goes into a low-power mode—and it is a pretty low-power device anyway (but the Raspberry Pi hardware has no control over its power supply).
See Also
You can buy a module that will turn off the power when the Raspberry Pi shuts down here: http://www.pi-supply.com/.
1.18. Installing the Raspberry Pi Camera Module
Problem
You want to use the Raspberry Pi camera module (see Modules).
Solution
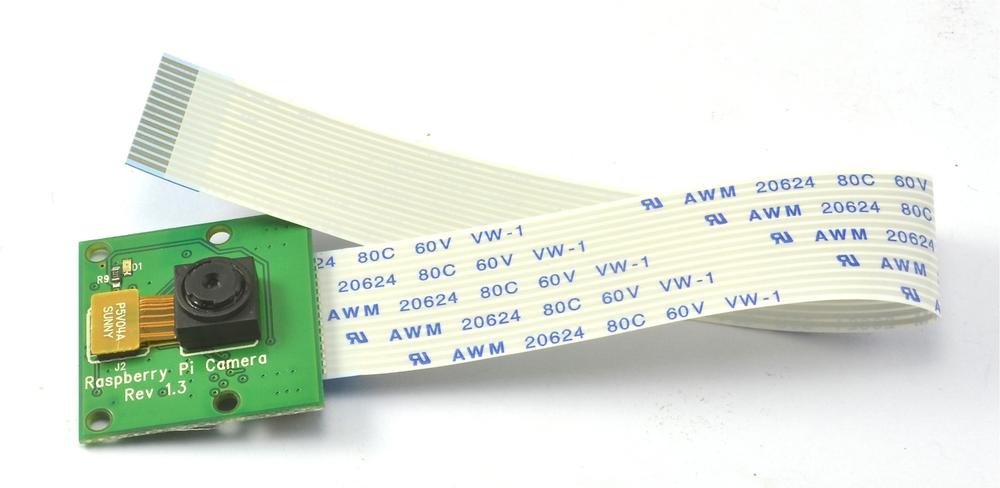
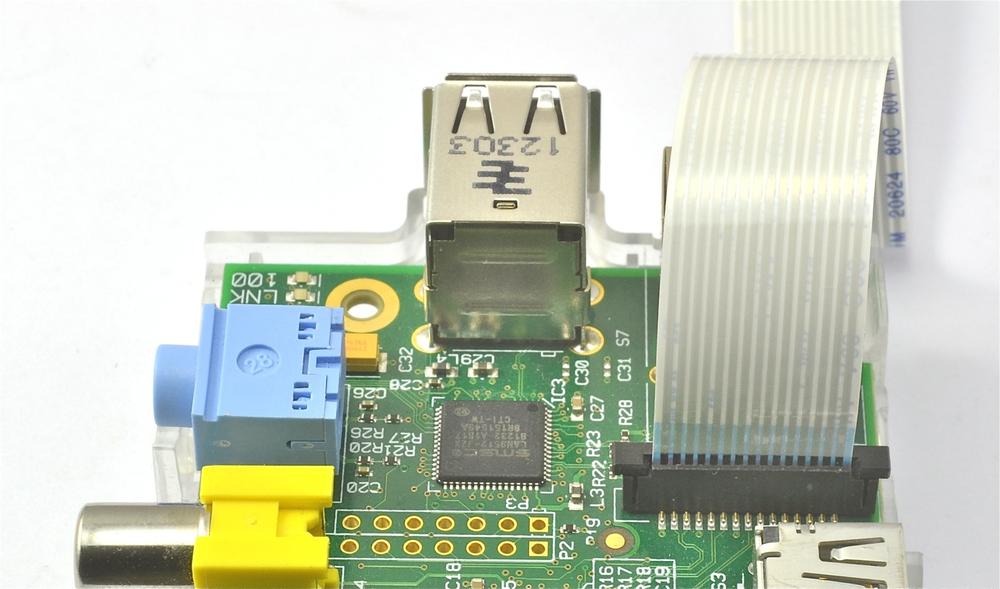
The Raspberry Pi camera module (Figure 1-17) is attached to a Raspberry Pi by a ribbon cable.
This cable attaches to a special connector just behind the Ethernet socket. To fit it, pull up the levers on either side of the connector, so that they unlock, and then press the cable into the slot with the connector pads of the cable facing away from the Ethernet socket. Press the two levers of the connector back down to lock the cable in place (Figure 1-18).
Warning
The camera module packaging states that it is sensitive to static. So, before handling it, ground yourself by touching something grounded like the metal case of a PC.
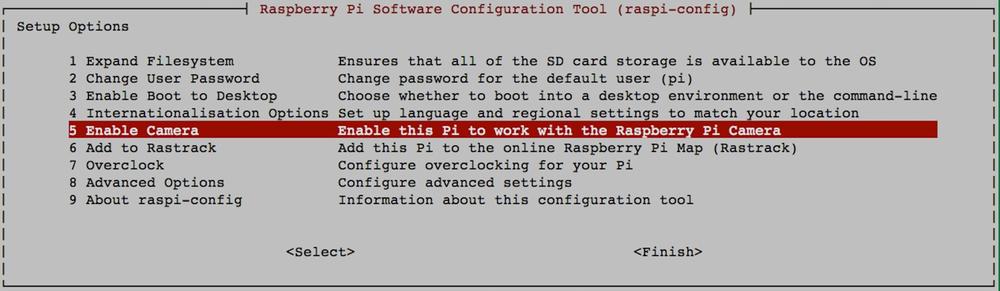
The camera module requires some software configuration. The easiest way to configure it is to use raspi_config (Recipe 1.12). To run raspi-config, enter the following command into a Terminal session.
$ sudo raspi-config
You will then see a list of options like those shown in Figure 1-19.
If the option Camera is not in the list, then you need to update the operating system by running the following commands in a Terminal session (see Recipe 3.2):
$ sudo apt-get update
$ sudo apt-get upgrade
You need an Internet connection to do this. The second of these commands may take a few minutes to complete. When they are complete, reboot your Raspberry Pi (Recipe 1.17).
Now, when you run raspi-config you will see the option to enable the camera (Figure 1-20).
Two commands are available for capturing still images and videos: raspiStill and raspivid.
To capture a single still image, use the raspiStill command as shown here:
$ raspistill -o image1.jpg
A preview screen displays for about five seconds and then takes a photograph and stores it in the file image1.jpg in the current directory.
To capture video, use the command raspivid:
$ raspivid -o video.h264 -t 10000
The number on the end is the recording duration in milliseconds—in this case, 10 seconds.
Discussion
Both raspstill and raspivid have a large number of options. If you type either command without any parameters, help text displays options that are available.
The camera module is capable of high-resolution stills and video recording.
Here are some of the key features of the camera:
- 5-megapixel sensor
- Fixed focus f/2 lens
- Still resolution 1,920×1,080
- Video 1080p 30fps
An alternative to the camera module is to use a USB webcam (see Recipe 4.5).
See Also
The RaspiCam documentation includes raspstill and raspivid.
Get Raspberry Pi Cookbook now with the O’Reilly learning platform.
O’Reilly members experience books, live events, courses curated by job role, and more from O’Reilly and nearly 200 top publishers.

