Working with Presets
Once you get comfortable in Photoshop, you can customize the behavior of almost every tool in the Tools panel. If you find yourself entering the same settings in the Options bar over and over again for the same tool, then saving those settings can save you time. In fact, Photoshop includes a bunch of built-in tool recipes, called presets, such as frequently used crop sizes, colorful gradient sets, patterns, shapes, and brush tips. You can access ’em through the tool’s Preset Picker at the far left of the Options bar. Figure 2-15 (top) has the scoop.
The Preset Manager handles loading, saving, and sharing the built-in presets, as well as the ones you create yourself. You can open it by choosing Edit→Presets→Preset Manager. Each group of settings, like a category of brushes, is called a preset library. To see a certain preset library, choose it from the Preset Type drop-down menu at the top of the Preset Manager dialog box (Figure 2-15, bottom).
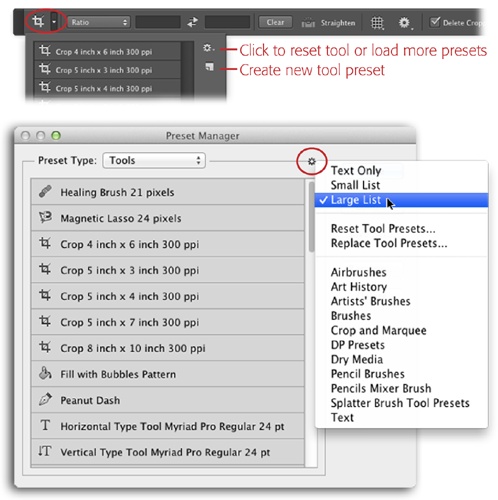
Figure 2-15. Top: To access a tool’s presets or create new ones, open its Preset Picker at the far left of the Options bar (circled). Click a preset in the list to activate it and then use the tool as you normally would. To save a new preset, enter your custom settings in the Options bar and then click the Create New Preset button labeled here. Give the preset a name in the resulting dialog box, click OK, and it appears in ...
Get Photoshop CC: The Missing Manual now with the O’Reilly learning platform.
O’Reilly members experience books, live events, courses curated by job role, and more from O’Reilly and nearly 200 top publishers.

