Executing the Logifier Plug-in
At this point you must be anxious to see the Logifier plug-in executing... As you are a good developer, your first instinct is to write tests for the plug-in which will also serve as an execution bed. Good call!
How do I do that?
You already saw in a previous lab how to write a plug-in test, so focus on the parts specific to the Logifier plug-in. Figure 6-5 show the typical test directory structure.
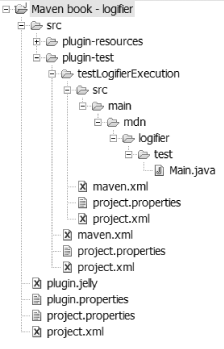
Figure 6-5. Logifier plug-in directory structure showing the plug-in tests
The testLogifierExecution
subproject is a Maven project that has some source (Main.java) and which generates an
executable JAR (the project.properties file defines the
maven.jar.mainclass property to
specify the main class: maven.jar.mainclass = mdn.logifier.test.Main).
The Main.java class contains
some very simple code meant to trigger the Logging Aspect:
package mdn.logifier.test;

public class Main
{
    public static void main(String[  ] args)
    {
        Main main = new Main();
        main.display1("It works1...");
        main.display2("It works2...");
    }

    public void display1(String message)
    {
        System.out.println(message);
    }

    public int display2(String message)
    {
        System.out.println(message);
        return 1;
    }
}
The maven.xml file is very similar in content to the one you saw in the "Testing a Plug-in" lab earlier in this chapter, and it verifies that the Logging Aspect has executed by asserting the content of the console ...
Get Maven: A Developer's Notebook now with the O’Reilly learning platform.
O’Reilly members experience books, live events, courses curated by job role, and more from O’Reilly and nearly 200 top publishers.

