Chapter 1. Solutions and Projects
The first product Microsoft ever built was a Basic interpreter for the Altair 8800 personal computer,[1] so they’ve had a lot of years to perfect their development tools. That time has not been wasted. Visual Studio .NET is the culmination of more than a decade of work on Visual C++, Visual Basic, Visual InterDev, and Visual J++. In this chapter, we will introduce the foundation of all VS.NET-based software development: solutions and projects. Everything that you do with VS.NET will revolve around these two concepts, so a sound understanding of these is central to making effective use of this tool.
To build anything with Visual Studio .NET, you need to use a solution, and that solution must contain at least one project. Solutions are the containers for all your work in VS.NET. A solution contains a project for each build output. (For example, if you want to build a DLL, an EXE, and an MSI Installer file, your solution will contain three projects.) Projects themselves contain source files. In this chapter, you will learn the ins and outs of solutions and projects and how to use them as effectively as possible.
Solutions
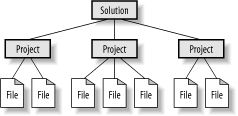
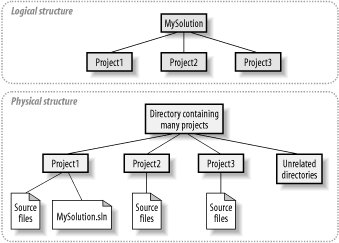
A solution contains a collection of projects, along with information on dependencies between those projects. The projects themselves contain files. This structure is illustrated in Figure 1-1. You can have as many projects as you like in a solution, but there can be only one solution open at a time in a particular instance of VS.NET. (You can, of course, open multiple solutions by running multiple instances of VS.NET.)
Solutions contain only projects—you cannot nest one solution inside another. However, projects can belong to multiple solutions, as Figure 1-2 shows, which gives you great flexibility for organizing your builds, particularly in large applications.

With Microsoft’s previous generation of development tools, each language had its own integrated development environment. Now there is just one unified environment. In addition, there are no restrictions on the range of different project types any single solution can contain, so you can work on, say, an unmanaged C++ DLL in the same solution as a VB.NET Window Forms application, which can greatly simplify development, debugging, and deployment. But before we get too excited about that, let us see how to create a solution.
Creating a Solution
A new solution may be created in many ways in VS.NET. The simplest is to create a new project—by default, Visual Studio .NET will create a new solution with the same name as the project, placing the solution files[2] in the same directory as the project. Although this works fine for small projects, it isn’t well suited to more complex applications. Since a solution is a container of projects, it does not make sense for the solution file to be inside the project directory. For multiproject solutions, having the directory structure reflect the solution structure usually makes more sense—it is best to have a directory that contains your solution file, with subdirectories for each individual project.
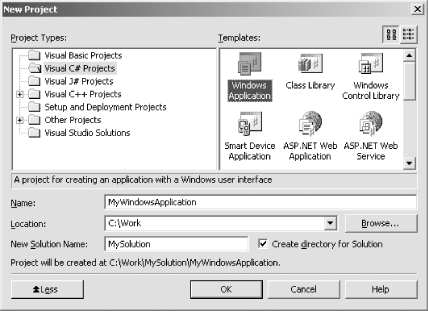
Visual Studio .NET is happy to create this type of directory structure for you. When you create a new project by using the New Project dialog box (Ctrl-Shift-N), you can bring up additional options by clicking on the More button in the lower-lefthand corner of the dialog. These options are shown in Figure 1-3. (The More button turns into a Less button when the extra options are visible.) If you select the Create directory for Solution checkbox, Visual Studio .NET will not place the solution files in the same directory as the project. Instead, it will create a folder for your solution and inside this will create a second folder containing your project. The New Solution Name text box determines the name of both the solution and the solution folder. (You pick the project template you want to create as your first project and type its name in the Name text box as usual.)
Tip
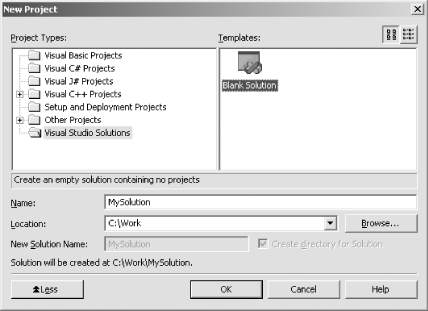
You cannot select the Create directory for Solution option when creating a new ASP.NET project. With web projects, you will need to create a blank solution first in order to make your directory structure match your solution structure. To create a blank solution, use File→New→Blank Solution—this will show the New Project dialog box with the Blank Solution template selected (see Figure 1-4). You can use the Location text box to choose the path for this New Solution Name and the Name text box to give it a name. A folder with your chosen name will be created at the specified path, and a new solution file (with the same name as the folder) will be placed there.
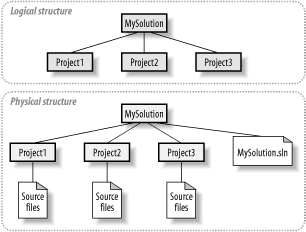
Matching the file structure of a solution and its contained projects to the logical structure has the advantage of making it easier to put together a zip file of the whole solution. Consider what happens if you just allow VS.NET to put new projects in the default locations when you create a new project and then add a second project to the solution. If you zip the first project directory, the zip file will contain the solution file, but that solution file will refer to the second project directory. However, the second project directory will not be present in the zip file, because, by default, VS.NET will make it a peer of the first project directory instead of a child. However, if you make the directory structure reflect the logical structure, with the project directories all being children of the solution directory, you can simply zip up the solution directory, and the zip file will contain all of the projects that belong to the solution.
Figure 1-5 illustrates how the physical directory structure can reflect the logical structure of a project. Figure 1-6 shows how Visual Studio .NET will organize the directory structure if left to its own devices—the physical structure is less closely related to the logical structure. The solution file is located in an arbitrary project directory. (Specifically, it is in the first project that was created in the solution.) The project directories themselves may well be in the same directory as other, unrelated directories or files. So, to avoid the mess shown in Figure 1-6, be sure to check the Create directory for solution checkbox.
Saving Web-Based Projects
By default, VS.NET creates all new solutions beneath the Visual Studio Projects folder inside of your My Documents folder.[3] However, it is a bad idea to put solutions that contain web-based projects here. Visual Studio .NET requires web projects to reside in a directory with Web Sharing enabled, and in Windows XP, you cannot turn on Web Sharing for directories underneath the My Documents folder.
A certain amount of planning is required if you want to keep control over where web projects end up, because although the default locations chosen by VS.NET for your files will work, they may not be the locations you were expecting, particularly if you let it create a new solution for a new web project. When you create a new web-based project, VS.NET communicates with the web server and checks to see whether an application already exists for the URL you specified. If not, it creates a new folder for the project under the root folder of the web server (which is usually %SystemDrive%\inetpub\wwwroot). The solution files, however, will be elsewhere—if you allow VS.NET to create a new solution for your web project (and it will by default), it will create a directory for your solution in the default location, underneath your My Documents folder. It offers you no choice over the location and doesn’t even tell you where it will go!
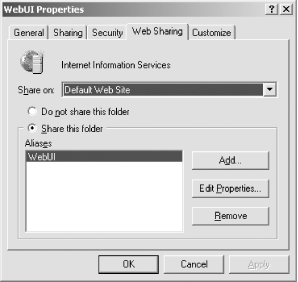
If you want to remain in control of the location of your web projects and their solutions, you must first create a new blank solution. Then use Windows Explorer to create a folder for your web-based project inside of your solution folder. Enable web sharing on the new folder using the Web Sharing tab on the folder’s property page, as shown in Figure 1-7. (You can get to the property page by right-clicking on the folder in Windows Explorer and selecting Properties.) Alternatively, you can use the IIS administration tool to set the new directory up as a web application.
Once you have created the web shared folder, add a new web project to your solution. (Use File → Add Project → New Project. Alternatively, use the New Project dialog (Ctrl-Shift-N) but select the Add to Solution radio button—this will add the new project to your existing blank solution instead of creating a new solution.) You must specify the URL of the web share you created as the project location. This will cause Visual Studio .NET to use your existing web folder instead of creating a new one. When you create web projects in this way, all of the files needed for that web project and the solution that contains it are kept in one place rather than two.[4]
Tip
When you create a folder that will contain a web-based project, you must make sure that the ASP.NET worker process will be able to access that folder. The ASP.NET worker process runs as the ASPNET user by default, so make sure that user account has permission to read and write files in that directory.
Projects
A project has two main jobs: to act as a container for our source files and to compile those files into some kind of component, typically either a Dynamic Link Library (DLL) or Windows Executable (EXE). We shall now run through the main types of projects supported by VS.NET.[5]
Project Types
Visual Studio .NET classifies projects by implementation language and then by project type in its New Project dialog box. However, many of the project types have a great deal in common despite using different languages, so although VS.NET 2003 Enterprise Edition lists more than 90 distinct types, most fall into one of six groups: managed local projects, managed web projects, Smart Device projects, unmanaged local projects, unmanaged web projects, and setup projects.
Tip
Your copy of Visual Studio .NET may have even more project types—third-party add-ins can extend the list. You can also add your own project templates—see Chapter 9.
A managed local project will create a .NET assembly. Managed web projects do the same, but the project output is intended to be accessed by a client over a network connection, typically using either a browser or a web service proxy. Web projects are therefore always associated with a web application on a web server. And although managed web projects produce a .NET assembly just like a managed local project, with a web project, Visual Studio .NET will place the assembly on the web server as part of the build process.
Tip
A web project can reside on either a remote web server or the web server on your local machine. Visual Studio .NET does not make any distinction between these two styles of development. However, if you use a remote server, you may need to modify its security settings in order to debug a web application successfully. See Chapter 3 for more information on debugging web applications.
Smart Device projects are available only in C# and VB.NET, and they build applications that target Pocket PCs and other mobile devices. These projects are not available with VS.NET 2002.
An unmanaged local project builds an unmanaged file (.dll or .exe). An unmanaged web project is the unmanaged counterpart of the managed web project type, in that its output will be deployed to and run from a web server.
Setup projects are used to create Windows Installer (.msi) files that can be used to deploy the final output of your solution.
Managed local
A managed local application could be written in C#, J#, VB.NET, or Managed C++ (MC++). VB.NET, C#, and J# all support the same local application types, which are shown in Table 1-1.
|
Project template |
Project output |
Type of file built |
|
Windows Application |
A Windows Forms application |
Managed EXE |
|
Class Library |
An assembly to be used by other .NET assemblies |
Managed DLL |
|
Windows Control Library |
An assembly containing at least one class derived from
|
Managed DLL |
|
Web Control Library |
An assembly containing at least one class derived from
|
Managed DLL |
|
Console Application |
A command-line application |
Managed EXE |
|
Windows Service |
A Windows Service |
Managed EXE |
|
Empty Project |
Any kind of .NET assembly |
Managed EXE or DLL |
Each of these project types builds a .NET assembly. You may be surprised to see the Web Control Library in this “local” category, but bear in mind that the distinguishing feature of a web project is that it is associated with a specific web application on a web server. Web Control Libraries can be used in any number of web applications but are not specifically associated with any one web application in particular. These projects simply produce a .NET DLL as their output, and this DLL will then typically be used by one or more web projects.
Managed C++ supports a subset of the project types available with C# and VB.NET. There is no MC++ Web Control Library project type, and on Visual Studio .NET 2002, the Windows Service, Windows Application, and Windows Control Library project types are also missing. The Visual Studio .NET designer does not support the use of Managed C++ to build Web Forms applications.
Tip
Windows Forms applications were not supported in MC++ in VS.NET 2002 either, although it was technically possible to use the Managed C++ Application project type to build a Windows Forms application. This project type is really meant for building console applications, but if you didn’t mind writing by hand all of the code that would normally be generated by the forms designer in C# and VB.NET projects, you could also use it to build Windows Forms applications. In VS.NET 2003, this is no longer necessary, as the Windows Forms Designer now supports MC++.
The MC++ project templates are in Table 1-2. Note that the names of these project types changed between VS.NET 2002 and VS.NET 2003, so both names are given in the table.
|
Project template |
Project output |
Type of file built |
|
Console Application (.NET) (2003) MC++ Application (2002) |
A command-line application (or a Windows Forms application, given sufficientdetermination) |
Managed EXE |
|
Class Library (.NET) (2003) MC++ Class Library (2002) |
An assembly to be used by other .NET assemblies |
Managed DLL |
|
Empty Project (.NET) (2003) MC++ Empty Project (2002) |
Any kind of .NET assembly |
Managed EXE or managed DLL |
|
Windows Forms Application (.NET) (2003 only) |
A Windows Forms application |
Managed EXE |
|
Windows Forms Control Library (.NET) (2003 only) |
An assembly containing at least one class derived from
|
Managed DLL |
|
Windows Service (.NET) (2003 only) |
A Windows Service |
Managed EXE |
Managed web-based
In a managed web-based project, the build output is copied to a web server and will run on that web server. (The web server can be either the one on your local machine or a remote server.) Of course, a web application typically needs more than just a compiled .NET assembly to run—there are usually files containing content such as .css and .html files, image files such as .gif or .jpeg files, and often files containing a mixture of code and content, such as .aspx files, that must be present on the server. So Visual Studio .NET does not just copy the compiled assembly to the web server—the entire project resides there.
Note
Arguably, slightly too much resides on the web server. Visual Studio .NET uses a web project’s associated web server folder as the canonical location for all project files, not just the ones that need to be there. So you will find all of your source files on the server along with the content and build output. This is because, conceptually, a web project doesn’t store any of its files locally—the whole project lives on the web server. Source files are cached locally so that you can edit them and so that the compiler can compile them, but the permanent home of all project members and all build output is the web server.
If the prospect of storing the source for your web projects on the web server frightens you, don’t worry—they need to be present on only development servers, not the live server. If you use a Setup and Deployment project to build an .msi file to install your project, only files needed by the web application to run will be included. So if you use this .msi to deploy the project on a server, the source files will not be installed. (Also, ASP.NET is configured not to serve out source files by default, so even on your development server, attempts to download the source using HTTP will fail.)
If you don’t like .msi files, VS.NET is also able to perform the deployment itself directly. If you select a web project in the Solution Explorer and then select Project → Copy Project... from the main menu, VS.NET will show the Copy Project dialog. This allows you to copy a web project’s files to another web server, and it provides you with the option to copy either all of the files or just the files the web application requires to run.
MC++ has only one project template in this group: ASP.NET Web Service (.NET). (VS.NET 2002 called this project type Managed C++ Web Service.) This project type is essentially the same as the VB.NET, J#, and C# ASP.NET Web Service project. All of the VB.NET, J#, and C# managed web-based projects are shown in Table 1-3.
|
Project template |
Project output |
Output file types |
|
ASP.NET Web Application |
An ASP.NET Web Forms application |
Managed DLL and web content files |
|
ASP.NET Mobile Web Application (VS.NET 2003 only) |
An ASP.NET Web Application intended to be viewed on Pocket PCs and other mobile devices |
Managed DLL and web content files |
|
ASP.NET Web Service |
A web service |
Managed DLL and web content files |
|
Empty Web Project |
Any C# or VB.NET web-based project |
Managed DLL and web content files |
An empty web project is useful if you want to build either an ASP.NET web application or web service, but you do not want the default options or files generated by VS.NET. (Of course, you could also write your own wizard to generate files that are more to your liking—see Chapter 9.)
Smart Device
Smart Device projects allow you to build applications that run on palmtop devices. These project types are not available on Visual Studio .NET 2002, and they target only C# and VB.NET. Each language lists just one Smart Device project. However, both the C# and VB.NET Smart Device projects open a wizard that allows you to target either the Pocket PC or the Windows CE platform, creating either a Windows Application, a Class Library, a Nongraphical Application, or an Empty Project. VS.NET ships with an emulator that enables you to test and run your applications on your PC without needing a real PDA. Detailed discussion of palmtop development is beyond the scope of this book. For more information on developing Windows Forms applications on the .NET Compact Framework, please see Essential Windows Forms (Addison-Wesley).
Unmanaged local
Unmanaged local projects build unmanaged executable files. These projects fall into three groups based upon the library used: Active Template Library (ATL) projects, Microsoft Foundation Class (MFC) projects, and straight Win32 projects. See Table 1-4.
|
Library |
Project template |
Project output |
Type of file built |
|
ATL |
An unmanaged executable that uses the ATL |
DLL or EXE | |
|
MFC |
An ActiveX Control built using MFC |
DLL | |
|
MFC |
An MFC Windows Application |
EXE | |
|
MFC |
A DLL that uses MFC |
DLL | |
|
MFC |
An ISAPI Extension DLL that uses MFC |
DLL | |
|
Win32 |
A simple Win32-based DLL or EXE |
EXE or DLL |
You may be surprised to see the MFC ISAPI Extension project listed as a local project, not a web project. But the defining feature of a web project is that it is associated with a particular web application on a server. MFC ISAPI Extension projects do not copy their build output to a web server—they work like any other local project. It is up to you to work out how to deploy the extension to a server.
Unmanaged web-based
Two ATL web-based projects, ATL Server Project and ATL Server Web Service, let you build web applications and web services, respectively. Both kinds of project build ISAPI extensions, using the ATL Server classes. (These classes were added to the ATL to coincide with the release of VS.NET.)
Like managed web-based projects, these projects connect directly to your web server and can contain other types of files than just the DLLs. To learn more about building unmanaged web-based projects with the ATL Server classes, see ATL Internals, Second Edition (Addison-Wesley).
Setup and deployment
The setup and deployment projects included in VS.NET allow you to create Microsoft Installer files (.msi) to deploy any VS.NET project. See Chapter 6 for more information about these projects.
Other project types
A few project types stand on their own, rather than fitting into any broad category. Database projects are described in Chapter 5. VS.NET Add-in projects are described in Chapter 8. Appendix A contains a complete list of all project types.
Adding Projects
Now that we have seen the available project types in VS.NET, let us see how to add projects to a solution. Adding projects is fairly simple—right-click on the solution in the Solution Explorer, and select Add → New Project to bring up the New Project dialog box, select the type of project you want, and then give it a name. You can also use Ctrl-Shift-N to bring up the New Project dialog box.
Warning
If you use the Ctrl-Shift-N shortcut to add a new project to an existing solution, make sure you select the Add to Solution radio button. By default, the Close Solution button will be selected, which will close your solution and create a brand-new solution for the new project! You can avoid this entirely by using the context menu in the Solution Explorer as described earlier or with File → Add Project → New Project... from the main menu. Both menu options show the Add New Project dialog box, which is almost identical to the New Project dialog box, except it will never close an existing solution. Unfortunately, there is no keyboard shortcut for this dialog.
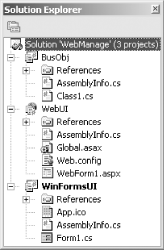
Figure 1-8 shows a typical example—a solution called WebManage containing three projects: a Class Library project named BusObj, an ASP.NET Web Application named WebUI, and a Windows Application named WinFormsUI. Figure 1-8 shows how this looks in the Solution Explorer.
Managing files
Projects contain source files that will be compiled to produce the project’s output. The following sections describe how to add new or existing files to a project and how to remove files from a project.
Adding a new file
You can add a new file to your project by right-clicking on the project in the Solution Explorer and selecting an item the Add submenu, which is shown in Figure 1-9. (The same choices are also available from the main Project menu.) The options these menus will offer depends upon the project type you are using (e.g., Add Web Form will be available only on web projects).
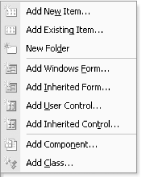
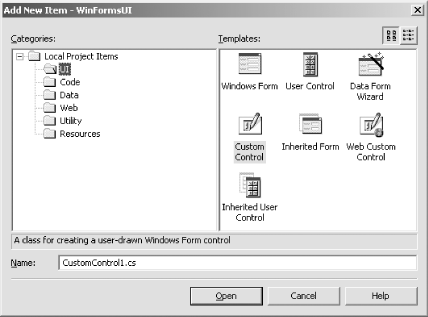
The list of items offered on the menus is not comprehensive; it merely shows the most commonly used items. You can get the full list by selecting Add New Item (Ctrl-Shift-A), which will display the Add New Item dialog box, as shown in Figure 1-10. (See Appendix B for a list of the available items, and see Chapter 9 for more information about customizing the items and adding your own.)
Adding an existing file
Sometimes you will want to add an existing file to a project. For example, if you have downloaded some sample code from MSDN, you may want to add one of the sample’s files to a project of your own. To add an existing file, go to the Project menu and select Project → Add Existing Item.... (Alternatively, select Add → Add Existing Item... from the project’s context menu in the Solution Explorer. Or just use the Shift-Alt-A shortcut.) When you add an existing item, Visual Studio .NET will either use the existing file directly or copy the file into the project directory. The behavior it chooses depends on the type of project and where the file is located. Table 1-5 shows the behavior of the various project types.
With VB.NET, C#, and J# projects, if the file is already inside the project directory, no copy will be made. Otherwise, VS.NET will copy the file into the project directory.
If you would like to force VS.NET to use the original file when it would normally make a copy, you can choose to link the file instead. If you look at the Open button on the Add Existing Item dialog, you will see that it has a drop-down arrow on its right. If you click on this, it pops up a menu with a Link File option. If you select this option, VS.NET will add the original file to the project, even when it would otherwise have made a copy.
Tip
The Link File option is not available on web projects. This restriction makes sense for local files—since the project resides on the web server, it would not make sense to allow links to files on a developer’s local machine. With files already in the project directory on the web server, no copy will be made. Linking to a file in a different web directory is not supported.
Moving files between projects
If you wish to move a file between two projects in the same solution, you can simply use drag and drop in the Solution Explorer.
Removing or deleting a file
You can remove a file from a solution by highlighting it in the Solution Explorer and selecting Delete, either from the main Edit menu or from the file’s context menu in the Solution Explorer. (You can also just press the Delete key.) For some project types, there will be a Remove option instead of a Delete option. Whether you see Remove or Delete will depend on the project type—VB.NET and C# projects offer Delete, everything else offers Remove. Either Delete or Remove will take the item out of the project’s list of files, but Remove will leave the file in the directory, while Delete moves the file to the Recycle Bin.
Although C# and VB.NET projects provide the destructive Delete option instead of Remove, you may still remove an item from these project types nondestructively. Instead of selecting Delete, you can select Exclude from Project. (This is available both from the file’s context menu and from the main Edit menu.) This takes the file out of the project but leaves the file in place on your hard drive—in other words, this does exactly what Remove does on other project types.
File properties
You can see a file’s properties in the properties window by selecting the file in the Solution Explorer. (You can move the focus to the properties window by pressing the F4 key.) The properties shown will depend on the type of file and the type of project. Most files have very few properties, and the only properties common to all files regardless of type are Name and FullPath (those being the name of and path to the file). We will discuss type-specific file properties as we look at the individual file types in question.
Solution Items
Some files do not belong to any particular project in a solution. For example, you may have a solution that contains multiple web applications, all of which share a single Cascading Stylesheet (.css) file. You could arbitrarily pick one of the projects and make the file a member of it, but this does not accurately reflect how the file is used and could confuse other developers who use your code. Fortunately, you don’t have to do this. Visual Studio .NET lets you add files to a solution without making them a member of any particular project. Such files are called solution items.
Tip
Solution items will not be compiled. Only files that belong to projects are compiled. Solution items are therefore typically some form of content or documentation.
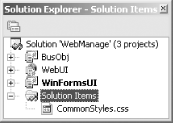
You can add a solution item by selecting the Solution node in the Solution Explorer then using Add New Item (Ctrl-Shift-A) from the File menu to create a new solution item or Add Existing Item (Shift-Alt-A) to add an already existing file to the solution items. You can add any file type you like to a solution. Figure 1-11 shows how VS.NET displays solution items in the Solution Explorer.
If you use the Add New Item dialog box to create a new solution item, the new file will be created inside of your solution’s folder. If you use the Add Existing Item dialog box, however, the items can live in any folder (i.e., you can add files that do not live in your solution folder). This is useful because it allows you to give yourself easy access to files in projects outside of your solution. Suppose you are writing a program that consumes a web service. It may be useful to have access to the WSDL file for that service. (A WSDL file is an XML file containing a detailed formal description of the facilities offered by a web service.) This WSDL file will not be part of your client project—it will be supplied by the web service itself.[6] Although you can just go and find the file with the File Open dialog box every time you want to look at it, this gets old fast. You could also simply include the Web Service project in your solution, but that may slow down your load time and would also make it easier to modify and rebuild the project by accident. But if you just add the WSDL file to your solution as a solution item, it will be available in the Solution Explorer whenever you need it, without the need to include the project in the solution you are working on.
Miscellaneous Files
Visual Studio .NET will let you open and edit files that do not belong to any project and that are not solution items—you can open any file with File → Open or by dragging a file into VS.NET from Windows Explorer. This is useful because it allows you to edit files with a minimum of fuss. VS.NET calls these files miscellaneous files. You can get VS.NET to display all open miscellaneous files in the Solution Explorer. If you open the Options dialog box (Tools → Options) and expand the Environment folder, you will see a Documents item on the left. When you select this, one of the options presented on the right is “Show Miscellaneous Files in Solution Explorer.” If you check this, any open files that do not belong to a project and are not listed in the Solution Items will appear in a folder labeled Miscellaneous Files in the Solution Explorer.
Solutions, Projects, and Dependencies
Remember that solutions do not just contain projects—they also hold information on the relationships between those projects. So once you have the projects you require in your solution, you must make sure Visual Studio .NET knows about the dependencies between them so that the projects will be built correctly. With .NET projects, this is done by setting up references from one project to another.
Adding References to Projects
All projects have a list of references, which is shown in the Solution Explorer directly beneath the project node. (See Figure 1-12.) Each item in this list represents a reference to some external component that your project uses.
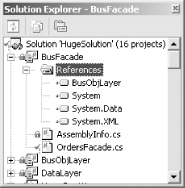
These external components can be .NET assemblies, COM components, or other projects within the same solution. With a .NET project, unless you add an external component to the References list, you will not be able to use that component’s types in your project.
Tip
With unmanaged C++ projects, you will add references only to other
projects—you will not use the .NET or COM reference types. If
your project depends on external C or C++ components, you will use
the traditional ways of importing type definitions.
(#include the header files and link in the
.lib files.) For COM components, either
#include the appropriate header files or use the
#import directive on the relevant type library.
Adding a reference can serve up to four purposes:
With .NET projects, it causes Visual Studio .NET to tell the compiler that your code uses the component, enabling you to use the types it contains—if you don’t have the appropriate references in your project, you will get compiler errors complaining that a type or namespace cannot be found.
If the component referred to is another project, Visual Studio .NET will infer dependency information from this and will use this information to work out the right order in which to build projects. (For example, if Project A has a reference to Project B, VS.NET will build Project B first, because it knows that Project A depends upon it.)
Visual Studio .NET will copy the referenced component into the referencing project’s build directory if necessary.
VS.NET will load the type information contained in the referenced components and use it to provide IntelliSense—the pop-up lists of statement completion suggestions. (IntelliSense is described in more detail in the next chapter.) You can also browse the type information for all referenced components using the object browser. (This can be displayed with View → Object Browser, or Ctrl-Alt-J.)
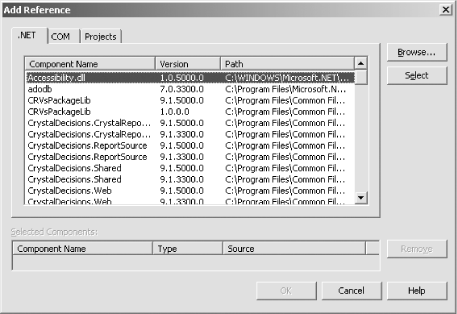
To add a reference to your project, right-click on it in the Solution Explorer and select Add Reference. (You can also select Add Reference from the context menu for the References node in the Solution Explorer.) This brings up the Add Reference dialog box, which is shown in Figure 1-13. There are three tabs on this dialog, one for .NET references, one for COM references, and one for Project references. The .NET tab and the COM tab enable you to add a reference to a .NET component and a COM component, respectively. Both present a list of installed components, but you can also use the Browse... button to import a specific component. The Project tab shows the projects in the solution that you can add as a Project reference. (Not all projects will be shown—for example, a project cannot have a reference to itself. Also, some project types do not produce output that can meaningfully be referenced from other projects—you cannot add a reference to a Database project or to a Setup and Deployment project.)
The COM tab simply lists all registered components on the local machine. .NET components provide VS.NET with more of a challenge, because, unlike COM components, .NET components do not need to be registered before they can be used, which makes it hard to build a complete list. VS.NET builds the list of available .NET components by looking in certain directories. By default, it looks in the install directory for the .NET Framework (%SystemRoot%\Microsoft.NET\Framework\vX.X.XXXX), but it will also look in any directories listed in a certain registry key.[7] So if you want extra components to be displayed in this dialog, add your own directories under that registry key.
The Copy Local property
Like most items in the Solution Explorer, references have properties that can be shown in the Properties pane (F4). Most of the properties are read-only and show details such as the path and version information. However, with a reference to a .NET component, you can change one property: the Copy Local property. If this is set to True, Visual Studio .NET will copy the component into the project’s build directory.
The default setting for the Copy Local property depends on whether the reference is stored in the GAC (the Global Assembly Cache—the place where shared system components are stored). Such components are available to all applications without the need for copying files, so when you add a reference to a component that is in the GAC, Visual Studio .NET sets this property to false. For all other .NET component references, it will set this property to true.
Note
The GAC is “global” only in the sense that the components it contains are available to all code on a particular machine. But just because there is a component in one machine’s GAC doesn"t mean that it is available everywhere. Be aware that when you reference a component in the GAC and then check the referring project into source control, it will not build when you download the project onto another machine if that machine’s GAC does not contain the relevant component.
There is no formal mechanism for dealing with this in VS.NET. You may therefore want to consider establishing a procedure for putting nonstandard GAC components into source control, so that all developers will be able to get hold of them.
The behavior when the Copy Local flag is set to true is subtly different depending on whether the reference is to an external component or to another project in the solution. For external components, the copy is made when you create the reference. If the external component changes, or is even removed completely, Visual Studio .NET will not notice, and the project will carry on using the copy. If you care about the change, you must delete the reference and recreate it in order to get a new copy of the component. (Or you can just delete the copy from the build directory—this will cause VS.NET to make a new copy.) However, if the reference is to another project in the solution, VS.NET will make a new copy every time the project being referred to is rebuilt.
Tip
Project references are always preferable to external component references because of this automatic copy-on-build behavior. However, for third-party components, project references are not normally an option because you are unlikely to have the component’s project file. (That would also require you to have the source.) However, third-party components tend not to change all that often, so the nonupdating nature of the references is less likely to be a problem.
Adding references to COM components
When you add a reference to a COM component in a .NET project, VS.NET will either find or create a .NET interop assembly. Interop assemblies are .NET wrapper components that enable a .NET project to use COM components. If there is a primary interop assembly registered on your system for the COM component, VS.NET will just use that. (Primary interop assemblies are wrapper assemblies generated with tlbimp.exe that are signed and distributed by the vendor of the COM component. Their purpose is to avoid a proliferation of wrappers by providing one definitive wrapper for a given COM component. VS.NET will look for primary interop assemblies in the GAC.) If no primary interop assembly is registered, VS.NET automatically creates a new interop assembly using the tlbimp.exe command-line tool and copies it into your build directory.
Adding references to other projects
With references to other projects, Visual Studio .NET automates two things: it automatically rebuilds dependent projects when necessary, and it automatically updates local copies after each change. For all other types of references, you are responsible for doing these jobs yourself.
Table 1-6 summarizes the behavior of the various types of references.
|
Type of reference |
IDE action |
Versioning |
|
Copies the assembly to the build directory. Makes assembly available to the project. |
When the referring project is built, VS.NET checks to see if the project being referred to also needs to be rebuilt. If it does, VS.NET will build it first and then copy the output to the referring project’s build directory. | |
|
Makes assembly available to the project. |
No copy is made, so if the original DLL is modified, the modified version will be used. | |
|
Copies the assembly to the build directory. Makes assembly available to the project. |
A copy is made and will not be updated unless you explicitly remove and readd the reference. | |
|
Uses primary interop assembly if available. Otherwise, uses the .NET tlbimp.exe tool to create an interop assembly. Adds reference to interop assembly. |
If primary interop assembly used, behavior is the same as a .NET reference with Copy Local = False. If interop assembly generated by VS.NET, behavior is the same as .NET reference with Copy Local = True. |
You should use project references whenever possible. It is technically possible to create a nonproject reference to the output of another project—you just add a new .NET reference and browse for the DLL. But you should avoid this because you lose all the advantages of a project reference. Project references make team development easier, since projects included in the same solution will be guaranteed to be present on each development machine (since these projects will be part of the checkin/checkout when working with the solution from source control). They also allows VS.NET to detect and disallow circular references.
Project Dependencies and Build Order
While adding a project reference automatically adds a dependency, you can also manage dependencies directly. Dependencies are solution-scoped properties that affect the build order of the projects in your solution. If Project A depends on Project B, VS.NET will always make sure Project B has been built before building Project A.
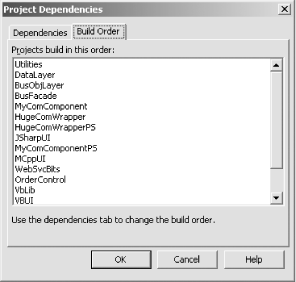
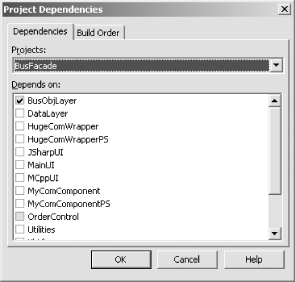
If you want to see the current build order, you can right-click on the solution in the Solution Explorer and select Project Build Order. This will show the Build Order tab of the Project Dependencies dialog as shown in Figure 1-14. The build order tab does not let you change the build order, because the build order is determined by the dependencies. You can view or edit your dependencies by clicking on the Dependencies tab (see Figure 1-15).
Once all of your references are in place, you can build your solution. The simplest way to do this is with Build → Build Solution (Ctrl-Shift-B). However, VS.NET offers many ways to build a solution, along with many ways to customize the build of a solution (e.g., the command line or the VS.NET object model). This section deals with the properties of solutions and projects that relate to builds, and also how to manually build projects and automate solution builds.
Configuration Manager
It is common to want to be able to build a given project in more than one way. For example, at development time, you want to build in debugging information, but you would not normally want to build the version you ship this way. You may also need to build special versions with extra logging enabled to help you diagnose a problem on a live system. To enable this, Visual Studio .NET allows projects and solutions to have a number of different configurations. Each configuration can specify its own settings for any property of any project.
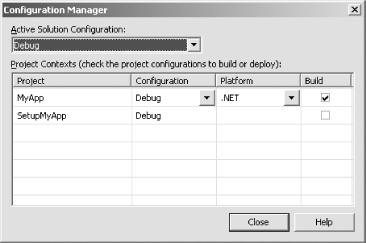
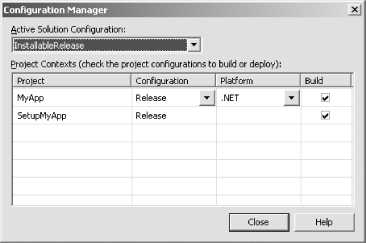
By default, Visual Studio .NET creates Debug and Release configurations for all projects and solutions. The Debug configuration sets up projects to compile with full debugging information and no optimization, while the Release build does the opposite. You can modify these configurations or create new configurations as needed. For example, you might add unit testing code to your project that is compiled only in special unit test configurations. You can also create configurations that leave out certain projects. For example, Setup and Deployment projects take a fairly long time to build, but you usually want to build those only occasionally. In fact, a new Setup and Deployment project will, by default, be configured not to build in either the Debug or the Release configuration. So you might add a third configuration that builds everything that the Release configuration builds and also builds the Setup project.Solution configurations are set up using the Configuration Manager dialog box. You can get to the Configuration Manager dialog box by right-clicking on the solution in the Solution Explorer and selecting Configuration Manager or by selecting Build → Configuration Manager from the main menu. Figure 1-16 shows the Configuration Manager for a solution containing two projects, which is displaying the settings for the Debug configuration. The first project, MyApp, is a normal .NET application. As the checked box in its Build column indicates, this project will be built whenever the Debug configuration is selected. However, the second project (SetupMyApp) is a Setup and Deployment project and is therefore configured not to build by default.
You can choose which configuration’s settings the
Configuration Manager dialog box displays with the Active Solution
Configuration drop-down list. In addition to showing all of the
available configurations, this list has two special entries,
<edit> and <new>.
The <edit> entry allows you to either remove
or rename a configuration. The <new> entry
allows you to create a new configuration, displaying the dialog shown
in Figure 1-17. We can use this to create a new
configuration in which the deployment project, SetupMyApp, will be
built, giving it an appropriate name such as InstallableRelease.
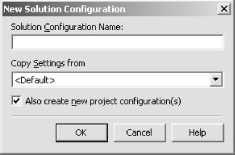
As well as allowing you to give your new configuration a name, the
New Solution Configuration dialog box also allows you to select the
configuration from which to copy settings. (The special
<Default> entry shown in Figure 1-17 instructs Visual Studio .NET not to copy
settings from any existing configuration, but to use default values
instead.) In this case, when we just want to build an installable
application, we would normally choose to copy settings from the
Release configuration.
The New Solution Configuration dialog box also has an “Also create new project configuration(s)” checkbox. This tells the IDE to create new configurations for each project—both projects and solutions can have per-configuration settings. If you are creating a new configuration merely to control which projects are built, this box should be unchecked. For example, in our InstallableRelease configuration, we will want the projects to be built with exactly the same settings as they use with the Release configuration, so there is no need to create new per-project settings.
Figure 1-18 shows a new configuration that was created without new project configurations. Notice that although the newly created InstallableRelease solution configuration is selected, each individual project’s Configuration column shows that the project settings from the Release configuration are being used. The only difference between this solution configuration and the Release configuration shown in is that we are now building the setup project as well as the application—both items are checked in the Build column.
Disabling the creation of new per-project configuration settings is appropriate when you just want to control which projects are built. However, if you want your new solution configuration to build the projects in a different way, you will need to create a new set of per-project settings. Per-project configuration settings contain information such as whether debug information is required, which conditional compilation flags are set, and what level of optimization the compiler should use.
A solution’s configuration information really does nothing more than define which projects should be built and which project configurations should be used. By default, a newly created solution configuration either will use its own newly created set of project configurations or will use the same project configurations as the solution configuration on which it was based, depending on whether the Create New Project Configurations checkbox was checked. However, it is possible to create a solution configuration that uses a different project configuration for each individual project. You could use this to create a special diagnostic build of an application in which all of the projects are built in their Release configurations with the exception of one troublesome component. Figure 1-19 shows how the Configuration Manager might look for this kind of configuration.

In this example, our solution has three projects. Figure 1-19 is showing a solution configuration called Diagnostic. It has chosen to build all three projects, but as the Configuration column shows, two will be built using Release settings, while the FlakeyComponent project is to be built with Debug settings.
Manual Building
When you select Build → Build Solution (Ctrl-Shift-B), all of the out-of-date projects in the currently selected configuration are built. (A project is deemed out-of-date if any of its source files or any of the projects it depends upon have changed since it was last built.) To save time, you might sometimes want to override this and build only the project you are currently working on. Of course, you can create a configuration that builds only the projects you want, but there is a more direct approach if you want to rebuild just a single project. If you right-click the project you want to build in the Solution Explorer and select Build, VS.NET will build just that project and its dependencies. (If the project is selected in the Solution Explorer, you can also use Build → Build ProjectName from the main menu.)
Building occurs automatically for .NET projects when you start the debugger (F5). (With unmanaged projects, you will be asked if you want to rebuild if you change your project and attempt to run it without rebuilding it first.) Visual Studio .NET 2003 allows you to change how much is built for .NET projects—by default, it will build all projects (although if the projects have not been changed, this will be relatively quick, since the compilers will detect that nothing has changed). However, you can elect to have only the Startup project (the one that runs when you hit F5) rebuilt, along with any projects it depends on, rather than building everything in the solution. You can configure this in the Tools → Options dialog—under the Environment category, select the Projects and Solutions item, and check the “Only build startup project and dependencies on Run” checkbox.
Automated Building
So far, all the techniques we have looked at for building projects and solutions require a developer to be seated in front of a running copy of Visual Studio .NET. However, you may automate your builds, that is, launch a build without human intervention. For example, many development teams run a nightly build. (Nightly builds are a great way of making sure that integration issues come out of the woodwork sooner rather than later, as well as making sure that there is always a “latest version” to run tests against.) It would be unreasonable to expect some hapless employee to stay around until midnight every night just to launch the build (even if he were the last person to break the build), so the ability to start a build automatically is important.
The simplest way to automate your build is to create a .bat file with the following command line in it:
devenv /build Debug /out builderrors.log "MySolution.sln"
If this .bat file is placed in your solution directory, it will build the Debug configuration of the solution and send any errors to the builderrors.log file. In conjunction with the Windows “at” scheduling service, this is all you need to perform an automated, scheduled build. (This requires the devenv executable to be on the path, of course. Alternatively, you could hardcode the path into the batch file. The devenv executable lives inside the Common7\IDE subdirectory of the Visual Studio .NET installation directory.)
Tip
There are two devenv executables: devenv.exe and devenv.com. Both work in much the same way, the only difference being that devenv.com is a console application, while devenv.exe is a Windows application. (In fact devenv.exe is the main Visual Studio .NET executable.) When running automated builds, the main difference is that if a single .bat file launches devenv.exe twice (e.g., to build two different configurations), both will run concurrently. (devenv.exe returns the console immediately, so the .bat file will not wait for the first to finish before starting the next.) But because devenv.com is a console application, the two tasks would run sequentially. If you do not specify the extension in the .bat file, devenv.com will be used.
You can pass other useful command-line switches to
devenv. You can use the
/rebuild switch to cause a clean and then a build
or use /clean to clean out extraneous build files.
You can also use the /project switch to build a
specific project within a solution.
Using a simple batch file in conjunction with the Windows task
scheduler to run your nightly build provides enough functionality for
many solutions. In theory, you could further customize the build
process using the automation model built into VS.NET (see Chapter 8 on macros). devenv
provides the /command switch, which enables you to
invoke any built-in command from the command line and to also invoke
macros. Unfortunately, running macros in this way will have the
unhelpful side effect of opening the Visual Studio .NET user
interface and leaving it open even after the macro has finished. This
means that, in practice, you cannot usefully invoke macros as part of
an automated build. But, of course, you can always add extra lines to
the .bat file to run other programs if you need
to perform work not supported by VS.NET as part of your build.
External build tools
Many organizations do not use Visual Studio .NET to perform their automated builds, preferring command-line tools such as NAnt (http://nant.sourceforge.net/) and continuous integration managers such as Draco ( http://draconet.sourceforge.net ). However, this does not necessarily mean abandoning VS.NET altogether. It is common practice for individual developers to work with the VS.NET build systems on their own machine, with the external tools being used only on the build machines. To help make this easier, NAnt ships with a utility called SLiNgshoT that enables NAnt build files to be generated from VS.NET solutions and vice versa.
Build Events
You can instruct VS.NET to perform custom actions before or after a build occurs. (VS.NET 2002 supports Build Events only in C++ projects. VS.NET 2003 supports this feature in all languages other than VB.NET.) Build Events are used to run external tools as part of the build process. For example, ATL projects exploit this feature to run the COM component registration utility (regsvr32.exe) when a COM component is built.
In C# or J# projects, you can configure Build Events from the project property pages. (You can show these by selecting the project in the Solution Explorer and pressing Shift-F4 or by selecting Properties from the project’s context menu.) In the panel on the left, expand the Common Properties folder and select the Build Events item, as shown in Figure 1-20.
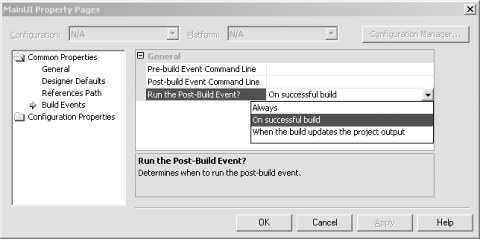
The property grid shows three entries for Build Events. Two let you specify the custom actions to be invoked: one before the build starts and one after the build finishes. In both cases, you supply a command line to be executed as the custom action. The final property lets you select when to perform the post-build action. By default, it will be run only if the project builds successfully. However, as Figure 1-20 shows, you may also specify that the action Always occurs (i.e., it happens whether the build succeeds or not). You can also select “When the build updates the project output”. This means that if the user rebuilds the solution, the action will be run only if VS.NET concludes that the project needs to be rebuilt (because it has changed).
C++ projects are built in a slightly different way from C# and J# projects, so Build Events work slightly differently. As before, they are configured with the project’s property pages. But C++ projects categorize build settings slightly differently. Instead of a single Build Events item, there is a Build Events folder containing three items: Pre-Build Event, Pre-Link Event, and Post-Build Event. Each of these allows three properties to be configured, as Figure 1-21 shows.
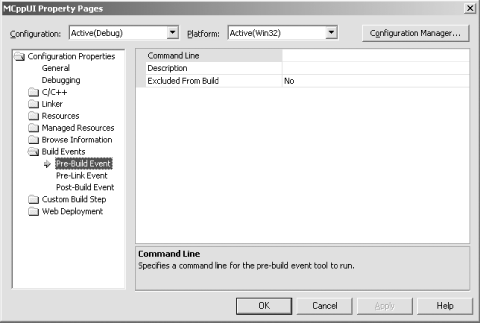
As before, each Build Event can have a command line associated with it. The main difference with C++ projects is that there is an extra event: the Pre-Link Event. This occurs after compilation has finished but before linking occurs. Unlike with C# and J# projects, in a C++ project you have no choice about when the event occurs. The Pre-Link and Post-Build custom actions will be run whenever successful compilation and linking occurs. (And they will not be run if VS.NET determines that no changes have been made to the project.) Also, C++ projects allow a description for each event to be supplied. This text will be written to the Output window when the action is executed. The Excluded from Build option allows you to disable the custom action in specific configurations.
Organizing Your Projects
Several different strategies are available when choosing a logical structure for your projects and solutions. So far, we have just used a single solution containing all of the projects that we are working on. (We also saw how to make sure that the physical structure of the solution on the filesystem matches the logical structure.) But there are other options, and thinking about the structure of solution(s) and projects before you start to write code will potentially save you time in the end.
Remember that a project may belong to more than one solution. This gives us some flexibility in the way that we structure our projects. We will now examine the three basic ways to organize your solution(s) and projects and discuss their pros and cons.
Single Solution File
The easiest way to organize your projects is to put them all in a single solution—the approach we have used so far in this chapter. The main advantage of this style is its simplicity. This structure also makes automated builds simple, since only one solution will have to be built. The disadvantage is the lack of flexibility in a large project—any developers who wish to work on the solution will always have to have all of the solution’s projects downloaded from the source control database.
Problems can arise as the number of projects in the system grows. Although VS.NET has no hard limit to the number of projects that can be added to a solution, at some point a solution with a large number of projects will become unwieldy. It can take a long time to open, since VS.NET will check the status of every project in the source control database. Large solutions will cause more memory to be consumed. Big solutions may also present logistical problems if multiple developers need to make changes to the solution files. Another potential problem is that as the solution gets bigger, the build time will tend to be unnecessarily high, as VS.NET may decide to rebuild files that a developer may not even be working on right now (although you can, of course, mitigate this by creating configurations that build only subsets of the solution). The next technique provides a solution to most of these problems.
Multiple Solution Files with a Master
The multiple-solution-with-master strategy is similar to the single-solution approach, in that there is still a single solution file that contains all of the projects necessary to build your system. The difference is that it is not the only solution file. This master solution file will be used whenever the entire solution needs to be built (e.g., for nightly or other automated builds). However, the master solution will not normally be used by developers in their day-to-day work. Instead, they will use other solutions that contain only the projects they require to work on some particular aspect of the system.
To create one of these smaller solutions, you will start by creating a new blank solution. But rather than adding new projects, you will select Add → Existing Project... from the solution’s context menu in the Solution Explorer. (Or use File → Add Project → Existing Project... from the main menu.) You can add as many of the existing projects as you require.
This method of organizing projects and solutions is likely to be appropriate if you have a large number of projects (e.g., more than 10) and you want to make it easier for each developer to work on just one portion of the software. Using a solution that contains only the projects you need to work on has a number of advantages. It will reduce the amount of time it takes to open the solution, especially if the solution is in a revision control system. It will also reduce the amount of unwanted information displayed—the Solution Explorer, class view, and object browser will all be less cluttered and therefore easier to use.
Note
Although working with a subset of the projects will reduce the number of files that need to be retrieved from source control in order to begin work, developers are likely to need to get updates of more of the source tree before checking their changes back in. It would be a foolhardy developer who checks in changes without first making sure that those changes won’t break the nightly build. And, of course, the only way to find out for certain whether your changes will pass the nightly build and any automated unit testing is to get an update of everything and perform a test build.
Of course, if you are certain that your work won’t affect certain other areas, you will probably get away without testing them yourself and just trusting to the automated processes. But do you really want to risk being the developer who broke the build?
Although this solution structure essentially builds on top of the single-solution approach, you will need a little planning to take advantage of it. You will not simply be able to pick arbitrary groups of projects and create new solutions for them—you will be restricted by the dependencies between the projects. For example, if your solution contains a UI project that uses a class library project, attempting to create a solution that contains only the UI project will not be successful—it will need a reference to the Class Library project in order to build. You should therefore try to keep the relationships between your components as simple as possible.[8]
This style of solution structure introduces a new challenge. Now that there are multiple solutions, it will probably not be possible to make your filesystem structure match all of the solutions. For example, if we create solutions for working on a Windows Forms UI project and a Web Forms UI project, both of these solutions might need to contain the same Class Library project. Since a directory cannot be contained by multiple parent directories,[9] there is no single filesystem structure that matches both solutions. The simplest way of dealing with this is to choose just one solution and make the filesystem match that. The obvious solution to choose for this is the master solution.
There will be some extra subdirectories in the master solution for this approach. Visual Studio .NET insists on giving each solution its own directory. (And although you can move .sln files after VS.NET creates them, it will insist on putting each in its own directory in your version control system, regardless of how you may have restructured the files on your local filesystem.) So there will be a directory for each secondary solution you create, containing just the solution files. The project files will be inside the project directories as before.
Projects inside of the master solution can then be contained by multiple different secondary solutions. This enables each developer to download and work with only those projects that are related to the part of the system she is currently working on. The only problems with this technique are the constraints imposed by use of project references and the fact that the master solution can become a bottleneck—anytime a new project is added, the master solution will need to be updated. (In software shops where people are in the habit of keeping files checked out for a long time, this can be a problem.) The final way of structuring your projects can get around both of these issues, although not without some inconvenience.
Multiple Solution Files with No Project References
If you want developers to have the maximum possible flexibility as to which projects they can download and work on, you could create one solution per project and have no master solution at all. The cost of this flexibility is that you have to deal with dependencies manually, because VS.NET has no way of representing cross-solution dependencies.
It is likely that some of your projects will depend upon other projects, but if they all live in their own solutions, you will have no way of representing this formally. You will have to use .NET file references instead of project references. This is inconvenient because you need to delete and recreate the references (or delete the copied component from the build directory) every time the component you are using changes. It also makes automated builds harder, since the build script will have to build multiple solutions, and it will also be responsible for getting the build order correct.
Note
You may think that you could mitigate this by creating a master solution on top of this multisolution structure and adding the relevant project references to it. However, this will not work, because references are stored in projects, not in the solution, so if you add a project reference to a project, it doesn’t matter what solution you happened to be using when you added the reference—you will have changed the project for everyone. Anyone who wanted to build the project would now be obliged to have a copy of the project on which it depends, defeating the whole purpose of this strategy.
However, although adding project references will not work, you could create a master solution and add explicit dependencies instead. (Remember that although implicit dependencies are inferred from project references, explicit dependencies are stored in the solution. So using explicit dependencies would not negate the benefit of being able to download any individual project in isolation.) This would make automated build scripts easier to create, but you would still be responsible for working out for yourself what the appropriate dependencies are. You also still need to recopy or recreate file references every time anything changes.
Choosing an Organizational Method
The simplest structure is the single-solution approach. Using this will mean that your solution’s physical layout can easily match its logical structure, and you can always use project references to make sure that every project will be rebuilt and copied automatically when it needs to be. Choosing this structure as a starting point is almost always the right decision.
If the number of projects makes dealing with the solution too unwieldy, then you should consider migrating to the multiple-solution-with-master-solution structure. Your existing single solution will become your master solution, and you can add new solutions to partition your projects as required. When creating the new solutions, you will find that if you include a project that has a reference to another project, VS.NET will complain. (If you expand the project’s References node in the Solution Explorer, you will see that the reference is still there but now has an exclamation mark in a yellow triangle over it.) You will need to add all referenced projects to the new solution in order to be able to build it.
If at all possible, you should always have a master solution—an organization with multiple solutions but no master should be chosen only as a last resort, as shown in Table 1-7. The advantages of more flexible partitioning rarely outweigh the disadvantages of not being able to use project references and the increased difficulty of automating builds.
|
Master solution |
Advantages |
Disadvantages |
|
Simplest. Can use project references for other assemblies in the solution. Makes automated builds simple. |
Might have to open more projects than you need. Rebuilds may take a long time unless you add solution configurations to build selected subsets. | |
|
Can still use master solution for automated builds. May be faster to work with a smaller set of projects than the whole. Can use project references. |
More work to add new projects as you have to add them to multiple solutions. Cannot divide up master solution into arbitrary project groups—grouping is constrained by project references. | |
|
Adding new projects is easier (no sharing of projects between solutions). Can split your projects however you like. |
Can’t use project references across solutions, so dependencies must be managed by hand. Harder to automate the build of the entire system. |
Conclusion
Projects and solutions are at the core of any work you do with Visual Studio .NET. Projects represent individual components or applications. Solutions are collections of related projects. Solutions can manage the dependencies between projects, ensuring that components are built in the correct order and copied into the right places. Of course, a solution and its projects would be of no use at all if they didn’t contain source code of some kind, so in the next chapter we will look at the features in Visual Studio .NET designed to help you edit individual files.
[2] Two files are typically created for each solution. The .sln file contains a complete description of the contents of the solution. The .suo file just contains information such as editor window positions and breakpoint settings. The .suo file is essentially dispensable since it is not required in order to build the projects in the solution; unlike .sln files, .suo files are not normally checked into source control.
[3] You can permanently change this default by going to Tools → Options, then going to Environment → Projects and Solutions and changing the path of the Visual Studio Projects text box.
[4] Of course, if your environment requires that you develop on a common web server rather than from your local machine, this will not be a viable solution, since the web project will be stored on another machine (the web server). In this case, Visual Studio .NET’s default behavior for new web projects is perfectly reasonable, although it does make it impossible to keep the solution and all its projects in a single directory.
[5] Appendix A provides a complete list of project types. Some have been omitted from this chapter for brevity.
[6] By default, Web Service projects created by VS.NET do not contain a WSDL file, because the .NET Framework is able to generate these on the fly. However, because the WSDL can often be the basis of a contract between the web service provider and web service consumer, many web services hardcode the WSDL file into the project to make sure it doesn’t change.
[7]
HKLM\Software\Microsoft\.NETFramework\AssemblyFolders.
Each directory should be specified as an
Assembly Folders subkey whose
(Default) value is set to the path.
[8] Issues with VS.NET project references notwithstanding, it is good practice to minimize cross-component dependencies in order to simplify your build and test procedures. Large-Scale C++ Software Design (Addison-Wesley) provides excellent and extensive explanations of why this is so. Despite its title, many of the issues presented in this book are of interest to developers creating large software systems in any programming language.
[9] Strictly speaking, NTFS 5 reparse points do allow a directory to have multiple parents. However, even if all of your developers’ machines have appropriate filesystems, your source control system almost certainly won’t be able to deal with such a directory structure.
Get Mastering Visual Studio .NET now with the O’Reilly learning platform.
O’Reilly members experience books, live events, courses curated by job role, and more from O’Reilly and nearly 200 top publishers.

