With a typical Unix system, a staff person has to set up a Unix account for you before you can use it. With Mac OS X, however, the operating system installation automatically creates a default user account. The account is identified by your username , which is usually a single word or an abbreviation. Think of this account as your office — it’s your personal place in the Unix environment.
When you log in to your Mac OS X system, you’re automatically logged into your Unix account as well. In fact, your Desktop and other customized features of your Mac OS X environment have corresponding features in the Unix environment. Your files and programs can be accessed either through the Mac Finder or through a variety of Unix command-line utilities that you can reach from within Mac OS X’s Terminal window.
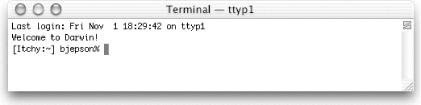
To get into the Unix environment, launch the Terminal application. (That’s Finder → Applications → Utilities → Terminal. If you expect to use the Terminal a lot, drag the Terminal icon from the Finder window onto the Dock. You can then launch Terminal with a single click.) Once Terminal is running, you’ll see a window like the one in Figure 1-1.
Once you have a window open and you’re typing commands, it’s helpful to know that regular Mac OS X copy and paste commands work, so it’s simple to send an email message to a colleague showing your latest Unix interaction, or to paste some text from a web page into a file you’re editing with a Unix text editor such as vi.
You can also have a number of different Terminal windows open if that helps your workflow. Simply use
-~ to cycle between them without removing your hands from the keyboard.
If you have material in your scroll buffer you want to find, use
-F (or select Find → Find from the Edit menu) and enter the specific text.
-G (Find Next) lets you search down the scroll buffer for the next occurrence, and
-D (Find Previous) lets you search up the scroll buffer for the previous occurrence. You can also search for material by highlighting a passage, entering
-E (Use Selection for Find) or jumping to the selected material with
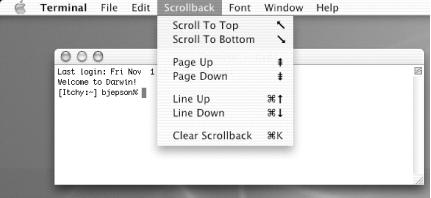
-J (Jump to Selection). You can also save an entire Terminal session as a text file with File → Save Text As, and you can print the entire session with File → Print. It’s a good idea to study the key sequences shown in the Scrollback menu, as illustrated in Figure 1-2.
Inside the Terminal window, you’re working with a
program called a
shell
.
The shell interprets command lines you enter, runs programs you ask
for, and generally coordinates what happens between you and the Unix
operating system. The default shell on
Mac OS X
is called tcsh (this could change in future
versions of Mac OS X).
Other available shells include
the Bourne shell (sh), the C shell
(csh), the Bourne-Again shell
(bash), and the Z Shell
(zsh). A popular shell on other versions of Unix
(not available by default on Mac OS X) is the Korn shell
(ksh). To change the shell that Terminal uses,
see Section 4.1.
For a beginner, differences between shells are slight. If you plan to work with Unix a lot, though, you should learn more about your shell and its special commands.
Tip
To find out which
shell you’re
using, run the command echo $SHELL
or ps $$
. (See Section 1.1.2, later in this chapter.) The
answer, which could be something like /bin/tcsh,
is your shell’s name or pathname.
When the system is ready to run a command, the shell outputs a prompt to tell you that you can enter a command.
The default prompt in
tcsh
is the computer name (which might be
something automatically generated, such as
dhcp-254-108, or a name you’ve
given your system), the current directory (which might be represented
by ~, Unix’s shorthand for your
home directory), your login name, and a percent sign. For example,
the complete prompt might look like this: [limbo:~] taylor%. The prompt can be customized, though, so your own
shell prompt may be different. We’ll show you how to
customize your prompt in Chapter 4.
A prompt that ends with a hash mark (#) usually
means you’re logged in as the
superuser
. The superuser
doesn’t have the protections for standard users that
are built into the Unix system. If you don’t know
Unix well, you can inadvertently damage your system software when you
are logged in as the superuser. In this case, we recommend that you
stop work until you’ve found out how to access your
personal Unix account. The simplest solution is to open a new
Terminal window (File → New Shell) and work in that window.
If you’ve still got the superuser prompt, it means that someone
either logged into Mac OS X as the superuser or your shell prompt has
been customized to end with a # even when you’re not the superuser.
Try logging out of Mac OS X (
→ Log Out) and logging back in.
Entering a command line at the shell prompt tells the computer what to do. Each command line includes the name of a Unix program. When you press Return, the shell interprets your command line and executes the program.
The first word that you type at a shell prompt is always a Unix command (or program name). Like most things in Unix, program names are case sensitive; if the program name is lowercase (and most are), you must type it in lowercase. Some simple command lines have just one word, which is the program name. For more information, see Section 1.2, later in this chapter.
An example single-word command is
date. Entering the command date
displays the current date and time:
% date
Fri Nov  1 16:26:55 EST 2002
%
As you type a command line, the system simply collects your keyboard input. Pressing the Return key tells the shell that you’ve finished entering text, and it can run the program.
Another simple command is
who. It displays a list of each logged-on
user’s username, terminal number, and login time.
Try it now, if you’d like.
The who program can also tell you which account is
currently using the Terminal application, in case you have multiple
user accounts on your Mac. The command line for this is
who
am
i. This command line consists of the
command (who, the program’s name)
and arguments (am
i). (Arguments are explained in
Section 1.2 later in this
chapter.) For example:
% who am i
taylor   ttyp1    Nov  1 16:26
The response shown in this example says that:
“I am” Taylor (actually, my username is taylor). The username is the same as the Short Name you’re asked to define when you create a new user with System Preferences → Accounts → New User.
I’m using terminal p1. (This cryptic syntax, ttyp1, is a holdover from the early days of Unix. All you need to know as a Unix beginner is that each time you open a new terminal window, the number at the end of the name gets incremented. The first one by ttyp1, the second ttyp2, and so on. The terminal ID also appears in the titlebar of the Terminal window.)
I opened a new Terminal window at 4:26 in the afternoon of November 1.
Modern Unix shells remember command lines you’ve typed previously. They can even remember commands from previous login sessions. This handy feature can save you a lot of retyping of common commands. As with many things in Unix, though, there are several different ways to do this; we don’t have room to show and explain them all. You can get more information from sources listed in Chapter 10.
After you’ve typed and executed several command lines, try pressing the up-arrow key on your keyboard. You will see the previous command line after your shell prompt, just as you typed it before. Pressing the up-arrow again recalls the previous command line, and so on. Also, as you’d expect, the down-arrow key will recall more recent command lines.
To execute one of these remembered commands, just press the Return key. (Your cursor doesn’t have to be at the end of the command line.)
Once you’ve recalled a command line, you can edit it. If you don’t want to execute any remembered commands, cancel the command line with Control-C or
-.. The next section explains both of
these.
What if you make a mistake in a command line? Suppose you typed
dare instead of date and
pressed the Return key before you realized your mistake. The shell
will give you an error message:
% dare
dare: command not found
%
Don’t be too concerned about getting error messages. Sometimes you’ll get an error even if it appears that you typed the command correctly. This can be caused by typing control characters that are invisible on the screen. Once the prompt returns, reenter your command.
As we said earlier (in Section 1.1.3), you can recall previous commands and edit command lines. Use the up-arrow to recall a previous command.
To edit the command line, use the left-arrow and right-arrow keys to move your cursor to the point where you want to make a change. You can use the Delete key to erase characters to the left of the cursor.
If you have logged into your Macintosh remotely from another system (see Chapter 7), your keyboard may be different. The erase character differs between systems and accounts, and can be customized. The most common erase characters are:
Delete or Del
Control-H
-.will interrupt or cancel a
command and can be used in many
(but not all) cases when you want to quit what
you’re doing.
Other common control characters are:
- Control-U
- Control-S
Pauses output from a program that’s writing to the screen. This can be confusing; we don’t recommend using Control-S, but want you to be aware of it.
- Control-Q
- Control-D
Signals the end of input for some programs (such as
cat, explained in Section 6.1.1) and returns you to a shell prompt. If you type Control-D at a shell prompt, it may close your current Terminal window.
To
end a Unix session, you must exit the Terminal. You should
not end a session by just quitting the Terminal
application or closing the terminal window. It’s
possible that you might have started a process running in the
background (see Chapter 9), and closing the window
will interrupt the process so it won’t complete.
Instead, type exit at a shell prompt. The window
will either close or display [Process completed];
then you can then safely quit the Terminal application. If
you’ve started a background process,
you’ll instead get one of the messages in the
Problem Checklist below.
The first few times you use Mac OS X, you aren’t likely to have the following problems. But you may encounter these problems later, as you do more advanced work.
- You get another shell prompt, or the shell says “logout: not login shell.”
You’ve been using a subshell (a shell created by your original Terminal shell). To end each subshell, type
exit(or just type Control-D) until the Terminal window closes.- The shell says “There are stopped jobs” or “There are running jobs.”
Mac OS X and many other Unix systems have a feature called job control that lets you suspend a program temporarily while it’s running or keep it running separately in the “background.” One or more programs you ran during your session has not ended but is stopped (paused) or in the background. Enter
fgto bring each stopped job into the foreground, then quit the program normally. (See Chapter 9 for more information.)- The Terminal application refuses to quit, saying “Closing this window will terminate the following processes inside it:”, followed by a list of programs.
Terminal tries to help by not quitting when you’re in the middle of running a command. Cancel the dialog box and make sure you don’t have any commands running that you forgot about.
Get Learning Unix for Mac OS X, Second Edition now with the O’Reilly learning platform.
O’Reilly members experience books, live events, courses curated by job role, and more from O’Reilly and nearly 200 top publishers.

