Having learned to walk, let’s try a jog. In this section, we’ll look at some techniques for doing fast and flicker-free drawing and painting. If you’re interested in animation or smooth updating, this is for you.
Drawing operations take time, and time spent drawing leads to delays and imperfect results. Our goal is to minimize the amount of drawing work we do and, as much as possible, to do that work away from the eyes of the user. To see how to eliminate flicker and blinking problems, we’ll look at an application that animates very badly. The good news is that Swing automatically solves a lot of flicker problems.
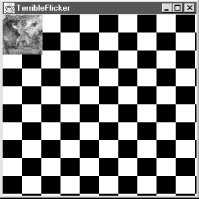
TerribleFlicker
illustrates some of the problems of updating a display. Like many
animations, it has two parts: a constant background and a changing
object in the foreground. In this case, the background is a
checkerboard pattern and the object is a small, scaled image we can
drag around on top of it, as shown in Figure 17.4. Our first version of
TerribleFlicker lives up to its name, doing a very
poor job of updating.
//file: TerribleFlicker.java
import java.awt.*;
import java.awt.event.*;
import javax.swing.*;

public class TerribleFlicker extends JComponent
                             implements MouseMotionListener {
  int grid = 10;
  int imageX, imageY;
  Image image;
  int imageWidth = 60, imageHeight = 60;

  public TerribleFlicker(Image i) {
    image = i;
    addMouseMotionListener(this);
  }

  public void mouseDragged(MouseEvent e) {
    imageX = e.getX( );
    imageY = e.getY( );
    repaint( );
  }

  public void mouseMoved(MouseEvent e) {}

  public void paint(Graphics g) {
    Graphics2D g2 = (Graphics2D)g;

    int w = getSize( ).width / grid;
    int h = getSize( ).height / grid;
    boolean black = false;
    for (int y = 0; y <= grid; y++)
      for (int x = 0; x <= grid; x++) {
        g2.setPaint(black ? Color.black : Color.white);
        black = !black;
        g2.fillRect(x * w, y * h, w, h);
      }
    g2.drawImage(image, imageX, imageY,
                 imageWidth, imageHeight, this);
  }

  public static void main(String[] args) {
    String imageFile = "L1-Light.jpg";
    if (args.length > 0)
      imageFile = args[0];
    Image i = Toolkit.getDefaultToolkit( ).getImage(
        TerribleFlicker.class.getResource(imageFile));
    JFrame f = new JFrame("TerribleFlicker");
    Container content = new Panel(new BorderLayout( ));
    content.add(new TerribleFlicker(i), BorderLayout.CENTER);
    f.setContentPane(content);
    f.setSize(300, 300);
    f.setLocation(100, 100);
    f.addWindowListener(new WindowAdapter( ) {
      public void windowClosing(WindowEvent e) { System.exit(0); }
    });
    f.setVisible(true);
  }
}
Run the application by specifying an image file as a command-line
argument. Try dragging the image; you’ll notice both the
background and foreground flicker as they are repeatedly redrawn.
What is TerribleFlicker doing, and what is it
doing wrong?
TerribleFlicker is a custom component that is
shown in the content pane of a JFrame. In the
main( ) method, a
TerribleFlicker is created and put in a
Panel. The Panel is set to be
the content pane of the applet. A Panel is used in
place of one of the Swing containers for the purposes of
illustration. At the end of this section, we’ll use a
JPanel, which will take care of all of our
problems in one dramatic step.
As the mouse is dragged, TerribleFlicker keeps
track of its position in two instance variables,
imageX and imageY. On each call
to mouseDragged( ), the coordinates are updated,
and repaint( ) is called to ask that the display
be updated. When paint( ) is called, it looks at
some parameters, draws the checkerboard pattern to fill the
applet’s area, and finally paints a small version of the image
at the latest coordinates.
Our first, and biggest, problem is
that we are updating, but we have neglected to implement a good
strategy. The panel that contains TerribleFlicker
is using the default implementation of the update( ) method, which looks something like this:
public void update( Graphics g ) {
    setColor ( backgroundColor );
    fillRect( 0, 0, getSize().width, getSize( ).height );
    paint ( g );
}
This method simply clears the display to the background color and
calls the paint( ) method, which eventually calls
the paint( ) method of
TerribleFlicker. This is almost never the best
strategy, but is the only appropriate default for update( ), which doesn’t know how much of the screen
we’re really going to paint.
Our application paints its own background in its entirety, so we can
provide a simpler version of update( ) that
doesn’t bother to clear the display. Here’s another
example that uses the TerribleFlicker class. This
time, we create a Panel with a modified
update( ) method:
//file: UpdateFlicker.java
import java.awt.*;
import java.awt.event.*;
import javax.swing.*;

public class UpdateFlicker {
  public static void main(String[] args) {
    String imageFile = "L1-Light.jpg";
    if (args.length > 0) imageFile = args[0];
    Image i = Toolkit.getDefaultToolkit( ).getImage(
        TerribleFlicker.class.getResource(imageFile));
    JFrame f = new JFrame("UpdateFlicker");
    Container content = new Panel(new BorderLayout( )) {
        public void update(Graphics g) { paint(g); }
    };
    content.add(new TerribleFlicker(i), BorderLayout.CENTER);
    f.setContentPane(content);
    f.setSize(300, 300);
    f.setLocation(100, 100);
    f.addWindowListener(new WindowAdapter( ) {
      public void windowClosing(WindowEvent e) { System.exit(0); }
    });
    f.setVisible(true);
  }
}
This application works better because we
have eliminated one large, unnecessary, and (in fact) annoying
graphics operation. However, although we have eliminated a
fillRect( ) call, we’re still doing a lot of
wasted drawing. Most of the background stays the same each time
it’s drawn. You might think of trying to make paint( ) smarter, so that it wouldn’t redraw these areas,
but remember that paint( ) has to be able to draw
the entire scene, because it might be called in situations when the
display isn’t intact. The solution is to draw only part of the
picture whenever the mouse moves.
Whenever the mouse is dragged,
TerribleFlicker responds by updating its
coordinates and calling repaint( )
. But repaint( ) draws the entire component. Most of this drawing is
unnecessary. It turns out that there’s another version of
repaint( ) that lets you specify a rectangular
area that should be drawn—in essence, a clipping region.
Why does it help to restrict the drawing area? Well, foremost, drawing operations that fall outside of the clipping region are not displayed. If a drawing operation overlaps the clipping region, we see only the part that’s inside. A second effect is that, in a good implementation, the graphics context can recognize drawing operations that fall completely outside the clipping region and ignore them altogether. Eliminating unnecessary operations can save time if we’re doing something complex, like filling a bunch of polygons. This doesn’t save the time our application spends calling the drawing methods, but the overhead of calling these kinds of drawing methods is usually negligible compared to the time it takes to execute them. (If we were generating an image pixel by pixel, this would not be the case, as the calculations would be the major time sink, not the drawing.)
So we can save time in our application by redrawing only the affected portion of the display. We can pick the smallest rectangular area that includes both the old image position and the new image position, as shown in Figure 17.5. This is the only portion of the display that really needs to change; everything else stays the same.
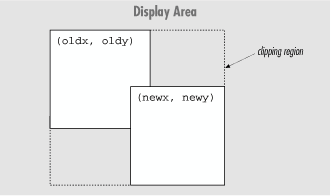
A smarter algorithm could save even more time by redrawing only those regions that have changed. However, the simple clipping strategy we’ve implemented here can be applied to many kinds of drawing, and gives quite good performance, particularly if the area being changed is small.
One important thing to note is that, in addition to looking at the
new position, our updating operation now has to remember the last
position at which the image was drawn. Let’s fix
our application
so it will use a specified clipping region. To keep this short and
emphasize the changes, we’ll take some liberties with design
and make our next example
a subclass of
TerribleFlicker. Let’s call it
LimitedFlicker.
//file: LimitedFlicker.java
import java.awt.*;
import java.awt.event.*;
import javax.swing.*;

public class LimitedFlicker extends TerribleFlicker {
  int oldX, oldY;

  public LimitedFlicker(Image i) { super(i); }

  public void mouseDragged(MouseEvent e) {
    imageX = e.getX( );
    imageY = e.getY( );
    Rectangle r = getAffectedArea(oldX, oldY, imageX, imageY,
        imageWidth, imageHeight);
    // update just the affected part of the component
    repaint(r);
    oldX = imageX;
    oldY = imageY;
  }

  private Rectangle getAffectedArea(int oldx, int oldy,
      int newx, int newy, int width, int height) {
    int x = Math.min(oldx, newx);
    int y = Math.min(oldy, newy);
    int w = (Math.max(oldx, newx) + width) - x;
    int h = (Math.max(oldy, newy) + height) - y;
    return new Rectangle(x, y, w, h);
  }

  public static void main(String[] args) {
    String imageFile = "L1-Light.jpg";
    if (args.length > 0)
      imageFile = args[0];
    Image i = Toolkit.getDefaultToolkit( ).getImage(
        TerribleFlicker.class.getResource(imageFile));
    JFrame f = new JFrame("LimitedFlicker");
    Container content = new Panel(new BorderLayout( )) {
        public void update(Graphics g) { paint(g); }
    };
    content.add(new LimitedFlicker(i), BorderLayout.CENTER);
    f.setContentPane(content);
    f.setSize(300, 300);
    f.setLocation(100, 100);
    f.addWindowListener(new WindowAdapter( ) {
      public void windowClosing(WindowEvent e) { System.exit(0); }
    });
    f.setVisible(true);
  }
}
You may find that LimitedFlicker is significantly
faster, though it still flickers. (You might not notice the speed-up
on a fast machine.) We’ll make one more change in the next
section to eliminate that.
So, what have we changed? First,
we’ve overridden mouseDragged( ) so that
instead of setting the current coordinates of the image, it figures
out the area that has changed. A new, private
method helps it do this. getAffectedArea( ) takes
as arguments the new and old coordinates and the width and height of
the image. It determines the bounding rectangle as shown in Figure 17.6, then calls repaint( )
to draw only the affected area of the screen. mouseDragged( ) also saves the current position away, by
setting the
oldX and oldY variables.
Now let’s get to the most powerful technique in our toolbox: double buffering. Double buffering is a technique that fixes our flickering problems completely. It’s easy to do and gives us almost flawless updates. We’ll combine it with our clipping technique for better performance. In general, you can use double buffering with or without clipping.
Double buffering our display means drawing into an offscreen buffer and then copying our completed work to the display in a single painting operation, as shown in Figure 17.6. It takes the same amount of time to draw a frame, but double buffering instantaneously updates our display when it’s ready.
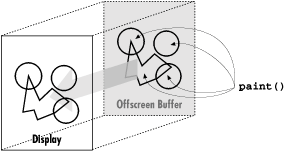
Although you could implement this technique yourself, there’s
not much point—Swing supplies double buffering for free. All
you need to do is use a Swing component in a Swing container. Swing
takes care of the details. Instead of using an AWT
Panel as a container, then, let’s see how it
works with a
Swing JPanel:
//file: Smoothie.java
import java.awt.*;
import java.awt.event.*;
import javax.swing.*;

public class Smoothie {
  public static void main(String[] args) {
    String imageFile = "L1-Light.jpg";
    if (args.length > 0)
      imageFile = args[0];
    Image i = Toolkit.getDefaultToolkit( ).getImage(
        TerribleFlicker.class.getResource(imageFile));
    JFrame f = new JFrame("Smoothie");
    Container content = new JPanel(new BorderLayout( )) {
        public void update(Graphics g) { paint(g); }
    };
    content.add(new LimitedFlicker(i), BorderLayout.CENTER);
    f.setContentPane(content);
    f.setSize(300, 300);
    f.setLocation(100, 100);
    f.addWindowListener(new WindowAdapter( ) {
      public void windowClosing(WindowEvent e) { System.exit(0); }
    });
    f.setVisible(true);
  }
}
Now, when you drag the image, you shouldn’t see any flickering. The update rate should be about the same as in the previous example (or marginally slower), but the image should move from position to position without noticeable repainting.
Note that we’re still limiting repaints, because we’re
still using LimitedFlicker. You could use
TerribleFlicker if you want. It should perform a
little more slowly but you still won’t see any flickering.
In
addition to serving as buffers for double buffering, offscreen images
are useful for saving complex, hard-to-produce, background
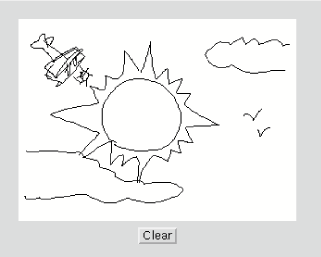
information. We’ll look at a simple example: the “doodle
pad.” DoodlePad is a simple drawing tool
that lets us scribble by dragging the mouse, as shown in Figure 17.7. It draws into an offscreen image; its
paint( ) method simply copies the image to the
display area.
//file: DoodlePad.java
import java.awt.*;
import java.awt.event.*;
import javax.swing.*;

public class DoodlePad extends JFrame {

  public DoodlePad( ) {
    super("DoodlePad");
    Container content = getContentPane( );
    content.setLayout(new BorderLayout( ));
    final DrawPad drawPad = new DrawPad( );
    content.add(drawPad, BorderLayout.CENTER);
    JPanel p = new JPanel( );
    JButton clearButton = new JButton("Clear");
    clearButton.addActionListener(new ActionListener( ) {
      public void actionPerformed(ActionEvent e) {
        drawPad.clear( );
      }
    });
    p.add(clearButton);
    content.add(p, BorderLayout.SOUTH);
    setSize(280, 300);
    setLocation(100, 100);
    addWindowListener(new WindowAdapter( ) {
      public void windowClosing(WindowEvent e) {
        System.exit(0);
      }
    });
    setVisible(true);
  }

  public static void main(String[] args) {
    new DoodlePad( );
  }
} // end of class DoodlePad

class DrawPad extends JComponent {
  Image image;
  Graphics2D graphics2D;
  int currentX, currentY, oldX, oldY;

  public DrawPad( ) {
    setDoubleBuffered(false);
    addMouseListener(new MouseAdapter( ) {
      public void mousePressed(MouseEvent e) {
        oldX = e.getX( );
        oldY = e.getY( );
      }
    });
    addMouseMotionListener(new MouseMotionAdapter( ) {
      public void mouseDragged(MouseEvent e) {
        currentX = e.getX( );
        currentY = e.getY( );
        if (graphics2D != null)
          graphics2D.drawLine(oldX, oldY, currentX, currentY);
        repaint( );
        oldX = currentX;
        oldY = currentY;
      }
    });
  }

  public void paintComponent(Graphics g) {
    if (image == null) {
      image = createImage(getSize().width, getSize( ).height);
      graphics2D = (Graphics2D)image.getGraphics( );
      graphics2D.setRenderingHint(RenderingHints.KEY_ANTIALIASING,
          RenderingHints.VALUE_ANTIALIAS_ON);
      clear( );
    }
    g.drawImage(image, 0, 0, null);
  }

  public void clear( ) {
    graphics2D.setPaint(Color.white);
    graphics2D.fillRect(0, 0, getSize().width, getSize( ).height);
    graphics2D.setPaint(Color.black);
    repaint( );
  }
}
Give it a try. Draw a nice moose, or a sunset. We just drew a lovely cartoon of Bill Gates. If you make a mistake, hit the Clear button and start over.
The parts should be familiar by now. We have made a type of
JComponent called DrawPad. The
new DrawPad component uses inner classes to supply
handlers for the MouseListener and
MouseMotionListener interfaces. Mouse dragging is
handled by drawing lines into an offscreen image and calling
repaint( ) to update the display.
DrawPad’s paint( ) method
simply does a drawImage( ) to copy the offscreen
drawing area to the display. In this way, DrawPad
saves our sketch information.
What is unusual about DrawPad is that it does some
drawing outside of paint( ). In this example, we
want to let the user scribble with the mouse, so we should respond to
every mouse movement. Therefore, we do our work in
mouseDragged( ) itself. As a rule, we should be
careful about doing heavy work in event-handling methods because we
don’t want to interfere with other tasks the windowing
system’s painting thread is performing. In this case, our
line-drawing option should not be a burden, and our primary concern
is getting as close a coupling as possible between the mouse movement
events and the sketch on the screen.
In addition to drawing a line as the user drags the mouse, the
mouseDragged( ) handler maintains a set of old
coordinates, to be used as a starting point for the next line
segment. The mousePressed( ) handler resets the
old coordinates to the current mouse position whenever the user moves
the mouse. Finally, DrawPad provides a
clear( ) method that clears the offscreen buffer
and calls repaint( ) to update the display. The
DoodlePad application ties the clear( ) method to an appropriately labeled button through another
anonymous inner class.
What if we wanted to do something with the image after the user has finished scribbling on it? As we’ll see in the next chapter, we could get the pixel data for the image and work with that. It wouldn’t be hard to create a save facility that stores the pixel data and reproduces it later. Think about how you might go about creating a networked “bathroom wall,” where people could scribble on your web pages.
Get Learning Java now with the O’Reilly learning platform.
O’Reilly members experience books, live events, courses curated by job role, and more from O’Reilly and nearly 200 top publishers.

