Chapter 4. Enhancing IRC Clients
Introduction: Hacks #17-30
Most IRC clients provide the same basic subset of functionality, but you can really improve your IRC experience by exploiting the features provided by your particular IRC client. Almost all IRC clients offer various shortcuts to prevent your having to type more than necessary. Nickname completion is seemingly universally supported and means you don’t have to type the full nickname of another user when you address her. This is particularly useful when you encounter channels that contain users with strange nicknames.
Some of the enhancements introduced by this chapter are simple yet useful, such as adding timestamps to your messages and highlighting keywords from other users. You will also be introduced to IRC scripting, which enables you to customize the functionality of your IRC client. Practical examples include filtering banned words, managing huge debate channels, getting your IRC client to talk out loud, and controlling captions on webcams.
IRC is primarily a text-based chat system, but that doesn’t mean you are limited to using just plain text. This chapter shows you how to add colors and other formatting to your messages, making them stand out among the rest.
While older IRC clients could connect to only one server at a time, modern IRC clients allow you to connect to any number of servers. Even the most paranoid user can feel safe using IRC, as this chapter also shows you how to secure your IRC connection or tunnel it through other machines.
Automatic Completion of Nicknames
Your client does the typing so that you don’t have to.
Often when chatting on IRC you spend much of your time just typing in people’s nicknames. This can get tedious, so many clients have some kind of automatic completion facility that works out whose nick you’re trying to type and finishes the job for you. This hack will explain the nick-completion functionality provided in several popular IRC clients.
mIRC
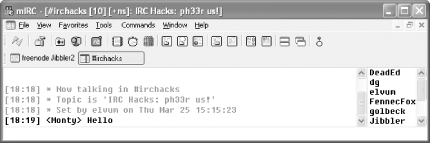
mIRC provides basic tab-completion functionality that will be familiar to anyone who’s used a modern command-line interface. Type the first letter or so of a nickname and press the Tab key. mIRC will then complete the rest of the nickname for you, as shown in Figure 4-1. If more than one nick starts with the part that you typed, mIRC will allow you to cycle through the available options by repeatedly pressing the Tab key.

irssi
irssi
provides tab-completion features similar to those found in mIRC. If
the nick you tab-complete is the first word in a message,
irssi assumes that you’re
addressing someone, and automatically adds a colon to the end of the
nick. In addition, the concept of tab completion has been extended to
the rest of the irssi interface. You can see a
list of all user completions by entering
/completion
.
XChat
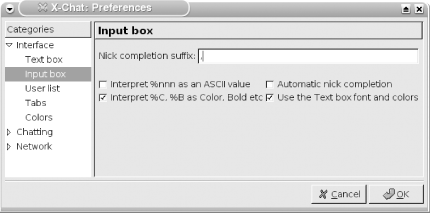
XChat offers some more advanced nick-completion features, which are configured in the Interface →Input Box page of the Preferences dialog. As with irssi, if the nick you are trying to complete is the first word of a line, XChat will assume that you are addressing the person in question and add an optional suffix to the nick. By default, this suffix is a comma, as shown in Figure 4-2. Unlike mIRC and irssi, XChat does not cycle through options if more than one nick starts with the character(s) you entered; instead, it displays all the options and expects you to enter enough extra characters to eliminate the ambiguity.
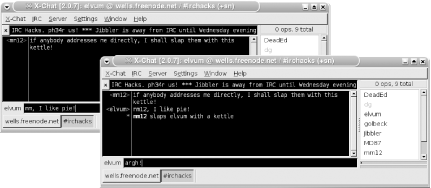
XChat also has automatic nick completion, a feature that people either love or hate: when it is turned on, any characters at the start of a message that are followed by the nick-completion suffix will be magically expanded when you press the Enter key. The characters will expand into the first matching nick, alphabetically. An example of how this works and the problems it can cause are shown in Figure 4-3. Autocompletion can be enabled and disabled in the XChat preferences.
ChatZilla
ChatZilla provides tab-completion facilities that are similar to those found in irssi. It does not cycle through nicks if there is ambiguity, but completes the nick as far as it can and displays the available options if you press Tab twice quickly. If the nick is the first word of a line, ChatZilla suffixes it with a comma.
Add Timestamps to mIRC Messages
If you leave your IRC client running all the time, learn when each message was sent.
Many people leave their IRC client running 24 hours a day in order to receive private messages even during their absence. It also allows them to scroll up to see what conversations they have missed in all of their channels.
When you listen to a message on your voice mail, you are typically told when it was sent so you know how fresh the message is. If you’ve just come back from vacation, this can be useful so you know whether it’s worth acting on each message. Similarly, it’s useful to know when IRC messages were sent during your absence.
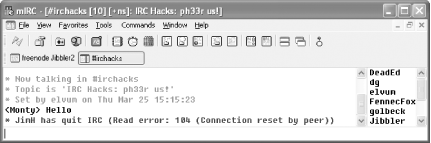
mIRC, the most popular Windows IRC client, doesn’t display timestamps by default. Figure 4-4 shows mIRC running without displaying any timestamps. From this, it is impossible to know when Monty said, “hello,” or when JimH quit from the network—maybe they happened in rapid succession; maybe they didn’t. Fortunately, turning on and customizing mIRC timestamps is a piece of cake.
Adding Simple Timestamps
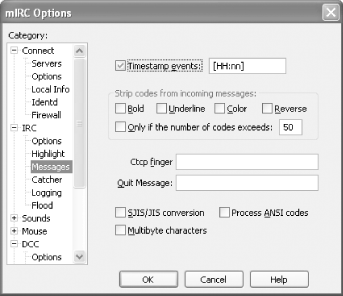
To turn on timestamps, open up the mIRC Options dialog, as shown in Figure 4-5, by choosing Tools → Options from the menu bar. Navigate to the IRC → Messages category and check the checkbox titled Timestamp Events. Now click on OK to close the dialog.
When you receive an event in mIRC now, it will be prefixed with a timestamp so you can see when the event occurred. Timestamps will be prefixed to all events, including public and private messages, joins, parts, quits, and so on.
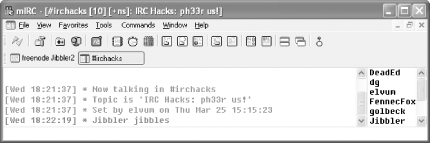
Figure 4-6 shows the format of these timestamps in the main window.
Hacking the Timestamp
Sometimes you might want a greater resolution on your timestamps. After all, the difference between one second and one minute is quite significant when it comes to real-time chat. Conversely, you may like to use the timestamp to show what day it is. This can be useful if you are away from your IRC client for more than a day or if you simply keep forgetting what day it is.
To the right of the Timestamp Events checkbox in
Figure 4-5, you can specify your own timestamp
format using standard time and date identifiers. The default is
[HH:nn], which displays the time in hours and
minutes with leading zeros, for example [18:01].
Timestamps are best kept as short as possible, so it is probably not
a great idea to include the full day name in them. Instead, you can
use the short version (ddd), which also has the
advantage of being the same length whatever day it is. Seconds (with
a leading zero) can be added to the end of the timestamp using
ss. So, to use this new and improved timestamp,
you just have to enter the following:
[ddd HH:nn:ss]
This results in the style of timestamp shown in Figure 4-7.
Investigate the mIRC help file if you want to find out what other
time and date modifiers are available. Some useful examples are
h to display the hours on a 12-hour clock and
tt to display am or
pm.
Highlight Lines in mIRC
Some channels are just too busy for you to keep track of everything that’s happening. Highlight lines that contain certain keywords to easily see what’s relevant to you.
IRC can be a fun way to kill some time, although it’s all too easy to get carried away and find it taking up more time than you’d like. After using IRC for a while, you tend to join more channels that interest you and get to know more people you never knew before. Following the conversation in several active channels is difficult, if not impossible.
Highlight Your Own Messages
The first useful feature you can add to a client is to make your own messages stand out. This may sound trivial, but it’s actually quite useful to be able to scroll back and see when you spoke, as most replies to your messages are likely to be close beneath. This way, you can use your own messages as visual markers to show when you were active in a channel.
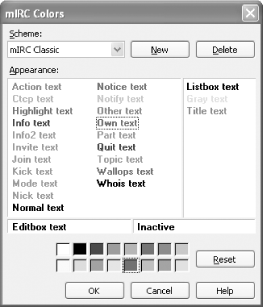
To change the color of your own text, open up the mIRC Colors dialog by selecting View → Colors... from the menu bar. In the Appearance field, click on the Own Text label, as shown in Figure 4-8, and select what color you would like your messages to be.
Click on OK, and all of your messages will now be a different color so you can find them more easily.
Highlight Messages from Other People
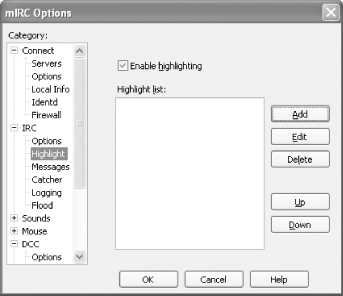
Highlighting messages from your friends or bots is also straightforward. If you choose a different color for each user, IRC will become much more intuitive to use. To enable highlighting, open up the mIRC Options dialog by selecting Tools → Options..., and select the IRC→Highlight category, as shown in Figure 4-9. Check the Enable Highlighting box, and you will now be able to add some entries to the Highlight List.
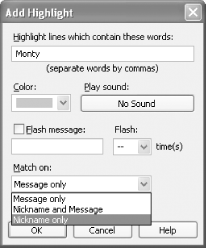
To add a new entry to the highlight list, click the Add button. Figure 4-10 shows how to highlight a line that has been sent by a bot called Monty. Monty’s nickname is entered in the first text box, and a color is chosen from the Color drop-down list (in this case, the chosen color is orange). Select Nickname Only from the Match On drop-down list. All messages sent by Monty will now be colored orange.
Highlight Messages Containing Keywords
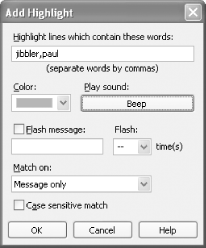
The most useful reason for highlighting a line is so you can tell if people are talking about you or trying to attract your attention. Add a list of your nicknames or aliases, separated by commas, as shown in Figure 4-11. Pick a color and select the highlight rule to match on the message only.
Whenever someone sends a message that contains “jibbler” or “paul,” the line will be highlighted in the color you chose. To make it even harder to miss this, you can click on the button underneath Play Sound so it reads Beep. As well as highlighting the line, mIRC will now also beep at you so you can even leave mIRC minimized without worrying about missing anything important.
Now you can concentrate on your work and leave your IRC client to do the arduous task of working out when you need to look at it.
Automate mIRC with Scripting
mIRC is already a friendly and easy-to-use IRC client. Master its scripting capabilities to automate lots of useful tasks.
mIRC is one of the most popular IRC clients available for Windows, and it comes complete with a robust scripting engine. Thousands of ready-to-run scripts are available from sites like http://www.mircscripts.org, although it is often hard to find a script that does exactly what you want, which is why many people decide to write their own scripts, or alter existing ones.
Opening the Scripts Editor
mIRC comes with its own integrated scripts editor (Figure 4-12), which can be accessed by pressing Alt-R while the client is active.
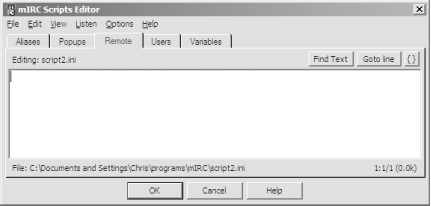
The five tabs in the scripts editor are Aliases, Popups, Remote, Users, and Variables. Almost all scripts fall into the Remote section. Remote means that the script can respond to remote events, such as people joining a channel or your connecting to an IRC server.
Making a Bad Word Banner
One of the most common types of script is the bad word banner, which bans or kicks users who say a bad word. To do this, the script must be supplied with a list of bad words, and it must “listen” for these words in channel messages.
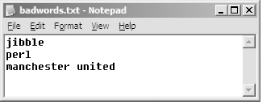
To make the script nice and flexible, you can use a text file to store the list of bad words. First, you need to make the file, so create a file called badwords.txt in your mIRC directory (for example, c:\Program Files\mIRC\)and place some bad words in it, one per line. If you want, you can also match phrases that contain spaces, as shown in Figure 4-13.
Save the bad words list and return to mIRC. Now open up the script editor (using Alt-R again) and make sure that the Remote tab is selected. Add the following code:
alias matchbad {
  set %i 1
  while (%i <= $lines(badwords.txt)) {
    if ($read(badwords.txt,%i) isin $1-) {
      return $true
    }
    inc %i
  }
  return $false
}
This script will return $true if the given phrase
matches a bad word, or $false if it
doesn’t. The script is explained step-by-step:
alias
This tells mIRC that you are creating an
alias for a group of
commands—instead of the main part of the script doing these
commands over and over again itself, you can group them into an
alias, which lets us repeat the code contained within it easily. The
alias you have made is called matchbad. The word
immediately following the alias command is the
name given to the alias, which executes all the code contained in the
outermost curly braces ({ ...
}). If you are used to other programming
languages, you can think of an alias as a method or function.
set
The set
command allows us to set a variable so it contains a value. Variables
begin with the % character in mIRC scripts. The
set command here sets the %i
variable to 1.
while
As with other languages, the
while
loop executes a group of commands while
a condition is true. The condition in this case is
%i
<=
$lines(badwords.txt), which roughly translates
into English as, “while %i is
less than or equal to the number of lines in
badwords.txt”. $lines is a
predefined alias to count the number of lines in a given file.
The code that gets executed while this condition is true is once again included in curly braces and is typically indented for clarity.
if
The if
statement causes a block of code to
be executed only if the condition is true. The
read alias used in this condition reads the given
line from the specified file, line %i from
badwords.txt. The isin operator
checks to see if one string is a substring of another. So in this
script, it is essentially checking to see if the text in the line
read from badwords.txt is in
$1-.
$1- is a special variable that returns all the
arguments passed to the alias, so if a script calls
$matchbad(This is,a test), $1-
will be set to “This is a test”.
There are numerous other variables that reference arguments:
$1 and $2 get the first and
second arguments, respectively, while suffixing one of these with a
- (for example, $1-,
$2-, etc.) gives you that argument and everything
after it.
Putting It All Together
When you put all of this together, you get an alias that scans
through a text file and checks to see if any of the phrases within it
are contained in the arguments passed. If they are, it returns
$true; otherwise it returns
$false.
The next part of the script listens to channel messages and
bans users who say a phrase that is
banned. To do this, use the on TEXT
event, which is triggered whenever mIRC receives a private or channel
message.
Add the following text to the script using mIRC’s editor. Again, let’s examine the code bit-by-bit:
on *:TEXT:*:#:{
  if ($matchbad($1-) == $true) {
    mode $chan +b $address($nick,3)
    kick $chan $nick Bad phrase detected!
  }
}
on TEXT
This event, as mentioned earlier, is triggered on all private or
channel messages. The * before the
TEXT means that there are no conditions attached
relating to you or the user. You can specify user levels here if you
want—see the built-in help system by typing /help user list. The * after it is a
wildcard that matches all text. You could use *e*
to match only text with an e in it, for example.
The # means that only messages sent to a channel
will be caught.
if
The if
statement should be familiar from
the alias created earlier. This particular if
statement calls the $matchbad alias with the text
as a parameter and checks to see if the result equals
$true. $1- is the first word of
the message and everything after that.
mode
This is exactly the same as the
/mode
command you may have used in mIRC or
other IRC clients. The $chan variable contains the
name of the channel the message was sent to. The
$address alias returns part of a given
nickname’s address (see /help $address), and the $nick variable
contains the user’s nickname. The line mode $chan +b $address($nick,3) will place a ban on the
user’s host.
Running the Hack
Put both the alias and the on TEXT
event into your Remote section using
the mIRC script editor, and create a
badwords.txt file with a few banned phrases in.
Now try it out! Note that the on TEXT event will
not trigger when you say something, so you will need to use another
client or get a friend to help you test the script. Anybody caught
saying words on the bad word list will be kick-banned from the
channel.
Further information about scripting can be found in the mIRC help
system. This is extremely detailed. Simply type
/help from mIRC (or press F1) to view
it.
—Chris Smith
Format Text
IRC does not limit you to using plain text. Add extra formatting, such as underlining and italics, to your messages.
Even though most IRC clients support color, simpler formatting can sometimes be more effective. Too much use of color tends to annoy people. In such circumstance, channel operators have at their disposal the option of banning the use of color. If this happens, it will still be possible to send messages with simpler formatting. To highlight a particular word in a message, you could underline it. To catch somebody’s attention, you could make your message bold. To emphasize something, you could make it italic. All of these options are possible, regardless of channel restrictions.
Formatting Text in mIRC
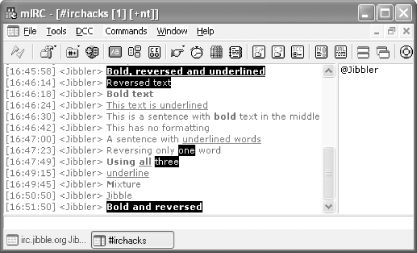
mIRC lets you view and send formatted text. Many other IRC clients behave in similar ways. Three main types of text formatting are available from mIRC. All of these can be accessed by keyboard shortcuts. These styles are complementary, so you can make text both bold and underlined, for example.
Bold
When composing a line or message, the text can be formatted as bold by pressing Ctrl-B. You will see a control character appear in your message. Anything you type after this will appear in bold. You will not see the result of this until you actually send your message to the server.
Underline
You can underline part of your message by pressing Ctrl-U. This will cause a control character to be inserted into your message. Everything after this character will be underlined.
Italic or reversed
Italic text can also be used. However, because some clients are incapable of rendering italic text, you will find that most clients (including those that can render italic text) display this as normal text with the background and foreground colors swapped. For this reason, it is also known as reversed text formatting and can be achieved in mIRC by pressing Ctrl-R.
Normal
To return text to its unformatted state, press Ctrl-O. This removes all formatting, even if more than one style has been applied.
Combinations of these options are illustrated in Figure 4-14.
Formatting Text with a Bot
Formatting text with the aforementioned attributes is simpler than applying colors, as only one control character is required for each style. There are no parameters to add after each style character.
Bold
Bold text can be achieved by prefixing
the text with ASCII character 0x02, which can be
represented in Unicode as \u0002. The following
Java code creates a bold IRC message:
String bold = "\u0002This is bold";
Underline
Text can be underlined with ASCII character
0x1F, which can be represented in Unicode as
\u001F.
String underlined = "\u001FThis is underlined";
Formatting Text with PircBot
The
Colors class in the
PircBot Java IRC API
[Hack #35]
contains useful constants,
not only for coloring, but also for formatting text with these
styles. Using these is probably easier than remembering the Unicode
characters.
String bold = Colors.BOLD + "This is bold";
String underlined = Colors.UNDERLINE + "This is underlined";
String reversed = Colors.REVERSE + "This is reversed";
String mixture = Colors.BOLD + "Bold" + Colors.NORMAL + " and gone";
Tip
Just because you can use formatting doesn’t mean you have to. Remember to use it sparingly and only when necessary, otherwise you’ll start to annoy people and they may start ignoring you!
Some of the bots covered later in this book use bold formatting to make parts of messages stand out more clearly.
Colorize Text
Not only can you add formatting to text, but you can also add colors. Use them to make your messages stand out.
Color can be useful. With it, one can add extra emphasis to typed words, and make them look prettier and more eye-catching. Color can also be annoying. It is important to steer clear of color combinations that are unnecessary or hard to read. Color is most effective when used sparingly.
Most IRC clients support color, both in terms of displaying colors correctly and allowing you to type messages that contain colors. Colors are achieved by placing special control codes within messages. IRC clients that do not support colors are likely to remove these special codes. At worst, they may actually display the characters used to make up the control codes. This can look rather peculiar, as they are not visible ASCII characters.
For the majority of IRC clients that do support color, there are 16 basic colors to choose from. The appearance of these colors is entirely dependant on your IRC client, but fortunately there is agreement on what these colors are. They are listed in Table 4-1.
|
Number |
Color |
Number |
Color |
|
0 |
White |
8 |
Yellow |
|
1 |
Black |
9 |
Green |
|
2 |
Dark blue |
10 |
Teal |
|
3 |
Dark green |
11 |
Cyan |
|
4 |
Red |
12 |
Blue |
|
5 |
Brown |
13 |
Magenta |
|
6 |
Purple |
14 |
Dark gray |
|
7 |
Olive |
15 |
Light gray |
Using Colors in mIRC
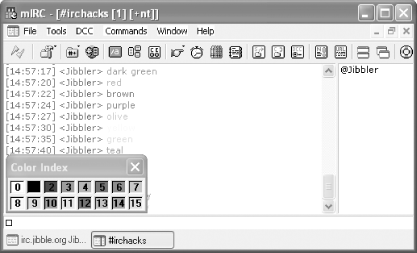
mIRC fully supports the set of 16 basic colors. When you are writing a message, you can change the color by pressing Ctrl-K. This inserts a special control character into the message and pops up a small window with a list of all 16 colors, as shown in Figure 4-15. If you click on one of these colors, it will insert the number for that color. Anything you type after this will be displayed in your chosen color.
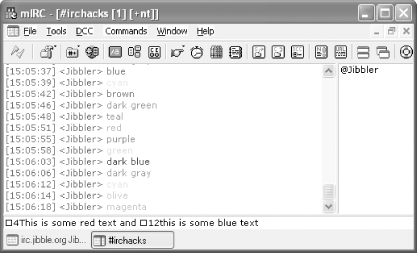
When composing a message, you will notice that color does not show until you have sent it to the server. You will, however, be shown the color codes that will be used. You can use more than one color in the same message. Unlike HTML, you do not need to end these color code “tags”—if you want to start using a new color, just enter a new color code and mIRC will forget about the old color, as shown in Figure 4-16.
Backgrounds
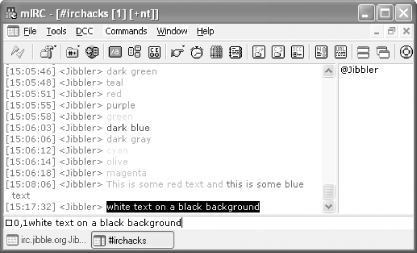
mIRC uses a pure white color for its default background, so it may not make sense to send white text. Unfortunately, not all IRC clients use the same background color, so this is another thing you will need to take into account when formatting text. Some clients, particularly those with Unix origins, use black backgrounds, so it may not even make sense to use black text!
Fortunately, you can specify the background color as well as the foreground color. This is done by adding another color code after the foreground color. A single comma is used to separate the two codes, as shown in Figure 4-17.
Problems with Coloring Numbers
If you wanted to color the number 123 in black, then you may fall foul of a slight problem with the color chooser in mIRC. The color code will be set as 1 (black), but because the next character in the message is also a number, it will result in 23 being colored in cyan (color code 11), rather than 123 being colored in black (color code 1). The solution to this problem is to ensure that all of your color codes contain two digits. That way, any subsequent digits will be interpreted as being part of the message text instead of a color code. If your desired color code consists of one digit, simply bulk it up by adding a leading zero.
Sending Colors from Bots
If you are sending
colored messages from an IRC bot, you can insert the special
characters into the string that you are going to send. The special
character used to signify the start of a color code is ASCII
character 0x03, which can be represented by the
Unicode character \u0003.
Here are some examples of color codes being placed into Java Strings:
String plain = "A plain message";
String red1 = "\u000304A red message";
String red2 = "\u0003" + "04" + "A red message";
String whiteOnBlack = "\u000300,01" + "White text on black background";
Sending Colors from PircBot
The
PircBot Java IRC API
[Hack #35]
includes a class called
Colors, which can be used to add color to
messages. It contains some useful constants so you
don’t have to keep remembering all the special color
codes.
Creating a colored string with PircBot is more intuitive:
String red = Colors.RED + "A red message";
Warning
Some IRC channels can be configured
to reject any messages that contain colors. Older IRC clients may not
render these colors correctly or at all. Channel mode
+c indicates that colors are not allowed.
Some of the bot hacks later in this book use colored messages to make the text stand out more.
Play Sounds
IRC doesn’t have to be solely text based. Add excitement by getting your IRC client to play sounds and share those sounds with other users.
One of mIRC’s most underused features is the ability to play sounds and to send and receive sound requests. This allows multiple users or whole channels to listen to the same sound at the same time, which is excellent for getting people’s attention while they are busy doing something else.
Enabling Sound Requests
The first thing to do is allow mIRC to handle sound requests. To do this, open the Options dialog (Tools→Options) and browse to the Sounds→Requests category, shown in Figure 4-18.
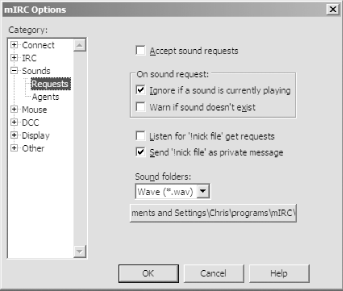
Make sure that the topmost option (Accept Sound Requests) is checked, and also check the Listen for `!Nick File’ Get Requests option. Both of these will be unchecked by default. These two options allow mIRC to listen for sound requests sent by other users—that is, it will play sounds when others request them and also allow other users to request sounds from you if they don’t have them.
Adding Sounds to mIRC
Now that sound requests are enabled, you will need to put some sound files where mIRC can find them. Going back to the sound requests settings category, look at the button near the bottom—this is the folder where mIRC will look for default sounds. You can change this location by clicking on it and selecting a new folder.
If you do not have any sounds, many web sites offer sound “packs” especially for mIRC. One good site is http://www.scumperson.eu.org/mircsounds, but you can find lot more by searching on Google for “mirc sounds download” and similar terms. When you have found some suitable sound files, place them in the directory located earlier. To help you organize your sounds better, you can also place sounds in subdirectories, as shown in Figure 4-19.

Placing files in subdirectories has no effect on mIRC’s ability to play them, but it will certainly make it easier for you to manage all of your sounds.
Sending Sound Requests
To
cause someone else to start
playing a sound file, you can use the
/sound
command. Switch to the channel you wish
to trigger the sound in, and type:
some_file.wavObviously, you will need to replace some_file.wav with the name of one of your sound files. This will cause the sound to be played on the other users’ clients. If they don’t have that particular file on their computers, they may try to request the sound from you.
Requesting Sounds
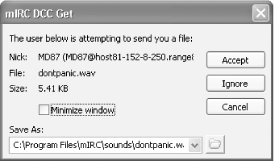
If someone else in your channel plays a sound that you do not have, you can request the file from his IRC client (assuming he has this feature enabled in his options). To request the file dontpanic.wav from the user MD87, you would type:
!MD87 dontpanicMD87 will then send you the requested file via DCC [Hack #72] , as shown in Figure 4-20.
Other users can now instruct your IRC client to play this sound.
Agents
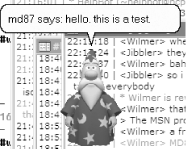
Another sound-related feature that mIRC boasts is the ability to integrate with Microsoft Agents. These little characters can read private messages or channel text out loud, so you can listen to chat rather than reading it. To enable agent support, open the Options dialog again and select the Agents tab from under the Sounds menu. If no agents are listed in the drop-down box, you will need to download one. Find full instructions on how to do this (and on how to use almost all of the agent-related features) at http://www.mirc.co.uk/agents.html. When you have selected an agent, tick the boxes for events you want the agent to read out loud. For example, ticking just Private Events will make the agent read out private messages only. When you receive a private message, an agent will pop up on top of mIRC and read the text, as shown in Figure 4-21.
mIRC’s sound-related features are quite elaborate
and when combined with a script can produce amazing results. The
documentation on the sound system is also quite elaborate—be
sure to read the details at /help agents and
/help sounds.
—Chris Smith
Enhance irssi with Perl
irssi is a popular IRC client. Enhance it with Perl scripts you write yourself or select from the large range available on the Web.
irssi is a client with a very nice Perl scripting interface. You don’t have to be a Perl programmer to enjoy this fact, as many scripts are already available. In fact, it’s hard to find original ideas for new scripts, because everything seems to exist already!
Here we’ll demonstrate some interesting scripts that let you see what films people are watching, find out what their real names are, obfuscate text, and so on. All of these scripts (and more) are available for download at http://www.irssi.org/scripts. Before you start downloading lots of scripts, now would be a good time to explain how to use them.
Using an irssi Script
There are two ways to do this. First,
of course, you have to download a script. Save it anywhere you want.
To try the script, use the /script load
command. Then do whatever you want to
see how the script works for you. If it doesn’t seem
to work, don’t forget to read the documentation that
accompanies the script to see if you have to change any settings to
make it work.
If you like the script, just copy it to the
.irssi/scripts/autorun directory in your home
directory. Next time you start irssi, the script
will be loaded. Of course, if you don’t like the
script, you can unload it using the
/script
unload command.
Remember that the unload command doesn’t accept
complete paths to files. Just the filename is enough.
For example, if you have downloaded the imdb.pl script and saved it in your home directory, this is how you would load and unload it:
> /script load /home/wilmer/imdb.pl
-!- Irssi: Loaded script imdb
> /script unload imdb
-!- Irssi: Unloaded script imdb
If the /script command doesn’t
seem to work, you may need to recompile irssi
with Perl scripting support, or you may need to manually load the
Perl module using the /load perl command. If
you still can’t get it working, please read the
irssi-building documentation for more
information.
Now you can take a look at some scripts of interest and some useful hints.
See What Film Everyone’s Watching
You may have heard of the Internet Movie DataBase at http://www.imdb.com. While using IRC, you may also have noticed people with seven-digit numbers after their nickname. Usually, this number corresponds to a film on IMDB. Of course, you can look up the film on IMDB when the user puts it in her nick—but why do that if a script can do it for you?
The script is called imdb.pl and can be found at http://www.irssi.org/scripts/scripts/imdb.pl. When you load it and someone changes his nick to something with an IMDB number in it, it looks up the name of the film and tells you what it is. Here’s an example of it in use:
<pengu> i'm going to watch a movie
-!- pengu is now known as tux|0208092
-!- pengu is watching Snatch. (2000)
Certainly more informative than just a number.
Who’s Behind That Nick?
Another script you may like is autorealname.pl (http://www.irssi.org/scripts/scripts/autorealname.pl). When someone joins a channel, it gets the person’s “real name” from the server and puts it in the join message. It looks like this:
-!- AxE (Alex Bylund) [~AxE@nextgentel.com] has joined #bitlbee
Strange Dialects
You may have seen some people talk like this on IRC:
<Pink> PpfPpmMfm, fmpmfpmppffm pmpmffpmfpmfmppmpm pmpmppppppppffm!
There are a lot of strange people on IRC, so it’s
quite easy to dismiss such a message. It may seem unlikely to you,
but this really means something! To find out what it means, you can
load the kenny.pl plug-in (http://www.irssi.org/scripts/scripts/kenny.pl).
It decodes these lines automatically, and it even allows you to write
like this, using the /kenny command. When you have
the kenny script loaded, the previous line will be rendered like
this:
[kenny] <Pink> OMG, they killed kenny!
This is certainly not the most useful script ever, but still it’s fun to play with for a while. Some other encodings you can try are morse.pl, binary.pl, dau.pl, figlet.pl, and foo.pl, all available directly from http://www.irssi.org/scripts.
Automatically Get Ops When the Channel Is Empty
There is a script called autocycle.pl (http://www.irssi.org/scripts/scripts/autocycle.pl), which is useful for regaining operator status if you have lost it. When you’re in an unregistered channel and don’t have operator status, this script automatically parts and immediately rejoins the channel after the last person has left. This usually makes you the new channel owner and gives you operator status for that channel.
Keep Everyone Amused When You’re Away
Another amusing script is eliza.pl (http://www.irssi.org/scripts/scripts/eliza.pl). When you’re away and people send you a private message, this script generates a reply and sends it back. Although it’s not hard for people to find out that they’re talking to a bot, it’s still good for some very funny conversations.
You can find some very nice Eliza conversations here: http://www.xs4all.nl/~hanb/documents/eliza.
What Was That Query About Again?
Sometimes you close a query window because you don’t expect a reaction any more, only to find that the person sends a reply a few seconds later. Being a busy person, you don’t have the slightest idea what it was about any more. The queryresume.pl script (http://www.irssi.org/scripts/scripts/queryresume.pl) provides a useful solution. If you have logging enabled, it puts the last lines from the log file in the query window when it opens—usually enough to understand what the person is talking about.
For example, without QueryResume, you might not
have any idea what this “wheeee”
was referring to:
22:16:35 ,--[QueryResume]
22:16:35 | 21:35      pengu| yeah :)
22:16:35 | 21:36      pengu| so now i'm a groupie?
22:16:35 | 21:36      pengu| ;p
22:16:35 | 21:36     wilmer| *grin*
22:16:35 | 21:36     wilmer| yes, you're the first
22:16:35 `--<~/.irssi/irclogs/FLUT/pengu.log>->
22:16:35     -!-     Irssi: Starting query in FLUT with pengu
22:16:35      pengu| wheeee
By default, QueryResume gives you the last 10
lines from the logs. If you want more (or fewer) lines, you can
change the number using the queryresume_lines
setting. For example, to get just five lines, type
/set
queryresume_lines 5.
Other Interesting Scripts
Many more scripts are available—enough to write another book about. If you haven’t found what you’re looking for yet, just look at the list on the irssi web site at http://www.irssi.org/scripts. Likely, someone has already written what you’re looking for. If not, maybe it’s time to write a script yourself. Unfortunately, there is little documentation about writing irssi scripts, so you’ll just have to look at other examples to see how things are done.
The Code
Following is a small example script. It makes a person believe she is in your ignore list, which can help to kill some boring discussions from time to time:
#!/usr/bin/perl -w

use strict;
use vars qw($VERSION %IRSSI);

# This file is partially based on rainbow.pl
$VERSION = "1";
%IRSSI = (
    authors     => 'Wilmer van der Gaast',
    contact     => 'lintux@lintux.cx',
    name        => 'Fake-Ignore',
    license     => 'GNU GPLv2 or later',
);

use Irssi;
use Irssi::Irc;

sub fignore {
        my ($text, $server, $dest) = @_;

        if (!$server || !$server->{connected}) {
                Irssi::print("Not connected to server");
                return;
        }

        return unless $dest;
        if ($dest->{type} eq "CHANNEL" || $dest->{type} eq "QUERY") {
                $text = `date +%H:%M:%S` . ' Ignoring ALL from ' . $text;
                $text =~ s/[\n\r ]+/ /gs;
                $dest->command("/msg " . $dest->{name} . " " . $text );
        }
}

Irssi::command_bind( "fignore", "fignore" );
The %IRSSI hash is used to define some information
about the module. This is usually the best place to put the
information about your module, such as who wrote it and how he can be
contacted. The module defines a couple of subs and, in the end, those
subs are linked to either irssi commands or
events. This example script is tied to a client command, so if you
were to type /fignore
nickname, the target user would see a
message suggesting that she is being ignored by your client. If you
want to know more about event-based scripts, you can take one of the
many other scripts as an example. Here is the result from running
this script:
               /fignore brannigan
23:51:29 Ignoring ALL from brannigan
Wilmer van der Gaast
Connect to Multiple Servers
Use more than one IRC network at a time from a single IRC client.
With an ever-increasing number of IRC servers and networks, the chances are that you’re going to want to connect to more than one at a time at some point. Most IRC clients these days have the ability to handle connections to multiple servers at the same time. This hack explains how to do it in some of the more popular clients.
mIRC
To connect to an additional server in mIRC, bring up the server-selection dialog by clicking File→Select Server. Choose the new server you want to connect to from the IRC Network and IRC Server drop-down boxes. Ensure that the New Server Window checkbox is checked, and then click Connect to Server, as shown in Figure 4-22.

A new status window will be opened for the new server, into which you
can type /join commands and so on as necessary.
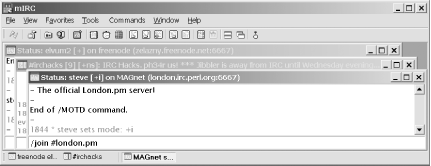
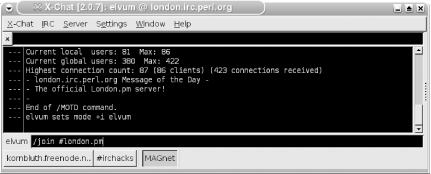
Figure 4-23 shows mIRC connected to two IRC servers:
freenode and MAGnet. The client has joined the #irchacks channel on
the freenode server.
Type /server
-m
new_server for a quicker method of adding
a new server in mIRC. The -m flag tells mIRC to
create a new connection rather than to nuke the existing one. So to
create another connection to the freenode IRC network, you would
type:
/server -m irc.freenode.netYou can also use the -j flag to get mIRC to
automatically join a channel when it has connected to the server:
/server -m irc.freenode.net -j#irchacks
To join more than one channel, you must specify their names as a comma-separated list, for example:
/server -m irc.freenode.net -j#irchacks,#java,#jibble
XChat
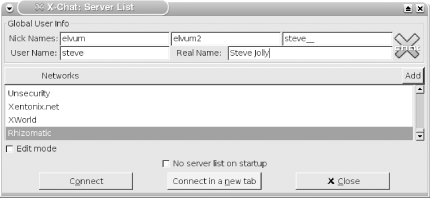
To open a connection to another server in XChat, bring up the Server List dialog by clicking X-Chat→Server List. Choose the new server or network you want to connect to from the Networks list, and then click Connect in a New Tab, as shown in Figure 4-24.
A new tab will be opened for the new server, into which you can type
all the necessary /join commands again, as shown
in Figure 4-25.
Secure Your IRC Connection with SSL
Hide your conversations on IRC from prying eyes on the Internet.
Let’s face it—IRC was not designed for the paranoid. Messages, commands, passwords, everything gets sent to the server unencrypted, which frankly just makes life easy for eavesdroppers. The Internet has demanded a solution to this problem, and the Internet has provided one: SSL, the Swiss Army knife of network encryption solutions. If your IRC server of choice supports SSL, you can open an encrypted connection between your computer and the IRC server and tunnel your IRC connection through it, hiding your precious conversations from all eavesdroppers with fewer resources than a national government.
Securing IRC with SSL has a number of advantages over SSH tunneling. Most importantly, no user account is required on the machine at the remote end of the tunnel. Secondly, the information usually remains encrypted at every point between the client and the server, rather than just between the start and end of the tunnel. Finally, the tunnel can be automatically established and destroyed when the IRC client connects and disconnects, relieving the user of the job of starting and stopping a separate SSH session. However, SSL tunneling cannot be used to bypass firewalls in the same manner as SSH.
Many modern IRC clients and servers have SSL support built in. This hack will explain how to establish secure connections with mIRC, XChat, and irssi. The use of an external SSL package such as stunnel to create the encrypted link will also be explained. To make a secure connection to your IRC server or network, it must support SSL connections at the server end—contact your server administrator or read your network’s FAQ to find out if this is the case.
Securing Your IRC Connection with mIRC
mIRC Versions 6.14 and later support SSL-encrypted IRC connections, but at the time of writing, mIRC does not include the required SSL libraries for legal reasons. Fortunately, all you have to do to install the libraries is download and run the latest self-installing OpenSSL package from http://www.shininglightpro.com/products/Win32OpenSSL.html. mIRC’s SSL support will then be enabled automatically.
To configure mIRC to connect to a server using SSL, open the
FileSelect Server dialog, select your IRC server from the
IRC Server list, and click the
Edit button. In the Edit
Server dialog that appears, change the port number to the
port on which the server listens for SSL connections and prefix it
with a + to tell mIRC to use SSL when connecting,
as shown in Figure 4-26. Finally, click
OK and then Connect to
Server to connect securely to the server.
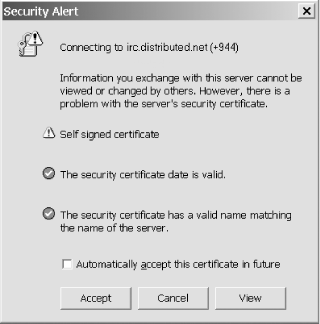
If your server presents a self-signed certificate, mIRC will display the dialog shown in Figure 4-26. To accept the certificate and complete the IRC connection, click Accept.
Securing Your IRC Connection with XChat
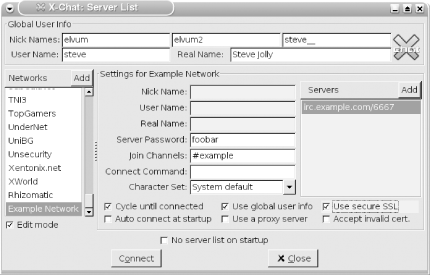
To open a secure IRC connection with XChat, first bring up the Server List window by selecting X-Chat → Server List from the main menu. Select your network from the Networks list and check the Edit Mode checkbox. The Servers window should now look like Figure 4-27. Check the Use Secure SSL checkbox. To connect to a server that presents a self-signed certificate, you must also check the Accept Invalid Cert. checkbox. Most IRC servers listen for SSL connections on a nonstandard port number—if this is the case, you will have to edit the Servers list appropriately. Finally, click the Connect button to connect securely to the server.
Securing Your IRC Connection with irssi
Specifying in
irssi
that a connection should be encrypted
using SSL is as easy as adding an -ssl parameter
to the /connect command. If your server were
irc.example.com and it listened for SSL
connections on port 6668, you would simply launch
irssi and type:
irc.example.com 6668irssi supports a number of other SSL-related commands, including ones that attempt to verify the authenticity of server certificates before connecting. By default, irssi will accept all valid certificates, even self-signed ones. See the irssi documentation for further details.
Securing Your IRC Connection with stunnel
If your IRC client doesn’t support SSL natively, you can create a secure connection to the IRC server with a separate package, and then tunnel your IRC connection through it. One such free package is stunnel, available for both Windows and Linux/Unix operating systems from http://www.stunnel.org. For installation instructions, see the stunnel installation FAQ at http://www.stunnel.org/faq/install.html. This hack is based on stunnel Version 4.0 or later.
To set up stunnel to secure your IRC connections, you need to create a configuration file, stunnel.conf. On Linux/Unix, this file should go in your home directory. On Windows, it should go in the same directory as the stunnel executable. If your server were irc.example.com and it listened for SSL connections on port 6668, then for simple IRC session encryption, the contents of the file should be as follows:
client = yes
verify = 0
delay = yes
#
[irc]
accept = 6667
connect = irc.example.com:6668
Now run stunnel. On Linux/Unix, run
stunnel ~/stunnel.conf. On Windows, just launch
stunnel.exe from wherever you installed it.
Finally, to set up the secure link
and tunnel your IRC connection through it, simply tell your IRC
client to connect to port 6667 on localhost. The
preceding sample configuration file does not prevent
stunnel from connecting to servers with
self-signed certificates: details of how to do so are in the
stunnel documentation.
The SSL connection will not be made until your IRC client tries to connect, so it is safe and convenient to start stunnel automatically by adding it to your Start menu’s Startup folder, or by adding the previous command to your .profile.
—Steve Jolly
Tunnel Your IRC Connection with SSH
Encrypt your conversation and access IRC servers through firewalls using SSH.
Firewalls are a fact of life these days, and if you want to connect to a private IRC server via the Internet, chances are you’re going to have to deal with one. Many firewalls block IRC but allow SSH connections. This hack explains how to take advantage of this fact to tunnel your IRC connection via SSH and bypass the firewall.
Unsurprisingly, you will need an SSH client to use SSH. If you run Linux/Unix, then you almost certainly already have an SSH client installed or can easily obtain it from the provider of your operating system. If you use Windows, a number of SSH clients are available. The most popular seems to be PuTTY, which is free and can be downloaded from http://www.chiark.greenend.org.uk/~sgtatham/putty. This hack contains instructions for both PuTTY and OpenSSH. You will also need an account on an SSH-accessible machine on the same side of the firewall as the IRC server (perhaps the IRC server itself).
The concept of tunneling is quite simple. The SSH client listens on a port of your choosing on the client machine and forwards everything via the encrypted link to the SSH server. This then passes everything on to a remote machine and port also of your choosing. An additional advantage of tunneling your connection with SSH is that your IRC session is encrypted and thus concealed from prying eyes between the two end-points of the SSH tunnel.
Setting Up an SSH Tunnel with OpenSSH
Once you can log into the SSH server, creating the tunnel is as simple as adding an extra command-line parameter to ssh. For example, let’s say that your IRC server is called irc.example.com and runs IRC on port 6667, and your SSH server is ssh.example.com. The command to connect to the SSH server and set up the tunnel will be:
%ssh -L 6030:irc.example.com:6667username@ssh.example.com
This example uses 6030 as the port at the local end of the tunnel,
but it could be any port you like. If you use a
privileged port number between 0 and 1023, you
will have to run ssh as root.
It is usually easier (and safer) to simply choose any unused port
from 1024 to 65534.
To connect to the IRC server via the tunnel, tell your IRC client that its server is localhost, port 6030. The IRC client will then connect to the local end of the IRC tunnel, which will forward the data to the other end.
To avoid having to type in the whole command every time, you can add a section to your SSH configuration file that will establish the tunnel every time you connect to the SSH server. Open (or create) the file ~/.ssh/config and add the following lines to the end:
Host irc HostNamessh.example.comLocalForward6030 irc.example.com:6667Userusername
Now you need only run ssh irc to connect to the SSH server and establish the tunnel.
Note that the domain name you should use for the IRC server is its internal name. In many cases, this may just be the unqualified name of the server, which in the case of irc.example.com would be irc.
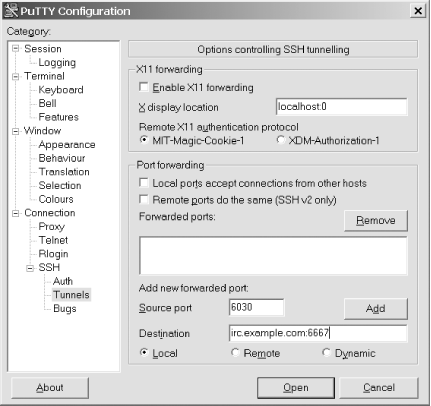
Setting Up an SSH Tunnel with PuTTY
PuTTY
works in terms of
sessions, which contain all the configuration
details for a connection to a particular SSH server. To add tunneling
of IRC connections to an existing PuTTY session, launch PuTTY and
load the saved session. Select the Connection → SSH
→ Tunnels page, shown in Figure 4-28. In
the Add New Forwarded Port section
of the page, enter into the Source
Port box the port on the local machine that you wish to
use as the entrance to the tunnel (for example, 6030). In the
Destination box, enter the hostname of the IRC
server and the port it listens on, separated by a colon (for example,
irc.example.com:6667). Return to the
Session page and save the changes that you have
just made before connecting to the SSH server. The tunnel will be
established, and you can connect to the IRC server by instructing
your client to connect to your chosen source port on
localhost.
Allowing Third Parties to Bypass the Firewall
Most SSH clients that support port forwarding
also allow the user to permit IRC clients running on
any machine to use the tunnel and bypass the
firewall. In
OpenSSH, you can do this by adding the
-g command-line option. This can be useful in some
situations (for example, allowing all staff in a small branch office
to access a server at the company headquarters), but you should be
aware that if the SSH client machine is not behind a firewall, then
anyone on the Internet can connect to the
hitherto private IRC server. You should always check with your
network administrator before enabling third-party access.
—Steve Jolly
Automate Voice Management
Large channels are inevitable targets for abuse. Help prevent problems by creating a client script that is responsible for handing out voice status to deserving users.
Let’s say you’re the one in charge of managing a huge channel that is dedicated to some important event that’s going on. Hundreds of people are joining and leaving and, like any large channel, it will inevitably attract some abusers as well, wanting to flood, swear, and spew out vile colorful text.
Your ban list is already full and a new horde of savages has just entered the channel. What do you do? A simple step would be to voice everyone as soon as they join the channel, make the channel moderated, and just devoice the user if he becomes abusive. The simple flaw here is that the evildoer can part and rejoin the channel and get voiced.
Tip
If you are a channel operator, you can voice another user by entering
/mode
#channel
+v
User. To moderate the channel, you must
enter /mode
#channel
+m. While
a channel is moderated, only channel operators and users with voice
will be able to talk. Everyone else will still be able to see
what’s being said, but won’t be
able to join in with the conversation.
This hack comes in form of an irssi script
and is implemented in Perl. It does not require any other modules and
needs no special configuration, so you simply have to place it into
your scripts directory (~/.irssi/scripts) and
perform /script load autovoice in order to get it
running.
The script automatically voices every newcomer on the channel, so
make sure you have operator status on the channel or it
won’t work. However, if anyone gets devoiced, the
script will remember this and save the host mask of the offender. If
the offender rejoins the channel, she will not get autovoiced again.
If anyone manually voices an offender, he will be removed from the
blacklist and will be autovoiced if he joins the channel at a later
moment. You can inspect the blacklist contents at any time by using
the /AUTOVOICE command.
The Code
This is a fairly simple irssi Perl hack, so the
comments in the code should explain what is going on. Every
irssi script should have an
%IRSSI hash that contains some basic information
and $VERSION that shows the current version number
of the script. Other scripts can then extract and use these pieces of
information automatically. A good example of this is
scriptassist.pl, which helps you manage your
scripts repository and interfaces the http://scripts.irssi.org central
irssi scripts repository. All good
irssi scripts should announce themselves when
they are loaded, just as ours politely does.
use strict;
use vars qw($VERSION %IRSSI);
use Irssi;

$VERSION = "0.0.1";
%IRSSI = (
  name        => 'autovoice',
  authors     => 'Petr Baudis',
  contact     => 'pasky@ucw.cz',
  description => 'Smart voice management on a channel',
  license     => 'BSD',
);

# In this blacklist we keep all the offending hostmasks
# Keys: channels, Values: pointers to arrays of strings
my %dmasks;

# This command lists the blacklist's content
sub cmd_autovoice {
  my ($data) = @_;
  foreach my $chan (keys %dmasks) {
    next unless ($dmasks{$chan});
    my $str = "[$chan] ";
    foreach my $mask (@{$dmasks{$chan}}) {
      $str .= $mask . ", ";
    }
    $str =~ s/, $//;
    Irssi::print($str);
  }
}

# Triggered when someone joins a channel
sub event_massjoin {
  my ($channel, $nicks_list) = @_;
  my @nicks = @{$nicks_list};

  return unless ($channel->{chanop});

  # Each nick in a batch...
  foreach my $nickrec (@nicks) {
    my $in_blacklist = 0;
    # Do we keep a blacklist for this channel?
    if (defined $dmasks{$channel->{name}}) {
      foreach my $mask (@{$dmasks{$channel->{name}}}) {
        # Is this user blacklisted?
        if ($channel->{server}->mask_match_address($mask, $nickrec->{nick},
                           $nickrec->{host})) {
          $in_blacklist = 1; last;
        }
      }
    }
    $channel->command("/voice ".$nickrec->{nick}) unless $in_blacklist;
  }
}

# Triggered when someone changes channel mode (including voice/devoice)
sub event_mode {
  my ($server, $data, $nick, $addr) = @_;
  my ($channel, @mmode) = split(/ /, $data);
  my ($mode, @args) = @mmode;
  my $operation;
  my $chanptr = $server->channel_find($channel);

  return if ($nick eq $server->{nick});
  foreach my $mchar (split //, $mode) {
    if ($mchar =~ /[+-]/) { $operation = $mchar; next; }
    if ($mchar =~ /[eIbolk]/) { shift @args; }
    if ($mchar ne 'v') { next; }

    # This is a voice/devoice
    my $victim = $args[0];
    my $victptr = $chanptr->nick_find($victim);
    if ($operation eq '+') {
      if (defined $dmasks{$channel}) {
        my @masks = @{$dmasks{$channel}};
        for (my $i = 0; $i < @masks; $i++) {
          if ($server->mask_match_address($masks[$i], $victim,
            $victptr->{host})) {
            splice(@masks, $i, 1);
            $i--;
          }
        }
        $dmasks{$channel} = \@masks;
      }
    } else {
      my $in_blacklist = 1;
      foreach my $mask (@{$dmasks{$channel}}) {
        if ($server->mask_match_address($mask,
          $victim, $victptr->{host})) {
          $in_blacklist = 0; last;
        }
      }
      push(@{$dmasks{$channel}}, $chanptr->ban_get_mask($victim, 0))
        unless $in_blacklist;
    }
  }
}

Irssi::command_bind('autovoice', 'cmd_autovoice');
Irssi::signal_add_last('massjoin', 'event_massjoin');
Irssi::signal_add_last('event mode', 'event_mode');

Irssi::print "AutoVoice.PL $VERSION (c) Petr Baudis <pasky\@ucw.cz> loaded.";
Running the Hack
The script will be active as soon as it is loaded. You can load the script by typing:
/script load autovoiceYou can then enjoy a sensible debate channel, without having to worry about people ruining the karma.
Hacking the Hack
The main problem with the preceding
script is that its state is not persistent. This means that if you
restart irssi, the whole blacklist will be lost
and you are left starting from scratch. This is easy to
fix—just use the
Data::Dumper
module and print
Dumper(\%dmasks) to a file each time you modify
the hash. If the file already exists at startup, you can load its
content into %dmasks.
This hack was originally written for a single irssi instance that is connected via a fast link and acts only as a given channel’s gatekeeper. If you run it on multiple channels, the IRC session will start to get much more vulnerable to lag, as voicing/devoicing on so many channels will slow it down due to the rate limiting imposed by the IRC server. If your irssi client is in multiple channels and you would like to play gatekeeper on only one of them, you will need to hack some settings to control that behavior into the previous code. Also, if you are connected to multiple networks at the same time and would like your script to work properly, you will need to add support for multiple connections (for example, you could keep the blacklist as a hash of hashes, indexed by the server tag first).
It would also be good to have some way of manually editing the blacklist, allowing you to add some more general host masks to it or remove a good host mask. The script already provides a very simple interface for displaying the blacklist contents, but improving this is one thing you can experiment with.
—Petr Baudis
Make IRC Talk
Even when you can’t keep your IRC client in view, keep track of IRC by making your IRC client talk to you.
Ever wondered if you could touch the future just a little? What about getting your computer to read out what’s happening on a channel or at least just your private messages? You would be able to do something else while listening to the cheery activity of IRC, perhaps even establish a bot that tells you fairy tales while you drift off to sleep. The possibilities are endless—if only your IRC client could speak!
It is not impossible, but because this is still very much a cutting edge and not a mass technology, it will not be easy to set up either. You will be hacking in Perl, this time to create a script for the popular irssi IRC client. At the backend, you can employ the Festival speech engine.
The first step is to install a speech synthesizer, and then you have to find a Perl interface for it. Neither of these tasks is particularly easy.
For the speech synthesizer, we will be using Festival. Its main advantage is that it is a universal engine, so you can teach it to speak virtually any language (from English to Spanish to Czech). It is perhaps not as effective as a native speech synthesizer would be, but it will be enough for our purposes.
You can get Festival from http://www.cstr.ed.ac.uk/projects/festival/download.html. However, if you are not sure which tarballs to grab, you can try reading http://www.cstr.ed.ac.uk/cgi-bin/lists.cgi?config=festival_faq&entry=installing_festival/what_do_i_need.html. It comes with support for English, but chances are someone has implemented rulesets for other languages as well. After you have set up Festival, start up the festival-server, as you are going to use it to process requests from your script.
Now you need to grab the Perl Festival interface,
Speech::Festival
. You can download it through the popular
CPAN interface, but make test will fail. You will
need to run make install manually, although you
may notice the modules will install to the wrong location. To fix
this, you must move to the directory where the modules were installed
(for example,
/usr/lib/perl/site_perl/5.6.1/Speech), move the
Audio subdirectory to its parent directory, and
move the contents of the Speech subdirectory to
the current directory. Next, you will probably want to remove
print
"connected\n"; from
Speech/Festival/Synthesiser.pm and
print
"disconnected\n"; from
Speech/Festival.pm.
By now, you should hopefully have an idea how important it is to do
some basic quality assurance before releasing a module to the world.
Of course, the Speech::Festival maintainer might
already spare you of this valuable lesson by the time you read this
hack.
The Code
So you don’t block irssi while pushing data to the Festival server, you must spawn a helper in a child process to take care of things. You can give it everything through a pipe and close it if the child dies (you probably want to restart it in case the settings change).
# Talking irssi gadget (c) Petr Baudis <pasky@ucw.cz>, BSD licence.

use strict;

use vars qw($forked $wh $type $lang);

use Irssi;
use Irssi::Irc;
use Speech::Synthesiser;

# Spawn a helper which will feed our Festival backend, so that we do not
# block the main irssi process while pushing data all around.
sub fork_me {
  my ($rh, $pid);
  pipe($rh, $wh);
  $forked = 1;
  $pid = fork( );
  if ($pid > 0) {
    # The main irssi process
    close $rh;
    # This makes sure we do not get a zombie
    Irssi::pidwait_add($pid);
    return;
  } else {
    # The helper child
    close($wh);
    my $synth = new Speech::Synthesiser(-type => $type);
    start $synth;
    if ($lang) { voice $synth $lang; }
    while (my $in = <$rh>) {
      chomp $in;
      speak $synth $in;
    }
    stop $synth;
    close($rh);
    POSIX::_exit(0);
  }
}

# The incoming message event handler.
sub event_privmsg {
  my ($server, $data, $nick, $address) = @_;
  my ($msgtarget, $text) = split(/ :/, $data, 2);
  my (@channels) = split(/\s+/, Irssi::settings_get_str('speech_channels'));

  # The ~ substitution
  return unless (grep {s/^~$/$server->{nick}/x; $_ eq $msgtarget} @channels);

  # Restart the backend if something changed.
  my ($otype, $olang) = ($type, $lang);
  $type = Irssi::settings_get_str('speech_backend');
  $lang = Irssi::settings_get_str('speech_language');
  if ($forked and ($type ne $otype or $lang ne $olang)) {
    print $wh "\n";
    close($wh);
    $forked = 0;
  }
  if (!$forked) {
    fork_me( );
  }

  # Some emoticon replacements (e.g. ":-)"->"hehe!"
  # add your own if you need more!
  $text =~ s/:.?\)/hehe!/g;
  $text =~ s/:.?\(/sniff/g;

  # The exclamation point helps to get the right intonation.
  print $wh "$nick! $text\n";
}

# Our command interface.
sub cmd_speech {
  my ($cmd) = @_;
  if ($cmd =~ /^languages/i) {
    my $synth = new Speech::Synthesiser(
                      -type => Irssi::settings_get_str('speech_backend'));
    start $synth;
    my @voices = voice_list $synth;
    Irssi::print("These languages are supported: @voices");
    stop $synth;
  }
}

Irssi::command_bind('speech', \&cmd_speech);
Irssi::signal_add("event privmsg", "event_privmsg");
Irssi::settings_add_str('speech', 'speech_backend', 'Festival');
Irssi::settings_add_str('speech', 'speech_language', '');
Irssi::settings_add_str('speech', 'speech_channels', '~ #irchacks');
Running the Hack
Now you can venture to add speak.pl to your ~/.irssi/scripts directory and type:
/script load speakNow you need to adjust your settings:
speech_language should be set to one of those
listed when you type:
/speech languages
speech_channels controls which channels (separated
by spaces) should trigger a speech output (~
stands for private messages).
Hacking the Hack
The preceding code is no more than a skeleton script, which could of
course be extended and polished in so many ways. A good
irssi script should follow some basic
conventions, which can also help it to make it into the http://scripts.irssi.org repository—the
script should ideally provide an %IRSSI hash
containing some basic information about itself (author, version,
description, license, required modules).
While you’re adding those features, you should
extend the /SPEECH command interface so that it
provides some status information and perhaps could even send some
commands to the Festival server. I also recommend that the script
print a short announcement when it is loaded.
Another area of improvement would be the relevant text
transformations. The script substitutes only the most frequent
smileys now (:),
:-), :o), etc.), but all of
this should be configurable so that people can expand this list and
adjust it to their language preference.
Speaking of languages, another interesting direction of expansion could be to make the language settings channel-specific. Non-English people frequently idle in both English and foreign channels, therefore irssi should speak in a different language in each channel.
Yes, Festival is great and cool, but for most languages, the reality is that better speech synthesizers exist, being optimized specifically for the given language. Therefore, a larger project would involve hacking Perl interfaces for other synthesizers as well, perhaps also fixing some of the problems in the Festival interface as described earlier.
—Petr Baudis
Add Your IRC Nickname to Your Webcam
Webcams are a great way of showing people what you’re doing. With a little IRC scripting, show people your current nickname, too.
Webcams are the best way to let people know exactly what you’re doing—after all, a picture is worth a thousand words, or so they say. Adding extra text to your webcam image can reveal a lot more, particularly if you are not there to be seen. This hack shows you how to display your current IRC nickname on your webcam image.
The Windows webcam software used in this hack is Dorgem. This unusual name doesn’t actually mean anything; it is a combination of letters that could sound like a word and didn’t return any results on search engines at the time of its creation. So the chances are that if you Google this, you’ll be able to find it easily. If not, you can download it from http://dorgem.sourceforge.net.
One useful feature of Dorgem is that it allows you to overlay captions on your webcam image. These captions can be either bitmap images or plain text. If you go for the plain text option, you can choose to overlay a string that you type in, or tell it to read the contents of a file. The latter choice allows you to include whatever text is in the file, so you can easily create a script for your IRC client that updates the file with your current nickname.
Writing Your Nickname to a File
As this hack is to run on a Windows machine, it will use mIRC as the IRC
client. To update the contents of the file every time you change your
nickname, it’s going to be necessary to trap that
event. The easiest way of doing this is to override
mIRC’s
/nick
command so that it saves the new
nickname in a file.
Open up the mIRC Scripts Editor (Tools → Scripts Editor...)
and select the Aliases tab. Now create the alias for the
/nick command shown in Figure 4-29.
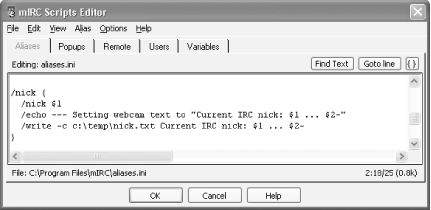
This overrides the /nick command and causes a
sequence of three other commands to be executed instead. The first of
these passes the $1 variable to the
/nick command. $1 is the first
argument that is supplied to your alias, so this has the effect of
changing your nickname as usual.
The second line echoes a string to your active window so you can
receive a confirmation of what your webcam message will say.
$2- is a variable that refers to the second
argument, including everything after it. This means you can add some
more details after your nickname, and they will also be included in
this message.
The third line writes the same message to a file. The
-c means that the file will be cleared before it
is written to. In this example, the message will be written to
c:\temp\nick.txt.
The alias lets you add extra parameters to the
/nick command in case you want to add more detail
to your webcam message. For example, if Paul
wants to change his nickname to Paul|desk-less,
he can do so in the usual way by entering:
Paul|desk-lessThis would cause nick.txt to contain:
Current IRC nick: Paul|desk-less ...
If he wanted to include some more information about his nickname, he
could simply add some more details after the /nick
command:
/nickPaul|desk-less they came and stole my desk :(
This would cause nick.txt to contain:
Current IRC nick: Paul|desk-less ... they came and stole my desk :(
Now that you’ve configured your IRC client to keep this file up-to-date, you just have to set up Dorgem to display its contents on your webcam image.
Displaying File Contents in Dorgem
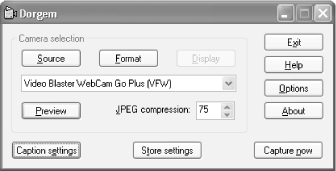
Assuming Dorgem is up and running properly, you can add a caption to the webcam image by clicking on the Caption Settings button, as shown in Figure 4-30.
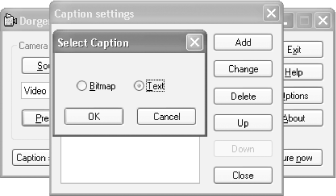
In the Caption Settings dialog (Figure 4-31), click on Add to add a new caption overlay. When prompted, select a Text caption and click on OK.
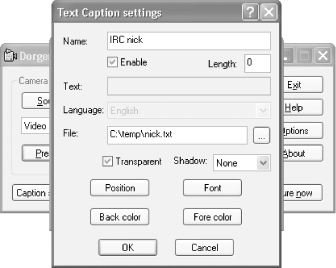
In the Text Caption Settings dialog, shown in Figure 4-32, give the caption a meaningful name, such as “IRC nick.” This will not appear on the webcam image, but it will help you work out what this caption is used for if you end up adding any others.
Make sure the Enable checkbox is checked and that the length is set to 0 (unlimited). Enter the filename in the File box. For best results, you should make the text transparent, otherwise it will be printed on an opaque rectangle. If you want to make it stand out better, you could add a full shadow and use a contrasting color for background and foreground.
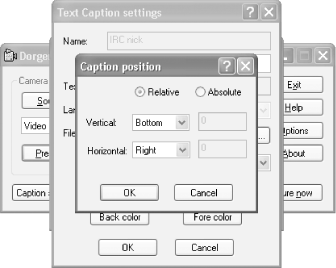
Clicking on the Position button reveals the Caption Position dialog, as shown in Figure 4-33. This example places the caption at the bottom right of the webcam image. If you know the dimensions of your webcam image, you can even experiment with absolute positioning.
The Results
Figure 4-34 shows the final results: a webcam image with the user’s current IRC nickname and personalized message in the bottom right.

When people look at your webcam now, they will no longer be left guessing what you’re up to when you’re not there.
Get IRC Hacks now with the O’Reilly learning platform.
O’Reilly members experience books, live events, courses curated by job role, and more from O’Reilly and nearly 200 top publishers.

